Physical Address
304 North Cardinal St.
Dorchester Center, MA 02124
Quality control samples are assayed on a schedule to verify that a laboratory procedure is performing correctly.
Interpretation of quality control results is based on acceptance criteria that will identify bias, trend in bias, or imprecision that exceeds expected method performance characteristics.
In the event of an unacceptable quality control result, corrective action is taken to fix the method problem, and all patient results since the time of the previous acceptable quality control result are repeated to determine whether a result correction is needed.
Because of commutability limitations, quality control samples cannot be used to verify that two different methods, or two different lots of reagents, produce the same results for patient samples.
Proficiency testing provides external evaluation that a laboratory is using a method correctly and in conformance with the manufacturer’s specifications.
The purpose of a clinical laboratory test is to evaluate the pathophysiologic condition of an individual patient to assist with diagnosis, to guide or monitor therapy, or to assess risk for a disease or for progression of a disease. To have value for clinical decision making, an individual laboratory test result must have total error small enough to reflect the biological condition being evaluated. The total error of a measured result is influenced by the following:
Preanalytic variability in sample collection, transportation, processing, and storage
Analytic variability in test performance
Interfering substances such as drugs or metabolic components in the clinical sample
Quality control (QC) is also called internal quality control (meaning internal to the laboratory testing process and distinct from built-in QC, to be discussed later) or statistical process control . QC is a process to periodically examine a measurement procedure to verify that it is performing according to preestablished specifications. This chapter addresses QC of an analytic measurement procedure using QC sample materials intended to simulate clinical samples. Such QC sample materials are called surrogate samples. The QC samples are measured periodically in the same manner as clinical samples, and their results are examined to determine that the measurement procedure meets performance requirements appropriate for patient care. Techniques for using results from patient samples in the QC program are also included. This chapter is organized as follows:
Analytic bias and imprecision
Calibration considerations in quality control
Overview of quality control procedures
Implementing quality control procedures
Reagent and calibrator lot changes
Using patient data in quality control procedures
Proficiency testing
Quality management
Figures 11.1 and 11.2 illustrate the meaning of bias and imprecision for a measurement. In Figure 11.1 , the horizontal axis represents the measured numeric value for an individual result, and the vertical axis represents the number of repeated measurements with the same value made on different samples of a QC material. The red line shows the distribution of different results for repeated measurements of the same QC material, which is the random imprecision of the measurement. If we assume that repeated measurements of a QC sample follow a Gaussian (normal) distribution, as discussed in Chapter 10 , the standard deviation (SD) is a measure of the expected imprecision or variability in a measurement procedure when it is performing correctly. Note that results near the mean (average value) occur more frequently than results farther away from the mean. An interval of ±1 SD includes 68% of the measured values, and an interval of ±2 SD includes 95% of the values. A result that is more than 2 SD from the mean is expected to occur 5% of the time (100%−95%) in a positive (2.5% of the time) or a negative (2.5% of the time) direction from the mean value. The mean of repeated measurements of a QC sample when the measurement procedure is performing within specifications becomes the expected, or target, value for that QC sample.
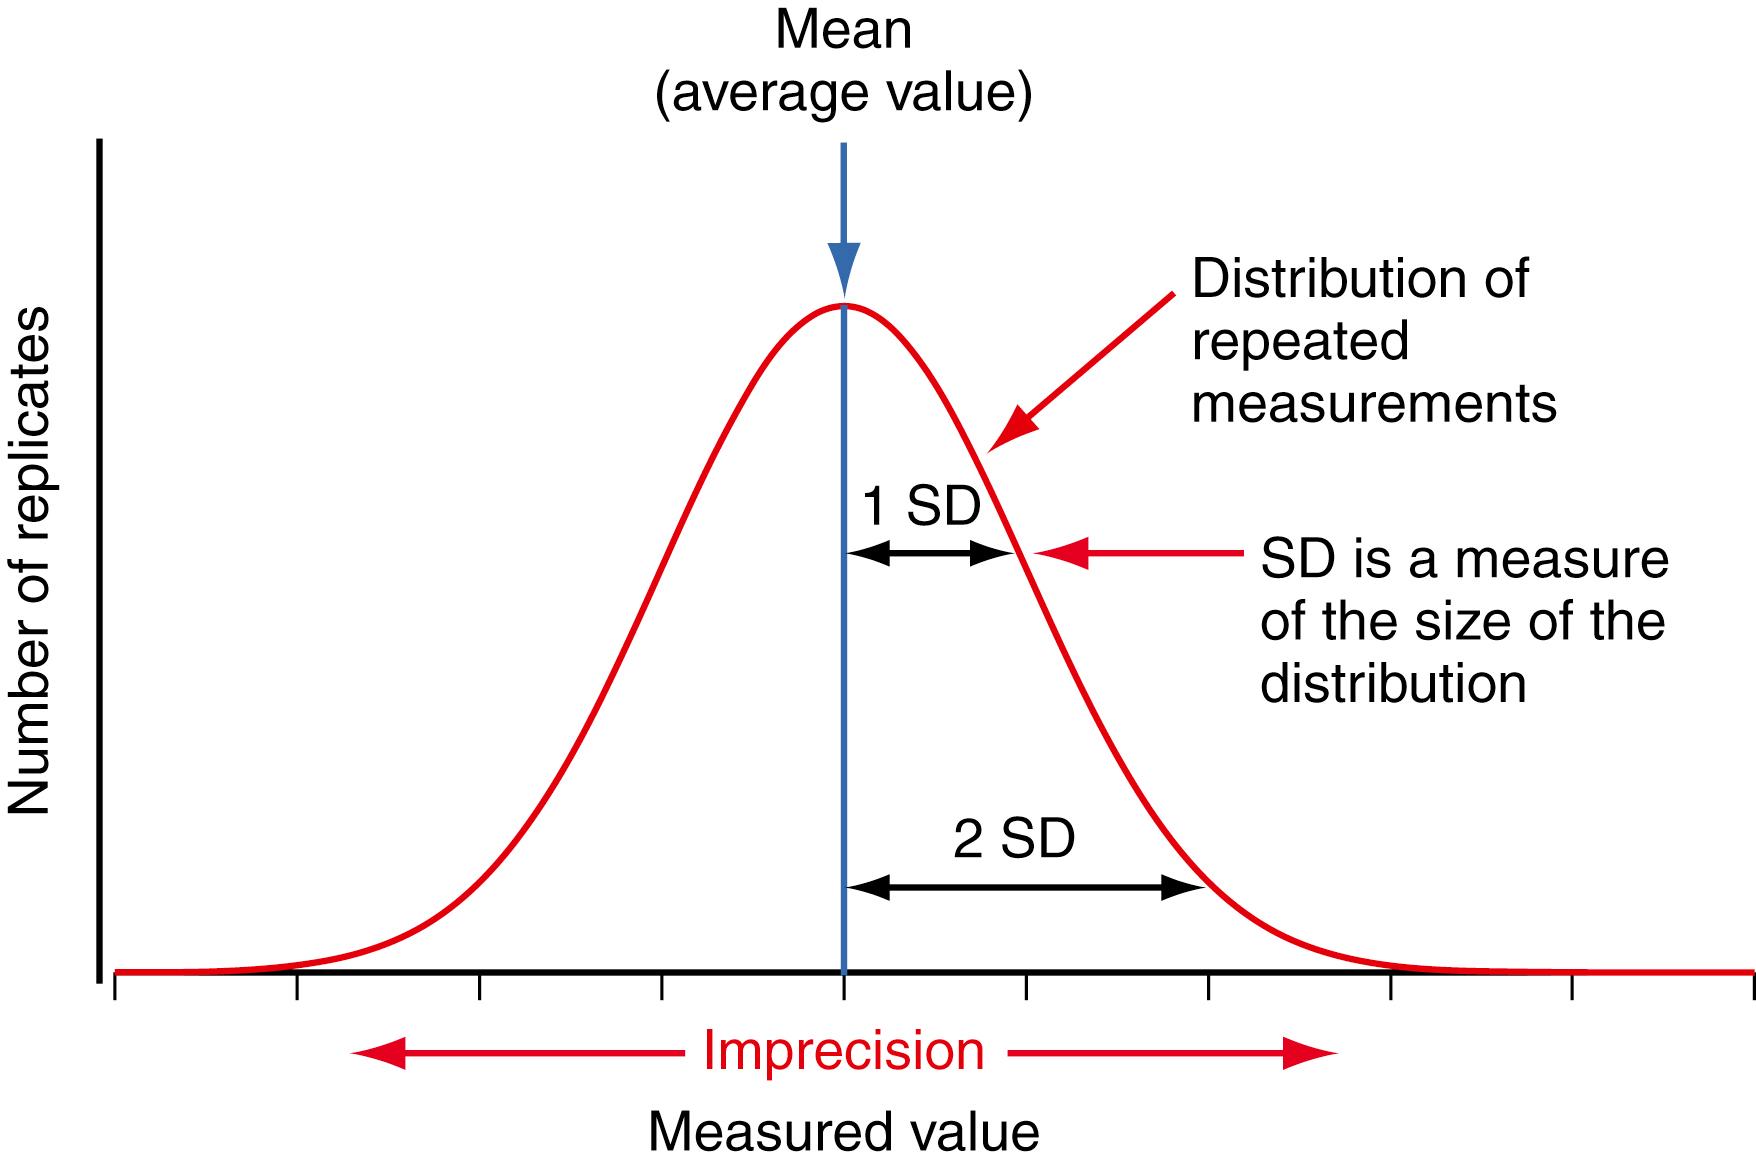
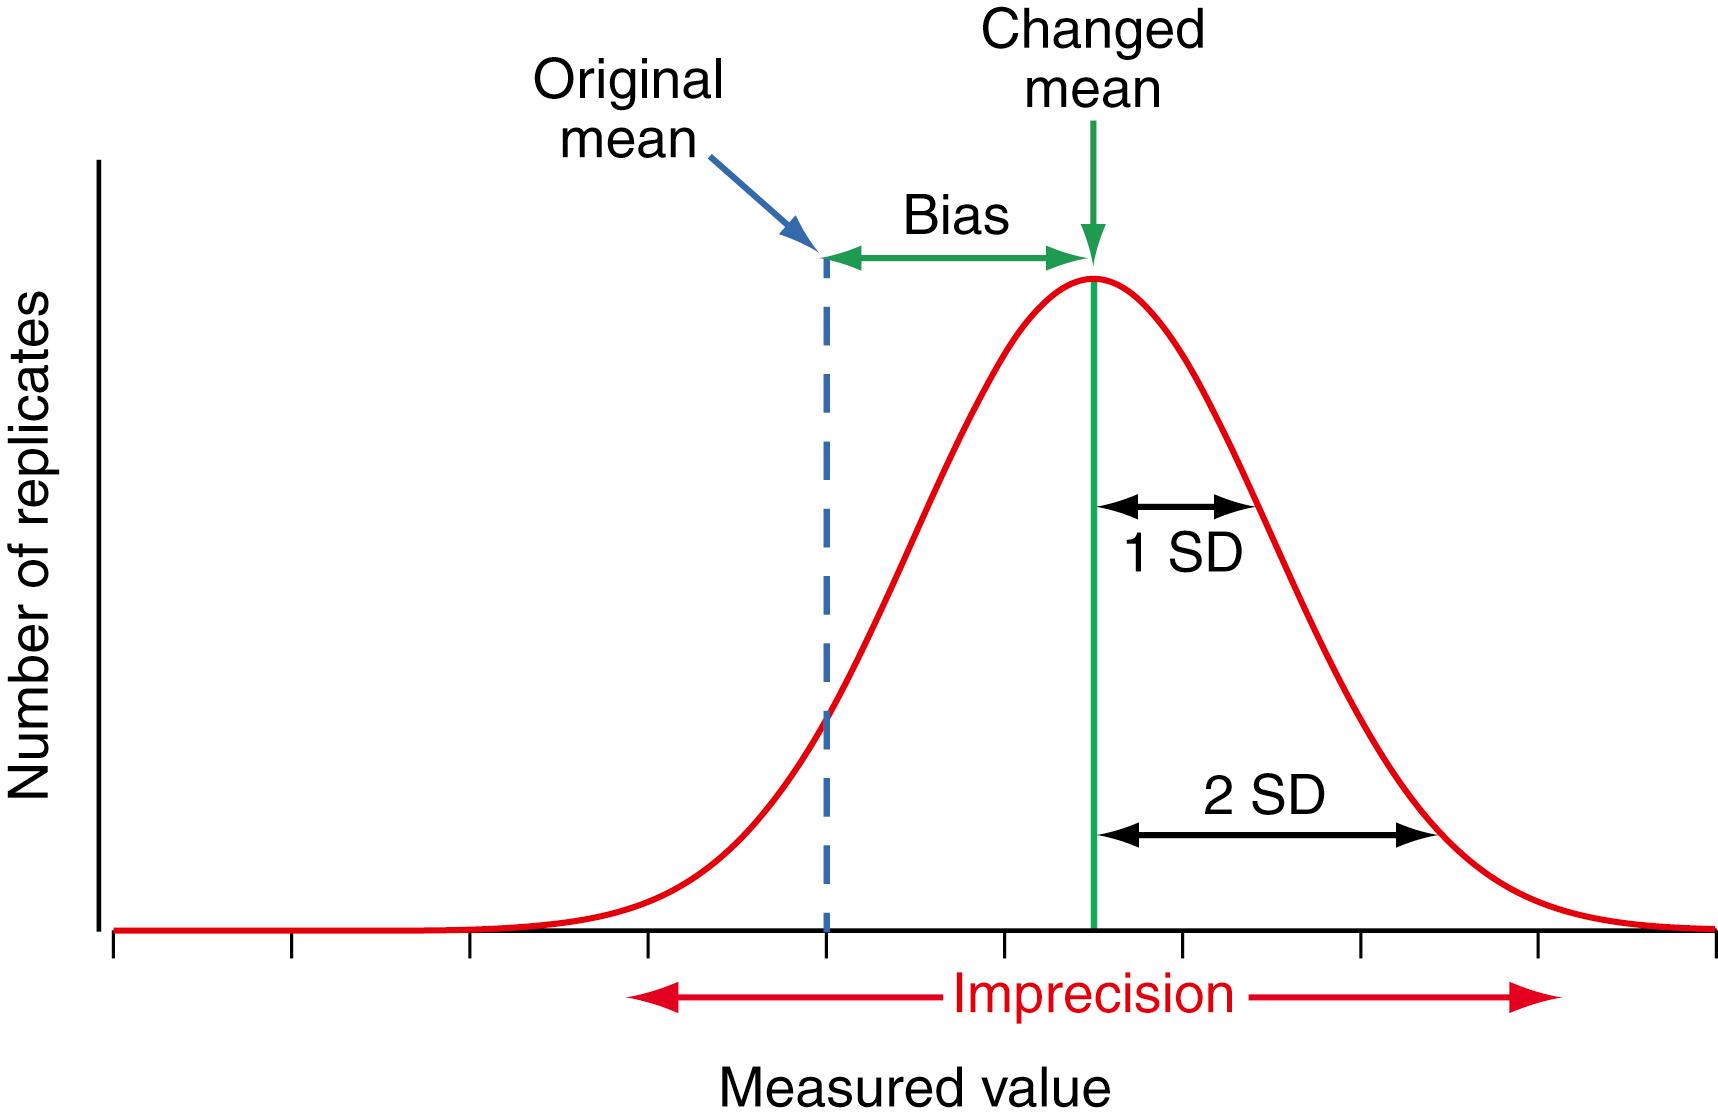
Figure 11.2 illustrates that if the calibration changes for any reason, a systematic bias is introduced into the results. The systematic bias is the difference between the observed mean and the original target value for a QC material. Note that the imprecision of an incorrectly calibrated method is the same as when correctly calibrated. All measurement procedures have an inherent imprecision. The purpose of measuring QC samples is to statistically evaluate the measurement process to verify that the measurement procedure continues to perform within the specifications consistent with acceptable systematic bias and imprecision, and to identify whether a change in performance occurred that needs to be corrected. QC result acceptance criteria, discussed in a later section, are based on the probability for an individual QC result to be different from the variability in results expected when the measurement procedure is performing correctly. The imprecision observed in QC results provides a measure of the variability expected for individual patient results caused by the inherent variability of the measurement procedure.
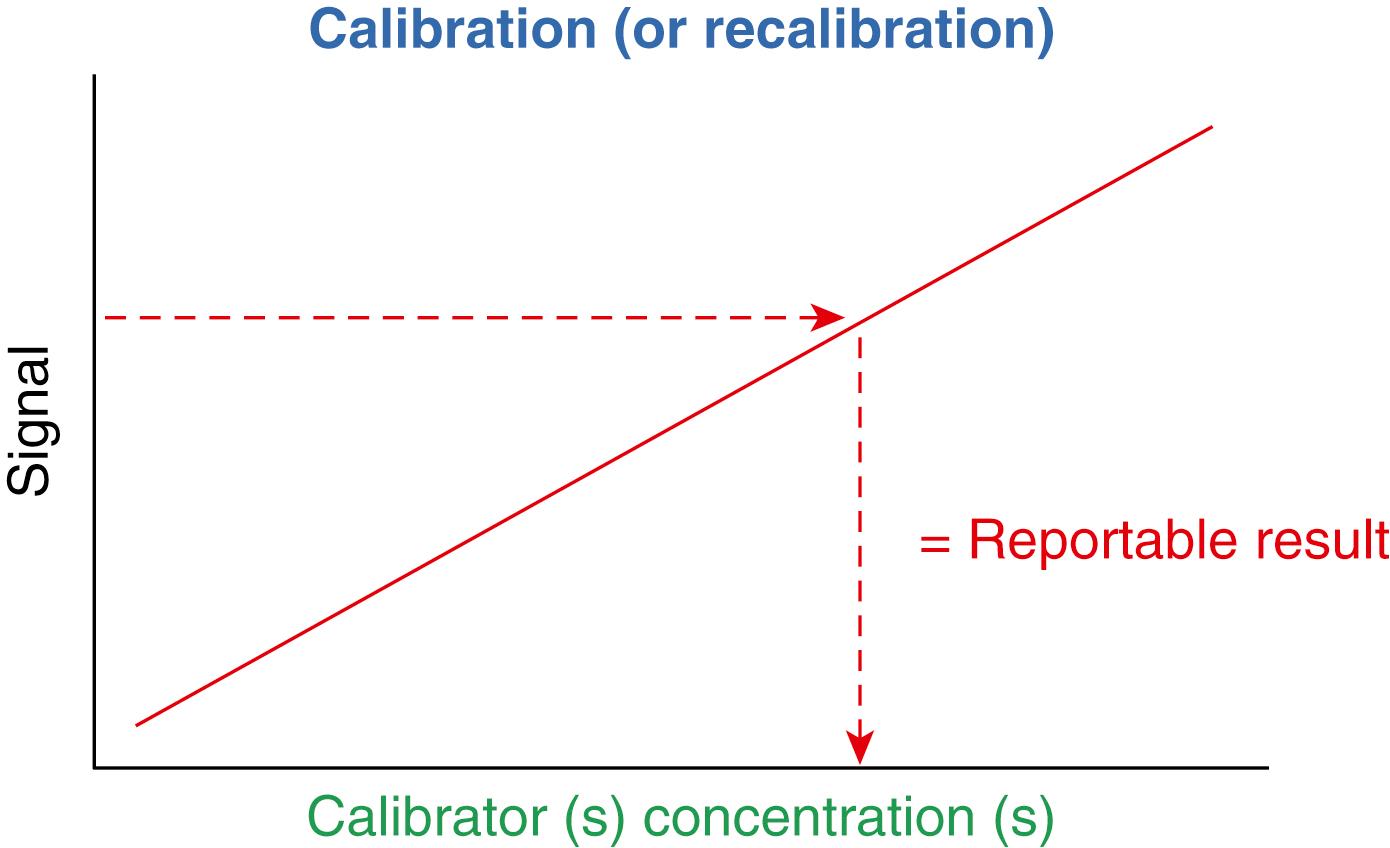
Calibration of the analytic measurement procedure is a key component in achieving quality results. Figure 11.3 shows calibration of a measurement procedure that establishes the relationship between the signal measured and the quantitative value of analyte in the calibrator materials. This relationship is used to convert the measurement signal from a patient sample into a reportable concentration for the analyte. Specific techniques for calibration are unique to individual methods and will not be covered here. However, some general principles for implementing calibration procedures can contribute to the stability and clinical reliability of laboratory results.
Measurement procedure calibration is most often performed by the laboratory using end-user calibrator materials provided by the method or instrument manufacturer. In some cases (e.g., point-of-care devices), methods are calibrated during the manufacturing process and the laboratory performs a verification of that calibration. In either situation, traceability of result accuracy to the highest-order reference system is provided by the method manufacturer. The measurement procedure manufacturer’s calibrator material(s) and assigned value(s) are designed to produce accurate results with clinical patient samples measured using that particular manufacturer’s routine measurement procedure. One manufacturer’s end-user calibrator is not intended for use with other measurement procedures; laboratories should not use calibrator materials intended for one measurement procedure with any other measurement procedure. Use of a calibrator with a measurement procedure for which it was not specifically intended can produce miscalibration and erroneous patient results (see next section).
One of the common causes of drift in QC results is inadequate frequency of calibration of measurement procedures. Measurement procedure manufacturers provide instructions on calibration frequency. Instructions to recalibrate when QC indicates a problem are not usually effective and lead to excessive result variability that is easily prevented by calibrating at a suitable interval. This condition is identified by a drift in QC results on a Levey-Jennings chart that returns to the target value when a recalibration is performed and typically looks like a sawtooth pattern. QC rules (see later section) are designed to identify that a measurement procedure does not meet its performance expectations and results for patient samples should not be reported. While it is possible that recalibration is necessary to correct the erroneous measurement condition, QC rules are not designed to identify when recalibration is needed during normal operation of a measurement procedure.
Whenever possible, calibration of routine measurement procedures should be traceable to a higher-order reference measurement procedure or international certified reference material ( ; ; ). For commercially available measurement procedures cleared by the U.S. Food and Drug Administration (FDA), the in vitro diagnostics (IVD) manufacturer offers end-user calibrators that provide calibration traceable to the applicable reference system for an analyte (called a measurand when fully specified to include the sample type and the molecular substance measured).
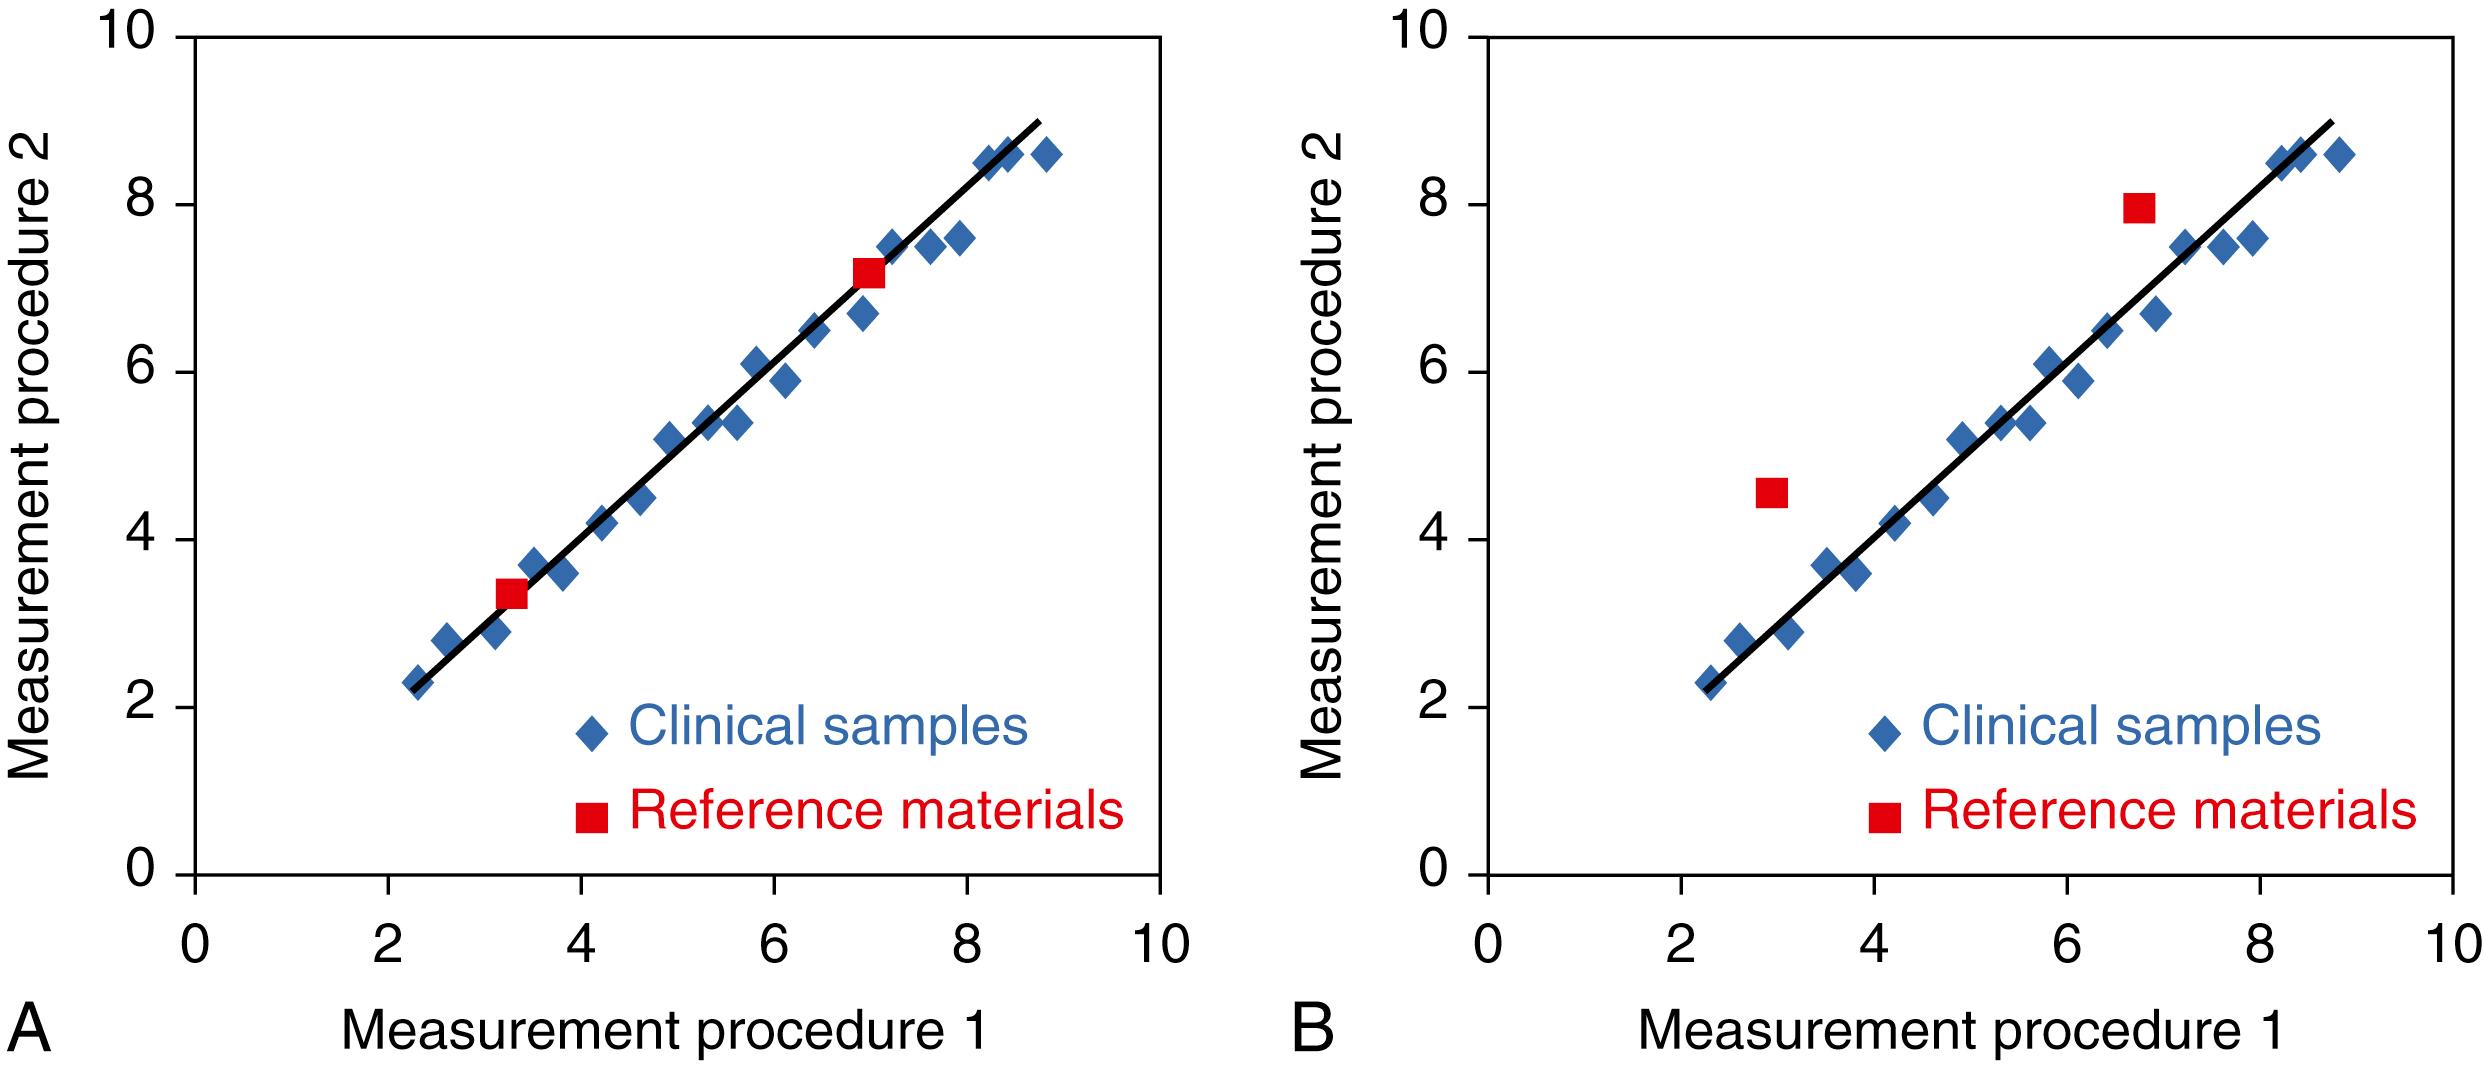
Commutability is a property of a reference material, such as a higher-order certified reference material, a QC material, or a proficiency testing (PT) material. As shown in Figure 11.4A, a commutable reference material has a numeric relationship between two or more measurement procedures that closely agrees with the relationship observed for a panel of clinical patient samples ( ; ). Consequently, a commutable reference material (or calibrator) reacts in a measurement procedure to give a numeric result that would be in close agreement to that observed for a patient sample with the same amount of analyte. A noncommutable material ( Figure 11.4B ) has some other relationship between measurement procedures than that observed for clinical samples. Differences in commutability are caused by matrix-related bias between a reference material and clinical patient samples. Note that noncommutability is also an important limitation of QC and PT materials discussed in later sections.
A reference material’s certificate of analysis should be reviewed for commutability documentation. If a reference material is commutable with patient samples for a given measurement procedure, it can be used for calibration or verification of calibration traceability to the reference system. Use of a noncommutable reference material for calibration will cause the clinical laboratory measurement procedure to be miscalibrated and produce erroneous patient results ( ; ; ; ). Similarly, use of a noncommutable reference material to verify calibration will give incorrect information regarding the calibration status of a method. Many higher-order certified reference materials have not been evaluated for commutability with patient samples measured using clinical laboratory measurement procedures. If a reference material’s commutability status is unknown, it must be assumed not to be commutable with patient samples.
It is important to recognize that IVD manufacturer–provided calibrators typically have matrix characteristics and assigned values that are intended only for use with that specific measurement procedure and cannot be used with any other manufacturer’s measurement procedures. An IVD manufacturer can assign a value to a measurement procedure–specific calibrator that corrects for any matrix-related bias that may be present so that results for clinical samples are correctly traceable to the reference system for an analyte. However, if such a measurement procedure–specific calibrator is used with a different measurement procedure, it will cause miscalibration, because it does not compensate for a different matrix-related bias with that different measurement procedure.
A clinical laboratory may wish to verify that a measurement procedure’s calibration conforms to a manufacturer’s claim for traceability to the reference system used for a given analyte. Some manufacturers provide calibration verification materials specifically intended for this purpose. Such materials may be provided as measurement procedure–specific QC materials. Such measurement procedure manufacturer–provided QC materials typically have matrix characteristics and target values that are intended only for use with the specific measurement procedures claimed in the instructions for use and cannot be used with any other manufacturers’ measurement procedure. Such measurement procedure–specific calibration verification materials may have assigned values that are specific for stated reagent lots or may have values certified by the manufacturer to be suitable for all reagent lots.
National and international certified reference materials are available for some analytes. In many cases, these reference materials are intended for use with higher-order reference measurement procedures and may not be suitable for use with clinical laboratory measurement procedures. Laboratories should not use national or international certified reference materials to calibrate, or to verify calibration, of a routine measurement procedure unless the reference material’s commutability with patient samples has been verified for the specific measurement procedure used by a clinical laboratory.
Third-party QC materials (i.e., those provided by a manufacturer other than the clinical laboratory measurement procedure’s manufacturer) are not suitable to verify calibration traceability. These materials are not validated for commutability with clinical samples for different clinical laboratory measurement procedures, and they do not have assigned values that are traceable to higher-order reference measurement procedures. Such third-party QC materials are designed to be used as QC samples for statistical process control, with target values and SD values assigned as described later in the Implementing Quality Control Procedures section. When third-party QC materials are used in an interlaboratory method comparison program with method-specific peer group mean values, these values can be used to confirm that a laboratory is using a specific method in conformance with other users of the same method (see Proficiency Testing section).
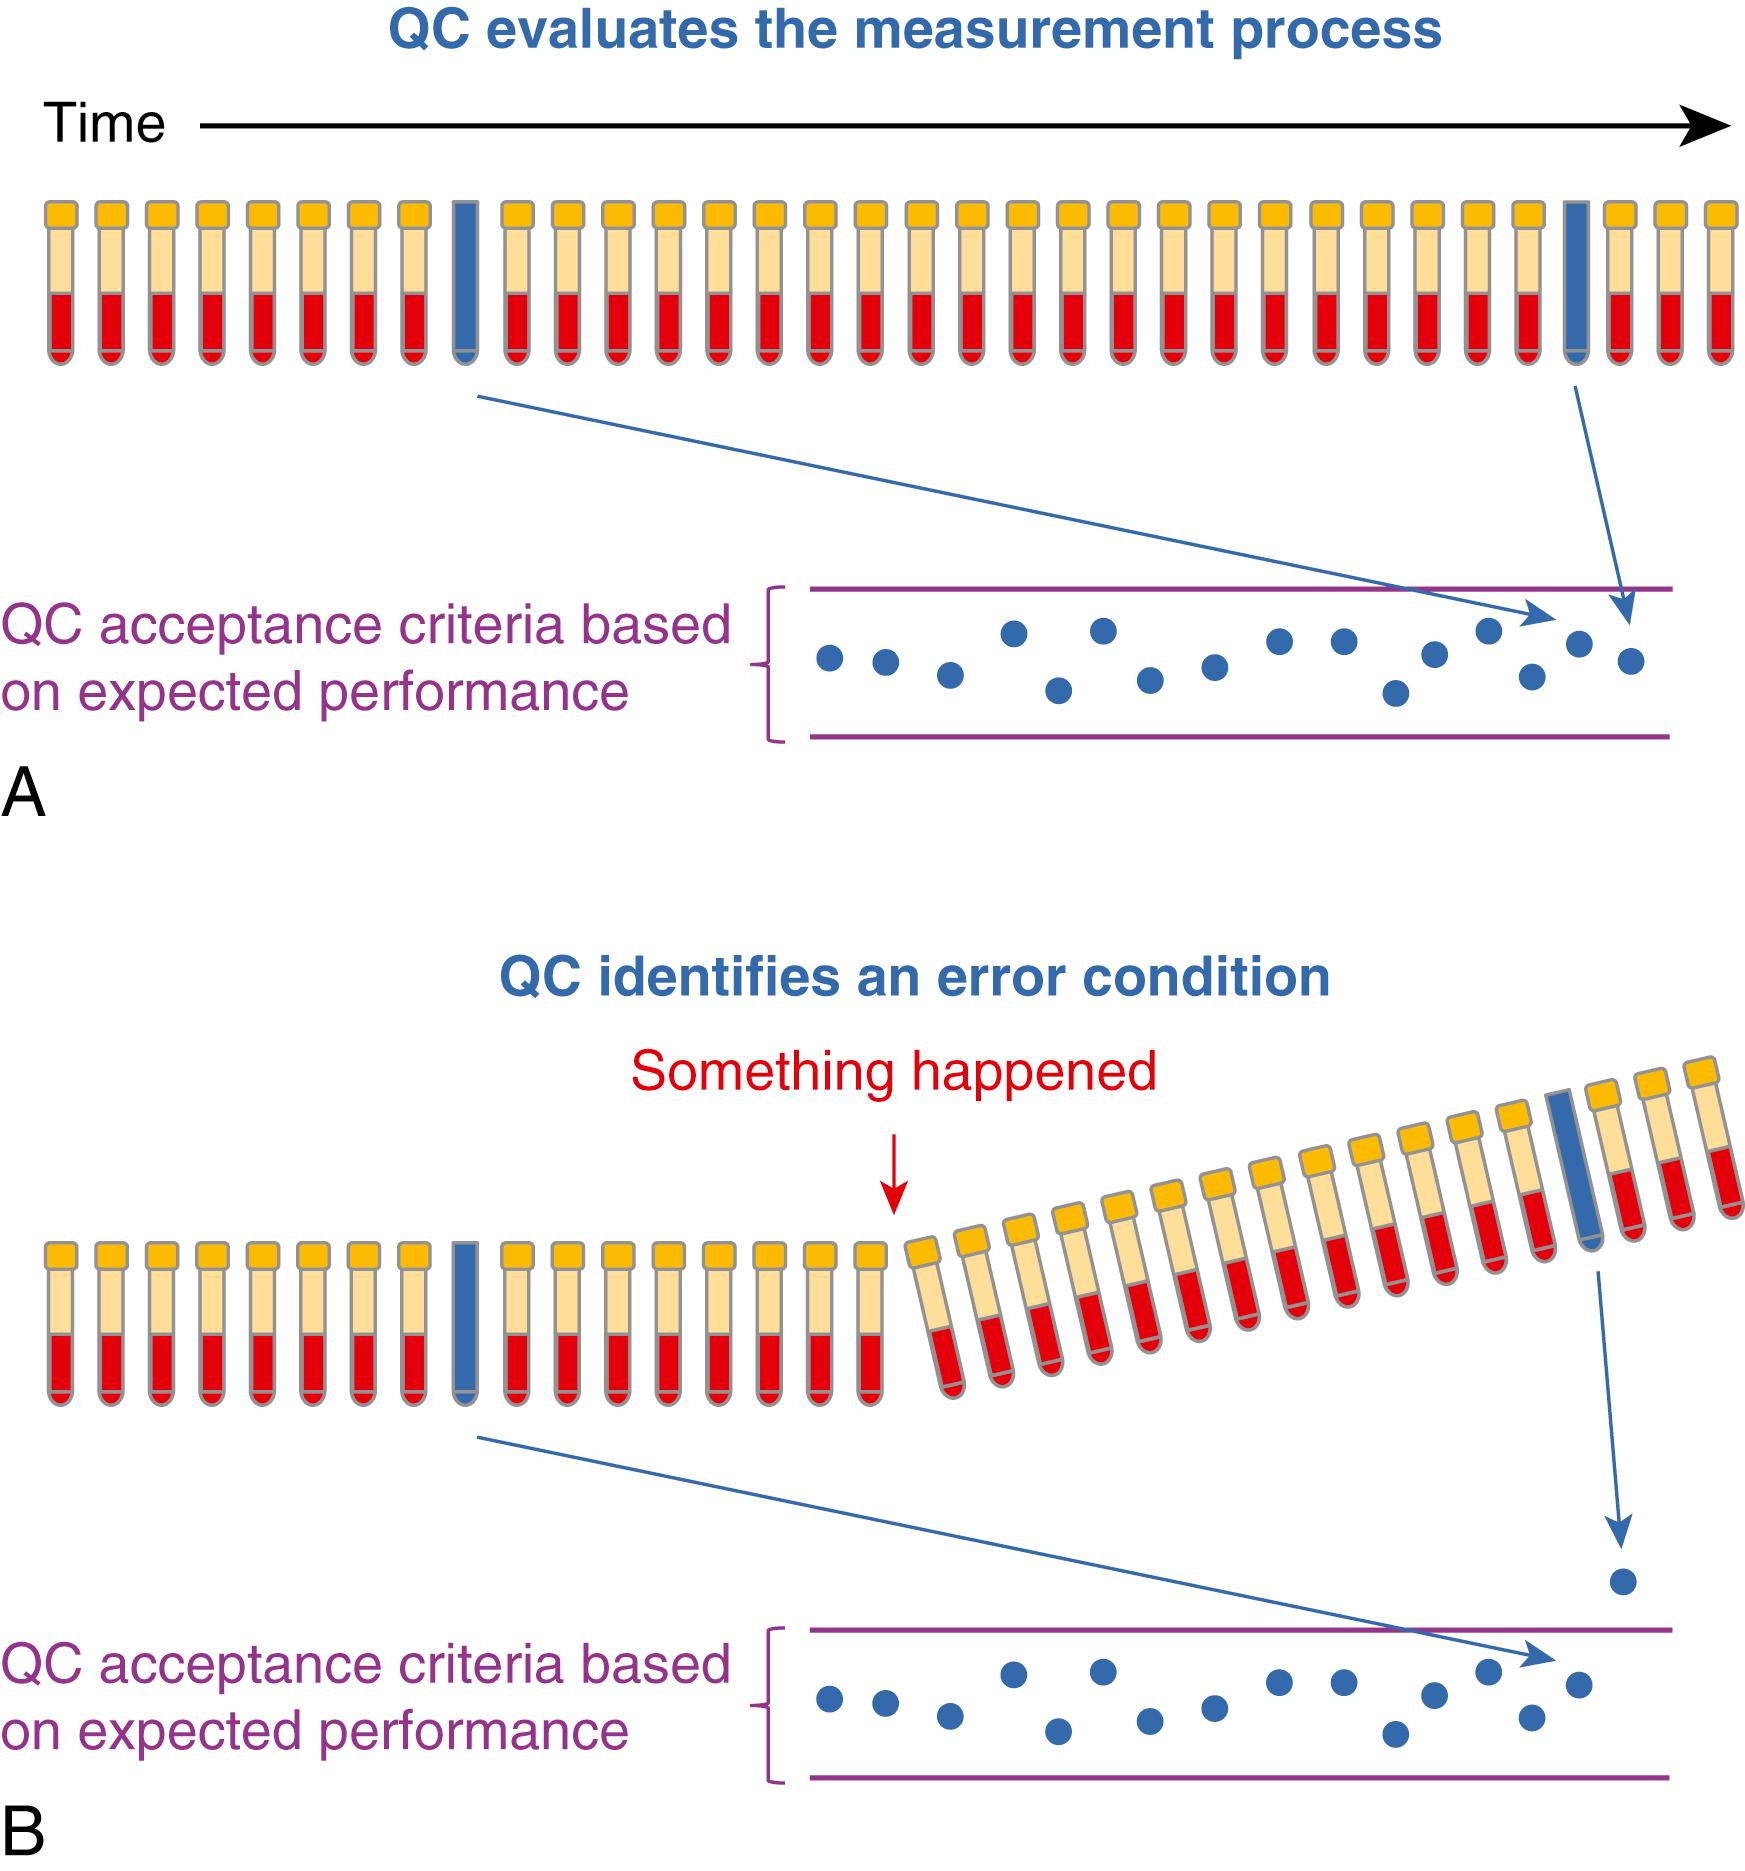
Statistical QC is a component of a quality management system as shown in Figure 11.5 . Figure 11.6A illustrates that a QC sample is periodically measured along with clinical samples. If the QC result is within acceptable limits of its target value, the measurement procedure is performing as expected, and results for patient samples can be reported with good probability that they are suitable for clinical use. If a QC result is not within acceptable limits ( Figure 11.6B ), the measurement procedure is not performing correctly, results for patient samples are not reported, and corrective action is necessary. Following corrective action, patient sample measurements that have already been reported since the time of the last acceptable QC result are repeated. Good laboratory practice requires verification that a measurement procedure is performing correctly at the time patient results are measured.
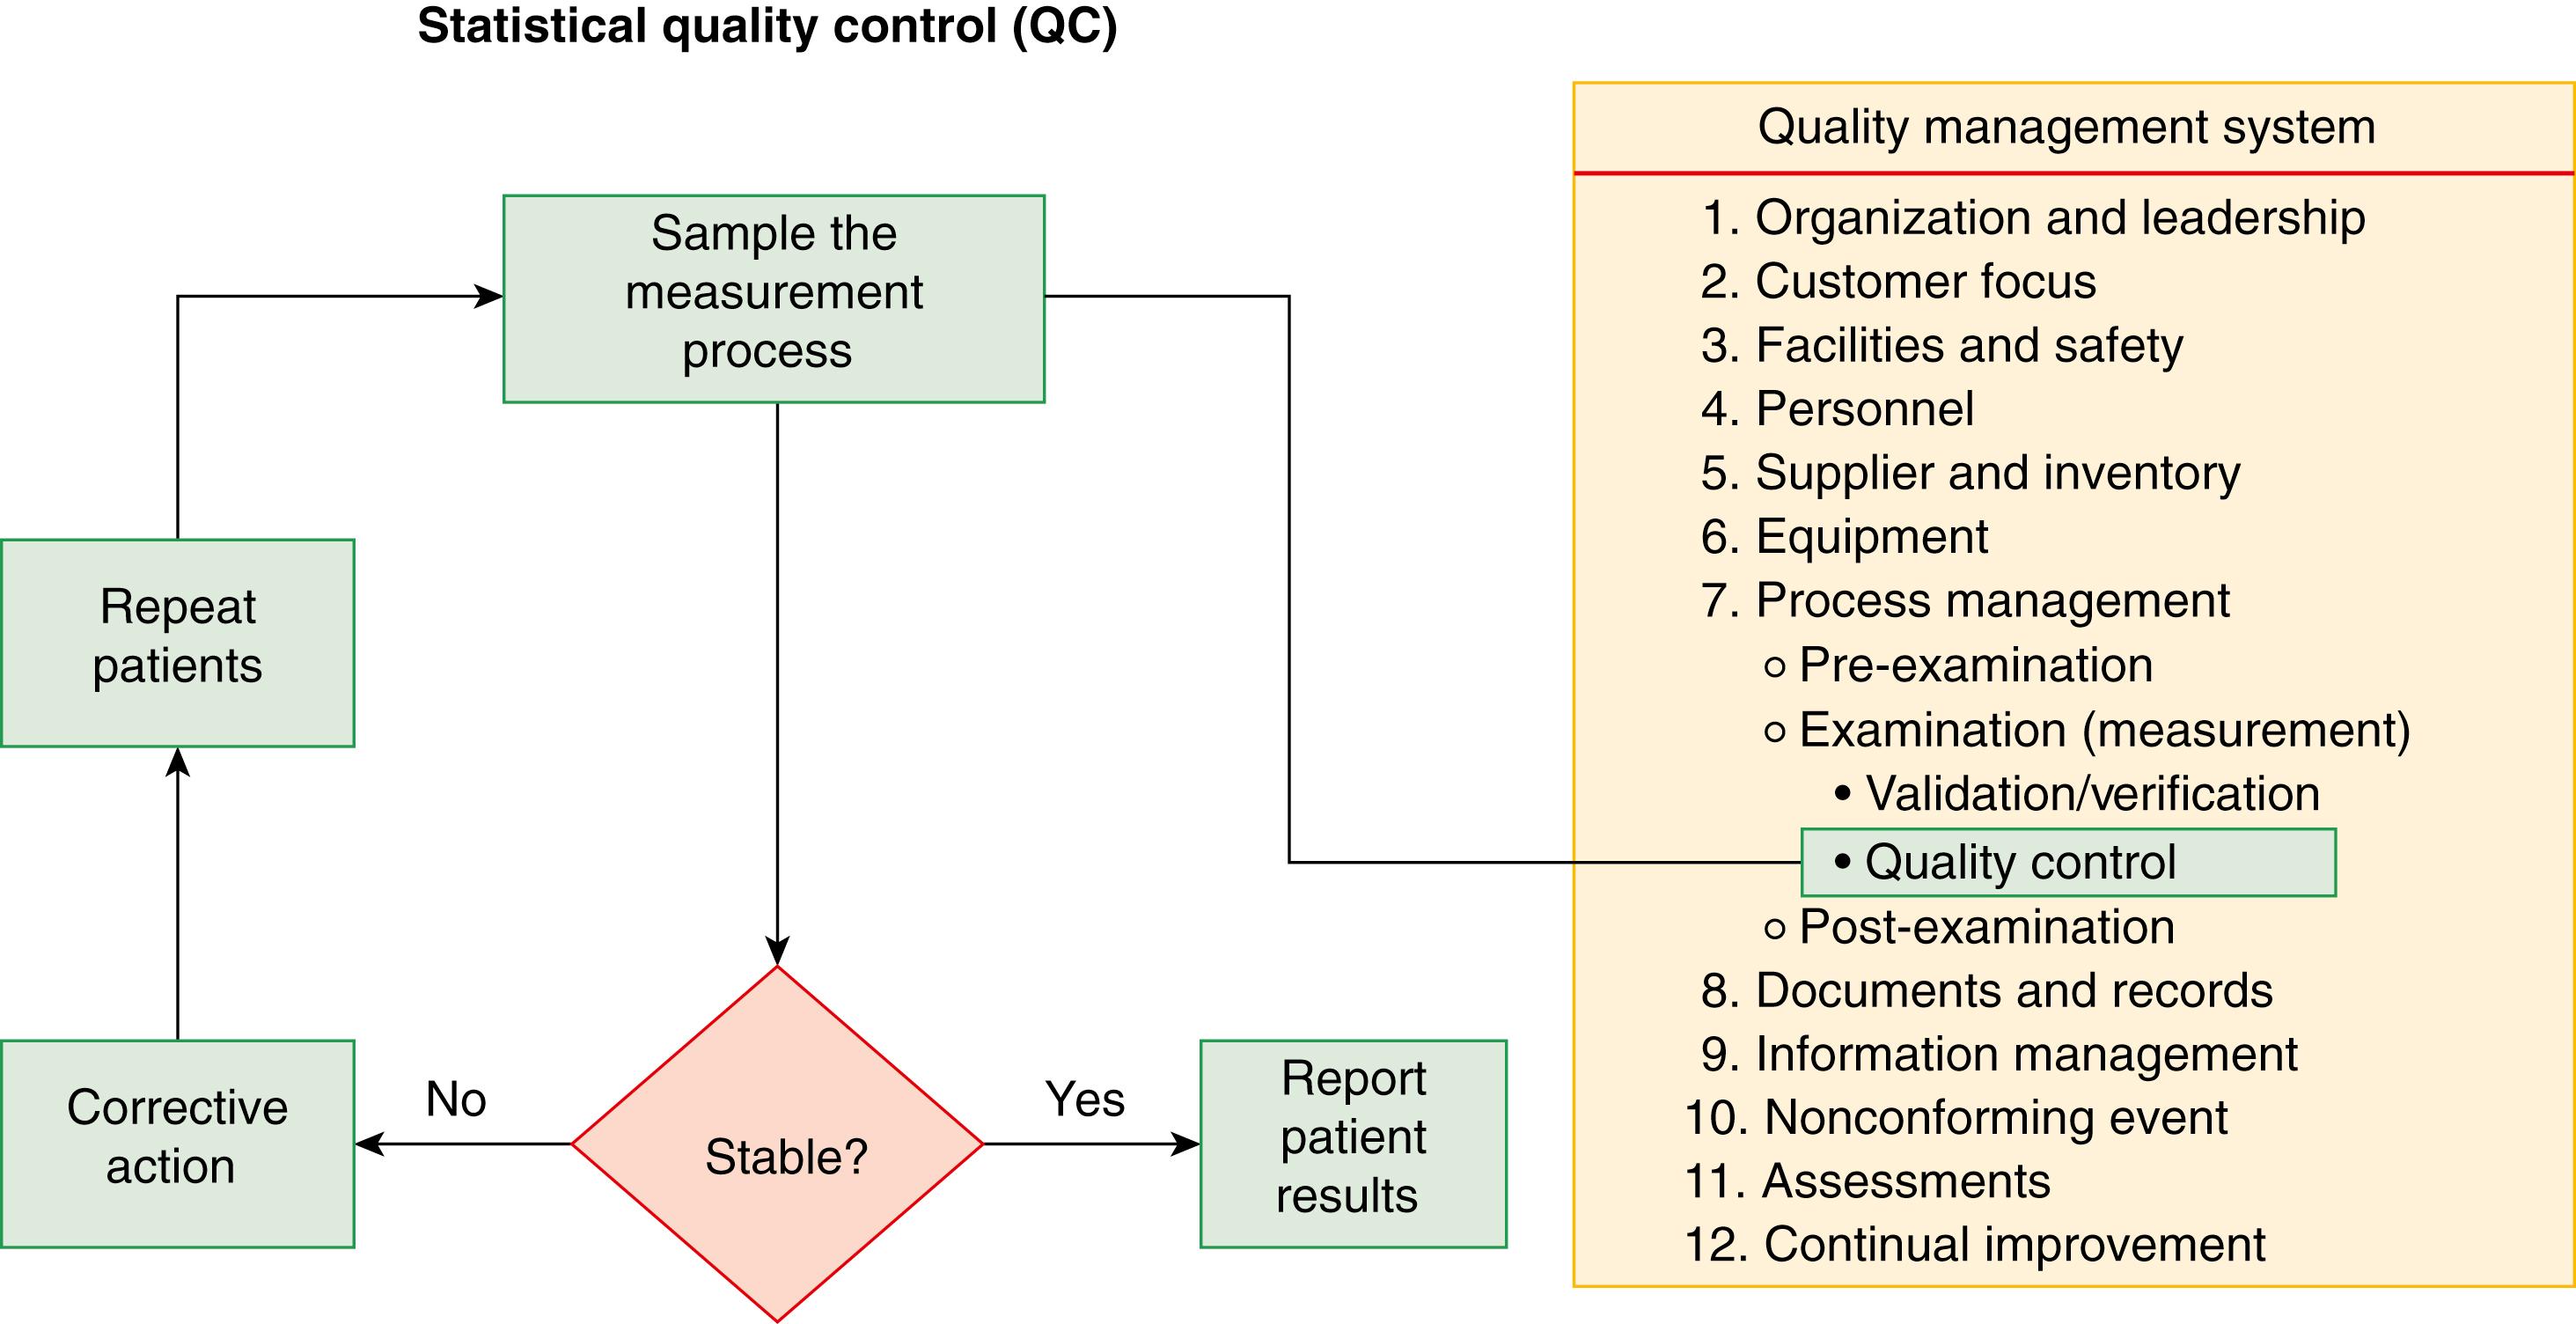
Statistical QC is part of the process management component of the quality system that integrates good laboratory practices to ensure correct patient results. Written standard operating procedures (SOPs) are required for all aspects of laboratory operation, including statistical quality control. The SOP for QC should include all aspects of the program, including the selection of QC materials, how to determine statistical parameters to describe method performance, criteria for acceptability of QC results, how frequently to measure the QC materials, corrective action when problems are identified, and documentation and review processes. The SOP should include who is authorized to establish acceptable control limits and interpretive rules for release of results; who should review performance parameters, including statistical QC results; and who can authorize exceptions to or modify an established QC policy or procedure.
Figure 11.7 shows a Levey-Jennings ( ), also called Shewhart ( ), plot, which is the most common presentation for evaluating QC results. This format shows each QC result sequentially over time and allows a quick visual assessment of measurement procedure performance, including trend detection. Assuming that the measurement procedure is performing in a stable condition consistent with its specifications, the mean value represents the target (or expected) value for the result, and the SD lines represent the expected imprecision for the measurements. Assuming a Gaussian (normal) distribution of imprecision, the results are distributed uniformly around the mean, with results observed more frequently closer to the mean than near the extremes of the distribution. Note that seven results are greater than 2 SD, four results are on the 2 SD lines, and two results slightly exceed 3 SD, which are expected on the basis of a Gaussian distribution of imprecision. For a large number of repeated measurements, the number of results expected within the SD intervals is as follows:
±1 SD = 68.3% of observations
±2 SD = 95.4% of observations
±3 SD = 99.7% of observations
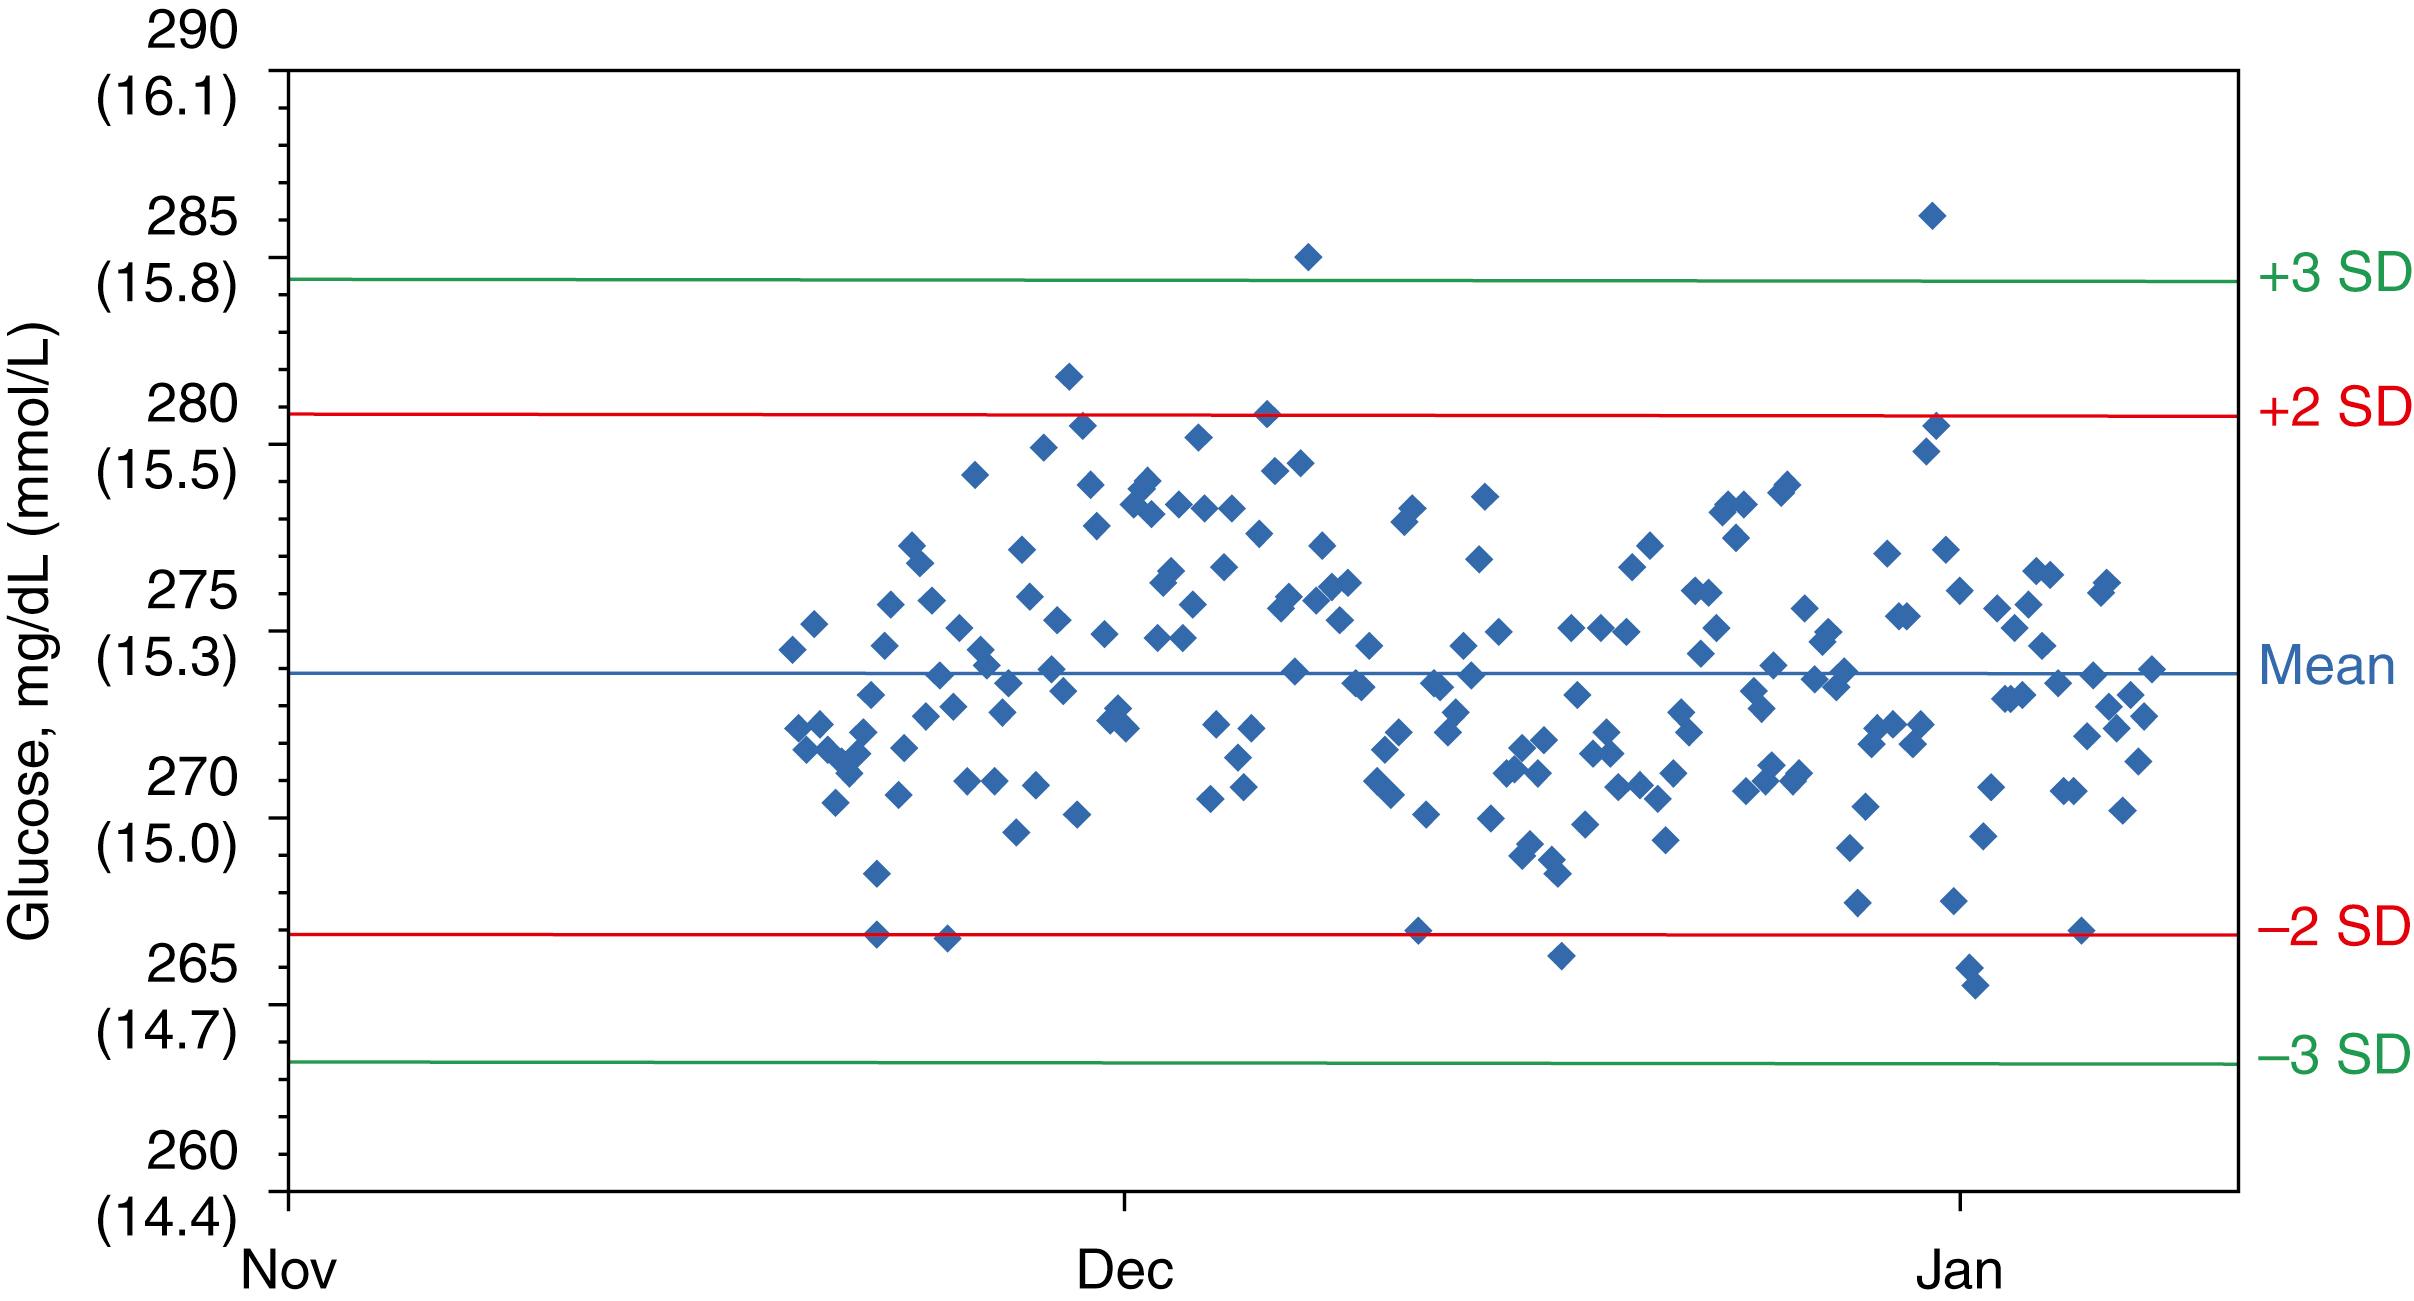
Interpretation of an individual QC result is based on its probability to be part of the expected distribution of results when the measurement procedure is performing correctly. A later section provides details regarding interpretive rules for evaluation of QC results. Note that evaluation of individual QC results may be performed by computer algorithms. However, the underlying logic of such algorithms is illustrated by the Levey-Jennings chart example.
Generally, two different concentrations are necessary for adequate statistical QC. For quantitative methods, QC materials should be selected to provide analyte concentrations that monitor the analytic measurement range of the method. In practice, laboratories are frequently limited by concentrations available in commercial QC products. When possible, it is important to confirm that method performance is stable near the limits of its analytic measurement range, because defects may affect these concentrations before others. Many quantitative measurement procedures have a linear response over the analytic measurement range—it is reasonable to assume that their performance over the range is acceptable if the results near the assay limits are acceptable. In the case of nonlinear response, it is necessary to use additional controls at intermediate concentrations. Critical concentrations for clinical decisions (e.g., glucose, therapeutic drugs, thyroid-stimulating hormone, prostate-specific antigen, troponin) may also warrant QC monitoring. In the case of analytes that have poor precision at low concentrations, such as troponin or bilirubin, the concentration should be chosen to provide an adequate SD for practical evaluation. For procedures with extraction or other pretreatment, controls must be used in the extraction or pretreatment step.
This chapter is primarily focused on QC procedures for quantitative methods. However, the principles can be adapted to most qualitative procedures. For tests based on qualitative interpretation of quantitative measurements (e.g., drugs of abuse), the same principles of QC assessment can be applied to the numeric results, and the negative and positive controls should be selected to have concentrations relatively near the decision threshold to adequately control for discrimination between negative and positive. For qualitative procedures with graded responses (e.g., dipstick urinalysis), negative, positive, and graded response controls are required. For qualitative tests based on other properties (e.g., electrophoretic procedures, stain adequacy, immunofluorescence, organism identification), it is necessary to ensure that the QC procedure will appropriately discriminate normal from pathologic conditions.
The QC samples selected must be manufactured to provide a stable material that can be used for an extended time period, preferably 1 or more years for stable analytes. Use of a single lot for an extended period allows reliable interpretive criteria to be established that will permit efficient identification of a measurement procedure problem, avoid false alerts due to poorly defined expected ranges for the QC results, and minimize limitations in interpreting values following reagent and calibrator lot changes.
Limitations are inherent in commercially available QC materials. One limitation is that a QC material is frequently noncommutable with clinical patient samples. A commutable QC material is one that reacts in a measurement system to give a result that would closely agree with that expected for a clinical sample with the same amount of analyte. The property of commutability is shown in Figure 11.8 , in which measurement responses for a QC material and patient samples are compared. In panel A, the QC samples are commutable with clinical samples because they have the same relationship as observed for results for the clinical samples when two different reagent lots are used. In panel B, the QC samples are noncommutable with clinical samples because they have a different relationship than observed for the results for the clinical samples. In the case of panel B, the results for clinical samples correctly show that equivalent results are obtained with either reagent lot, while the results for the QC samples do not mimic those for patients and incorrectly suggest that a bias exists for results with the two different reagent lots.
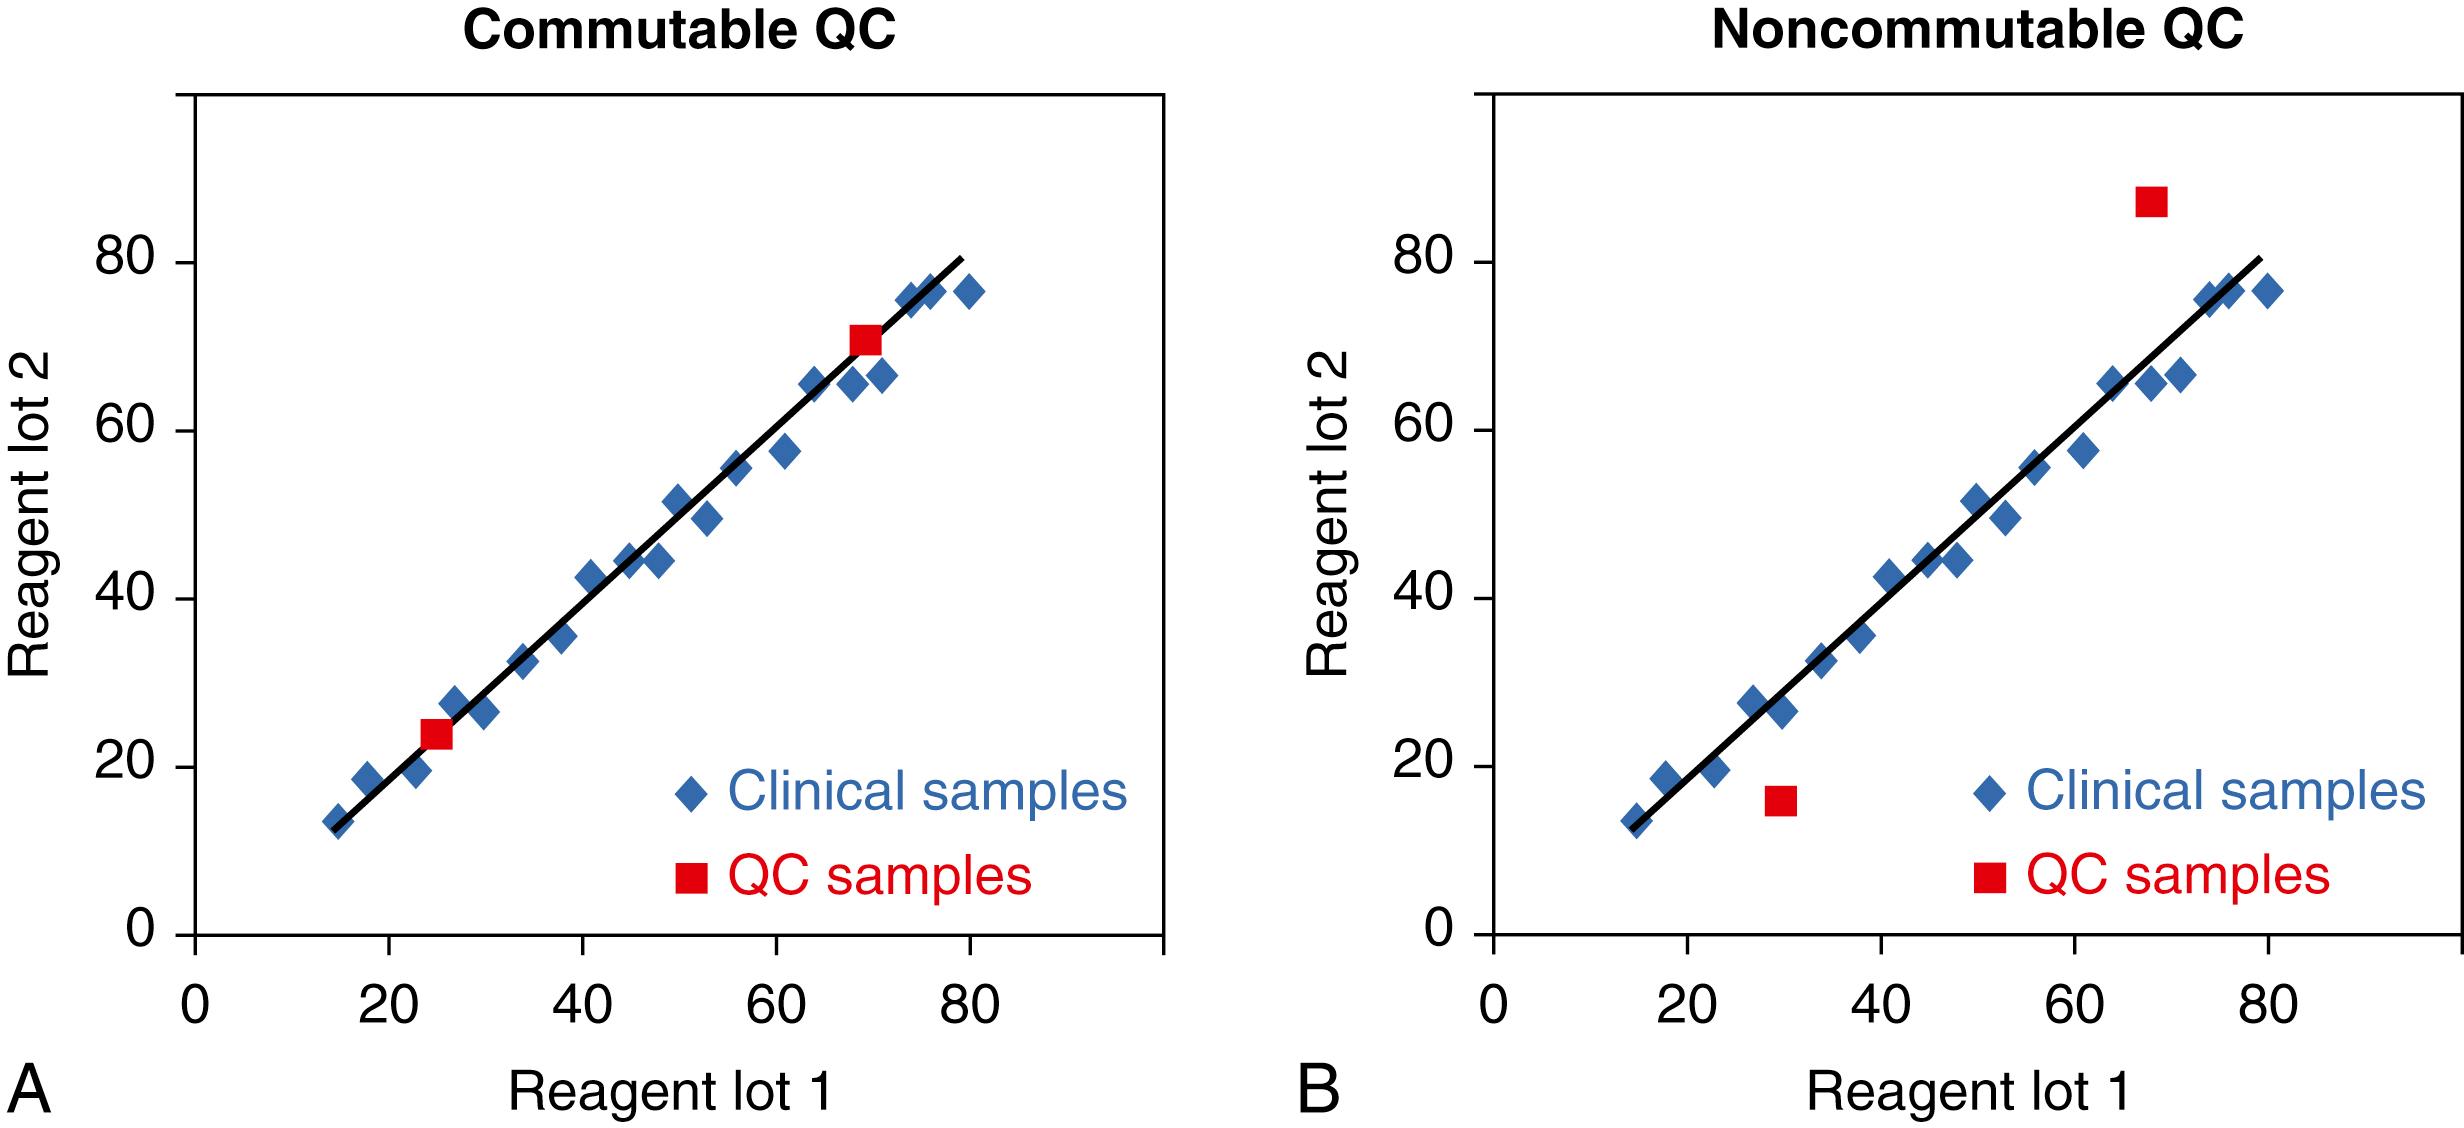
QC (and PT) materials are frequently noncommutable with clinical samples because the serum or other biological fluid matrix is usually altered from that of a clinical sample ( ; ; ; ; ; ; ). The matrix alteration is due to processing of the biological fluid during product manufacturing, use of partially purified human and nonhuman analyte additives to achieve desired concentrations, and various stabilization processes that alter proteins, cells, and other components. The impact of the matrix alteration on the recovery of an analyte in a measurement procedure is not predictable and is frequently different for different lots of QC material, for different lots of reagent within a given measurement procedure, and for different measurement procedures ( ). Because of the noncommutability limitation, special procedures are required (discussed in later sections) when changing lots of reagent or comparing QC (or PT) results among two or more measurement procedures.
A second limitation of QC materials is deterioration of the analyte during storage. Analyte stability during unopened storage is generally excellent, but slow deterioration eventually limits the shelf life of a product and can introduce a gradual drift into QC data. Analyte stability after reconstitution, thawing, or vial opening can be an important source of variability in QC results and can vary substantially among analytes in the same vial. User variables to be controlled are the time spent at room temperature and the time spent uncapped with the potential for evaporation. An expiration time after opening is provided by the QC material manufacturer but may need to be established by a laboratory for each QC material under the conditions of use in that laboratory and may be different for different analytes in the same QC product. For QC materials reconstituted by adding a diluent, vial-to-vial variability can be minimized by standardizing the pipetting procedure (e.g., using the same pipet or filling device—preferably an automated device—and having the same person prepare the controls) whenever practical.
Another limitation of QC materials is that analyte concentrations in multi-constituent materials may not be at levels optimal for the different measurement procedures. This limitation may be caused by solubility considerations or potential interactions between different constituents, particularly at higher concentrations. It may be necessary to use supplementary QC materials to adequately monitor the analytic measurement range and clinically important decision concentrations.
QC target values and acceptable performance limits are established to optimize the probability to detect a measurement defect that is large enough to have an impact on clinical care decisions while minimizing the frequency of “false alerts” due to statistical limitations of the criteria used to evaluate QC results. The measuring system must be correctly calibrated and operating within acceptable performance specifications before the statistical parameters to establish QC interpretive rules can be established. Some sources of measurement variability that are expected to occur during typical operation of a measurement procedure are listed in Table 11.1 .
| Source | Time Interval for Fluctuation | Likely Statistical Distribution |
|---|---|---|
| Pipette volume | Short | Gaussian |
| Pipette seal deterioration | Long | Drift |
| Instrument temperature control | Short or long | Gaussian or other |
| Electronic noise in the measuring system | Short | Gaussian |
| Calibration cycles | Short to long | Gaussian or periodic drift/shift |
| Reagent deterioration in storage | Long | Drift |
| Reagent deterioration after opening | Intermediate | Cyclic, periodic drift/shift |
| Calibrator deterioration in storage | Long | Drift |
| Calibrator deterioration after opening | Intermediate | Cyclic, periodic drift/shift |
| Control material deterioration in storage | Long | Drift |
| Control material deterioration after opening | Intermediate | Cyclic, periodic drift/shift |
| Environmental temperature and humidity | Variable | Variable |
| Reagent lot changes | Long | Periodic shift |
| Calibrator lot changes | Long | Periodic shift |
| Instrument maintenance | Variable | Cyclic or periodic shift |
| Deterioration of instrument components | Variable | Drift, cyclic, or periodic shift |
A QC material must have a reliable target value that represents the condition when systematic bias is as small as possible. This condition requires the method to be calibrated correctly. For practical reasons, the typical sources of measurement variability in Table 11.1 are rarely all represented in the time available to establish a target value; consequently, the target value has some uncertainty and needs to be refined over time to reflect the expected fluctuations in measurement conditions that occur when the measuring system remains within its performance specifications. The generally accepted protocol for target value assignment is to use the mean value from measuring a QC material a minimum of 10 times on 10 different days ( ). If a 10-day protocol is not possible—for example, if an emergency replacement lot of QC material is necessary—a provisional target value can be established with fewer data but should be updated as additional results are available. When applicable, more than one calibration should be represented in the 10-day period to include this source of variability in the target value. If a QC material will be used for longer than 1 day, a single vial should be stored correctly and measured on as many days as the material is planned to be used to allow any variability caused by deterioration of the analyte to be averaged into the target value.
Some QC materials are provided by the measurement procedure manufacturer with preassigned target values and ranges intended to confirm that the measurement procedure meets the manufacturer’s specifications. Such assigned values may be used initially by the laboratory. It is recommended that both the target value and the SD be reevaluated and adjusted by the laboratory after adequate replicate results have been obtained because the QC interpretive rules used in a single laboratory should reflect performance for the measurement procedure in that laboratory. The acceptability limits (product insert ranges) suggested by a measurement procedure manufacturer typically are based on data collected from several laboratories. These acceptability limits will inevitably be greater than the variability expected for a measurement procedure used in an individual laboratory. Use of product insert ranges that are too large will reduce a laboratory’s ability to detect an erroneous measurement condition.
QC materials with assigned target values are also available from third-party manufacturers (i.e., manufacturers not affiliated with the measurement procedure manufacturer). Caution should be used with target values assigned by third-party QC material providers because the target values may have been assigned using reagent and calibrator lots that are no longer available (see the section on Verifying Quality Control Evaluation Parameters Following a Reagent Lot Change). A laboratory should establish a target value that reflects the measurement conditions for a particular measurement procedure used in a specific laboratory. Some QC material providers offer an interlaboratory data aggregation service and report peer group target values for large numbers of laboratories using the same measurement procedure. Such interlaboratory QC data aggregation target values can be useful to determine that a laboratory is obtaining results similar to other users of the same measuring system in conformance to the manufacturer’s specifications. However, such target values should not be used within a laboratory because those values will be influenced by reagent lot–specific noncommutability biases and other differences between measurement procedures in different laboratories that will make the target value less reliable for use in QC rules to identify errors in a laboratory’s measurement procedure.
In addition to a target value, an SD is estimated for a QC material that represents the expected imprecision of the measurement procedure when it is performing according to its design specifications. As shown in Table 11.1 , measurement variability includes sources with short time interval frequencies, many of which can be described by Gaussian error distributions. Measurement variability also includes influences from intermittent and longer time interval sources that are not described by Gaussian error distributions. Such longer-term variability can cause cyclic fluctuations over several days or weeks, small drift over weeks or months, and more abrupt small shifts in results when a measurement procedure is performing within its specifications. QC interpretive rules are based on an assumption of Gaussian distribution of imprecision. However, the actual QC results are frequently non-Gaussian and it is very important to base the estimate of SD on a long enough time interval that all or most sources of variability that are consistent with the measurement procedure performing to specifications are reflected in the SD.
A minimum of 20 observations is recommended for an initial estimate of SD ( ). It is desirable to have as many of the events that contribute to measurement variability, in particular calibration and maintenance, included during the time interval over which the SD is estimated. The initial estimate of SD will not include contributions from all expected sources of variability in Table 11.1 and will need to be updated when additional data are available. CLSI document EP05 provides guidance on establishing the SD for a measurement procedure under carefully defined conditions that do not include longer-term components of variability ( ). Consequently, an SD determined by this protocol is inevitably an underestimate of the SD needed for use in QC interpretive rules.
The SD for stable measurement performance should be estimated from the cumulative SD over a 6- to 12-month period for a single lot of QC material. The cumulative SD is likely to include most expected sources of variation in Table 11.1 and thus provide a realistic SD for use in QC interpretive rules. See an important limitation when determining a cumulative SD, described later in the section Verifying Quality Control Evaluation Parameters Following a Reagent Lot Change. Figure 11.9 illustrates (with data for a glucose method) the fluctuation in SD that occurs when calculated for monthly intervals compared with the relatively stable value observed for the cumulative SD after a period of 6 months. Note that the cumulative SD is not the average of the monthly values but is the SD determined from all individual results obtained over a time interval since the lot of QC material was first used. Different sources of long-term variability occur at different times during the use of a measurement procedure. The monthly SD does not adequately reflect the longer-term components of variability. Consequently, the cumulative SD will typically be larger than the monthly values and will better represent the actual variability of the method when it is operating to its specifications.
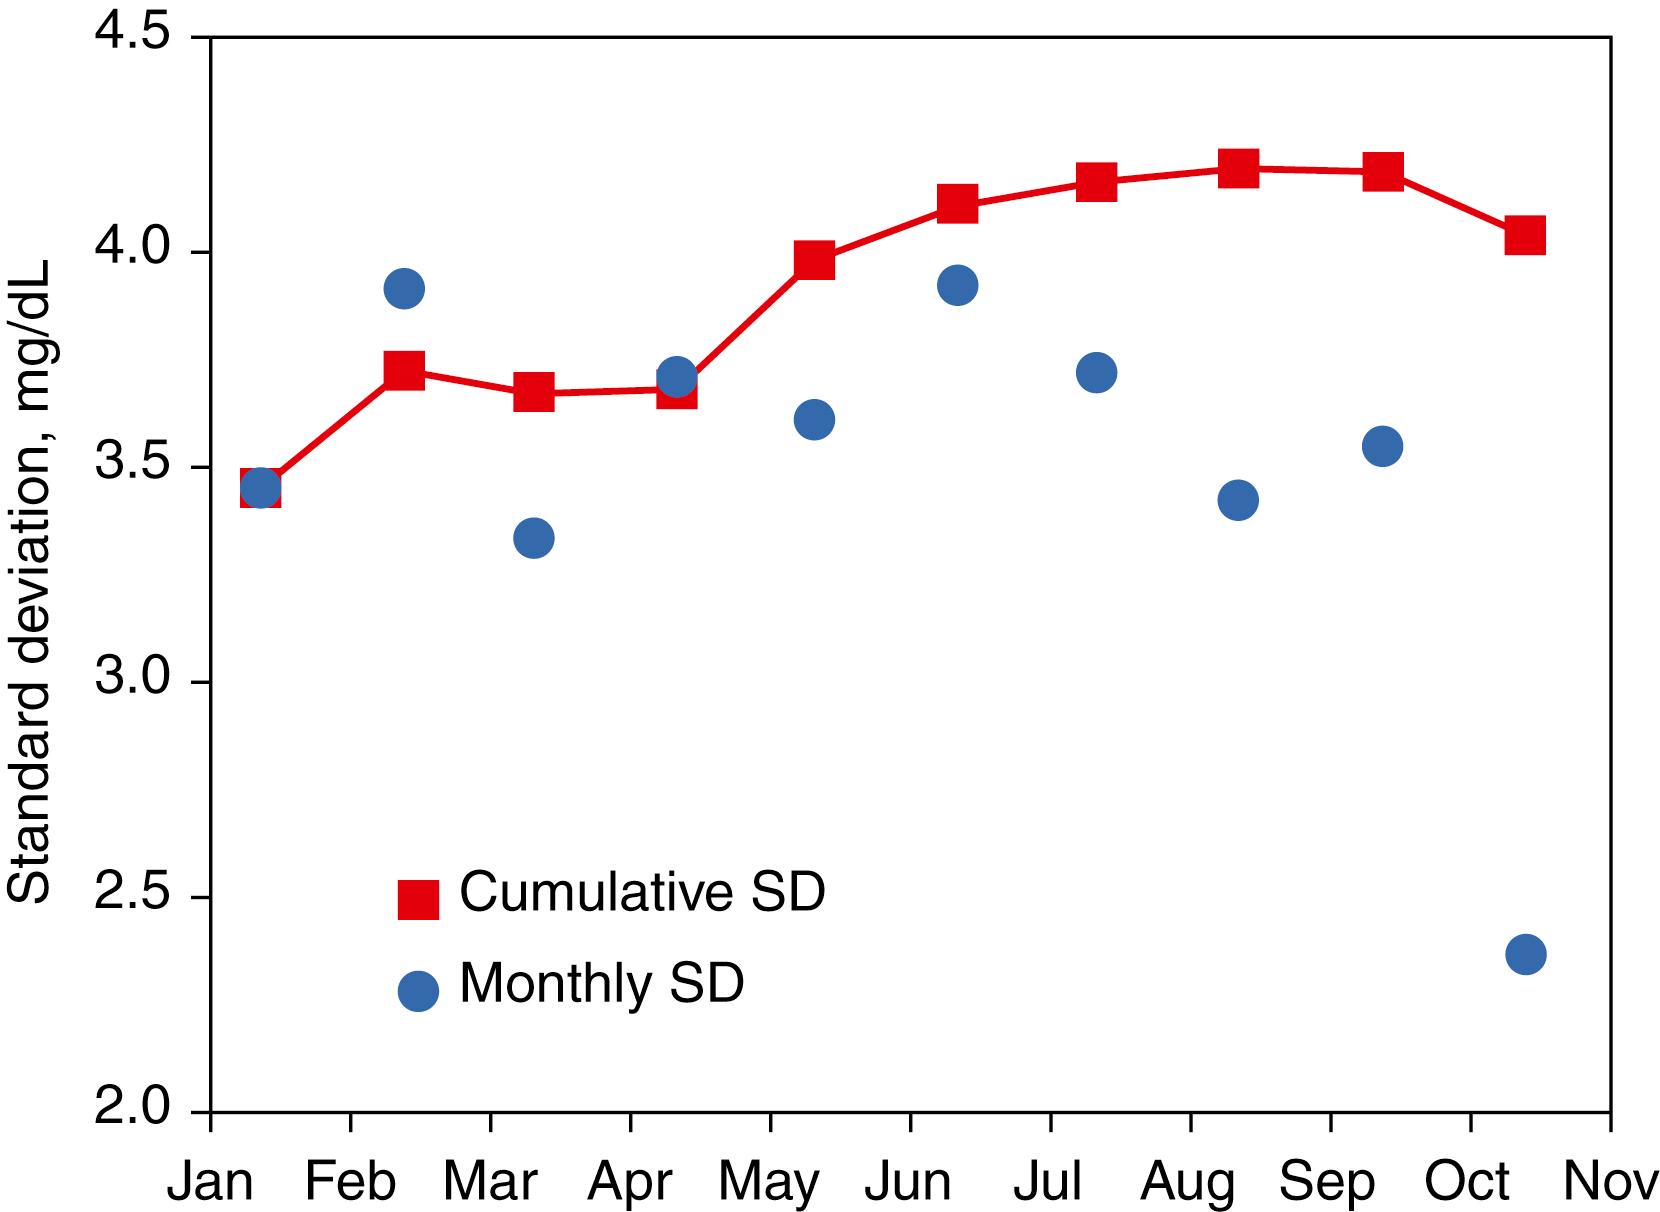
If the SD expected during stable operation is underestimated, the acceptable range for QC results will be too small, and the false alert rate will be unacceptably high. If the SD for the stable operating condition is overestimated, such as when using the SD from an interlaboratory comparison program, the acceptable range will be too large, and a significant measurement error could go undetected. Some QC material providers offer an interlaboratory data aggregation service that reports peer group SDs for laboratories using the same measurement procedure. Such SDs should not be used within a laboratory because those values will be influenced by reagent lot–specific noncommutability biases and other differences between measurement procedures in different laboratories that do not apply in a particular laboratory and will make the SD inappropriate for use in QC rules to identify errors in a laboratory’s measurement procedure.
The statistical QC packages in instrument and laboratory computer systems are designed with the assumption that the SD for a Gaussian (normal) distribution is used for the QC rules criteria even though non-Gaussian components of variability influence the QC results. Because there are non-Gaussian components to measurement variability over time, it is very important that they be represented in the data used to estimate an SD. We use an estimate of SD to make conclusions regarding the acceptability of an individual QC value; thus, the SD must be as realistic as possible to represent the variability expected for a measurement procedure when its performance meets its specifications.
It is important to include all valid QC results in the calculation of SD to ensure that the SD correctly represents expected measurement procedure variability. A valid QC result is one that was, or would have been in the case of preliminary value assignment, used to verify acceptable performance and reporting of patient results. Only QC results that were, or would have been, responsible for not releasing patient results should be excluded from summary calculations. If inappropriate editing of QC results occurs, the method SD may be inappropriately small, which will produce inappropriately small evaluation limits and an increase in false QC alerts, with concomitant reduction in the effectiveness of statistical QC evaluation.
When a method has been established in a laboratory and a new lot of QC material is being introduced, the target value for the new lot of QC material is used along with the well-established SD from the previous lot ( ). This practice is appropriate because measurement imprecision is a property of the measurement procedure and equipment used and is unlikely to change with a different lot of QC material. If target values for the old and new lots of QC materials are substantially different, a different SD may occur and adjustment to the SD may be necessary as additional experience with the new lot is accumulated.
If a new measurement procedure is introduced for which no historical performance information is available, the SD and target value assignment of the QC materials must be established using data available from the measurement procedure validation. In this case, the initial SD will underestimate the long-term SD, and evaluation criteria will need to be monitored closely and adjustments made as additional experience allows measurement imprecision from all sources to be reflected in the cumulative SD.
It is important to understand how a test’s performance impacts clinical decision making in order to determine the criteria used to evaluate acceptability and the optimal QC frequency. The sigma metric is commonly used to assess how well a measurement procedure performs relative to the medical requirement. Sigma is the Greek letter used to denote standard deviation. The sigma scale compares the variability of a measurement process in standard deviations to the variability that is medically acceptable because it has a low probability to cause an error in diagnosis or treatment of a patient.
For laboratory measurements, the sigma metric is calculated as:
where TE a is the total error allowed based on medical interpretation requirements, and the absolute value of bias and the SD refer to performance characteristics of the laboratory measurement procedure. The SD is estimated from the long-term QC data as previously described. It is critically important that the SD uses QC data that represents all or most components of variability that occur over an extended time period. It is difficult for a laboratory to estimate true bias because it requires comparison with a reference method, which is not usually a feasible approach. In practice, QC results are used to determine whether a change in bias has occurred compared with the condition established by calibration of a measurement procedure. Consequently, the bias is usually assumed to be zero when calculating sigma for the purpose of establishing suitable QC rules. In a situation in which different measurement procedures are used in different laboratories in the same health care system and there is a known bias between the measurement procedures, a bias value can be used to reflect the overall sigma performance for clinical sample results that might be measured in different laboratory locations. However, this overall sigma value may not be suitable for establishing QC parameters for a single measurement procedure in one laboratory location.
TE a can be estimated in several ways. The preferred way to set the TE a is from laboratory practice guidelines. For example, the National Cholesterol Education Program recommends that total cholesterol be measured with a TE a of 9% or less ( ), and the National Kidney Disease Education Program recommends that creatinine be measured with a TE a of less than approximately 0.10 mg/dL in the concentration range 1 to 1.5 mg/dL, which is 7% to 10% ( ). When practice guidelines are not available, the recommended way to estimate the TE a is to consult clinicians to determine the magnitude of change in a laboratory result that will prompt a patient care decision.
Another approach is to base the TE a on a fraction of the within- and between-individual biological variations for an analyte ( ; ; ). Tables of optimal, desirable, and minimal TE a based on biological variation are available ( ). However, biological variation–based estimates of TE a should be used with caution because the estimates of biological variation in many cases are based on minimal data, and the experimental designs of the estimates and the process to select the listed estimates have been challenged ( ; ; ). For example, reports of biological variation for AST, alanine aminotransferase (ALT), and γ-glutamyl transferase (GGT) varied between 11% and 58%, 3% and 32%, and 4% and 14%, respectively, among different studies ( ). In addition, the biological variability has typically been derived from data for nondiseased individuals and may be different for pathologic conditions. The European Federation of Clinical Chemistry and Laboratory Medicine is addressing some of the limitations of biological variability data, has published a checklist for quality of data ( ), and is updating the older published values (EFLM, 2019).
Because sigma assumes a Gaussian or normal distribution for repeated measurements, the probability of a defect—that is, an erroneous laboratory result—can be predicted as shown in Table 11.2 . The sigma metric represents the probability that a given number of erroneous results—which could cause risk of harm to a patient—are expected to occur when the test method is performing to its specifications. The phrase “six sigma” refers to a condition when the variability in the measurement process is sufficiently smaller than the medical requirement that erroneous results are very uncommon (see Chapter 2 ). A “four sigma” method would be less robust and have a higher probability that erroneous results could be produced but still at a fairly low frequency. A “two sigma” method would produce enough erroneous results even though it met its performance specifications that it would be less suitable for patient care.
| Sigma Value | Percent of Results within Specification | Percent of Results With an Error (Defect) | Errors (Defects) Per Million Opportunities |
|---|---|---|---|
| 1 | 68 | 32 | 317,311 |
| 2 | 95.5 | 4.5 | 45,500 |
| 3 | 99.7 | 0.3 | 2,700 |
| 4 | 99.994 | 0.006 | 63 |
| 5 | 99.99994 | 0.00006 | 0.6 |
| 6 | 99.9999998 | 0.0000002 | 0.002 |
a The values in this table are based on a Gaussian statistical distribution and do not include the “1.5 sigma shift” frequently introduced to recognize that many manufacturing processes have been observed to have a long-term drift approximately ±1.5 SD when operating in a stable condition. The 1.5 sigma shift is not used for QC rules design.
Figure 11.10 shows how the sigma metric describes the performance of a laboratory test. Panel A shows the performance of a “six sigma” test that has the TE a limits six SD away from the center point of the expected distribution of variability in measurements when the test procedure is performing to its analytic specifications. In the “six sigma” situation, some bias or increased imprecision will have little influence on the number of erroneous results produced, and less stringent QC will be appropriate because the risk of producing an erroneous result is very low even with some loss of performance. Panel B shows the performance of a “three sigma” test that has the TE a limits three SD away from the center point of the expected distribution of variability in measurements when the test procedure is performing to its analytic specifications. In the “three sigma” situation, a small amount of bias or increased imprecision will cause the number of erroneous results to increase substantially, and more stringent QC is needed to identify when such an error condition occurs. Note that no amount of QC will improve the performance of a marginal measurement procedure. However, more frequent QC and more stringent acceptance criteria will allow the laboratory to identify when small changes in performance occur so that they can be corrected to minimize the risk of harm to a patient from erroneous results being acted on to make clinical care decisions.

Become a Clinical Tree membership for Full access and enjoy Unlimited articles
If you are a member. Log in here