Physical Address
304 North Cardinal St.
Dorchester Center, MA 02124
Acknowledgments: The author gratefully acknowledges the foundational basic science and clinical expertise of Drs. James Strickland, Lawrence Schneider, and Martin I. Boyer who created several previous editions of the Acute Injury portion of this chapter, as well as the outstanding efforts of Dr. John S. Taras, Dr. Robert A. Kaufmann, and Dr. Scott Wolfe to the Late Reconstruction portion of this chapter. Their writing and teachings have been preserved to a great extent and modified, combined, and updated as necessary. These authors’ contributions to our understanding of repair and reconstruction of the damaged flexor tendon system have greatly advanced our ability to care for these injuries. The author also acknowledges the contributions of Mr. Daniel Acker, OT, CHT, to the rehabilitation portion of this chapter.
In the 1960s, initial clinical reports began to emerge that suggested primary tendon repair was possible and desirable. Since that time, there have been major advances in the understanding of intrasynovial flexor tendon anatomy, biology, mechanisms of response to injury, and methods of repair. Pioneering work by Lundborg validated primary adhesion-free primary intrasynovial tendon repair in experimental and clinical studies. More recent research has focused on improvements in surgical and aftercare methods that can achieve a reliable flexor tendon repair site and are associated with satisfactory digital motion. , , These advances coupled with improvements in suture design, optical magnification, and rehabilitation methods have made primary flexor tendon repair the preferred operative treatment for lacerated tendons in zone 2. , Table 6.1 summarizes research relevant to flexor tendon repair.
| Author | Publication Activity | Main Area of Contribution | Significance |
|---|---|---|---|
| Bunnell | 1918–1951 | Surgical technique of tendon repair, grafting | Stressed importance of gentle, precise surgical technique as having a direct effect on results |
| Mason et al. | 1932–1959 | Animal model study of repair site healing | Classic in vivo study of repair site healing and accrual of strength |
| Boyes et al. | 1947–1989 | Surgical technique of tendon repair, grafting | Detailed techniques and results of intrasynovial flexor tendon grafts |
| Peacock et al. | 1957–1987 | Tendon biology, healing | Stressed contribution of surrounding sheath to tendon repair site healing |
| Verdan et al. | 1960–1987 | Primary tendon repair | First report of successful primary tendon repair within digital sheath |
| Potenza et al. | 1962–1986 | Tendon biology, healing | Stressed the contribution of surrounding sheath to repair site healing |
| Kleinert et al. | 1967–present | Early motion rehabilitation | Reported technique of reliable and reproducible postoperative “rubber band” rehabilitation. Also first valid report in United States of primary zone 2 repair |
| Burner | 1967–1975 | Skin incisions | Zigzag volar approach to digital sheath |
| Kessler et al. | 1969–1987 | Primary tendon repair | Core suture technique |
| Ketchum et al. | 1971–1985 | Biology and biomechanics of tendon repair | Experimental study of tendon repair and healing |
| Lundborg et al. | 1975–present | Tendon healing, vascularity, nutrition | Advocated concept of “intrinsic” tendon healing, detailed vascularity of flexor tendon |
| Duran et al. | 1975–1990 | Early motion rehabilitation | Passive motion rehabilitation protocol |
| Manske et al. | 1977–present | Tendon biology, biomechanics | Classic studies of tendon nutrition, repair site biology, and biomechanics |
| Leddy et al. | 1977–1993 | FDP avulsion injuries | Classification of FDP avulsions |
| Lister et al. | 1977–1986 | Rehabilitation, pulley reconstruction | Clinical studies of pulley reconstruction and handling of digital sheath |
| Gelberman et al. | 1980–present | Tendon biology, biomechanics, rehabilitation | Classic experimental and clinical studies of tendon repair site biology, biomechanics, vascularity, and rehabilitation |
| Strickland et al. | 1982–present | Tendon repair, rehabilitation | Classic clinical and experimental studies of flexor tendon repair and rehabilitation |
| Silfverskiöld et al. | 1983–1994 | Tendon repair, rehabilitation | Clinical and experimental study of repair site gap formation and rehabilitation |
| Amadio et al. | 1984–present | Tendon and pulley biology, biomechanics, rehabilitation | Classic experimental studies of tendon repair site biology, biomechanics, and rehabilitation |
| Hitchcock et al. | 1987 | Tendon biology, rehabilitation | Experimental study of biologic effect of passive motion rehabilitation |
| Doyle | 1988 | Flexor pulley system | Relative importance of each pulley |
| Mass et al. | 1989–present | Tendon biomechanics | Experimental study of in vitro repair site biomechanics |
| Abrahamsson et al. | 1989–present | Growth factors in tendon healing | In vitro studies of growth factor synthesis during repair site healing and their effects |
| Seiler et al. | 1990–1991 | Biology of tendon repair | Identification of growth factors in repair, suture methods in tendon repair |
| Schuind et al. | 1992–present | In vivo flexor tendon forces | Classic study documenting in vivo flexor forces during digital motion |
| Diao et al. | 1996–present | Core and circumferential suture techniques | Experimental study of role of circumferential suture in time-zero repair site strength |
| Sandow and McMahon | 1996–present | Core suture technique | Improved time-zero core suture technique |
| Boyer et al. | 1997–present | Tendon biology, biomechanics, rehabilitation | Experimental studies of tendon repair site biology, biomechanics, vascularity, and rehabilitation |
| Wolfe et al. | 1999–present | Core suture technique | Core suture technique |
| Taras | 1999–present | Core suture technique | Core suture technique |
| Leversedge | 2000–present | Tendon vascularity and neovascularization after repair | Experimental studies of tendon repair site and insertion site vascularity |
| Trumble et al. | 2010–present | Early active range of motion | Improved outcomes with early active range-of-motion protocols |
| LaLonde D | 2005–present | “Wide awake” surgery with epinephrine | Use of wide awake methods allows the surgeon to inspect the repair site during active finger range of motion |
The goals of surgical treatment of a lacerated intrasynovial flexor tendon have remained constant: accurate smooth coaptation of the tendon ends in such a manner as to allow application of a postoperative rehabilitation protocol that encourages tendon gliding, inhibits the formation of peritendinous adhesions, stimulates restoration of the gliding surface, allows for primary healing of the repair site, and ultimately allows normal range of motion to the finger.
A thorough patient history and physical examination of the injured hand are performed as a part of the initial evaluation and before the administration of local anesthesia or sedation so that any potential neurologic or vascular injuries can be accurately detected. Generally, a systematic method of examining each system in the hand is most effective in documenting the components of the injury. This primary evaluation is important to planning the nature and timing of future medical and surgical treatments.
The integrity of the skin on the volar and dorsal aspects of the injured digit is examined to ascertain the presence or absence of additional injuries. The nature of each skin injury should be recorded.
Obvious angular or rotational deformity of the digit signifies either a fracture or a ligamentous injury that requires further assessment. Realignment of a fracture or reduction of a dislocation may be required before the evaluation of flexor tendon integrity or the presence of digital neurovascular injury. If the flexor tendons are completely lacerated, the digit loses its inherent flexor tone and assumes an extended posture at the proximal interphalangeal (PIP) and distal interphalangeal (DIP) joints. If the tendons are completely transected, there is no active flexion, on examination, and the tenodesis effect (normal increase in flexor tone) is lost with passive wrist extension.
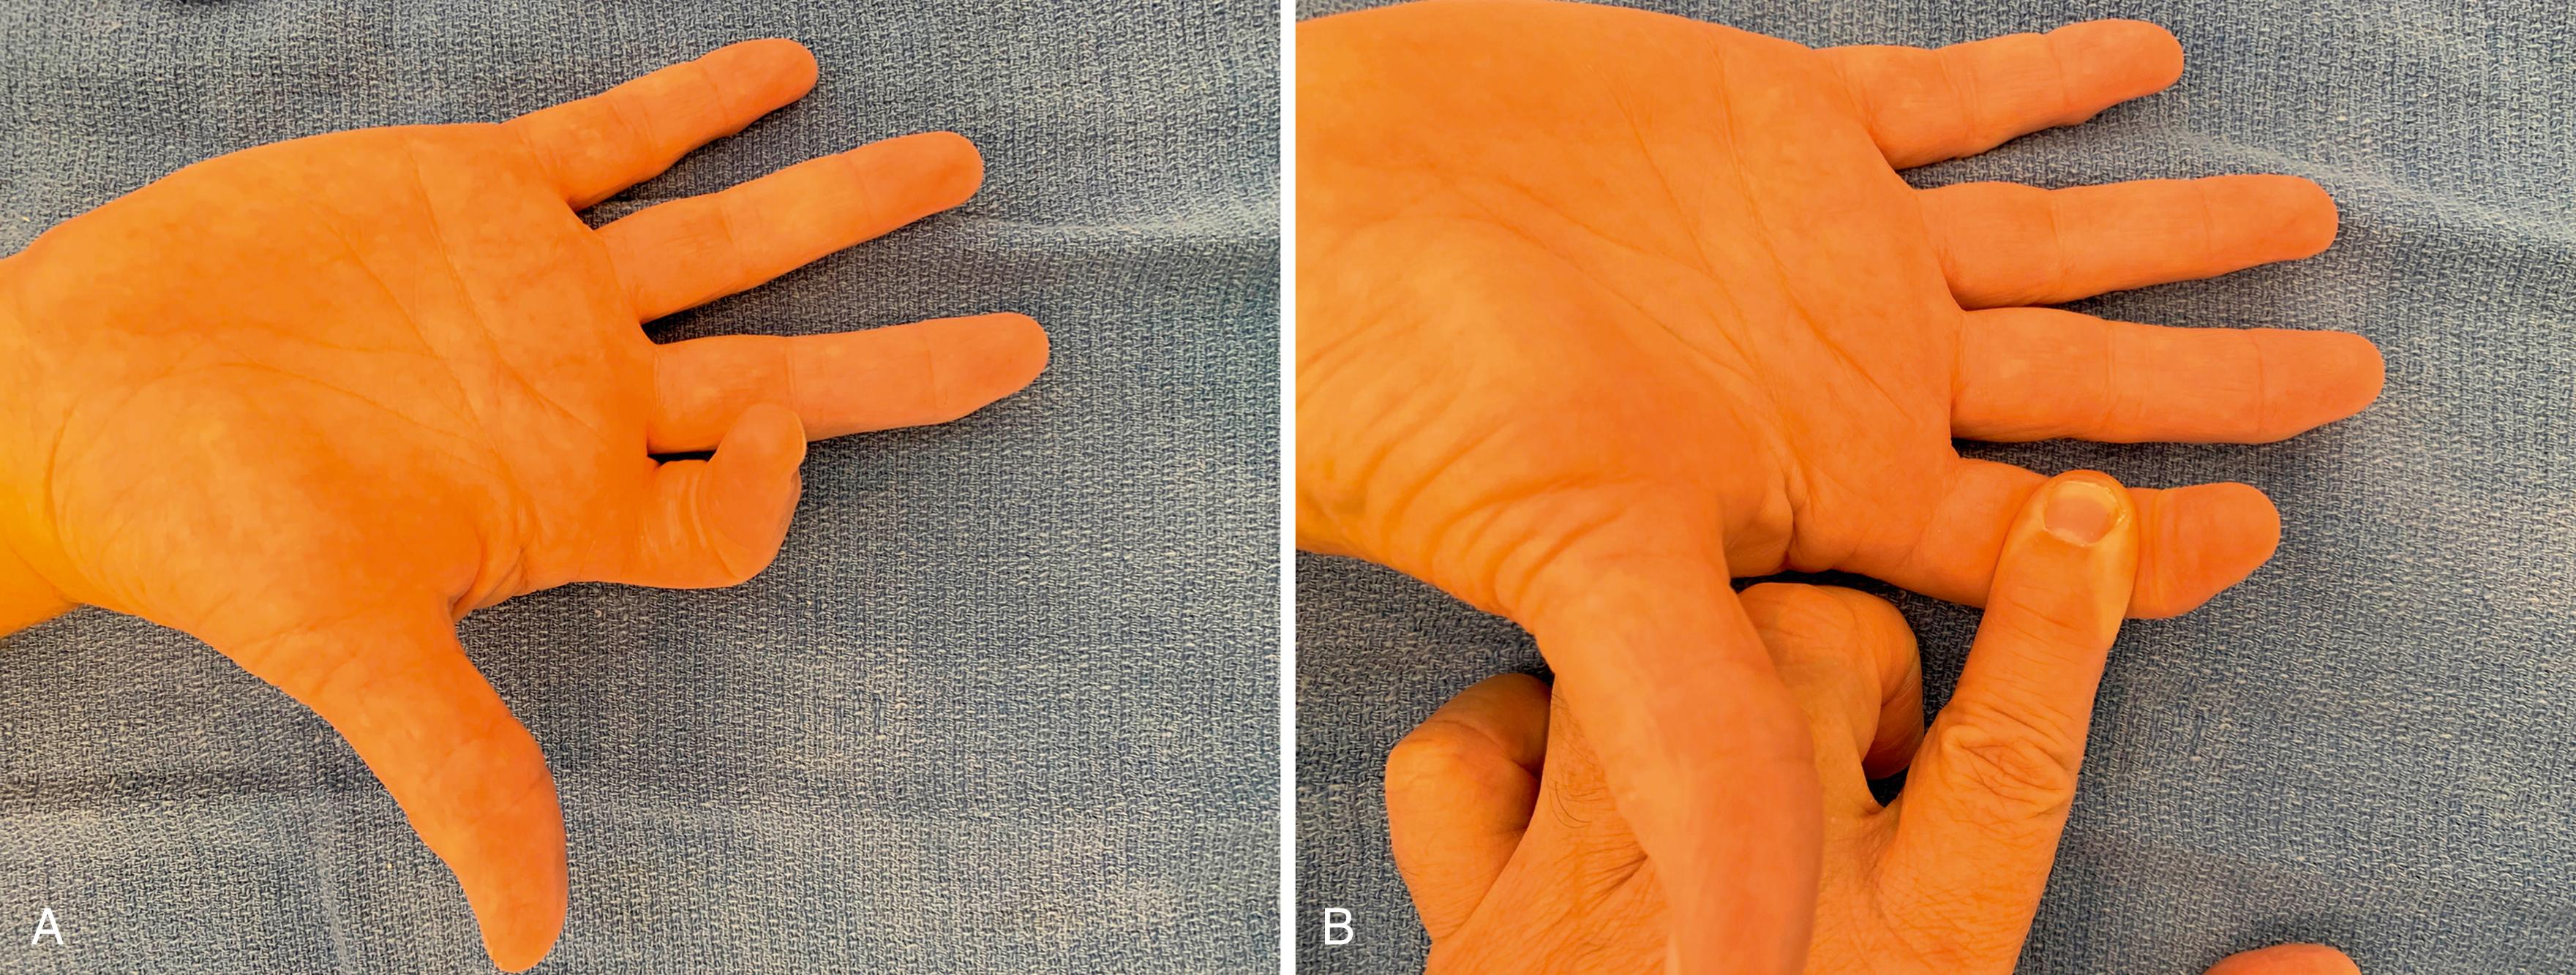
The tendons should be examined individually in each finger. To isolate the flexor digitorum superficialis (FDS) tendon ( Fig. 6.1 ), the adjacent digits are held in full extension or in mild hyperextension by the examiner at the metacarpophalangeal (MCP), PIP, and DIP joints. Active flexion of the PIP joint is evaluated for each digit, and its presence indicates that fibers of the FDS tendon are intact. However, the presence of active flexion does not rule out partial FDS tendon injury. Pain on active flexion may suggest a partial tendon injury. The flexor digitorum profundus (FDP) tendon examination is done by positioning the finger in full extension, stabilizing the middle phalanx against the examining surface, and asking the patient to flex the DIP joint actively. Correlation of the laceration of skin injury, the mechanism of injury, and the physical examination findings will often suggest the presence of a substantial partial tendon injury, which may benefit from elective surgical exploration and possible repair.
An assessment of light touch and static two-point discrimination is preferred; loss of sensation in a digital nerve distribution after a sharp laceration represents a nerve transection until proven otherwise.
Capillary refill of the volar digital pulp and the nail bed is assessed. When necessary, a digital Allen test can be done. Delayed capillary refill or poor turgor may suggest a digital artery laceration.
After a complete evaluation of the skin, skeleton, tendons, nerves, and vascular supply, the evaluating physician can make a judgment regarding the need, timing, and nature of the anticipated surgical repair. The surgeon should be prepared, however, to treat any findings that could be encountered during surgical exploration.
Plain radiographs are usually obtained at the time of initial assessment while the patient is in the emergency department. Diagnostic ultrasound may be useful when the continuity of a flexor tendon is in question or to assess a suspected partial laceration. Intraoperative fluoroscopic images may be useful, especially if indicated by the findings of surgical exploration.
The FDS muscle has two heads of origin. The ulnar head arises from the anterior aspect of the medial epicondyle, the ulnar collateral ligament of the elbow, the medial aspect of the coronoid process, and the proximal ulna. The radial head arises from the proximal radius immediately distal to the insertion of the supinator muscle and lies deep to the pronator teres. The median nerve is loosely adherent to the deep surface of the FDS muscle. At the level of the midforearm, the FDS muscle divides and sends tendons to the middle and ring fingers (superficial) and the index and small fingers (deep). The innervation of the FDS muscle is from the median nerve. The blood supply is from the radial and the ulnar arteries.
The FDP muscle belly arises from the volar and medial aspects of the proximal three-fourths of the ulna and from the interosseous membrane. In the deepest layer of the volar forearm, the FDP muscle lies adjacent to the flexor pollicis longus muscle. The deep muscles may be housed within a distinct and stout fascial envelope. The ulnar nerve innervates the muscle-tendon units of the ring and small fingers. The anterior interosseous branch of the median nerve innervates the FDP muscle-tendon units of the index and/or middle fingers. The blood supply to the FDP muscle is largely from the ulnar artery.
The flexor pollicis longus (FPL) tendon arises from the volar aspect of the middle third of the radial shaft and from the lateral aspect of the interosseous membrane. The anterior interosseous branch of the median nerve innervates the FPL muscle belly in the proximal forearm or midforearm. The blood supply of the FPL muscle is predominantly from the radial artery.
The tendons of the nine digital flexors enter the proximal aspect of the carpal tunnel in a fairly constant relationship. The most superficial tendons are the FDS tendons to the long and ring fingers. Immediately beneath them are the FDS tendons to the index and little fingers. In the deepest layer are four FDP tendons and the FPL.
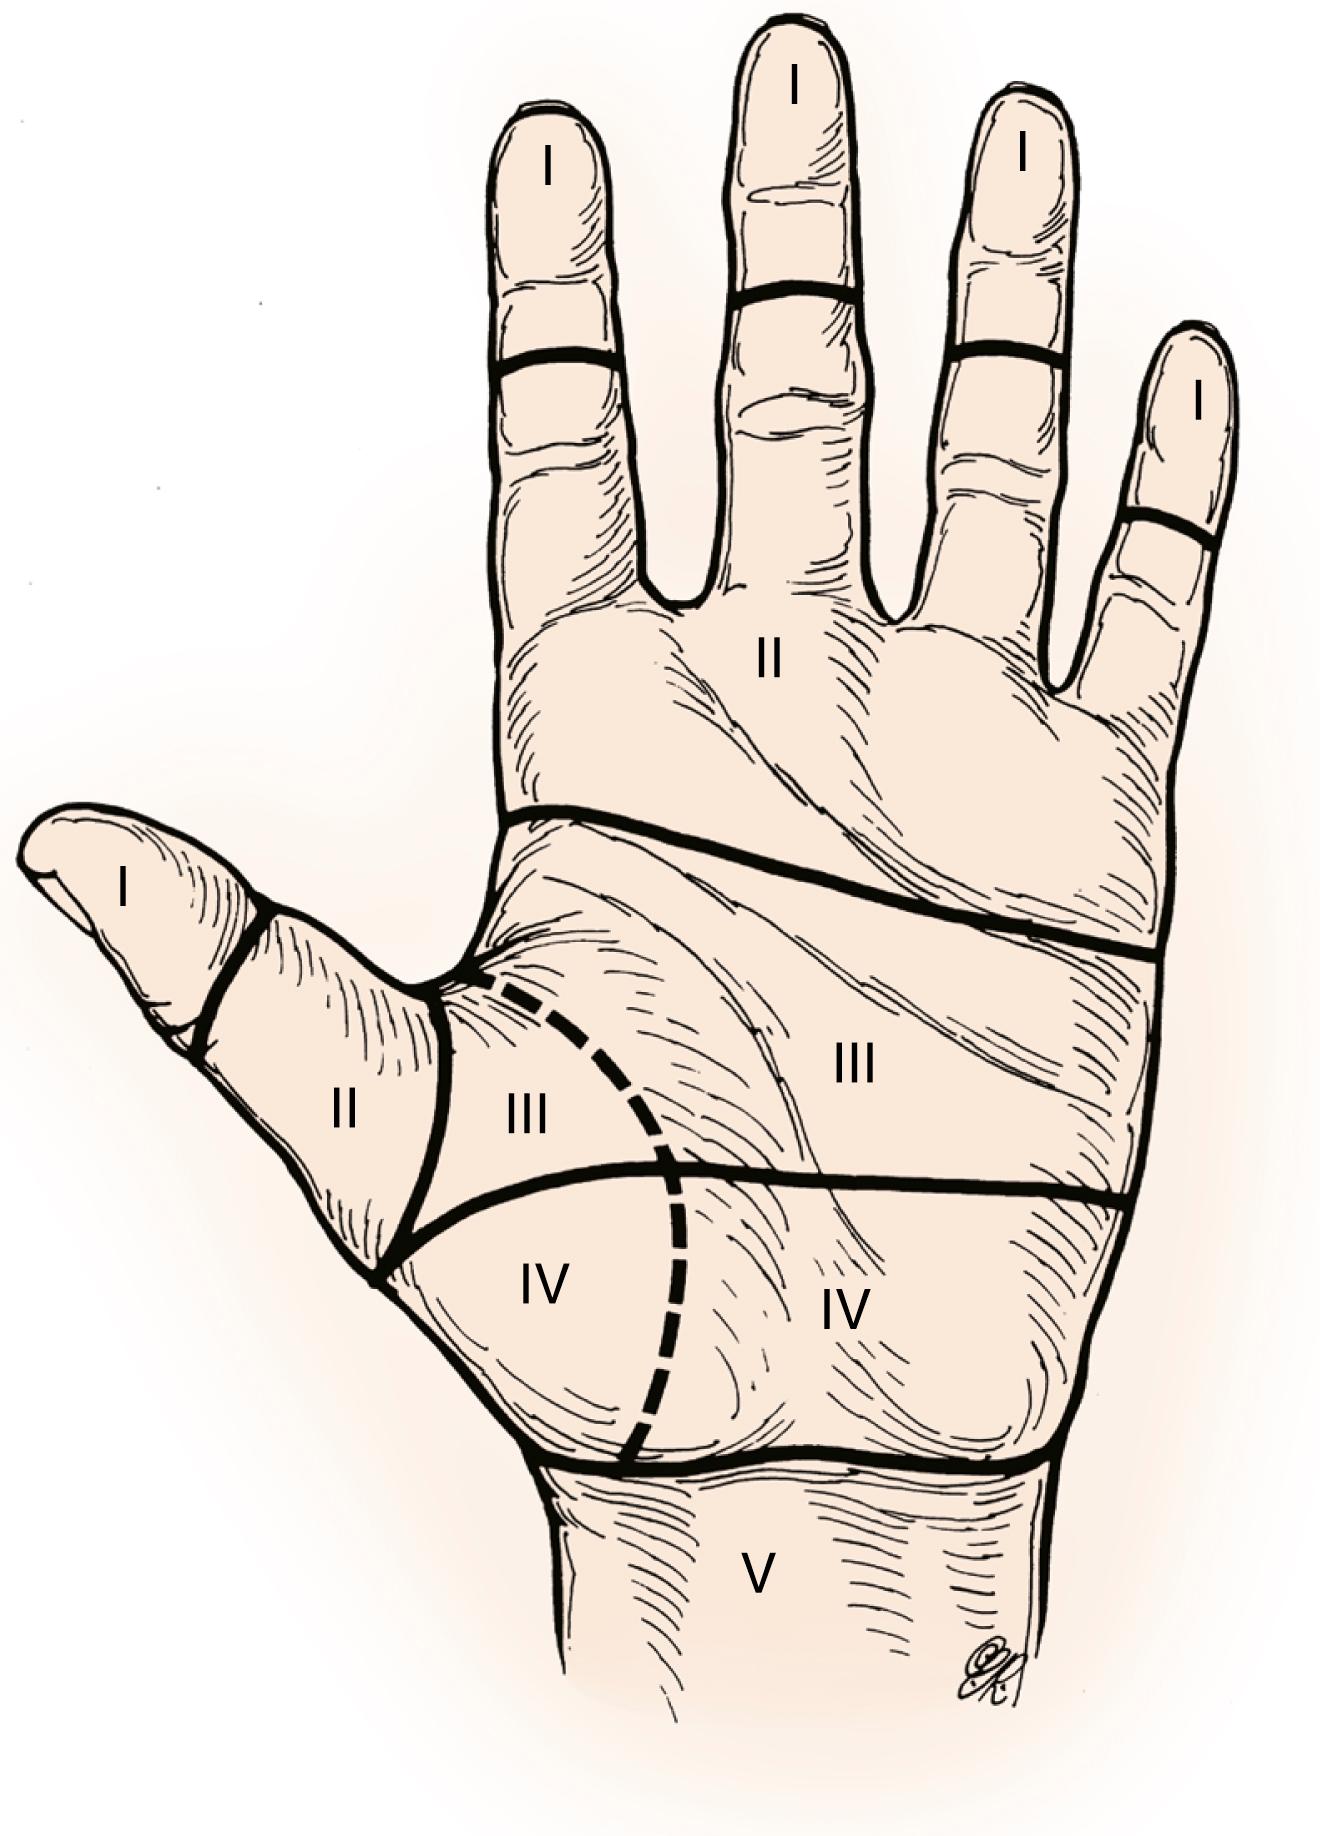
Kleinert and colleagues and Verdan used their knowledge of anatomy to develop a classification of tendon injuries into five anatomic zones ( Fig. 6.2 ). Zone 5 extends from the muscle-tendon junction to the proximal aspect of the carpal tunnel, and zone 4 describes the flexor tendons within the carpal tunnel. Distal to the transverse carpal ligament at approximately the level of the superficial palmar vascular arch, the lumbrical tendons take their origin from the FDP tendons. Zone 3 denotes the origin of the lumbricals from the FDP tendon. The proximal aspect of the A1 pulley is the entrance to zone 2, or “no man’s land.” Zone 1 is distal to the insertion of the FDS tendon. A laceration in zone 1, by definition, injures only the tendon of the FDP. This classification of tendon injury, by anatomic zone, is still in use today.
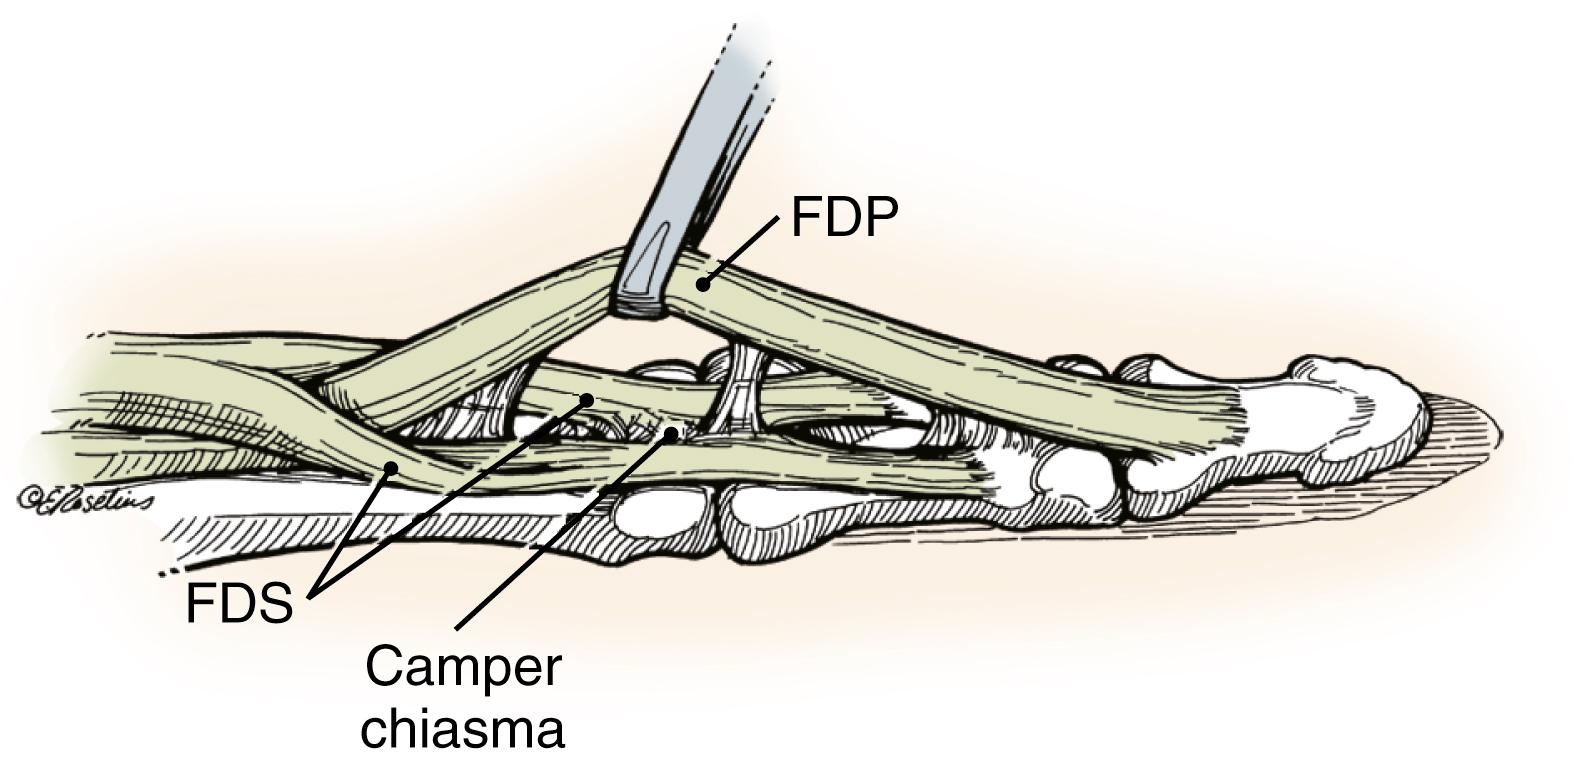
In each finger, the FDS tendon enters the A1 pulley and divides into two equal halves that rotate laterally and then dorsally (180 degrees) around the FDP tendon ( Fig. 6.3 ). The two slips rejoin deep to the FDP tendon over the distal aspect of the proximal phalanx and the palmar plate of the PIP joint at the Camper chiasm and then insert as two discrete separate slips inserting on the volar aspect of the middle phalanx.
Zones 1 and 2 of the FDS and FDP tendons are described by the fibroosseous digital sheath ( Fig. 6.4 ). Within this sheath, the flexor tendons are covered by a layer of flattened fibroblasts termed the epitenon. This specialized surface is the crucial gliding surface that must be restored for flexor tendon repair to be successful.
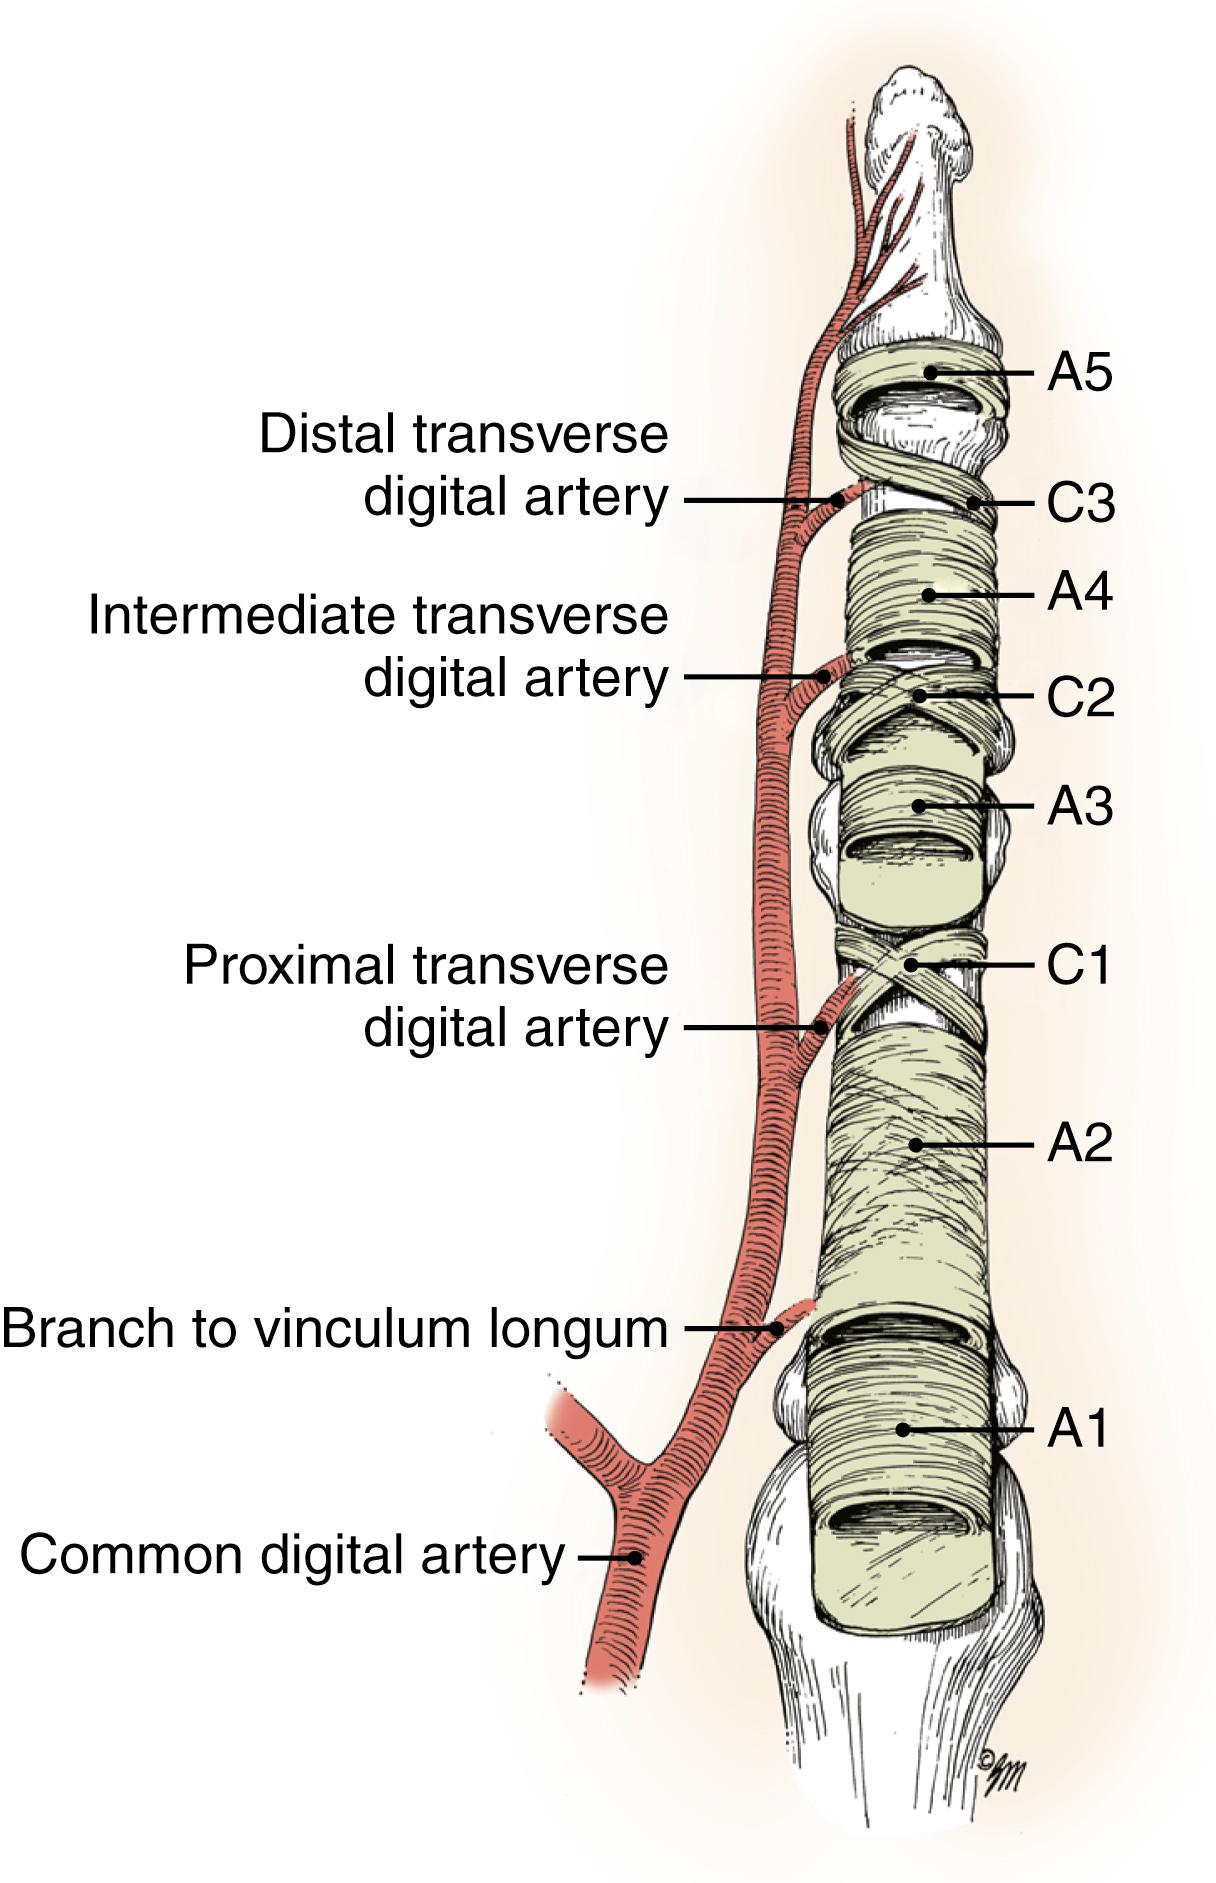
The pulley mechanism of the flexor sheath consists of thicker annular pulleys and thinner, more flexible cruciform pulleys. , , The annular pulleys are stiffer and keep the tendon closely applied to the underlying bone. Their form and function allow an economical amount of tendon excursion to effect a significant amount of joint angular rotation, improving the efficiency of the flexor apparatus. , Structural analysis of these pulleys has suggested that each of the three layers of the pulley has a strategic purpose. The innermost layer secretes hyaluronic acid and is designed to facilitate gliding. The middle layer, rich in collagen, resists palmar translation of the tendons. The outer areolar layer facilitates nutrition of the pulley. The cruciform pulleys are collapsible and can “accordion,” or collapse, to allow for digital flexion to occur without significant deformation of the annular pulley system (see Fig. 6.4 ). The A1, A3, and A5 pulleys take origin from the palmar plates of the MCP, PIP, and DIP joints. The A2 pulley originates from the proximal third of the proximal phalanx, and the A4 pulley originates from the middle phalanx.
The dual nutritional supply of the digital flexor tendons in zone 2 is from vascular perfusion and synovial diffusion ( Fig. 6.5 ). , The parietal paratenon allows for passive nutrient delivery to, and waste removal from, the flexor tendon within the flexor sheath by means of diffusion. The flexor tendons receive a direct arterial supply from the well-developed vincular system, osseous bony insertions, reflected vessels from the tendon sheath, and longitudinal vessels from the palm. The system of blood supply allows delivery of nutrients and removal of wastes.
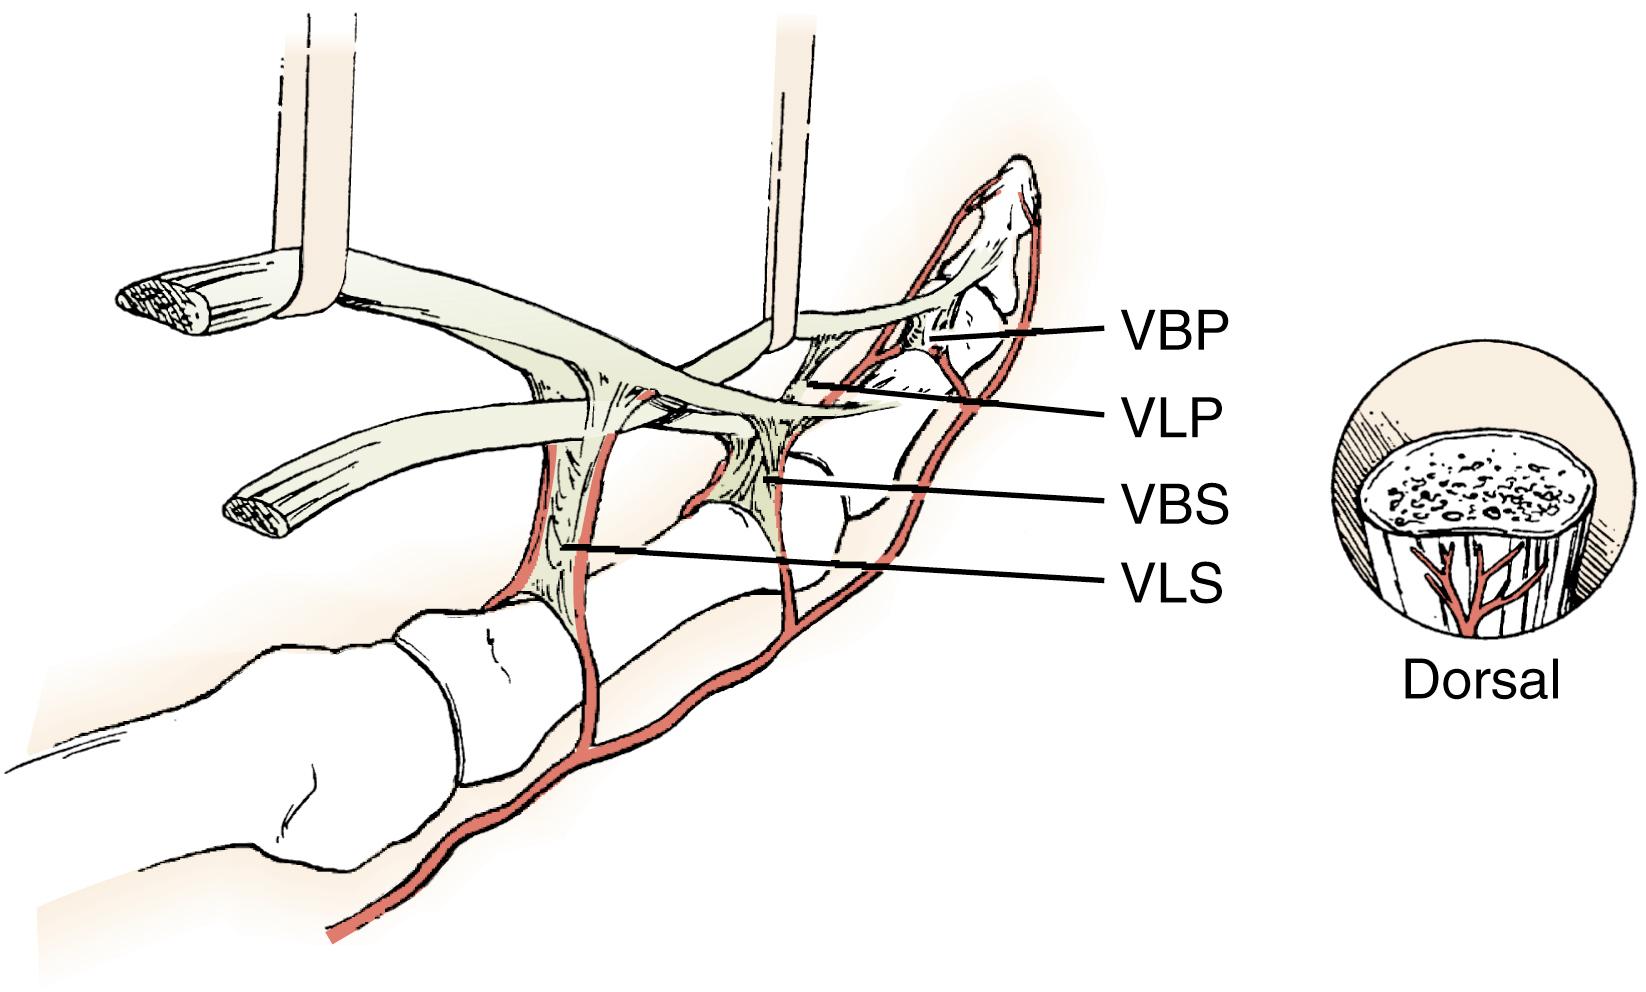
Optimal timing of flexor tendon repair depends on the findings of a thorough history and physical examination. Emergency repair of the lacerated tendons is indicated only in the setting of altered digital perfusion that requires microvascular repair or reconstruction. If digital perfusion is compromised, or if the mechanism of injury is consistent with injury to arteries, urgent exploration and tendon repair with microvascular digital artery and nerve repair are indicated.
Primary repair done within days of the injury allows for adequate preparation of the patient, education on therapy and postoperative protocols, and optimal conditions for the procedure. Basic science and clinical evidence suggest that it is preferable to perform tendon repair early after injury. Undue delay can be associated with changes in the tendon ends and proximal muscle that make primary tendon repair difficult. Done promptly after injury, the wound is easier to manage and the tendon ends are fresh for the repair.
In some cases of delayed presentation, or when the patient provides an unreliable history, the interval between injury and diagnosis may be unknown. In these cases, adequate preoperative consideration should be given to the possible need for tendon reconstruction and tendon repair. These more complicated cases may require the use of a primary tendon graft or placement of a silicon tendon spacer, anticipating a secondary tendon reconstruction.
In some settings, repair of both tendons is impossible. If the tendon ends are severely injured, unclean, or ragged, or if there is insufficient tendon for repair, excision of the FDS tendon and isolated repair of the FDP tendon may be the best alternative. , , Isolated repair of the FDP tendon creates a simpler finger and is generally associated with diminished adhesion formation in a severely traumatized digit. In cases where only repair of the FDS tendon is possible, FDP tenodesis to the middle phalanx or DIP joint fusion may be necessary. Generally, repair of both tendons is preferable for optimal gliding and strength. In select cases, excision of one slip of the FDS tendon or venting of an annular pulley may be necessary to diminish the bulk of the repair and facilitate gliding through the tendon sheath. The need for repair of the flexor sheath is controversial. ,
Laceration of the FDP tendon distal to the insertion of the FDS tendon or avulsion from its insertion at the base of the proximal aspect of the distal phalanx is a zone 1 injury. If the tendon is lacerated and the distal tendon stump is less than 1 cm long, FDP tendon advancement and primary repair to bone is usually indicated. If more than 1 cm of distal FDP stump is available for suture, primary tendon repair is performed to avoid unnecessary shortening of the flexor tendon and a potential “quadriga effect” on the intact FDP tendons.
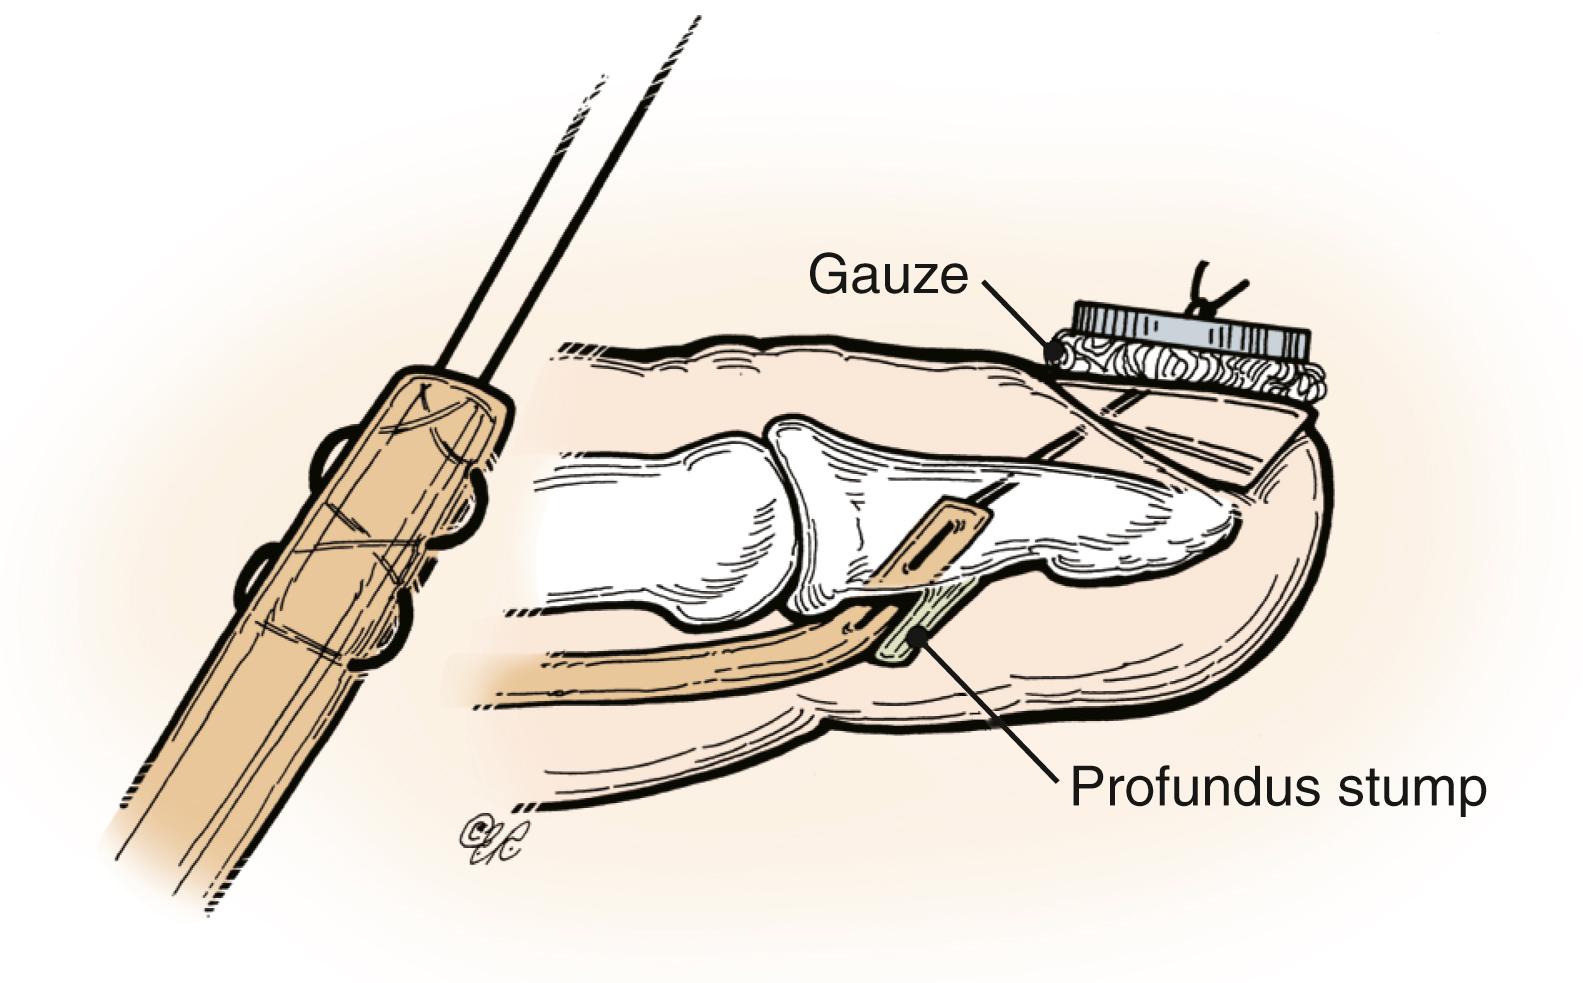
The many techniques for tendon-to-bone repair can be divided into two general types: traditional pull-out suture methods and internal suture methods. Traditional methods of FDP tendon repair to bone call for the placement of a core suture in the proximal tendon and using the free ends of the suture to secure the cut end of the tendon into a small trough in the distal phalanx. The free ends of the sutures are passed through or around the distal phalanx and through the sterile matrix and nail plate and tied over the dorsum of the fingernail ( Fig. 6.6 ). This “pull-out suture” usually is removed approximately 6 weeks after the procedure. All internal suture methods use suture anchors or other methods to affix the tendon directly to the bone. The development of miniature anchors, appropriate for deployment into the distal phalanx, has improved our ability to use newer core suture types, that is, four-strand tendon repairs, so as to fix the tendon to the distal phalanx in a stable manner. Whatever technique is used, it is essential that the FDP stump be secured directly to the footprint in the distal phalanx when the knot is secured.
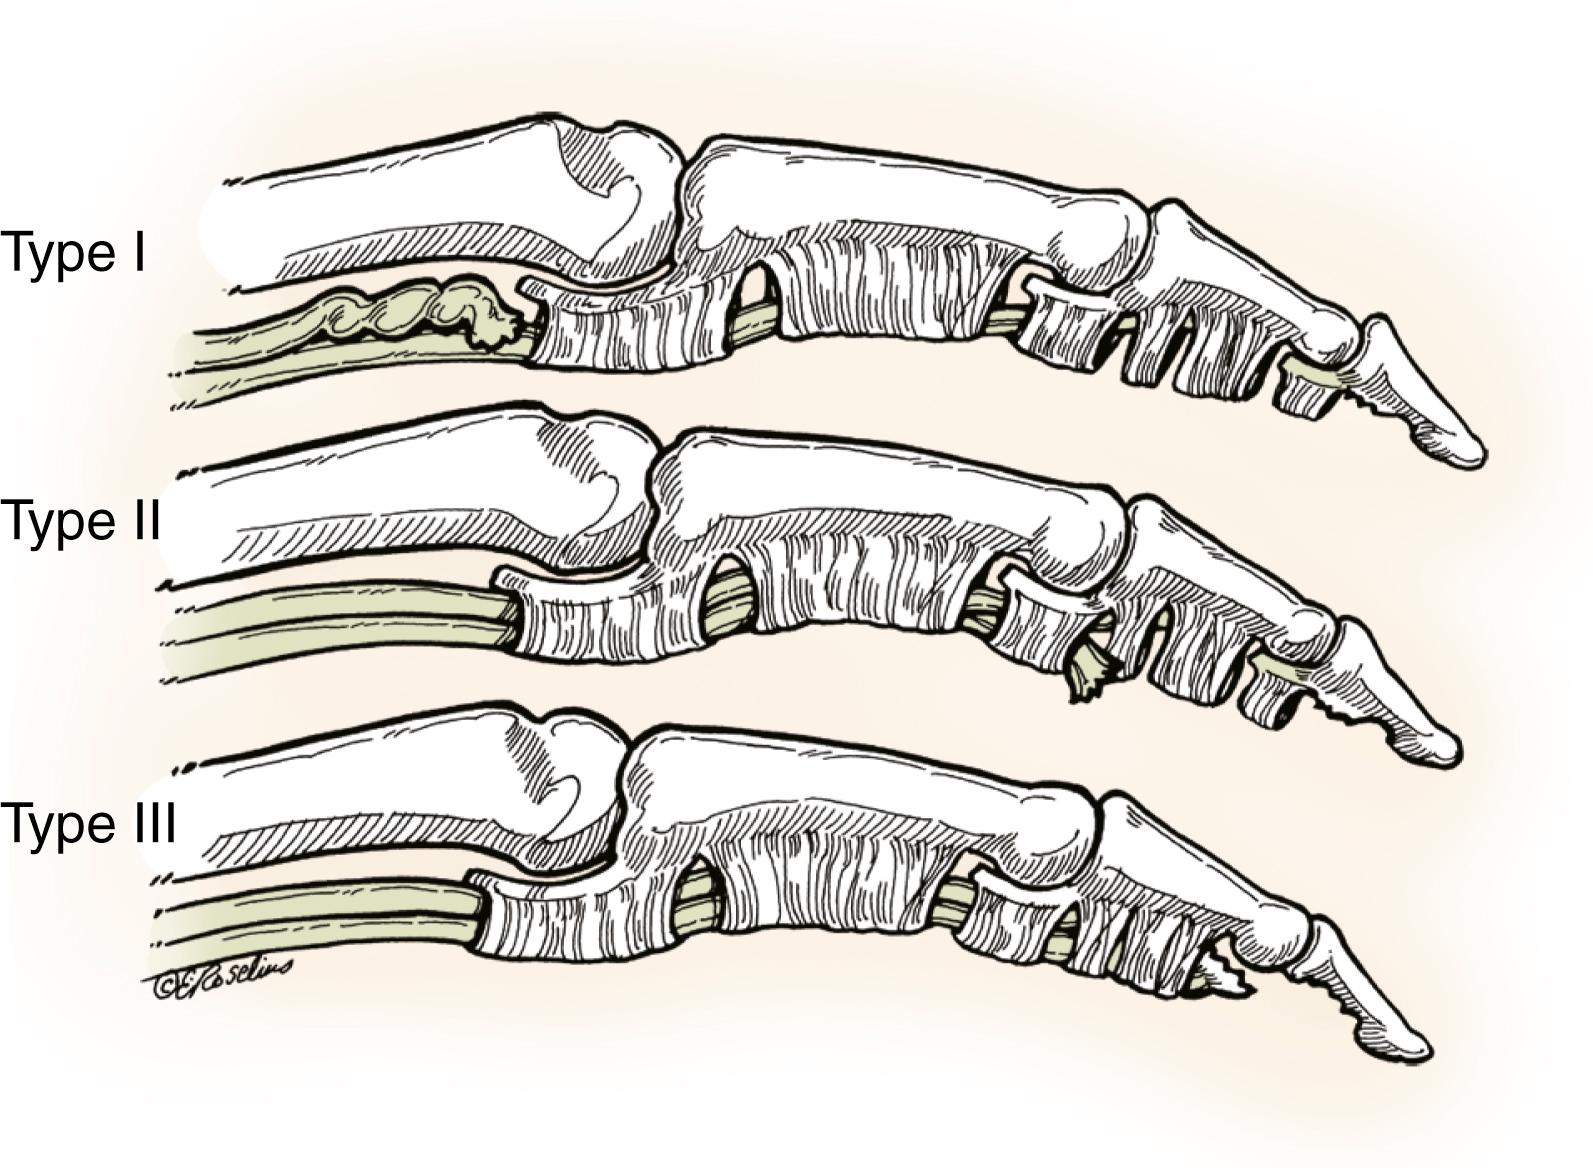
Leddy and Packer classified FDP avulsions into three types ( Fig. 6.7 ). In type I avulsions, the FDP tendon retracts into the palm, and the vincular blood supply of the tendon has been disrupted. These injuries are best treated by urgent surgical repair. In type II avulsions, the tendon stump retracts to the level of the PIP joint and some vincular blood supply is preserved. In some type II cases, a primary tendon repair may be done 6 weeks after injury. A large bone fragment is attached to the stump of the FDP tendon in type III injuries. This fragment usually prevents tendon retraction proximal to the distal edge of the A4 pulley. Fracture repair using Kirschner wire or miniature screw fixation is necessary for treatment of this injury. Since Leddy and Packer’s description was created, a fourth type of injury has been identified. A type IV injury is defined as a fracture and avulsion of the FDP tendon from the fracture fragment. The stump may be located either within the tendon sheath or within the palm. Suspicion of this injury can be confirmed with advanced digital imaging; either ultrasound or magnetic resonance imaging (MRI) is appropriate. Repair of the fracture is done first, after which the tendon is advanced and affixed to the distal phalanx. In some cases with a small fracture fragment, the bone may be excised, and the tendon may be advanced and sutured into the distal phalanx. Generally, this type IV injury is more severe and may be associated with a poorer outcome. Because the initial radiographic findings may be inconsistent with the proximal location of the flexor tendon, I recommend that all flexor tendon avulsion injuries be treated by early repair when possible; if that is not feasible, advanced imaging should be performed.
Attempts to improve the strength of flexor tendon repairs have focused on strategies to vary the material properties of the suture, the suture caliber, and the suture technique to coapt the tendon ends accurately. A smooth tendon suture is important for restoration of a low-friction gliding surface and facilitates tendon rehabilitation. Generally, surgeons need to master a method that allows for atraumatic suture placement and stable, accurate coaptation of the tendon ends. The method of tendon coaptation must be strong enough to allow early digital mobilization and prevent gapping of the repaired tendon.
Ex vivo and in vivo investigations in clinically relevant models have suggested that core suture configurations with the greatest tensile strength are those in which there are multiple sites of tendon-suture interaction. Although two-strand suture methods (Kessler and modified Kessler and Tajima techniques) still enjoy widespread acceptance, newer multistrand suture methods (Strickland, cruciate, Becker, Savage, and Winters) are being used with increasing frequency because they are stronger and have increased resistance to repair site gapping ( Figs. 6.8 and 6.9 ; ![]() ). These more modern methods of core tendon suture placement have been shown not only to offer greater initial repair site tensile strength but also to improve strength 6 weeks postoperatively. Maintenance of repair site strength allows for the early application of increased load to the repair site and rehabilitation methods that improve early tendon excursion.
). These more modern methods of core tendon suture placement have been shown not only to offer greater initial repair site tensile strength but also to improve strength 6 weeks postoperatively. Maintenance of repair site strength allows for the early application of increased load to the repair site and rehabilitation methods that improve early tendon excursion.
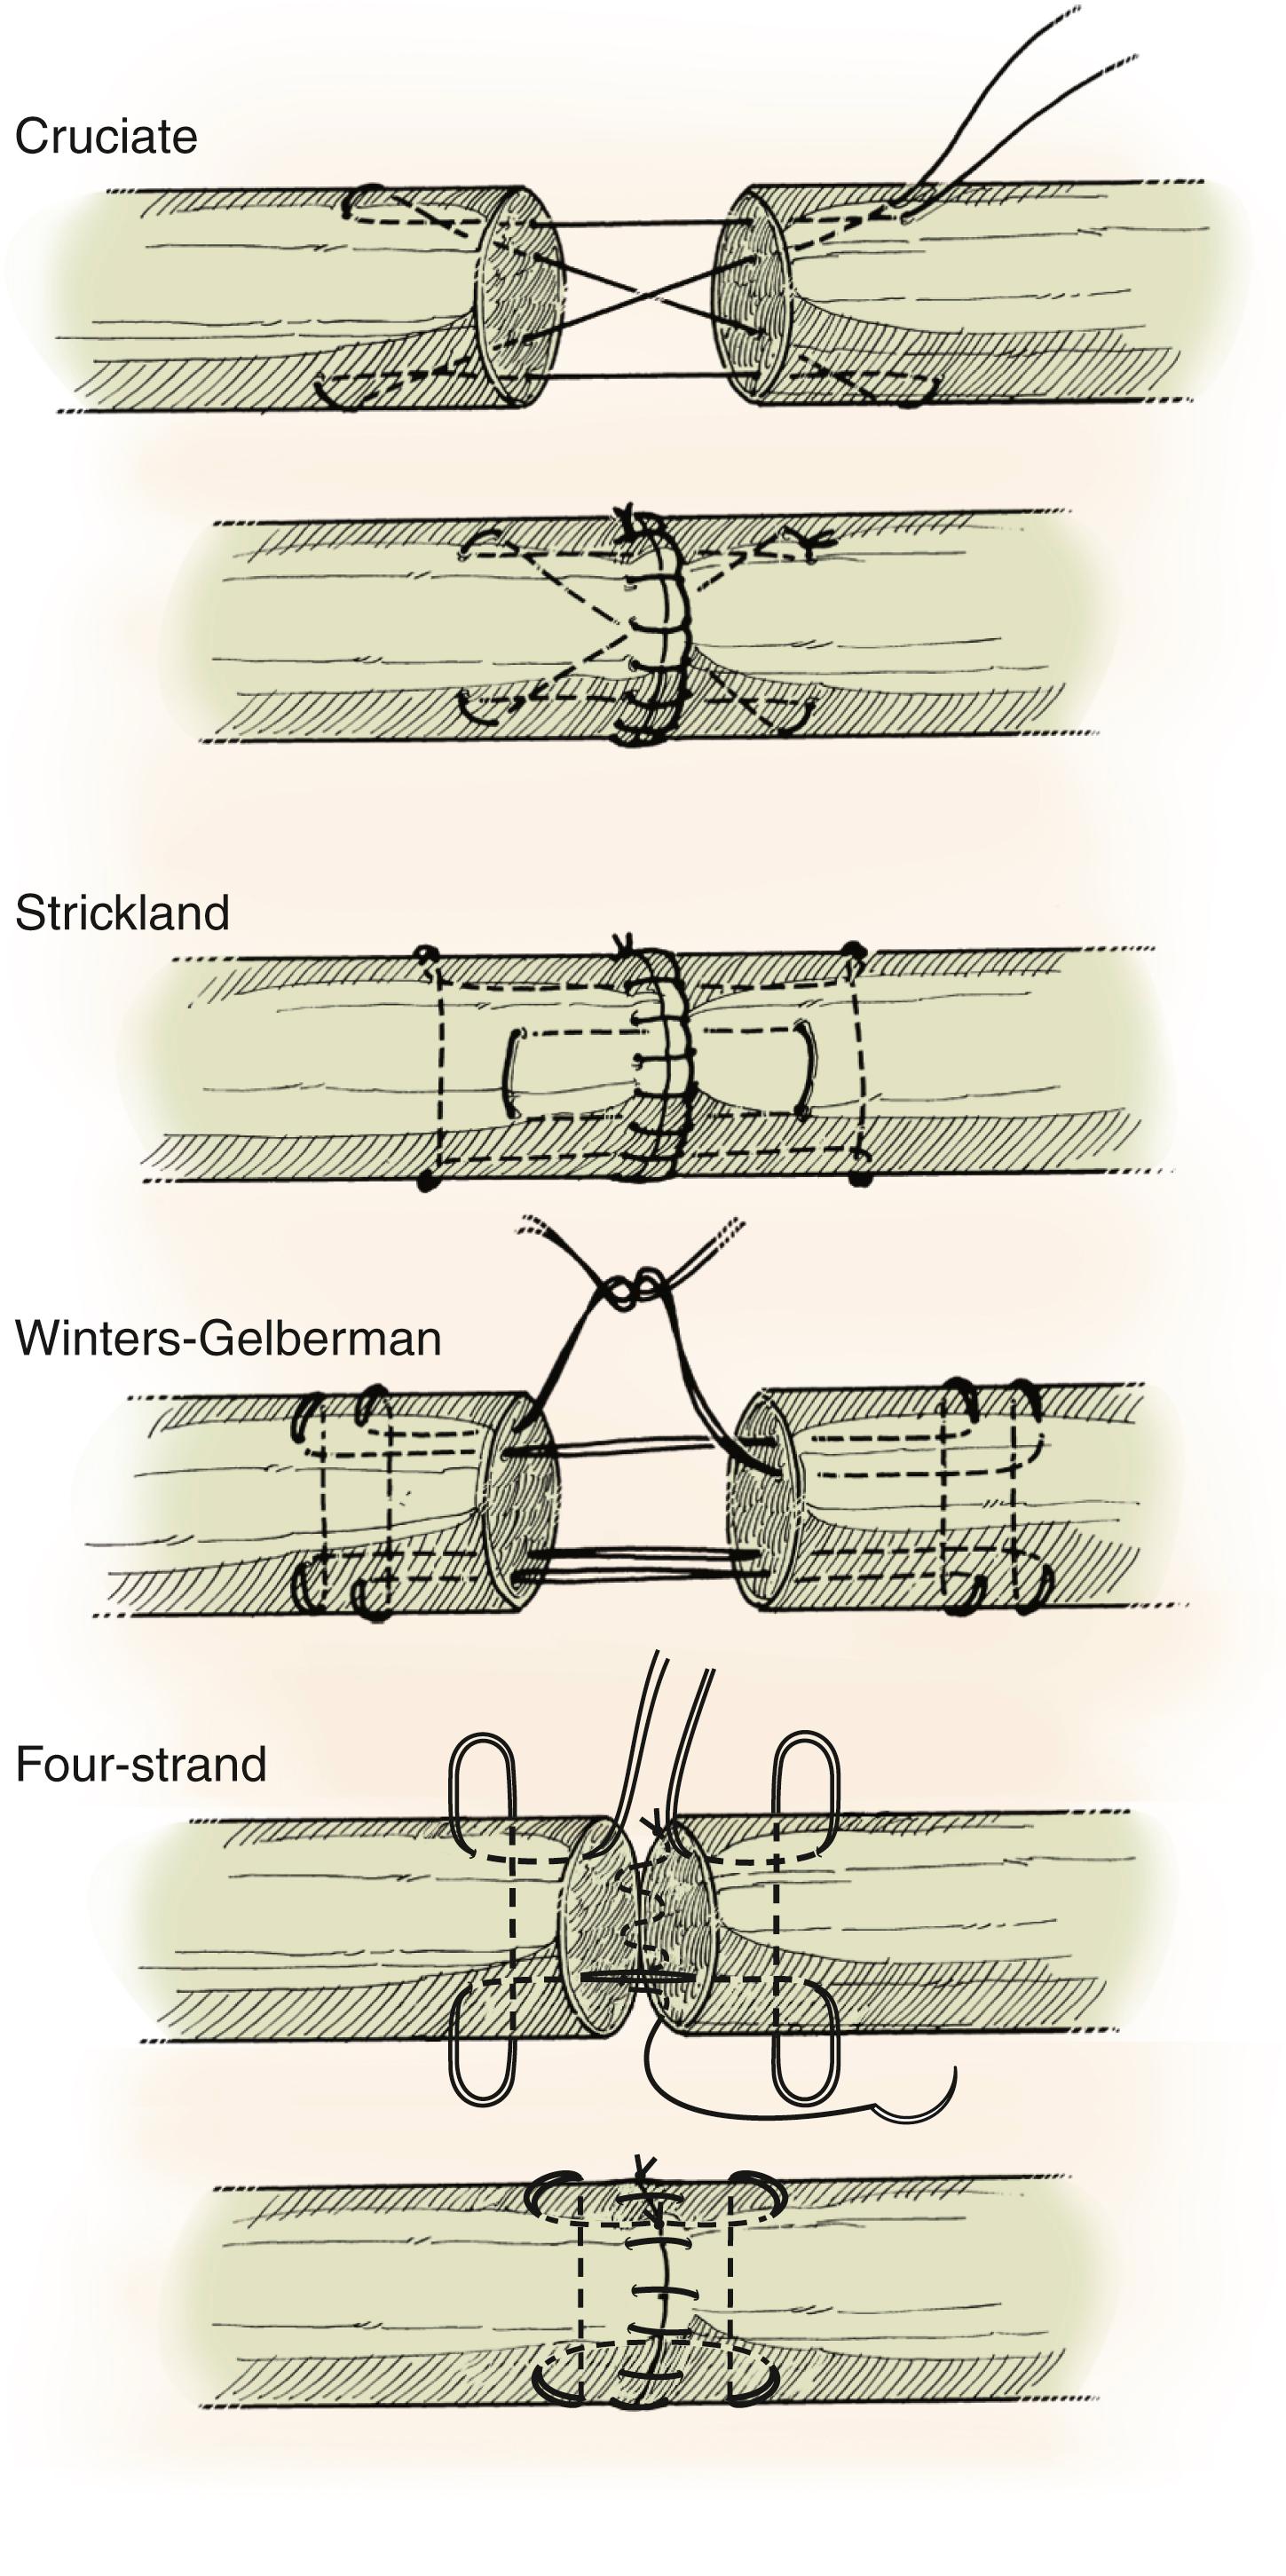
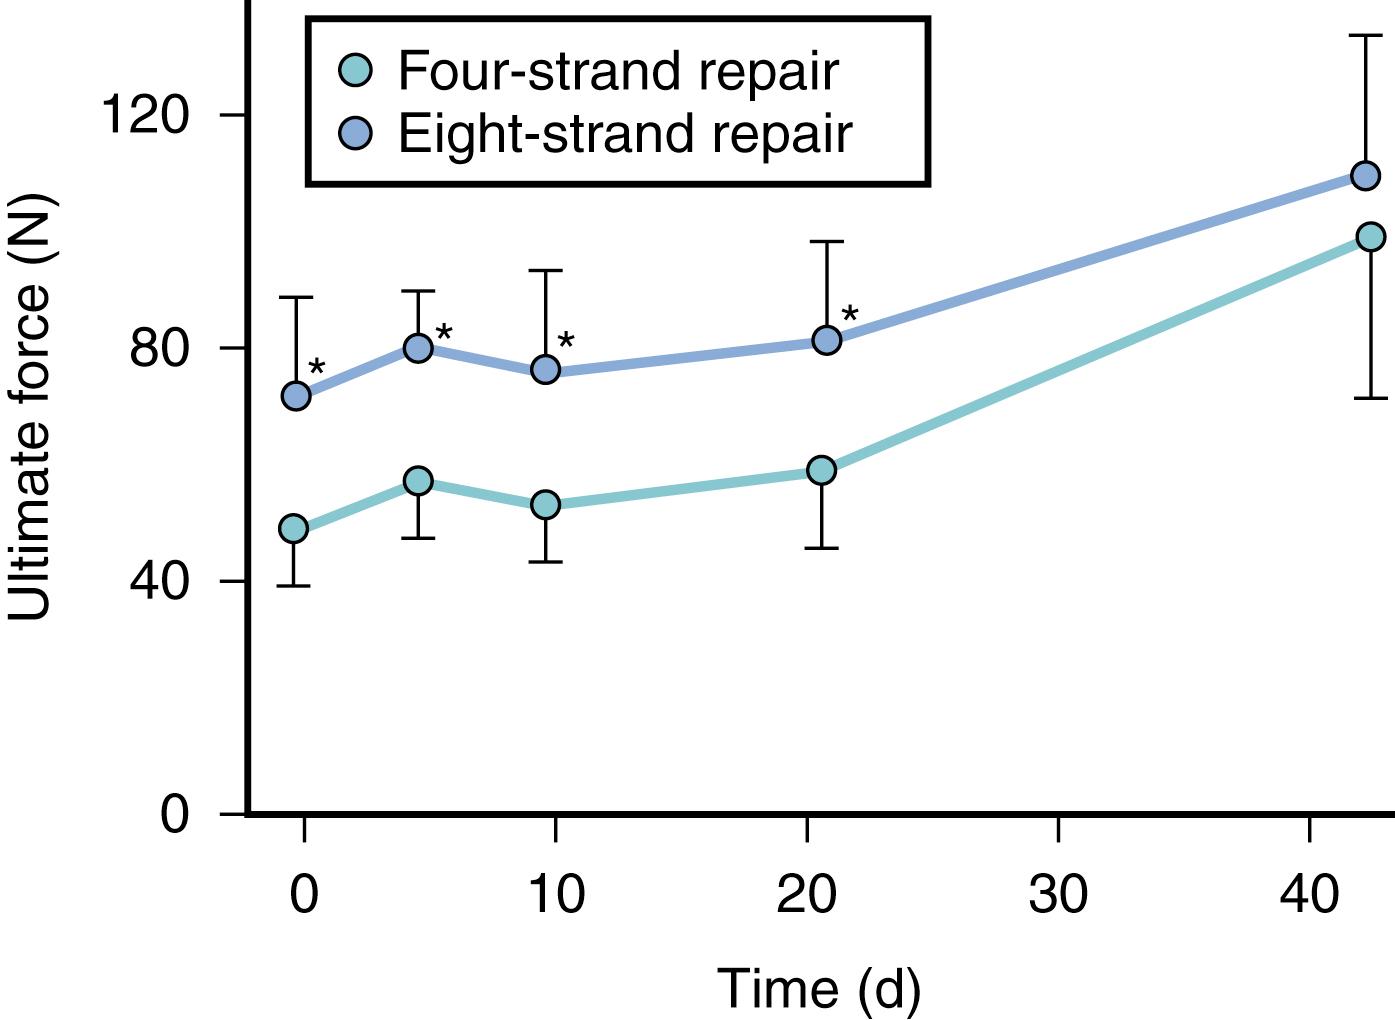
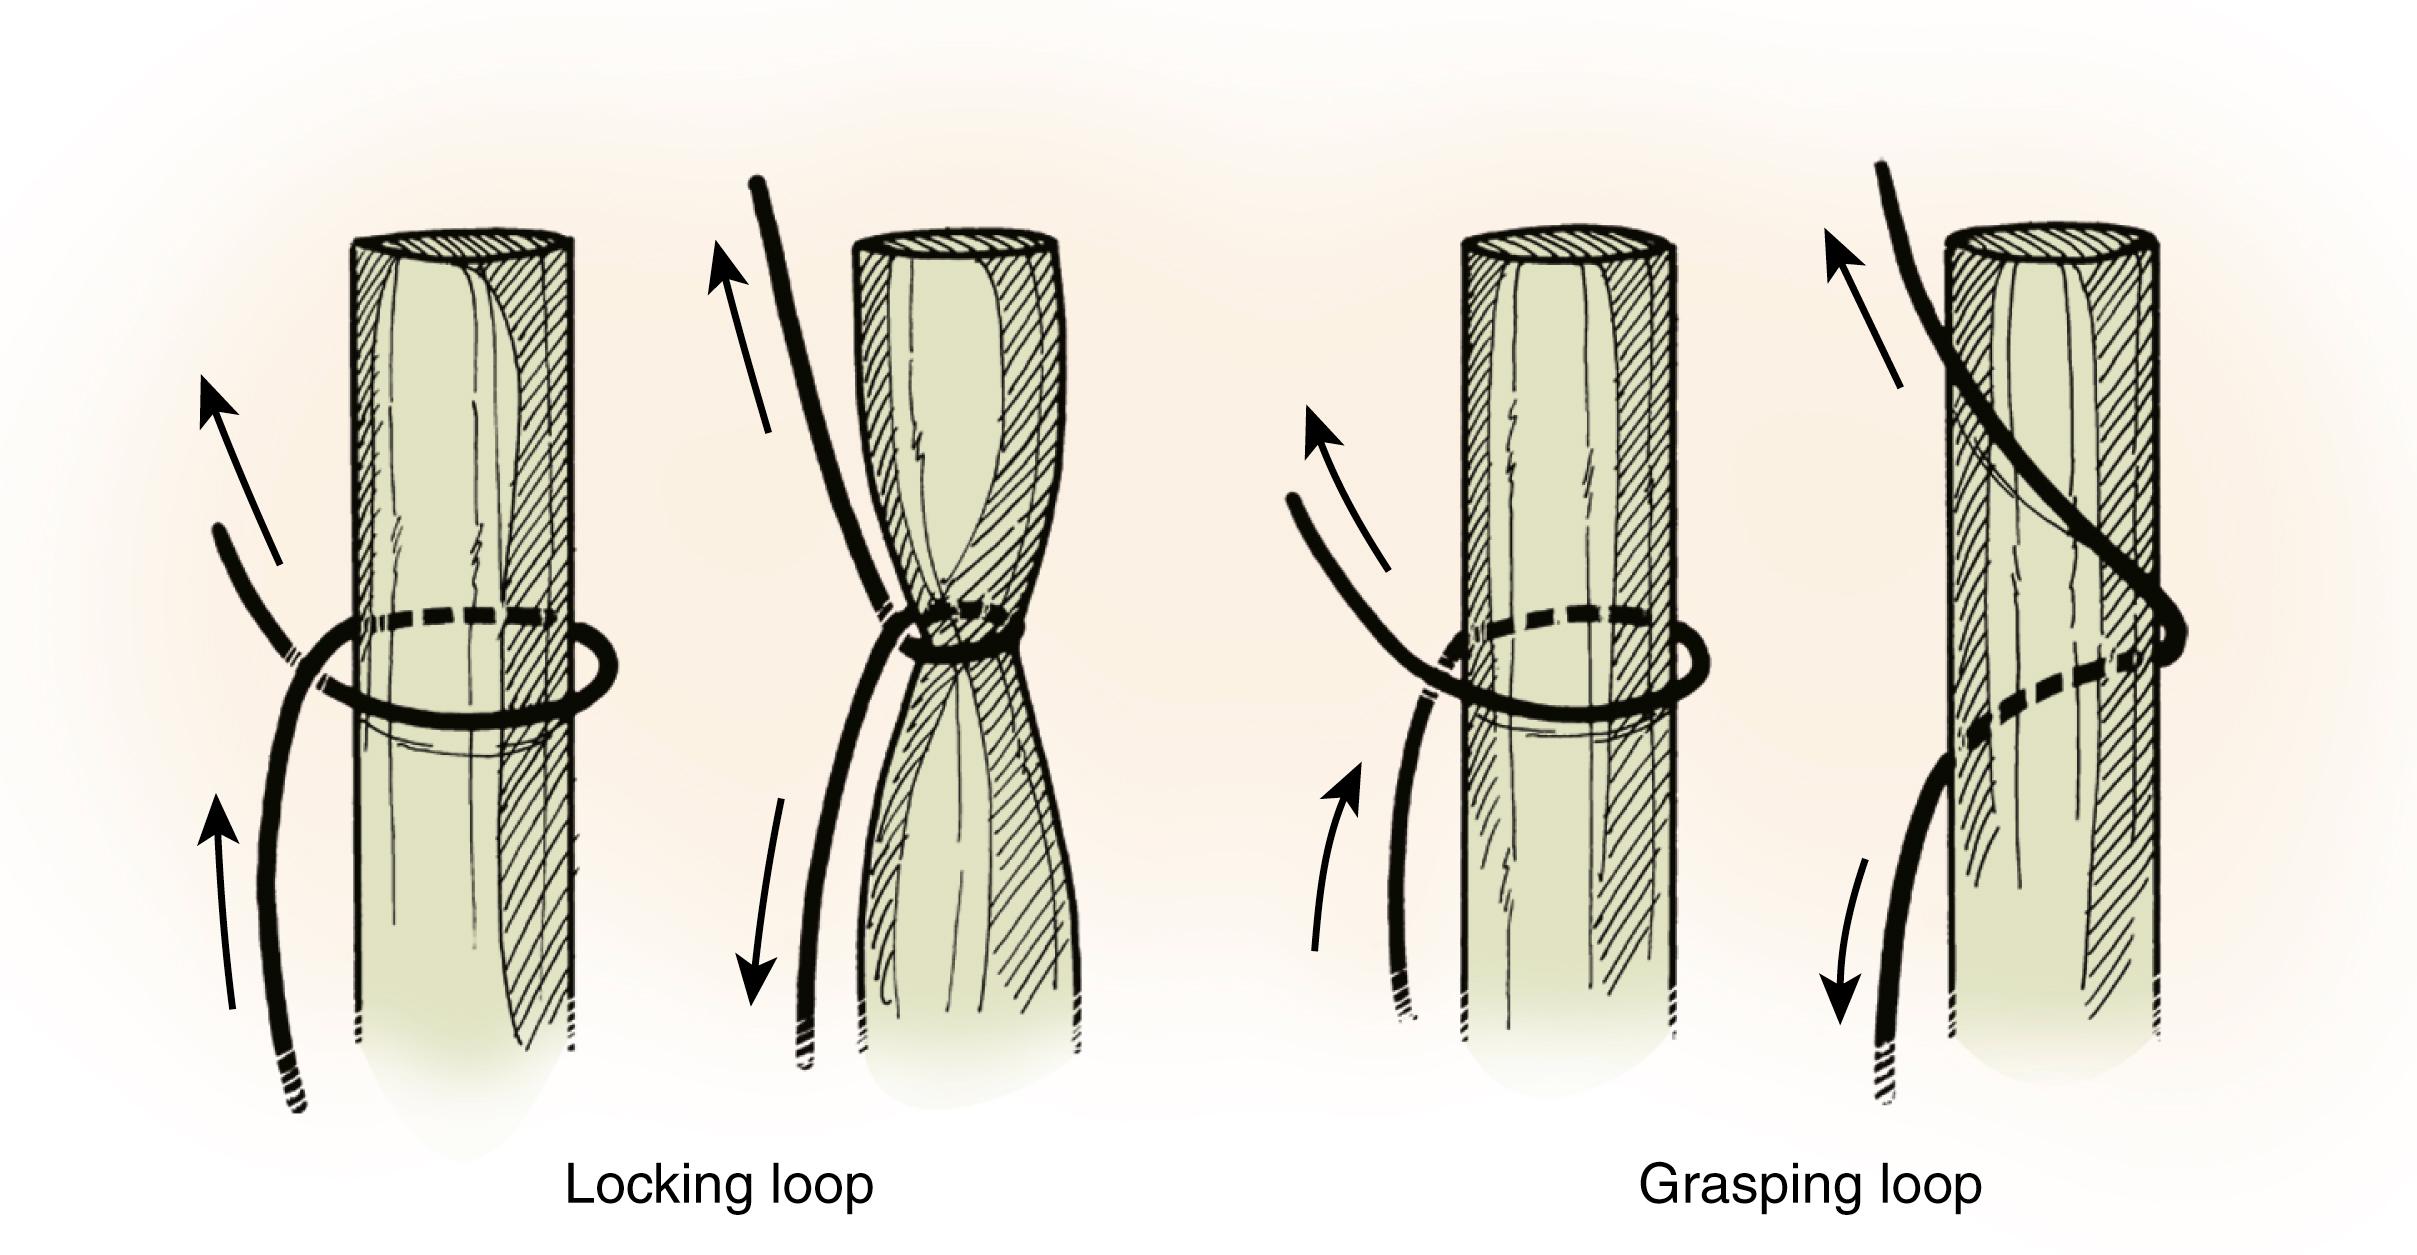
It is well accepted that core suture strength is related to the type of suture material, the caliber of the suture, and the number of suture strands crossing the repair site. This concept holds true in time-zero mechanical studies and in clinical studies for the first 6 weeks after repair. The practical limitation of the more esoteric repairs is the time required and the complexity of suture placement in a small space using a minimally traumatic technique. Most surgeons choose the suture size based on the caliber of the tendon to be repaired because a 3-0 suture shows increased strength compared with a 4-0 suture. Ex vivo studies have shown that the loop of the core suture that is positioned to “lock” rather than “grasp” the tendon stumps shows greater time-zero strength. Similarly, increasing the number of locks or grasps increases the time-zero tensile strength ( Fig. 6.10 ).
The placement of the suture knot either within or away from the repair site has not been shown to have an independent effect on tensile strength. Greater quantity of suture within the repair site may increase repair site bulk, increase the work of flexion, and diminish the surface area available for repair. External knot placement distant to the repair site may also adversely affect tendon gliding within the flexor tendon sheath by causing increased friction or knot trapping between tendon and sheath. ,
Initially proposed as a method to smooth the site of tendon repair, epitendinous, or circumferential, suture has been shown to augment repair site strength. Diao and colleagues and others have shown that by making the suture deeper or by altering the configuration, there is some improvement in repair site strength. , Although the circumferential suture can increase the initial and early postoperative strength of the repair site, it remains an adjunct to core tendon suture. In some cases, placement of the circumferential suture first (at least in the dorsalmost aspect of the tendon repair) can facilitate tendon orientation and make placement and tensioning of the core suture easier.
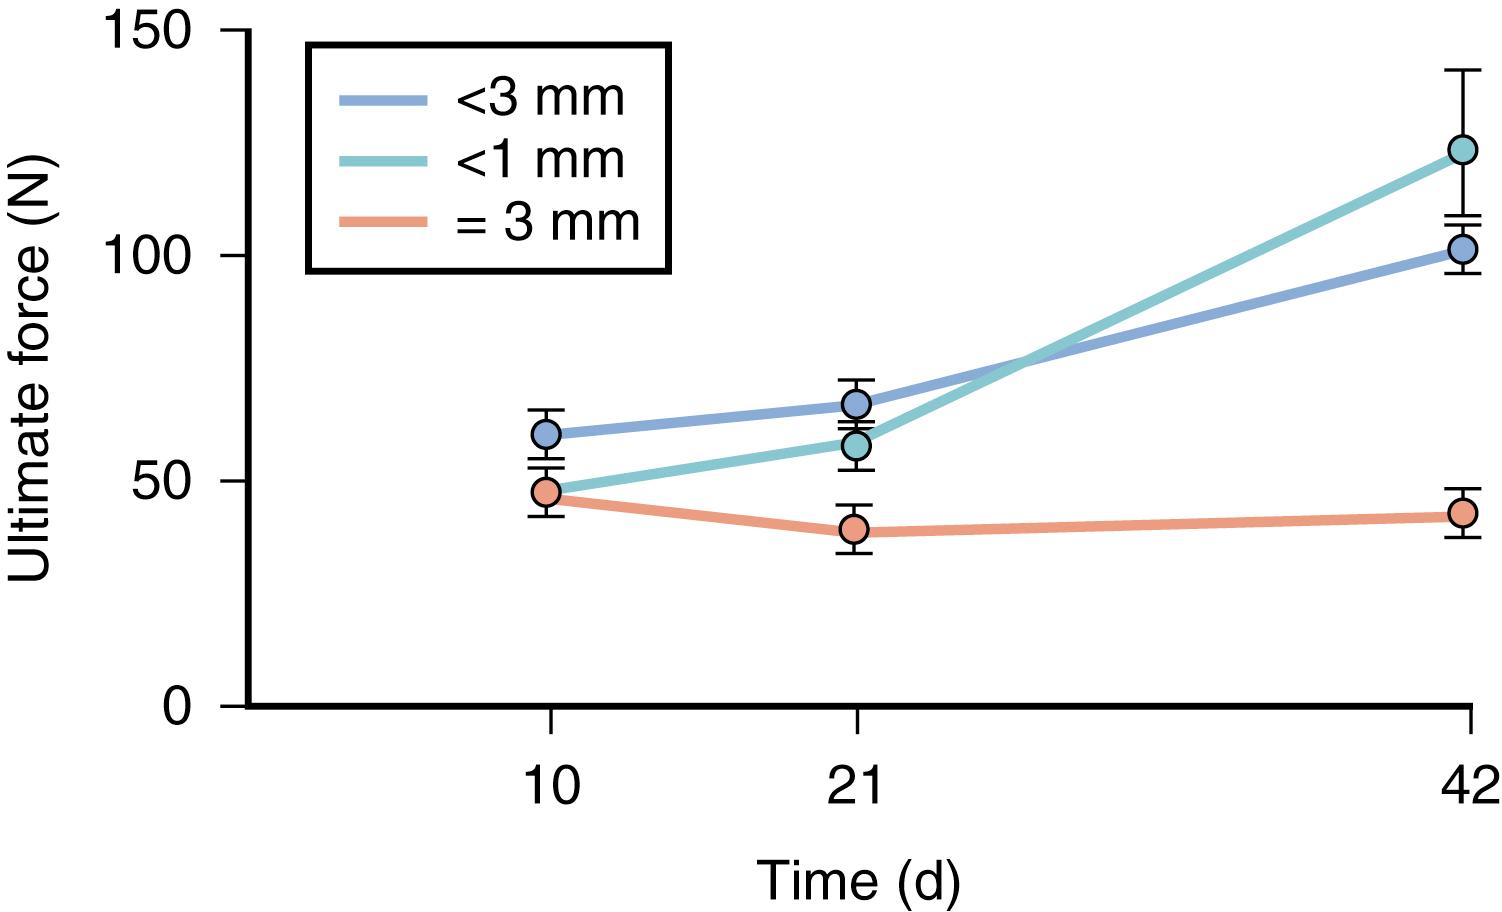
There is a negative effect of early repair site gap formation on tendon healing and accrual of repair site strength. An in vivo canine study showed that tendons healing without repair site gaps, or with gaps of less than 3 mm, acquire strength 6 weeks after repair. In this same study, if there was a repair site gap greater than 3 mm, significant accrual of repair site strength did not occur. Repair site gaps that develop early in the postoperative period pose a greater risk of rupture as rehabilitation progresses after 3 weeks ( Fig. 6.11 ).
Since Lundborg’s important observation that intrinsic tendon healing was possible, large strides have been made in the investigation of the biologic processes occurring at the repair site during the postoperative period. The process of flexor tendon repair can be divided into three general phases: early inflammatory, intermediate active repair, and late remodeling. The area within 1 cm of the repair site is the most active and is characterized by early cellular proliferation and migration to the repair site. Although suture methods maintain the position of the tendon ends, the biology of the repair response is the ultimate arbiter of outcome. Increased synthesis of type I collagen mRNA and protein has been shown within repair site cells and cells within the adjacent epitenon early in the postoperative period. Fibronectin, an abundant extracellular matrix protein involved in cell-matrix communication, and α 5 β 1 and α v β 3 integrins, cell surface compounds involved in the binding of fibroblasts to extracellular matrix, are also upregulated during the early postoperative period.
Despite advances in suture methods and understanding of the biology of the repair site, the formation of adhesions between the tendon and the surrounding fibroosseous sheath with resultant digital stiffness remains one of the most common complications after intrasynovial flexor tendon repair. In vivo studies have suggested that the formation of these restrictive intrasynovial adhesions at the repair site and at remote sites between tendon and sheath may be obviated if a sufficient amount of tendon excursion is achieved during passive motion rehabilitation. In vivo canine studies have shown that repaired tendons need only be moved passively 1.6 mm or more during postoperative rehabilitation to prevent clinically relevant adhesion formation. ,
In an effort to improve the accrual of strength at the tendon repair site, investigators have advocated rehabilitation methods that generate increased levels of applied in vivo force across the repair. Although some level of force application is valuable, Boyer and colleagues , showed that increasing levels of applied force during postoperative rehabilitation from 5N to 17N did not accelerate the accrual of repair site strength after placement of a multistrand repair and may risk gap or rupture.
Recent studies have explored the use of fibrin glue in the flexor tendon repair. Fibrin glue has been used in a variety of surgical procedures to promote hemostasis and tissue bonding and as a cell carrier for stem cells on tendons. Using a rabbit model, He and associates reported improved range of motion in digits following zone 2 tendon repair augmented with fibrin glue at 3 weeks compared with controls. At 8 weeks there was no difference in the range of motion between the two groups. There was no change in the biomechanical properties of the repair in the experimental group. A recent cadaveric study examined the effect of fibrin glue augmentation following zone 2 repairs. The authors compared a standard four-strand core repair plus fibrin glue augmentation with a standard four-strand core repair with epitendinous sutures. They reported a significantly higher gliding resistance in the fibrin glue group compared with the epitendinous suture group.
Vitamin C is an antioxidant that has been examined in flexor tendon repair. Tissue damage and hemorrhage can disturb redox regulation, thereby favoring fibrotic responses in the flexor tendon repair site. Hung and colleagues used a chicken model to examine the effects of local vitamin C following flexor tendon injury and repair. They reported improved gliding resistance, reduced fibrotic size, and fewer histologic peritendinous adhesions 6 weeks following repair compared with saline controls.
Intrasynovial lacerations of the FPL tendon may pose a unique difficulty in that the proximal tendon stump frequently retracts deep to the thenar musculature, making retrieval of the proximal end more difficult. , , If the proximal stump has retracted proximal to the distal edge of the thenar musculature, it can be localized through a separate incision in the carpal canal or distal forearm and easily retrieved by placing ½ of the core suture in the proximal tendon and then passing the sutures back to the repair site using a silicone feeding tube or similar device.
The principles for operative exploration and repair of flexor tendon injuries proximal to the A1 pulley are similar to injuries in zone 2, though the potential for disruptive adhesion formation postoperatively is considerably reduced. Generally, repair of lacerations in these zones has an improved prognosis. The preoperative planning for these repairs should account for the possible need for microsurgical nerve and arterial repair. Techniques and considerations for the placement of the core and circumferential sutures and postoperative rehabilitation are the same as those described for zone 2 injuries.
There has been considerable debate about the appropriate management of partial tendon lacerations. Partial flexor tendon lacerations can progress to late tendon rupture and tendon entrapment or triggering. For lacerations that are more than 50% of the tendon cross-sectional area, I usually repair the tendon using a core suture method and a circumferential suture. If the cross-sectional area lacerated is less than 50%, the tendon is either repaired or debrided to avoid entrapment and triggering of the tendon. My preference is to explore wounds where there is high probability on physical examination that a tendon injury has occurred. Advanced imaging can be useful in select cases for decision making but is unlikely to take the place of exploration in the majority of cases.
The patient is placed supine on the operating table, and the arm lies at a right angle to the long axis of the body. A well-padded brachial tourniquet is placed on the arm. The arm is prepared using a standard method. Within the hour prior to incision, a first-generation cephalosporin or other appropriate antibiotic(s) is administered as determined by the nature of the injury. A surgical pause or “time out” is done. The limb is exsanguinated using an elastic bandage, and the tourniquet is inflated to a pressure that is 100 mm Hg greater than the systolic blood pressure.
When possible, the existing laceration is incorporated into an extensile midlateral incision to expose the flexor apparatus. This may be extended with Bruner incisions proximally and distally as needed ( Fig. 6.12 ; see also Fig. 6.15 later in chapter). After the exposure is completed, assessment of the entire injury is possible and the sequence of repair is determined. The tendon stump is located proximally and drawn into the distal wound by any of the techniques described for zone 2 injuries (see Fig. 6.12 ). The tendon is then transfixed to the annular pulleys and the digital soft tissues with a 25-gauge needle.
It is often difficult to deliver the disheveled stump of the FDP tendon through the A4 pulley after it has avulsed from the distal phalanx and retracted proximally, particularly if several days or weeks have elapsed. Several techniques are available for this difficult situation. Sequential dilation of the A4 pulley using pediatric cervical sounds or dilators can be effective. The edges of the stump may be trimmed so that the width of the stump does not exceed that of the pulley. After sequential dilation of the pulley, a core suture is placed in the stump, and the suture strands are delivered in a proximal-to-distal direction through the pulley. With the sutures placed, gentle traction is applied to the suture ends, and the tendon can be guided through the pulley using a small flat elevator as a proximal skid. A small silastic catheter feeding tube or truncated pediatric red-rubber catheter can also be used in this situation; the flared end of the catheter is cut at a width just slightly larger than the tendon and A4 pulley. The tendon core suture end may be drawn into the flared end, and the whole composite can be slid through the pulley, simultaneously dilating and passing the avulsed tendon end. In some cases, the A4 pulley must be vented at the proximal end to allow passage of the tendon. Lieber and associates , and Tang have presented convincing mechanical and clinical evidence that the A4 pulley can be vented to promote tendon gliding without adverse effects on work of flexion or functional outcome.
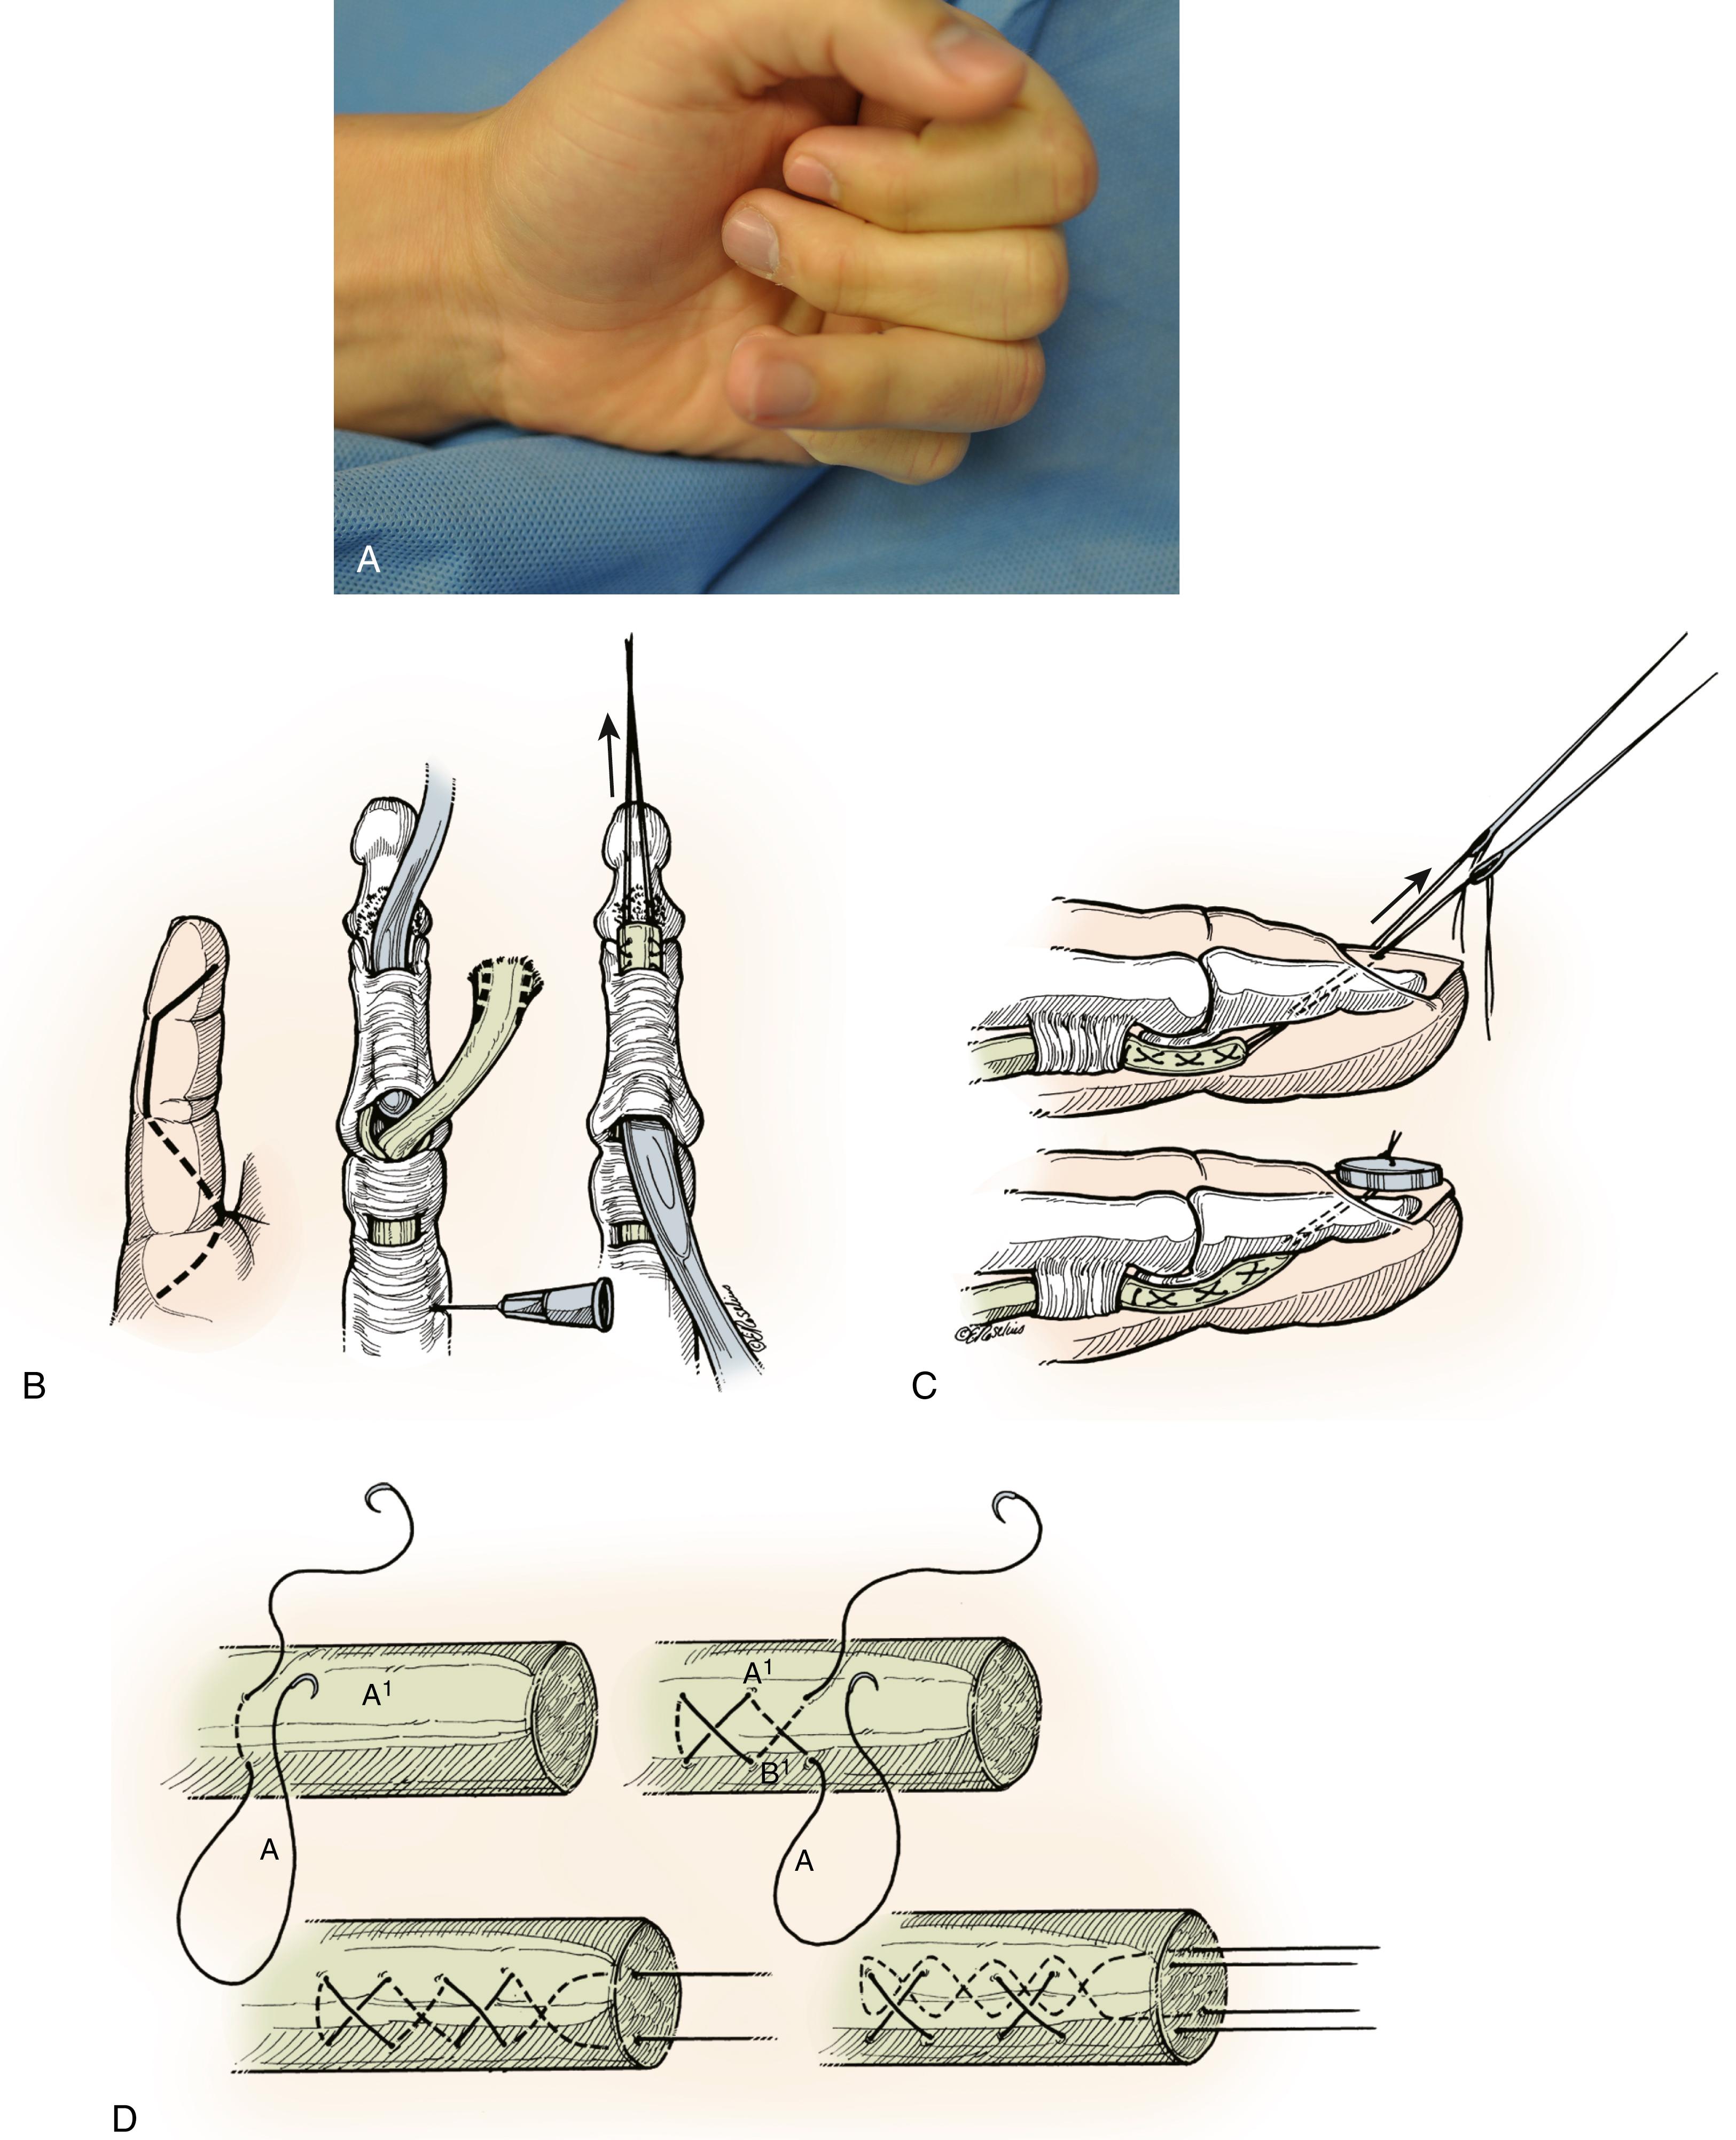
The bone at the volar base of the distal phalanx is exposed to establish a repair footprint for the tendon reinsertion. If the distal phalanx is large enough to accept a miniature suture anchor, I place an anchor in the center of the distal phalanx. Next, I place two corner sutures at the edge of the phalanx in the osteoperiosteal sleeve using 5-0 polypropylene. I use these sutures to seat the tendon into the footprint, and then secure the tendon into final position using the anchor suture ends. Using this technique, the tendon can be seated securely and then the grasping core suture can be more easily placed and appropriately tensioned. Two- or four-strand core suture methods can be used with this technique, and I prefer incorporating a Becker type of suture (see Fig. 6.12D ). When the distal phalanx is not large enough to accommodate an anchor, I use a traditional pull-out suture and change the repair strategy. Placement of the corner sutures is still useful, however, to guide and reinforce the repair site. The pull-out suture (I now use a modified two-strand, Kessler-type suture of 3-0 polypropylene suture) is passed through the distal phalanx using straight Keith needles that are drilled through the footprint at the base of the distal phalanx and are tied over a button placed on the nail plate dorsally (see Fig. 6.13C ). It is preferable to have the needles exit the nail plate beyond the lunula (and beyond the germinal matrix) to avoid nail deformity or eponychial injury. The button and suture are left in place for 6 weeks. The Kessler suture is easy to remove at 6 weeks. After removal of the button, cut one strand short and apply gentle traction to the longer end and it will pull out smoothly.
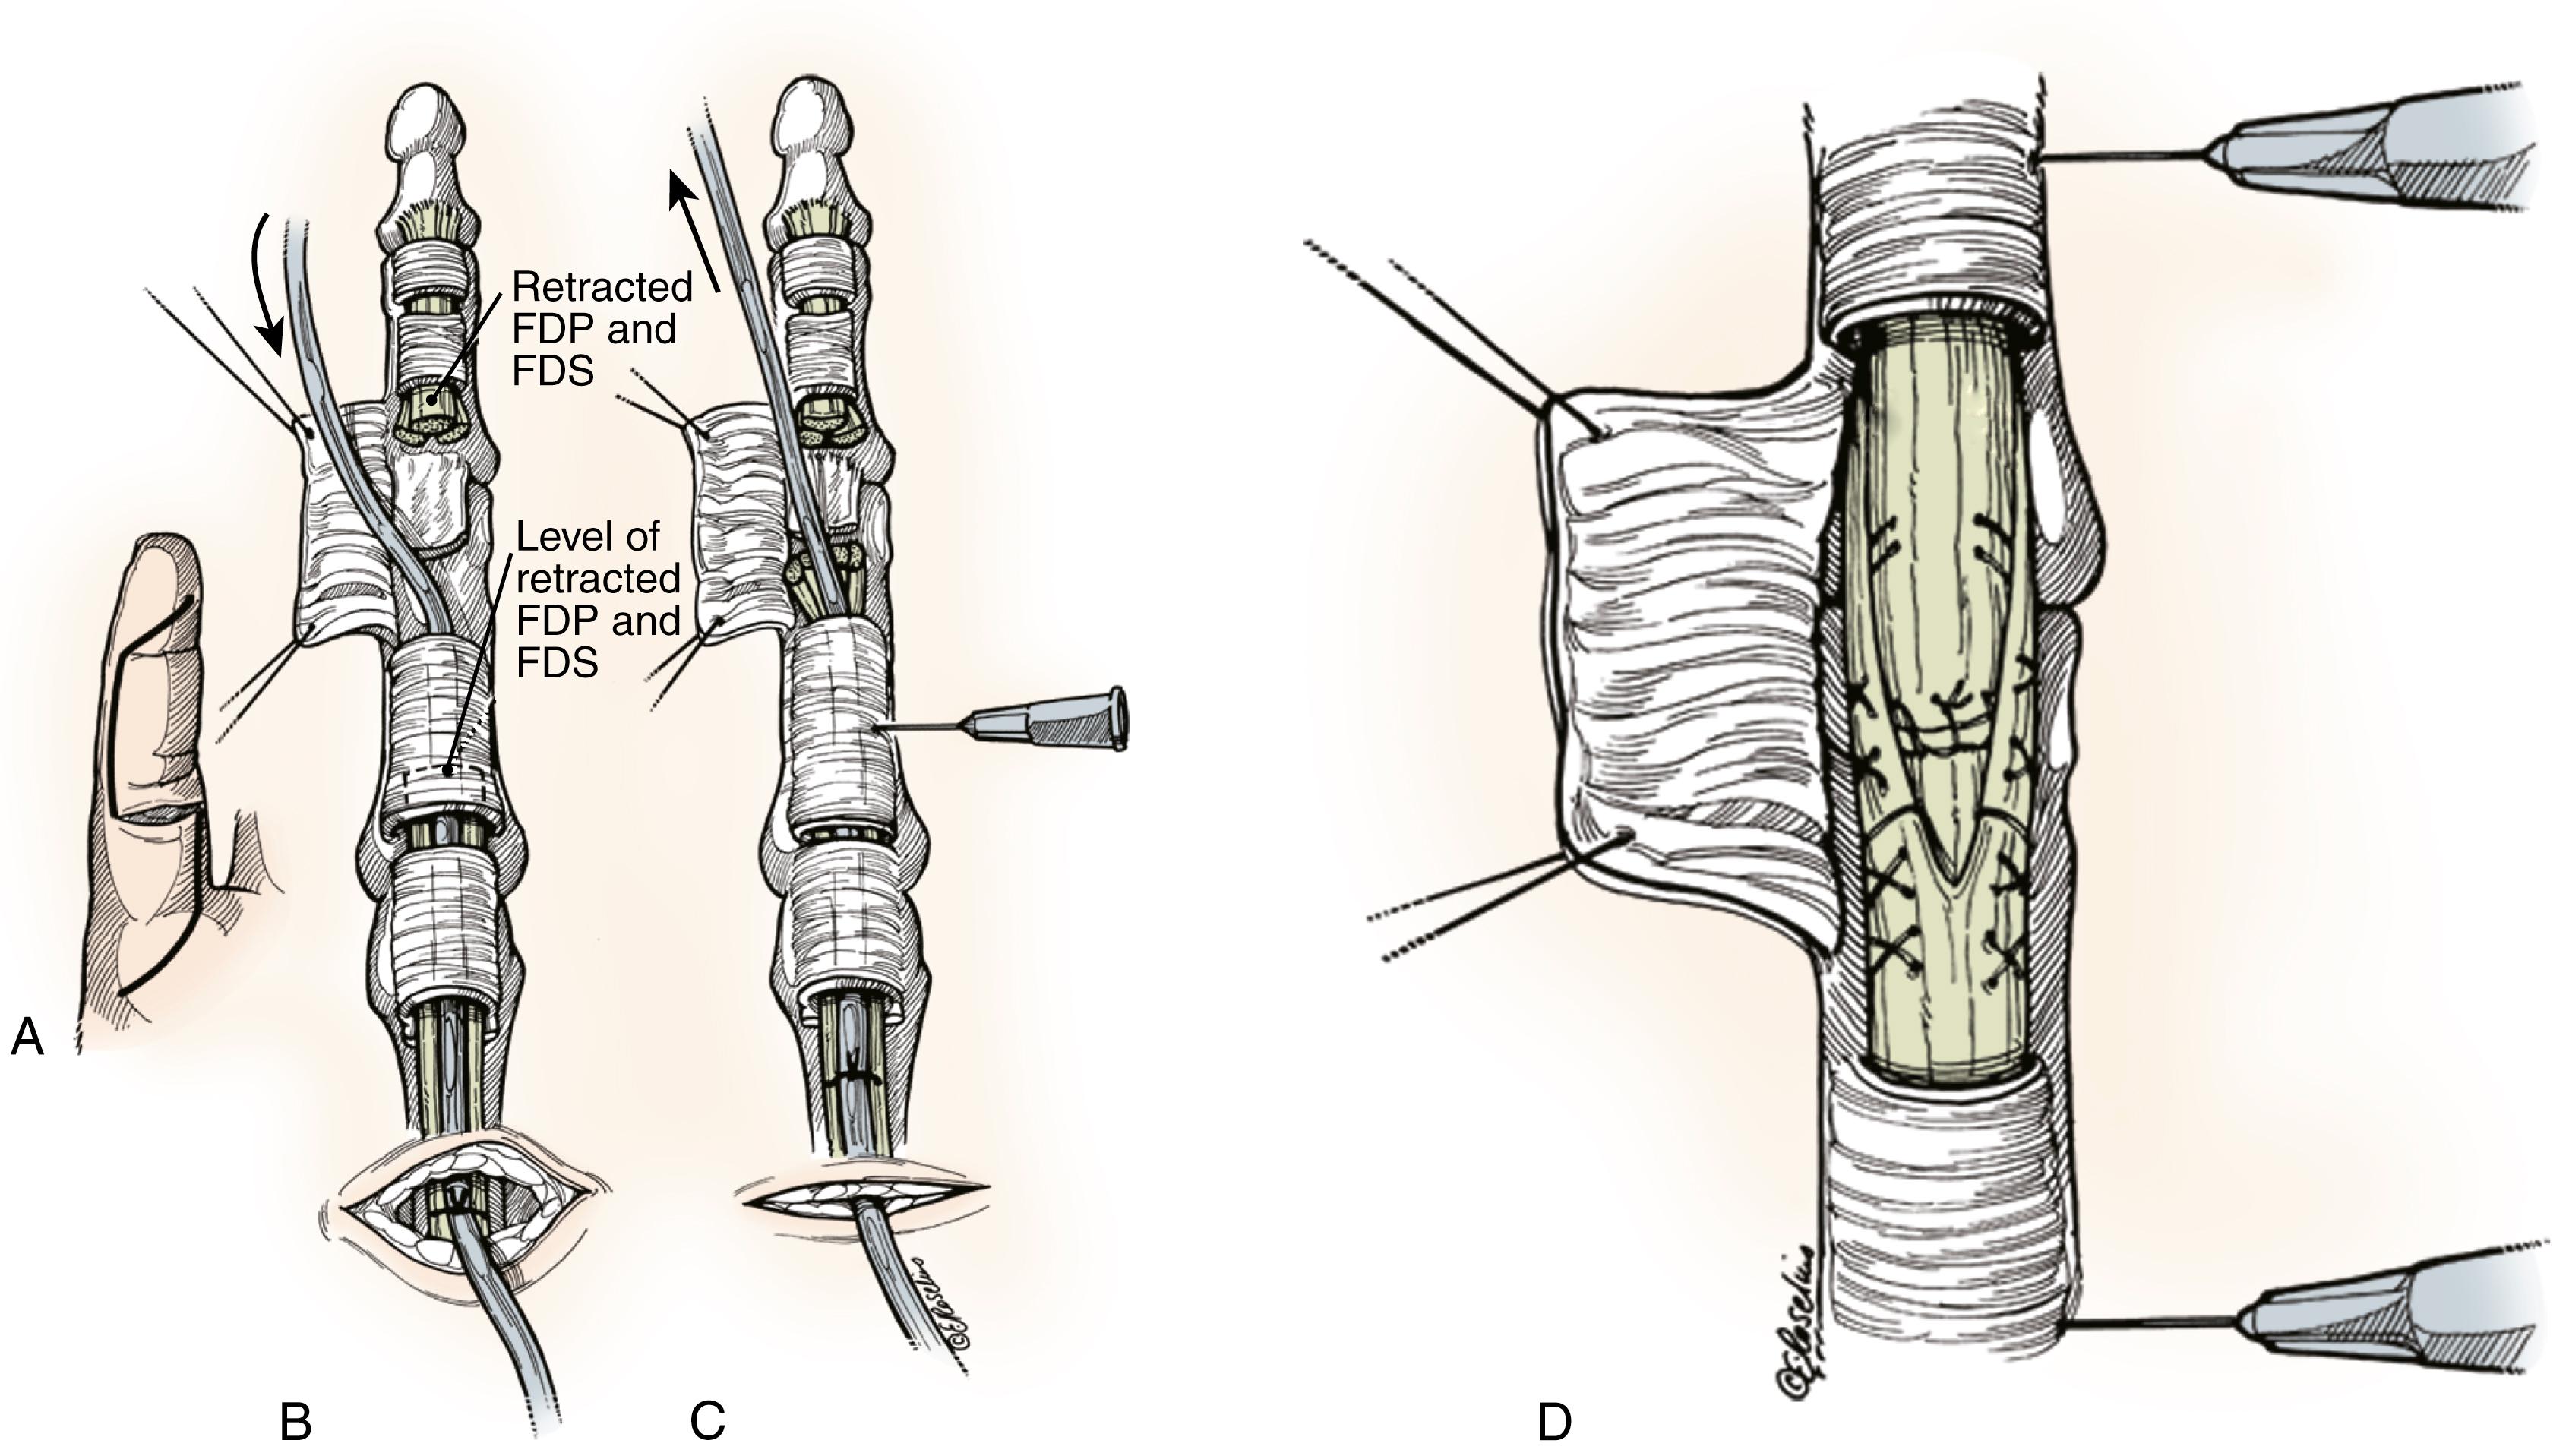
The rehabilitation protocol generally follows the same progression as described for zone 2 injuries (see later).
After the initial evaluation has been done and a decision has been made in favor of early repair, the wound is irrigated with an antibiotic solution and closed with a fine monofilament suture. For clean wounds and healthy patients, I administer a weight-based dosage (1 to 2 g) of a first-generation cephalosporin and a tetanus toxoid when necessary. For patients who have not been immunized and for patients whose immunization status is uncertain, passive immunization with tetanus immune globulin (TIG) may be indicated. Passive immunization is not a substitute for wound debridement. Patients who are at risk for methicillin-resistant Staphylococcus aureus or have a highly contaminated injury may require a more formal irrigation and debridement
Leddy type I injuries require early (within 3 weeks) diagnosis and treatment.
Although all flexor tendon avulsion injuries are best treated early, Leddy type II and III injuries may be amenable to later repair. Careful exploration is useful here.
Direct tendon repair is preferable if there is at least 1 cm of distal tendon stump.
Tendon repair to bone is done if there is less than 1 cm of distal tendon stump. Either suture anchors or pull-out suture and button constructs may be used.
The tendon-bone site should be observed directly before final knot-tying to ensure the tendon is well seated on the repair footprint (distal phalanx).
A tendon that is advanced too far and inserted too tightly leads to quadriga.
Two-strand repair techniques may be insufficient for rehabilitation programs that employ early active range of motion.
Identify and prepare the bony insertion site.
Ensure the tendon is seated in the footprint when the knot is secured.
Place additional peripheral sutures that guide and secure the tendon.
Apply a dorsal splint with wrist and MCP joints flexed and PIP and DIP joints at 0 to 10 degrees.
Use a graded rehabilitation protocol under supervision of a qualified therapist.
The patient may return to full activity at 4 to 6 months after surgery.
and/or broader-spectrum antibiotic coverage. A dorsal forearm-to-fingertip splint that includes all digits is applied. The splint should position the fingers in mild flexion. For cases that do not require urgent repair, I prefer to repair the tendon within 7 days of injury.
After the patient is anesthetized, the arm is prepped and draped, as above. Wide awake local anesthesia no tourniquet (WALANT) techniques using local anesthesia with epinephrine and without a tourniquet enable inspection of active motion following repair and may facilitate intraoperative decision making. (See Updates: Tumescent Local Anesthesia for Wide-Awake Hand & Upper Extremity Surgery on ExpertConsult.com.) The initial wound is examined, and incisions are planned that would predictably allow access to both tendon ends. A midlateral incision is preferred because it gives wide exposure and places intact skin and subcutaneous fat directly over the flexor tendon sheath. When the laceration is complex, a midlateral approach may not be practical, and in those instances, I incorporate the existing laceration into the approach to the tendon sheath ( Figs. 6.13 and 6.14 ). The goal of the exposure should be to provide maximum visualization while maintaining useful durable skin flaps over the area of the tendon repair. The skin and subcutaneous fat are raised off of the tendon sheath as a single thick layer. Separation of these tissues must be avoided because skin perfusion is by random vascular supply, and thinning of the skin flap can cause decreased perfusion at the distalmost aspect of the flap. I generally design the longitudinal limb of the incision to be associated with the nerve and artery that may require repair.
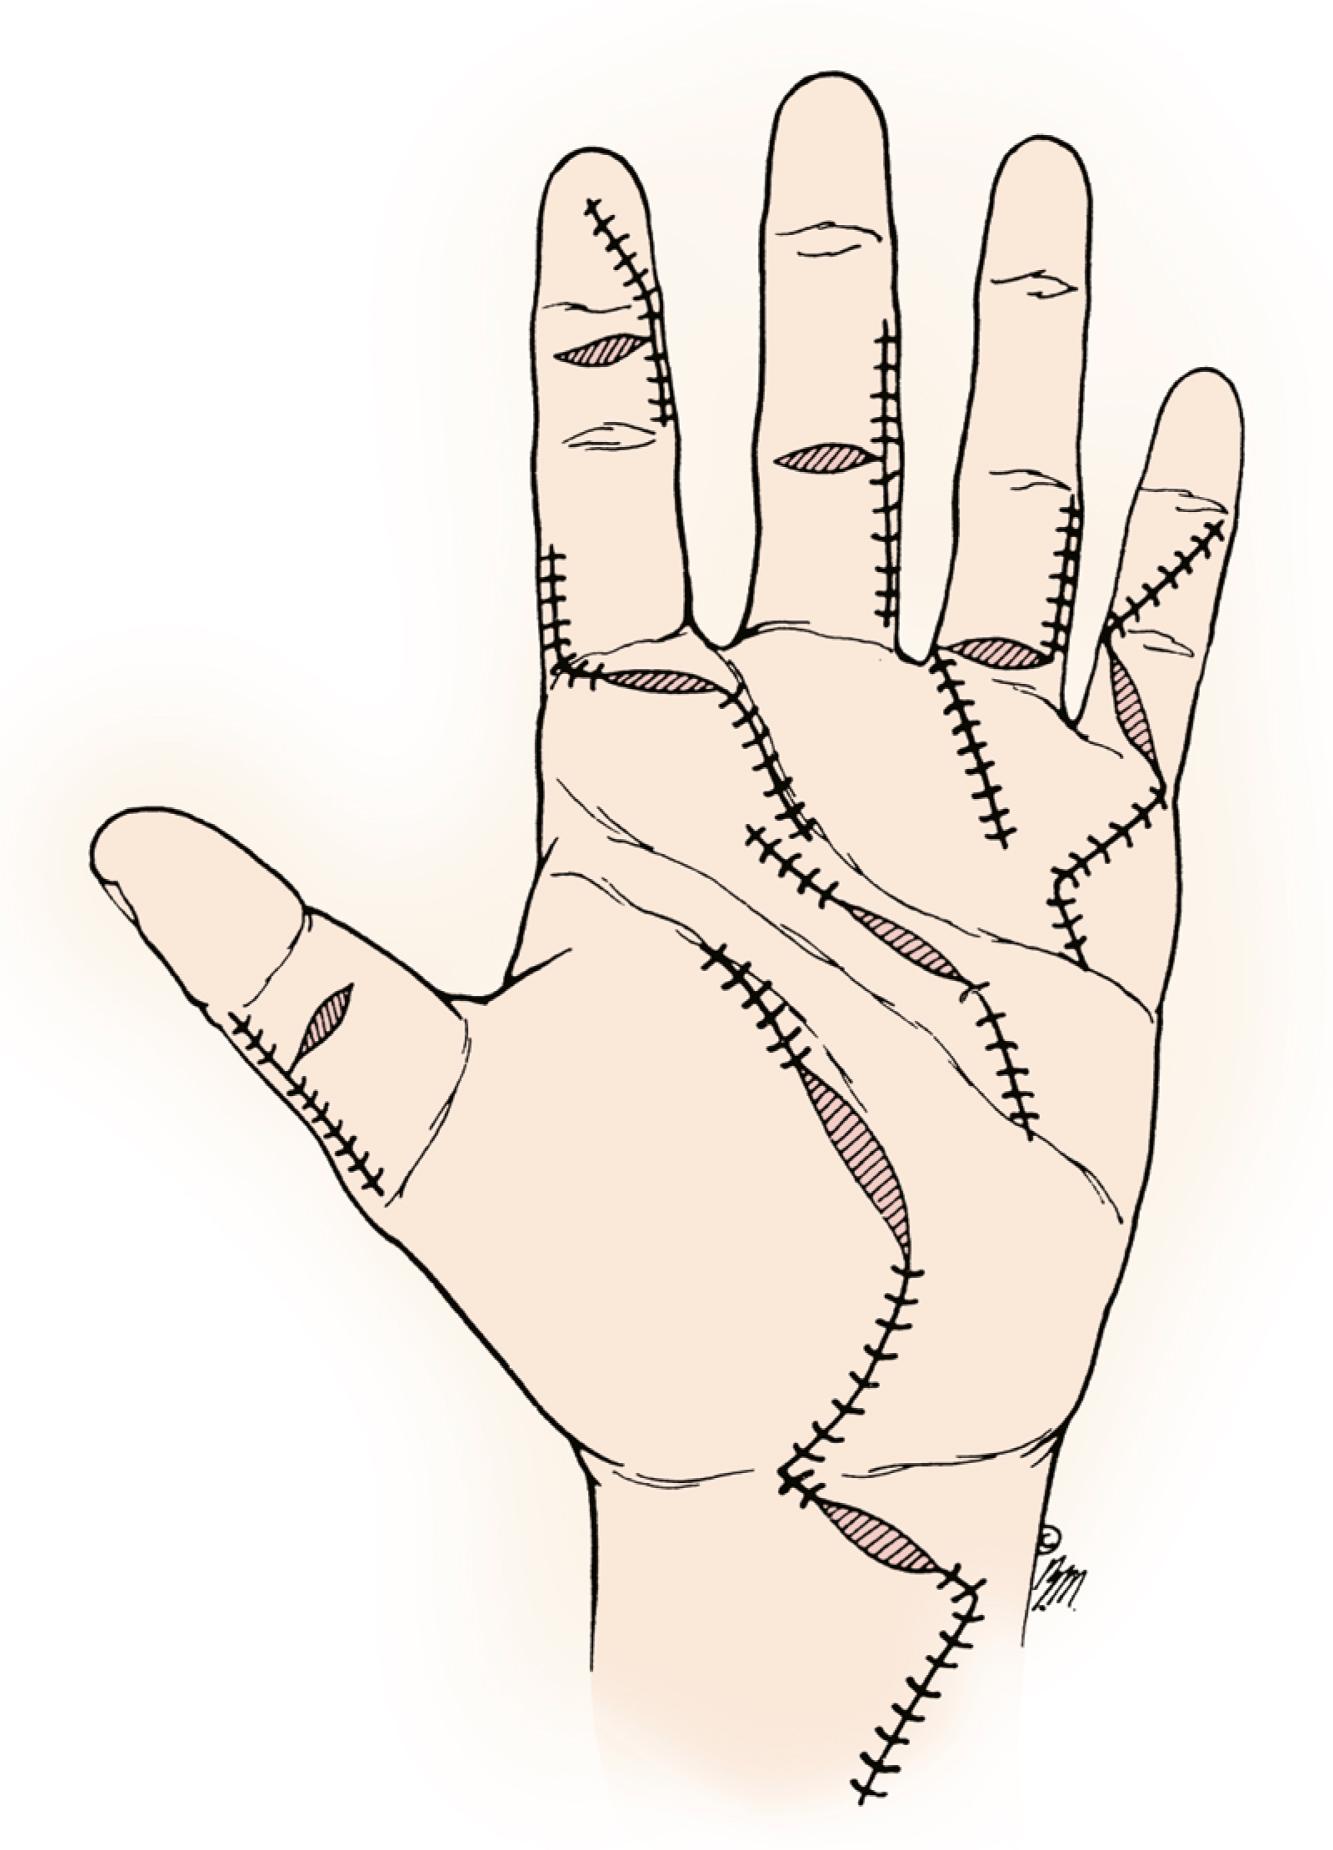
The wound is completely examined to define the nature and elements of the injury. After a thorough lavage, the sequence of repairs can be determined. The laceration of the sheath is identified, and a limited debridement of the hemorrhagic ends of the sheath is performed. Exposure of the tendons is done by reflecting a radial- or ulnar-based flap of sheath within repair “windows” between the A2 and A4 annular pulleys. Sheath venting and excision should be limited to that necessary for visualization and repair, as excessive sheath division can lead to tendon bowstringing.
If the digit was in a position of significant flexion at the time of injury, the distal stump usually lies distal to the skin laceration and may rest beneath or distal to the A4 pulley with the finger in extension. The distal tendon stump may often be delivered by passive flexion of the DIP and PIP joints. If the tendon does not pass readily, gentle sequential dilation of the A4 pulley with pediatric cervical sounds or dilators may be beneficial. Often, I place half of the core suture in the tendon distal to the pulley, and then pass the sutures and tendon end proximally beneath the pulley to complete the repair. Partial or complete A4 pulley division, pulley venting, and pulley lengthening may occasionally be necessary. My goal is to obtain a smooth repair, with full tendon excursion on intraoperative passive range-of-motion testing without additional alteration of the annular pulleys at the conclusion of the case. If it won’t glide smoothly at the time of intraoperative examination, then it won’t glide smoothly after the procedure.
The proximal tendon stumps may be visible within the fibroosseous sheath. The proximal tendon end may be retrieved using a variety of methods. If the tendon is immediately accessible, I gently grasp the endotenon of the FDP and pull the tendons distally; usually the FDS tendon comes into the wound with distally applied traction on the FDP tendon. The tendon position is maintained by placement of a 25-gauge, 5/8-inch needle through the tendon and one of the proximal annular pulleys.
For tendons that are not locally accessible, I milk the tendon ends into the wound using a proximal-to-distal massage of the digit. The tendon is grasped directly on its cut end (the endotenon) with nontoothed forceps and is held in position using a 25-gauge needle. If the proximal tendon stump is not visible and cannot be delivered by milking into the wound, the wound is extended or a counter incision is made in the palm to retrieve the proximal tendon end. Repeated blind passes into the digital sheath using a hemostat or similar device in an attempt to grasp the tendon end can be associated with additional injury to the tendon sheath and are not useful. Because there is some evidence that epitendinous injury can be associated with peritendinous adhesion formation, I try to limit contact with the epitenon during tendon repair and grasp the tendon by the endotenon whenever possible.
Although there are several methods for acquisition of the proximal tendons, the method advocated by Sourmelis and McGrouther is reliable and effective. A small pediatric feeding tube or similar device is passed in a retrograde manner through the digital sheath. The tube should enter at the site of the laceration and exit in the palm proximal to the A1 pulley. The flexor tendons are left in situ in the sheath, and, through a midpalmar incision, the catheter is sutured to both tendons several centimeters proximal to the A1 pulley. The catheter is pulled distally, delivering the tendon stumps into the distal repair site easily. A 25-gauge, 5/8-inch needle is used to secure the tendons to adjacent soft tissues at the repair site. In situations in which the tendons have retracted proximal to the A1 pulley, an incision is made just proximal to the A1 pulley and the lacerated tendons and adjacent neurovascular structures are identified. The proximal stumps are delivered distally by the catheter method when possible. A Freer elevator or one of several commercial instruments may be used to “shoehorn” the tendon atraumatically into the flexor sheath beneath the A1 pulley.
It is crucial to reestablish the proper anatomic relationship of the FDS and FDP tendons in the palm and at the site of the repair. In some complex injuries, orientation of the tendons and repair of all injured tendons may be impractical. In those cases, I excise one slip of the FDS tendon and repair one slip. Rarely would complete FDS excision be necessary. Preservation and successful repair of the FDS adds to strength of PIJ flexion. This repair strategy facilitates gliding of the repairs within the sheath and simplifies tendon orientation.
If the tendon is lacerated proximal to the FDS decussation, a core suture is used (see Fig. 6.8 ). I base the choice of core suture method on the caliber of the tendon that is available for repair. The more robust, thicker FDP tendon is ideal for core suture placement within zones 1 and 2. I prefer a 3-0 braided caprolactam looped (double-strand) suture affixed to a curved, tapered needle end. A four-strand modified Kessler core suture with locked loops offers a substantial improvement in time-zero repair site tensile strength and stiffness over traditional two-strand core suture techniques.
For smaller caliber tendons, I use a four-strand modified Kessler suture that is placed with a 4-0 braided caprolactam looped suture. When using looped suture, care must be taken to maintain even tension in all limbs of the suture; this allows the setting of an evenly tensioned suture knot. To finish the repair, a 5-0 or 6-0 polypropylene suture is used for a deep, running circumferential suture. This suture is started on a volar corner of the repair site and is placed circumferentially around the tendon over the repair site. When the stitch is started, I invert the first pass to facilitate inversion of the suture knot into the repair site. I leave one tail long when the suture is cut so that the running suture may be tied to itself when the suture is completed ( Fig. 6.15 ). Our clinical experience has been that this suture method is satisfactory for most advanced repair methods with limited risk for repair site failure. Merrell et al. demonstrated that a circumferential simple running suture placed 2 mm from the cut tendon edge is the ideal width and significantly increases the ultimate strength of the repair.
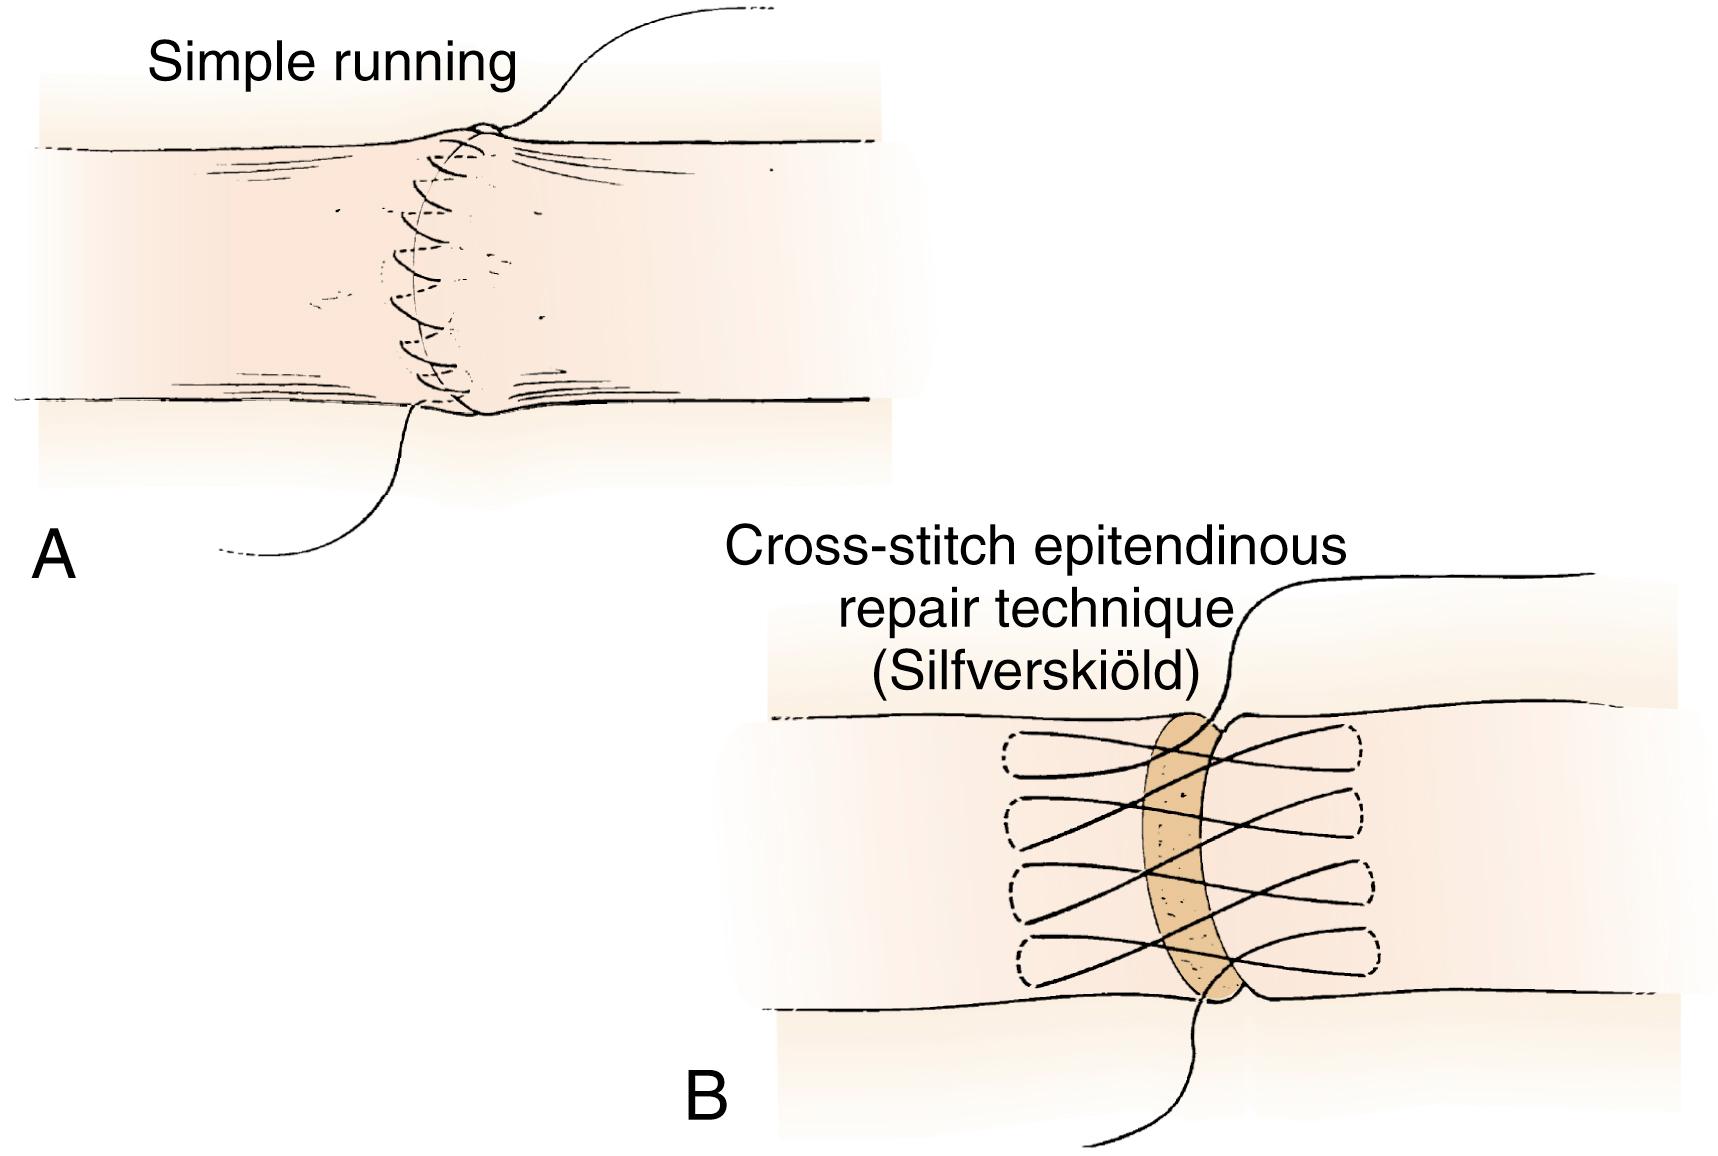
More distally, the FDS tendon repair is made difficult by the thin, flat shape of the tendon slips as they wrap around the FDP tendon. A traditional core suture may not be possible in the flattened FDS tendon slips near the PIP joint; these tendons may best be repaired using one of the zone 2 to 4 extensor tendon techniques or a modified Becker repair as shown in Fig. 6.13D . Some have used a modification of the Silfverskiold circumferential technique (see Fig. 6.15 ) for thin FDS slips as well. It is preferable to use a smaller needle along with a smaller-caliber suture to minimize tissue trauma. A 4-0 or 5-0 braided polyester suture affixed to a small, tapered needle at each end is effective.
After completion of all tendon sutures, I evaluate the stability of the repairs throughout a full range of digital motion and ensure satisfactory gliding of the repairs through the fibroosseous tunnel. Sheath closure is done only if it does not impair tendon gliding. Conversely, if necessary pulley venting is done to ensure full tendon excursion. These intraoperative observations may be valuable to clinicians in making decisions about best aftercare regimens.
I prefer to repair the tendons first and then repair the injured nerves and arteries. Often the arterial repair is done last, with the tourniquet deflated using standard microsurgical dissection and repair methods. This also provides a satisfactory length of time for hemostasis to occur. Bipolar electrocautery is critical to prevent postoperative hematoma formation, and primary wound closure is performed in clean wounds using simple 5-0 nylon sutures. I believe that meticulous hemostasis limits postoperative swelling, diminishes postoperative pain, and facilitates rehabilitation.
A well-padded compressive, nonconstrictive dressing with a dorsal plaster slab is applied from the fingertips to the proximal forearm to hold the wrist, MCP, PIP, and DIP joints in slight flexion to minimize passive myostatic tension on the repair site. All digits are included in the postoperative dressing. If the FPL tendon is repaired, the plaster splint overlies the dorsal aspect of the thumb to hold the carpometacarpal, MCP, and interphalangeal (IP) joints in slight flexion.
Emergency repair is indicated if both digital nerves and arteries are lacerated. Tendon repair is done in conjunction with digit revascularization.
Routine tendon repairs are preferably done no later than 7 days after injury.
After 6 weeks, primary repair is unlikely to be possible.
A multistrand core suture method with a running circumferential suture is preferred when the caliber of the tendon is sufficient.
A pediatric No. 8 feeding tube should be ready if retrieval is required (Sourmelis technique).
Knowledge of the patient’s history and the nature of the injury and observation of the repair should guide the approach to rehabilitation.
The importance of patient compliance with aftercare strategies should be emphasized.
Enter sheath between distal A2 pulley and proximal A4 pulley.
Retrieve proximal stump by milking, feeding tube, or direct exposure.
Deliver distal stump by passive DIP hyperflexion.
Stabilize the tendon ends for repair by transfixation using a 25-gauge, 5/8-inch needle. For some cases, single inverted simple sutures can provide temporary tendon alignment while the core suture is being placed.
The caliber of the tendon and the probable method of aftercare determine the choice of repair method.
Use at least a four-strand core suture technique (3-0 or 4-0 suture) with a running 6-0 polypropylene circumferential suture (nonlocked, deep bites into tendon).
Repair both the FDS and FDP tendons. Excise a single slip of the FDS tendon if it is excessively bulky or gliding is impaired.
Examine the intraoperative range of motion to guide therapy considerations.
Sheath repair is optional.
Ensure adequate hemostasis before closure.
Consider repair under local anesthetic for patients at high risk for anesthetic complication or to allow for observation of active motion to ensure full tendon excursion and limit risk for repair site gapping.
The postoperative dressing should be applied to position the wrist in flexion (20 to 30 degrees), the MCP joints in flexion (50 to 70 degrees), and the PIP and DIP joints at zero or slight flexion. Apply the dressing so that it is well padded and nonconstricting and does not have any fulcrum effect in the palm.
As soon as possible, begin a graded rehabilitation protocol under supervision of a qualified hand therapist.
Use a molded, protective aftercare splint and synergistic wrist motion to increase repair site excursion (see section on Rehabilitation; Figs. 6.16 and 6.17 ).
The patient may return to unrestricted activity at 4 to 6 months after surgery.
Tendon repairs in zones 3, 4, and 5 are performed with suture techniques similar to those used in zone 2. Because of the nature of penetrating injuries in these zones, an extensile approach is essential to complete identification of the injury. Arterial and nerve injuries in these areas are common, and the surgeon should be prepared to repair these injuries at the time of wound irrigation, debridement, and tendon repair. I prefer a longitudinal extensile approach that allows for the potential need for fasciotomy and allows each tendon to be identified at each end of the wound. Intraoperatively, the digits should be completely flexed and extended to identify the lacerated tendon ends. These operations generally are done in the following sequence:
Wound exposure
Wound debridement
Identification of injured structures
Repair of injured structures
For the forearm, I prefer to perform the arterial repairs first, the tendon repairs second, and the nerve repairs last. The tendon repairs are started from the deepest tendon that is lacerated, and the progression of repairs is to the most superficial tendon that is lacerated. If arterial repair is necessary or if the swelling in the forearm seems significant, I will consider a forearm fasciotomy prior to skin closure. For the specific repair method, I use a 3-0 looped, braided caprolactam suture and a modified Kessler four-strand technique. In these zones, it is often useful to place a simple suture in the corners of the tendon ends to begin the approximation and then place the core suture. This simple step eliminates the need to set the tension in the suture after suture passage and limits any gap formation between the tendon ends. I do not routinely use epitendinous sutures in these areas.
The outcome after flexor tendon repair is variable and depends on the nature of the injury, the patient’s individual biologic response to injury, the timing of repair, the method of repair, and the ability of the patient to participate in a postoperative occupational therapy program. If satisfactory tendon repair is obtained and if the patient can participate in a tendon repair aftercare program, tendon repair is generally associated with a good functional outcome.
The most common complication after tendon repair is digital stiffness related to peritendinous adhesion formation or digital joint contracture. Repair site rupture occurs uncommonly and can often be related to noncompliance with the suggested aftercare program. A second attempt at repair should be performed expeditiously, with the anticipation of good outcome, provided the patient is compliant and has access to supervised hand therapy. Pulley rupture with resultant tendon bowstringing, quadriga, digital triggering, swan neck digital deformity, and lumbrical-plus fingers can occur but are uncommon provided the mechanical and anatomic relationships of the tendons and the pulley system are maintained.
Postoperative Management: Rehabilitation
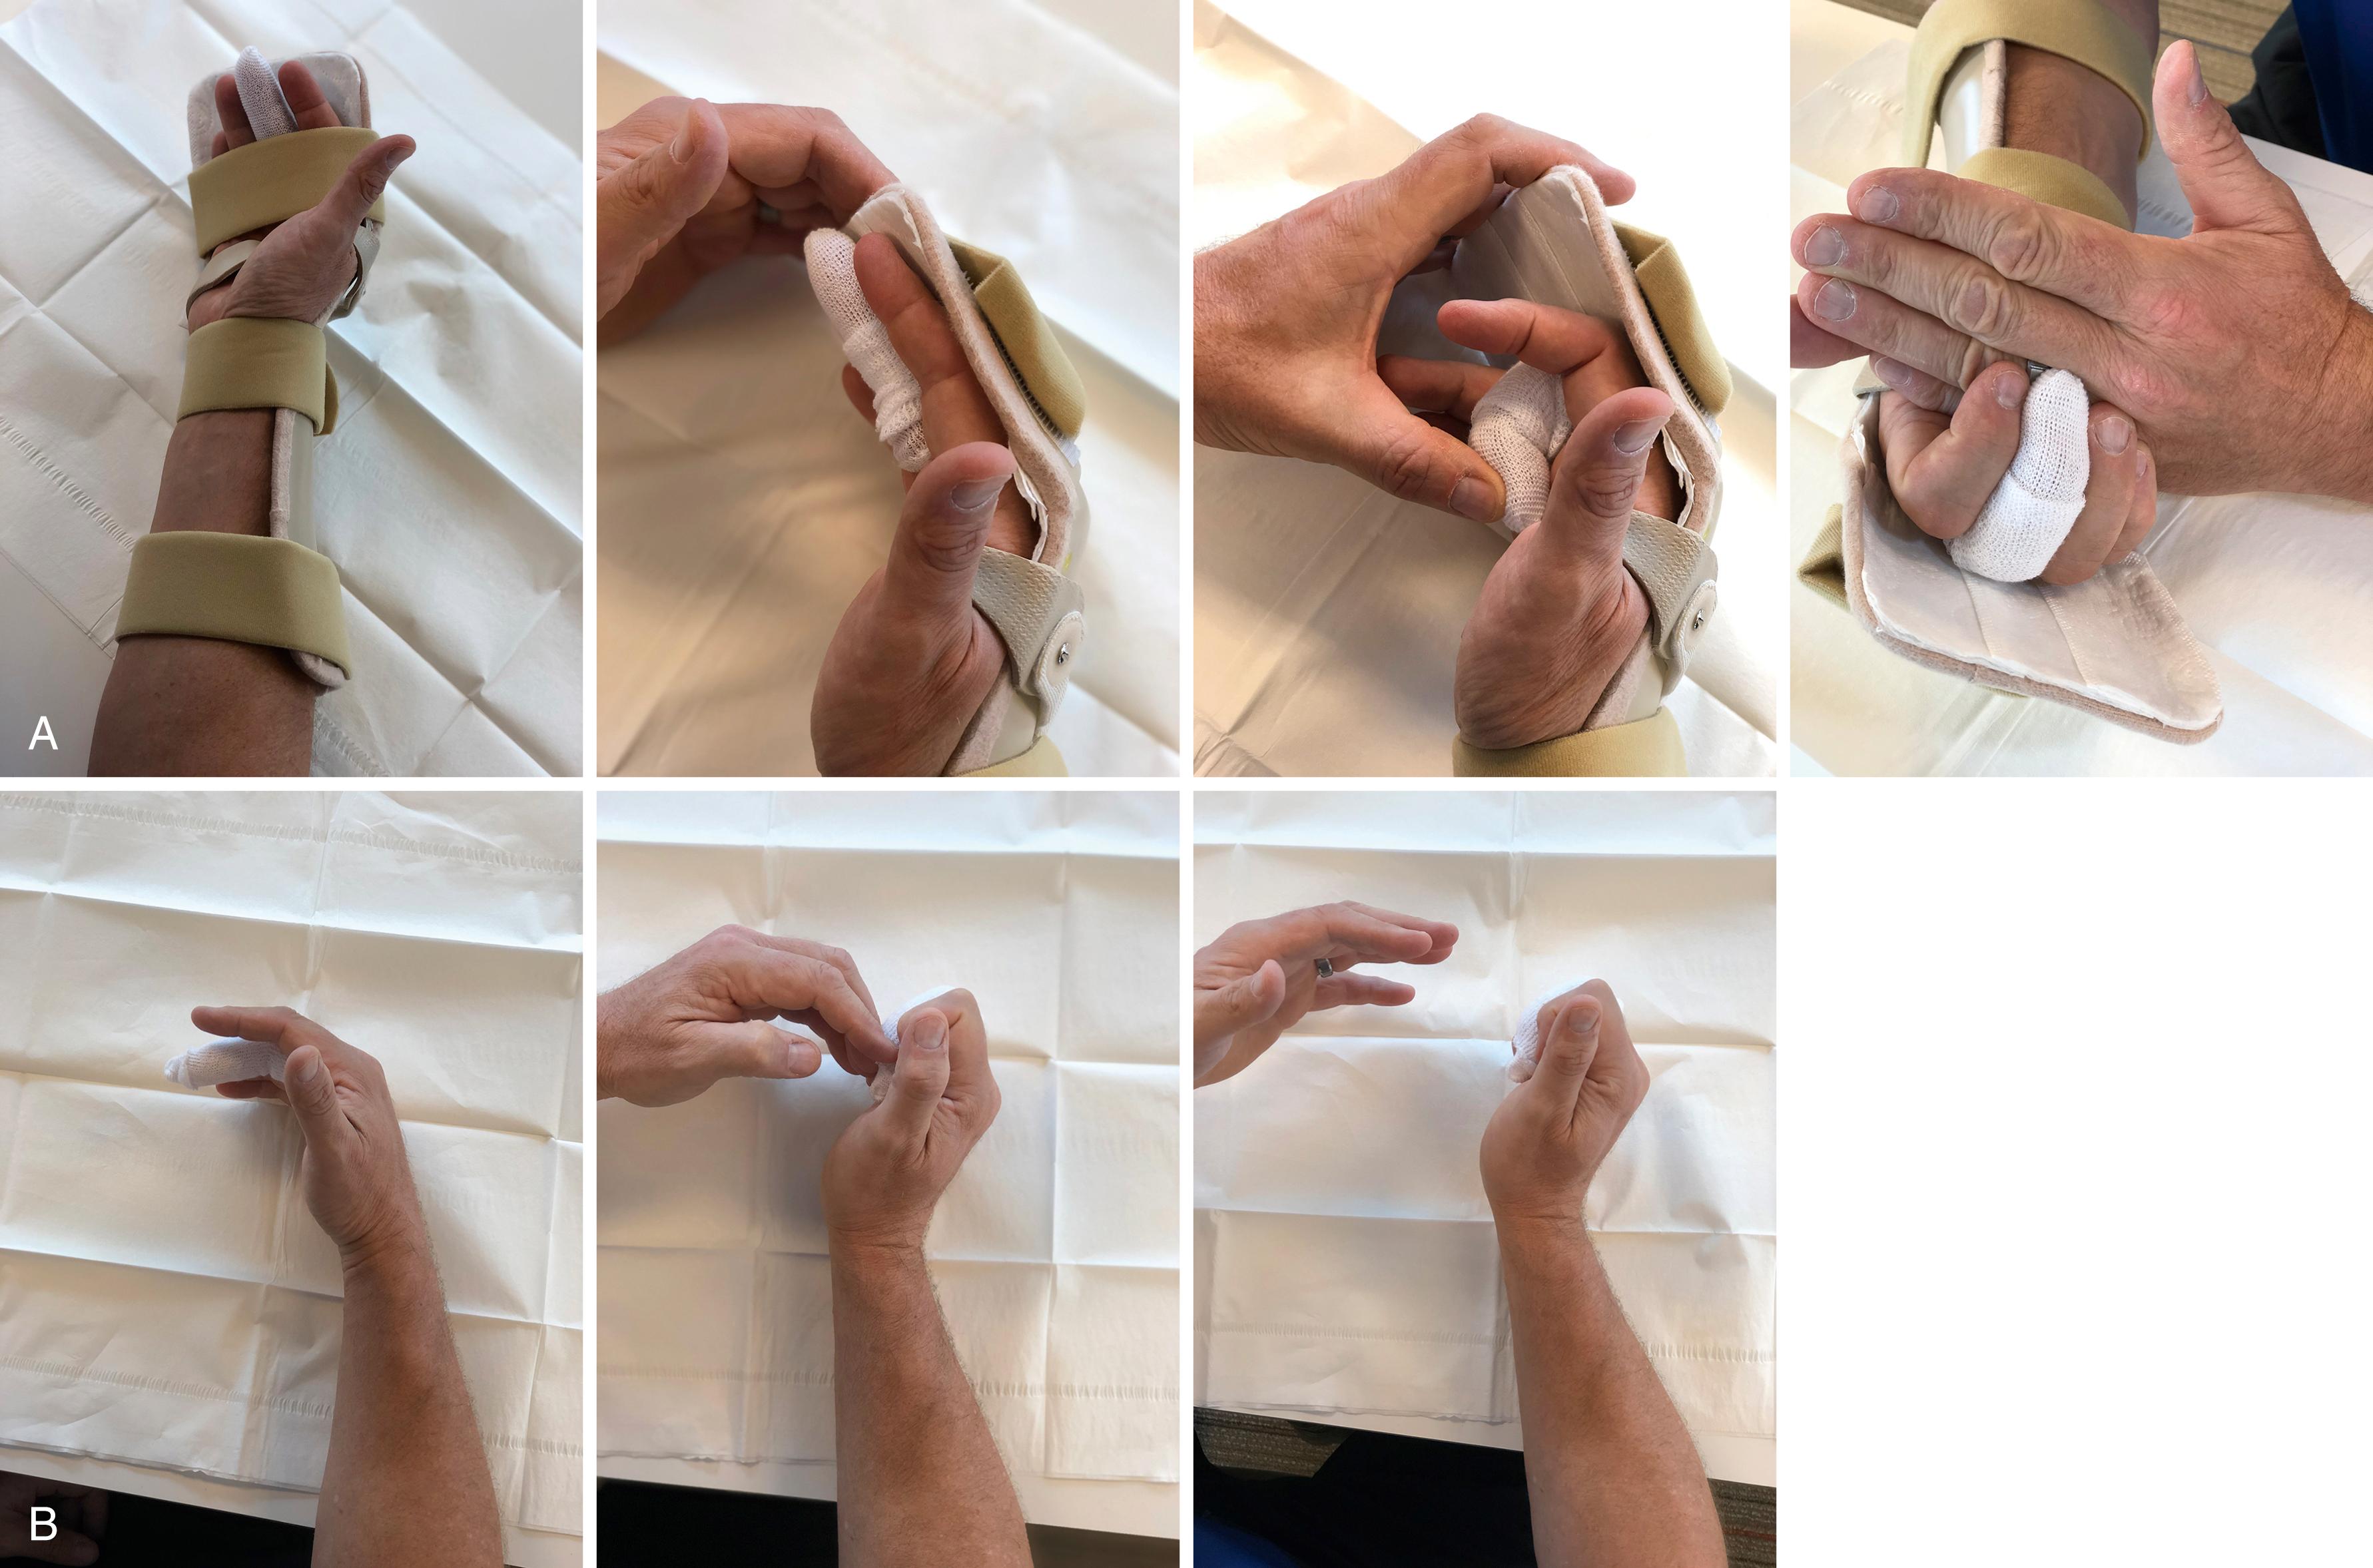
Philosophically, I believe the tendon rehabilitation program should be constructed to try to improve the function of the entire hand and facilitate differential incorporation of the injured soft tissues ( Figs. 6.16 to 6.18 ). From a more practical standpoint, the method of rehabilitation is significantly influenced by the compliance of the patient, the nature of the wound, and the method and location of the repair. Although we employ general time guidelines for implementation of various therapeutic interventions, we also accelerate and decelerate patients’ regimens based on their individual response to treatment. In this environment, there is no substitute for a knowledgeable, experienced, energetic, meticulous hand therapist. Surgeons and hand therapists have to work side by side in tendon rehabilitation. Clear communication is important.
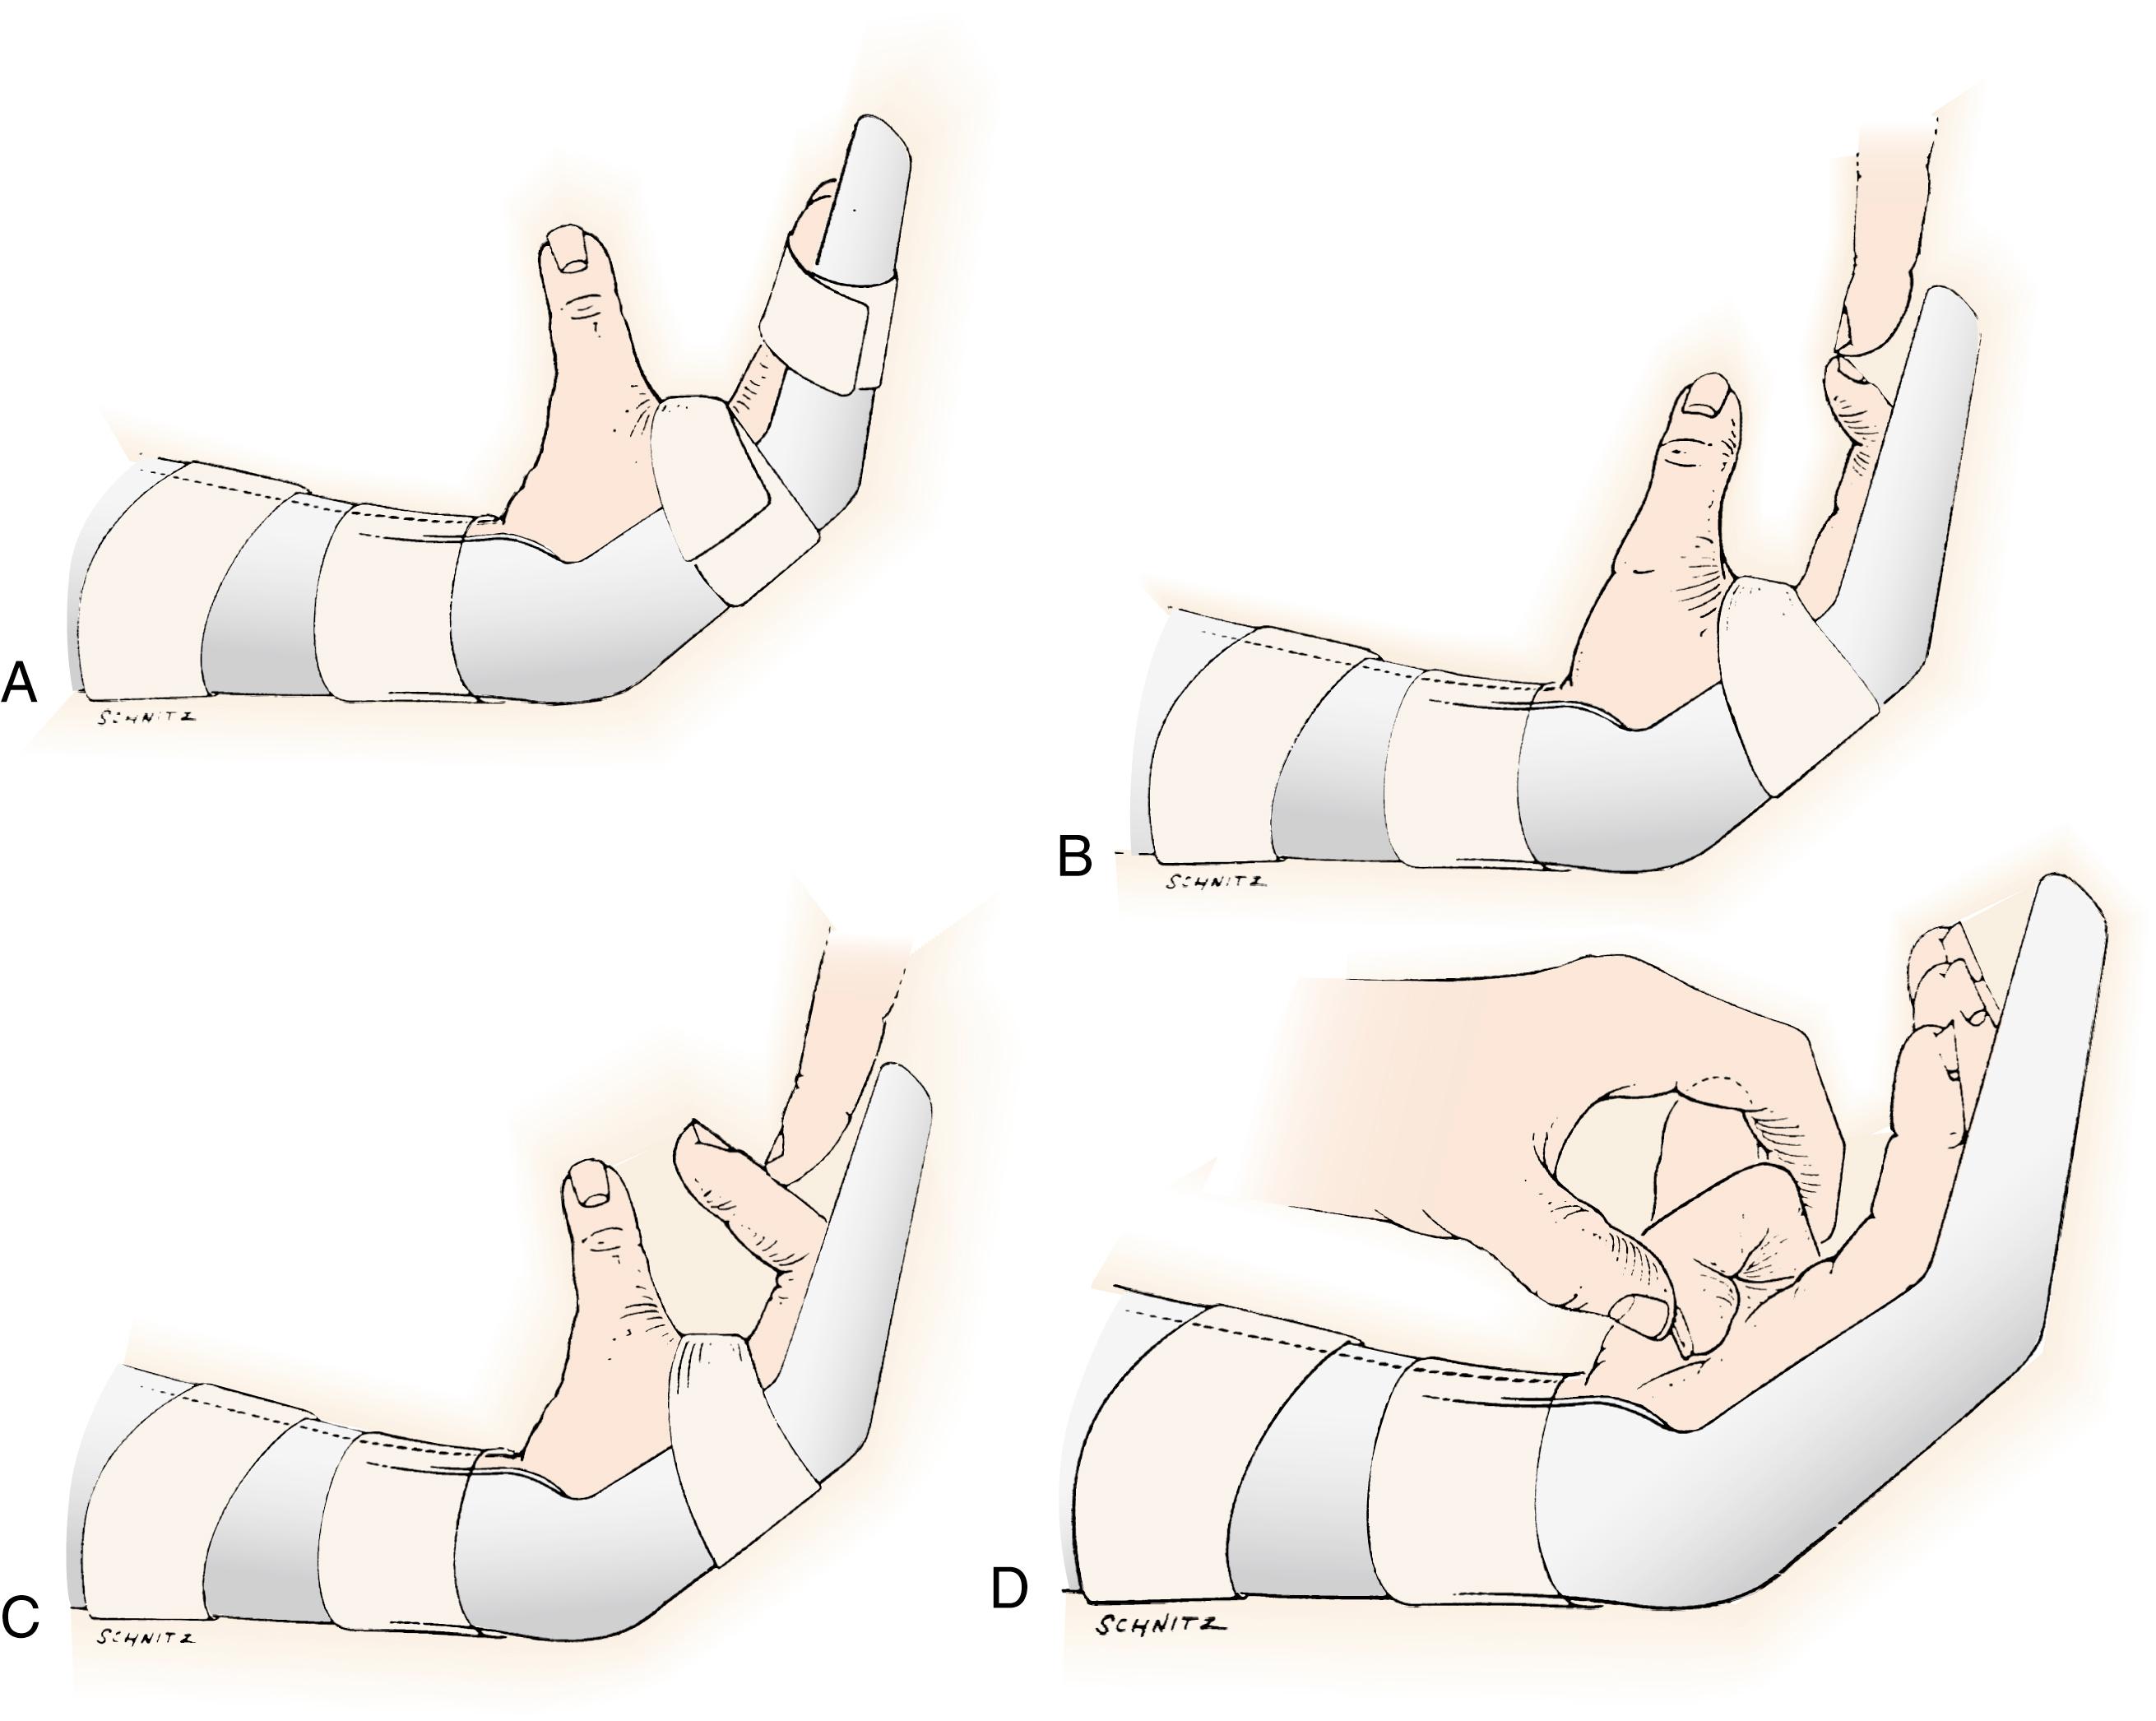
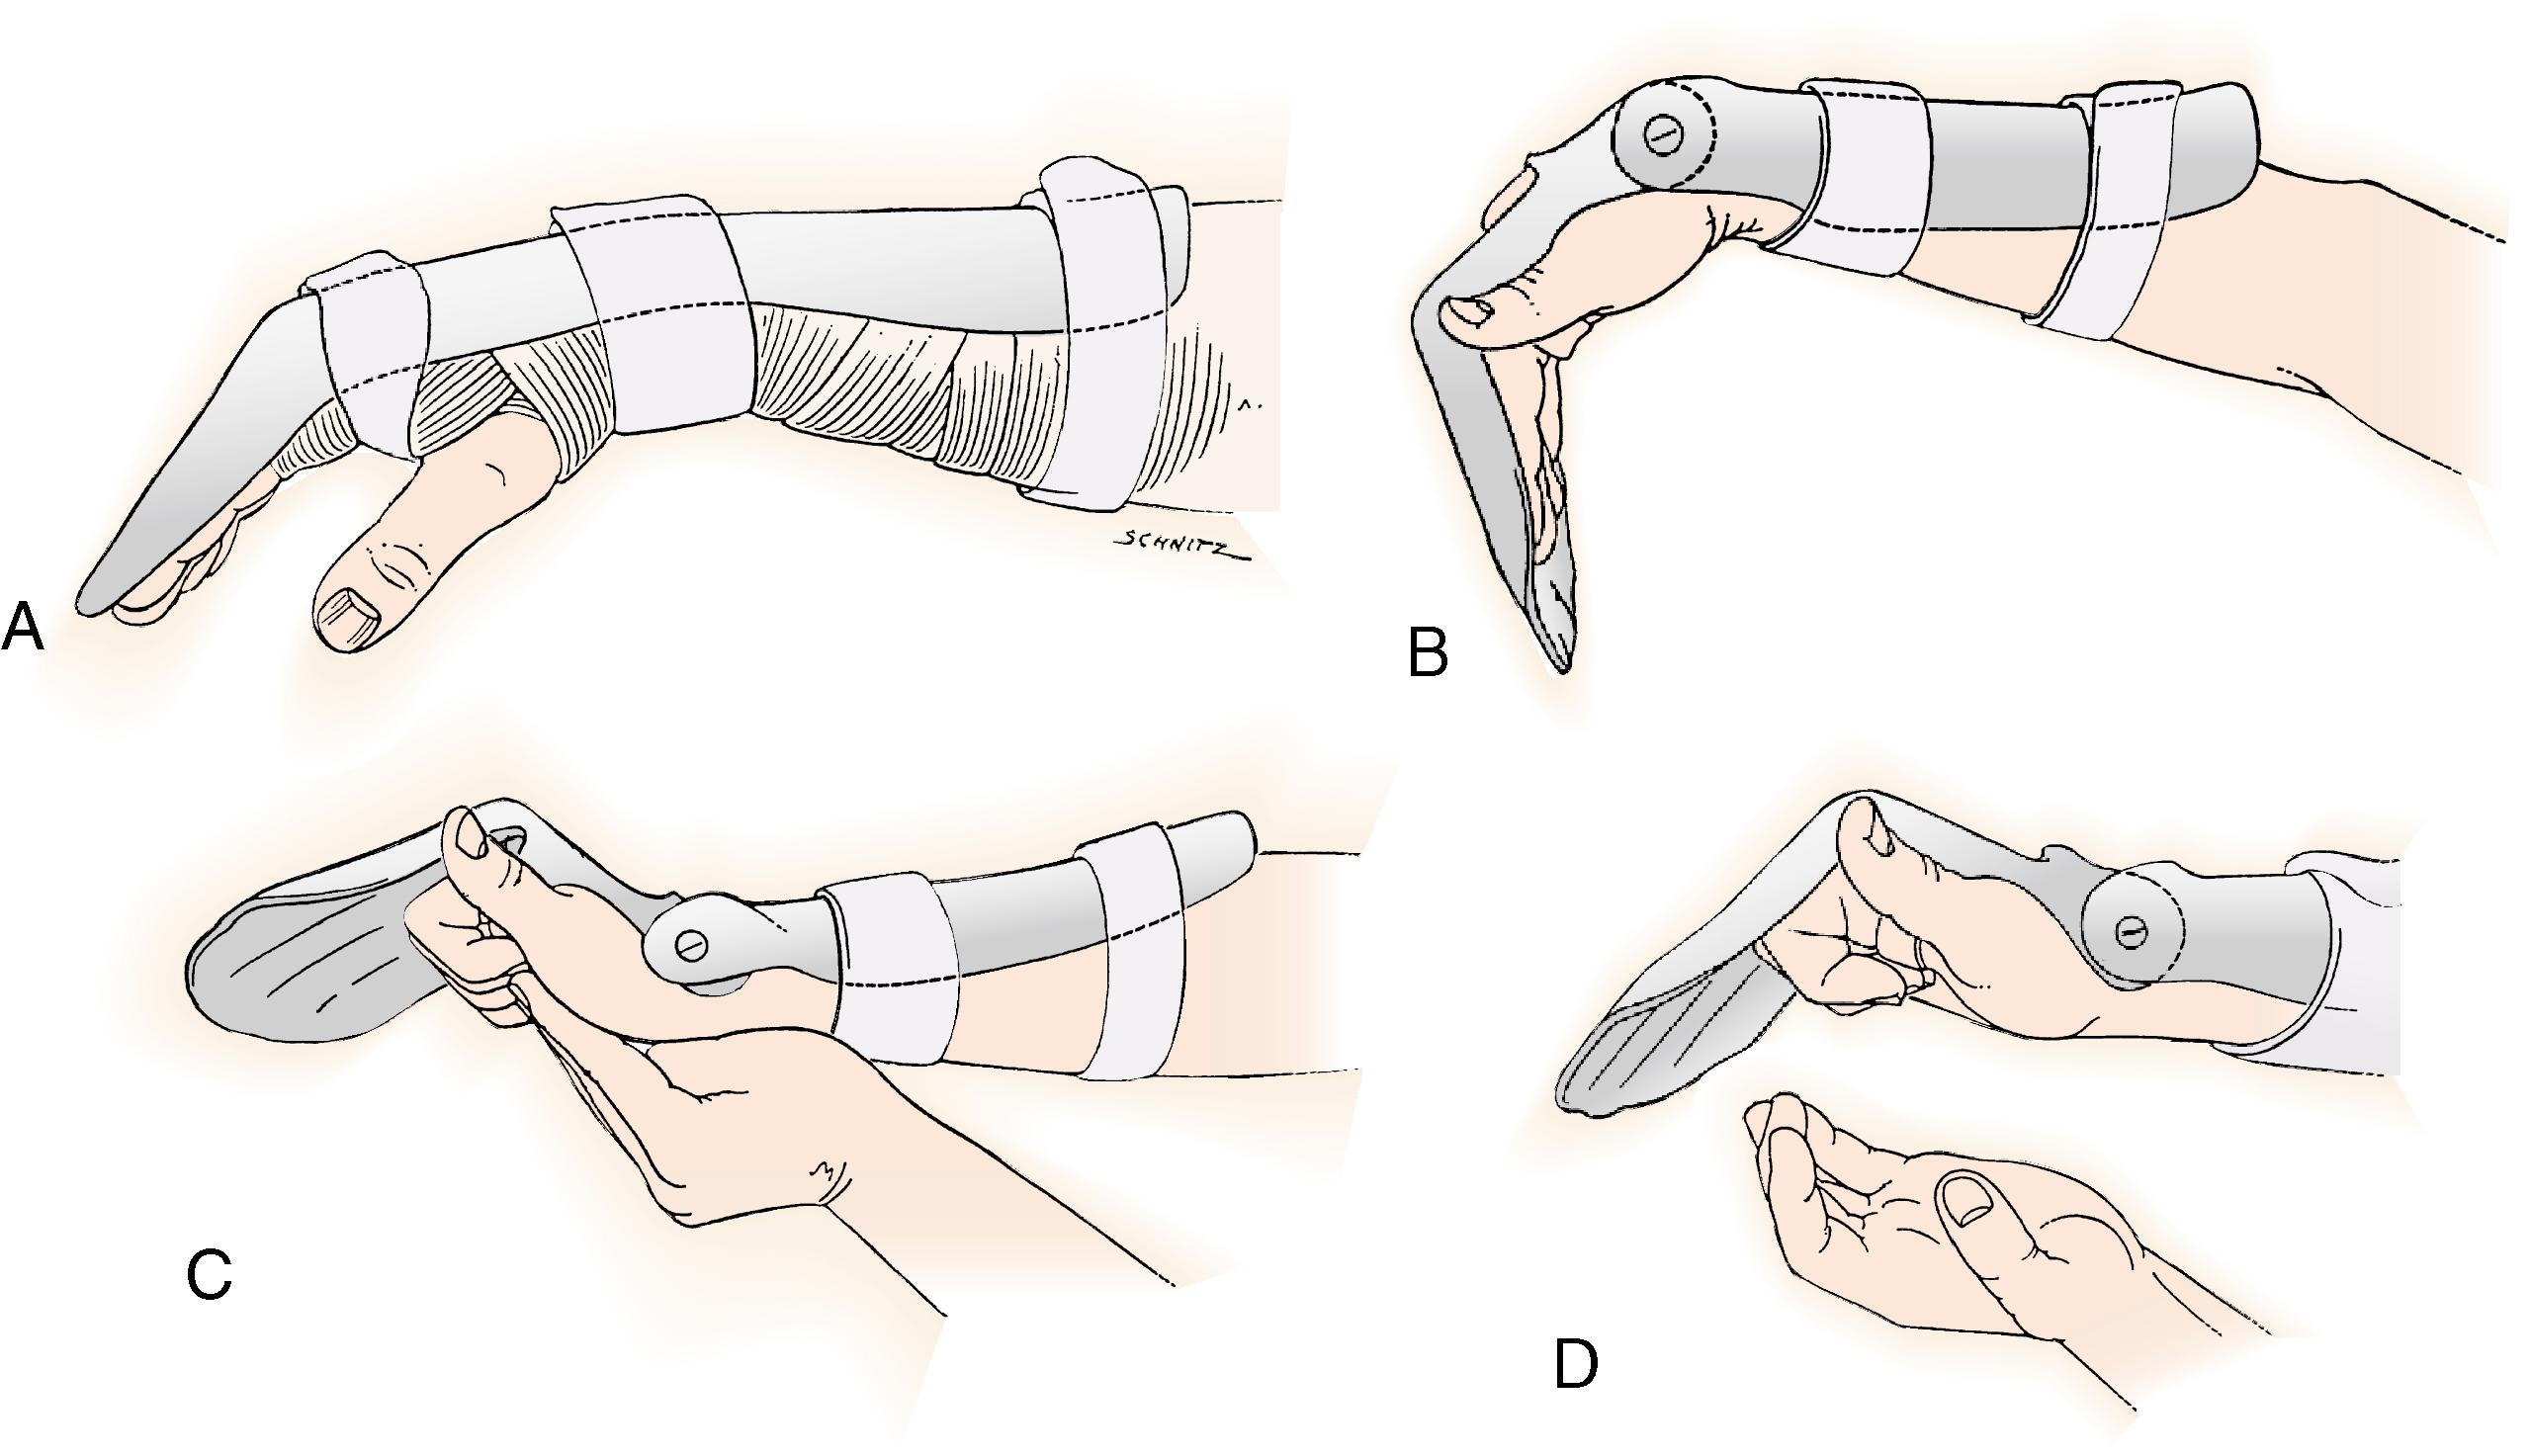
Therapists are encouraged to choose a postoperative program that controls the amount of force applied to the repair site, while promoting both proximal and distal of the tendon excursion. Ultimately, improvements in tendon excursion are thought to be associated with improvements in range of motion and patient outcome. The rationale for applying any force to the healing tendon during a postoperative rehabilitation program is to promote a small amount of proximal excursion and not to accelerate healing. , Application of excessive force during rehabilitation can lead to tendon gapping or rupture. The force that is applied to the repair site is controlled during an aftercare program by exercise and the position of the wrist, MCP, and IP joints.
Excursion, measured in millimeters, is best described as the total amount of glide that a point on the tendon travels during range of motion. In the original Duran and associates protocol, the authors reported that 3 to 5 mm of tendon excursion was sufficient to prevent restrictive adhesions after repair. This concept has been widely accepted and incorporated into tendon rehabilitation programs. More recently, authors have concluded that 6 to 9 mm of excursion was the maximal limit of therapeutic excursion during a postoperative program, and that further excursion was not beneficial.
Although each patient’s situation is generally similar, the particular therapy program must be individualized. Many factors influence decision making in the aftercare regimen, including patient compliance, edema (which increases the work of flexion), suture size and configuration, wound complications, wound dressings, systemic conditions, or concomitant injury. With these factors in mind, our center categorizes and treats postoperative patients in two general categories: patients who are appropriate for an accelerated rehabilitation program and patients who are not. That decision is best made in collaborative fashion between surgeon and therapist.
Before beginning therapy, it is important for the therapist to have information from the operating surgeon about the type of repair that was done and whether other structures were injured. If a high-strength tendon repair technique was successfully performed in a compliant patient, the patient is placed in a more aggressive early motion program that employs individual decision making based on patient progress. Therapy typically begins 1 to 5 days after surgery. On the initial visit, a wrist-neutral dorsal blocking orthosis is applied. The MCP joints are positioned at 50 degrees of flexion, a position that promotes gentle stretch on the collateral ligaments of the MCP joints and prevents excessive stretch on the flexor tendons.
The patient is taught an hourly home exercise program that consists initially of passive positioning of the fingers in a fist for 3 minutes, with the splint in place. Next, within the confines of the orthosis, the patient performs the exercise of passive flexion of the affected finger to the palm, followed by actively extending the finger to the orthosis: 15 passive flexion and active extension movements to the bib of the splint are done in each hour. Finally, the patient removes the splint and performs a tenodesis program. The fingers are passively flexed into the palm using the unaffected hand, and the wrist is actively extended to a comfortable end range. The patient gently contracts the flexor muscles, removes the unaffected hand, and actively holds the fist position for 5 seconds. After 5 seconds, the patient releases wrist extension and the wrist falls into flexion, and as it does, the fingers passively extend. The tenodesis cycle is repeated 10 times.
When not exercising, the patient straps the fingers into the bib of the splint, positioning the MCP joints in flexion and the IP joints at −10 to 0 degrees of extension. Based on the patient’s comfort with the program and any complicating factors, components of the program can be decelerated, accelerated, or discontinued by the therapist. The patient is counseled to stretch the PIP joint gently and passively with the MCP joints held in flexion to avoid joint contracture. Wounds are dressed with loose-fitting ½-inch tube gauze. Edema is addressed in the first 2 weeks with elevation, the gentle pumping action of the exercises, and the gentle compression of the gauze. After 2 weeks postoperatively, compressive bandages can be applied as needed.
At 3 weeks postoperatively, the dorsal protective splint is removed for isolated and composite active joint range-of-motion exercises that are done hourly. The timing and type of active exercises prescribed at this point in the aftercare program are based on the physiologic healing response of the injured hand. Our decision to prescribe more forceful exercises has been adapted from the work of Groth, who analyzed and reported the results of differing wrist and hand positions coupled with passive and active movements to create a pyramid of progressive force application to the healing tendon. Groth defined “high” or “low” physiologic tissue responses and suggested clinical approaches to each. Accelerated wound healing, edema, and dense scar resulting in the formation of peritendinous adhesions characterize a “high” physiologic response. Ultimately with a “high” physiologic response, there is significant loss of flexor tendon excursion. Patients who exhibit a “high” response are progressed through the pyramid of exercises quickly to promote force and prevent further adhesions. During this time, the clinical evaluation for the formation of peritendinous adhesions that limit tendon excursion is done. The nonresistive exercises of the pyramid are ranked in ascending order of increased force, which includes place-and-hold, composite-fist, straight-fist, and isolated joint motion with joint blocking exercises.
Conversely, a “low” physiologic response is characterized by slower wound healing, limited edema, and minimal discrepancy between the patient’s active and passive finger flexion measurements. These patients generally have improved flexor tendon excursion, and less risk is required in therapy to maintain the range of motion. These patients may not have as robust a repair response, so progression to resistive exercises may be delayed, and patients are counseled not to use the hand in strength activities until cleared to do so by their surgeon.
The dorsal protective splint usually is discontinued at approximately 6 to 8 weeks postoperatively. If any flexion contractures of the IP joints are present, they are addressed with a static progressive device at that time. Isolated strength exercises are gradually introduced at 10 weeks postoperatively.
For more complicated cases, for patients with limited understanding, or for cases where compliance with the program is questionable, we use a passive mobilization program (see Fig. 6.18 ). The same dorsal protective splint is used, with the wrist in neutral and the MCP joints in 50 degrees of flexion. A passive range-of-motion program (Duran type of program) of isolated IP and MCP joint passive motion is taught. This program requires that the patient passively flex and extend the PIP joint of the affected finger while holding the DIP and MCP joints flexed, and then passively move the DIP joint into extension and flexion with the MCP and PIP joints flexed. All of the exercises are performed within the confines of the splint. The patient’s wounds and edema are addressed as described previously. The progression of force application after 4 weeks of passive motion is similar to that described previously but delayed for 2 to 3 weeks.
When children or adolescents have sustained a lacerated tendon and subsequent repair, the surgeon must make a decision with help from the parents and treating therapist as to whether or not the patient is a candidate for an accelerated rehabilitation program. A basic tenet of any early motion flexor tendon rehabilitation program is that the patient be an active participant in aftercare. For this reason, the surgeon, parents, and child all must agree that the child is mature enough to perform the essential functions of rehabilitation safely. If the decision is not to allow an early motion program, the patient’s wrist and hand are immobilized for 4 to 6 weeks in a cast positioning the wrist in neutral, the MCP joints in 70 degrees of flexion, and the IP joints straight. After the initial period of immobilization, the patient is referred to therapy for careful initiation and progression of range-of-motion exercises for the next 6 weeks. Although the advantages of increased repair site tensile strength, decreased peritendinous adhesions, and better functional outcomes associated with early motion programs are well documented, immobilizing a child’s hand after flexor tendon repair has not been found to be as deleterious as it is for adults.
If participants agree that the patient is a candidate for an early protected range-of-motion program, the tenodesis aftercare program discussed previously is employed. The treating therapist must frequently monitor the patient’s compliance by having the patient attend therapy at least two times a week for the first 6 to 8 weeks. If more complicated forceful movements need to be eliminated from the child’s aftercare program, movements such as tenodesis with place-and-hold therapy or simply place-and-hold therapy alone can be reduced to passive flexion/active extension movements within the splint. Progression through the phase of therapy is done based on both the injury and the patient’s individual physiologic response to the injury.
Recent research has described the use of ibuprofen at antiinflammatory doses (2400 mg/day) to decrease peritendinous adhesions following zone 2 flexor tendon repairs. In their study, Rouhani and colleagues found that patients who received ibuprofen following tendon repair had a better range of motion compared with their control group. There were no reported complications.
Despite continued improvement in surgical care and rehabilitation of flexor tendon injuries, complications still occur and may have devastating effects on hand function. , Infection, skin flap necrosis, tendon repair rupture, and tendon adherence all adversely affect digital function after injury. The greatest protection against repair site rupture is a well-done multistrand core suture, complemented by a running circumferential repair and early institution of high-quality hand therapy. Should repair site rupture occur up to 3 weeks postoperatively, repeat repair is done. If rupture occurs, it is crucial that the condition be diagnosed and treated within days of the event, before scarring and retraction prevent successful repeat repair. Patients should be counseled regarding the possibility of tendon reconstruction with a silicone rod or tendon graft.
The repaired tendons may become adherent and fail to glide sufficiently to restore unimpeded digital function. The decision to proceed with tenolysis is made after serial joint measurements fail to show improved active digital motion despite continued therapy. A prerequisite for successful tenolysis is that full or nearly full passive digital flexion has been achieved. Tenolysis is a surgical strategy that should be first considered 4 to 6 months after tendon repair for patients who have significant loss of tendon excursion (see Flexor Tenolysis).
IP joint contracture can occur after flexor tendon repair, especially among patients treated with the historical technique of elastic digital traction splinting. Early identification and treatment of the contracture using nonsurgical strategies of passive stretching exercises and static progressive splints usually results in satisfactory outcomes. Patients with recalcitrant contractures that limit hand function at 4 to 6 months after tendon repair can be considered for IP joint release.
Extensile exposure in a controlled setting with optical magnification allows the extent of the injury to be defined.
Tendon retrieval is done using atraumatic techniques and windows through noncrucial areas of the flexor tendon sheath.
Handling of the tendon should be minimal.
The tendon must be accurately oriented.
The core tendon sutures should be placed to allow for accurate coaptation of the tendon ends. The suture method should provide a stable, smooth repair that freely glides within the tendon sheath.
A circumferential suture is used to “finish” the repair and add strength.
Sheath closure is necessary only if it improves tendon gliding.
At the time of repair, ensuring full excursion of the flexor tendon repair is useful in guiding therapy and can be facilitated by performing the tendon repair using a local “awake” anesthetic method.
With improvements in flexor tendon repair methods, the need for flexor tendon reconstruction has substantially diminished. Still, flexor tendon reconstruction is a necessary and important procedure for failed or neglected tendon repairs. Prior to Lister’s report detailing a successful method for zone 2 flexor tendon repair, tendon transection in the finger had been treated using tendon grafting as the preferred method for the reconstruction of finger flexion. Restoration of satisfactory digital function after an unrepaired flexor tendon laceration or a failed repair remains one of the most difficult challenges in hand surgery. , , , ,
In this section, we review the indications and methods for primary tendon grafting, staged tendon grafting, select tendon transfers, pulley reconstruction, and tenolysis. Advances in repair methods and postoperative rehabilitation strategies have improved the results of flexor tendon reconstruction. Research that focuses on surface cell modulation, scaffold seeding, other tissue engineering methods, and biochemical agents that may decrease adhesion formation and facilitate graft survival will likely improve reconstructive surgical strategies in the future.
Proper patient selection is essential for the success of flexor tendon reconstruction. Before proceeding with surgery, the nature and number of procedures as well as the extent of postoperative therapy should be outlined for the patient. Finsen reported that most patients underestimate the impact of the reconstruction process. The patient must be willing and able to adhere to the aftercare regimen to optimize outcome. A number of patient variables have been identified that affect the need for and outcome after tendon grafting:
Age of the patient. Younger patients typically do better than elderly patients; however, in very young patients, technical difficulties and difficulties with rehabilitation compliance may compromise the outcome.
Mechanism and extent of trauma. Crushing injuries, fractures, joint disruption, nerve and artery damage, skin loss, and infection contribute to a poorer prognosis after reconstructive surgery.
Level of tendon laceration. As a rule, tendons injured outside the digital flexor sheath yield better results than tendons injured within zone 2.
Healing response of the patient. The patient’s individual innate healing response to injury is likely to influence the end result.
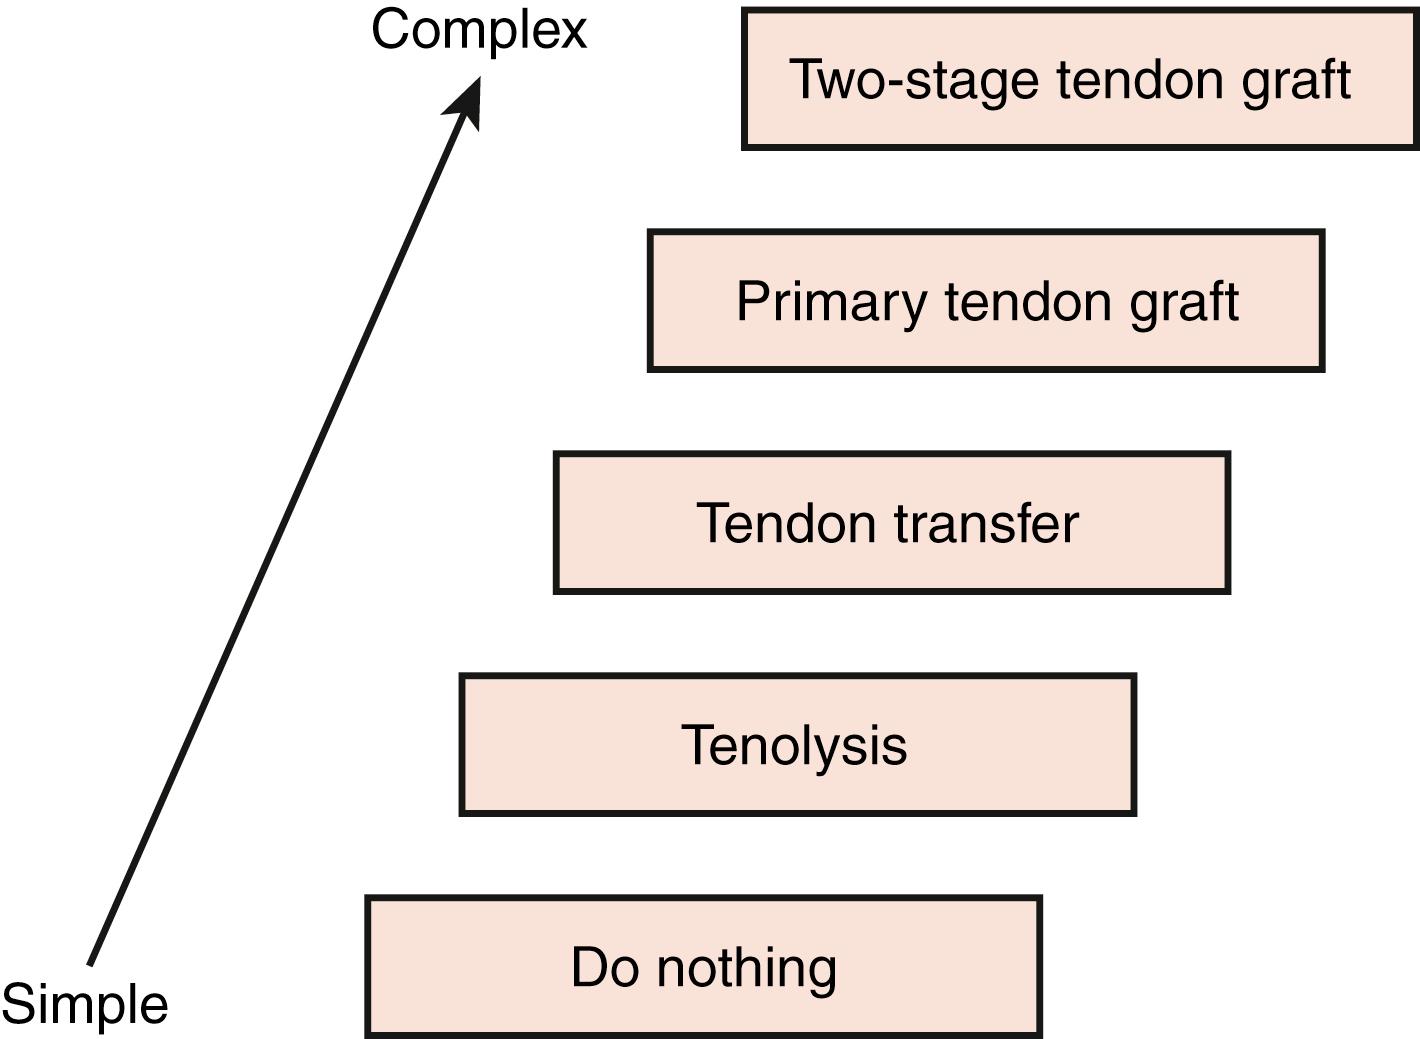
The timing of and nature of reconstructive procedures play a role in contributing to the success of the care plan. Reconstruction of the flexor tendon system can be viewed as a management ladder, with each rung representing a need to address greater impairment ( Fig. 6.19 ). For patients with early tendon repair site disruption, we recommend an early reattempt at re-tendon repair. For patients who have previously undergone repair, we recommend 4 to 6 months of occupational therapy and rehabilitation to restore normal tendon gliding and joint mobility prior to considering tenolysis and joint release. If, upon exploration, tendon grafting is necessary, primary tendon grafting can be done from palm to fingertip when the palm and fibroosseous tunnel are satisfactory. If extensive adhesions have formed in the fibroosseous tunnel, a staged tendon grafting procedure should be started using a temporary silicone spacer to recreate a gliding space and the tendon graft implanted at a second procedure.
Full smooth finger motion is, in part, the result of normal flexor tendon excursion within the digital sheath. Any source of peritendinous adhesion formation will limit tendon excursion and, consequently, active digital motion. Tendon adhesions occur whenever the surface of a tendon has been compromised either by the injury itself or by surgical manipulation. , Failed primary tendon repairs, crush injuries, fractures, inflammatory conditions, and infections can all cause peritendinous adhesions to the adjacent tendon, skin, neurovascular structure, or bone. Additionally, adhesions may form at the juncture between the graft and the native tendon after a grafting procedure. If the adhesions are mild, an organized occupational therapy program can often restore full gliding. When a patient’s progress has plateaued and a substantial difference exists between passive and active range of digital motion, a tenolysis may be considered. Surgical release of restrictive adhesions has been shown to be an effective salvage procedure when tendon and pulley integrity are maintained and the involved joints are supple. , , ,
Flexor tenolysis is technically demanding and can be associated with significant complications, including tendon repair site and graft juncture rupture. If unsuccessful, the patient’s hand function may be worse than before surgery. Tenolysis is usually considered approximately 4 to 6 months after the index procedure and when the soft tissues have recovered sufficiently to allow another attempt at restoration of motion. The best candidate for tenolysis is a patient with limited active but full passive range of motion, supple soft tissues, and a tendon repair with localized adhesions that limit tendon gliding ( Fig. 6.20 ). It is paramount that the patient begins hand therapy as soon as possible after surgery. When surgical release of this region has been accomplished successfully, full or near full range of motion is often regained. Commonly, adhesions have formed over a long segment of the involved tendon and require extensive exposure for release.
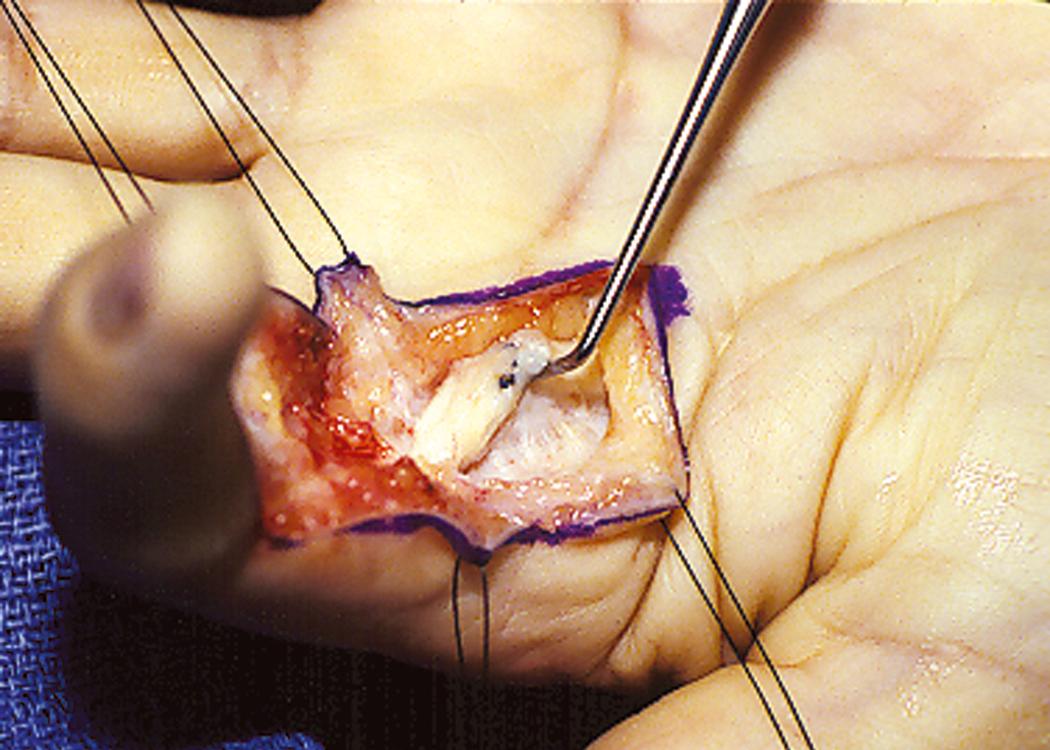
Because optimizing results after tenolysis requires immediate mobilization, any additional surgery that would require postoperative immobilization (i.e., repair of nonunion or skin coverage) should be done in a staged manner prior to tenolysis. Joint contracture is frequently seen in patients requiring tenolysis. These patients may require a capsulectomy, which complicates the problem further and results in diminished gains if done concurrently with tenolysis. Prognostic indicators that are associated with a poorer outcome include patient age older than 40 years, nerve repair or graft, late tenolysis (>1 year postoperatively), and tenolysis requiring a prolonged operative time.
Although opinions vary on the best timing of tenolysis, almost all surgeons agree that a reasonable time should be allowed for durable tendon repair, wound healing, and spontaneous remodeling of adhesions and scar tissue. Fetrow, after reviewing Pulvertaft’s cases, stated that 6 months should elapse before tenolysis after a free tendon graft to lessen the risk of graft rupture and suggested that a minimum of 3 months of healing be allowed before tenolysis after primary tendon repair. Rank and Wakefield originally waited 3 months but later advocated a delay of 6 to 9 months before considering tenolysis. Weeks and Wray reported that most of the active digital function obtained after a tendon graft occurred by the 22nd postoperative week. Based on these reports, we usually consider tenolysis at 4 postoperative months in motivated patients after primary repair who have loss of active motion, full passive motion, stable soft tissues, and healed fractures. The patients need to be willing and able to work with a hand therapist after the surgery to obtain the best outcome, and must accept the potential risk of tendon rupture following surgery.
The effect of patient age on functional improvement after tenolysis in children was investigated in a report by Birnie and Idler. These authors noted that tenolysis in children younger than 11 years resulted in only minimal gains, whereas older children benefited from tenolysis even when it was done more than 1 year after the original operation.
Several authors have investigated the use of agents to block restrictive adhesion formation after tenolysis or tendon repair. Steroid preparations have been locally instilled to alter wound healing in the belief that adhesion formation would be less robust. Whitaker and colleagues, James, Carstam, , Rank and associates, and Wrenn and coworkers suggested locally administered steroids to be of some value, whereas Verdan and Fetrow concluded that steroids do not improve the results of tenolysis. Bora and colleagues found that many of these materials promoted additional scarring. Using a rabbit model, Tan and associates reported that oral ibuprofen administration limited adhesion formation after FDP repair. Other authors have reported on the potential benefits of 5-fluorouracil , and hyaluronic acid surface treatments in limiting adhesion formation following tenolysis and tendon repair in animal models.
Schneider and Hunter and coworkers advocated local anesthesia and intravenous sedation to allow the patient’s active participation during tenolysis (see the section on awake anesthesia in Chapter 1 ). In our practice we often use local blocks for tenolysis. After the procedure is completed, the patient can actively and painlessly demonstrate the range of motion that was acquired through tenolysis surgery. Recently Lalonde and Martin have advocated WALANT (see Updates: Tumescent Local Anesthesia for Wide-Awake Hand & Upper Extremity Surgery on ExpertConsult.com ). These methods of anesthesia have improved our ability to verify that the tenolysis is complete and the extent to which the patient can activate the tendon.
We reserve regional or general anesthesia for anxious patients and patients with extensive scarring where the procedure time would be extended. When a patient is under a regional nerve block or general anesthesia, the surgeon must be certain to extend the tenolysis proximal and distal to the zone of injury to ensure that all adhesions are released. Whitaker and colleagues recommended a “traction flexor check” by pulling on the involved tendon through a separate incision at the wrist; this provides an estimate of the potential range of motion and has the additional benefit of breaking up any adhesions that may have been missed.
The involved flexor system is approached through an incision sufficiently long to uncover the entire length of the adhesions. Preoperative planning should ensure that the entire flexor apparatus can be exposed if necessary. Flexibility of the surgical approach may be required to use previous surgical scars. Beginning in a proximal area without adhesion formation and using careful dissection methods, all peritendinous adhesions are methodically excised. The tendon surface should be carefully identified proximally and distally to make it easier to define the areas of dense scar tissue formation. Optical magnification and specialized instrumentation may facilitate this process. Fine Beaver blades (Beaver-Visitec, Waltham, MA) (#6300, 6400, and 6900) or specialized tenolysis knives (Meals Tenolysis Knives; George Tiemann and Company, Hauppauge, NY) are particularly useful to cleave tendon adhesions ( Fig. 6.21 ). The dissection is continued along the tendon surfaces until all adhesions are removed or a need for tendon grafting is determined. Traction on the proximal end of the tendon and finger flexion and extension during the procedure will help the surgeon evaluate for additional areas of adhesion formation ( Fig. 6.22 ). It is imperative to preserve crucial elements of the pulley system, especially the A2 and A4 pulleys. If this preservation is impossible, new pulleys can be constructed at the time of tenolysis, but we believe that this practice reduces the probability of success.
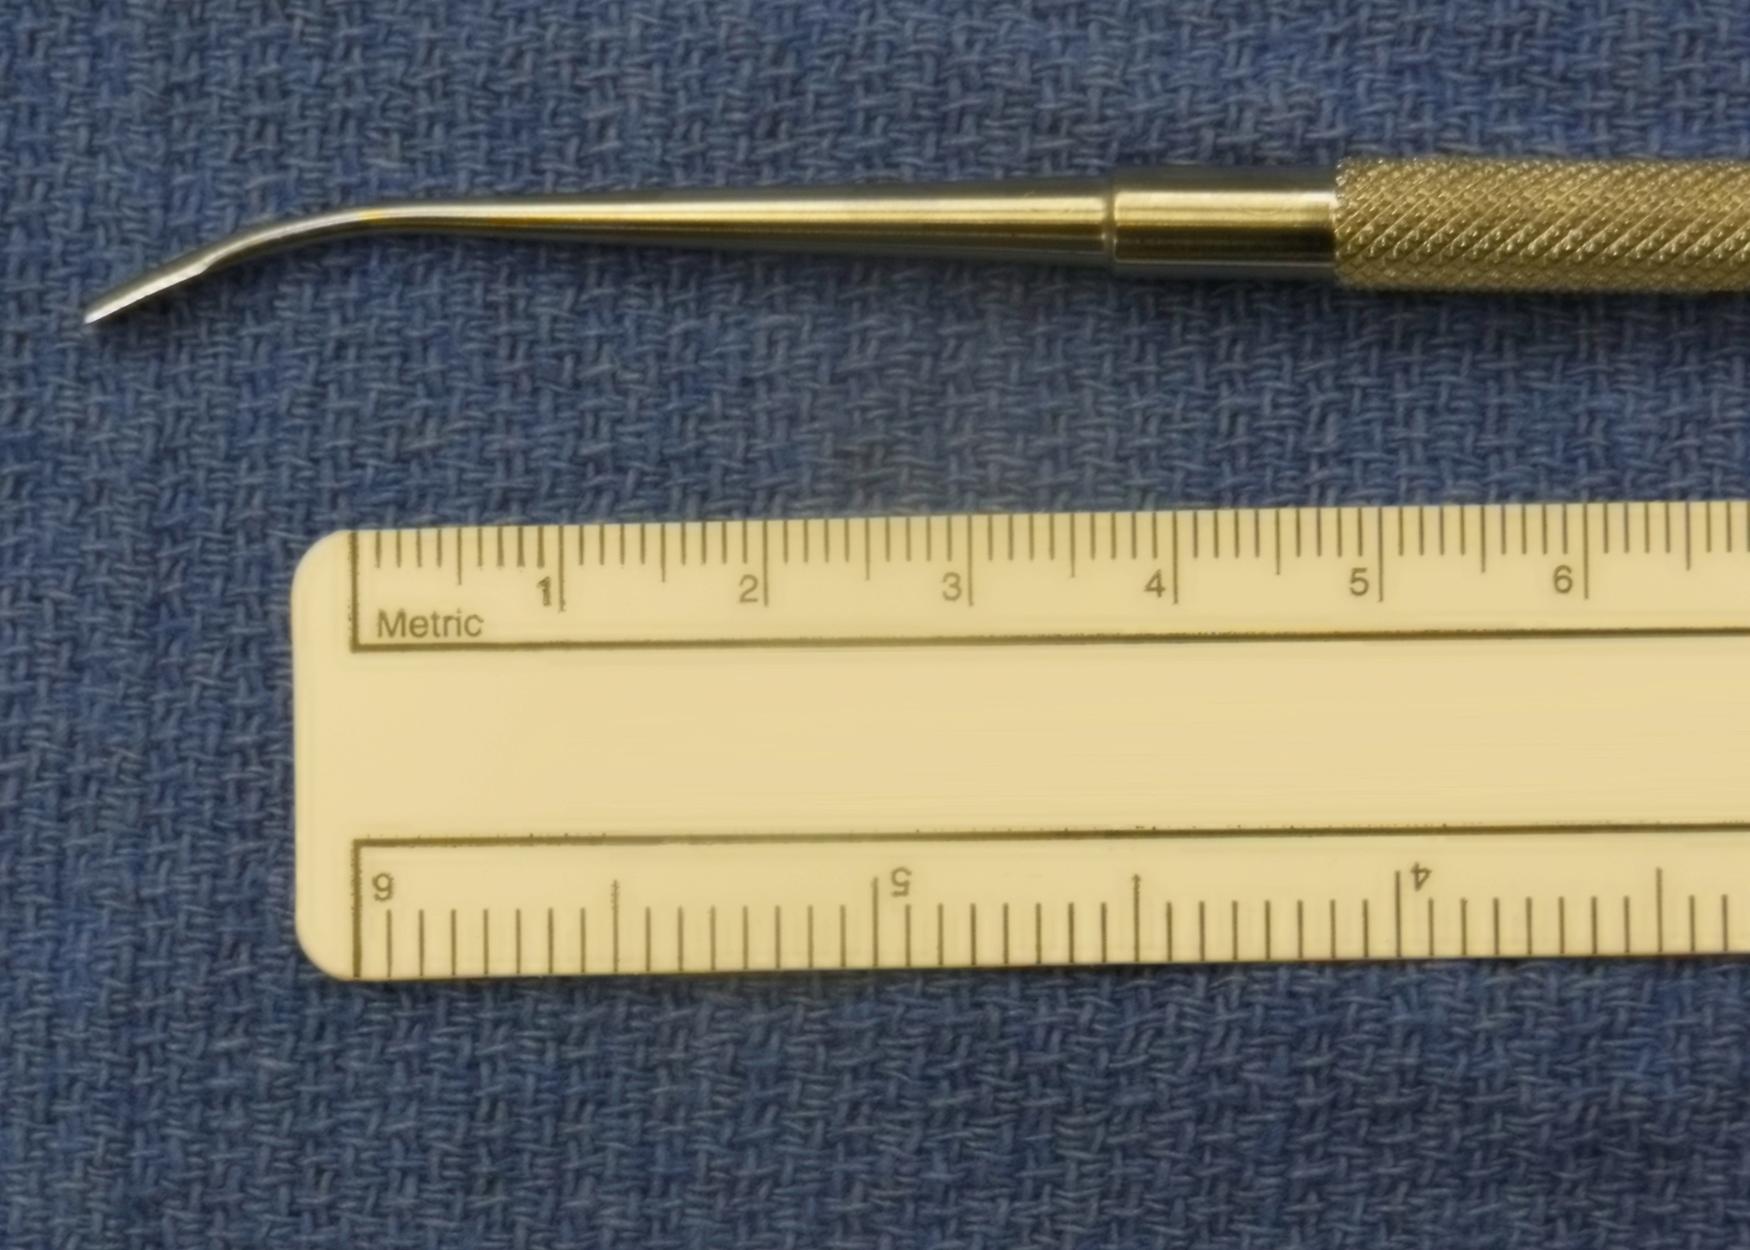
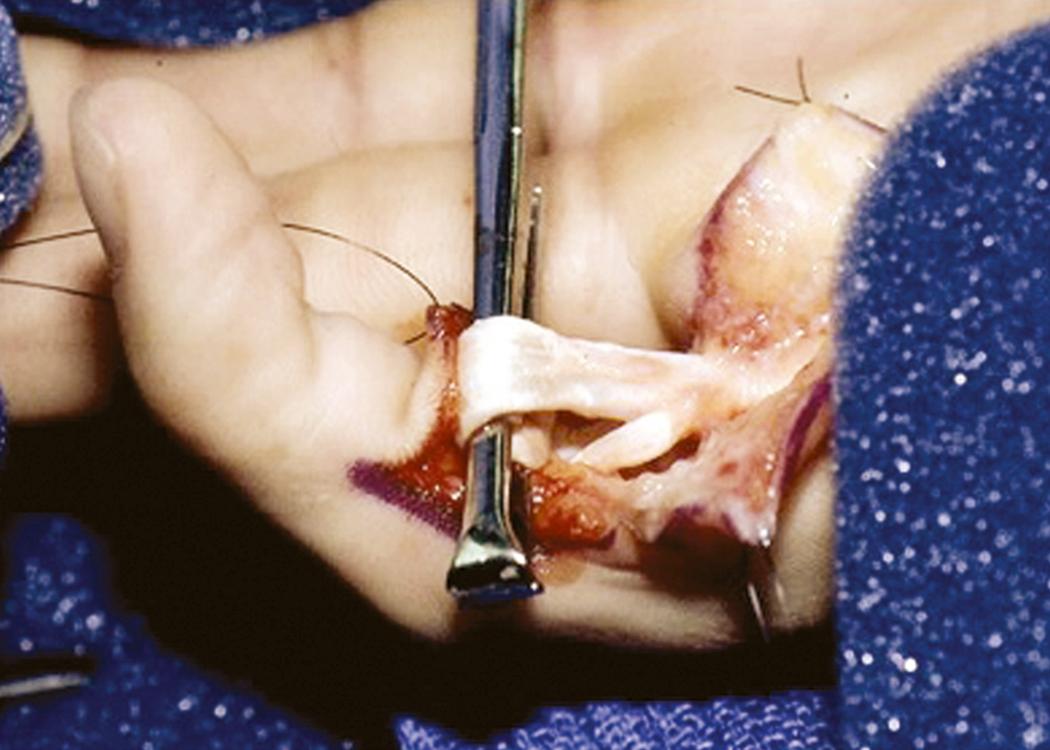
A staged tendon implant should be considered when the tendon sheath is obliterated over a long section or an adequate pulley system cannot be preserved and must be reconstructed at the time of tenolysis. A poor-quality tendon can rupture during a tenolysis, forcing the surgeon “up the reconstructive ladder” to consider tendon grafting (see Fig. 6.19 ).
After the tourniquet is released, hemostasis is helpful in limiting hematoma formation and facilitating aftercare. Wound closure is also a critical step. Using fine sutures to evert the skin edges for a nice closure is important to the success of the operation. A major benefit of using an anesthetic method that allows the patient to remain awake is the opportunity to allow the patient to witness the improved active digital flexion gained at surgery and understand their rehabilitation goals. Final intraoperative range-of-motion measurements are useful to both the patient and occupational therapist as a method of setting the goals for rehabilitation.
After closure, a nonconstrictive dressing is placed so that immediate flexion can be performed within the bandage to maintain the gains made at surgery. Active finger motion is begun under the supervision of a hand therapist on the first postoperative day. Active range-of-motion exercises must be the primary therapeutic modality after tenolysis. , To help the patient get through the difficult and often painful first week after tenolysis, an indwelling polyethylene catheter can be left in the involved area at the time of surgery. The catheter is inserted percutaneously so that the catheter tip lies below the proximal extent of the incision. A specialized continuous inflow device (ON-Q pump, Halyard Health, Alpharetta, GA) can provide up to 5 days of local anesthesia. Alternatively the catheter can be injected or a new block administered prior to therapy on the first few visits to improve discomfort during the session ( Fig. 6.23 ).
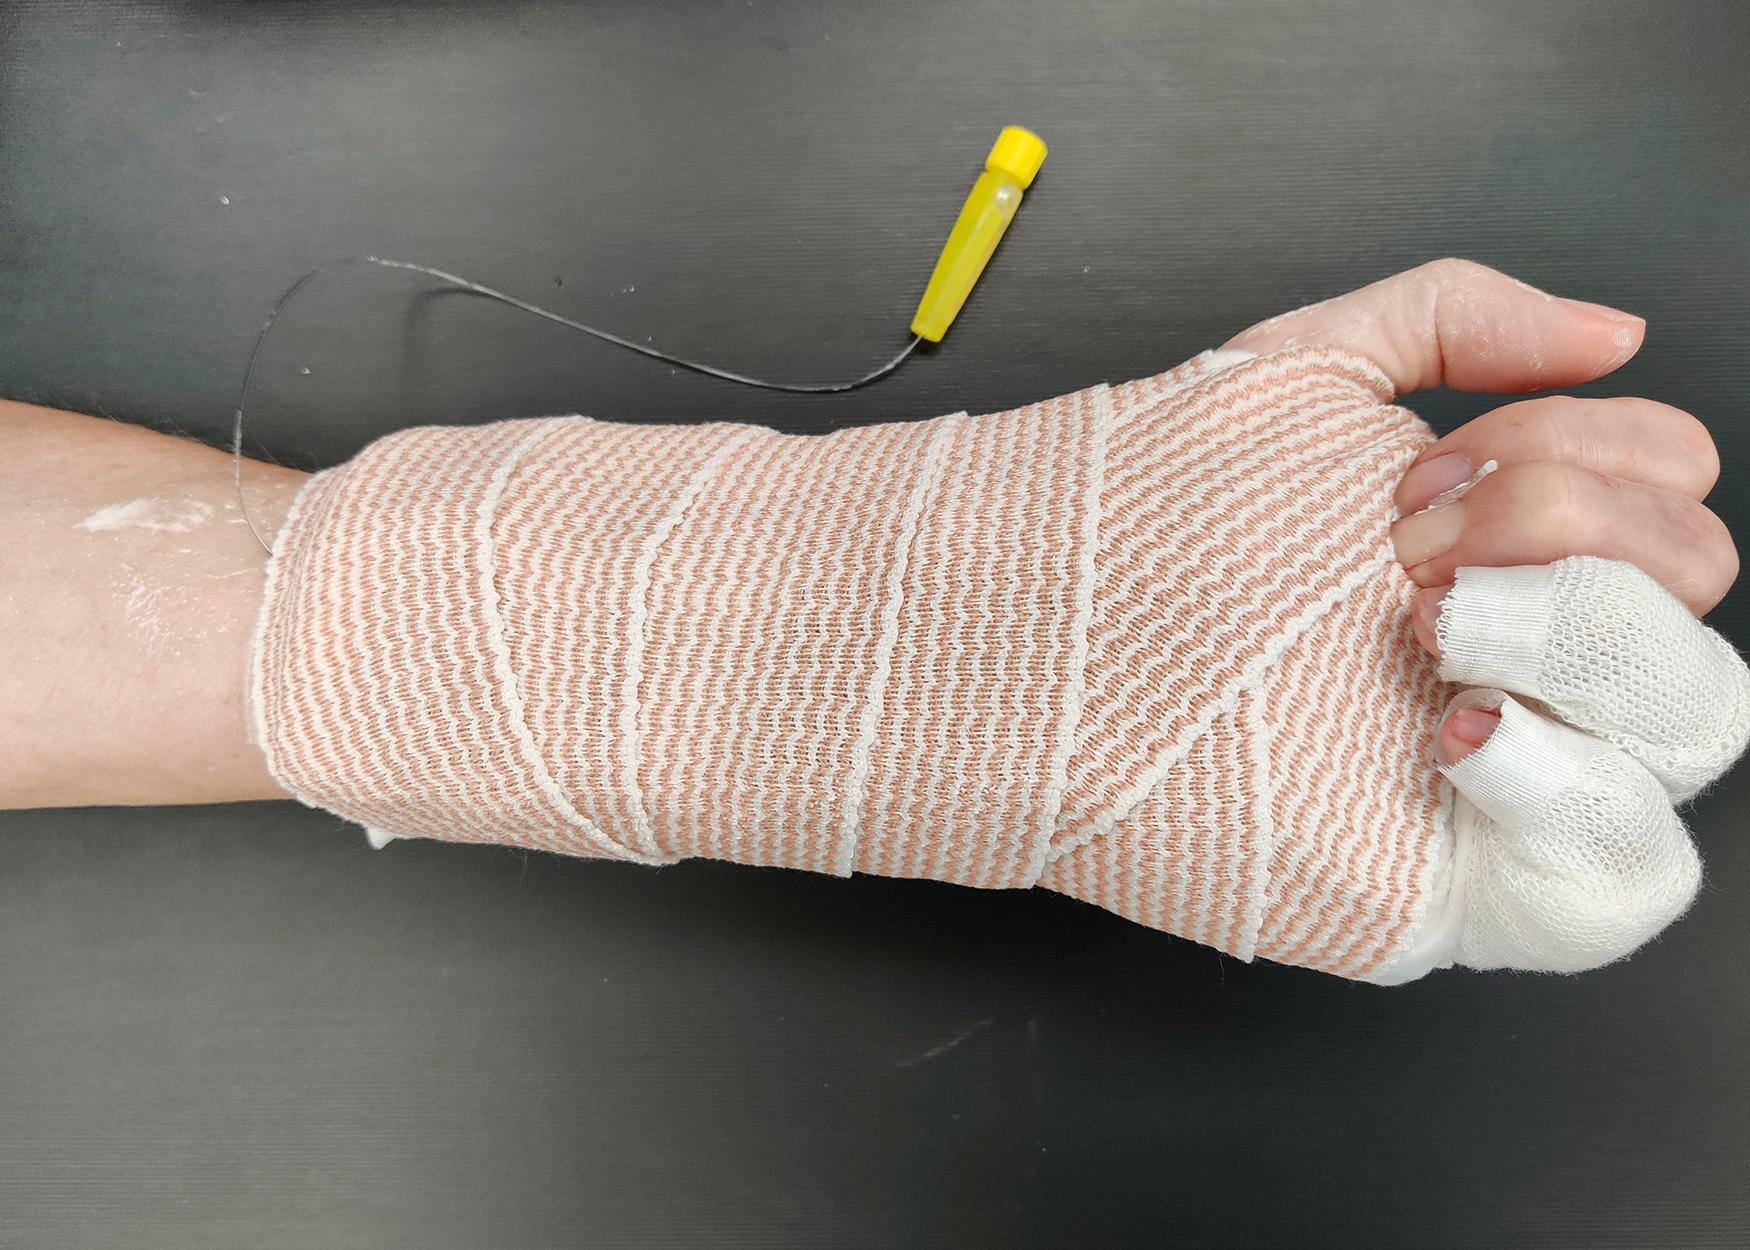
Continuous passive motion devices can be useful when joint contracture releases are performed concomitantly after tenolysis, but passive motion devices cannot substitute for immediate active pull-through exercises of the lysed tendon system. Continuous passive motion devices may impart a false impression of success if they are used without active-assisted exercises.
Tenolysis is a tedious and complicated procedure that, if successful, has a high likelihood of improving the discrepancy between the patient’s active and passive ranges of motion. The procedure has the following risks: neurovascular injury; tendon rupture; impaired healing; development of a cold, insensitive, and/or painful finger; and recurrence of adhesion. Some of these complications could lead to a discussion for the possibility of digital amputation. Having cautiously optimistic patients who understand the complexities and expect the unexpected is perhaps the healthiest mindset for the treating surgeon and the patient. One series reported an increase in active PIP joint and DIP joint range of motion of 70 degrees in 80% of patients, no change in 10% of patients, and loss of motion of 25 degrees in 10% of patients.
Single-stage free tendon grafting after flexor tendon injury remains one of the most elegant but difficult procedures in the hand surgeon’s
Tendon adhesions
A discrepancy exists between passive (full) and active (limited) range of motion after progress at hand therapy has plateaued.
Do not operate earlier than 4 months following repair or grafting.
Carefully design skin incisions to all exposure of the areas for release.
Use a block, the WALANT method, or neuroleptanesthesia, if possible. If using general or regional anesthesia, perform a proximal “traction check” through an additional wrist incision.
Use an extensile approach that allows for exposure of the entire flexor apparatus.
Start in an area of normal tendon to help with identification of the tendon surface when scar tissue is thick.
Specialized tenolysis blades may help divide adhesions without compromising pulley function.
Concurrent capsulectomy, concurrent osteotomy, age older than 40 years, and a 1-year delay contribute to a worse prognosis.
Supervised occupational therapy and active range-of-motion exercises should begin immediately and continue regularly for the early postoperative period.
armamentarium. The injured tendons are excised and replaced with a suitable tendon graft secured to the base of the distal phalanx at the FDP insertion and joined to a proximal motor in the palm or distal forearm. The palm-to-fingertip tendon graft ( Fig. 6.24 ) is usually performed in fingers that have had both flexor tendons severed in zone 2. Important surgical principles include the following:
Reconstruct only one tendon in each finger.
Never sacrifice an intact FDS tendon.
Use a graft of small caliber.
Perform the junctions outside of the tendon sheath.
Ensure adequate graft tension.
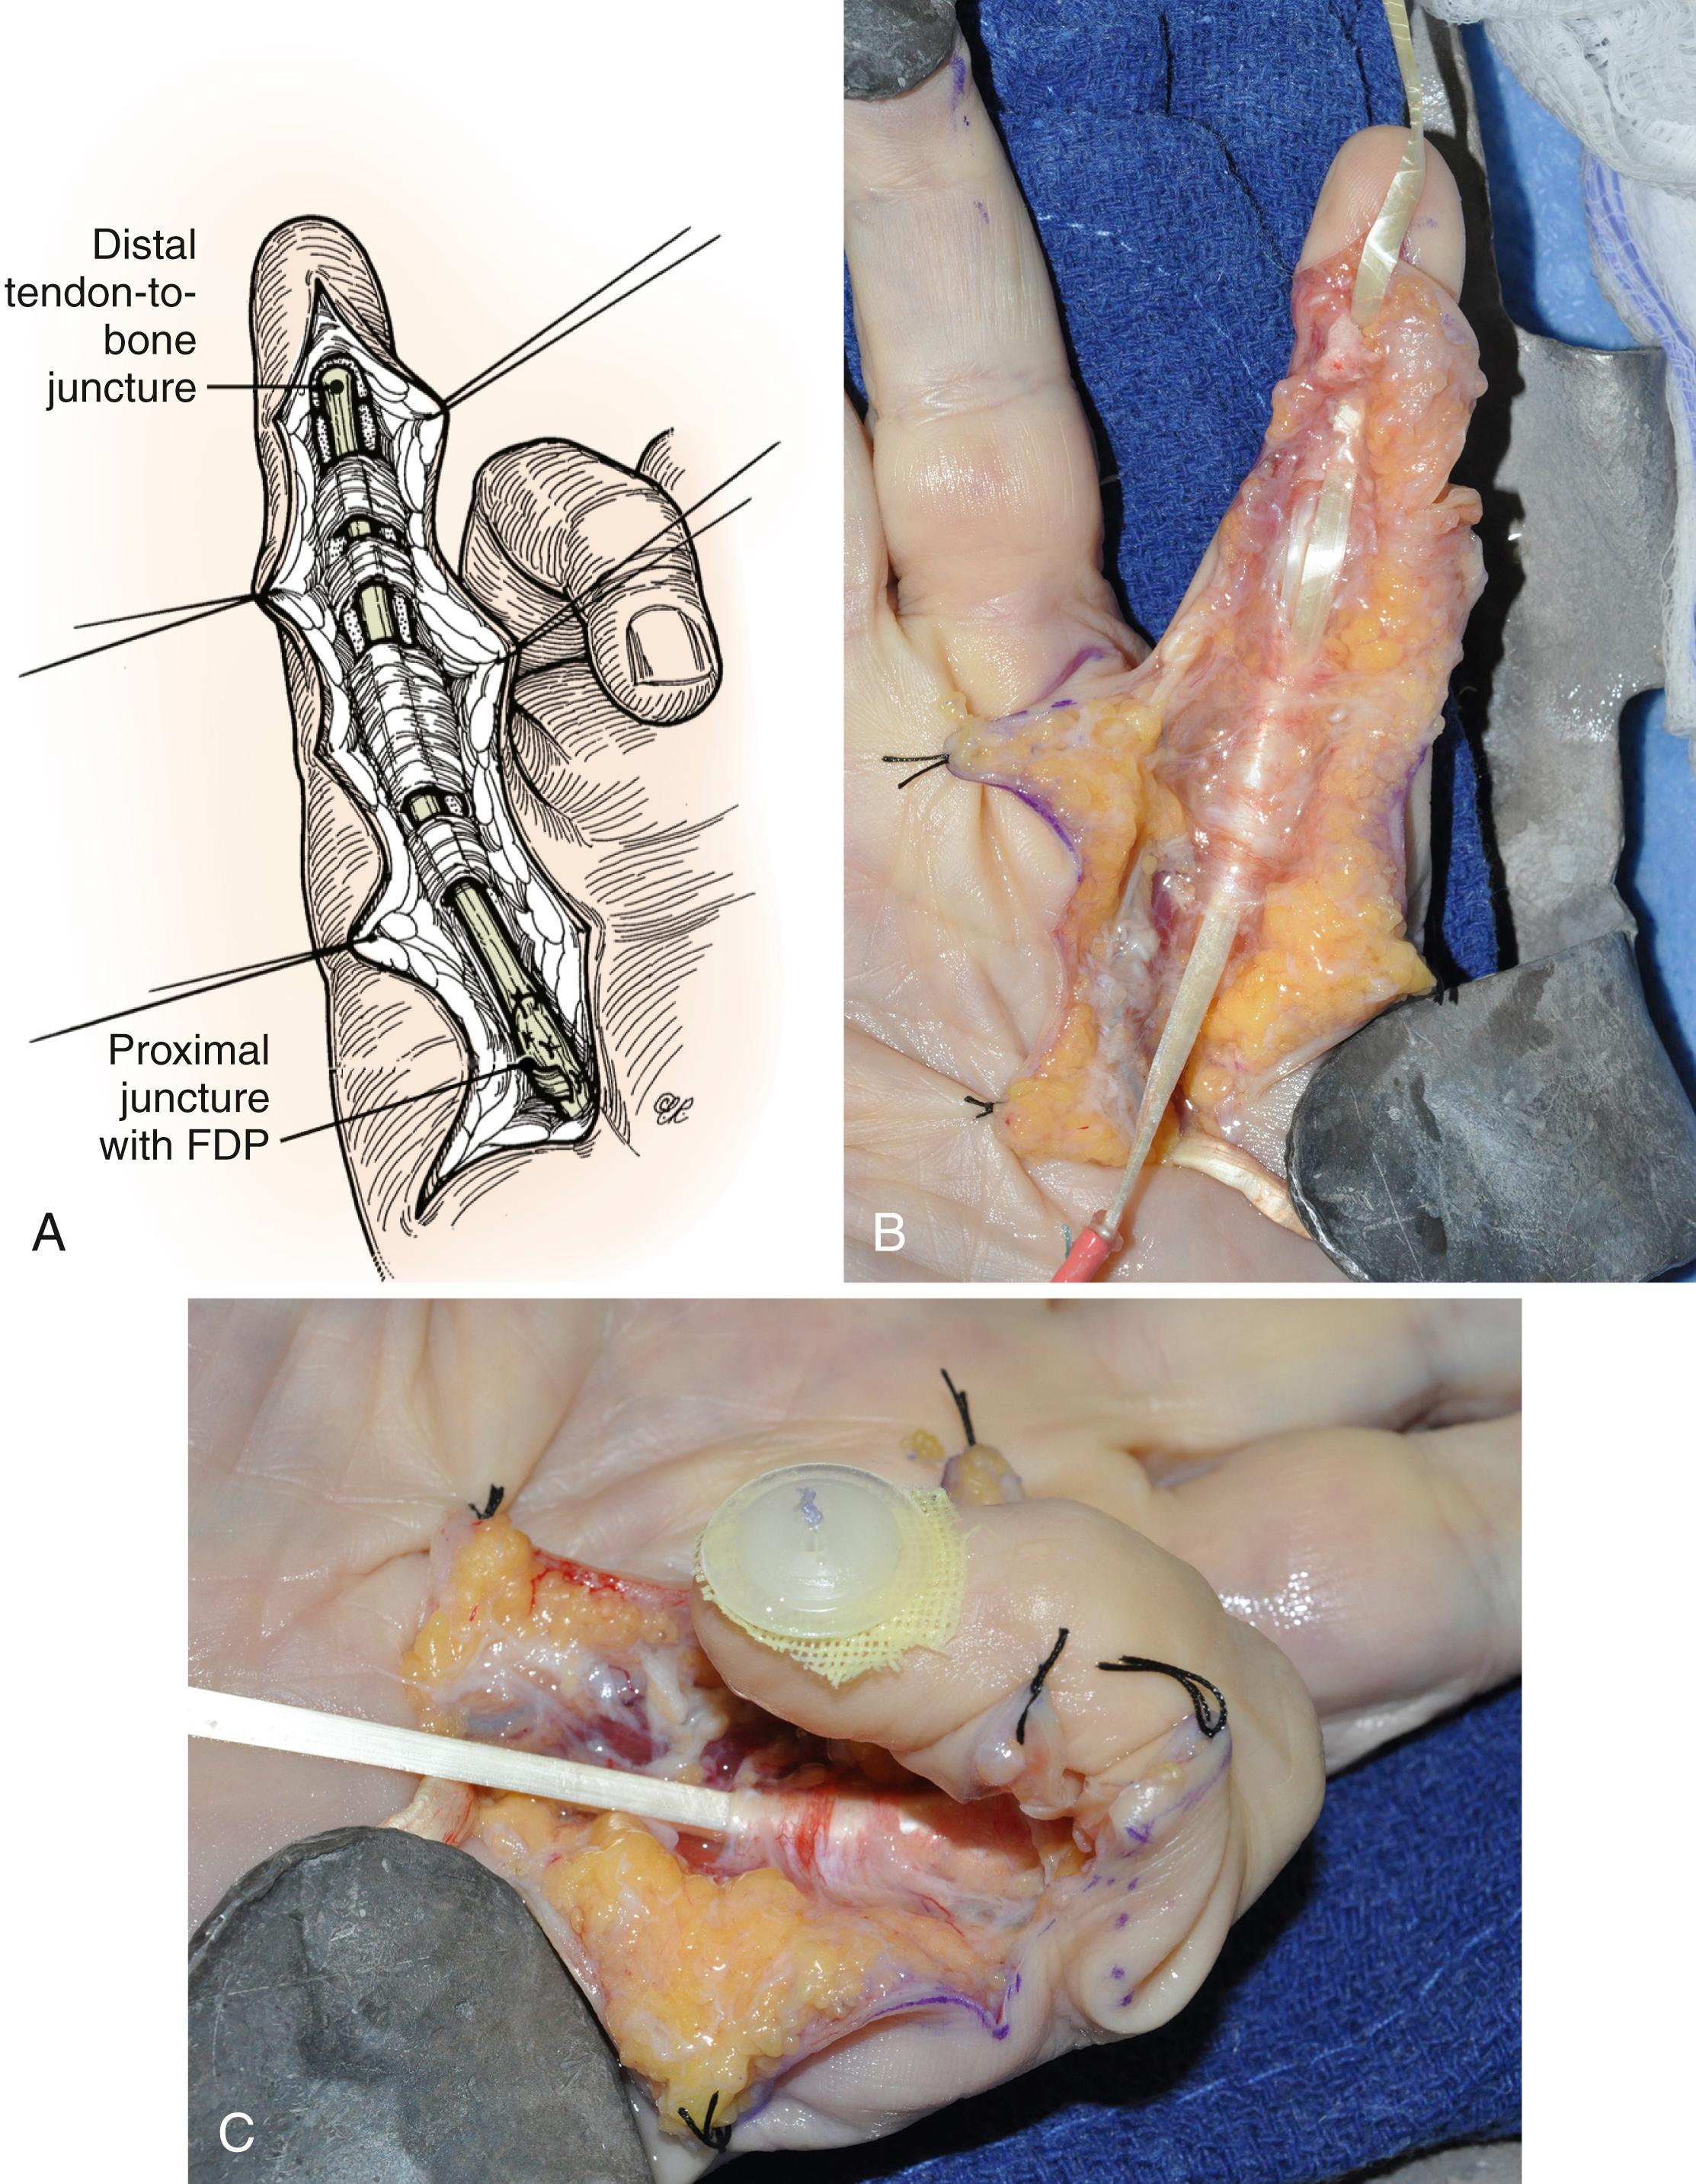
Flexor tendon grafting is indicated in the following clinical situations :
Failure of flexor tendon repair.
Injuries resulting in segmental tendon loss.
Delay in repair that obviates primary repair. Late referral or a missed diagnosis may preclude primary treatment. Lacerations that have been neglected for more than 3 to 6 weeks show tendon degeneration accompanied by scarring within the tendon sheath.
Patients in whom the surgeon believes delayed grafting is the better treatment alternative for a zone 2 injury (e.g., segmental or extensive tendon injury).
Occasionally, for delayed presentation of FDP avulsion injuries associated with significant tendon retraction.
Before flexor tendon reconstruction surgery is considered, the soft tissues should be healed, mobile, and stable; the joints should be free of contracture; and the finger should, ideally, have full passive motion (Boyes’ grade 1) ( Table 6.2 ). Pulvertaft emphasized that “the hand [must be] in good overall condition. There is no extensive scarring. Passive movements are full or nearly full. The circulation is satisfactory. At least one digital nerve in the affected digit is intact.” Prior to considering flexor tendon reconstruction, the surgeon should be prepared for and the patient advised of the need for additional reconstruction procedures after initial exploration. For example, at the time of initial exploration joint release, pulley reconstruction, tenolysis, and nerve reconstruction may be necessary, in addition to silicone rod implantation.
| Grade | Preoperative Condition |
|---|---|
| 1 | Good: Minimal scarring with mobile joints and no trophic changes |
| 2 | Cicatrix: Heavy skin scarring because of injury or prior surgery; deep scarring because of failed primary repair or infection |
| 3 | Joint damage: Injury to joint with restricted range of motion |
| 4 | Nerve damage: Injury to digital nerves resulting in trophic changes in finger |
| 5 | Multiple sites of damage: Involvement of multiple fingers with combination of above problems |
Initial exploration is usually done using a midlateral incision. This incision allows wide exposure of the digit and allows a nice thick flap of skin to be placed over the flexor tendon sheath. Sometimes, prior incisions dictate the operative approach. At the time of exploration it is crucial to make full assessment of the condition of the digit and reconstruct any injury that will facilitate the ultimate outcome of the reconstructive effort. For example, joint release, tenolysis, and pulley reconstruction should be done at the time of initial exploration. After exploration the surgeon can determine the best method for distal tendon juncture and the location and method for proximal tendon juncture. The length of the tendon graft can then be determined by measuring the extended finger from the distal juncture to the proximal juncture and adding 4 to 6 cm depending on the method of juncture that is anticipated.
Using a clinically relevant canine model, basic science investigators have reported on the incorporation of free tendon grafts when placed into the specialized environment of the digital synovial sheath. They have found that intrasynovial donor tendons seem adapted to survive transplantation to the digital sheath and can incorporate without the formation of peritendinous adhesions. This adhesion-free or minimal adhesion incorporation is associated with improved functional characteristics (tendon excursion and angular joint range of motion). In contrast, extrasynovial donor tendons undergo considerable peritendinous necrosis, which is associated with the formation of dense peritendinous adhesions during tendon graft incorporation. These adhesions limit tendon graft excursion and joint range of motion. ,
The most popular tendon grafts are the palmaris longus for palm-to-fingertip reconstruction and the plantaris for forearm-to-fingertip reconstruction. Other sources of graft material include the long extensors of the three middle toes, the toe flexors, the extensor indicis proprius, and one slip of the extensor digiti minimi (EDM). The selection of a graft in any specific case is determined by the particular demands of the surgical procedure. Several authors have investigated the use of intrasynovial toe flexor grafts. These grafts healed with fewer adhesions in animal models compared with extrasynovial grafts, but their clinical superiority has not been shown to date. All tendon grafts should be harvested and handled with the utmost care. A harvested tendon should be placed in a sponge moistened with saline or lactated Ringer solution to protect it from drying. Allis-type clamps or suture on each end can be used to facilitate handling of the graft.
Generally, we prefer the palmaris longus tendon for use in the palm-to-fingertip graft because it is in the same field of surgery and is accessible. The presence of the palmaris longus tendon can usually be determined during preoperative examination, but its length and adequacy for tendon graft are not predictable via clinical examination. In the most accurate clinical test, the patient is asked to oppose the thumb to the little finger while flexing the wrist against resistance (Schaeffer test). The palmaris longus tendon should be readily visible, superficial, and palpable in the midline of the wrist ( Fig. 6.25A ). While there is some difference among populations, the palmaris longus tendon is present in at least 75% to 85% of the population. If there is any doubt as to the presence or absence of a palmaris tendon, ultrasound examination is a highly reliable and accurate way to determine presence, length, and width of a palmaris longus tendon.
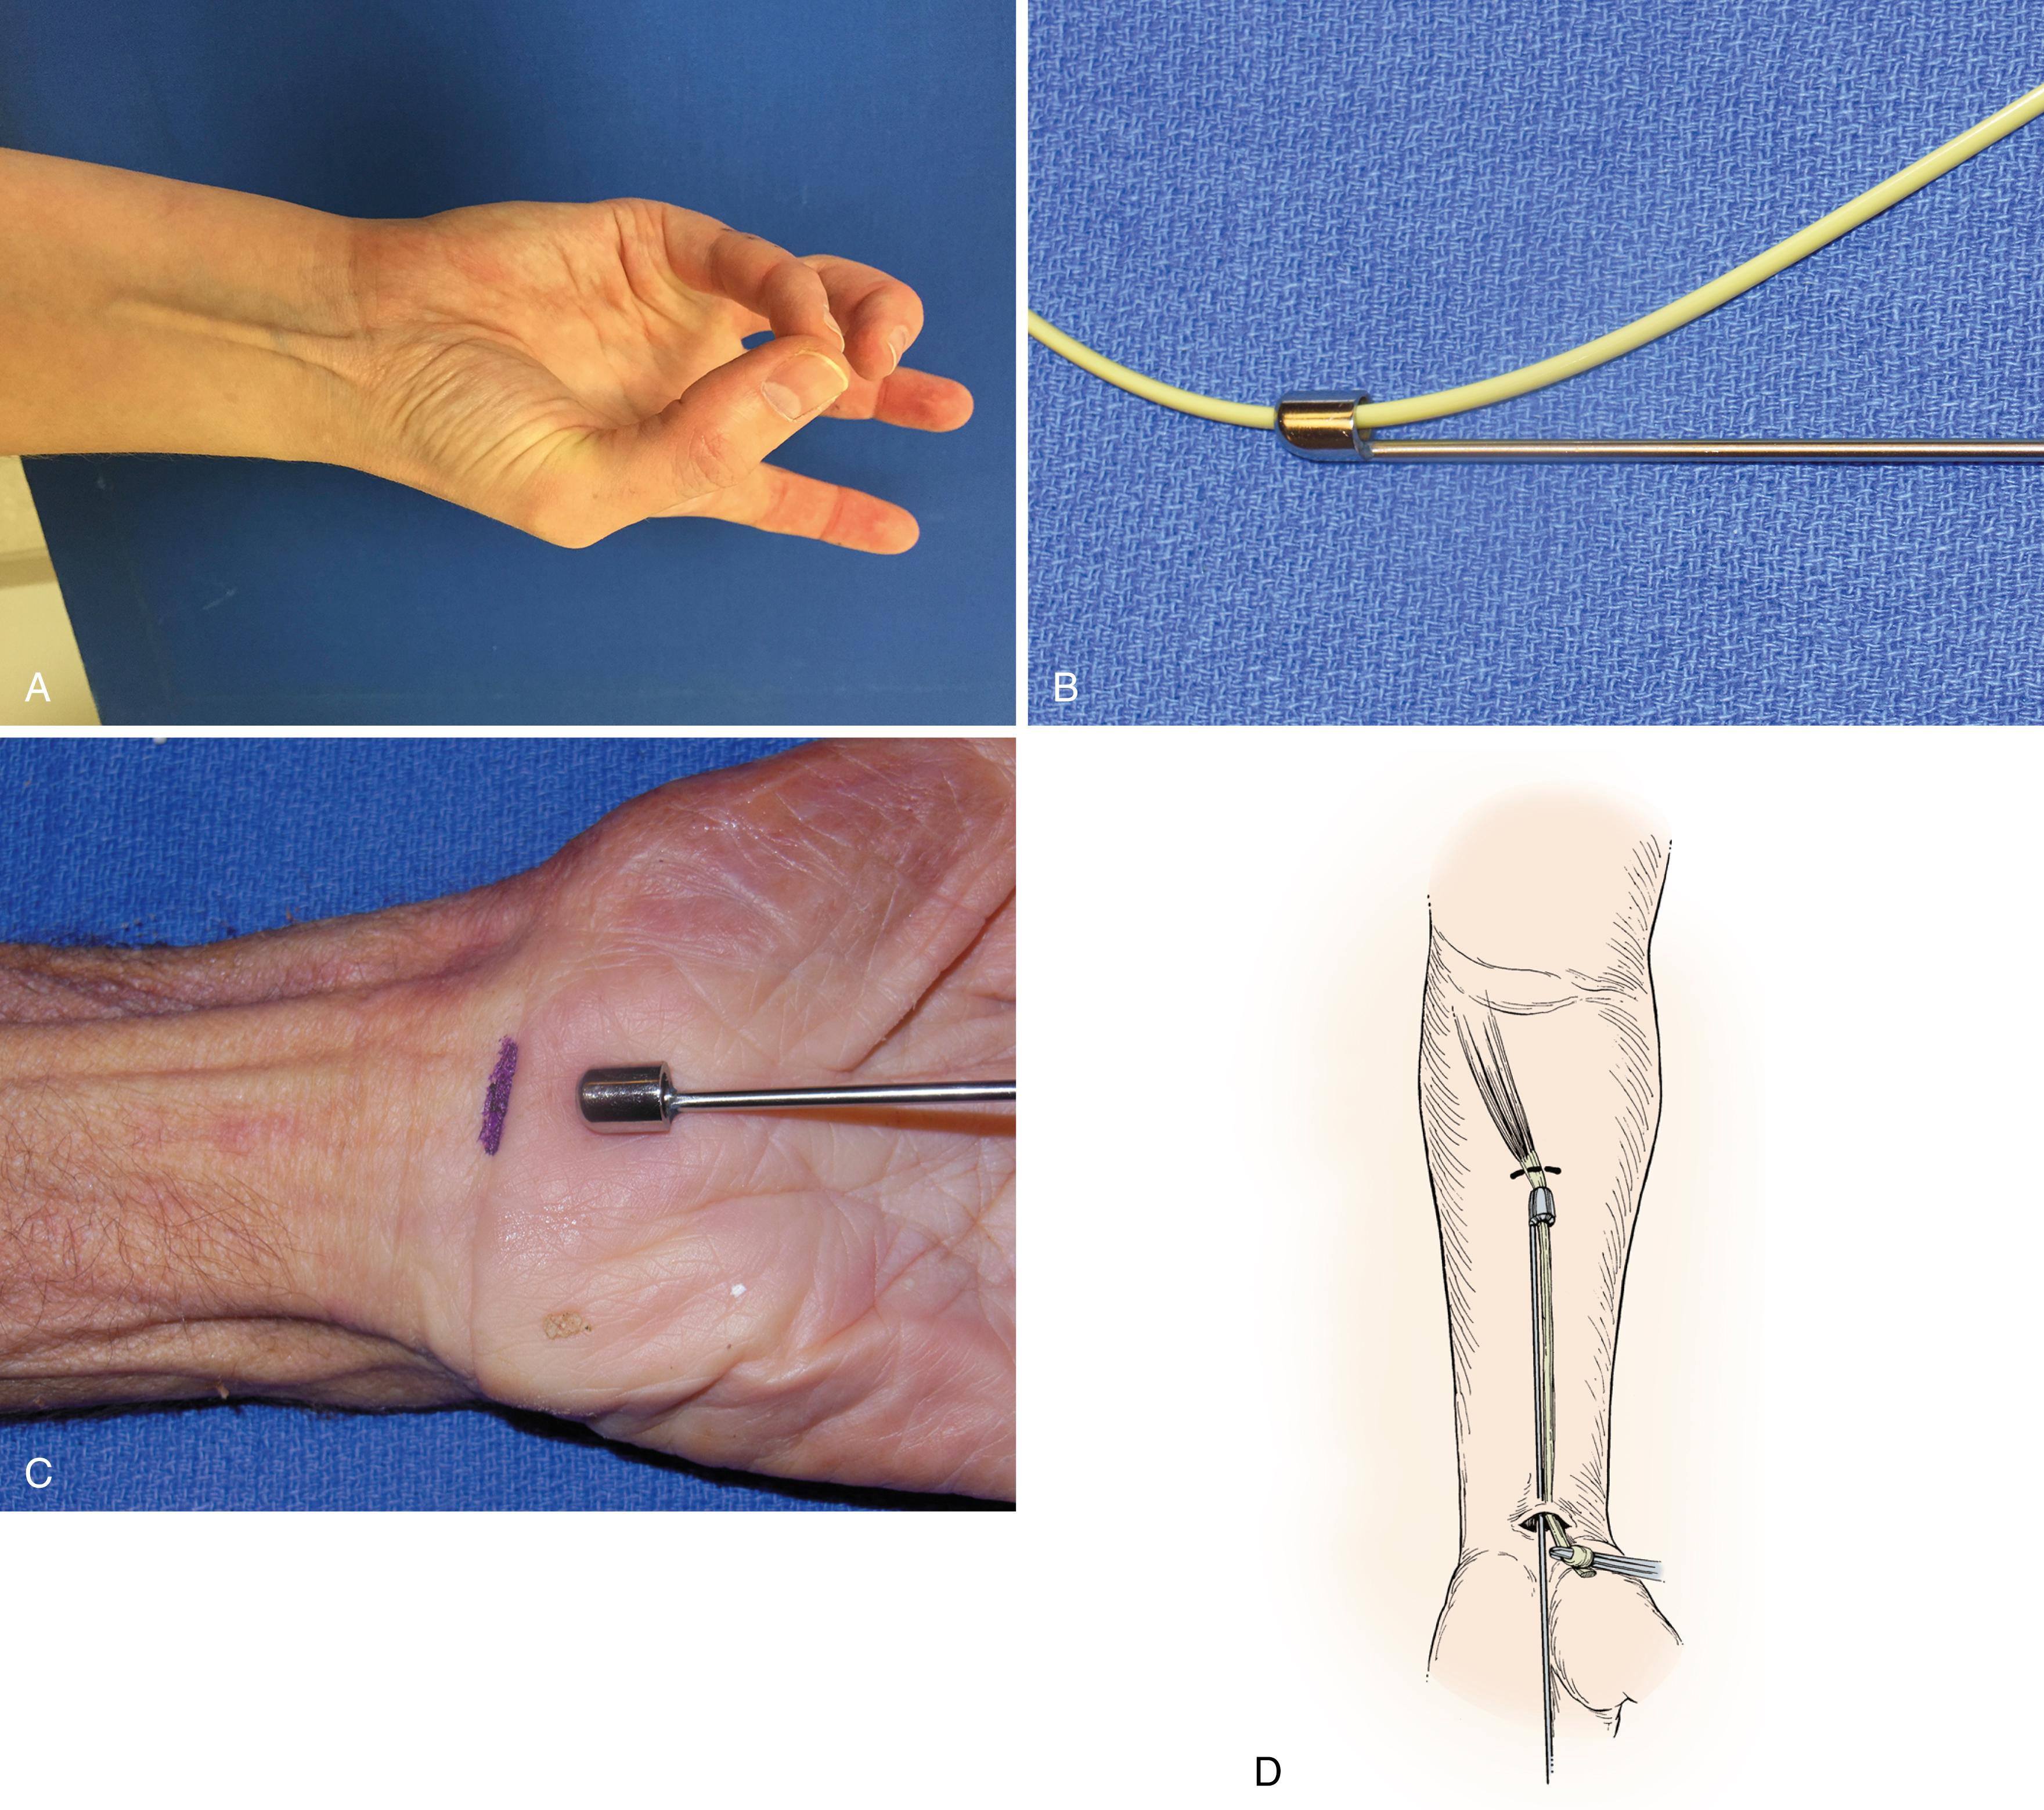
Become a Clinical Tree membership for Full access and enjoy Unlimited articles
If you are a member. Log in here