Physical Address
304 North Cardinal St.
Dorchester Center, MA 02124
Compartment syndrome is an elevation of the interstitial pressure in a closed osteofascial compartment that results in microvascular compromise. Compartments with relatively noncompliant fascial or osseous structures most commonly are involved, especially the anterior and deep posterior compartments of the leg ( Fig. 48.1 ) and the volar compartment of the forearm. Compartment syndrome can develop anywhere skeletal muscle is surrounded by substantial fascia, however, such as in the buttock, thigh, shoulder, hand, foot, arm, and lumbar paraspinous muscles.

Compartment syndromes can be classified as acute or chronic, depending on the cause of the increased pressure and the duration of symptoms. The most common causes of acute compartment syndrome are fractures, soft-tissue trauma, arterial injury, limb compression during altered consciousness, and burns. Other causes include intravenous fluid extravasation and anticoagulants. Acute exertional compartment syndromes have been reported in the foot in runners, basketball players, and other athletes. Chronic exertional compartment syndrome (CECS) is recurrence of increased pressure, most often in the anterior or deep posterior compartment of the leg. Exercise can increase muscle volume by 20%, causing an increase in pressure in a noncompliant compartment. Exertional compartment syndrome of the lower extremity is most common in long-distance runners and military recruits pushed past normal limits of functional tolerance. It also has been reported to occur elsewhere, including the forearms in weightlifters, rowers, welders, and others who place large demands on their upper extremities.
The pathophysiology of compartment syndrome involves an insult to normal local tissue homeostasis that results in increased tissue pressure, decreased capillary blood flow, and local tissue necrosis caused by oxygen deprivation. Experimental evidence suggests that significant muscle necrosis can occur in patients with normal blood flow if intracompartmental pressure is increased to more than 30 mm Hg for longer than 8 hours. Higher pressures have been shown to cause greater compromise of neuromuscular viability in shorter periods of time.
Fascial hernias have been reported to have a definite association with the development of exertional compartment symptoms. Approximately 15% to 40% of patients treated for CECS have been found to have a fascial hernia, often despite a normal physical examination.
Physical signs of acute compartment syndrome include tightness of the involved compartment, pain with passive motion of the muscles passing through the compartment, and weakness of the muscles. The most important sign is pain out of proportion to that expected with the injury. Hypesthesia or paresthesia should be evaluated by testing with pinprick, light touch, and two-point discrimination. The diagnosis of acute compartment syndrome may be delayed in patients with multiple injuries or altered consciousness and in children, in whom physical findings cannot be documented accurately. Because of the variability of clinical signs and symptoms of compartment syndrome, the sensitivity and positive predictive value of clinical findings are low; however, the specificity and negative predictive value are high. The absence of clinical findings associated with compartment syndrome is more useful for excluding the diagnosis than the presence of findings is for confirming the diagnosis.
If compartment syndrome is suspected and an adequate examination cannot be performed, pressure levels should be measured. Monitoring of compartment pressures also is helpful in patients with a fracture and altered neurologic function caused by vascular injuries, continuous epidural anesthesia, peripheral nerve injury, or tourniquet palsy.
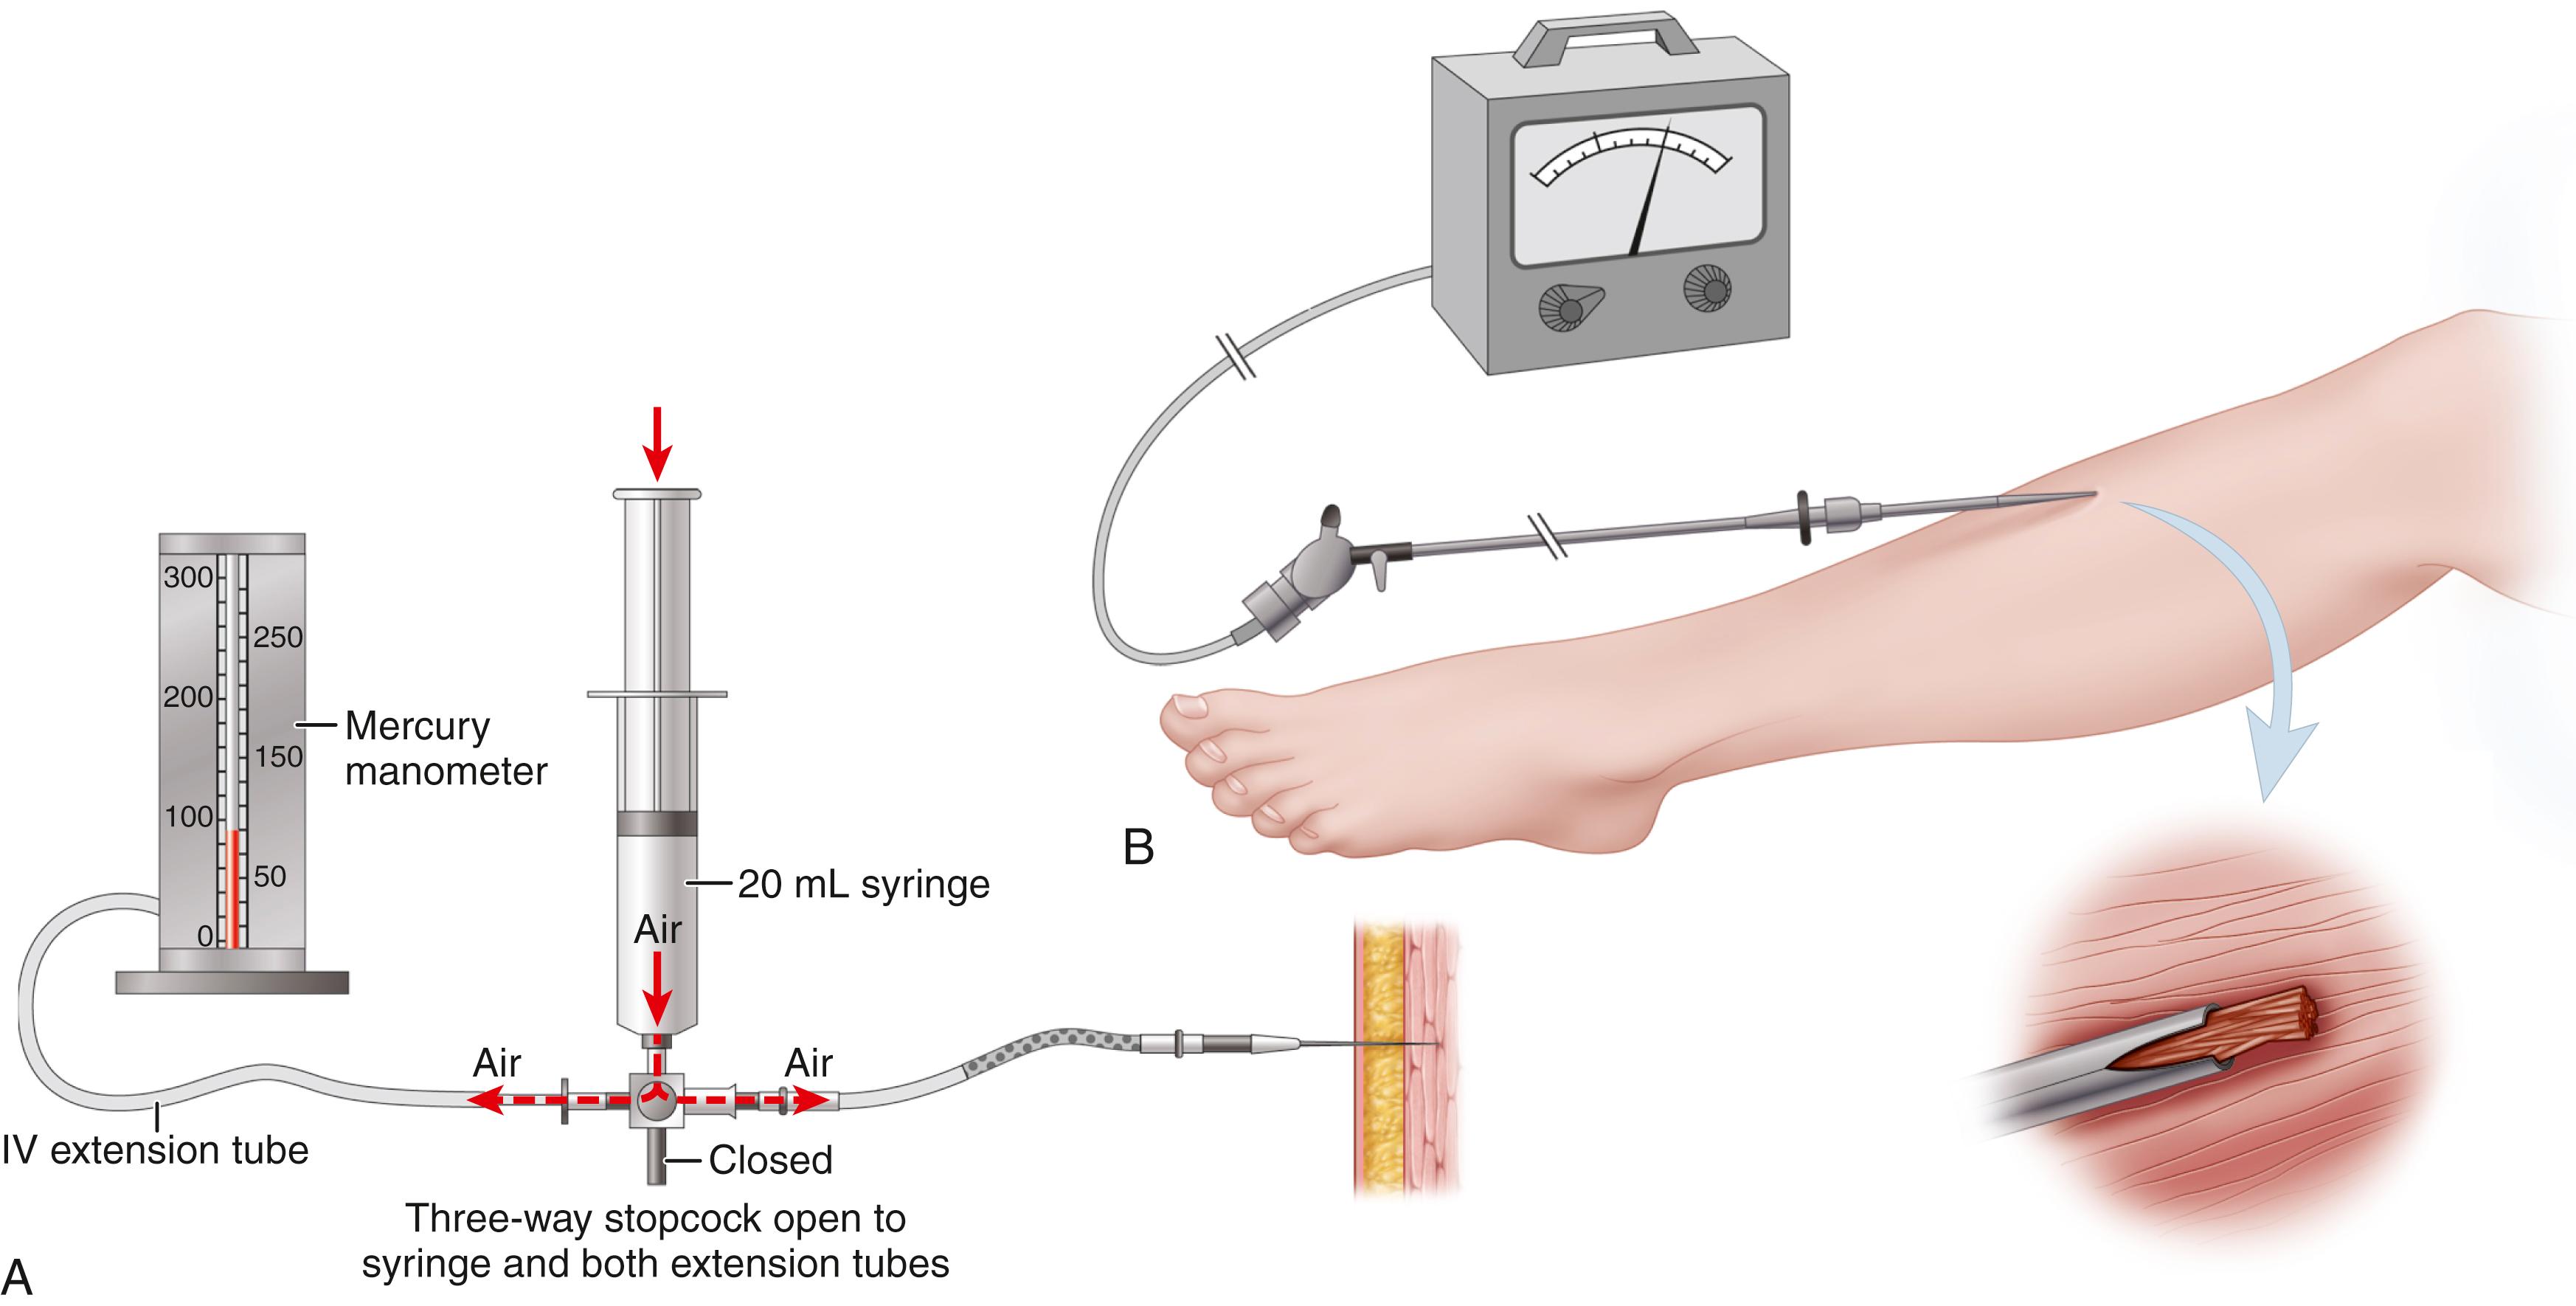
A variety of invasive devices are available for measurement of compartment pressures, including a commercially available pressure monitor ( Fig. 48.2 ), arterial line manometer, Whitesides three-way stopcock apparatus ( Fig. 48.3A ), and the wick monitor ( Fig. 48.3B ). Studies have shown, however, that pressure measurements are erroneous in as many as 30% to 35% of patients and should not be used as the primary determinant for or against fasciotomy. Noninvasive methods of evaluating compartment pressures include the use of ultrasonography to measure submicrometer displacement of the fascia wall caused by volume expansion of the muscle compartment, which is related to changes in intramuscular pressure. Although more study is necessary, in a model of compartment syndrome in the legs of healthy individuals, this technique had a diagnostic sensitivity of 77% and specificity of 93%. Infrared imaging also has been used in trauma patients to determine temperature differences between the proximal and distal skin surfaces to help make the diagnosis of compartment syndrome. Schmidt et al. determined that near-infrared spectroscopy data were not collected reliably, calling into question its utility for monitoring oxygenation in patients at risk for acute compartment syndrome. Currently, neither of these methods has been shown to be as accurate or easily available as the invasive methods.

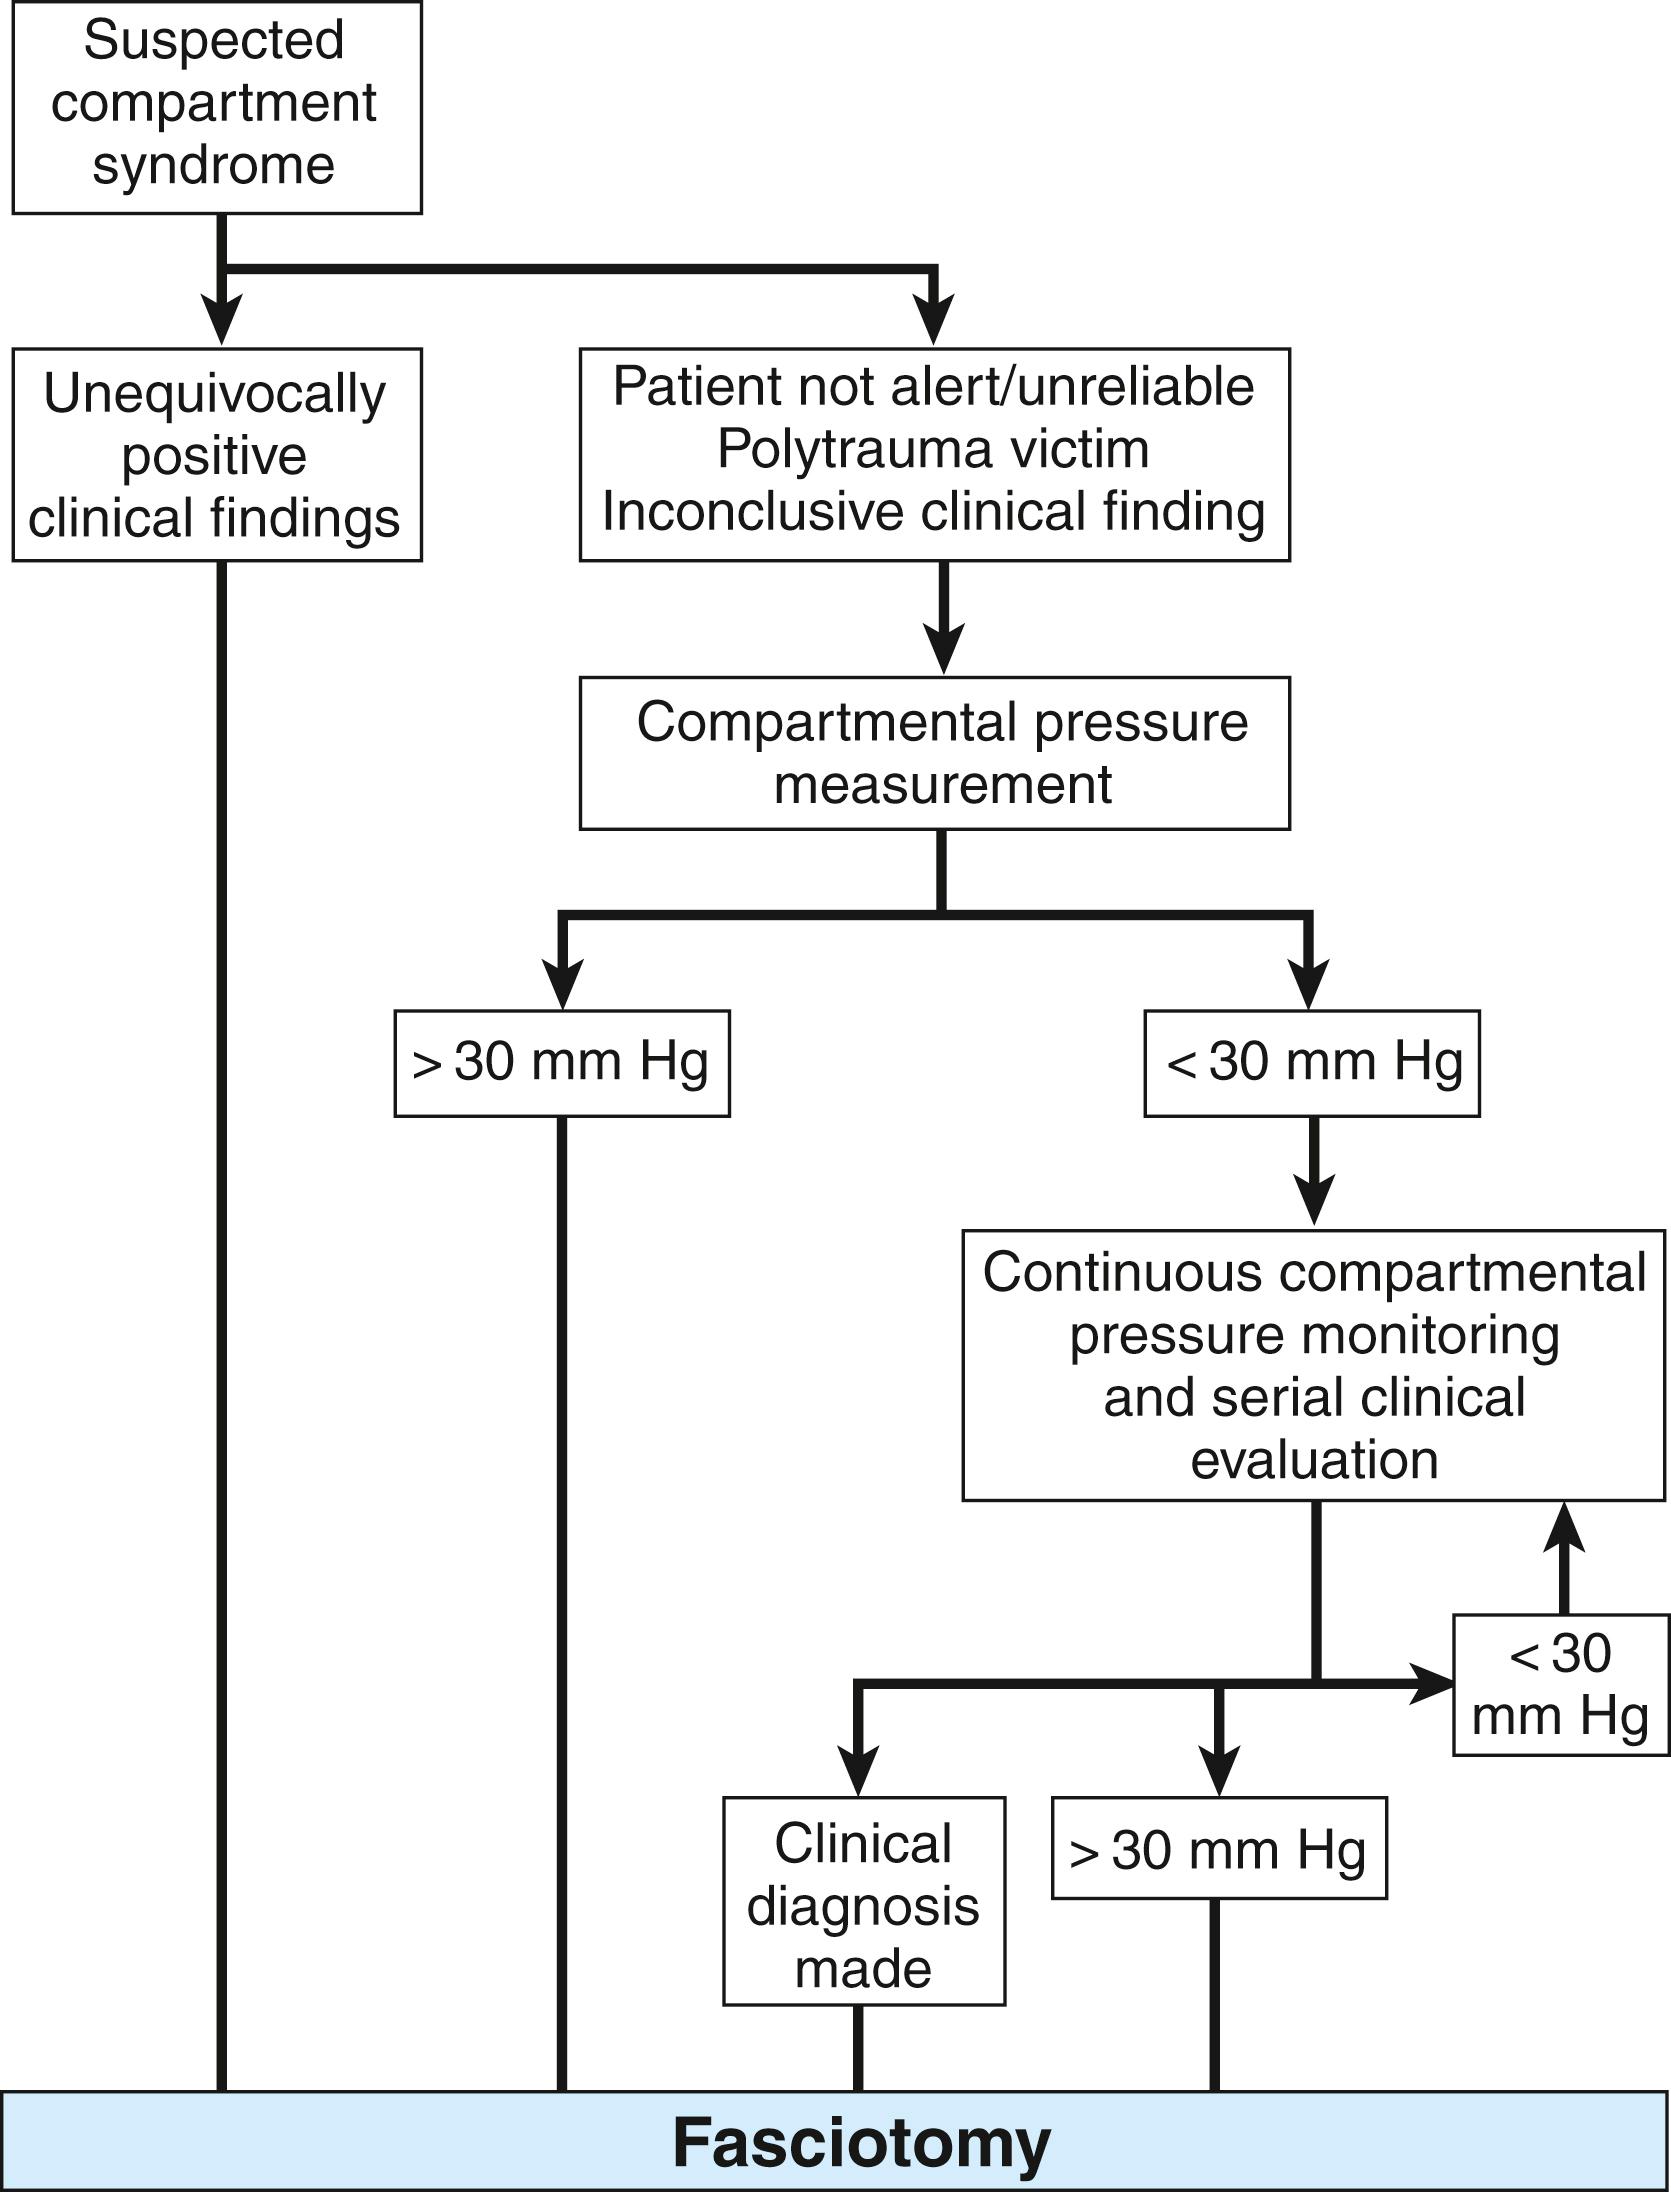
Significant controversy exists regarding appropriate compartmental pressures for performing fasciotomies. At our institution, if compartmental pressures are greater than 30 mm Hg in the presence of clinical findings, immediate fasciotomy is indicated. Equivocal readings require continuous monitoring and serial clinical examinations. In patients with major disruption of the arterial circulation or circumferential full-thickness burns, fasciotomy should be performed at the time of initial surgery. An algorithm for patients with tibial fractures has been developed to determine the roles of tissue pressure measurement and clinical findings ( Fig. 48.4 ).
In isolated limb injuries, splitting of the cast and underlying padding can decrease compartment pressure by as much as 50% to 85%. Any circular constrictive bandages also should be released. Positioning of the limb is important; placing the limb at the level of the heart produces the highest arteriovenous gradient. On the other hand, elevation of the limb decreases arterial inflow without significantly increasing venous outflow, thus increasing local ischemia. If symptoms do not resolve within 30 to 60 minutes after appropriate treatment, pressure measurement should be repeated and, if results are equivocal, fasciotomy is indicated without delay. Although an exact timeframe has not been firmly established by evidence-based research in humans, fasciotomy after 12 hours has been associated with adverse outcomes.
Compartment syndrome of the thigh is much less frequent than that of the forearm or lower leg, but it is associated with a high level of morbidity. In one study of 23 patients with acute thigh compartment syndrome, four patients (17%) required amputations, whereas in another study of 18 patients more than half did not recover full thigh-muscle strength and had long-term functional deficits. Factors associated with an increased likelihood of functional deficits were high injury severity scores, ipsilateral femoral fracture, prolonged intervals to decompression, the presence of myonecrosis at the time of fasciotomy, and an age older than 30 years.
The most common causes of thigh compartment syndrome are blunt trauma (with or without fracture) and vascular injury; other cited causes of acute compartment syndrome of the thigh include polytrauma, arterial ischemia, burns, limb compression secondary to drug abuse, tourniquet use for lower leg surgery, use of military antishock trousers, muscle overuse, penetrating gunshot wounds, quadriceps tendon rupture and contusion or strain, other thigh muscle strains, and heterotopic ossification. Acute compartment syndrome of the thigh has been described mostly in case reports, and most often in young, active males participating in a contact sport (e.g., soccer, rugby). “Idiopathic” thigh compartment syndrome also has been described.
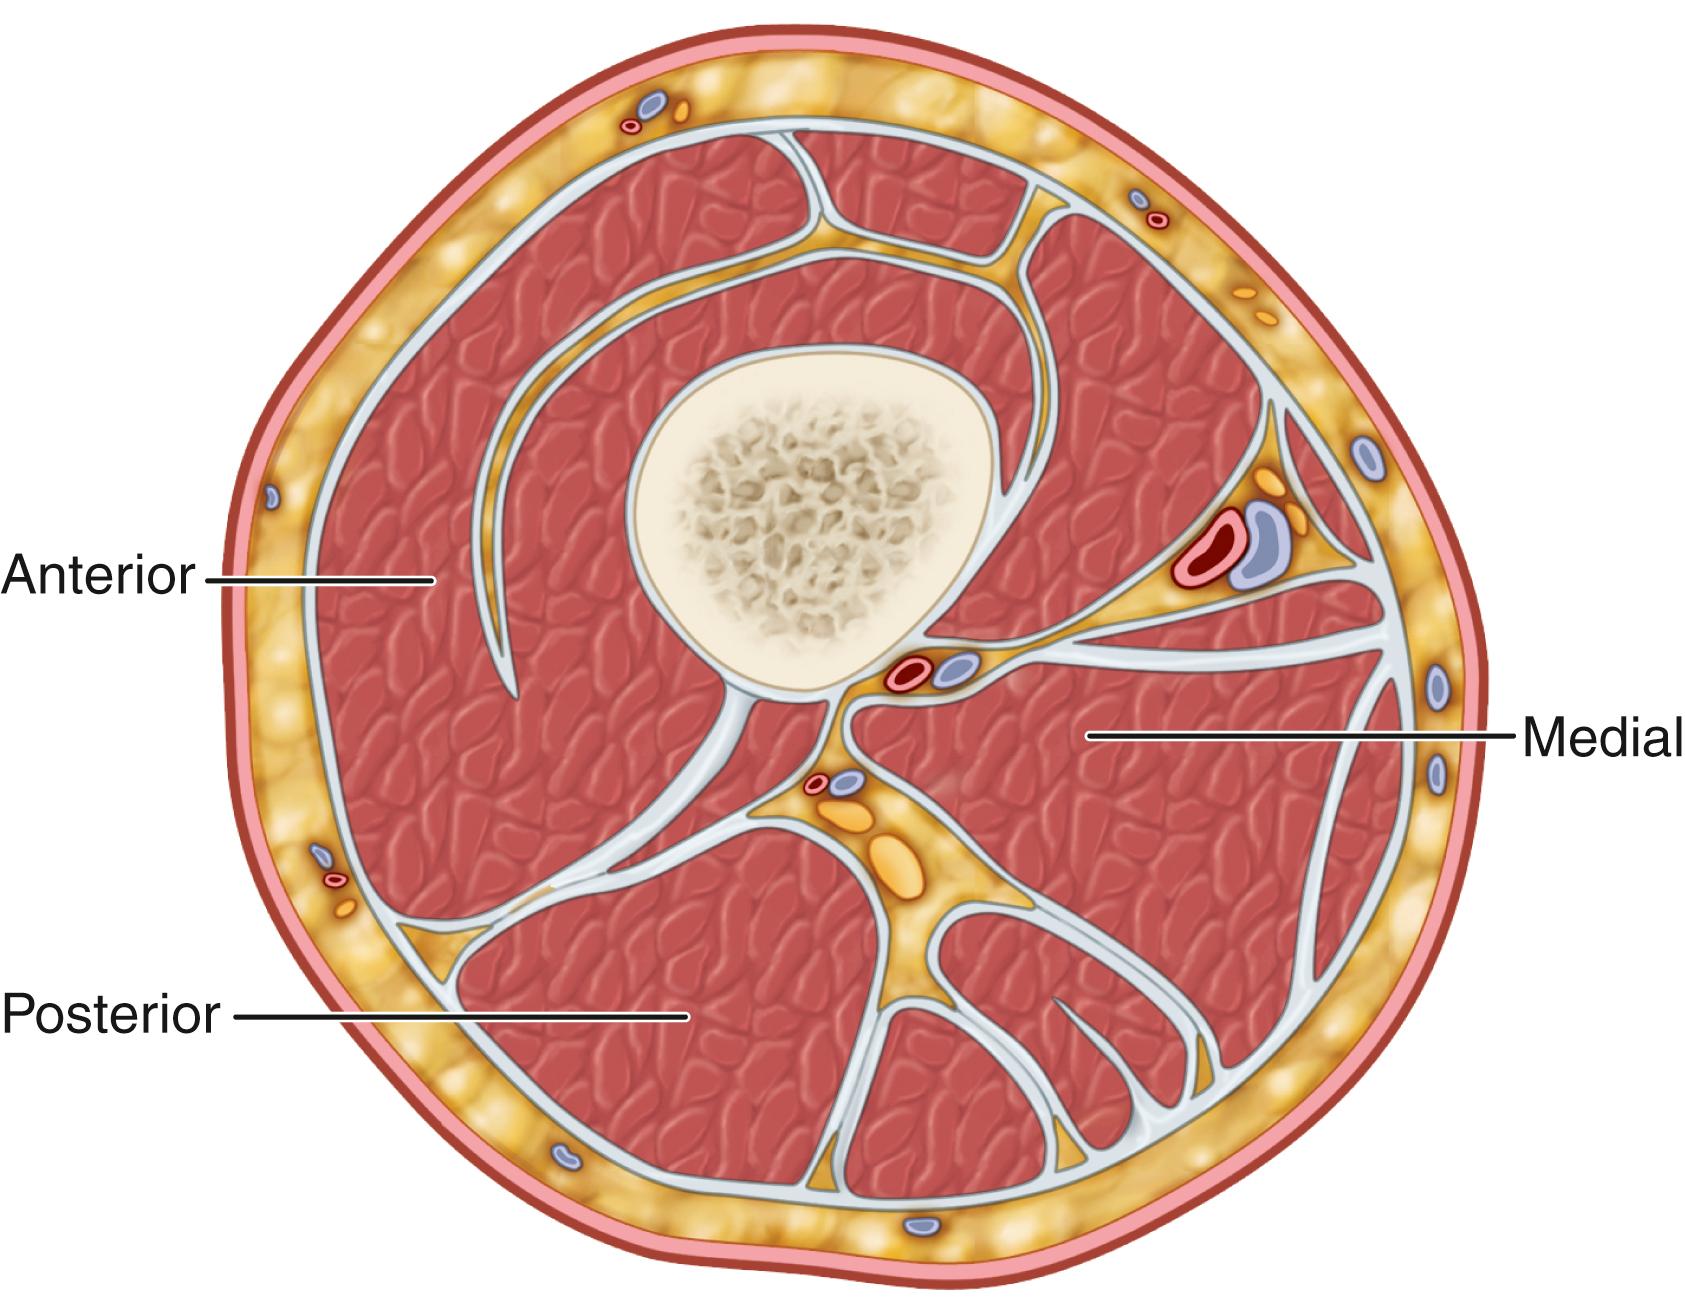
The myofascial compartments of the thigh have a considerably larger volume and potential capacity than those of the lower leg or forearm, accounting for the relative infrequency of thigh compartment syndrome. The thigh is divided into three distinct compartments (anterior, medial, and posterior) by intermuscular fascial extensions ( Fig. 48.5 ); collectively, the compartments are encased by the fascia lata. Within the anterior compartment are the quadriceps muscle group and the sartorius muscle, the femoral nerve and its sensory branch, the saphenous nerve, and the femoral artery and vein. The medial compartment contains the adductor muscle group and its neurovascular supply, the profunda femoris and obturator arteries, and the obturator nerve. In the posterior compartment are the biceps femoris, semimembranosus and semitendinosus muscles, arterial branches of the profunda femoris, and the sciatic nerve. Most reported compartment syndromes of the thigh involve the anterior compartment because it is surrounded by the stiffest walls laterally and medially (fascia lata and iliotibial tract) and is the most vulnerable to trauma.
The diagnosis of acute compartment syndrome of the thigh is based on the criteria described earlier for acute compartment syndrome. The most common signs of thigh compartment syndrome are pain and increased thigh circumference compared with the opposite side. Weakness of the involved thigh muscles and sensory or motor deficits in the anatomic distribution of the nerves contained in specific compartments can help determine which compartments are involved ( Table 48.1 ). Marmor et al., in a cadaver model of elevated muscle compartment pressures, used ultrasound to measure the width of the anterior compartment and the amount of pressure needed to flatten the bulging superficial compartment fascia, both of which showed strong correlation to compartment pressures, suggesting a clinical use for this modality in the future.
| Anterior Compartment | Posterior Compartment | Medial Compartment | |
|---|---|---|---|
| Pain with passive stretch | Passive knee flexion with hip in extension | Passive knee extension with hip in flexion | Passive hip abduction with knee in extension |
| Motor deficit | Knee extension | Knee flexion, plantar flexion (sciatic tibial branch), dorsiflexion, great toe extension (peroneal branch) | Hip adduction |
| Sensory deficit | Passive hip abduction with knee in extension | Hip adduction | Proximal-medial thigh (obturator nerve cutaneous branch) |
Although conservative management has been advocated for young patients with isolated anterior compartment syndrome of the thigh, most often immediate surgical decompression is indicated. A retrospective review of 29 patients with thigh compartment syndromes found that the frequency of complications correlated with the time to fasciotomy: delay of more than 12 hours was associated with a poor outcome in one study, and in another study patients who had decompression within 8 hours had significantly better outcomes than those with later surgery. High pressures in the thigh compartments have been found to cause long-term functional deficits even with shorter pressure durations, suggesting that the pressure level affects the time window until irreversible neuromuscular damage occurs. Some have suggested that fasciotomy should not be done when surgery is delayed for more than 12 hours because of the risk of infection in the ischemic muscle tissue, recommending that patients be treated medically (rapid fluid resuscitation) in an intensive care setting to manage rhabdomyolysis and avoid acute renal failure. When the condition of the involved muscles is unknown, a small incision has been recommended to allow access for testing of muscle viability before the extensive fasciotomy incision is made.
(TARLOW ET AL.)
Prepare and drape the thigh in a sterile fashion, exposing the limb from the iliac crest to the knee joint.
Make a lateral incision beginning just distal to the intertrochanteric line and extending to the lateral epicondyle ( Fig. 48.6A ).
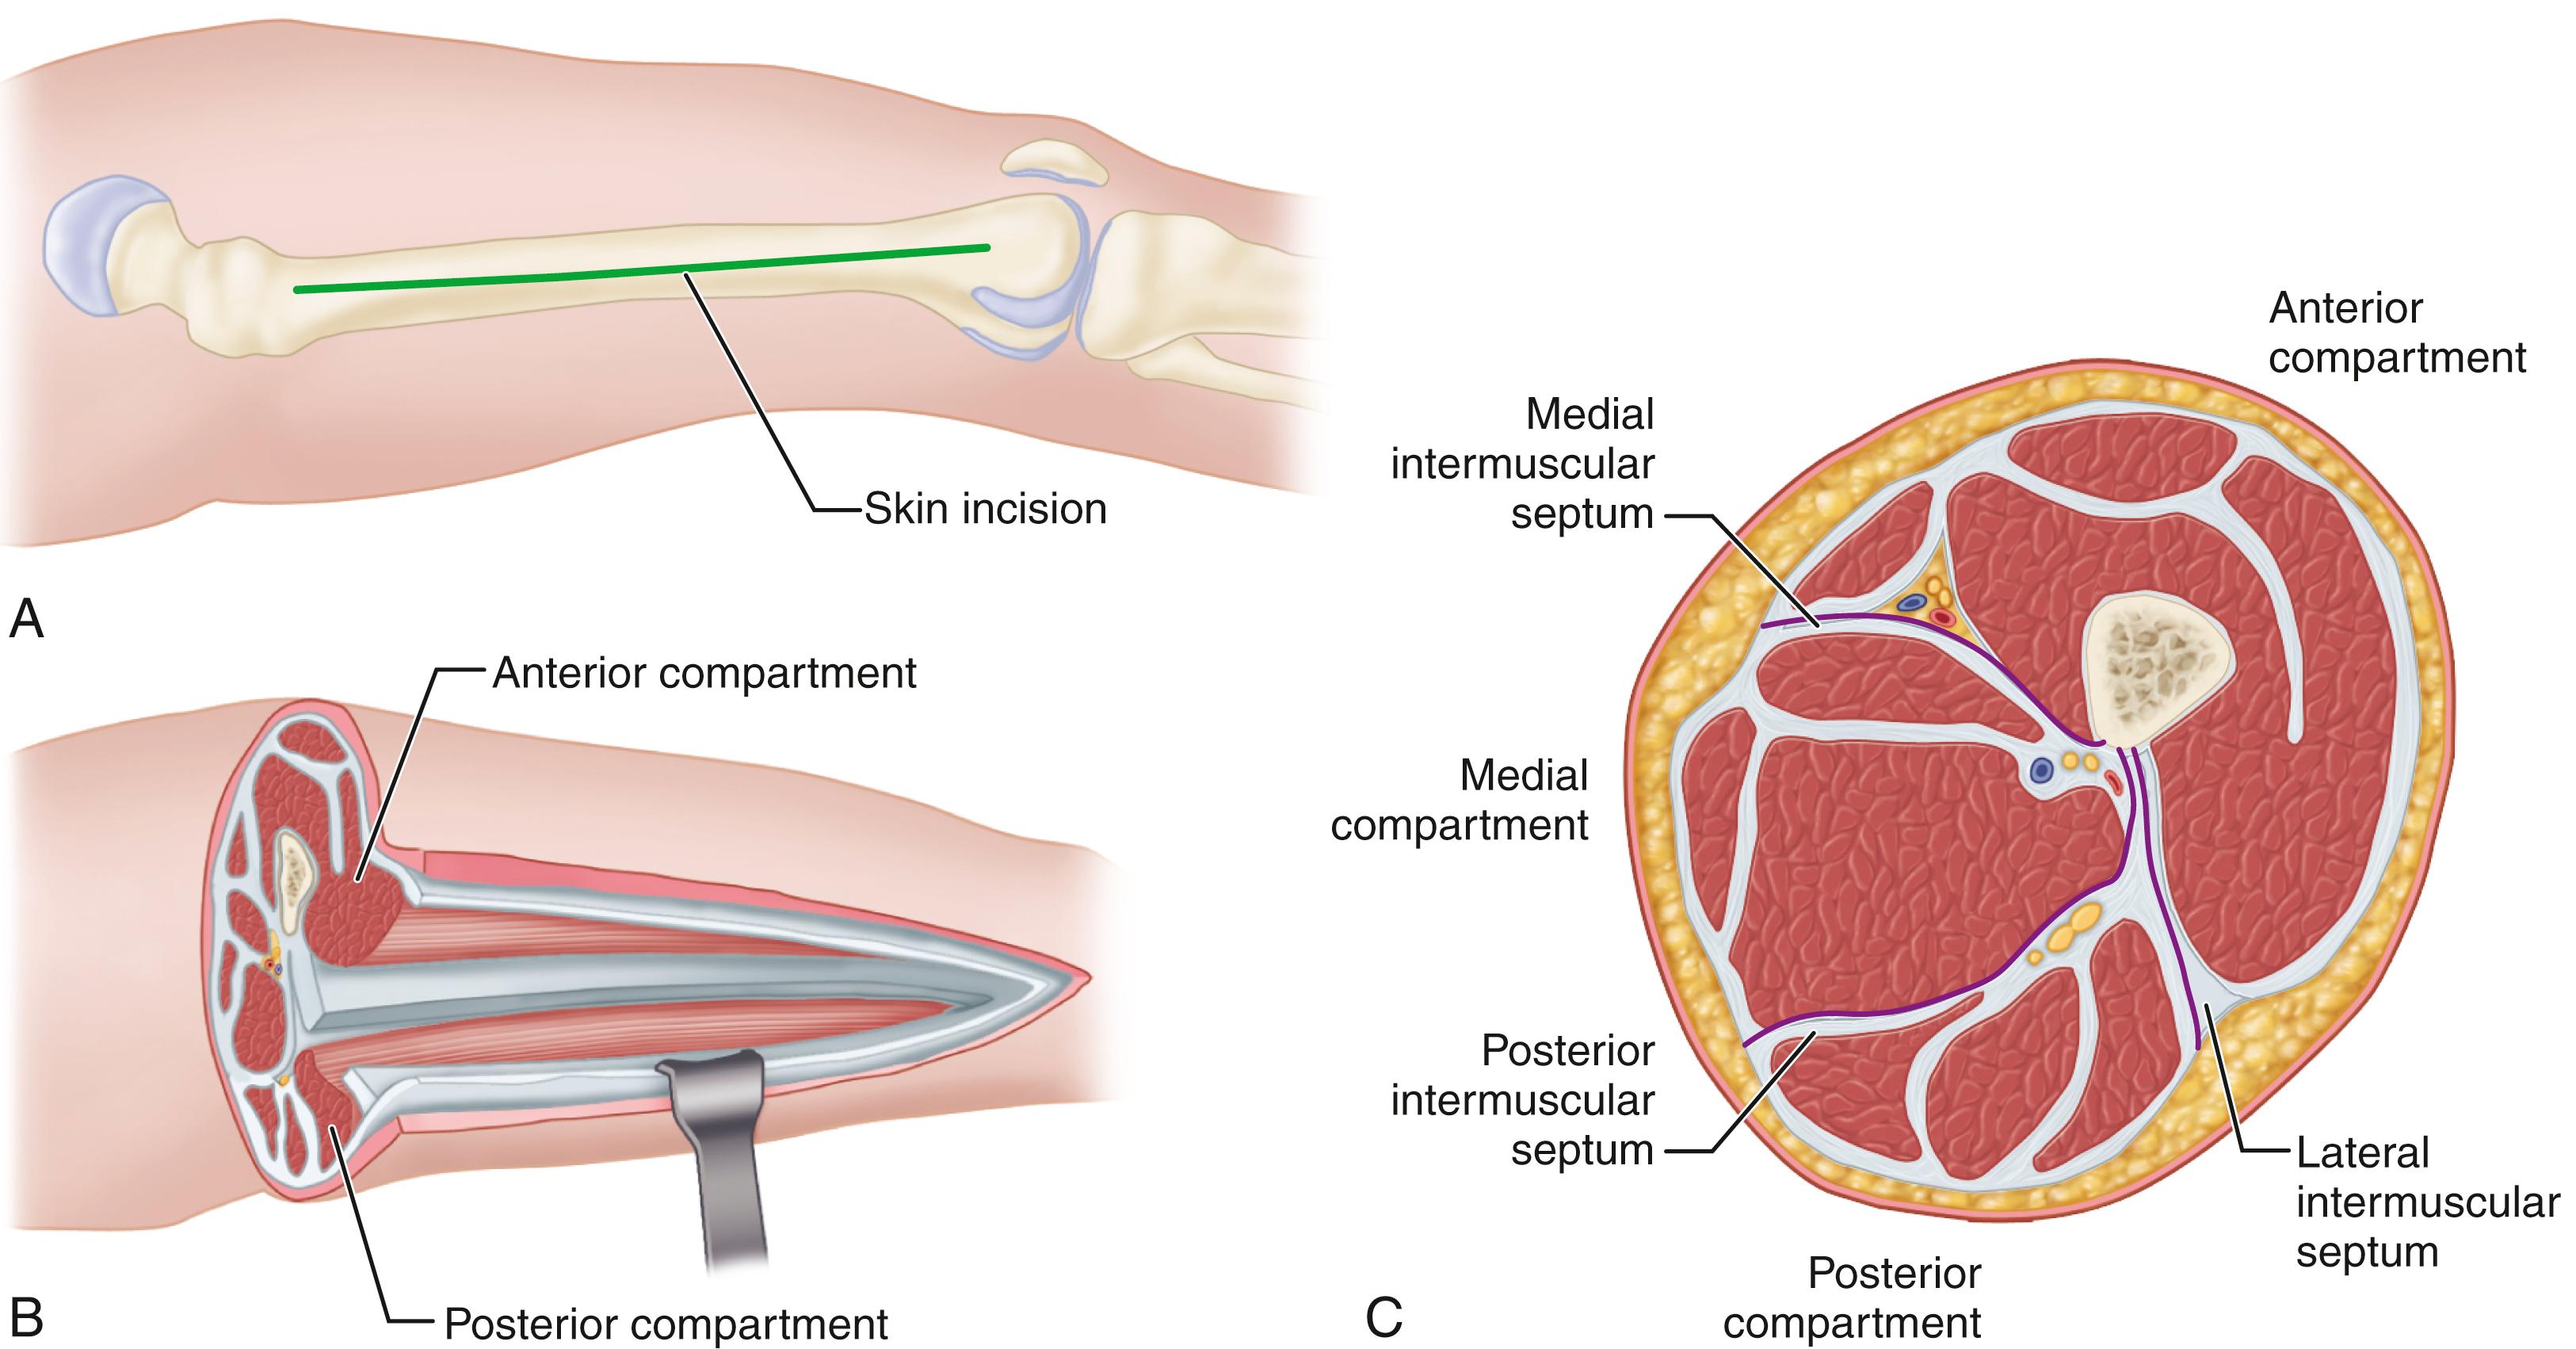
Use subcutaneous dissection to expose the iliotibial band and then make a straight incision in line with the skin incision through the iliotibial band ( Fig. 48.6B ).
Carefully reflect the vastus lateralis off the lateral intermuscular septum, making sure to coagulate all perforating vessels as they are encountered.
Make a 1.5-cm incision in the lateral intermuscular septum and, using Metzenbaum scissors, extend it proximally and distally the length of the incision ( Fig. 48.6C ).
After the anterior and posterior compartments have been released, measure the pressure of the medial compartment. If the pressure is elevated, make a separate medial incision to release the adductor compartment.
Pack the wound open and apply a large, bulky dressing.
See also .
At 48 to 72 hours the patient is returned to the operating room for debridement of any necrotic material. Intravenous fluorescein and a Wood light can be helpful in evaluating muscle viability. If there is no evidence of muscle necrosis, the skin is loosely closed. Alternatively, a negative pressure wound device can be used. If closure is not accomplished, the debridement is repeated after another 48- to 72-hour interval, after which skin closure or skin grafting can be done.
Most acute compartment syndromes of the lower leg (approximately 36%) are associated with tibial fractures; the second most common cause is blunt soft-tissue injury. During a 10-year period at a large trauma center, 288 (2.8%) of 10,315 patients with extremity trauma required fasciotomy for compartment syndrome. The need for fasciotomy varied widely according to mechanism of injury (<1% after motor vehicle accidents to almost 9% after gunshot wounds) and by type of injury (2% with closed fracture to 42% with combined vascular injury). Male sex and age younger than 55 years were among the independent predictors identified. An increasingly common risk factor for the development of compartment syndrome is the use of anticoagulation therapy in elderly trauma patients. As with all compartment syndromes, early diagnosis and treatment are essential to a good result. A review of the outcomes of fasciotomy found that 68% of patients treated within 12 hours of symptom onset had normal function, compared with only 8% in those treated more than 12 hours after symptom onset. Even with timely fasciotomy, many patients have long-term sequelae, including altered sensation, swelling, pain, functional deficits, and cosmetic concerns.
Two techniques for release of the compartments of the lower leg are commonly used: single-incision perifibular fasciotomy and double-incision fasciotomy. The single incision may be useful if the soft tissue of the limb is not extensively distorted. Because this is rarely true, the double-incision technique generally is safer and more effective. Neal et al., however, in a cadaver study determined that a single-incision four-compartment fasciotomy was as effective as fasciotomy with a double-incision technique. The role of selective compartment releases remains unclear. Thirty-eight patients with compartment syndromes in association with tibial fractures were treated according to an algorithm in which standard anterior and lateral releases were done through a full-length lateral incision and then superficial and deep posterior compartment pressures were measured. If the difference between compartment pressure and preoperative diastolic blood pressure was greater than or equal to 30 mm Hg, the posterior compartments were not released. Orthopaedic residents checked the patients every 2 hours on the floor and repeated compartment pressure measurements if symptomatology changed or the patient was obtunded. Although this management protocol seems safe and effective—only 8% of patients required posterior release and no patient without posterior release developed sequelae of a missed posterior compartment syndrome—the resources to follow patients closely and allow a rapid return to the operating room if needed may not be available to most practices. Release of all four compartments appears to be a safer approach for most patients.
(DAVEY ET AL.)
Make a single longitudinal, lateral incision in line with the fibula, extending from just distal to the head of the fibula to 3 to 4 cm proximal to the lateral malleolus ( Fig. 48.7A ).
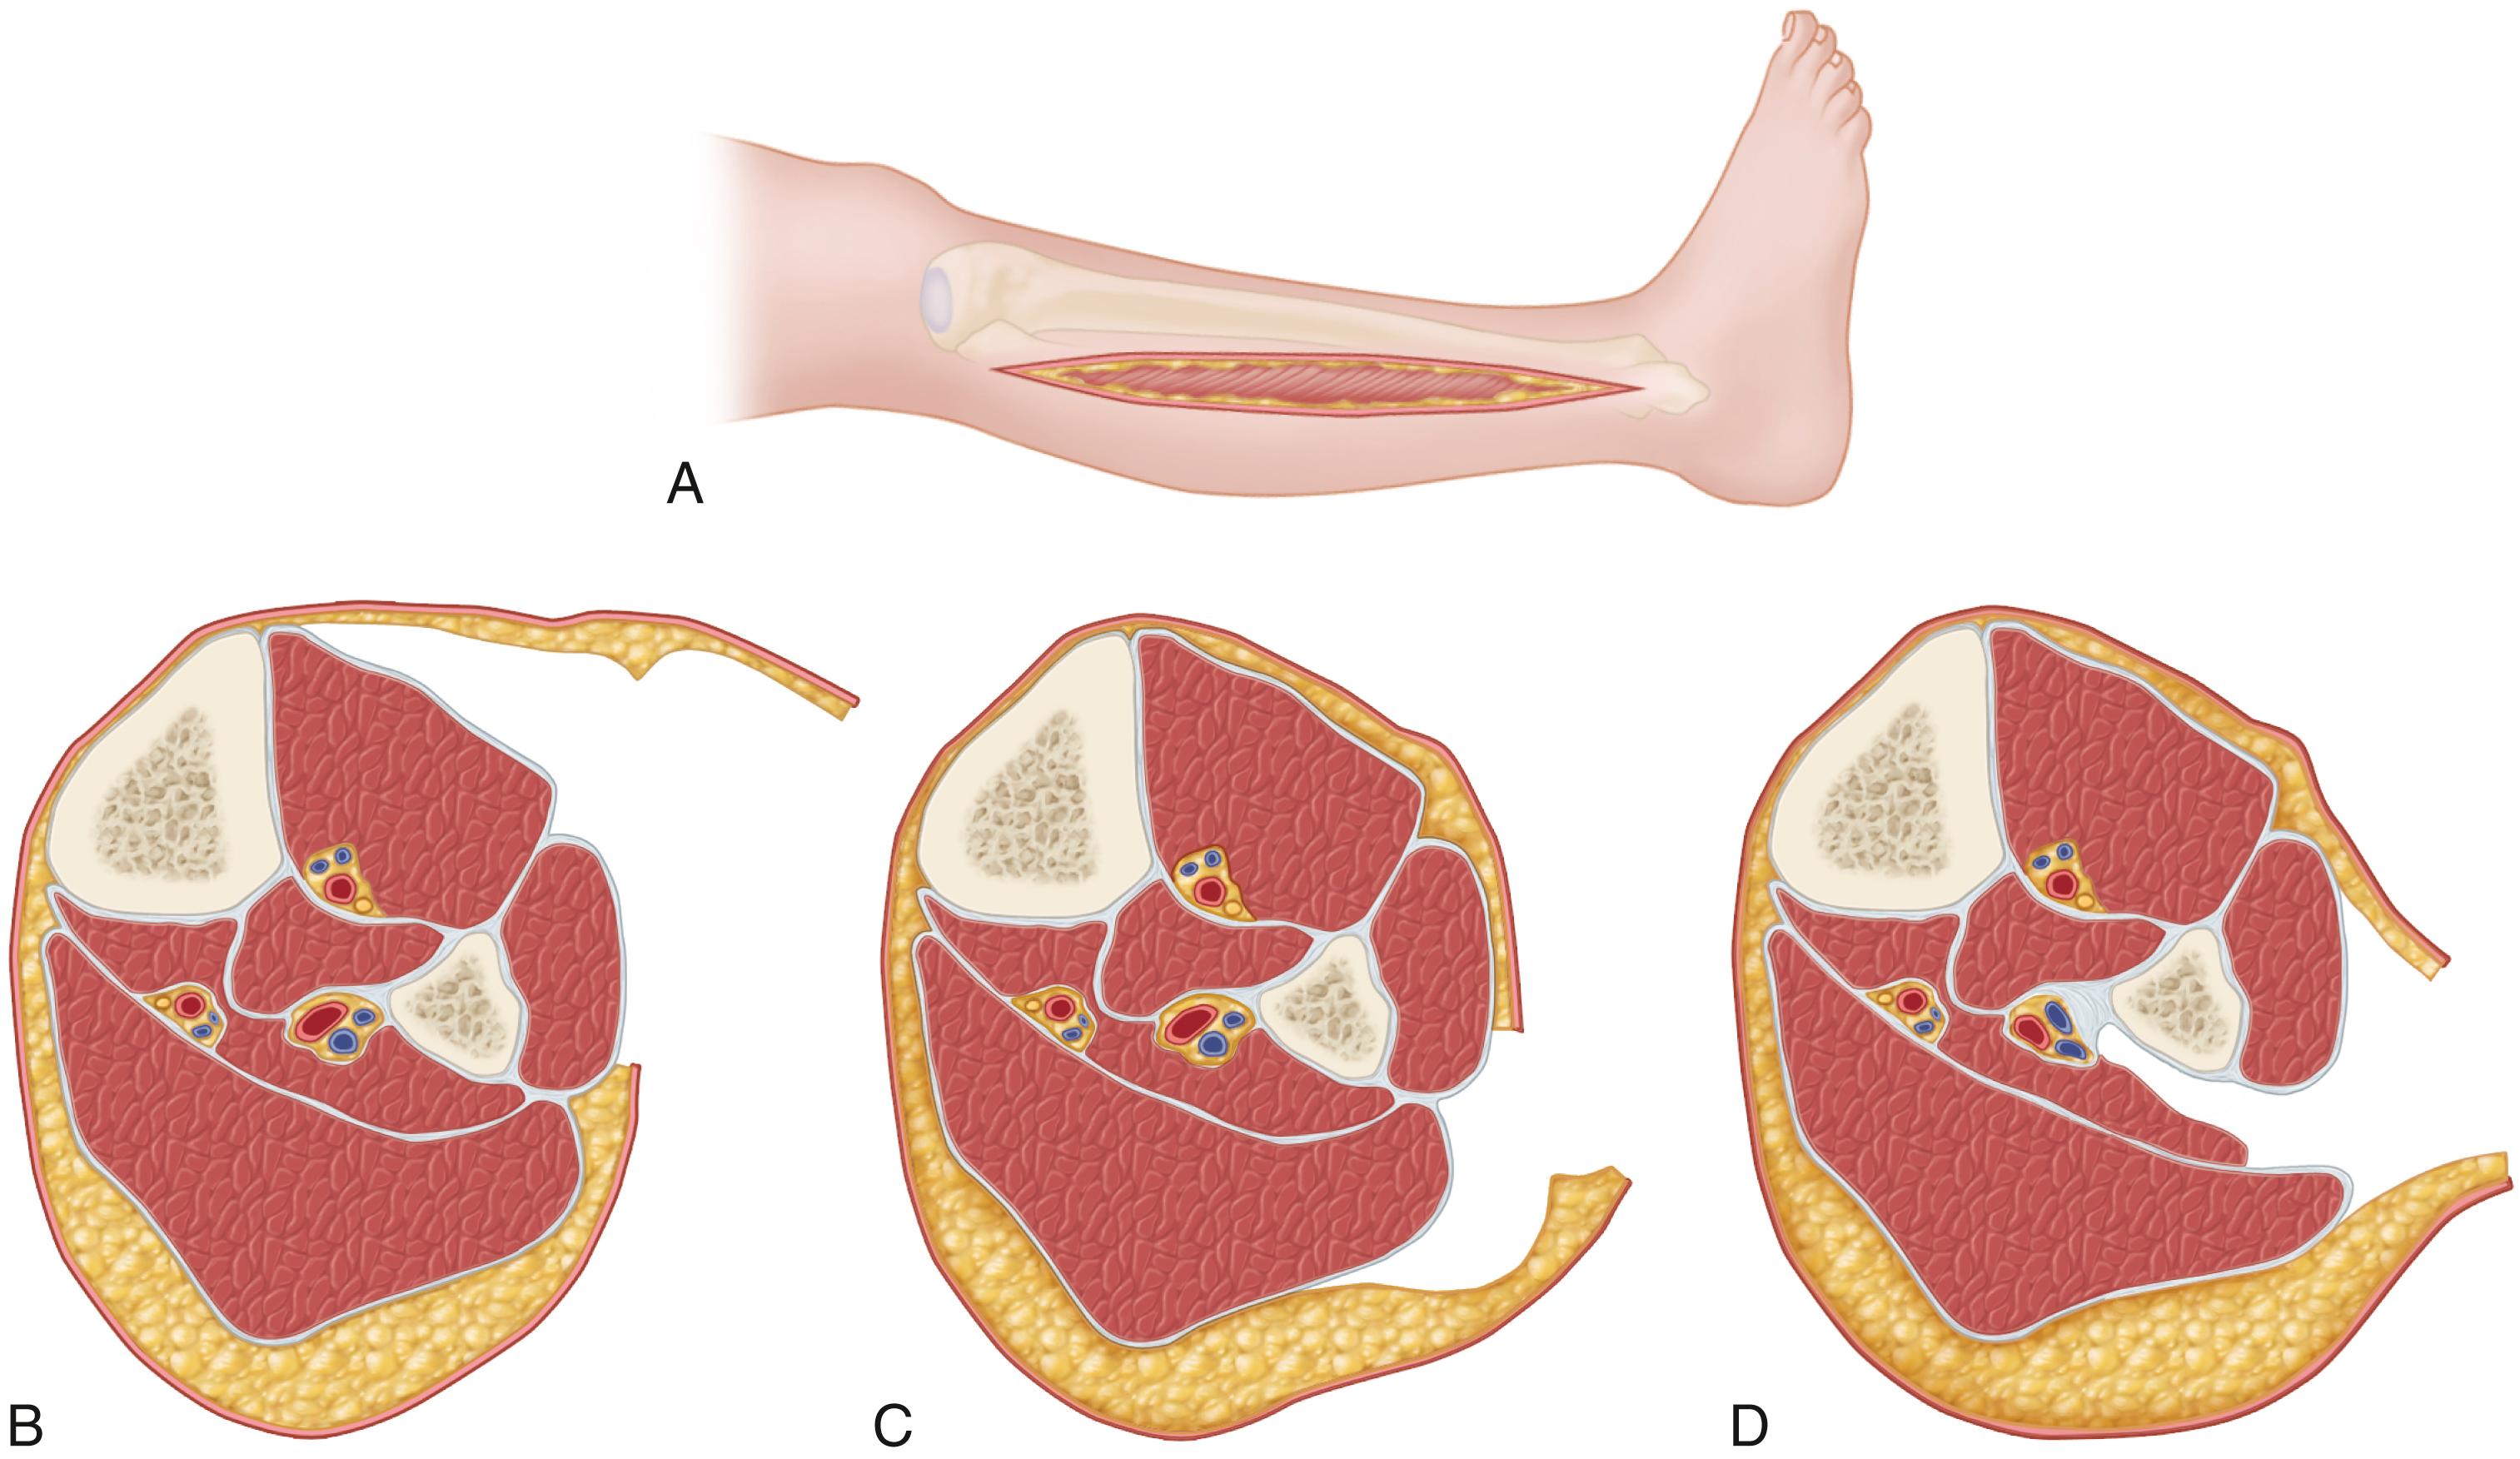
Undermine the skin anteriorly and avoid injuring the superficial peroneal nerve.
Perform a longitudinal fasciotomy of the anterior and lateral compartments ( Fig. 48.7B ).
Undermine the skin posteriorly and perform a fasciotomy of the superficial posterior compartment ( Fig. 48.7C ).
Identify the interval between the superficial and lateral compartments distally and develop this interval proximally by detaching the soleus from the fibula.
Subperiosteally dissect the flexor hallucis longus from the fibula.
Retract the muscle and the peroneal vessels posteriorly.
Identify the fascial attachment of the posterior tibial muscle to the fibula and incise this fascia longitudinally ( Fig. 48.7D ).
Close only the skin over a suction drain or a negative pressure wound device.
(MUBARAK AND HARGENS)
Make a 20- to 25-cm incision in the anterior compartment, centered halfway between the fibular shaft and the crest of the tibia ( Fig. 48.8A ). Use subcutaneous dissection for wide exposure of the fascial compartments.
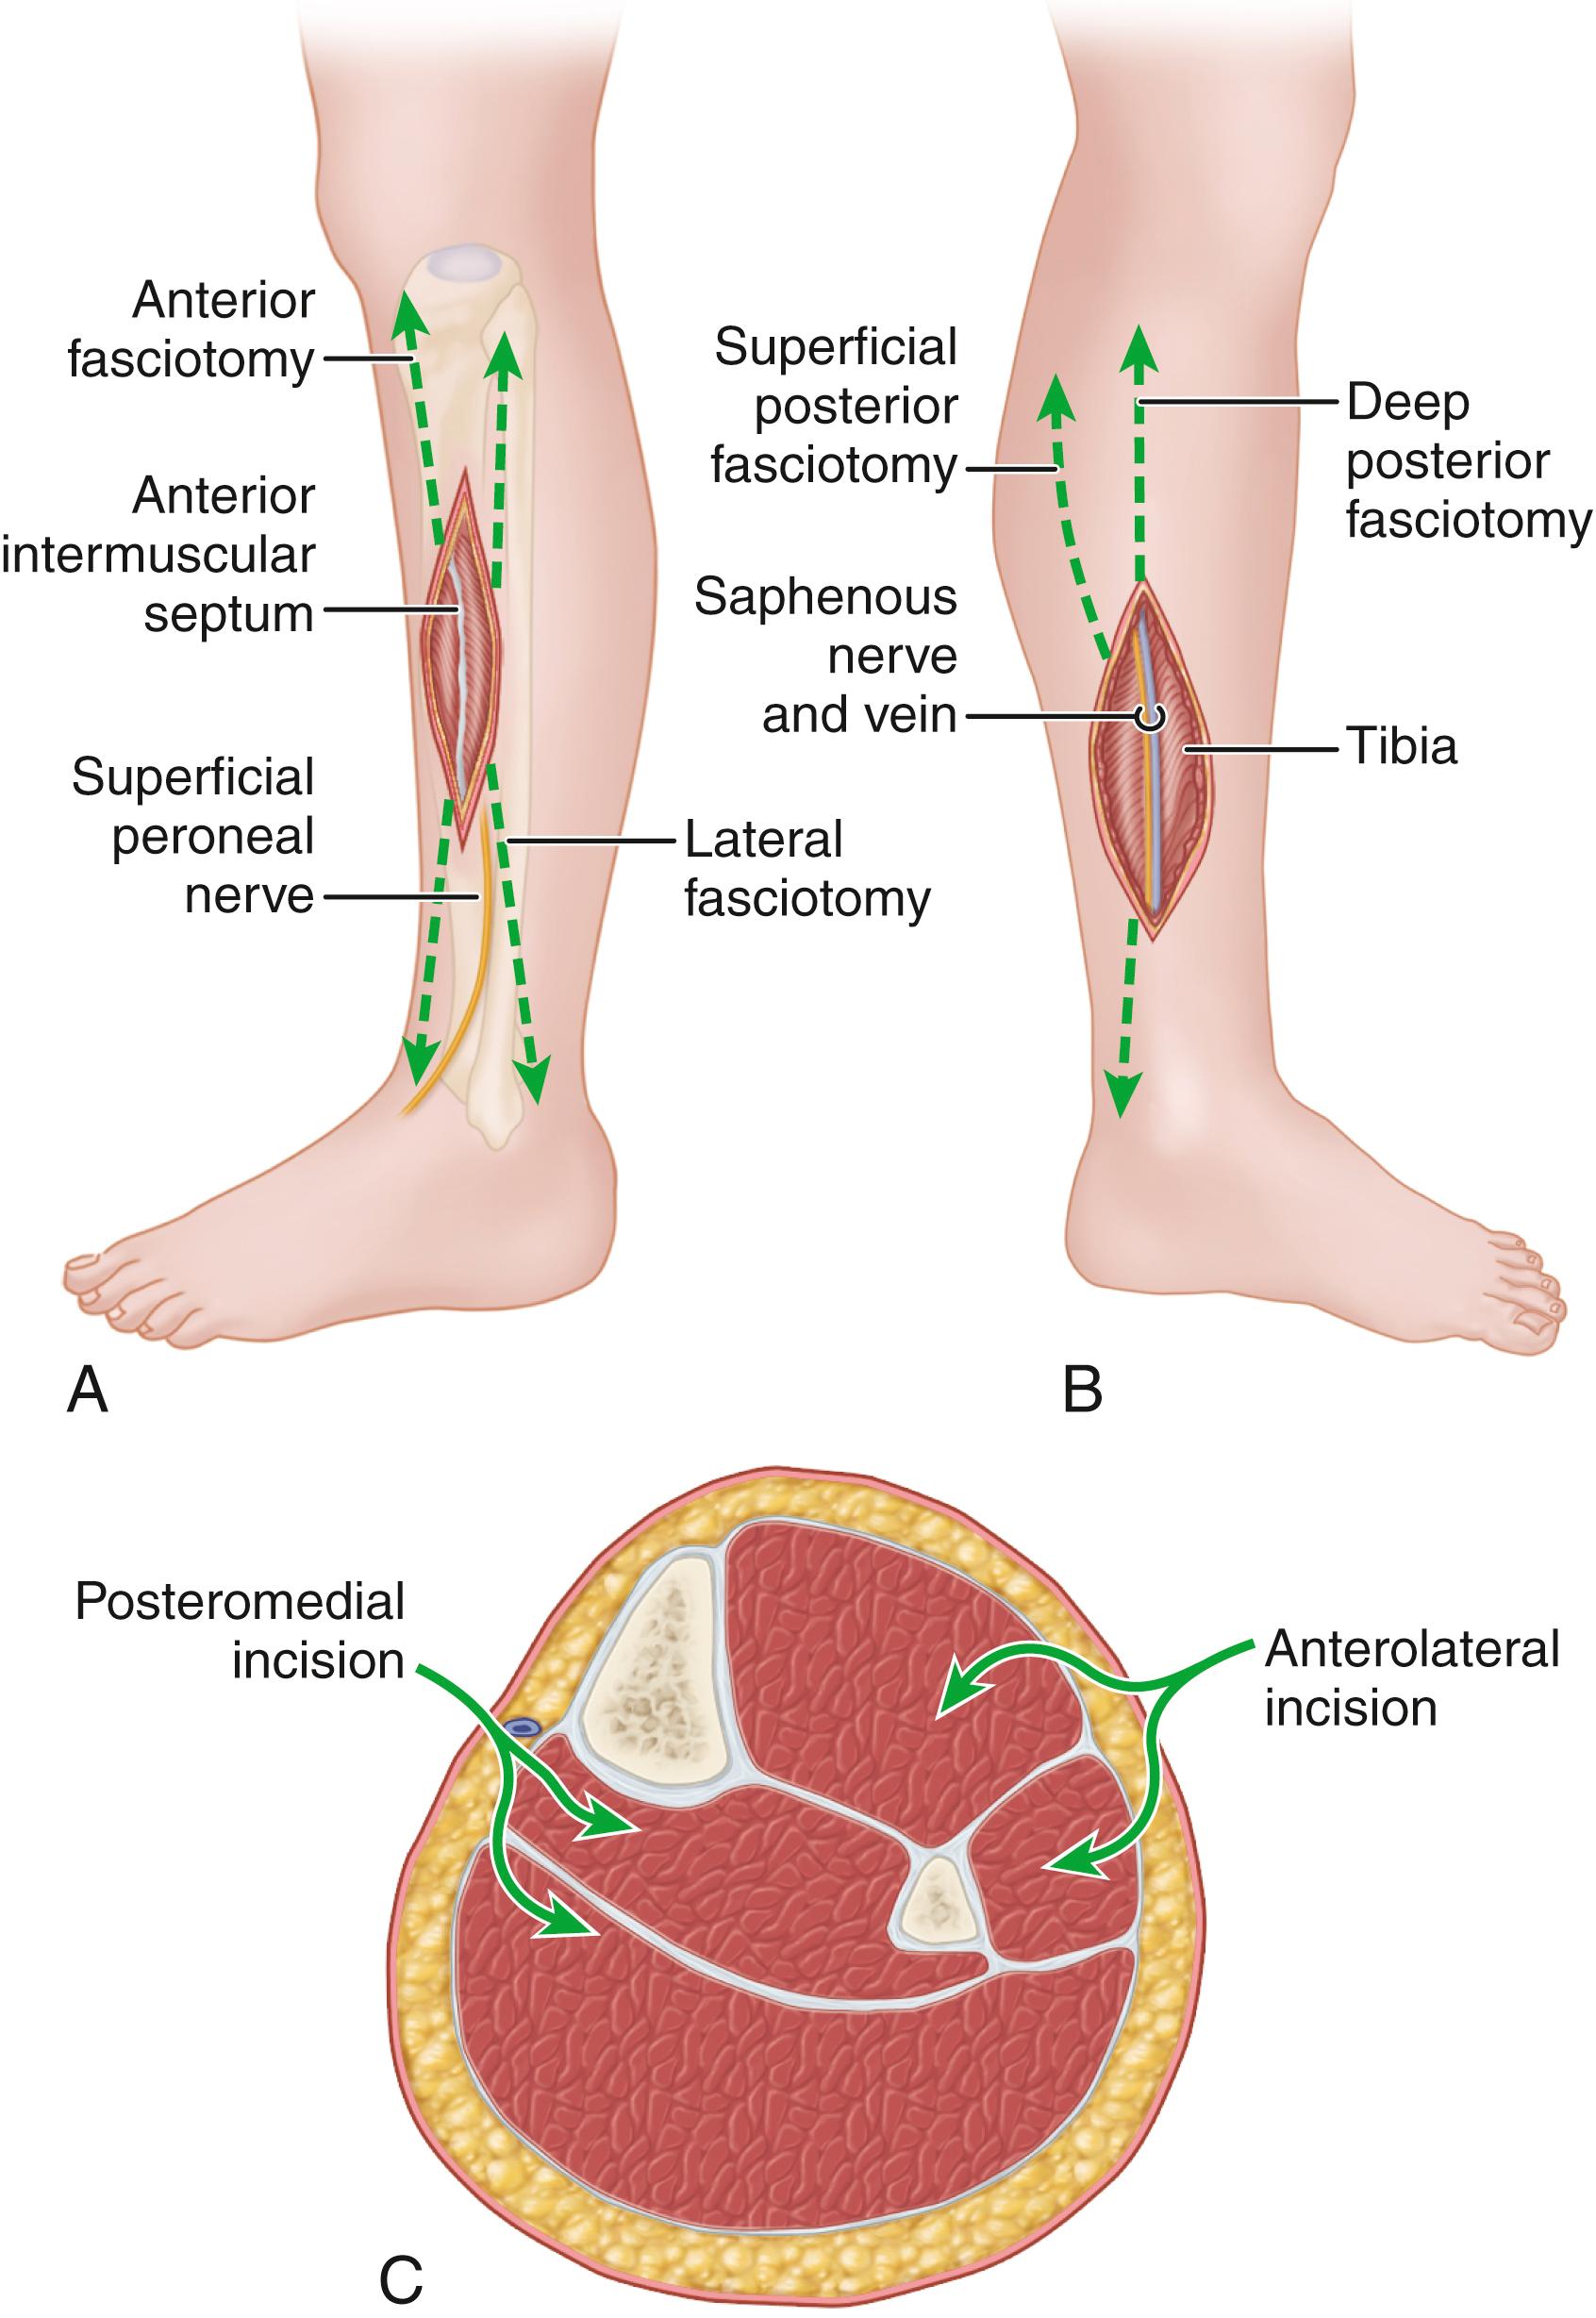
Make a transverse incision to expose the lateral intermuscular septum and identify the superficial peroneal nerve just posterior to the septum.
Using Metzenbaum scissors, release the anterior compartment proximally and distally in line with the anterior tibial muscle.
Perform a fasciotomy of the lateral compartment proximally and distally in line with the fibular shaft.
Make a second longitudinal incision 2 cm posterior to the posterior margin of the tibia ( Fig. 48.8B ). Use wide subcutaneous dissection to allow identification of the fascial planes.
Retract the saphenous vein and nerve anteriorly.
Make a transverse incision to identify the septum between the deep and superficial posterior compartments. Release the fascia over the gastrocnemius-soleus complex for the length of the compartment.
Make another fascial incision over the flexor digitorum longus muscle and release the entire deep posterior compartment. As dissection is carried proximally, if the soleus bridge extends more than halfway down the tibia, release this extended origin.
After release of the posterior compartment, identify the deep posterior muscle compartment. If increased tension is evident in this compartment, release it over the extent of the muscle belly ( Fig. 48.8C ).
Pack the wound open and apply a posterior plaster splint with the foot plantigrade.
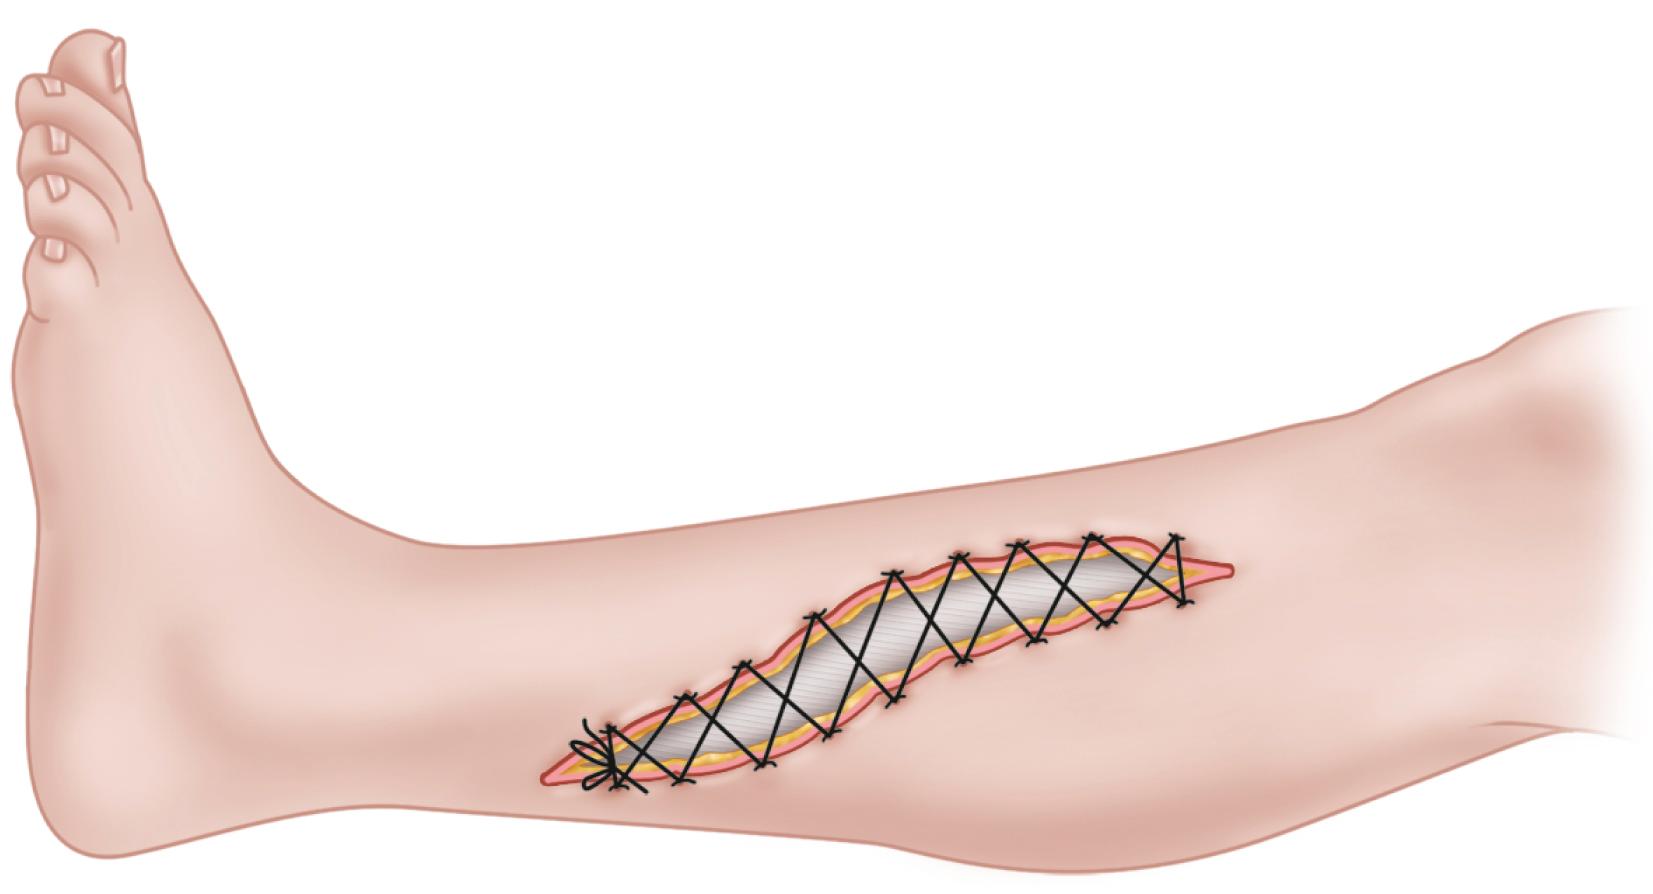
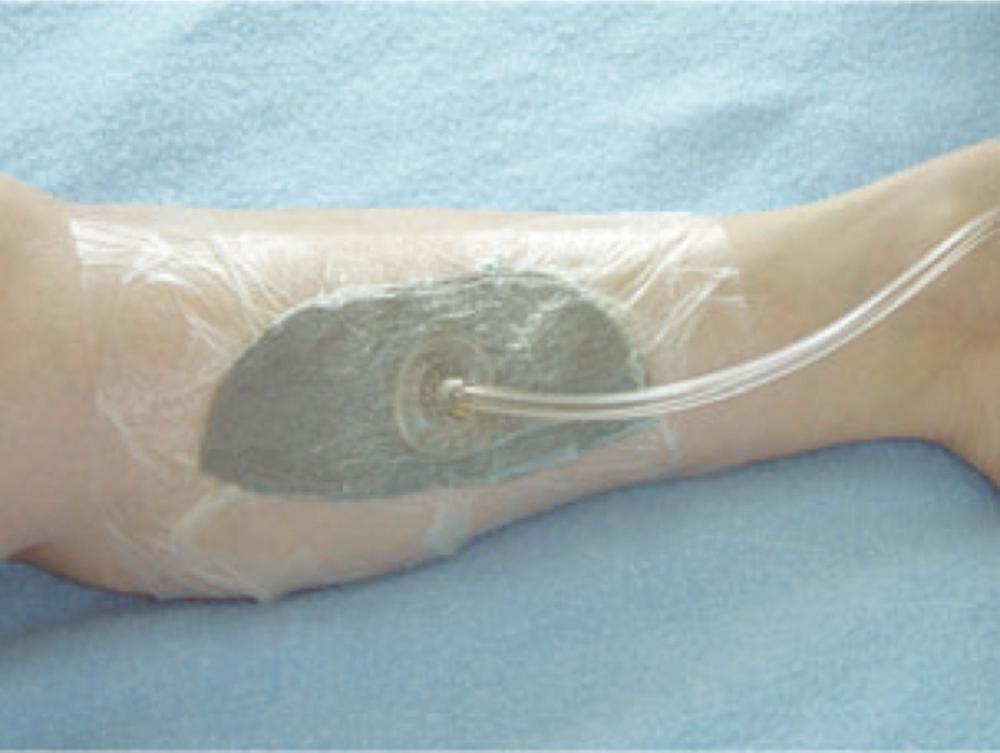
Management of fasciotomy wounds has included primary closure, healing by secondary intention, or split-thickness skin grafting to cover defects, which is necessary in approximately 50% of patients. An alternative is a delayed primary closure, which can be accomplished using the vessel loop shoelace technique ( Fig. 48.9 ) or commercial closure devices. Vacuum-assisted wound closure can be used to reduce postoperative edema, which may improve wound closure with or without negative pressure therapy ( Fig. 48.10 ).
At 48 to 72 hours, the patient is returned to the operating room for debridement of any necrotic material. Intravenous fluorescein and a Wood light can be helpful in evaluating muscle viability. If there is no evidence of muscle necrosis, the skin is loosely closed. If closure is not accomplished, the debridement is repeated after another 48- to 72-hour interval, after which skin closure or skin grafting can be done.
Chronic exertional compartment syndrome (CECS) is defined as reversible ischemia secondary to a noncompliant osteofascial compartment that is unresponsive to the expansion of muscle volume that occurs with exercise. Factors believed to contribute to an increase in an intracompartmental pressure during exercise include increased volume of the skeletal muscle with exertion due to blood flow and edema (muscle volume can increase up to 20% of its resting size during exercise), dynamic contraction factors due to the gait cycle (rear-foot landing, overpronation), and muscle hypertrophy as a response of exercise. Anabolic steroid and creatine use also increases muscle volume.
CECS is most common in young adult recreational runners, elite athletes, and military recruits. The anterior and lateral compartments are most often affected, and symptoms are bilateral in about 75% of patients. Studies have indicated that a 2-year delay in diagnosis is typical for CECS.
The importance of an accurate history cannot be overemphasized in the evaluation of patients with lower extremity pain. In many patients the diagnosis is delayed for months or even years. In their series of 42 patients, Winkes et al. reported a median time of 28 months from first symptom to diagnosis. A typical patient with CECS is a competitive runner, 20 to 30 years old, who describes exercise-induced pain and a feeling of tightness that begins after 20 to 30 minutes of running. The pain usually resolves within 15 to 30 minutes of cessation of exercise. Paresthesias of the nerves running through the involved compartment often are reported. Physical examination may reveal tenderness over the musculature of the involved compartment, and muscle herniation through defects in fascia may be palpated. Patients should be examined after completing the exercise that reproduces symptoms. Other possible causes of the patient’s symptoms also should be considered ( Box 48.1 ).
Medial tibial stress syndrome (shin splints)
Stress fracture
Tenosynovitis
Periostitis
Deep venous thrombosis
Nerve entrapment syndrome
Lumbosacral radiculopathy
Neurogenic claudication
Popliteal artery entrapment syndrome
Vascular claudication
Infection
Myopathy
Tumor
If history and physical examination are not diagnostic, other studies can be instituted to arrive at a diagnosis. Periostitis is easily seen on bone scan, with diffuse uptake often covering one third of the bone. Stress fractures show a more localized, intense uptake of the radioactive isotope, although 90% of stress fractures can be diagnosed with plain radiographs. Stress reactions, precursors of stress fractures, can best be detected by MRI on short T1 inversion recovery sequence or a fat-suppressed T2-weighted fast spin-echo sequence. Entrapment of the peroneal nerve can be determined by provocative tests in which pressure over the point at which the superficial peroneal nerve emerges from the deep fascia produces pain during active, resisted dorsiflexion and eversion of the ankle. The Tinel sign also may be positive in the same area.
As with acute compartment syndrome, some controversy exists as to values for diagnosis of CECS. The most commonly accepted values are the presence of one or more of the following criteria: (1) preexercise, resting pressure of 15 mm Hg or more; (2) pressure of 30 mm Hg or more 1 minute after exercise; and (3) pressure of 20 mm Hg or more 5 minutes after exercise. One study found that the level of pain was significantly higher in patients with CECS than in controls at all phases of exercise. The authors noted that a pressure of 105 mm Hg immediately after 5 minutes of sustained walking at 4 miles per hour with a 5% incline and the patient wearing a 15-kg backpack had better diagnostic accuracy than the Pedowitz criteria above. Other authors have suggested use of postexercise MRI, near-infrared spectroscopy, triple-phase bone scan, methoxyisobutyl isonitrile (MIBI) perfusion imaging, and thallous chloride scintigraphy.
Conservative measures include relative rest (limiting activity to a level that avoids all but minimal symptoms), antiinflammatory medications, manual therapy, stretching and strengthening of the involved muscles, and orthotics. Forefoot running (forefoot strike) also has been reported to improve pain and lower intracompartmental pressure with sustained results of up to 1 year, avoiding surgical intervention. Return to work or sports has been reported in 65% to 75% of patients with nonoperative treatment; however, Maksymiak et al. found that operatively treated patients were more satisfied, reported better recovery to former performance levels, and had better functional outcomes than those treated nonoperatively. If symptoms persist, if pressures are extremely elevated, or if the athlete desires to continue activity at the same level, fasciotomy of the involved compartments is indicated.
Failure after fasciotomy may be related to the compartments released. Anterior compartment fasciotomy has a success rate of 80% to 90%, whereas release of the deep posterior compartment has a lower rate of 50% to 70% as does a combined anterior and lateral release. Younger patient age (<23 years) also has been shown to be a factor in improved subjective function and satisfaction after fasciotomy. Most patients, however, are able to return to running without significant symptoms within 3 months of surgery. Winkes et al. reported that fasciotomy was beneficial in 71% of patients with CECS in the lower leg, with all symptoms improved at short-term and long-term follow-up. Several studies have indicated that patients who do not have all four compartments released have worse outcomes than those who have four-compartment release. Maher et al. reported that 91% of patients with four-compartment releases returned to sport at their desired level, compared to only 67% of those who did not have four-compartment release. In their literature review, Vajapey and Miller concluded that limited-incision fasciotomy remains the most effective treatment for CECS. Open fasciotomy remains the predominant surgical technique, although its comparative efficacy relative to newer endoscopic or other minimally invasive techniques is still being determined.
Subcutaneous and endoscopic techniques have been described for fasciotomy. Although increased complication rates and recurrence of symptoms have been reported with these techniques, a “double mini-incision” technique produced good results in 18 athletes; 14 had release of the anterior compartment only, and four had release of the anterior and lateral compartments. At 2-year follow-up, all 18 had resumed their sports activities; two had a transient sensation of weakness that resolved within 3 months. Endoscopic compartment release was reported to be successful in nine patients (14 legs), eight of whom were able to resume preoperative activities; the only reported complications were two postoperative hematomas that resolved. With anterior and posterior compartment release, extensive undermining and careful identification and retraction of the superficial peroneal nerve during anterior release and of the saphenous nerve and vein during posterior release are necessary. We believe the double-incision technique to be better for release of the posterior structures.
Fasciotomy may not be successful, resulting in recurrence of symptoms. Partial fasciectomy has been advocated by some authors, especially in patients with recurrence after fasciotomy. Other complications include numbness, bruising, skin infection, weakness, and vascular compromise.
(MOUHSINE ET AL.)
Without the use of a tourniquet, make two vertical 2-cm skin incisions over the anterior compartment 15 cm apart ( Fig. 48.11A ).
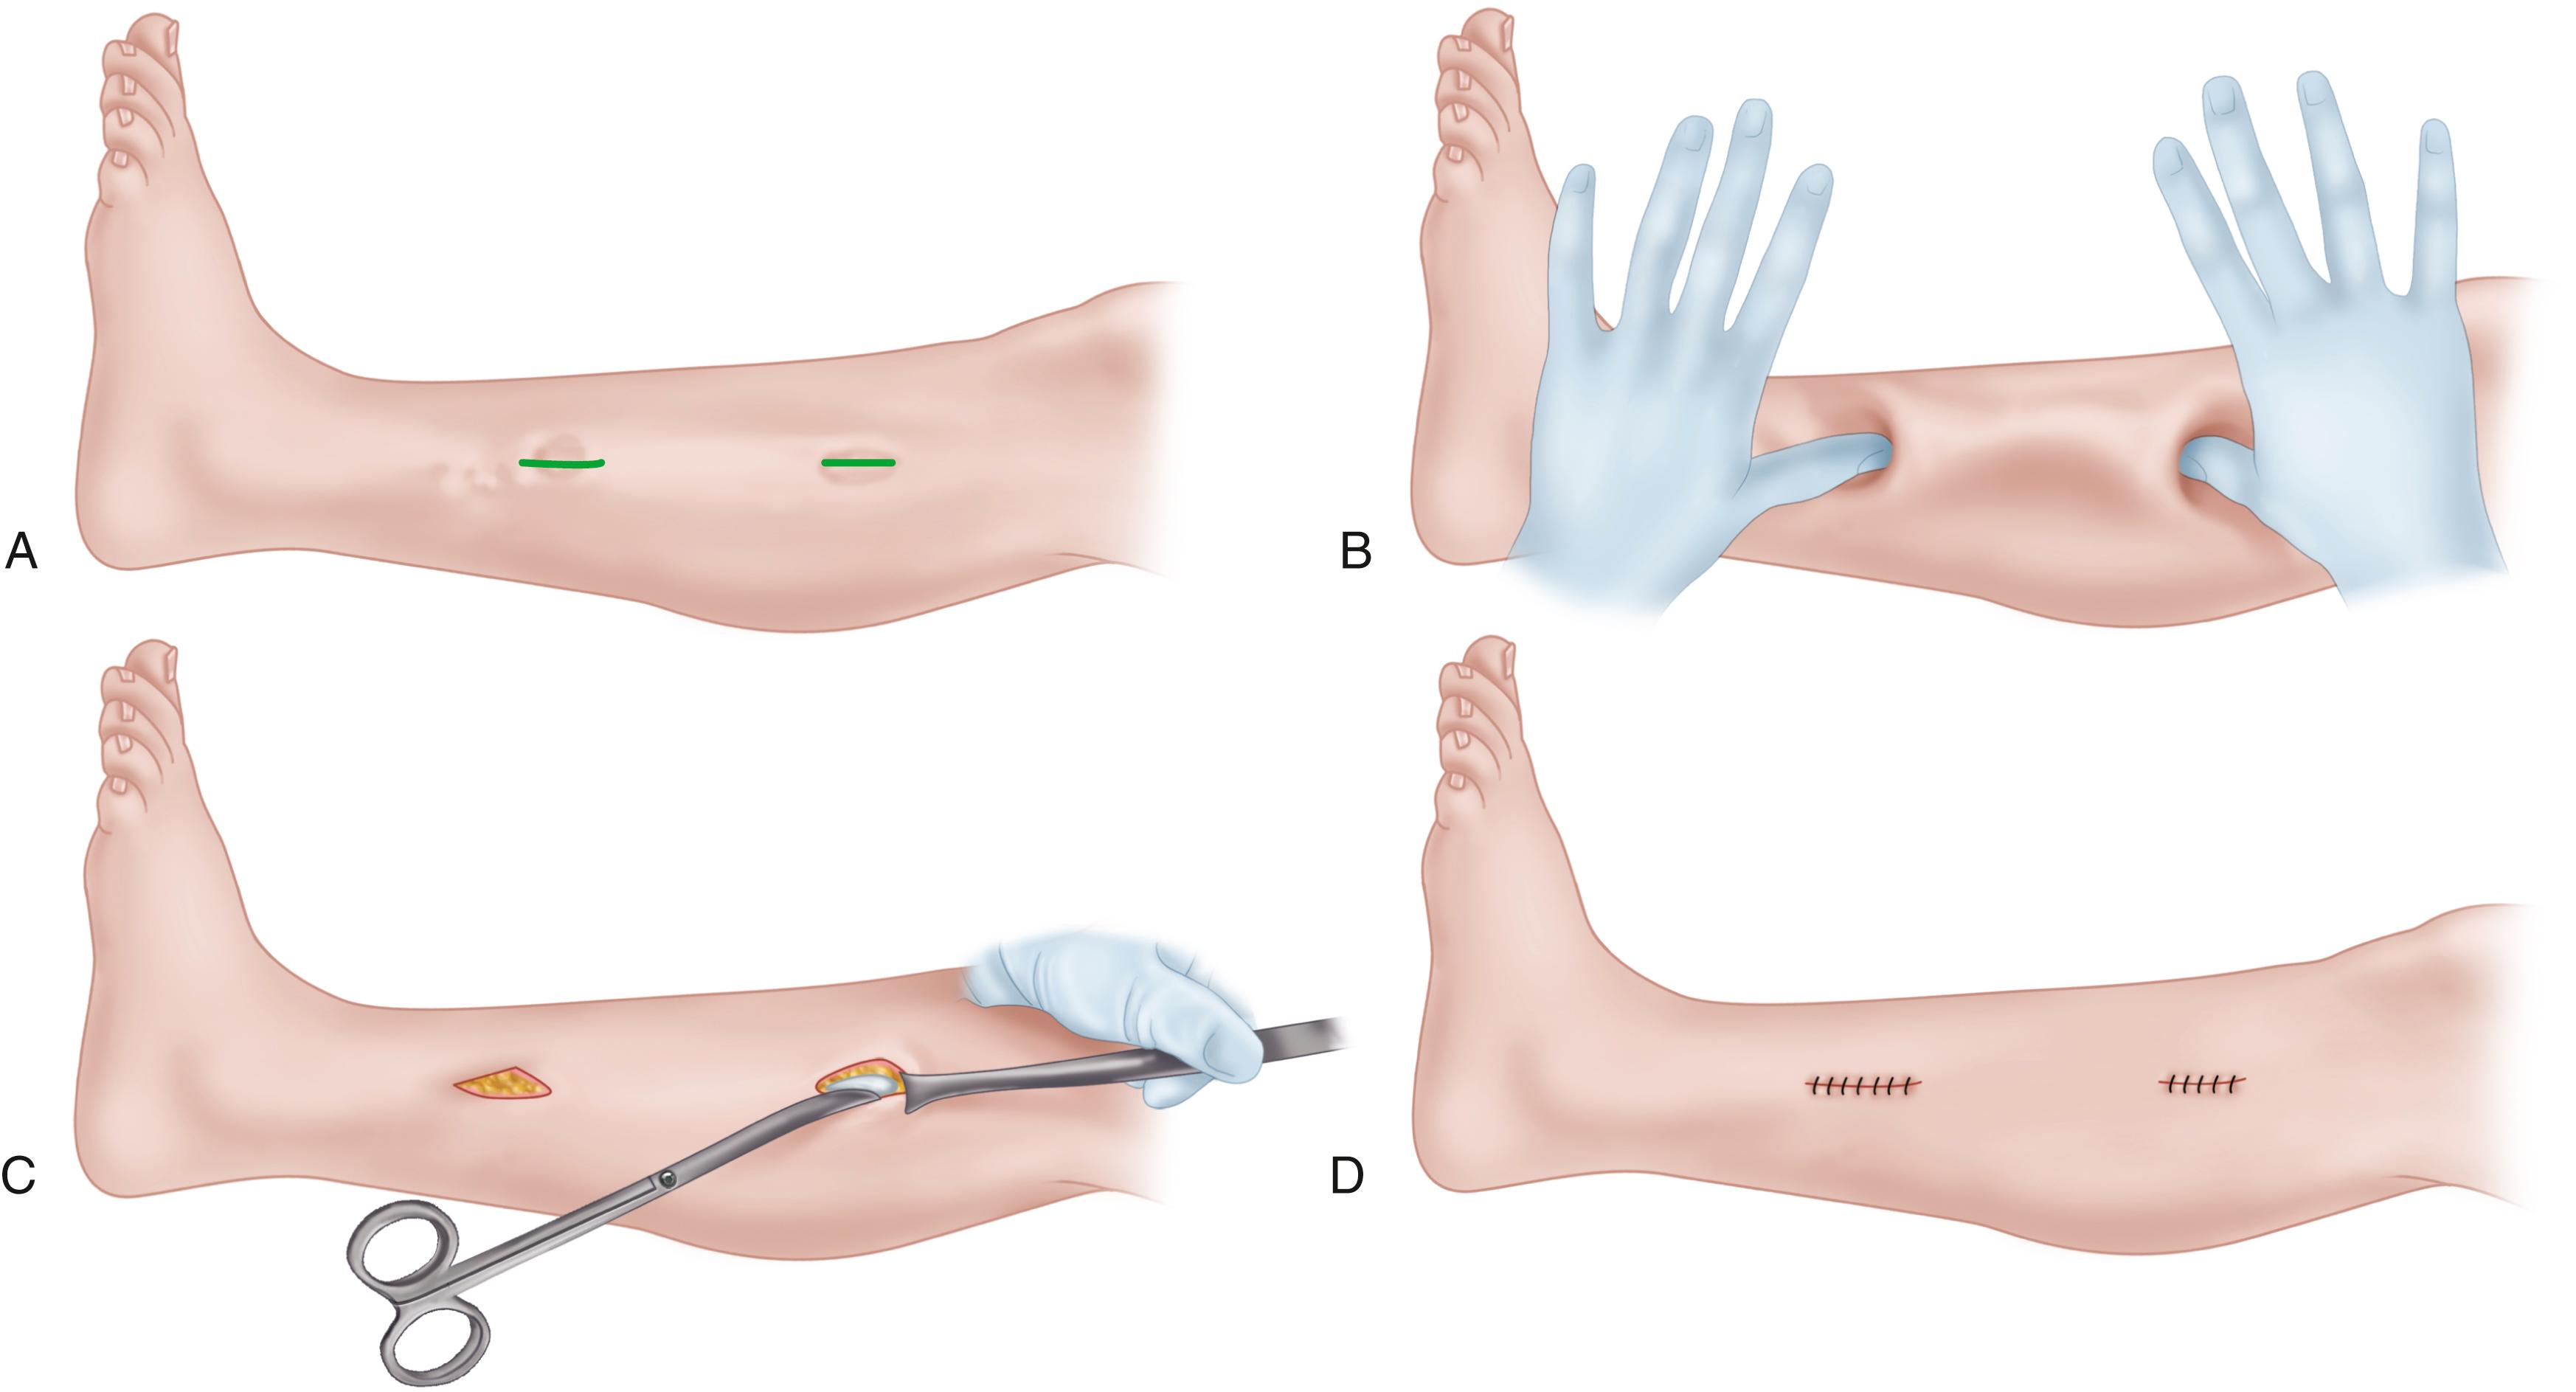
Identify the fascia and carefully develop a subcutaneous flap with blunt dissection of the bridge of skin and subcutaneous tissue ( Fig. 48.11B ). Use retractors to mobilize this flap to allow a clear view of the deep fascia.
Identify the anterior intermuscular septum and the superficial peroneal nerve through the distal incision (10 to 12 cm proximal to the lateral malleolus). Retract the skin anteriorly and posteriorly to allow anterior and/or lateral fasciotomy under direct vision ( Fig. 48.11C ). If needed, use a gloved finger to complete the release.
Close the two incisions with 3.0 monofilament and sterile adhesive strips ( Fig. 48.11D ) and apply a firm bandage from midfoot to the knee.
The limb is elevated for 24 to 48 hours and ice is applied. Then supervised active range-of-motion exercises and progressive weight bearing are begun. Most patients need to use crutches for up to 10 days. Sports activities are gradually resumed at 3 to 4 weeks after surgery.
(FRONEK ET AL.)
Make a 5-cm longitudinal incision halfway between the fibula and the tibial crest in the midportion of the leg ( Fig. 48.12A ) or over the fascial defect if a muscular hernia is present at the exit of the superficial peroneal nerve ( Fig. 48.12B,C ).
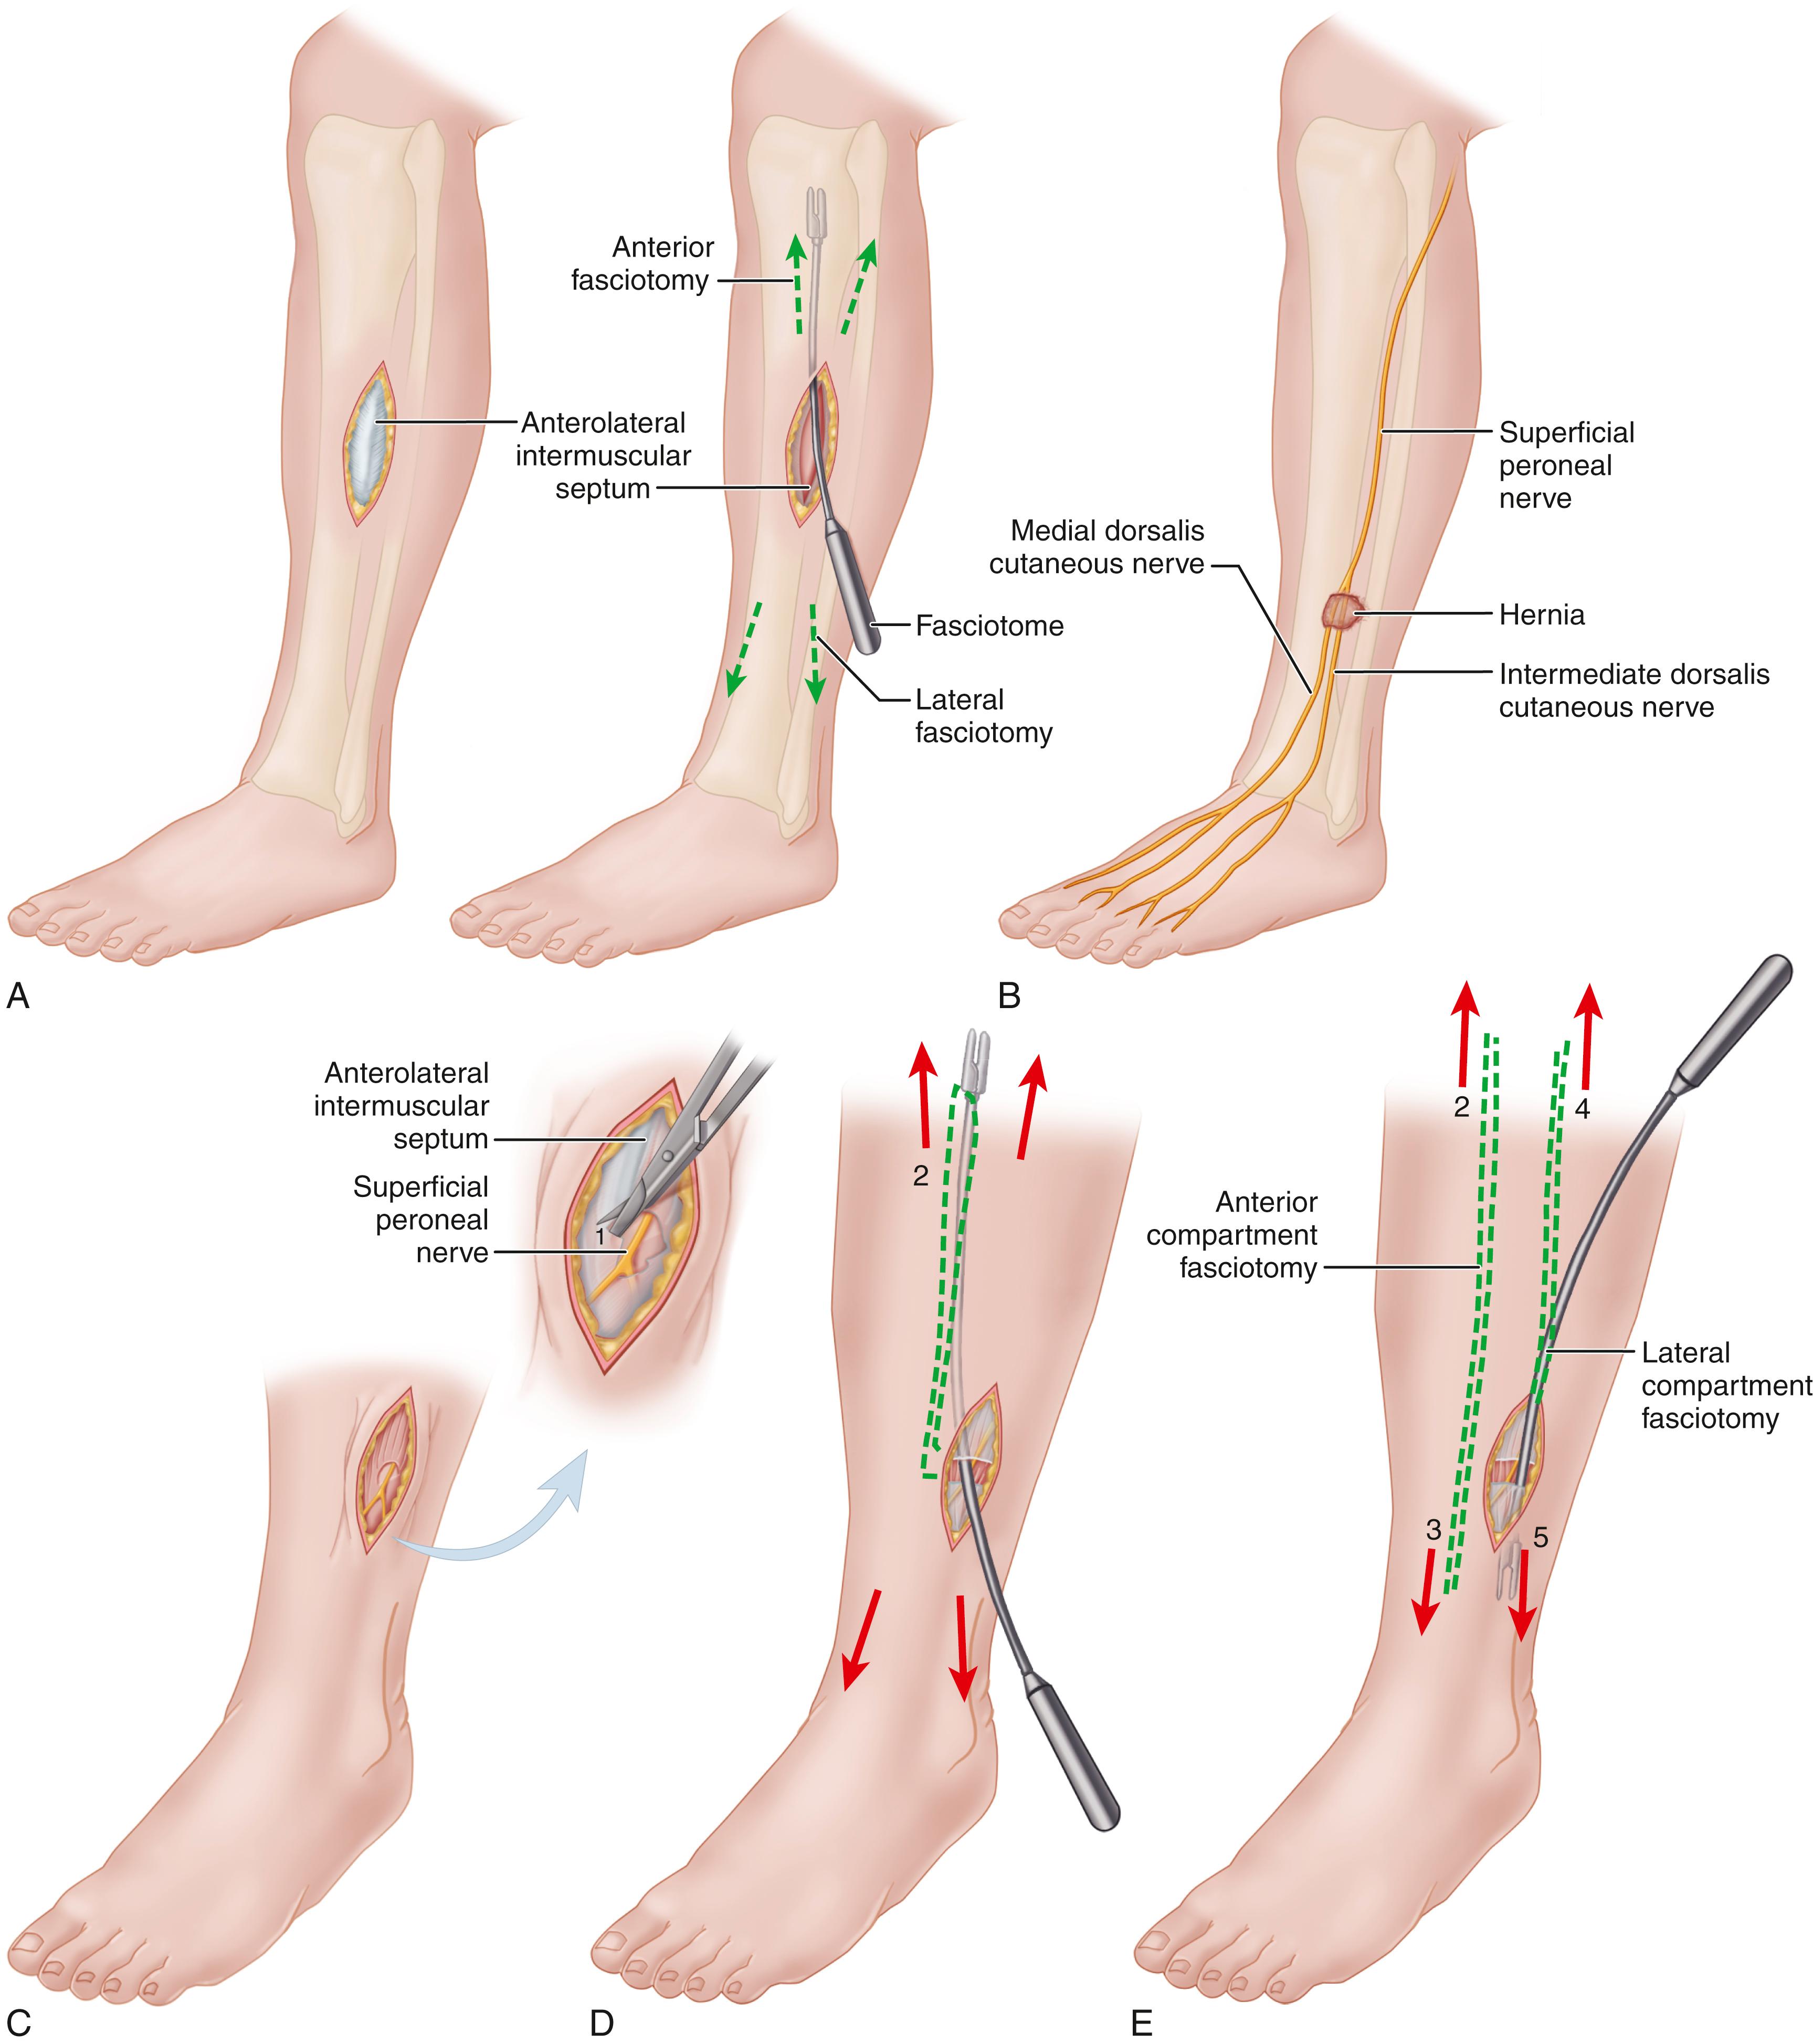
Identify the nerve and the intermuscular septum and pass a fasciotome into the anterior compartment in line with the anterior tibial muscle ( Fig. 48.12D ).
In the lateral compartment, run the fasciotome posterior to the superficial peroneal nerve in line with the fibular shaft ( Fig. 48.12E ).
Do not repair muscular hernias.
Close the skin in the usual fashion and apply a sterile dressing.
(RORABECK)
Make two incisions in the leg 1 cm behind the posteromedial border of the tibia ( Fig. 48.13A ). Identify the saphenous vein in the proximal incision and retract it anteriorly along with the nerve.
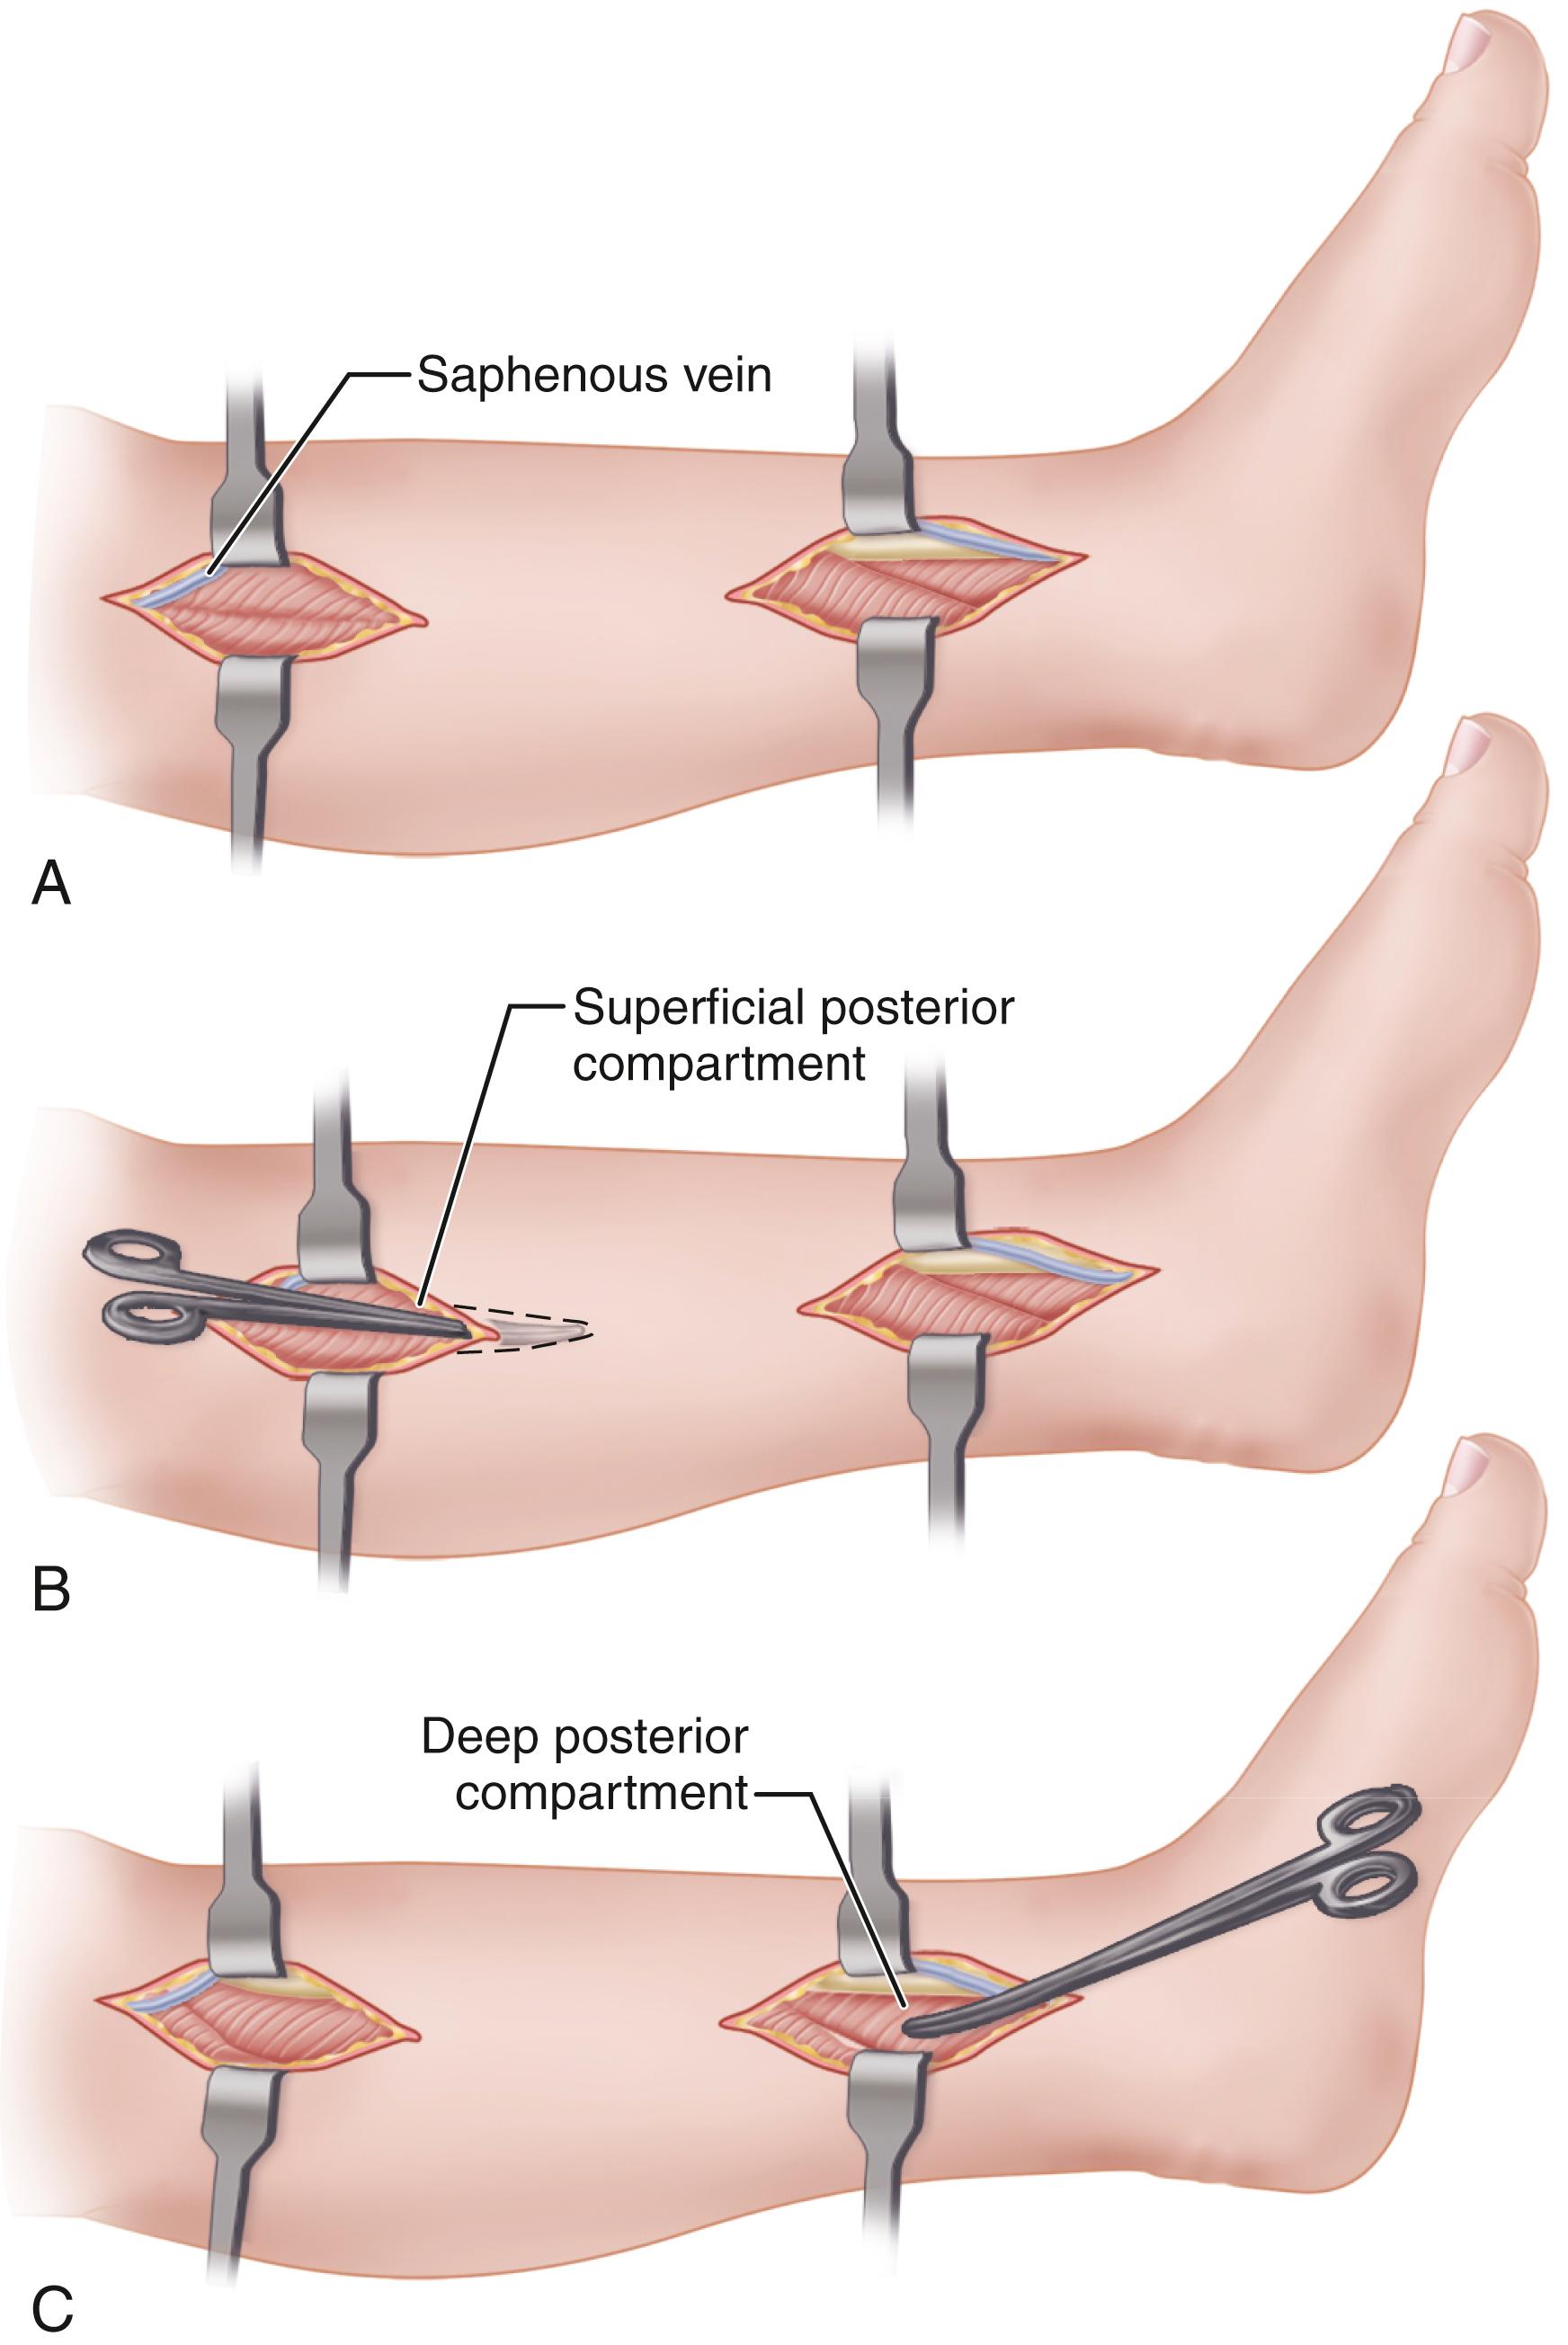
Enter and release the superficial compartment ( Fig. 48.13B ).
Incise the deep fascia ( Fig. 48.13C ).
Expose the deep compartment, including the flexor digitorum longus and posterior tibial muscles, by detaching the soleal bridge.
Identify the neurovascular bundle and posterior tibial tendon and incise proximally and distally the fascia overlying the tendon. The posterior tibial tendon is the key to posterior compartment decompression, and it usually is constricted proximally between the two origins of the flexor hallucis longus; enlarge the opening between these two structures to check for constriction.
Release the tourniquet and obtain meticulous hemostasis.
Close the wound over a suction drain to minimize the risk of hematoma formation.
Early range-of-motion exercises are encouraged, and weight bearing to tolerance on crutches is allowed the day after surgery. Crutches are discarded when walking is possible without difficulty. Light jogging is allowed at 2 to 3 weeks if swelling and tenderness are absent.
Injuries of the Achilles tendon are relatively common in middle-aged athletes, and the frequency of these injuries is increasing (from 2/100,000 in 1986 to 2.5/100,000 in 2016) as more people remain active in recreational sports for longer times. Tendinitis, tendinosis, and peritendinitis accounted for 11% of lower extremity complaints at a large runners’ clinic, and Achilles tendon ruptures have been estimated to be the third most frequent tendon rupture. Some studies have suggested that Achilles tendinopathy is present in 24% of competitive athletes and in up to 50% of competitive runners. Tendon ruptures are estimated to occur in approximately 8% of competitive athletes. The peak age for Achilles tendon rupture in both men and women is between 30 and 40 years of age. Several intrinsic and extrinsic risk factors for Achilles tendon rupture have been identified ( Box 48.2 ). A survey of 154 patients with acute tendon ruptures found that at 4-year follow-up 6% had sustained a rupture on the contralateral side; according to the authors’ calculations, patients with an acute Achilles tendon rupture have a nearly 200-fold increased risk of a contralateral tendon rupture. Patients who have an Achilles tendon rupture in their 30s have a significantly increased risk for contralateral tendon rupture.
Subtalar hyperpronation
Excessive rearfoot/forefoot varus/valgus
Increased femoral anteversion
Limb-length discrepancy
Muscle weakness/imbalance
High body mass index
Aging
Excessive running duration and intensity
Unfamiliar running surface
Drugs: fluoroquinolone antibiotics, corticosteroids
Most commonly, the mechanisms of Achilles tendon rupture are pushing off with the weight-bearing forefoot while extending the knee, sudden unexpected dorsiflexion of the ankle, and violent dorsiflexion of the plantar flexed foot, as in a fall from a height. Disruption also can occur from a direct blow to the contracted tendon or from a laceration.
Achilles tendon rupture has been related to a relatively hypovascular area of the tendon, shown by angiography to be 2 to 6 cm above the tendon insertion into the calcaneus. The major blood supply of the tendon is through its mesotendon, with the richest supply through the anterior mesentery. With increasing age, this anterior mesenteric supply becomes reduced. Age-dependent changes in collagen crosslinking result in increased stiffness and loss of viscoelasticity, predisposing to injury. Repetitive microtrauma to this area may make it impossible for the reparative process to keep pace, and a degenerative attrition may be responsible for many Achilles tendon ruptures. Another theory concerning the cause of Achilles tendon rupture is the failure of inhibiting mechanisms at the musculotendinous unit as a result of fatigue, with resultant eccentric overload. The cause of Achilles tendon rupture probably is a combination of a relatively hypovascular area and repetitive microtrauma that causes an inflammatory reparative process that is unable to keep up with the stresses because of decreased vascularity. A mechanical overload completes the rupture.
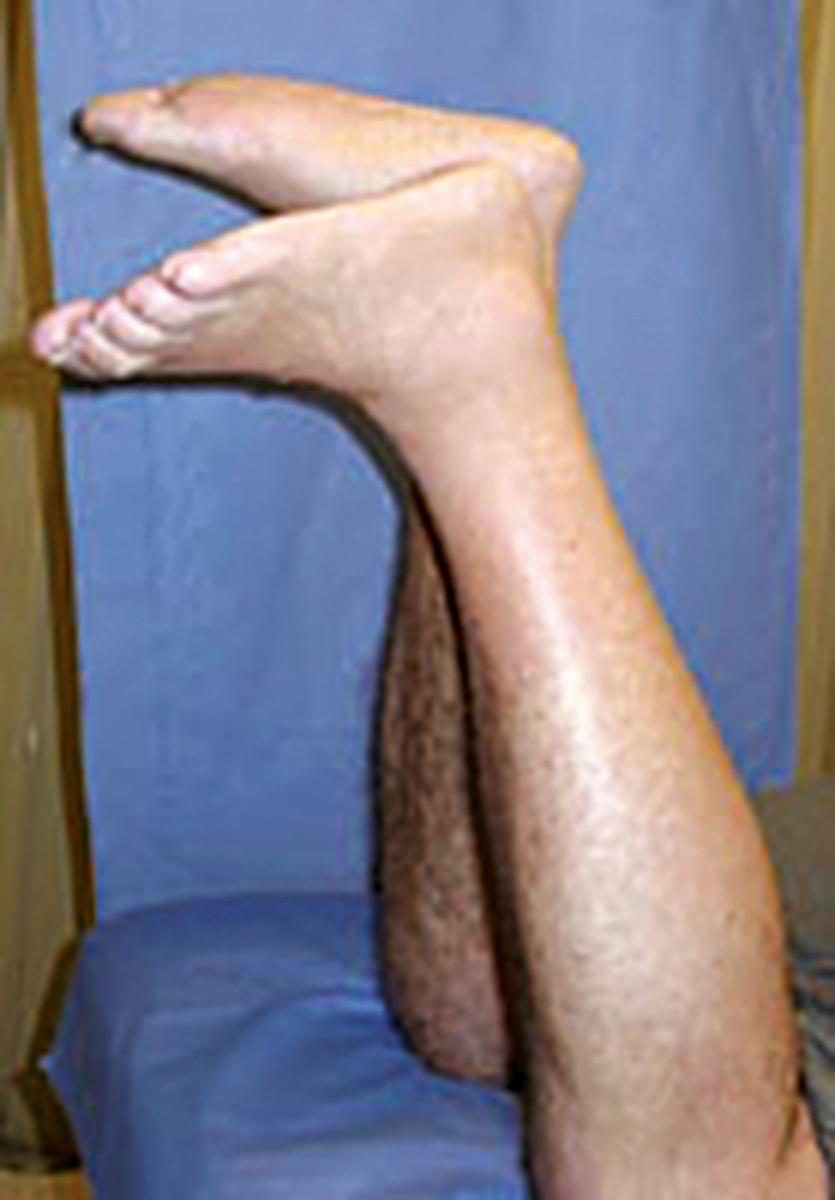
The diagnosis of Achilles tendon rupture is reliably made by a palpable tendon defect, the inability to do a toe raise on the affected side, and a positive Thompson “squeeze test,” which is performed by squeezing the calf muscle just distal to its maximal girth while the patient is prone to bring about plantar flexion of the ankle joint. The test is positive for complete rupture when there is no plantar flexion of the ankle. Another test that may be beneficial is that described by Matles. The patient is placed prone with the lower legs extending off the bed and is asked to actively flex the knees to 90 degrees. Active flexion of the knee should cause the gastrocnemius to shorten, causing plantar flexion of the foot. If the foot falls into neutral or slight dorsiflexion, the Achilles tendon is likely ruptured ( Fig. 48.14 ). In the needle test described by O’Brien, a 25-gauge needle is placed percutaneously in the midline of the proximal tendon. Motion of the proximal tendon indicating continuity is detected by observing the needle when the foot is put through passive range of motion.
The decision to treat acute Achilles tendon ruptures conservatively or operatively is somewhat controversial, with evidence to support either form of treatment. Despite the multitude of articles in the medical literature about Achilles tendon rupture, there is still no consensus as to the best treatment and few high-level studies to support various recommendations. The American Academy of Orthopaedic Surgeons’ recommendations ( Box 48.3 ) are primarily consensus or based on weak or inconclusive evidence. Important considerations include return to sport and to activities of daily living (pain, range of motion, strength), rerupture rate, and risks associated with surgery.
The physical examination should include two or more of the following tests to establish the diagnosis of acute Achilles tendon rupture:
Clinical Thompson test (Simmonds squeeze test)
Decreased ankle plantar flexion strength
Presence of a palpable gap (defect, loss of contour)
Increased passive ankle dorsiflexion with gentle manipulation
Operative treatment should be approached more cautiously in patients with diabetes, neuropathy, immunocompromised states, age older than 65, tobacco use, sedentary lifestyle, obesity (body mass index > 30), peripheral vascular disease, or local/systemic dermatologic disorders.
Early (≤2 weeks) postoperative protected weight bearing (including limiting dorsiflexion) for patients with acute Achilles tendon rupture who have been treated operatively
Use of a protective device that allows mobilization by 2 to 4 weeks postoperatively
Nonoperative treatment as an option for patients with acute Achilles tendon rupture
Open, limited open, and percutaneous techniques as options for treating patients with acute Achilles tendon rupture
In patients who participate in sports, option of returning to sports within 3 to 6 months after operative treatment for acute Achilles tendon rupture
Routine use of magnetic resonance imaging, ultrasound, and radiography to confirm the diagnosis of acute Achilles tendon rupture
Use of immediate functional bracing as nonoperative treatment for patients with acute Achilles tendon rupture
Preoperative immobilization or restricted weight bearing before surgical treatment of acute Achilles tendon rupture
Use of allograft, autograft, xenograft, synthetic tissue, or biologic adjuncts in acute Achilles tendon ruptures that are treated operatively
Use of antithrombotic treatment for patients with acute Achilles tendon ruptures
Postoperative physiotherapy for patients with acute Achilles tendon rupture
Current nonoperative treatment of Achilles tendon ruptures involves functional bracing and an aggressive rehabilitation protocol that allows early motion ( Table 48.2 ). Suggested ultrasound-based criteria for choosing nonoperative treatment include (1) gap of less than 5 mm with maximal plantar flexion, (2) gap of less than 10 mm with the foot in neutral position, and (3) more than 75% tendon apposition with the foot in 20 degrees of plantar flexion.
| 0-2 weeks | Posterior slab/splint; non–weight bearing with crutches (immediately postoperative or after injury) |
| 2-4 weeks | Aircast walking boot with 2-cm heel lift ∗ Protected weight bearing with crutches. Active plantar flexion and dorsiflexion to neutral, inversion/eversion below neutral, modalities to control swelling Incision mobilization modalities † (e.g., friction, ultrasound, stretching) Knee/hip exercises with no ankle involvement (e.g., leg lifts from sitting, prone, or side-lying position) Non–weight-bearing fitness/cardiovascular exercises (e.g., bicycling with one leg, deep-water running) Hydrotherapy (within motion and weight-bearing limitations) |
| 4-6 weeks | Weight bearing as tolerated ∗ Continue activities as above |
| 6-8 weeks | Remove heel lift from boot Weight bearing as tolerated ∗ Dorsiflexion stretching, slowly graduated resistance exercises (open and closed kinetic chain, functional activities) Proprioceptive and gait training Modalities, including ice, heat, and ultrasound as indicated Incision mobilization † Fitness/cardiovascular exercises, including weight bearing as tolerated (e.g., bicycling, elliptical machine, walking and/or running on treadmill, StairMaster) Hydrotherapy |
| 8-12 weeks | Wean off boot Return to crutches and/or cane as necessary and gradually wean off Continue to progress range of motion, strength, proprioception |
| >12 weeks | Continue to progress range of motion, strength, proprioception Retrain strength, power, endurance Increase dynamic weight-bearing exercise, include plyometric training Sport-specific training |
∗ Patients are required to wear the boot while sleeping; may be removed for bathing and dressing but weight-bearing restrictions must be observed.
† If deemed necessary by the physical therapist (scar tight or not moving well).
Historically, operative treatment has been shown to have a significantly lower rerupture rate than nonoperative treatment but to be associated with a higher complication rate. More recent comparisons, however, show less difference in rerupture rates, rates of other complications, and functional outcomes, perhaps because improved operative techniques have decreased the frequency of postoperative complications and the use of functional bracing and aggressive rehabilitation has improved rerupture rates and function after nonoperative treatment. A systematic review and meta-analysis involving 762 patients found no significant differences between conservative and operative treatment in terms of deep venous thrombosis (DVT), return to sport, ankle range of motion, or physical activity scale; however, the rate of rerupture was significantly lower in the operative group than in the nonoperative group. Overall the risk of rerupture is low and differences between treatment groups are small.
Regardless of treatment, 30% to 50% of patients are reported to have functional impairments, including pain, reduced strength, and decreased range of motion, at 1 to 5 years after injury. A study of 31 National Football League (NFL) players who had an acute Achilles tendon rupture found that only 21 (64%) returned to play at an average of 11 months after injury, and all 21 had significant decreases in the number of games played and in their power ratings compared with the three seasons preceding the injury. Despite the persistence of functional deficits and lower activity levels, in most patient populations the patient-reported outcomes are relatively high, suggesting that patients learn to adjust to any impairments.
Contraindications to operative repair of Achilles tendon ruptures include arterial insufficiency, poor skin and soft-tissue quality, poorly controlled medical comorbidities (e.g., diabetes), and an inability to comply with postoperative rehabilitation protocols. Advanced age alone is not a contraindication to operative repair; good results have been reported with both open and percutaneous repair techniques in older patients. Although obesity has been cited as a risk factor for poorer outcomes after a number of orthopaedic procedures, current studies have found that both obese and non-obese patients can achieve good outcomes with Achilles tendon repair. Hillam et al. compared outcomes in obese and non-obese patients and found that obesity had an increased association with wound dehiscence but was not significantly associated with any other complication.
A variety of techniques and modifications have been described for repair of acute Achilles tendon ruptures, including open repair, with or without augmentation (tendon transfer, local fascial turndown, allograft), and percutaneous or minimally invasive repair, with or without intraoperative ultrasound or endoscopy. In addition, numerous suture materials and configurations have been used for repair, including single and double Bunnell, Kessler, and Krackow (locking-loop) techniques and various modifications of these. Although proponents have suggested benefits for varied modifications, none has been firmly proved to be superior. A cadaver study found no difference in strength between Krackow, Bunnell, and Kessler sutures when all were done with a double-suture technique. One long-term follow-up study (12 years) reported that fibrin glue produced functional results equal to those obtained with sutures, with fewer complications.
Repairs of acute Achilles tendon ruptures have been augmented with “turn-down” flap of fascia, the plantaris and peroneus brevis tendons, and biologic or synthetic scaffolds. Two large studies found no benefit of turn-down flaps over simple end-to-end repair, noting that the augmentation required a longer incision and a longer operating time. Extracellular matrix xenografts have been reported to decrease gapping and increase load to failure immediately after surgery in cadaver models of Achilles rupture, as well as in animal studies; however, these benefits have not been clinically proven.
Another “biologic” treatment approach involves the use of platelet-rich plasma (PRP) injected into the area of tendon rupture to theoretically recruit platelet growth factors to promote rapid tendon healing. Animal studies have shown that local application of PRP stimulates tendon repair, and cell culture studies have shown that PRP can stimulate processes associated with tendon healing. A clinical study on the use of PRP in open repair of acute Achilles tendon injuries reported faster recovery of motion and quicker return to sports with PRP; however, others reached the opposite conclusion, reporting no effect on function and suggesting that PRP may actually have a negative effect on tendon healing. Until preparation and delivery methods, as well as patient selection, are more standardized, it is difficult to determine the effect of PRP on tendon healing. Animal studies using mesenchymal stem cells for tendon healing also have shown promise.
Open repair of acute Achilles tendon ruptures remains the “gold standard” of operative treatment, especially for athletic individuals, because of the historically low rate of reruptures, high rate of return to sports, and decreased complication rate with newer techniques. Of 62 professional athletes with acute Achilles tendon ruptures repaired operatively, 31% were unable to return to play. Athletes who did return played in fewer games, had less playing time, and performed at a lower level than their preinjury status. However, these functional deficits were seen at only 1 year after surgery compared to matched controls, suggesting that those who return to play can expect to perform at a level similar to that of uninjured controls 2 years after surgery. Advocates of open repair argue that Achilles tendon injuries often result in complex obliquely oriented tears that cannot be adequately apposed and repaired with percutaneous or minimally invasive techniques.
Complications of open Achilles tendon surgery have been well documented, with major complications reported in up to 10% of patients. The most frequently reported complications include wound infection, rerupture, and sural nerve injury. Traditionally, Achilles tendon repair has been done with the patient prone, which itself is associated with a number of complication risks. Marcel et al. described an alternative technique in which the surgery is done through a posteromedial incision with the patient supine. They suggest that supine positioning can avoid risks associated with prone positioning and markedly reduce operating room time without increasing complications. None of their 45 patients in whom supine positioning was used had infections, sural nerve injuries, or reruptures.
Delayed time to surgery has been cited as a prognostic factor in outcomes after open repair of acute Achilles tendon ruptures. Svedman et al., in a study of 228 patients with acute Achilles tendon rupture who were treated with uniform anesthetic and surgical techniques within 10 days of injury, found that those who had surgery within 48 hours of injury had better outcomes and fewer adverse events than those treated after 72 hours.
With the patient prone, make a posteromedial longitudinal incision 8 to 10 cm long; make it about 1 cm medial to the tendon, and end it just proximal to where the shoe counter strikes the heel. The skin incision should be off center to prevent later irritation by shoes directly over the tendon in the midline.

Carry the incision sharply through the skin, subcutaneous tissues, and tendon sheath.
Reflect the tendon sheath with the subcutaneous tissue, minimizing subcutaneous dissection.
Approximate the ruptured ends of the tendon with No. 5 nonabsorbable tension suture, using a modified Kessler stitch through the stump 2.5 cm from the rupture. Plantar flex the foot 0 to 5 degrees, flex the knee 15 degrees, and approximate the ends of the tendon by tying the tension suture.
Use a tendon stripper and harvest the plantaris tendon, releasing it proximally. Lay it aside in a moist sponge.
Place the frayed ends of the tendon in as nearly normal position as possible and repair the rupture with multiple 2-0 absorbable sutures anteriorly and posteriorly.
Place the previously harvested plantaris tendon in a fascial needle and pass it circumferentially, first through the posterior and then through the anterior part of the tendon 2 cm from the rupture.
Use multiple 2-0 absorbable sutures to tack the plantaris tendon to the Achilles tendon. The distal tendon usually is long enough to be fanned out and tacked over the repair, as described by Lynn (see Technique 48.10).
Close the fascial sheath and subcutaneous tissues with 2-0 absorbable sutures.
Close the skin and apply a sterile dressing.
Apply a short leg cast with the foot in gravity equinus.
With the patient prone, make a posteromedial incision approximately 10 cm long about 1 cm medial to the tendon and ending proximal to where the shoe counter strikes the heel.
Sharply dissect through the skin, subcutaneous tissues, and tendon sheath. Reflect the tendon sheath with the subcutaneous tissue to minimize subcutaneous dissection.
Approximate the ruptured ends of the tendon with a 2-0 nonabsorbable suture ( Fig. 48.16 ).

Check the repair for stability after the sutures are tied.
Close the peritenon and subcutaneous tissues with 4-0 absorbable sutures.
Close the skin and apply a sterile dressing and a posterior splint or short leg cast with the foot in gravity equinus.
With the patient prone, make a posterior curvilinear incision extending from the midcalf to the calcaneus.
Incise the deep fascia in the midline and expose the tendon rupture.
Debride the ragged ends of the tendon and appose them with a box type of mattress suture of heavy nonabsorbable suture material or wire; also use fine interrupted sutures ( Fig. 48.17 ).

Fashion two flaps from the proximal tendon and gastrocnemius aponeurosis, each approximately 1 cm wide and 7 to 8 cm long. Leave these flaps attached at a point 3 cm proximal to the site of rupture.
Twist each flap 180 degrees on itself so that its smooth external surface lies next to the subcutaneous tissue as it is turned distally over the rupture.
Suture each flap to the distal stump of the tendon and to one another so that they cover the site of rupture completely.
Close the wound, being careful to approximate the tendon sheath over the site of repair.
Lynn described a method of repairing ruptures of the Achilles tendon in which the plantaris tendon is fanned out to make a membrane 2.5 cm or wider for reinforcing the repair. The method is useful for injuries less than 10 days old; later the plantaris tendon becomes incorporated in the scar tissue and cannot be identified easily.
(LYNN)
Make an incision 12.5 to 17.5 cm long parallel to the medial border of the Achilles tendon.
Open the tendon sheath in the midline and, with the foot held in 20 degrees of plantar flexion and without excising the irregular edges, sew the ends of the Achilles tendon together with 2-0 absorbable sutures.
If the plantaris tendon is intact ( Fig. 48.18A ), divide its insertion on the calcaneus; then, using forceps and beginning distally, fan out the tendon to form a membrane.
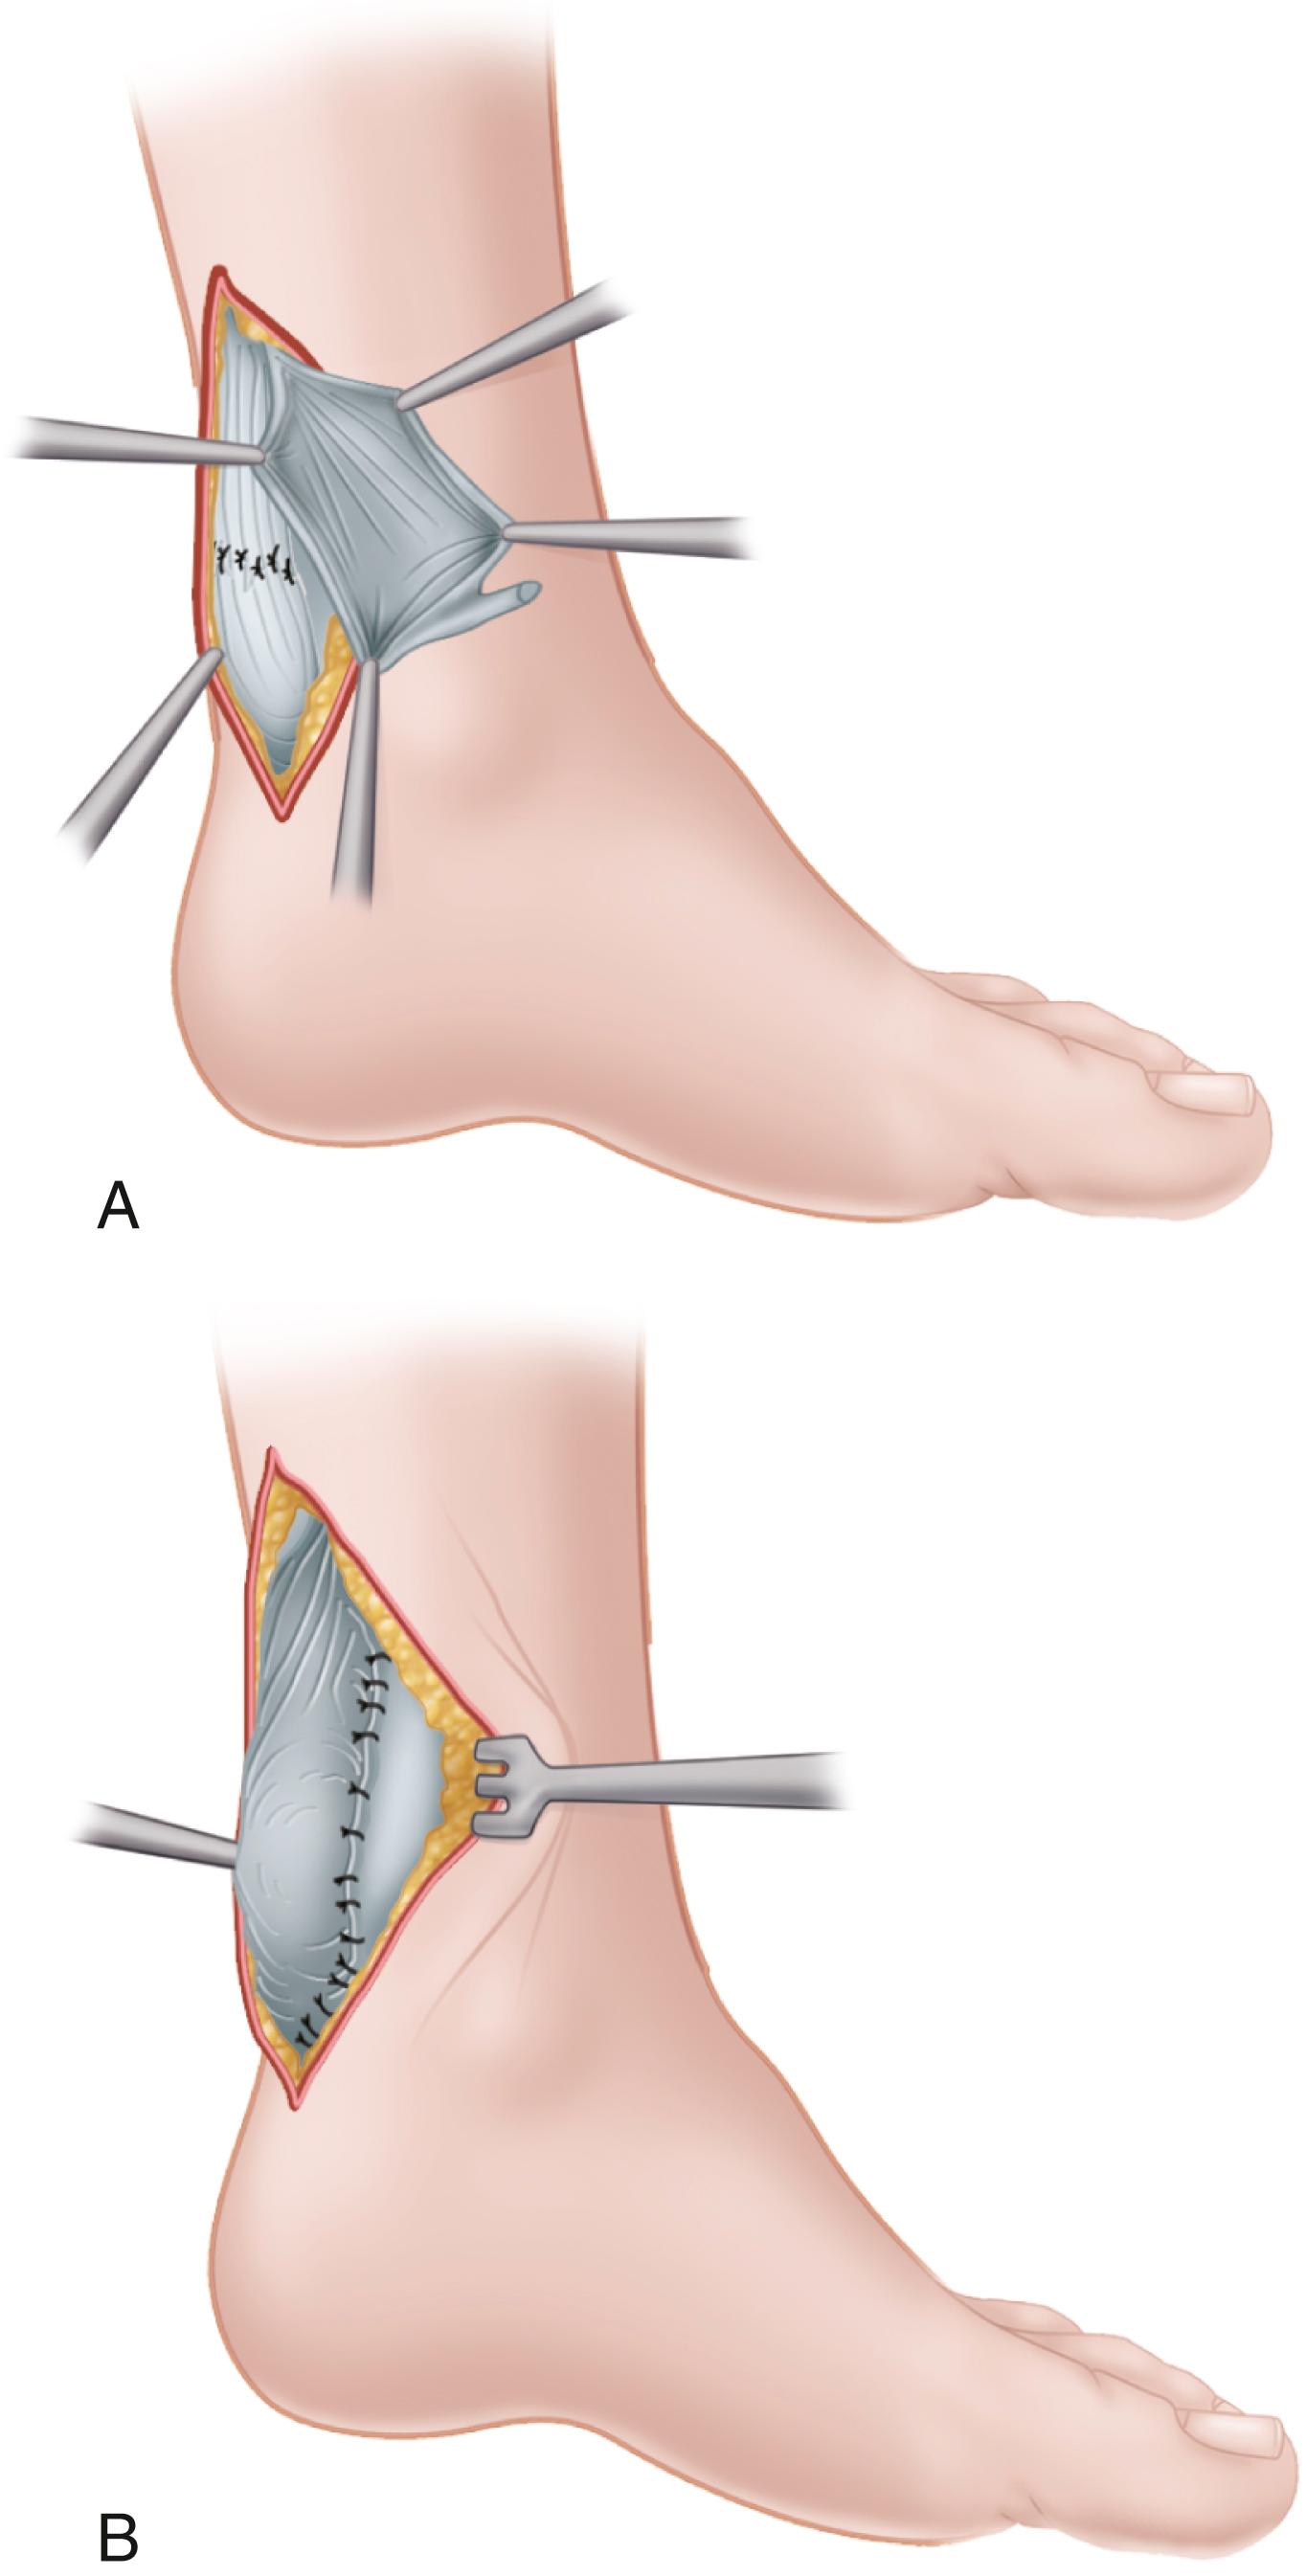
Place this membrane over the repair of the Achilles tendon and suture it in place with interrupted sutures ( Fig. 48.18B ). When possible, cover the Achilles tendon for 2.5 cm both proximal and distal to the repair.
If the plantaris tendon also is ruptured, dissect it free from the Achilles tendon for several centimeters and divide it proximally, using a tendon stripper.
Then pull the tendon distally into the incision, fan it out as a free graft, and cover the repair as already described.
Close the sheath of the Achilles tendon as far distally as possible without tension and close the wound.
Postoperative care is the same as that used after treatment of acute rupture of the Achilles tendon (see Technique 48.11).
(TEUFFER)
Expose the Achilles tendon and the tuberosity of the calcaneus through a posterolateral longitudinal incision.
Identify and retract the sural nerve in the proximal part of the wound.
Detach the peroneus brevis tendon from its insertion through a small incision at the base of the fifth metatarsal.
Excise the aponeurotic septum, separating the lateral and posterior compartments, and deliver the freed peroneus brevis into the first incision.
Dissect the tuberosity of the calcaneus and drill a hole large enough for passage of the tendon through the transverse diameter of the bone.
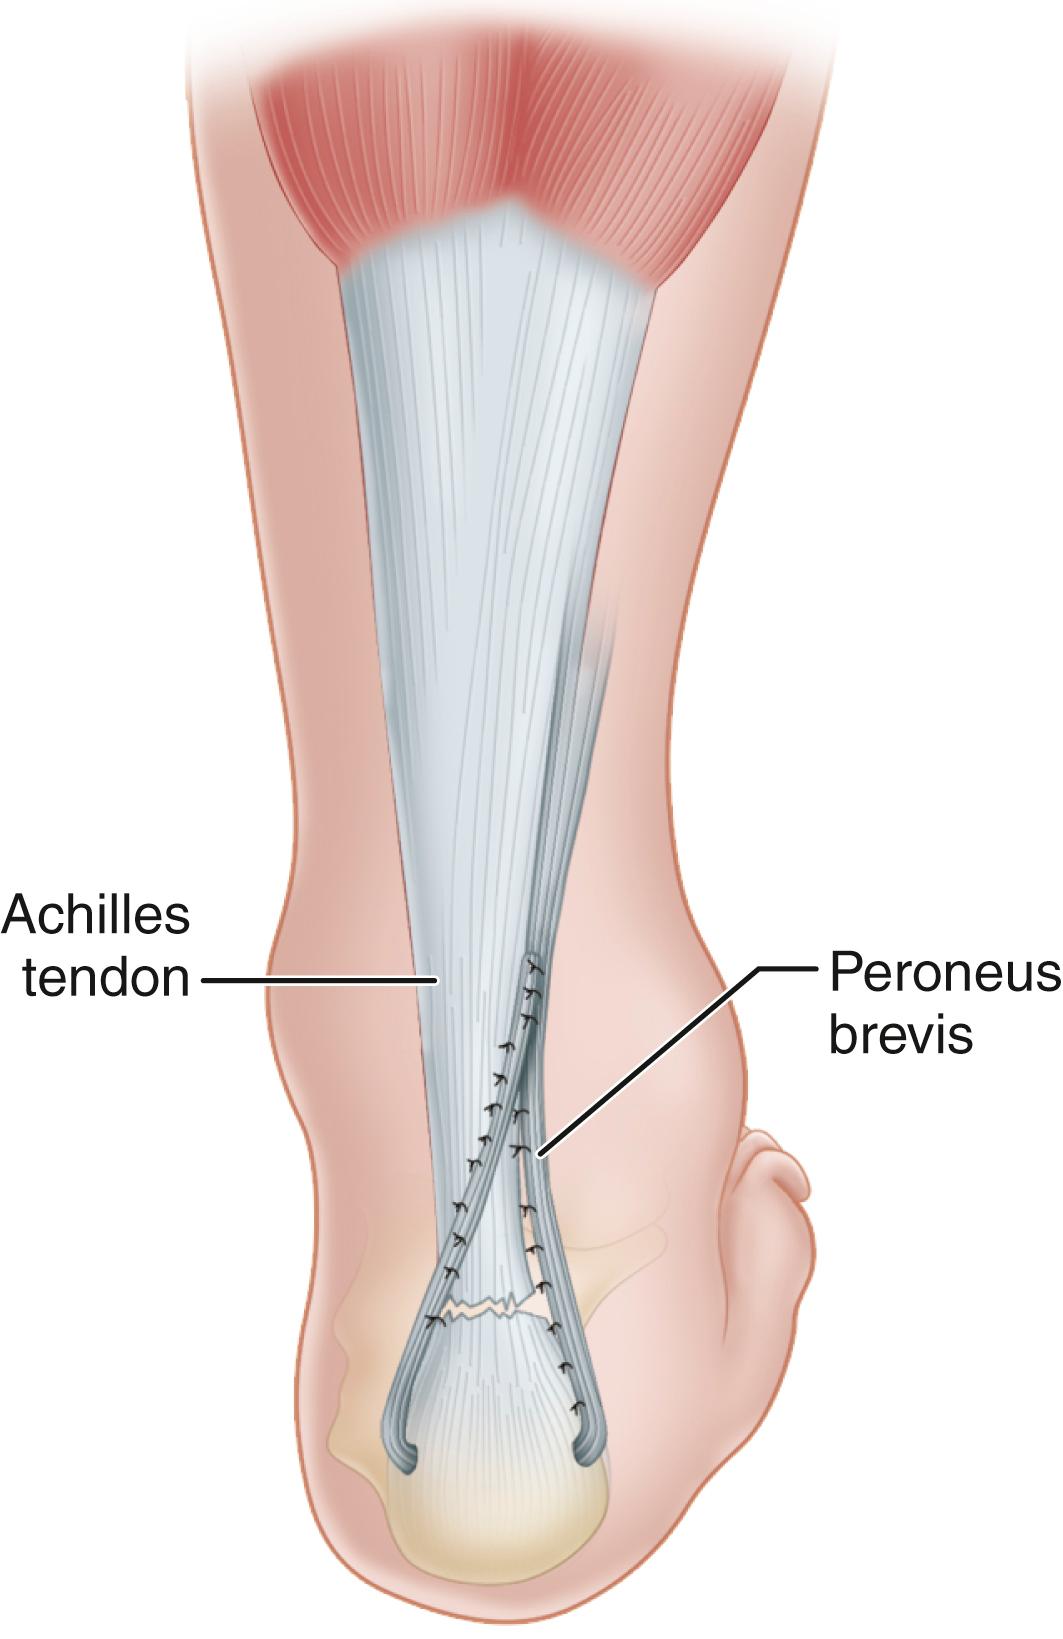
Pass the peroneus brevis tendon through this hole and back proximally beside the Achilles tendon, reinforcing the site of rupture, and suture it to the peroneus brevis itself, producing a dynamic loop ( Fig. 48.19 ).
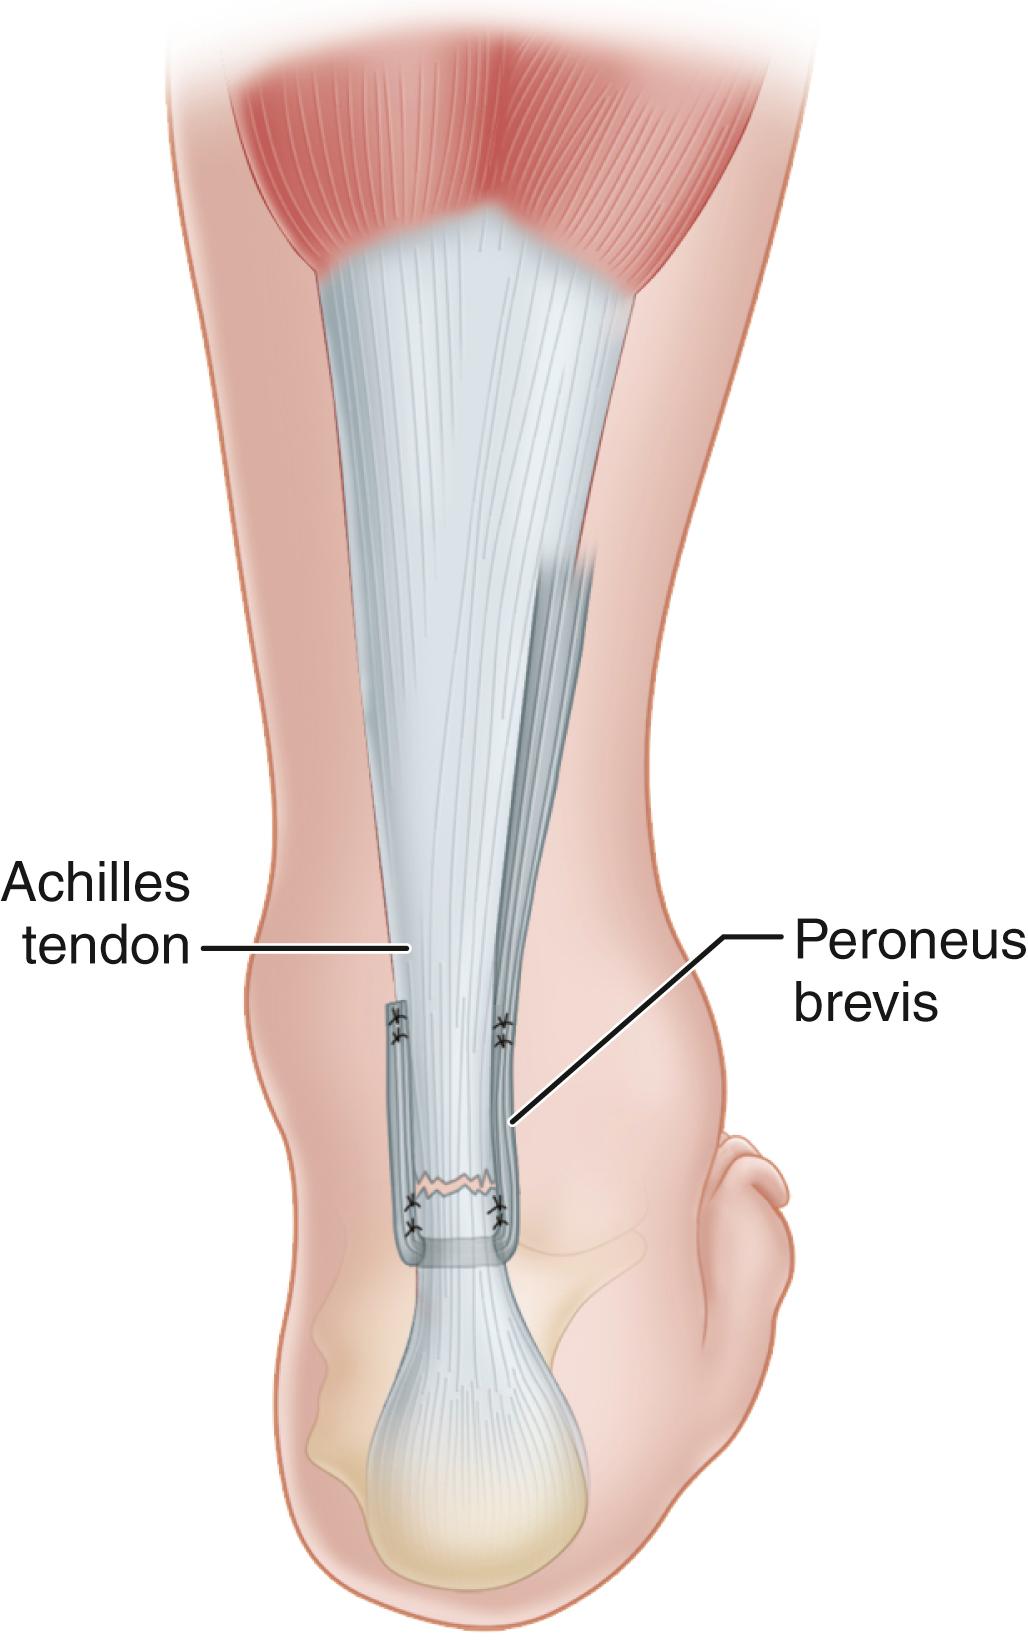
Turco and Spinella described a modification in which the peroneus brevis is passed through a midcoronal slit in the distal stump of the Achilles tendon. The graft is sutured medially and laterally to the stump and proximally to the tendon with multiple interrupted sutures to prevent splitting of the distal tendon stump ( Fig. 48.20 ). This modification can be beneficial if a long distal stump is present.
The cast is removed at 2 weeks, the wound is inspected, and the staples or sutures are removed unless subcuticular sutures were used for wound closure. Occasionally, another week is required for proper wound healing before sutures are removed. Another short leg cast with the foot in gravity equinus is worn for an additional 2 weeks. At 4 weeks, the cast is changed again and the foot is gradually brought to the plantigrade position over the next 2 weeks. Walking is gradually resumed with partial weight bearing on crutches during a 2-week period. At 6 to 8 weeks, a short leg walking cast is applied with the foot in the plantigrade position and full weight bearing is allowed. Alternatively, a removable brace allowing only plantar flexion can be used as early as 4 to 6 weeks after surgery. Gentle active range-of-motion exercises for 20 minutes twice a day are begun. Isometric ankle exercises along with a knee-strengthening and hip-strengthening program can be instituted. Toe raises, progressive resistance exercises, and proprioceptive exercises, in combination with a general strengthening program, constitute the third stage of rehabilitation. In reliable, well-supervised patients with good tissue repair, this program can be accelerated, with earlier use of dorsiflexion-stop orthoses and active range-of-motion exercises. Return to full unrestricted activity usually requires at least 6 months and often more.
A number of techniques have been developed to allow repair through smaller incisions to speed recovery and minimize complications, especially infection and sural nerve damage. Because of the risk of sural nerve injuries with “blind” suturing of the tendon, some of these techniques use multiple incisions (e.g., three-incision technique), endoscopy, or specially designed devices.
Comparisons of open repairs with minimally invasive or percutaneous techniques have shown functional results comparable to those obtained with open repair, with fewer complications, no apparent increased risk of rerupture, and better cosmetic results. A recent systematic review involving 182 patients found a significantly decreased risk of postoperative complications, especially wound infection, in acute Achilles tendon ruptures treated with minimally invasive surgery compared with open surgery. In their systematic review and meta-analysis of 2060 patients treated with six commonly used surgery and rehabilitation protocols, Wu et al. determined that minimally invasive surgery with accelerated rehabilitation had the lowest risk of DVT, deep infection, and rerupture. Cited disadvantages of minimally invasive techniques include risk of sural nerve injury, failure to appose tendon ends or malalignment of tendon ends, and a lower strength of the repair. In a study of 211 patients with minimally invasive repairs, sural nerve injury occurred in 41 (19%) and reruptures in 17 (8%).
Keller et al. described a mini-open Achilles tendon rupture technique that does not open the paratenon and avoids the sural nerve. In their 100 patients with this procedure, there were no infections, wound dehiscence, scar adherence, or sural nerve damage; 98% of patients were satisfied with their results, and 80 returned to their previous sport activity at the same or higher level. The technique requires the use of custom-made suture retrievers. In a later description of the technique, Wagner and Wagner listed important tips for performing the procedure: (1) operate within 10 days of the rupture to avoid scar formation at the rupture site; (2) plan the procedure according to the level of the rupture to ensure that the suture passers are long enough to span the rupture site from the proximal incision up to the calcaneus; (3) ensure that the bone anchors are placed in the middle of the total height of the calcaneus, avoiding the enthesis, and align the anchors to be perpendicular to the axis of the calcaneus; (4) follow the proximal suturing technique to obtain the best resistance of the repair; and (5) taking care to not overtighten consecutive sutures, restore the appropriate level of physiologic equinus.
A percutaneous technique using a device (percutaneous Achilles repair system, PARS, Arthrex) has been developed to improve recovery and reduce postoperative complications. Hsu et al. compared the PARS technique in 101 patients to open repair in 169 patients and found that the percutaneous group had shorter surgical times and more patients who returned to baseline physical activities by 5 months compared to the open repair group. The overall postoperative complication rate was 5% in the percutaneous group and 11% in the open group. As noted by Lichti et al., the PARS technique requires that the surgeon be familiar with the instrumentation and suture management must be meticulous to avoid entanglement of the sutures.
(MA AND GRIFFITH)
In the operating room with the patient under local, regional, or general anesthesia, and with the extremity prepared as for open surgery, palpate the tendon defect and make small stab wounds on each side of the Achilles tendon 2.5 cm proximal to the rupture defect.
Use a small hemostat to free the underlying tendon sheath from the subcutaneous tissue; pass a No. 0 or a No. 1 nonabsorbable suture threaded on a straight needle from the lateral stab wound through the body of the tendon and exit in the medial stab wound ( Fig. 48.21 , step 1 ).
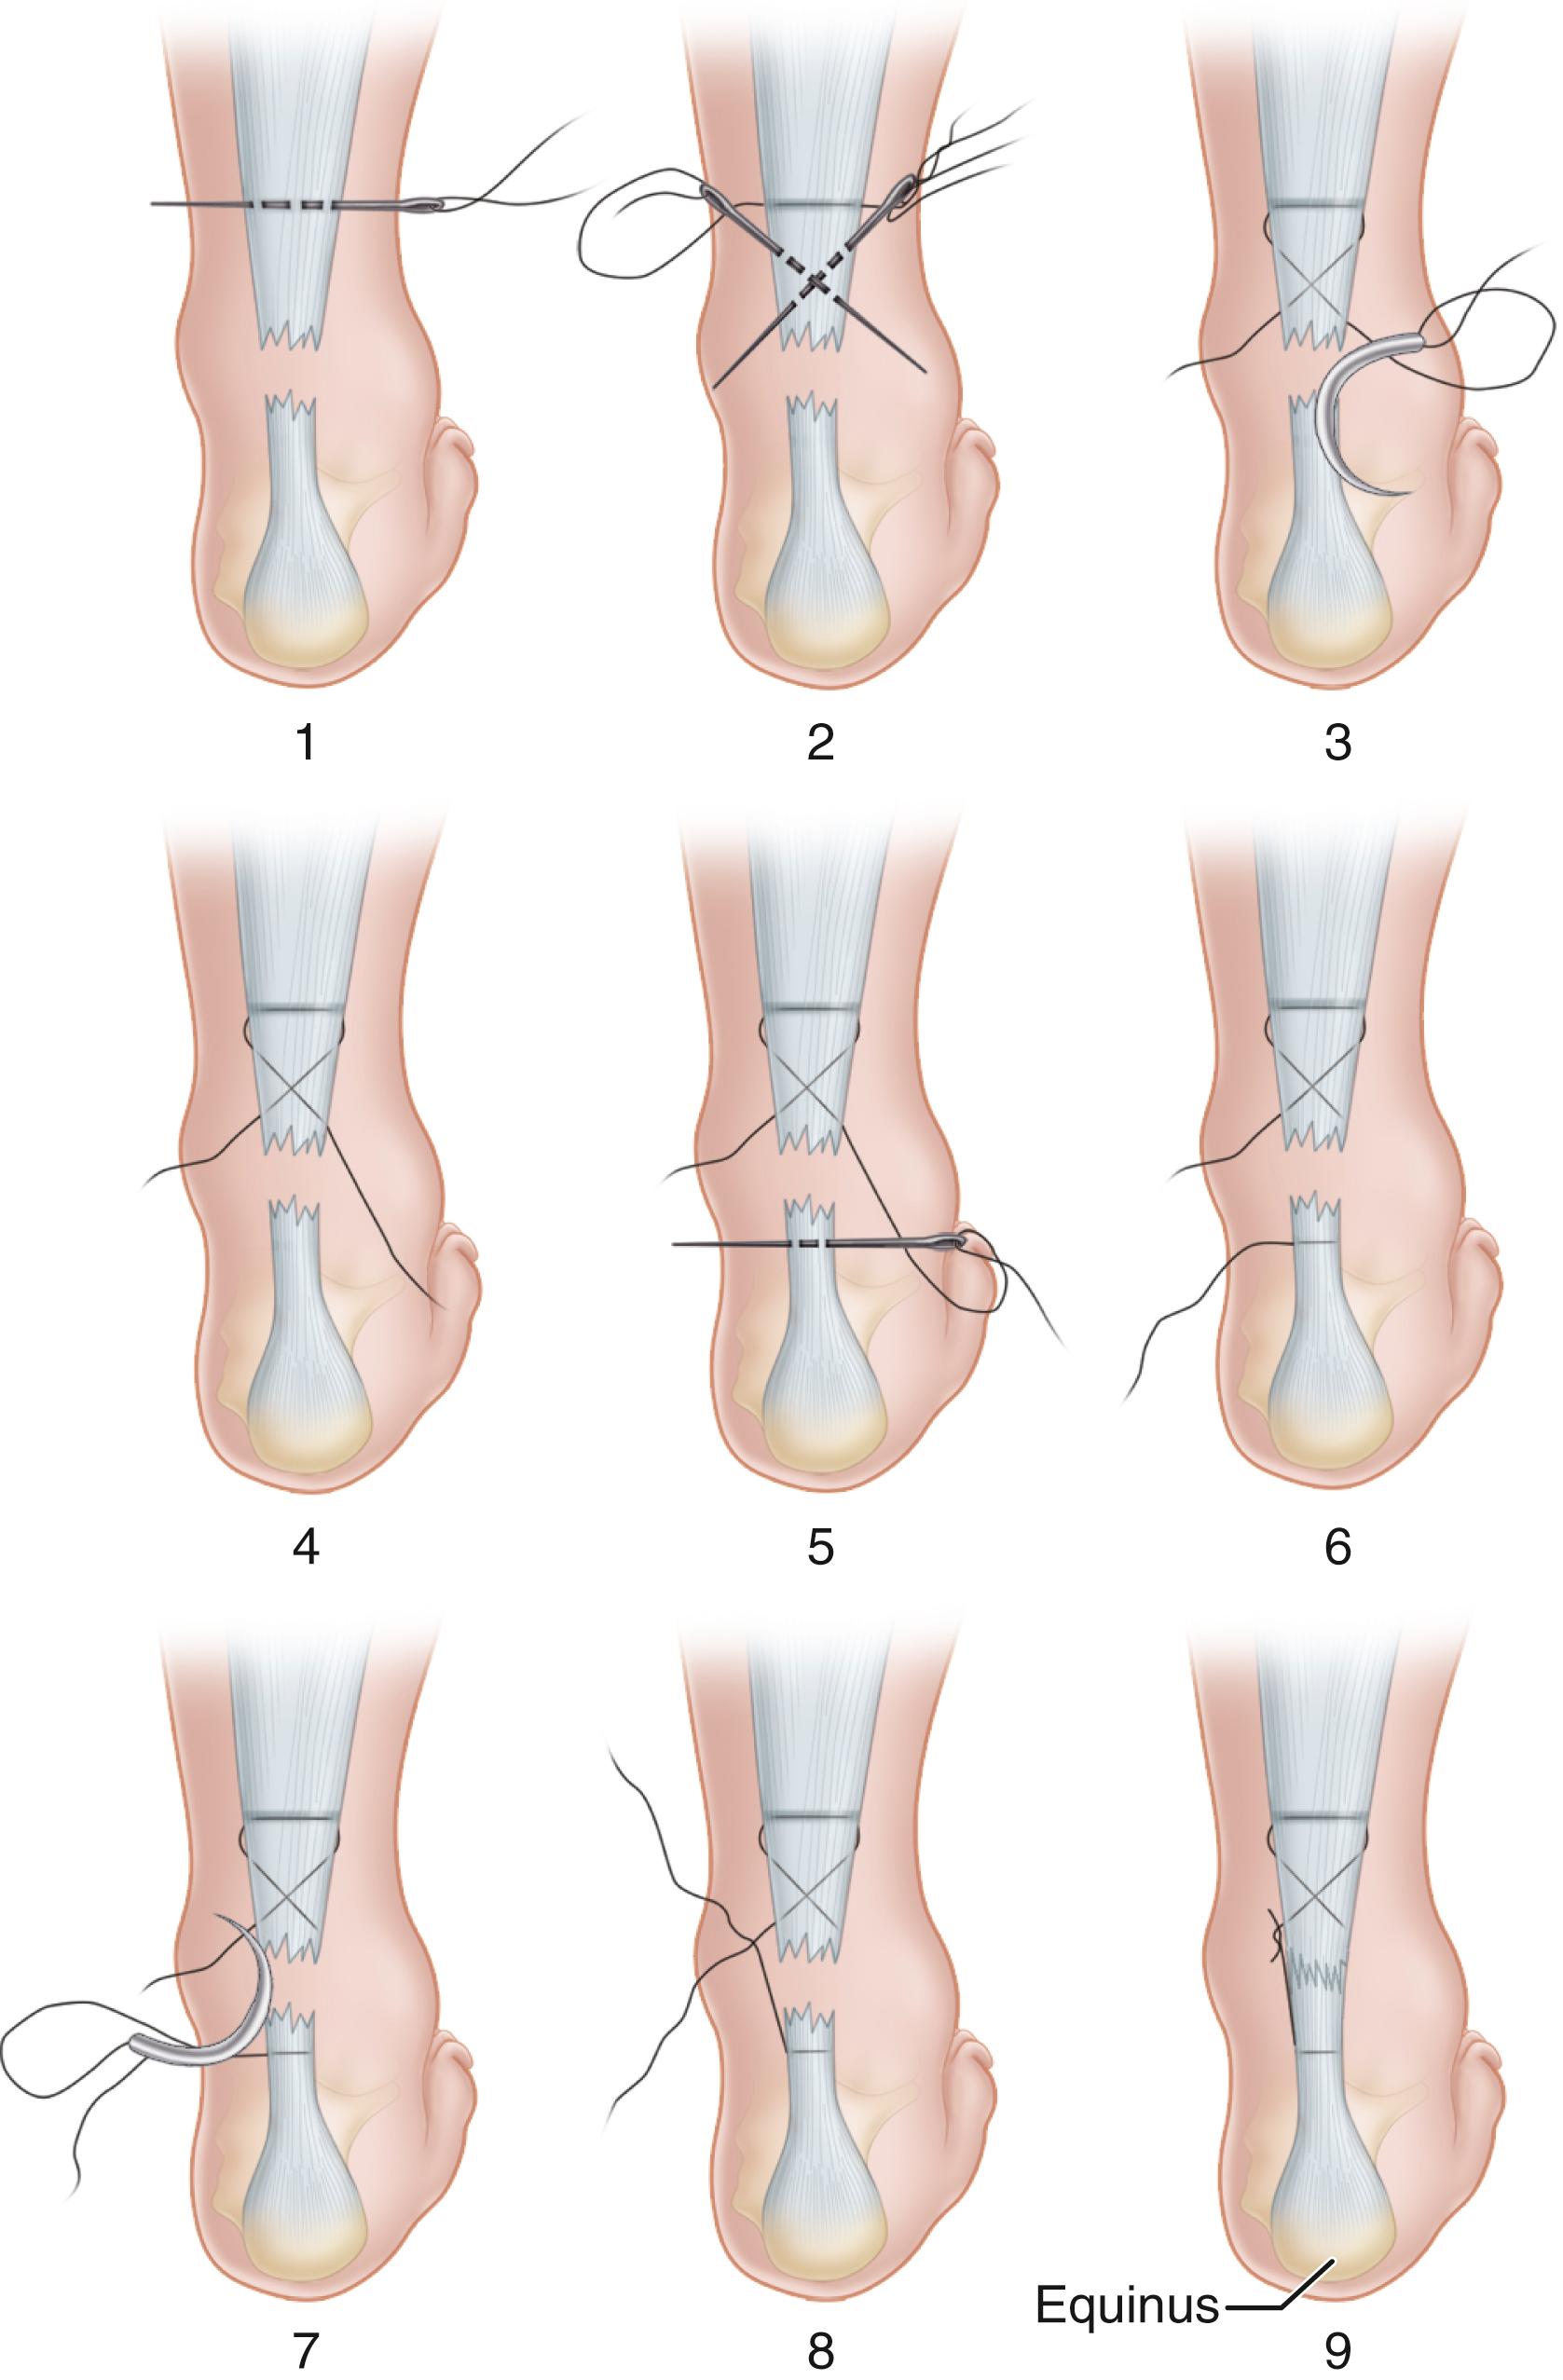
With a straight needle on each end of the inserted suture, crisscross the needles within the body of the tendon and puncture the skin just distal to the site of tendon rupture; enlarge the sites of needle puncture with a scalpel ( Fig. 48.21 , step 2 ) and pull the suture completely through the stab wounds; snug the suture within the proximal portion of the ruptured tendon.
With the lateral suture now threaded on a curved cutting needle, pass the suture back through the last stab wound to exit at about the midportion of the distal stump of the ruptured tendon on the lateral side ( Fig. 48.21 , step 3 ). Enlarge the hole with a scalpel before pulling the suture through.
Use a hemostat to free the subcutaneous tissue from the underlying tendon sheath ( Fig. 48.21 , step 4 ).
Using a straight needle, pass the lateral suture through the body of the distal stump of the tendon; enlarge the puncture wound in the skin as before ( Fig. 48.21 , steps 5 and 6 ).
Using a curved cutting needle, pass the suture from this distalmost stab wound on the medial side and exit at the middle stab wound on the medial side of the ruptured tendon ( Fig. 48.21 , step 7 ).
With the ankle maintained in equinus position, apply tension to the suture in a crisscross manner and bring the tendon ends together; tie the suture in this position and, with a small hemostat, bury the knot in the depths of the wound ( Fig. 48.21 , steps 8 and 9 ).
Suturing the skin is unnecessary. Apply a sterile dressing to the stab wounds, and apply a short leg cast in gravity equinus position.
The short leg cast is worn with non–weight bearing for 4 weeks, at which time a weight-bearing, low-heeled, short leg equinus cast is applied. At 8 weeks, the cast is removed and a therapy program of toe-heel raising and gastrocnemius-soleus exercises is begun. The patient gradually restores the foot to a neutral position during a 4-week period. Then the patient begins heel cord stretching exercises for an additional 4 weeks.
(HSU, BERLET, ANDERSON)
Position the patient prone and apply a thigh tourniquet. Place the feet slightly hanging off the end of the bed with a bump beneath the operative side ankle to adjust plantar flexion and Achilles tension and avoid interference with the contralateral leg. The operative leg should be in neutral rotation to allow subsequent central positioning of the PARS jig.
After preparation and draping, exsanguinate the extremity and inflate the tourniquet.
Palpate the defect in the Achilles tendon and make a 2-cm transverse or vertical incision just proximal to the defect in the center of the tendon. Placing the incision just proximal to the rupture site ensures proper visualization and control of the proximal Achilles tendon stump, which can be retracted proximally into the calf. The distal stump can be brought into the incision by plantar flexing the ankle. A transverse incision follows the natural skin creases in the back of the ankle and allows for percutaneous jig insertion with minimal paratenon disruption. A vertical incision can be used and extended in cases of tendinosis, calcifications, or delayed presentation, but it requires increased paratenon and soft-tissue disruption.
Incise the skin and soft tissues using a “no-touch” technique without pickups. Carefully carry dissection down to the paratenon and sharply incise it. Preservation of the paratenon helps minimize disruption to the vascular supply of the tendon and allows repair at the end of the procedure.
The sural nerve is not typically seen in the operative field, but if it is, dissect it out and retract it out of the way with a vessel loop.
Use an index finger or Freer elevator within the wound to confirm that the center of the rupture has been located.
Insert an Allis clamp into the wound, secure the proximal tendon stump, and pull it through the wound 1 to 2 cm. Run a Freer elevator along the dorsal aspect of the proximal tendon to release potential adhesions that may limit distal excursion. Avoid dissection along the ventral aspect of the tendon to preserve native tendon blood supply.
Insert the proximal jig into the wound with the inner prongs in the narrowest position possible while gently placing traction on the proximal tendon stump with a clamp ( Fig. 48.22A ).
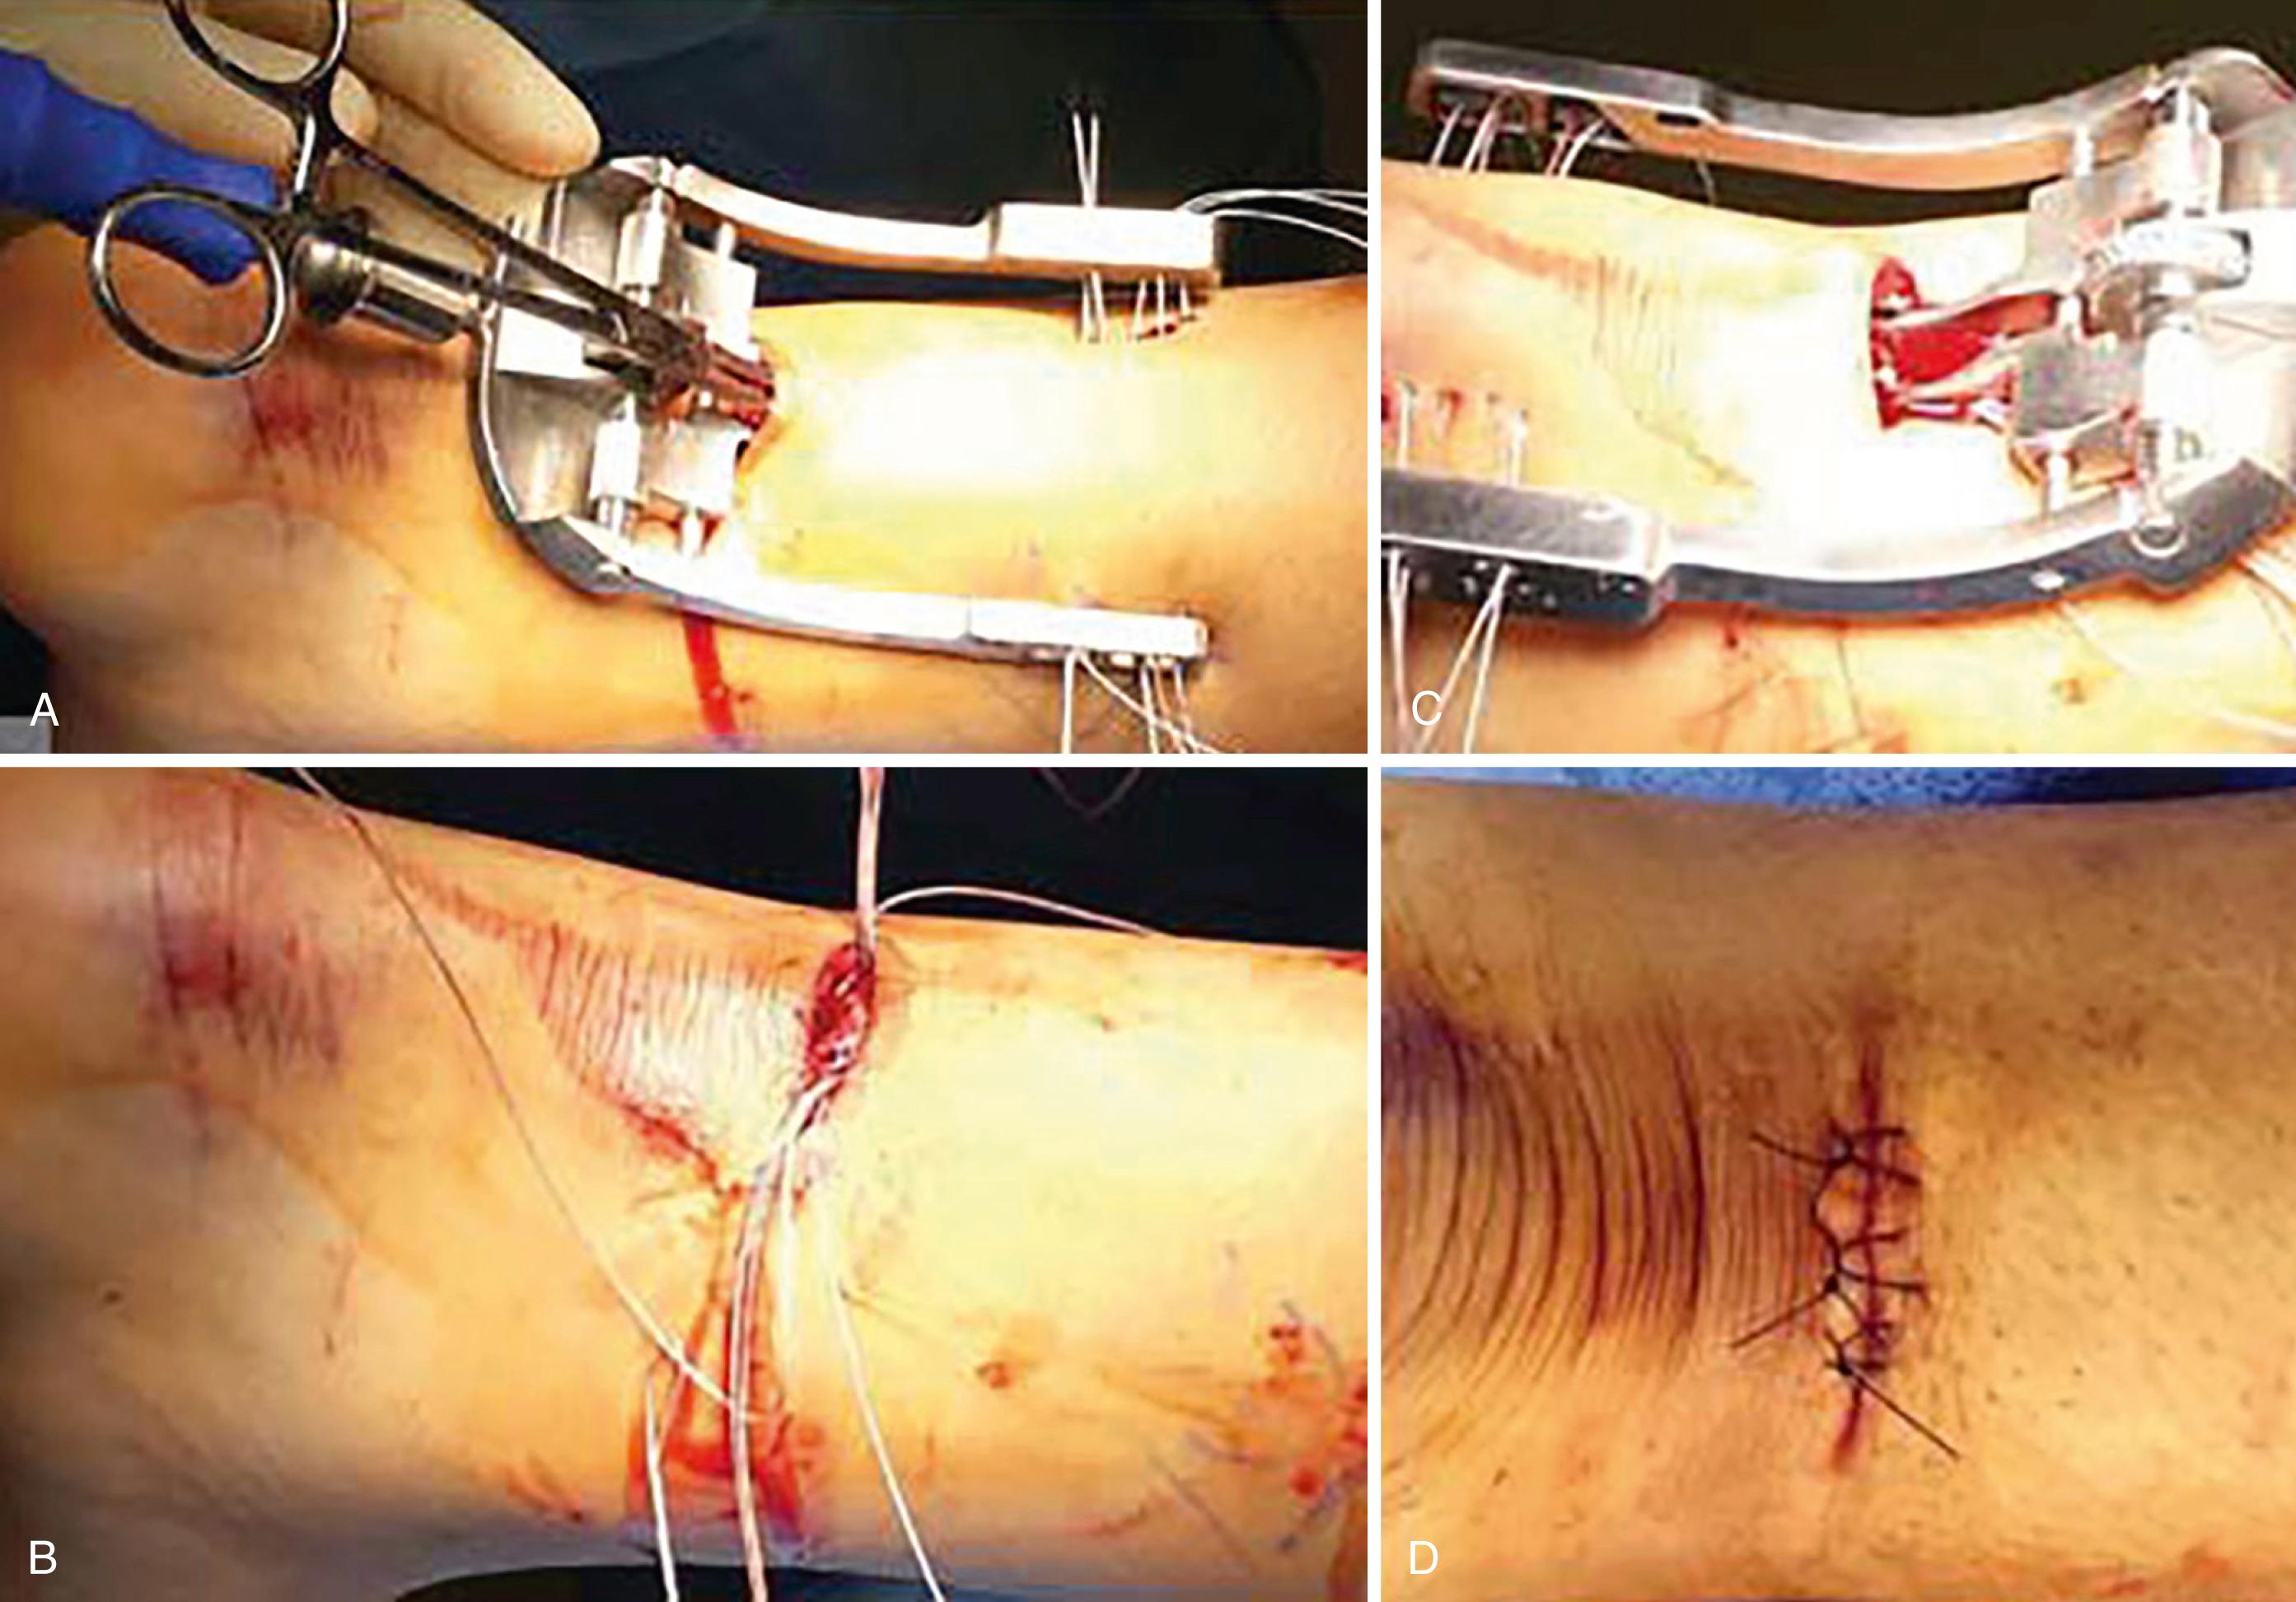
Use the center turn wheel to widen the inner prongs so that they slide along the sides of the tendon in the paratenon. Proper jig placement should allow the jig to slide along the tendon with minimal resistance.
Palpate the proximal tendon under the skin to check that the tendon is centered within the prongs of the jig. The most common error is to insert the jig too deep, which causes subsequent needles and sutures to miss the tendon and pull through.
Once it is properly located, keep the jig centered and stabilized so that it does not veer medially or laterally.
During suture passing, first use all the needles (1.6 mm) with Nitinol loops that are not loaded with suture.
Insert the first two needles into their respective numbered holes through the tendon and then through the opposite side of the jig. Check each needle to make sure it does not pass outside the jig. The placement of two needles within the jig and tendon at all times during suture passing helps stabilize the jig and avoids adjacent suture piercing with the subsequent needle.
Pass a #2 FiberWire suture or SutureTape suture through the jig with the needle suture passer, making them of equal length on both sides. SutureTape has a broader, flatter surface to increase contact surface area between the suture and tendon and reduce any suture cutting through frayed tendon.
The colors of the sutures are not as important as the order in which they are placed. An assistant can write down the colors and order of the sutures passed, as needed. The two central sutures—#3 and #4—have one looped end and one end with a tail. They are passed in an oblique, crossing pattern. These sutures create locking sutures on either side of the tendon ( Fig. 48.22B ). Holes #6 and #7 can be used if a second locking suture is needed.
After all sutures are passed, use the turn wheel to narrow the inner prongs while applying controlled tension to the jig to remove it. Remove all sutures from both sides of the tendon from the wound. Before the jig is completely removed, use a hemostat through each loop of sutures to guide them out of the wound. Test both pairs of sutures by pulling them distally to ensure that adequate proximal fixation has been obtained.
If any or all of the sutures pull out of the tendon, this indicates that the tendon was not centered in the jig or the jig was placed too deep or not proximal enough along the tendon during suture passing. If this occurs, remove the sutures and repeat the previous steps paying attention to tendon positioning within the jig.
Do not extend the incision longitudinally on either end of a transverse incision as this may lead to wound healing complications.
Once proximal fixation is achieved, neatly spread apart the sutures on each side of the tendon in the following order from proximal to distal: first suture, second suture, looped, green striped suture (third), tail of the green striped suture (fourth), and fifth suture. Loop the second suture on both sides around the two green striped sutures and back proximally through the looped end of the green striped suture.
Pull the green striped suture tail through the tendon onto the opposite side to create a locking suture on both sides of the tendon. In the end, there are two nonlocking sutures and one locking suture on either side of the tendon. Pull each pair of sutures individually distally to confirm fixation and remove creep from the sutures. Place a hemostat on each group of three sutures to keep these out of the way during distal tendon preparation.
For distal tendon preparation using this technique, repeat the above steps. Secure the distal tendon stump with an Allis clamp and deliver it out of the wound while inserting the jig ( Fig. 48.22C ). Insert the jig as distal as possible to the Achilles insertion to ensure that all sutures are passed through the tendon. Suture passing, jig removal, and creation of locking sutures follow the previously outlined steps. Test and pull on each pair of sutures to ensure that adequate distal tendon fixation was achieved.
Place and hold the ankle in maximal plantar flexion during suture tying for a secure repair. We have never found the Achilles tendon repair to be too tight when using the percutaneous technique. The tendon will always gradually stretch out during weight bearing and physical therapy.
When tying nonlocking sutures, have an assistant hold tension on the opposite side as the suture will continue to slide through the tendon with increasing force applied to the suture during knot tying. During tying, pull out any remaining slack from the sutures before securing them with five or six knots. After each suture is tied, cut it above the knot and away from the other sutures to avoid tangling.
After the sutures are tied, the ankle should be plantar flexed with improved resting tension. After wound irrigation, ensure the suture knots are tucked ventrally into the wound and do not protrude into the subcutaneous tissue. Sharply debride residual strands of tendon and tuck them within the wound for adequate paratenon closure ( Fig. 48.22D ). Use absorbable sutures to close the paratenon and subcutaneous tissues and nylon sutures for skin closure.
The definition of a “chronic” rupture has ranged from those diagnosed and treated more than 48 hours after injury to those diagnosed and treated up to 2 months after injury. There appears to be some consensus that a rupture diagnosed 4 to 6 weeks after injury should be considered a chronic rupture and that these are more difficult to treat than acute injuries. At about 1 week after rupture of the Achilles tendon, any space between the tendon ends fills with scar tissue. If left untreated, the tendon heals elongated, leaving the patient unable to push off on the affected side. Running, jumping, and activities such as ascending or descending stairs are severely compromised. Calf atrophy usually is present, the Achilles tendon often loses its normal contour, and a visible tendon defect may be present. MRI can be helpful to estimate the gap between the ruptured ends of the tendon ( Fig. 48.23 ). Chronic ruptures appear as an area of low-intensity signal on T1-weighted images and alteration in T2-weighted signal.
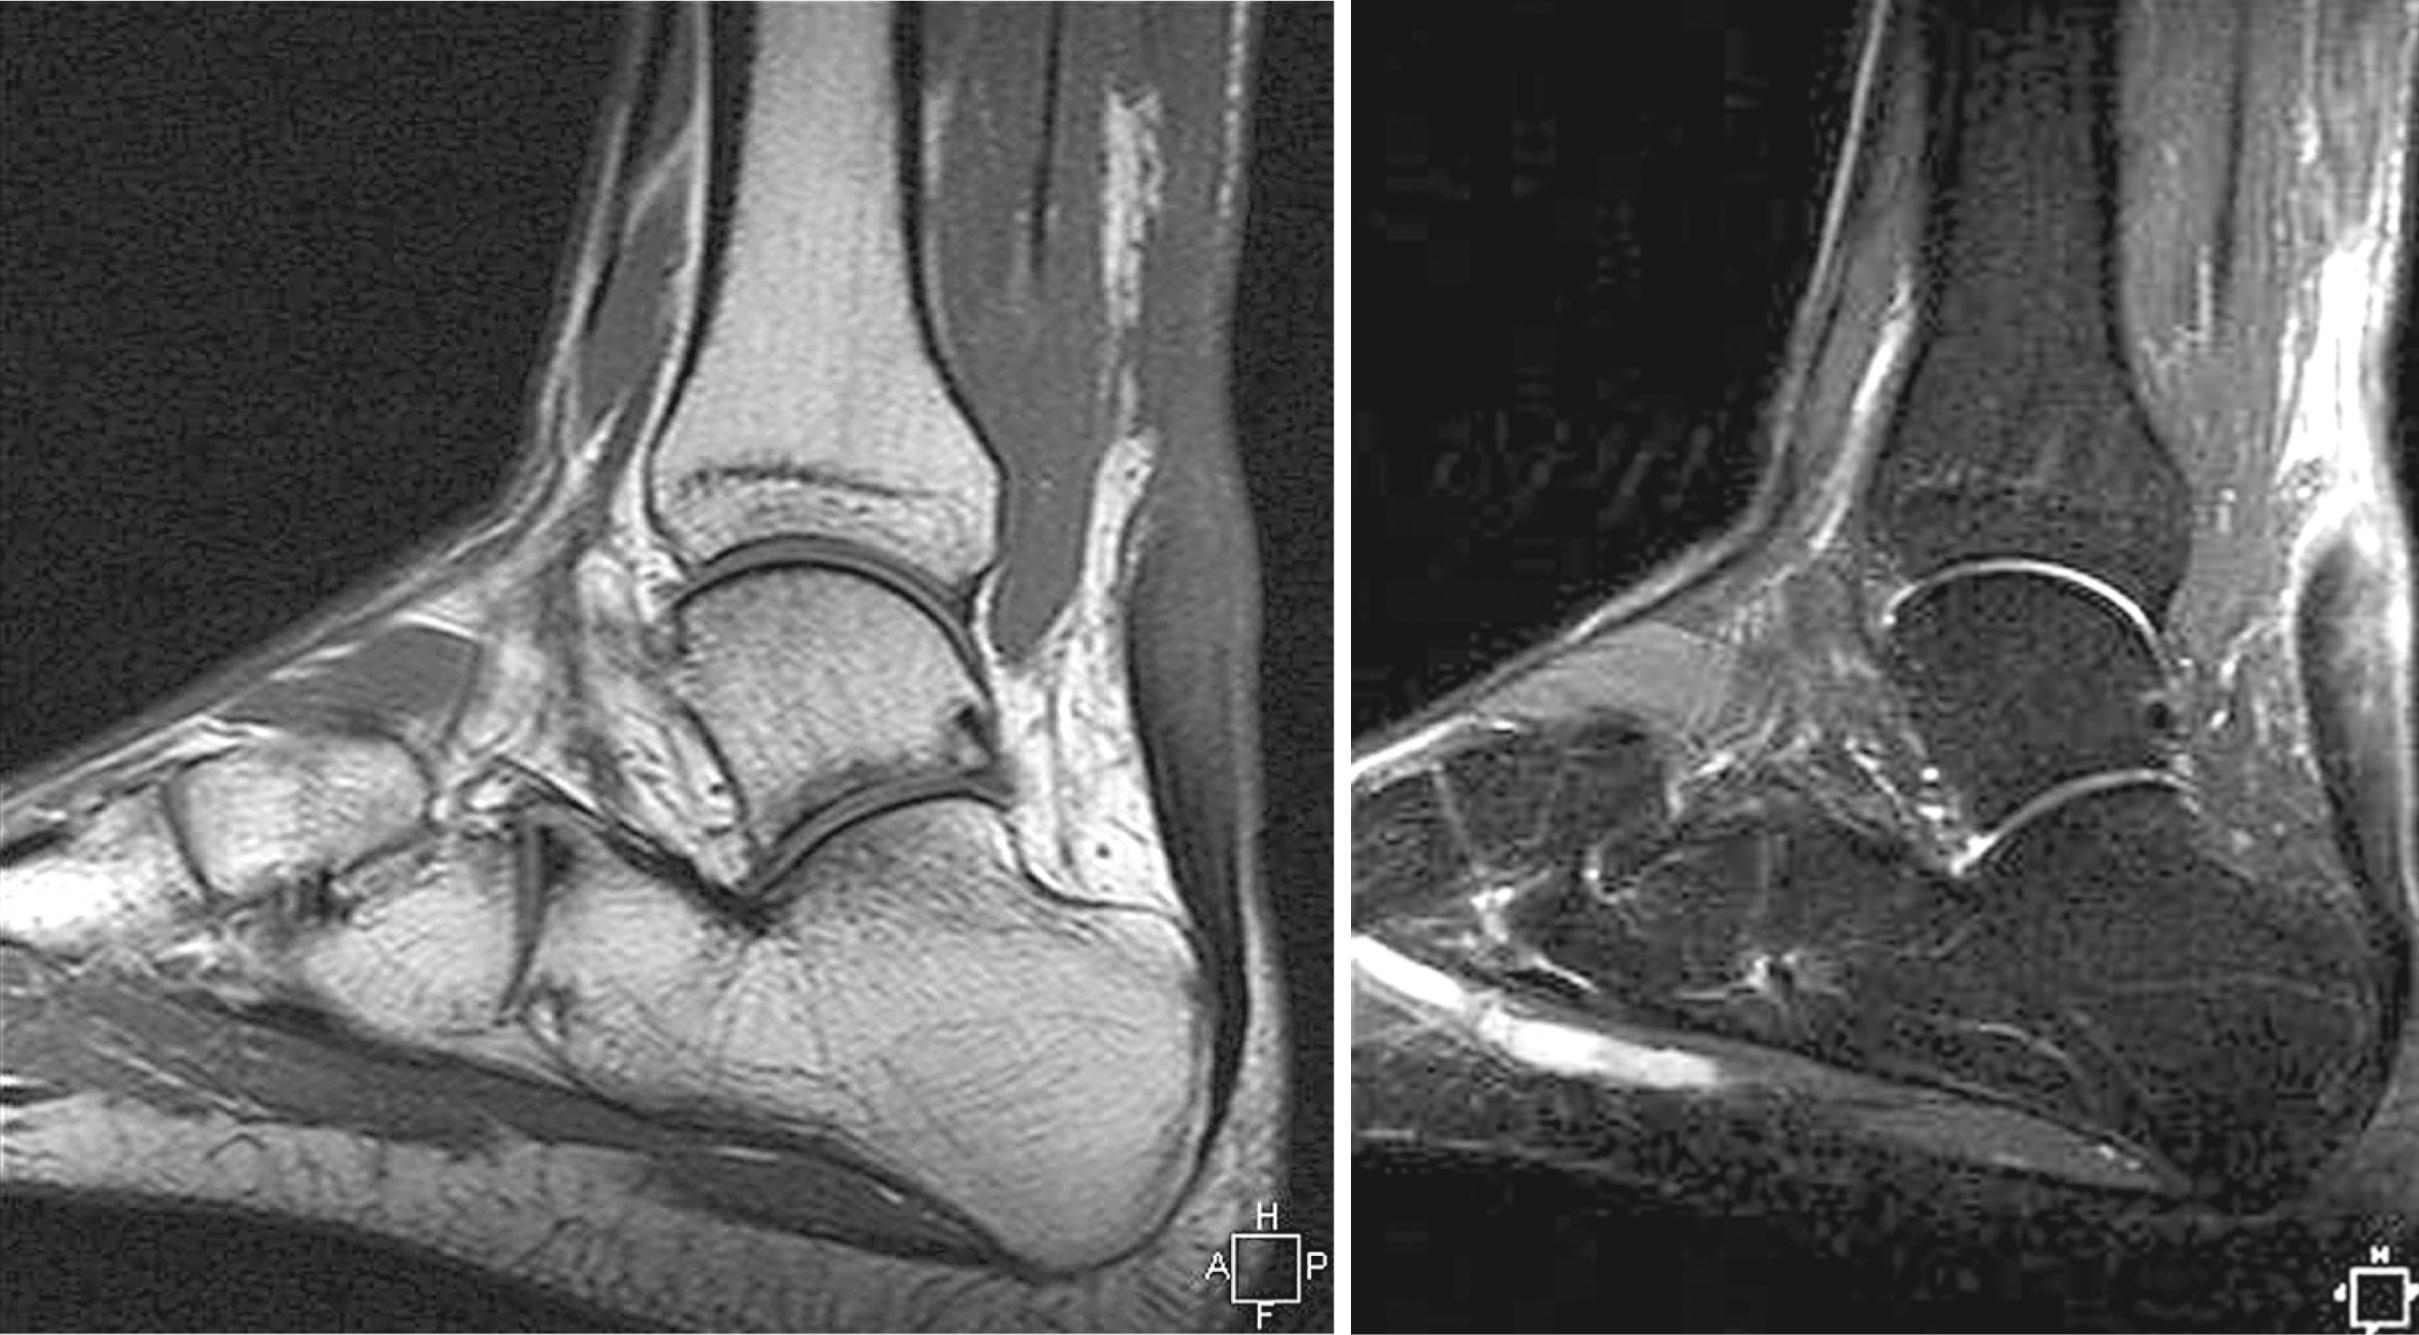
If posterior heel pain, swelling, or functional impairment is disabling, delayed repair or reconstruction is indicated. In most active adults, repair is preferable but often is not possible. For ruptures more than 3 months old, treatment depends on the patient’s physiologic age, activity level, and amount of functional impairment. A number of techniques have been described for reconstruction of a neglected Achilles tendon rupture ( Box 48.4 ). If the tendon defect is less than 3 cm after debridement and the injury is less than 3 months old, direct repair often is possible. If, however, the tendon gap is more than 3 cm (more common), additional techniques must be used, such as local tissue transfer, tissue augmentation, synthetics, and allografts.
Primary repair (uncommon)
Augmentation
Free fascia tendon graft
Fascia lata
Donor tendons (semitendinosus, peroneal, gracilis,patellar tendon)
Fascia advancement
V-Y quadriceps plasty
Gastrocnemius-soleus fascia turn-down graft
Local tendon transfer
Flexor hallucis longus
Flexor digitorum longus
Peroneus brevis
Peroneus longus
Plantaris
Posterior tibial
Synthetic or allograft augmentation
Polyglycol threads
Marlex mesh
Dacron vascular graft
Carbon fiber
Allograft tendon
V-Y quadricepsplasty (see Technique 48.18) and gastrocnemius-soleus fascia turn-down graft (see Technique 48.17) techniques can be used for augmentation, and local tendon transfers (flexor hallucis longus, flexor digitorum longus, peroneus brevis and longus, plantaris) can be used to bridge larger defects ( Table 48.3 ). Minimally invasive and endoscopically assisted techniques have been described for tendon transfers, but there are few reports of the long-term outcomes of these procedures. Maffulli et al. described a “less-invasive” technique for transfer of the peroneus brevis through two paramidline incisions and recommended this technique for tendon gaps of less than 6 cm. In a later report, he and his colleagues compared outcomes of three less invasive tendon transfer procedures: free ipsilateral semitendinosus graft (gaps of more than 6 cm), ipsilateral peroneus brevis transfer (smaller gaps), and ipsilateral flexor hallucis longus transfer. All three techniques produced significant functional improvement, and return to sports was possible in most patients; no clear advantage of one technique over the others was demonstrated.
| Tendon | Strength Relative to GSC | Advantages | Concerns |
|---|---|---|---|
| Peroneus brevis | 18 times weaker |
|
|
| Flexor digitorum longus | 27 times weaker |
|
|
| Flexor hallucis longus | 13 times weaker |
|
|
(MAFFULLI ET AL.)
Make a 5-cm longitudinal incision 2 cm proximal and just medial to the palpable end of the proximal stump.
Make a second longitudinal incision, 3 cm long, 2 cm distal, and just lateral to the lateral margin of the distal stump ( Fig. 48.24A ). Take care to avoid sural nerve injury by making this incision as close as possible to the anterior aspect of the lateral border of the Achilles tendon (posterior to the sural nerve).
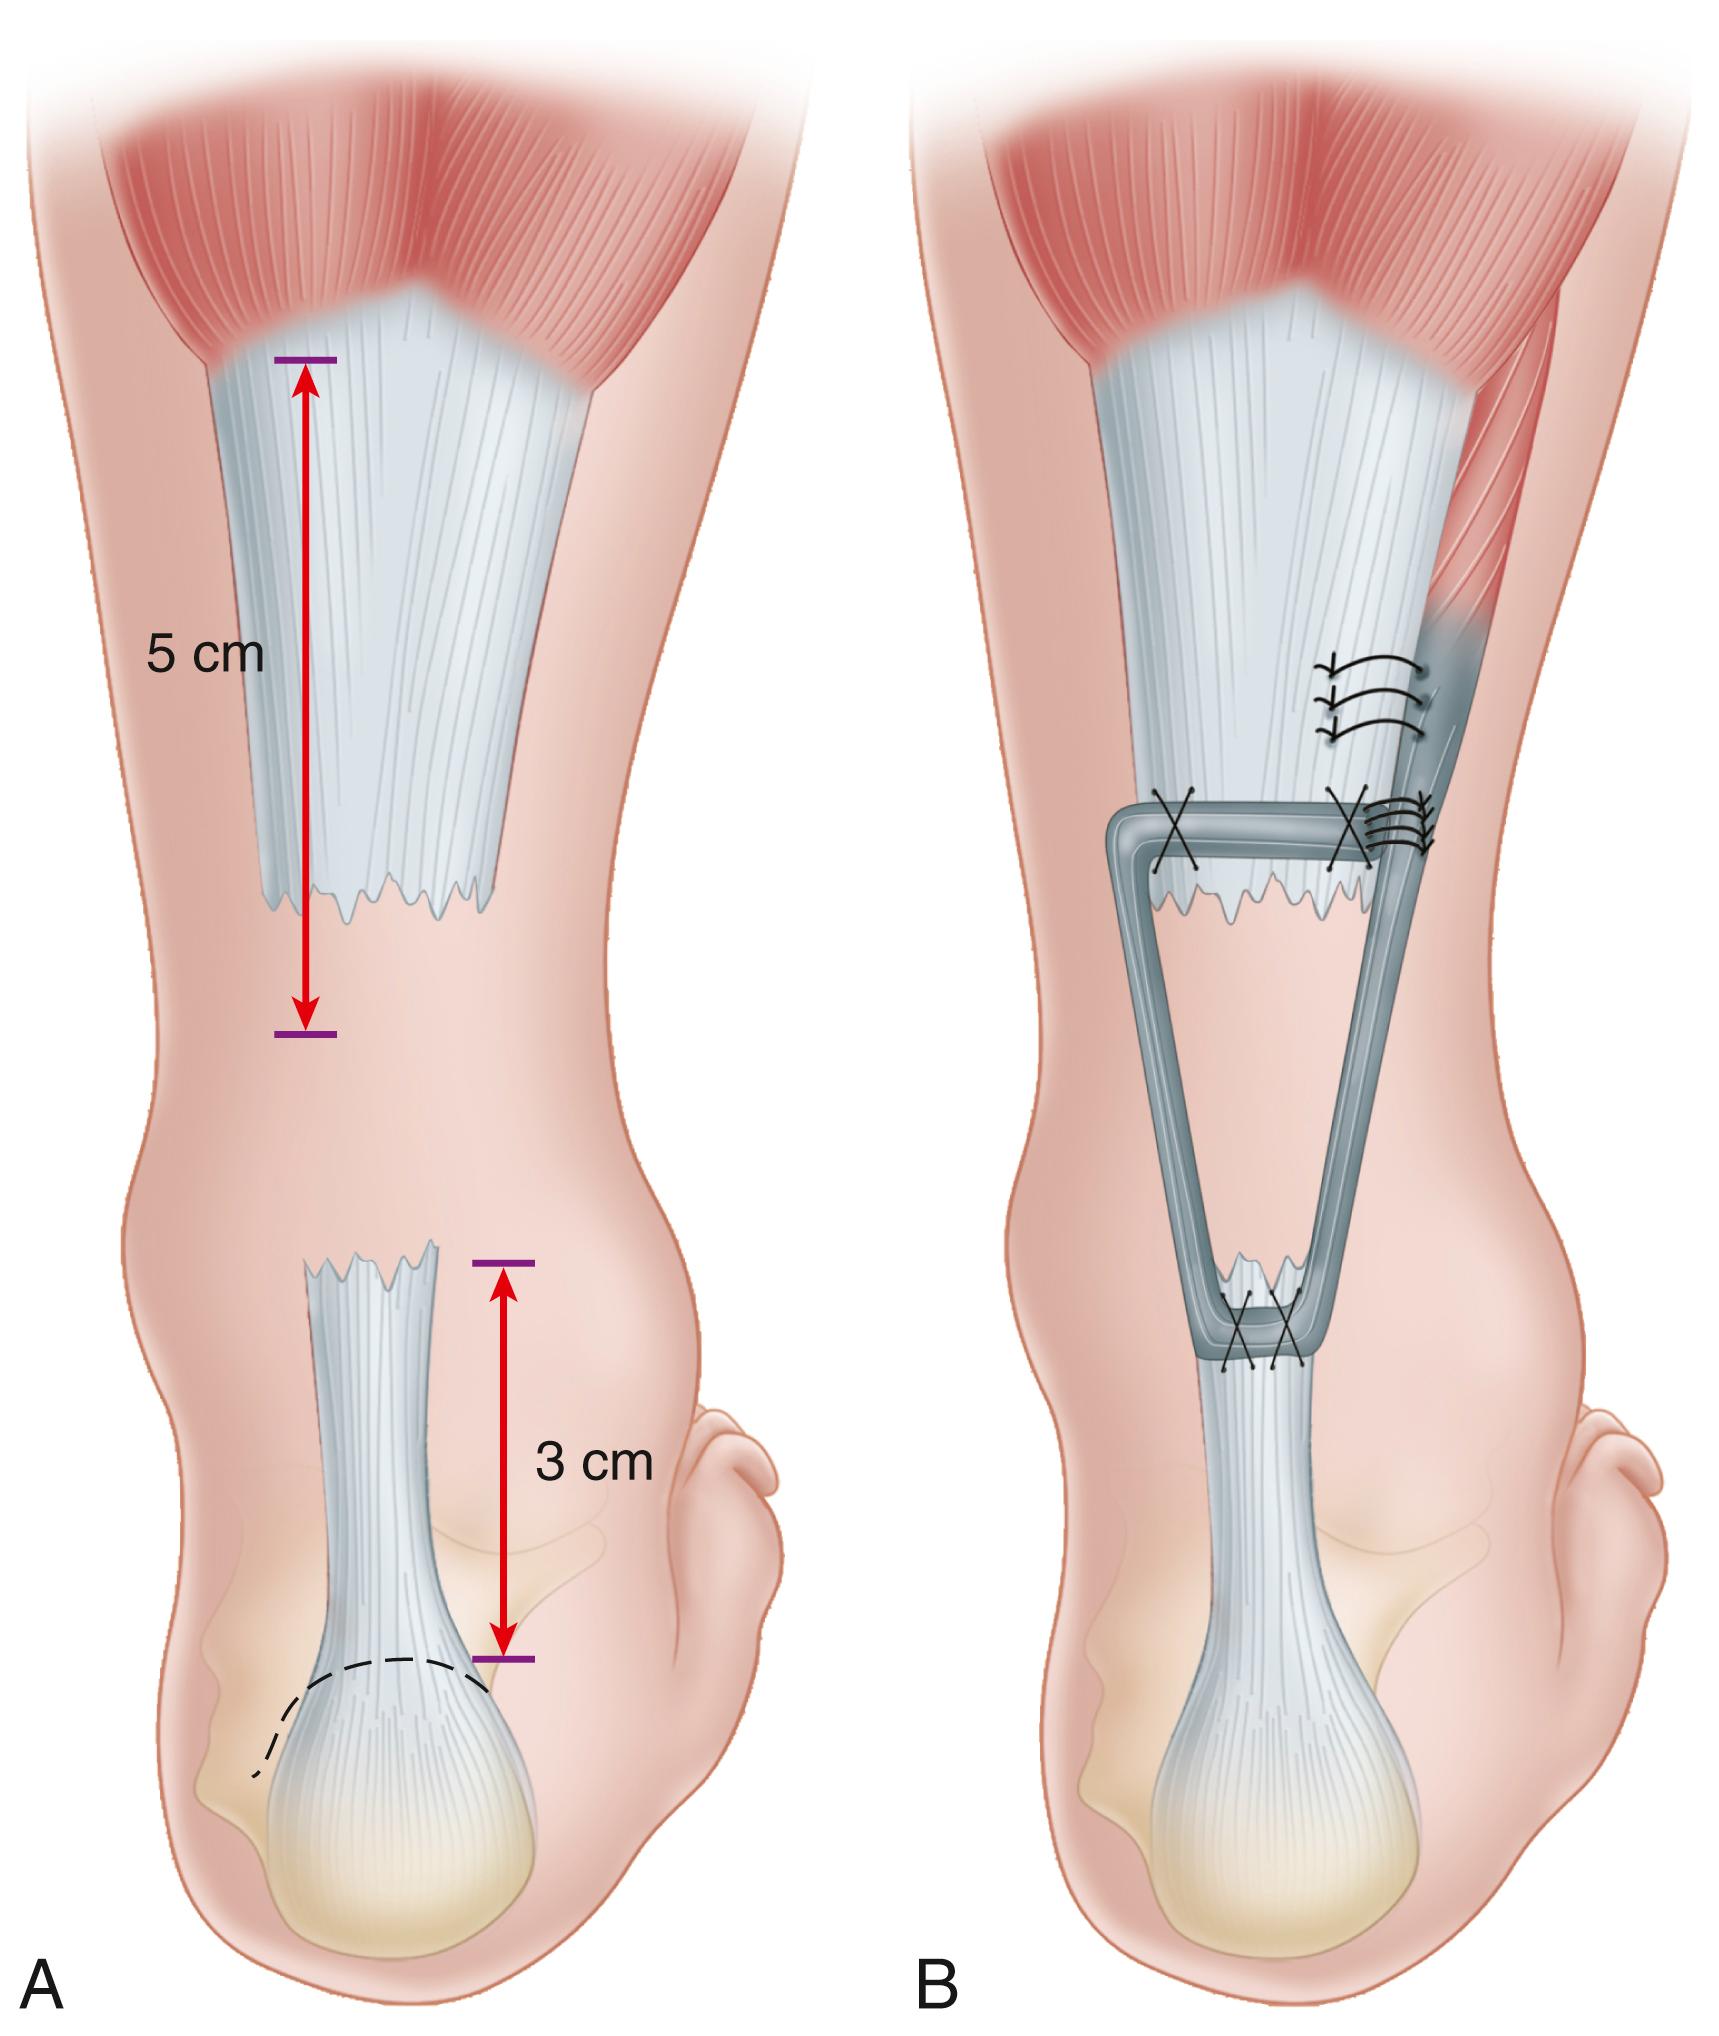
Make a 2-cm longitudinal incision at the base of the fifth metatarsal.
Mobilize the distal Achilles tendon stump, freeing it of all peritendinous adhesions, particularly on its lateral aspect. Resect the ruptured tendon end back to healthy tendon and place a locking suture (No. 1 Vicryl) along the free tendon edge to prevent separation of the bundles.
Mobilize the proximal tendon stump through the proximal incision, divide any adhesions, and release the soft tissues anterior to the soleus and gastrocnemius muscle to allow maximal excursion and minimize the gap between the tendon stumps.
Plantar flex the ankle and measure the gap between the two tendon ends. If less than 6 cm, the peroneus brevis tendon can be used to bridge the gap.
Identify the peroneus brevis tendon through the incision on the lateral border of the foot. Expose the tendon and place a locking suture in the tendon end before releasing it from the metatarsal base.
Through the distal incision over the Achilles tendon, incise the deep fascia overlying the peroneal muscle compartment and identify the peroneus brevis tendon at the base of the incision. Withdraw the peroneus brevis tendon through the distal incision; tendinous strands between the two peroneal tendons distally may require strong force to withdraw the tendon.
Mobilize the muscular portion of the peroneus brevis proximally to increase its excursion.
Make a longitudinal tenotomy parallel to the tendon fibers in both tendon stumps.
Use a clamp to develop the plane, from lateral to medial, in the distal Achilles tendon stump, and pass the peroneus brevis graft through the tenotomy.
With the ankle in maximal plantar flexion, suture the peroneus brevis to both sides of the distal stump.
Pass the peroneus brevis tendon beneath the intact skin bridge into the proximal incision, then from medial to lateral through the transverse tenotomy in the proximal stump, and secure it with sutures.
Suture the peroneus brevis tendon back onto itself on the lateral side of the proximal incision ( Fig. 48.24B ).
Close the incisions in standard fashion and apply a previously prepared removable fiberglass cast support with the foot in maximal equinus.
Weight bearing to tolerance on the metatarsal heads is allowed with the use of elbow crutches. Active flexion and extension of the hallux and lesser toes are encouraged, as are isometric exercises of the calf muscles and toes. At 2 weeks, the back shell of the cast is removed and physical therapy focusing on proprioception, plantar flexion, inversion, and eversion is begun with the front shell in place to prevent ankle dorsiflexion. Full weight bearing is allowed with the front shell of the cast in place, but this rarely is possible because of balance difficulties, and most patients still require the assistance of a single elbow crutch. The front shell of the cast is removed at 6 weeks and physical therapy is continued. Patients normally regain a plantigrade ankle over the next 2 to 3 weeks.
Make a curvilinear, posteromedial incision, extending proximally as far as necessary for mobilization of the tendon.
Free the gastrocnemius and soleus muscles individually in the proximal leg with combinations of sharp and blunt dissection to provide additional mobilization.
Resect most of the scar tissue and proceed with repair as described for acute ruptures, using tension sutures and reinforcement with the plantaris tendon.
Keep the knee flexed and the foot in equinus during the repair to relieve tension.
Postoperative care is as described for after repair of an acute rupture of the Achilles tendon (see Technique 48.11).
Become a Clinical Tree membership for Full access and enjoy Unlimited articles
If you are a member. Log in here