Physical Address
304 North Cardinal St.
Dorchester Center, MA 02124
The vast majority of soft contact lenses are today mass produced by a double-sided moulding process (see Chapter 5 ). Using such a method of manufacture ensures relatively consistent quality, eliminating the need to measure every lens that comes out of production. This standardization also makes it easier for manufacturers to meet regulatory requirements and for practitioners and patients to have confidence that every lens that goes on the eye is of good quality and correct power. Although this reduces the need for the contact lens fitter and dispenser to measure key lens parameters, manufacturers need to be even more diligent with their measurement methods, not only to ensure good product quality but also to increase manufacturing productivity and gain the trust of practitioners and consumers.
The assiduous practitioner might still prefer to carry out basic lens measurements when investigating and seeking to resolve cases of unsatisfactory lens fit, poor comfort or reduced visual performance.
Contact lens researchers also have a strong interest in lens metrology. Within the diverse range of research areas comprising biological science, clinical research and optical engineering, each group has specific requirements in measuring aspects of lens geometry, optical and material properties with great precision and accuracy.
To cater to these various applications and demands, a wide range of equipment has been developed over the years. In general, the required level of instrument sophistication and accuracy depends on the user group and increases from practitioners to manufacturers to researchers. A good reference guide on measurement methods, procedures and tolerances is the International Standards Organization (ISO) four-part document ISO 18369, and its close US equivalent . These standards are of critical importance for manufacturers in demonstrating the safety and efficacy of their products; they are also a good reference guide for practitioners and researchers. The four parts of ISO 18369 cover:
Part 1: Vocabulary, classification system and recommendations for labelling specifications
Part 2: Tolerances
Part 3: Measurement methods
Part 4: Physiochemical properties of contact lens materials
The tolerances for measuring soft contact lenses, as specified in ISO 18369, are listed in Appendix B .
It is in the nature of all hydrogel materials that they dehydrate quickly when removed from their aqueous environment. Exposure to air changes all physical and geometrical properties of the lens. Particular care is therefore required when making measurements in air to minimize these changes. Alternatively, most measurements can be performed in a wet cell, whereby the lens remains immersed in a saline solution. Even then, the pH and osmolality of the solution need to fall within narrow ranges as specified in to ensure that correct water content and physical dimensions are maintained.
The key optical, material and geometrical parameters of interest are as follows:
Optical parameters
Power and power profiles
Optical quality
Scattering
Material properties
Water content
Modulus
Wettability
Surface friction
Oxygen permeability
Refractive index
Spectral transmission
Lens geometry
Diameter
Sagittal depth
Thickness
Radius of curvature
Edge shape
Whereas measurement of some of these parameters requires specialist instrumentation and expertise, other parameters can be measured quite easily by clinicians for ‘on the spot’ trouble shooting in their contact lens practice.
Because of the hydrophilic nature of all soft lens materials and their sensitivity towards environmental changes, proper conditioning of these lenses prior to any measurements is of critical importance. prescribes that a standard phosphate-buffered saline (PBS) with a pH of 7.4 ± 0.1 and an osmolarity of 310 ± 5 mOsm/kg is to be used to soak all lenses for at least 30 minutes. Generally, measurements are to be taken at a temperature of 20°C ± 0.5°C. Standard PBS is prescribed as it closely mimics the osmolarity and pH environment of tears on eye. In clinical practice, sterile 0.9% saline solution is more readily available and can also be used.
The optical parameters are most important for the visual performance of a contact lens on eye.
The visual performance of a contact lens is largely determined by the fidelity of optical parameters and prescription. Light scattering and optical distortions are generally low and of less significance.
The three categories of soft lenses – spherical, toric and multifocal – require differing approaches to determine their relevant parameters. For single-vision spherical lenses, a single power reading for the sphere power is sufficient to evaluate the optical power. Toric lenses are rotationally nonsymmetric and require the power measurement along at least two different meridians. Multifocal lenses are rotationally symmetric, whereby the most interesting information is contained in the power profile along the diameter. The power profile determines the distance and adds power, and the blending between these two powers.
For the contact lens practitioner, the simplest method to confirm the power of a particular contact lens is to place the lens on eye and perform an overrefraction ( ) to achieve best distance visual acuity. Although this technique is a viable method for prescribing contact lenses, its subjective nature and uncontrolled factors like pupil size and orientation/centration make this methodology unsuitable for precise and objective power measurements.
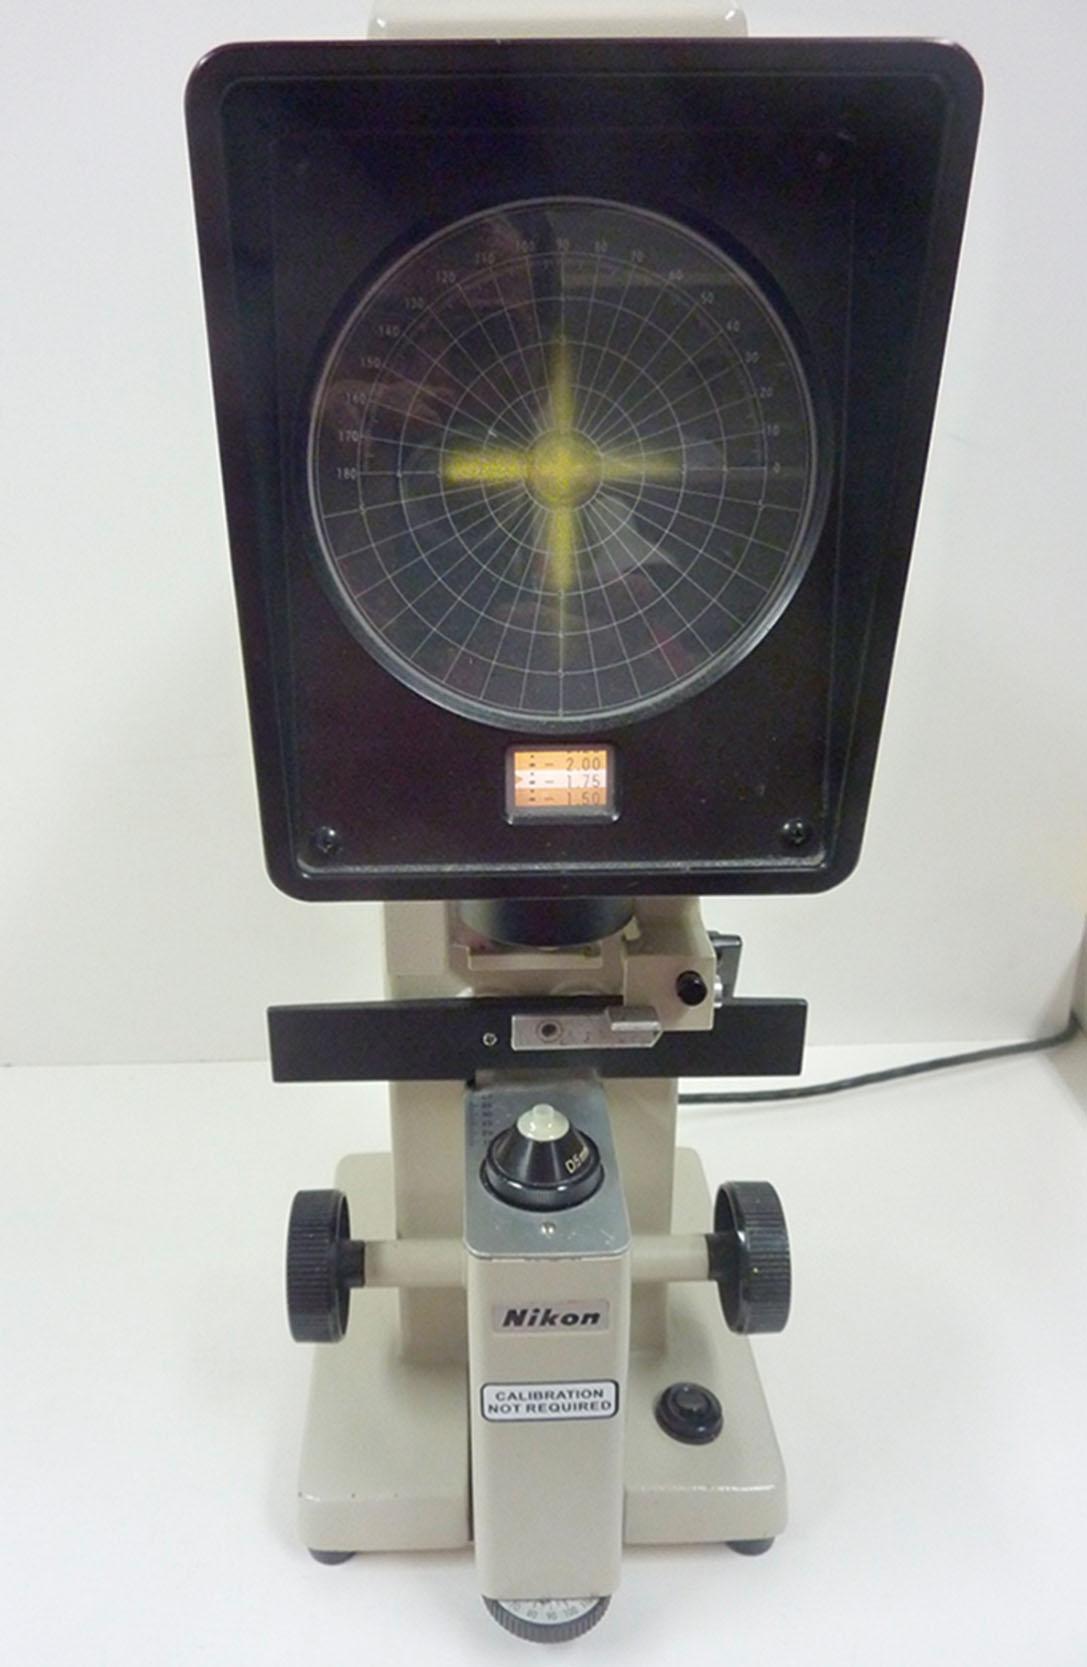
The focimeter is a simple optical instrument that is still widely used by manufacturers and practitioners to measure back vertex power (BVP) over a 4.5-mm central aperture in air ( Fig. 7.1 ). A cross-shaped mire is projected through the lens and the image is brought into focus by turning the power drum. The BVP is then read off a dial connected to the power drum. Toric lens power can also be measured by first aligning the orientation marks on the lens and then rotating the mire to align with the flat and steep meridian of the toric optic zone. Focusing the line along the flat meridian will provide the sphere power. The cylinder power is the difference to the focus position of the steep meridian. The axis value is the angle between the flat meridian and the horizontal line. Most of the auto-lensometers work on a similar principle, but the power and axis measurements are taken automatically and the results displayed digitally ( Fig. 7.2 ).


Careful handling and preparation are required when measuring lens power in air. It is recommended to clean the contact lens and then dab dry both surfaces before centring it on the lens support. Excessive drying or exposing the lens for too long (longer than around 10 seconds) will dehydrate the lens and change the optical power. In a ring test involving five laboratories, showed that standard deviations of 0.10–0.30 D for sphere and cylinder power can be achieved for 10 repeated measurements of low-powered toric lenses using a manual focimeter.
The current state-of-the-art power-measuring instruments immerse the lens in a saline-filled cuvette to avoid dehydration effects. These instruments can also map the power of the complete optical zone from which all the optical power parameters can be extracted. Power-mapping instruments based on the Moiré deflectometry, Hartmann–Shack (HS) and the phase-shifting Schlieren principles are on the market.
The Moiré deflectometry instrument from Rotlex was the first commercially available power mapper and the first to be included in . It utilizes two precision gratings placed in the optical path of a collimated light beam that also passes through the contact lens inside the cuvette ( Fig. 7.3 ). The fringe pattern generated by the gratings is captured by a camera and analysed. The local tilt angle of the fringes correlates to the local power of the lens. Thereby, an entire power map of the optic zone can be calculated and averaged values for sphere, cylinder and axis obtained.

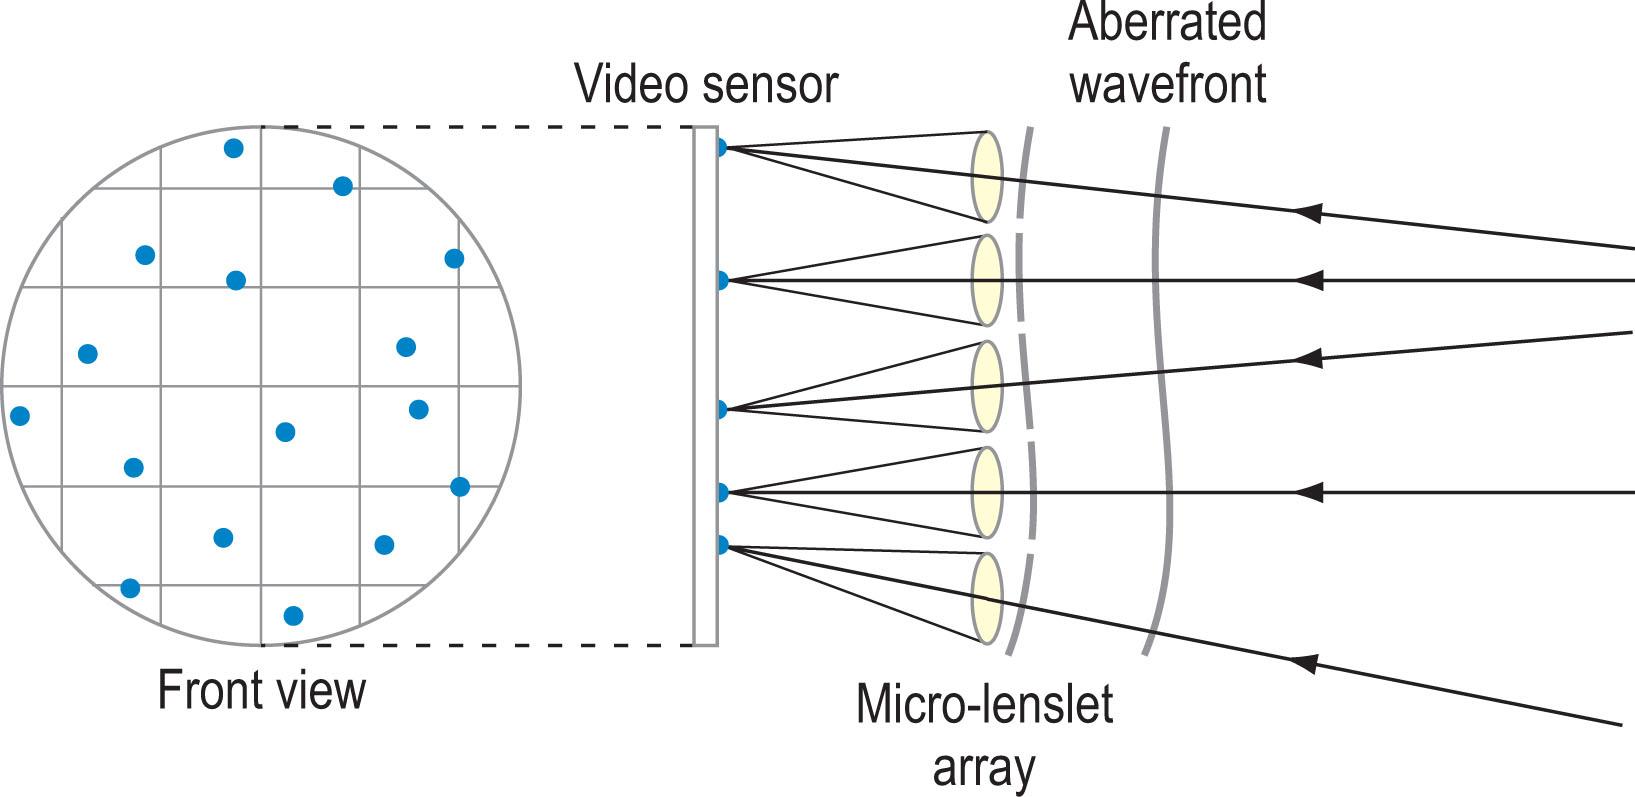
Several instrument manufacturers have over the last 15 years utilized the HS method to generate power maps of soft contact lenses. HS sensors consist of an array of microlenses and a two-dimensional photo detector array – generally a charge-coupled device (CCD) or complementary metal-oxide semiconductor camera to measure the distortions within a wavefront ( ). The number of microlenses determines the achievable lateral resolution. The sensitivity and measurement range are determined by the focal length of the microlenses ( Fig. 7.4 ). The instrument shown in Fig. 7.5 features a 101 × 101 micro-lenslet array providing a measurement range of ±20.00 D and a precision of 0.05 D. The instrument performs well within the ISO specified precision tolerances ( ). However, when power profiles are extracted, the reliability drops significantly towards the optical centre of the lens.


Phase-shifting Schlieren is a more recent technology to be implemented in a commercial instrument for the power mapping of contact lenses. The NIMO TR1504, and its successor the NIMOevo, from Lambda-X claim a measurement range of ±30.00 D and a repeatability of < ± 0.05 D. Repeatability is generally good, except for the central area close to the optical axis within which the confidence interval increases to over 0.80 D for some lens types ( ). The Schlieren principle is explained in detail by ; it is based on the knife-edge method, in which the single knife edge is replaced by a multiline filter element with sinusoidal transmission. The wavefront passing through the contact lens, the Schlieren lens and the Schlieren filter is focused on a CCD camera to capture the Schlieren fringes ( Figs. 7.6 and 7.7 ). By moving the filter laterally in small steps, a set of phase-shifted images is acquired from which the wavefront can be reconstructed.


The three methods and instruments used to generate power maps of soft contact lenses have a number of common features, as summarized below.
By measuring and mapping the complete optical zone, local power defects or deviations can be detected. Most instruments have implemented algorithms to generate a single quality number to quantify optical quality and use this as an additional pass/fail criteria.
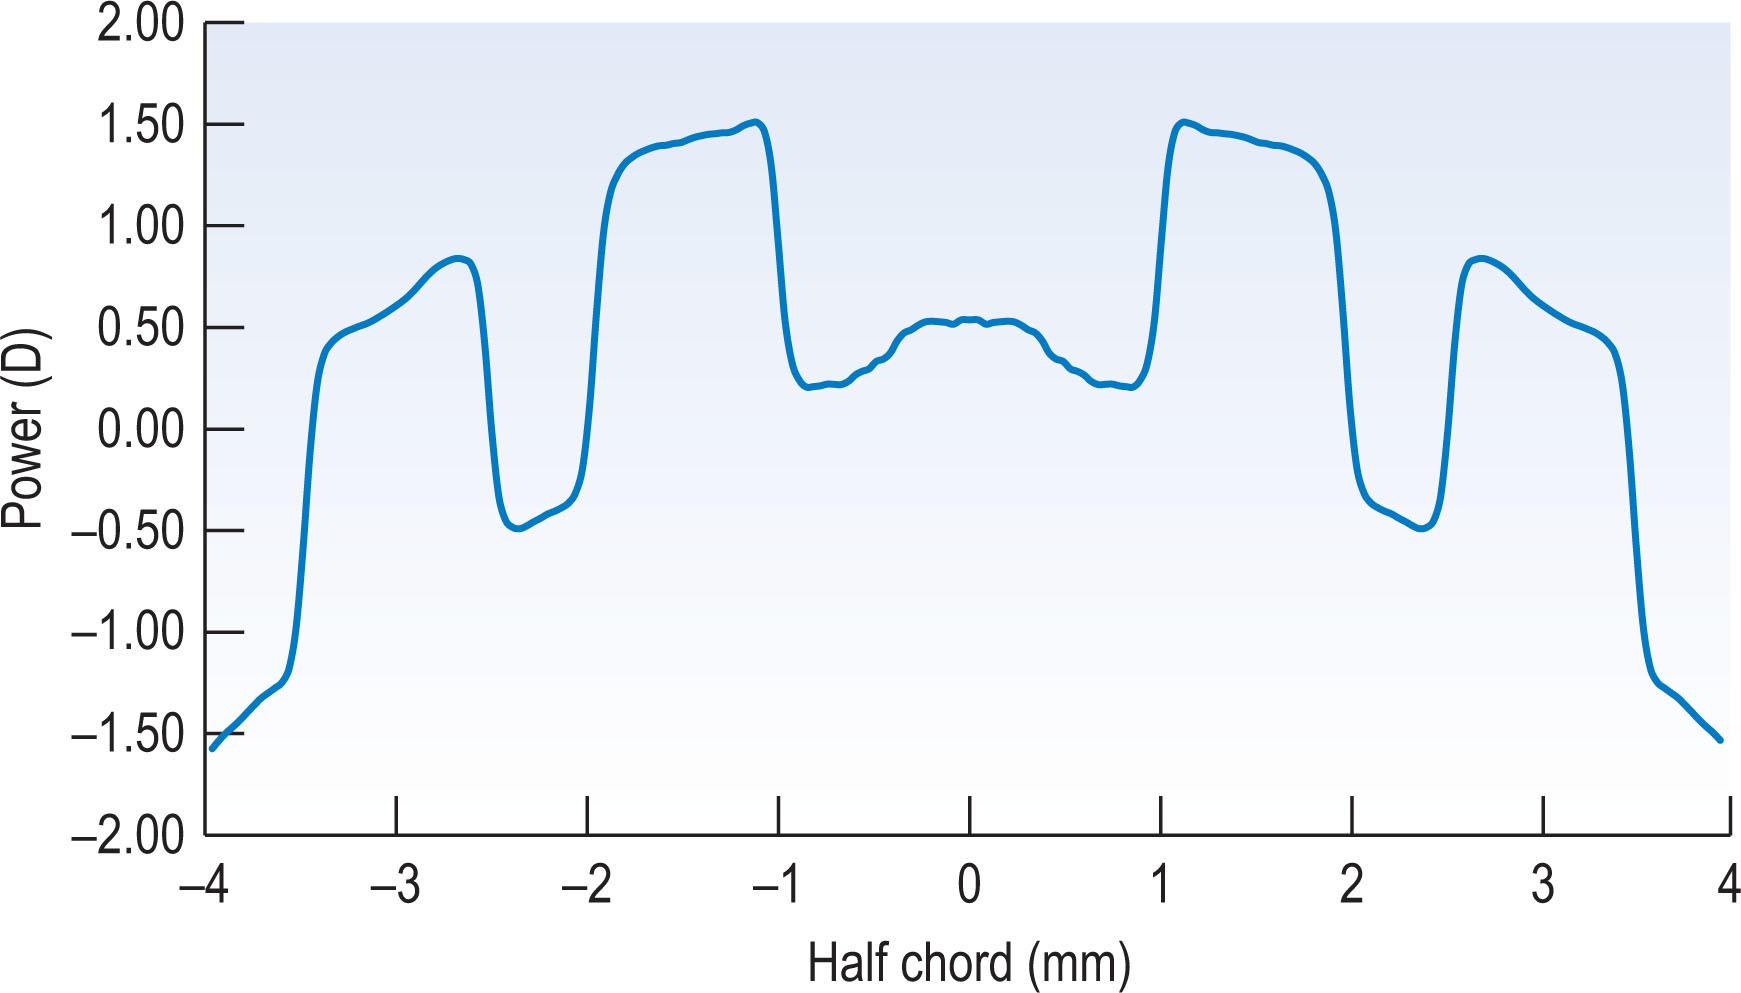
Besides reporting the lower-order aberrations of sphere and cylinder power and axis angle, higher-order aberrations such as coma and spherical aberrations can also be obtained from the power maps. These are generally reported in the format of Zernike coefficients. Higher-order spherical aberrations can also be plotted as power profiles, providing useful information, in particular for bifocal and multifocal lenses, as shown in Fig. 7.8 .

Measuring the soft lens immersed in saline has the advantage of avoiding dehydration, but it also has some disadvantages that can significantly affect the measurement accuracy. The measured ‘in-saline’ power needs to be converted back to ‘in air’ power using the following equation:
where P air : lens power in air, P saline : lens power in saline, n air : refractive index of air=1, n saline : refractive index of PBS=1.3345 and n lens : refractive index of lens material ~1.39–1.42.
With most lens material having a refractive index of around 1.39–1.42 and the refractive index of saline being 1.3345, measurements in saline need to be about five times more accurate compared with a corresponding power measurement in air. The closeness of the refractive indices of saline and lens material also requires that both need to be known or measured with great accuracy. For example, an error of only 0.0005 for a 1.4100 lens material will lead to a false power reading of 0.35 D for a −6.00 D contact lens. Relying on the tolerance of 0.005 for the refractive index of soft lens materials is therefore not sufficient when measuring optical power in a cuvette.
The BVP of a contact lens is referenced to the apex of the back surface. As this axial position is not known precisely for a lens placed inside the cuvette, instrument manufacturers use various methods to approximate that location for their power calculations using thin or thick lens formulae. The best results can be achieved by entering values for centre thickness and base curve (BC) for each particular lens.
The method of power mapping has the disadvantage that, close to the optical centre of the lens, even very small errors in the detection of the incoming wavefront angle can lead to a very large error in the calculated power. To alleviate this problem, the data-processing algorithms in most instruments utilize noise filtering and extrapolation methods to smooth the power values around the optical axis. While this is a viable method for most single-vision and toric lenses, multifocal and the newly developed extended depth of focus lenses ( ) contain critical features close to the optical centre, which may be masked out by this profile extrapolation.
Factors that can compromise the optical quality of a soft contact lens are inhomogeneous material, surface scratches or deposits, lathe marks, material inclusions or air bubbles. The more obvious defects can be picked up with any of the power-mapping instruments or careful observations using a slit lamp. More subtle defects can only be detected using more sophisticated equipment like the knife-edge tester ( ) ( Fig. 7.9 ) or thickness profilers ( ).

Scattering is generally of little concern with soft contact lenses. It might be observed occasionally, caused either by surface deposits or contamination or by manufacturing defects affecting the bulk of the material. Quantitative assessment is best done using a dark-field microscope. In vivo, optical coherence tomography (OCT) instruments, such as the one used by , can be employed to determine the degree of back scattering.
Properties can vary widely between different soft lens materials and concomitantly, on-eye performance in terms of comfort, vision, fit and ocular health. For traditional hydrogel materials, most of the properties, including modulus, oxygen permeability, refractive index and wettability are linked to the water content of the material. With the introduction of silicone hydrogels, coated lens surfaces and additives in packaging solutions, properties are less predictable and need to be measured individually for each material.
Become a Clinical Tree membership for Full access and enjoy Unlimited articles
If you are a member. Log in here