Physical Address
304 North Cardinal St.
Dorchester Center, MA 02124
The proximal femoral osteotomy (PFO) has been a part of pediatric orthopedic surgical techniques since at least the 1960s, when Dr. Southwick described a peritrochanteric osteotomy in 1963. Numerous variations of the PFO have been described since that time, all with the intent to optimize coxofemoral hip anatomy, maximize patient function, and delay long-term degenerative arthrosis. Great diversity exists when it comes to patient pathology, age at time of intervention, type of osteotomy, and means of fixation. A PFO is an excellent procedure with treatment potential, assuming the surgeon also has a complete understanding of the associated pre-, peri-, and postoperative complications that can occur.
A PFO for a patient with hip dysplasia is perhaps the most common application of the PFO. The osteotomy for dysplasia serves to redirect the contact forces between the femoral head and acetabulum, with the goal of remodeling the joint to achieve a normal relationship (i.e., one that is not associated with hip subluxation or femoral head escape). This diverse surgical technique can be utilized to correct an array of lower extremity pathologies, with an equally diverse age population. In the young child, a PFO may be indicated for coxa vara reconstruction or as part of an open hip reduction. A school-age child may undergo a PFO to address hip instability in patients with neuromuscular disorders or severe Legg-Calve-Perthes disease (LCPD). Finally, a PFO in an adolescent may be used for malalignment issues, for a slipped capital epiphysis, or in conjunction with a periacetabular osteotomy for ongoing dysplasia.
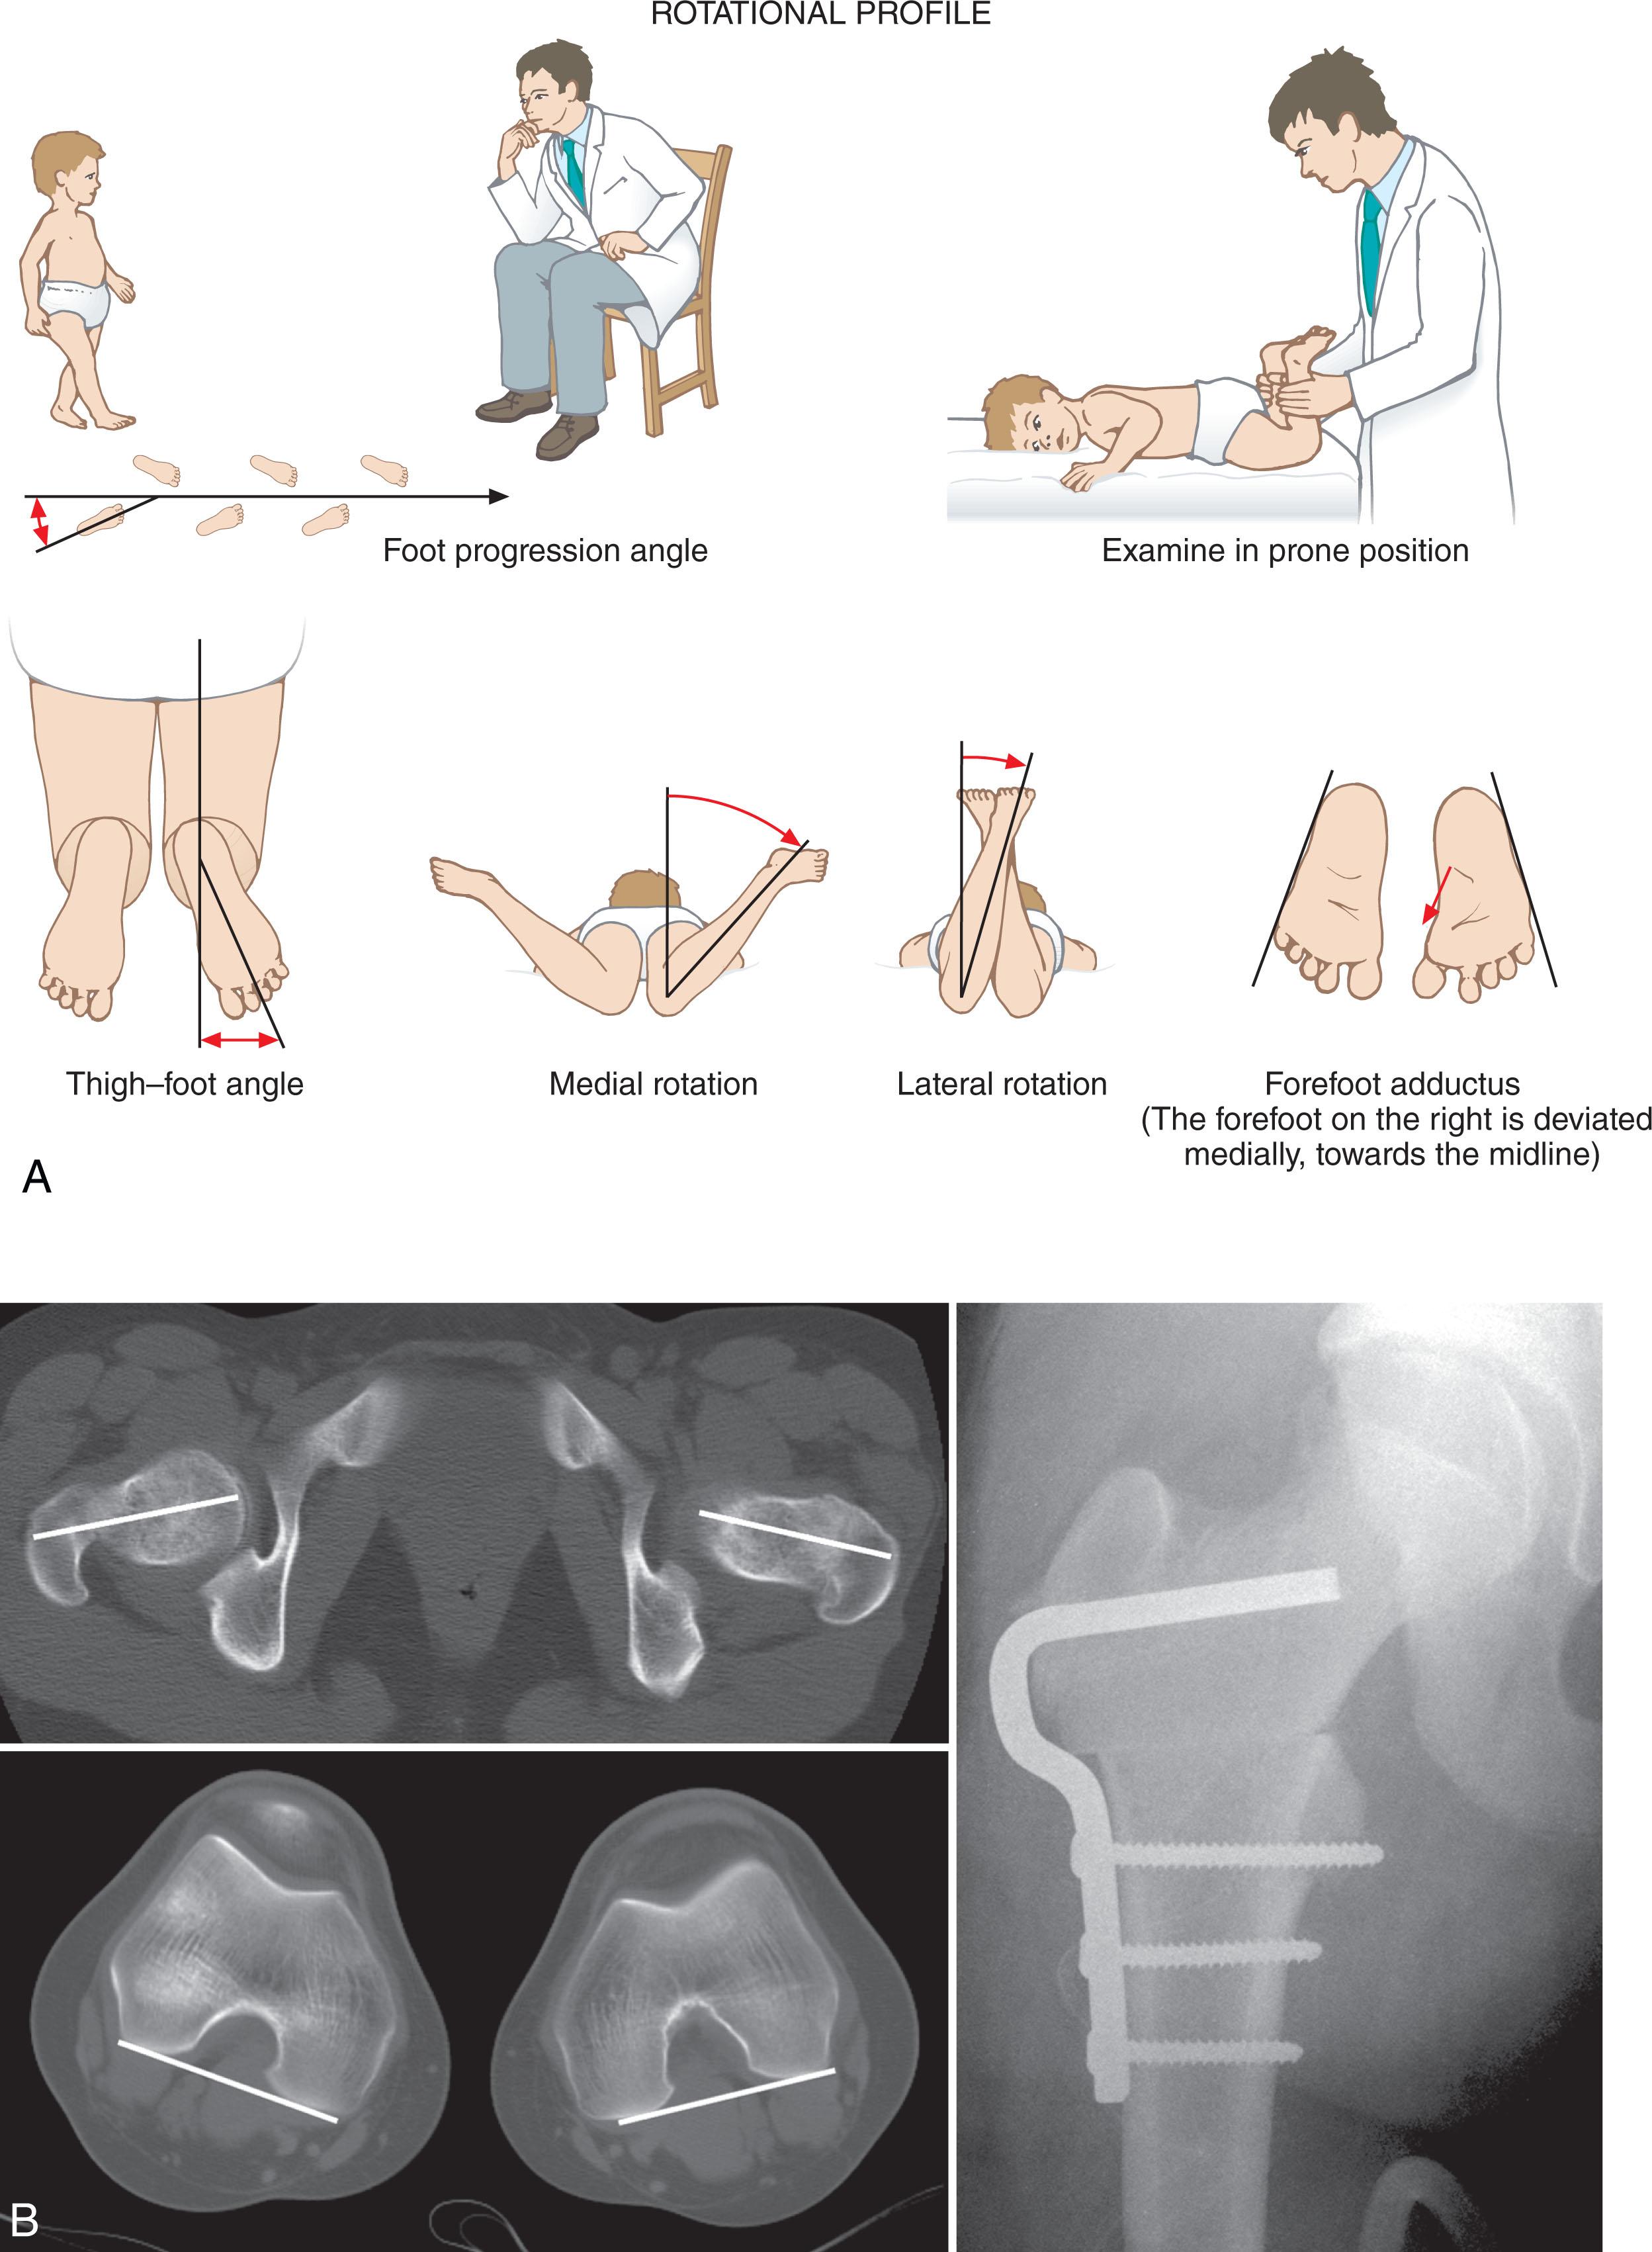
The degree of desired correction of length, rotation, and angulation is determined preoperatively. Preoperatively, the surgeon needs to critically examine the patient, noting their bilateral lower extremity rotational profile. This is traditionally done based on clinical exam. In specific cases, the physical examination can be supplemented with formal gait analysis and/or rotational profile imaging ( Fig. 29.1A,B ). The amount of shortening required can be assessed clinically or on radiographs ( Fig. 29.1C ), and the planned angular correct is calculated based on preoperative radiographs ( Fig. 29.1C ). To determine guidewire position and angle of the osteotomy, the ideal correction (such as 20 degrees) is subtracted from the angle of the blade plate being utilized (e.g., 110 degrees); therefore, the guide would need to be set at 90 (110 – 20) degrees for a varus correction. The ideal correction is added to the blade plate angulation for a valgus correction.

In the operating room, the patient is positioned supine on a radiolucent table, with the patient’s operative hip positioned on the ipsilateral edge of the table to facilitate exposure and ease of instrumentation. For patients undergoing concomitant extension osteotomy (such as for a slipped capital femoral epiphysis), consider positioning the patient laterally to facilitate extension of the distal fragment. A small bump is placed under the sacrum. The patient is then prepped and draped anteriorly to just lateral to the umbilicus, posteriorly adjacent and parallel to the gluteal cleft, and superiorly to the inferior costal margin.
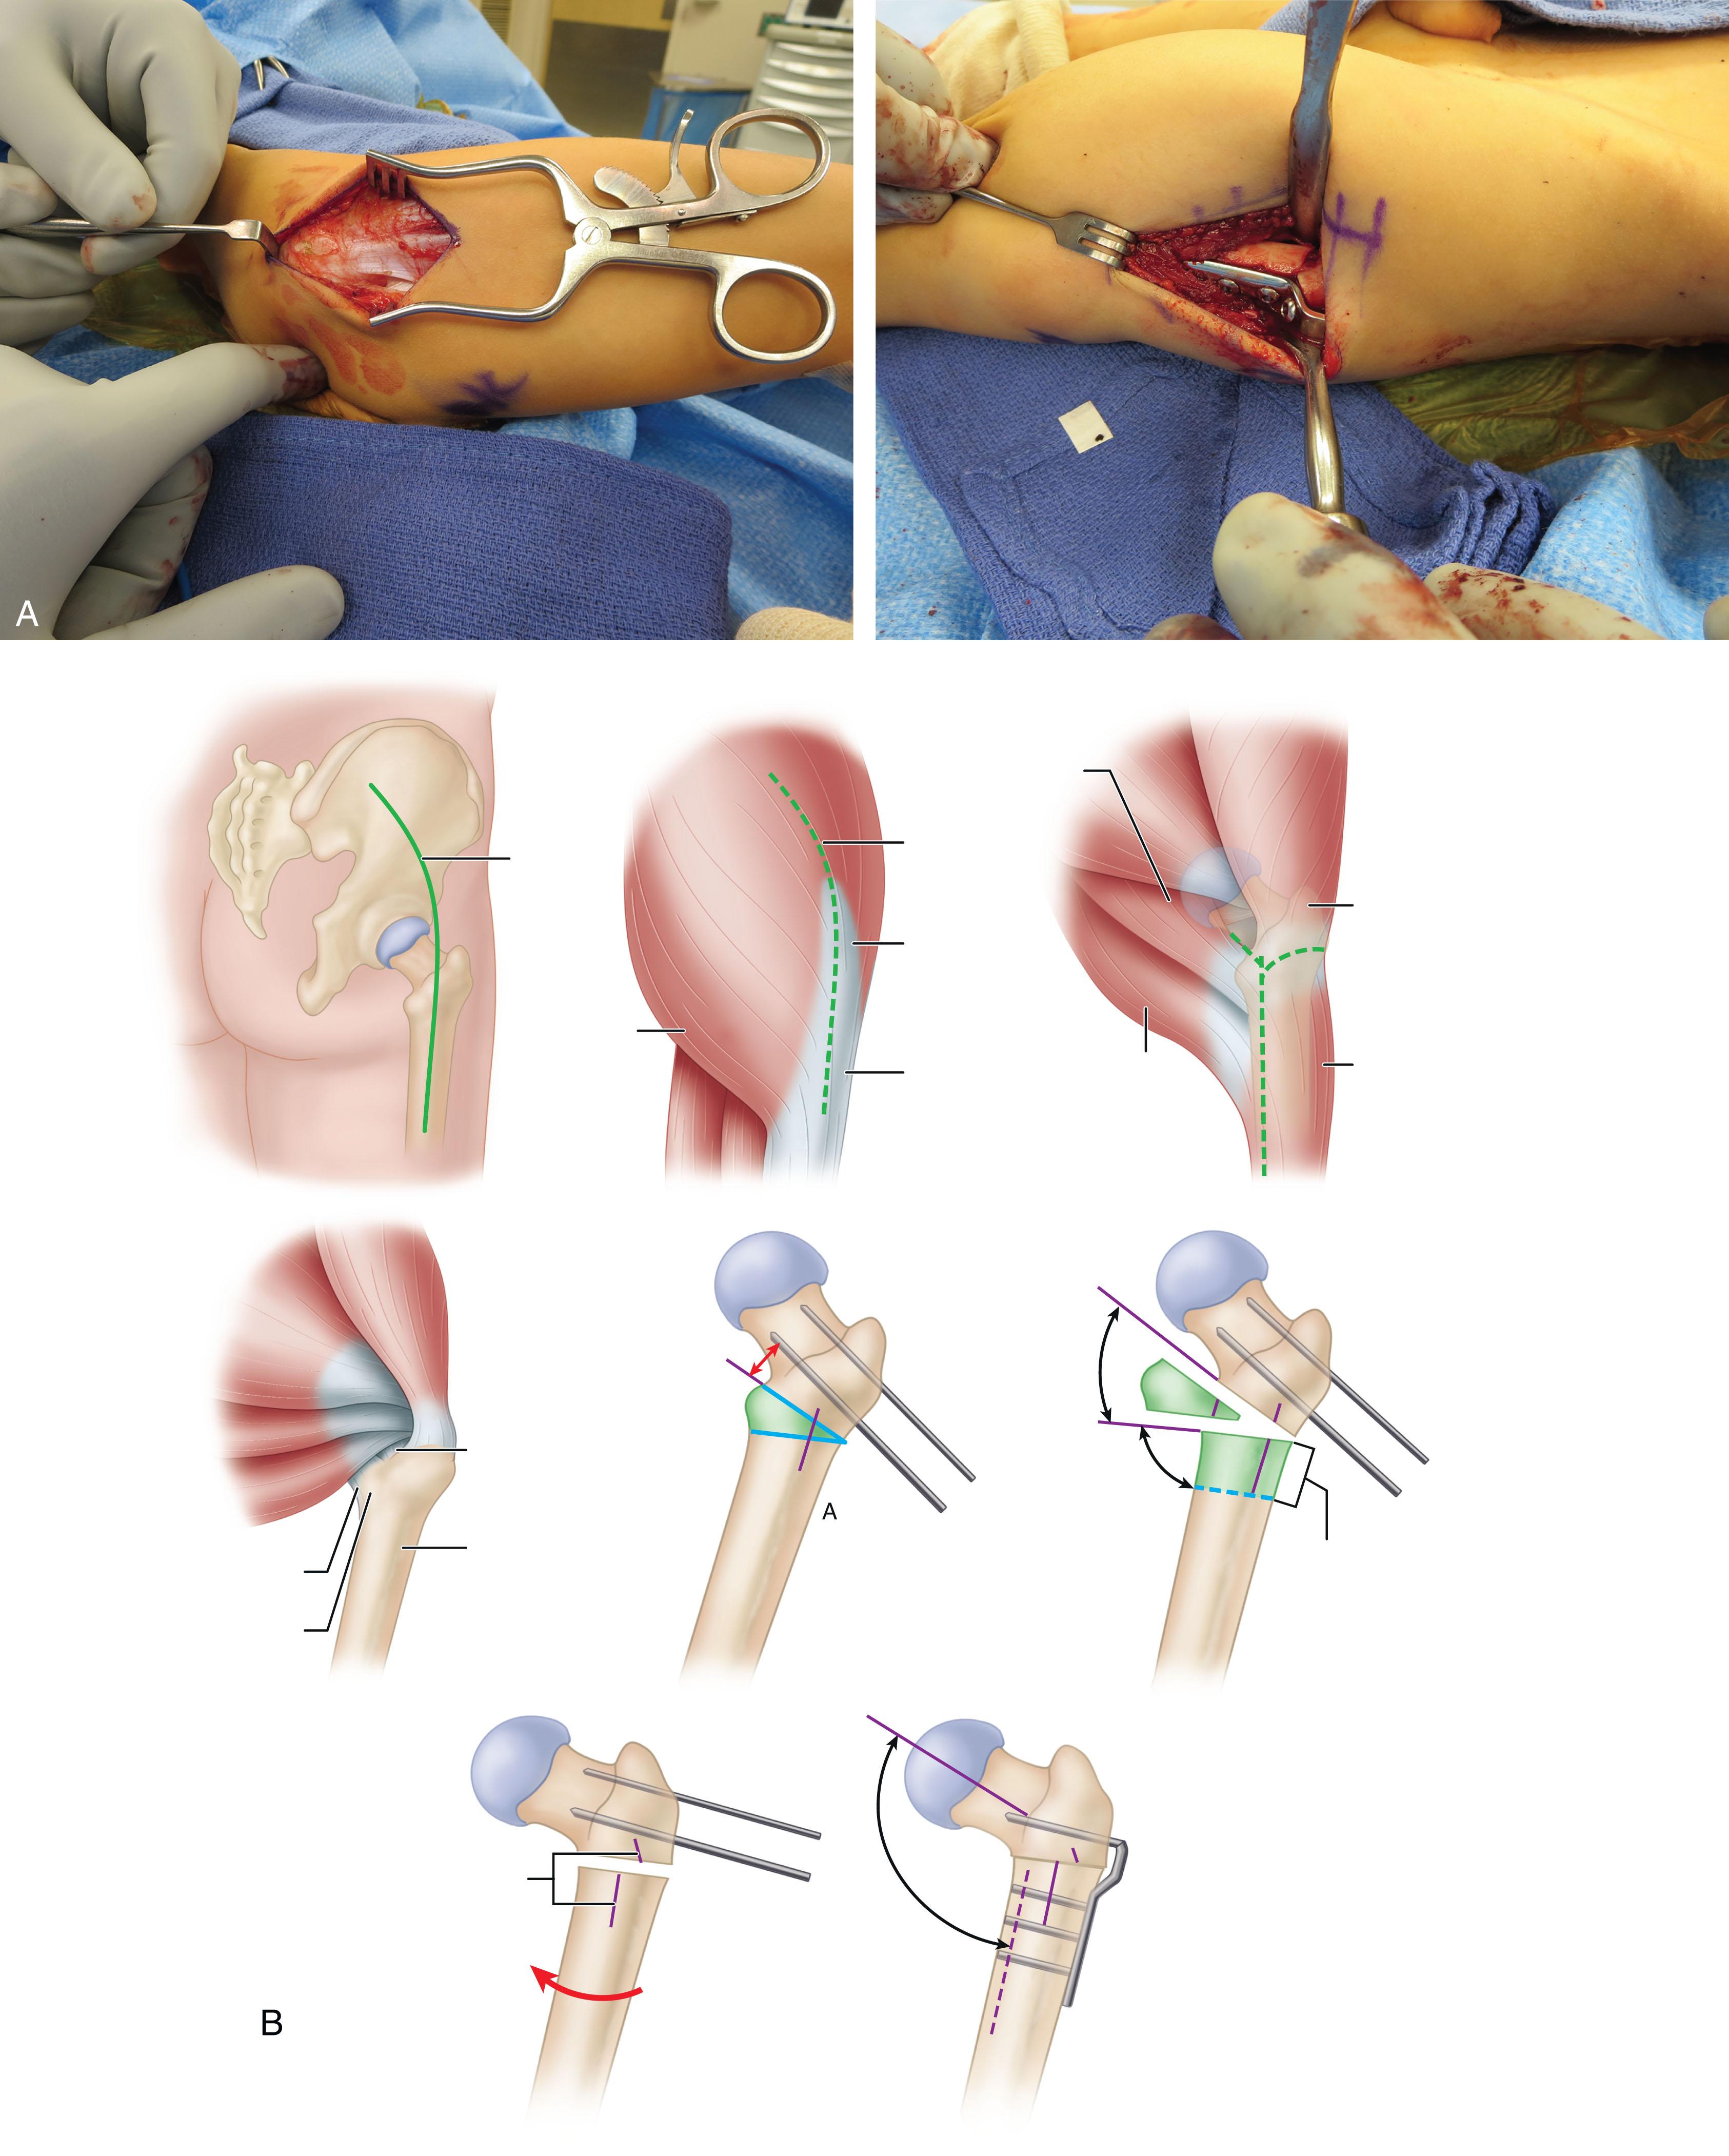
A lateral approach to the proximal femur is performed, specifically using a subvastus approach to mobilize the vastus lateralis proximal myotendinous junction ( Fig. 29.2A ). Under fluoroscopic imaging guidance, the reference pin for the blade plate’s chisel is inserted in the femoral neck at the planned angle to the femoral shaft. An angle guide can be used to ensure the most accurate pin placement. The chisel of the blade plate is then impacted to the templated depth, utilizing the guidewire to maintain the correct angle to the femoral shaft. Care is taken to not introduce any flexion/extension, unless flexion/extension was planned for preoperatively. A specialized guide can be used to control this. Once the chisel is impacted to the planned depth, the level of the osteotomy is marked. Any shortening that is needed should be marked at this time. Two parallel derotational guide wires are then inserted proximal and distal to the planned osteotomy.

The osteotomy is performed next, typically with a combination of oscillating saw and osteotomes. The initial osteotomy is made perpendicular to the long access of the femoral shaft. A second osteotomy is then made parallel to the angle of the chisel, beginning in the midpoint of the proximal fragment and extending medial for a varus correction ( Fig. 29.2B ). For a valgus correction, this second osteotomy is made on the distal fragment. Once the osteotomies are complete, the chisel is exchange for the blade plate. Care must be taken to ensure that the plate follows the same path created by the chisel.
A plate holder is then used to secure the distal fragment to the plate, using fluoroscopy to evaluate the initial correction. Derotation is also made at this time by internally or externally rotating the distal fragment, using the derotation wires to determine the degree of correction. Adjustments are made as necessary, and screws are inserted into the distal plate once satisfactory. If desired in the situations of poor bone quality or a noncompliant patient, additional screw fixation may be considered. The wound is closed in a standard fashion, and the patient is typically non-weight bearing for a minimum of 6 weeks postoperatively.
Complications with PFOs are associated with the surgeon’s understanding of how the procedure can be tailored to fit each unique patient’s pathology. The purpose of this chapter is to help clinics avoid perioperative adverse outcomes by recognizing the following.
Indications for a PFO are wide-ranging, from the healthy child with a post-slipped capital femoral epiphysis (SCFE) deformity and spanning to a neuromuscular patient with progressive hip dislocation. Considerations for additional procedures must also part of the preoperative planning, in addition to deciding upon the correct variant of osteotomy.
Perioperative complications include malrotation or angulation, as well as risk of peri-implant complications, such as poor screw purchase or fracture.
Postoperative complications can occur in the acute postoperative period (i.e., undercorrection), as well as remotely (including peri-implant fracture, failure of fixation, and increased complexity of future procedures). Patients who have undergone an osteotomy should be followed for years after the procedure, as an important component of caring for these patients is anticipating the next hip procedure.
Become a Clinical Tree membership for Full access and enjoy Unlimited articles
If you are a member. Log in here