Physical Address
304 North Cardinal St.
Dorchester Center, MA 02124
Peripheral nerve field stimulation (PNfS) is a new and exciting area of neurostimulation. It belongs to the general category of electrical stimulation of the peripheral nervous system. However, instead of stimulating a well-defined nerve trunk, the stimulation is applied to the small terminal branches of one or more peripheral nerves. The target area for stimulation is the subcutaneous tissue, where the small nervous endings of the nerves arborize in a widespread network ( Fig 61.1 ).
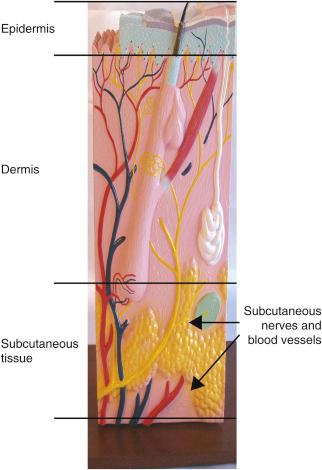
The technique of PNfS is known by different names, such as “subcutaneous stimulation,” “peripheral nerve subcutaneous stimulation,” “regional stimulation,” and “subcutaneous target stimulation” ( ; ). All these names for the same technique point to the fact that the target is the small peripheral nervous fibers in the subcutaneous tissue. The use of PNfS is a paradigm switch from previous neurostimulation modalities, where stimulation is applied to a large, well-defined neural structure such as a large peripheral nerve, the nerve roots, or the spinal cord.
The mechanisms of action of PNfS, although unknown, are most likely similar to the ones described for peripheral nerve stimulation (PNS) ( ). Vera-Portocarrero et al. studied the behavioral effects of targeting peripheral axons by electrode placement in the subcutaneous space (subcutaneous electrical stimulation or SQS) versus electrode placement on the surface of the skin in a rodent model ( ). Rodent models of inflammatory and neuropathic pain were used to investigate SQS versus transcutaneous electrical nerve stimulation (TENS). SQS had cumulative efficacy in both inflammatory and neuropathic pain rodent models, with significant inhibition of mechanical hypersensitivity observed on days 3–4 of treatment. In contrast, reduction of thermal hyperalgesia in the inflammatory model was observed during the first 4 days of treatment with SQS, and reduction of cold allodynia in the neuropathic pain model was seen only on the first day with SQS. TENS was effective in the inflammation model. With the exception of a reversal of cold hypersensitivity on day 1 of testing, TENS did not show significant analgesic effects in this rodent model of neuropathic pain. The researchers’ conclusion was that TENS and SQS have different effects that could point to unique biologic mechanisms underlying the analgesic effect of each therapy. Furthermore, this was the first study to document, in an animal model, that SQS attenuates neuropathic and inflammatory-induced pain behaviors.
developed a finite element model combined with an active cable model of Aβ and Aδ nerve fibers, which was used to simulate the extracellular potential during PNfS. This model investigated how the angle between the nerve fiber and electrode affected nerve activation, and whether anodal blocking could occur. The area of paresthesia was estimated and compared with concomitant Aδ fiber activation. In the model, the lowest threshold during PNfS was found when nerve and electrode were in parallel, and anodal blocking did not appear to occur. The activation of Aβ fibers was within therapeutic range (<10 V) of PNfS, but within this range Aδ fiber activation also occurred. The combined area of activated Aβ fibers (paresthesia) was at least two times larger than the area of activated Aδ fibers for similar stimulation intensities. The authors concluded that there was no evidence of anodal blocking in this PNfS model. The thresholds were lowest when the nerves and electrodes were parallel; they suggested that it may be relevant to investigate the overall position of the target nerve fibers prior to electrode placement.
The PNfS technique has birthed a revolutionary change to the paradigm of classical neurostimulation as previously performed for several decades. In the classical paradigm the goal is to stimulate major sensory neural structures that are upstream from the painful area to generate paresthesias in that area. With PNfS the lead is actually placed within or near the area of the pain (or the area of the projection of the pain). This technique was developed with the goal of stimulating areas that are notoriously difficult or impossible to reach using spinal cord stimulation (SCS) or stimulation at the level of major nerve trunks, such as the posterior axial surface of the body from the neck to the lumbar spine. While originally developed for these difficult situations, PNfS has sometimes become utilized as a first-line, minimally invasive neurostimulation procedure if the pain is limited to a relatively small and well-defined area. The goal of PNfS is to stimulate Aβ fibers with the least activation of Aδ fibers, which, when stimulated, cause a painful sensation. showed, in a finite element model, that the skin area covered by Aδ fiber activation was largest when the electrode was modeled to have a superficial location (≤5 mm below the skin surface), while the skin area covered by Aβ fiber activation was largest at lower depths. According to their model, an optimal implantation depth is 10–15 mm below the skin surface. This modeling data correlates well with , who, in a small clinical series with 21 leads in 10 patients, demonstrated that the optimal target zone is at 10.5 mm (9.8–11.3 mm) below the surface of the skin. This optimal target zone for PNfS correlates well with this author’s personal experience.
This chapter does not deal with PNfS of the head and face, since the techniques and therapeutic implications are very different, require a completely separate set of considerations, and are discussed elsewhere.
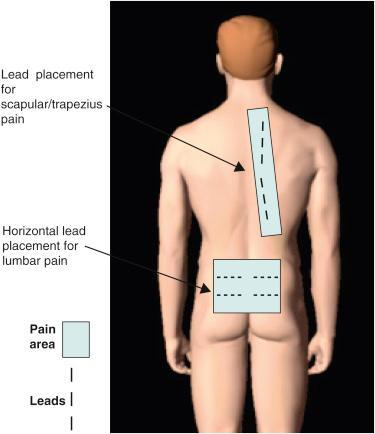
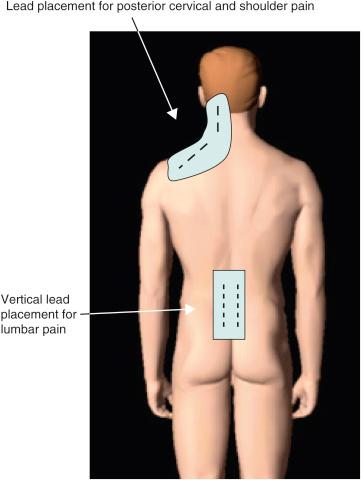
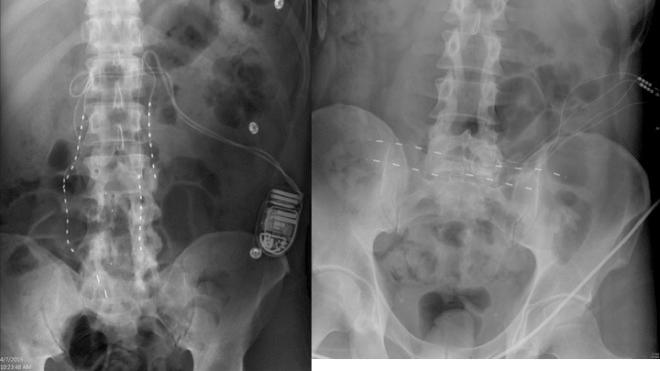
In the author’s experience, PNfS is best accomplished with percutaneously placed cylindrical leads and not with paddle leads ( ). The reason lies in the target of the stimulation. When performing dorsal column, nerve root, or large PNS, the target is a well-defined neural structure and the lead(s) is placed on or around its surface. The current is therefore unidirectional and best delivered by a paddle lead. With PNfS the lead is placed within the target, which is made up of small sensory nerve endings within the subcutaneous tissues. The best electrical field is therefore one that is circumferential, like that delivered by a percutaneously placed cylindrical lead. The type and contact spacing of the lead depend on the size of the pain area and the number of leads one is planning to utilize. For a very small pain area, a quadripolar lead with 5–7 mm intercontact spacing is most likely sufficient. For a large pain area, one or more leads with 9 mm or more intercontact spacing is more appropriate ( Figs. 61.2 and 61.3 ).
Currently there is no fully implantable equipment developed specifically for this modality. The leads and the pulse generators utilized are the same ones as used for SCS.
The most important part of the procedure is careful planning. Unlike SCS, where the lead insertion incision is almost invariably either in the upper lumbar or upper thoracic midline, PNfS incisions can be numerous and must be strategically placed according to the pain areas to be covered and the location of the implanted pulse generator (IPG). It is imperative that the patient and the implanting physician clearly agree on which painful areas are to be addressed. Many times, when presented with the question “where is your pain?” the patient points to very large body areas, often larger than it is reasonable to try to cover with stimulation. Two key questions should follow. Where is the area of your worst pain? Where is the area from which your pain originates (if there is one)? If the patient points to a vague and large area and cannot pinpoint the answer to these questions, he/she should not be deemed to be a good candidate for the procedure. Next, the areas of pain to be addressed must be mapped out on the patient’s body in detail. Areas that qualify for criterion 1 (worst pain) and/or 2 (pain origin) are the ones that carry priority in lead placement.
The success of the procedure is directly related to the ability of the patient to guide the implanter to the most crucial pain areas. Experienced implanters often ask the patient to mark the areas of pain prior to coming to the hospital. Some implanters go as far as asking the patient to give numerical values, as a reflection of the pain severity, to the various pain areas. Unlike SCS, where paresthesia coverage and overlap with stimulation can be controlled by reprogramming the electrical field, stimulation with PNfS is limited to the area of the lead implant and cannot be expanded significantly with programming.
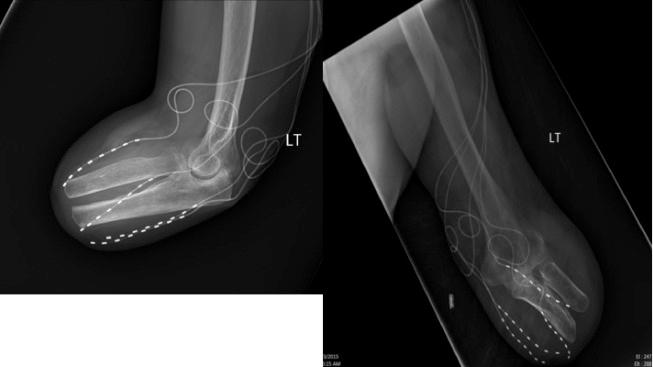
Strategic placement of the leads can be accomplished either by placing the lead(s) in the center of the painful area or by “bracketing” the painful areas with leads that flank it ( Figs. 61.2 and 61.3 ). The bracketing approach is definitely preferred in the case of stimulating allodynic areas. Leads placed directly in the allodynic area might be physically bothersome and the stimulation might be perceived as painful. It is crucial to map transition zones between allodynic and nonallodynic areas carefully and place the leads exactly within such zones. A centimeter difference could substantially affect the success or failure of the modality.
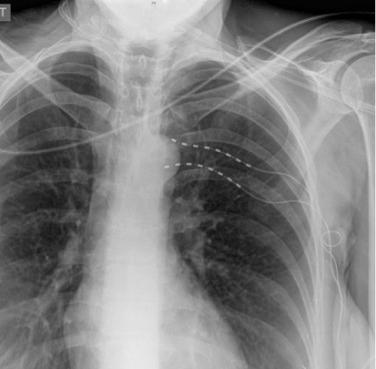
The principle of PNfS is that the lead(s) should be placed within or as near as possible to the painful area ( ). Each electrical contact spreads a circumferential electrical field of about 2.5 cm in diameter. The number, spacing, and distribution of the electrical contacts should therefore be carefully planned according to the size and shape of the painful area ( Figs. 61.2 and 61.3 ). The current can also be driven across leads placed at a distance, thereby increasing the size of the affected electrical field. Larger areas might require several leads placed strategically. It is not uncommon to have a pain area that would require up to four implanted leads. Almost any area of the body can be reached with this technique. The most commonly addressed areas of pain include the lumbar area, the thoracic area, the scapular area, the inguinal area, the limbs, and various regions of the head and face ( ) ( Figs. 61.4–61.6 ).
A bendable introducer with a blunt obturator (On-Q tunneller, part of the On-Q Pain Relief System, Halyard, Alpharetta, GA, USA) is very useful in areas of great curvature, such as the forehead, the cervical region, and the knee, to mention a few. A long introducer (6–8 in.) can also be useful to avoid placing an incision near or within the painful areas.
The depth of the needle (and therefore the lead) is crucial to the success of the procedure. The lead should be placed in the superficial layer of the subcutaneous tissues. If the lead is placed in the deep layers of the subcutaneous tissues, no paresthesias will be perceived. If the lead is under the fascia or very close to the muscles, motor contractions will be elicited. If the lead is placed within the dermis, the stimulation will be perceived as a painful burning sensation. The depth of the needle should satisfy two criteria. Firstly, there should be no indentations in the skin. Indentations mean that the needle is in the dermis. If the needle is in the dermis, advancing it is very difficult and meets with much resistance. Advancing the needle within the resisting dermis is extremely painful. Secondly, one should be able to visualize a slight “tenting up” caused by the needle in the subcutaneous tissue, and certainly one should be able to feel the needle readily with finger palpation. If the needle cannot be felt, its location is too deep. During a percutaneous trial, entry into the subcutaneous tissue is usually characterized by a “pop” feeling that is due to the loss of resistance once the needle has penetrated through the deep layer of dermis.
The trial is performed without an incision or with a small nick in the skin by inserting the leads into the subcutaneous tissue through the needle provided in the kit or some other inserting device. Even though the procedure is simple, it has to be performed with heavy (albeit short) intravenous sedation. Heavy sedation is highly recommended since the needle tract cannot be infiltrated with local anesthetic (otherwise one would lose the depth landmark and patient feedback). Upon insertion of the leads, a trial is conducted as one would perform an SCS trial. Patient feedback of paresthesia within the appropriate pain location is essential. In some instances the trauma of the needle insertion will cause the tissues temporarily to react abnormally to stimulation. Impedances can be high and stimulation might not be fully perceived. A reprogramming session 24–48 h following lead insertion usually yields much more reliable results.
If the trial is successful in reducing pain, the whole system is implanted at a second sitting. Another option is to perform a “staged” trial, where the permanent leads are inserted through a surgical incision and externalized via contiguous temporary extensions. If the trial is successful, the second procedure consists of removal of the extensions and implantation of the IPG. Both options can be considered, and have their advantages and disadvantages.
Even though seemingly simple, implantation of the whole system requires surgical technique that pays attention to minute details and very careful planning. The areas of pain to be addressed must be marked. Areas of hypersensitivity and hyperalgesia must be avoided, and these areas mapped out. The IPG location must be decided with this mapping in mind. Sometimes tunneling several electrodes subcutaneously in the posterior thoracic area is not desirable, and the same applies to the strategic placement of anchors and connections with extension cables. If not properly placed, these latter elements could lead to discomfort of such a magnitude as to require removal of the device.
Migration of the leads is the most common complication, and one should make every effort to prevent that occurrence. Anchoring and looping of the lead are crucial. Several ways of anchoring are available. One could use the commercially available anchors that come with the lead kit of the manufacturer. If more than one anchor per lead is placed, the anchors can be trimmed so as not to be too bulky. Alternatively, one could place two or three “drain stitches,” with the knots tied semiloosely around the lead so as not to damage it. This is a very effective way of “trapping” the lead without the bulk of an anchor. This author always places a loop of lead which is then secured with a second anchor or another suture. The loop serves to reduce strain on the lead and is probably the most significant protection against migration. In some areas, such as the posterior cervical region, migrations are more likely.
The surgical implantation of the whole system can be simple and straightforward, or could be a complicated surgical procedure that cannot be overestimated. Often several incisions and multiple tunneling efforts might be required and the procedure could last hours. A complex PNfS procedure could be much more demanding than a simple SCS implant.
Become a Clinical Tree membership for Full access and enjoy Unlimited articles
If you are a member. Log in here