Physical Address
304 North Cardinal St.
Dorchester Center, MA 02124
Understanding of the different needs of the parents and the child being treated is essential for pediatric interventions.
Multimodality interventional suites allow for procedural guidance with varied modalities at different points during the procedure.
Although needle guides may be used, they add to the expense of the procedure. Therefore we typically advocate for a single-operator freehand technique with needle entry point chosen after careful consideration of the anatomy and important structures such as ribs, large vessels, diaphragm, and bowel.
Many needles and devices are available, and each practitioner should select and become very familiar with a limited selection of these devices.
Few children younger than 12 years will cooperate during an invasive procedure, and a thorough familiarity with pediatric sedation is necessary, together with skilled personnel and adequate resuscitation facilities.
In general, it is the external covering of an organ or muscle, the pleura, the peritoneum, the perimysium, or the deep fascia that registers pain sensation. Therefore local anesthesia is particularly important in these deep areas.
Procedures such as abscess drainage, peripherally inserted central catheter (PICC) lines, pleural drainage, percutaneous cholangiography, targeted organ lesion biopsy, and musculoskeletal procedures can all benefit from ultrasound guidance.
Unlike many adult patients, most pediatric patients are medically robust, without multiple comorbidities such as superimposed coronary, peripheral vascular, or cerebral disease. The smaller the patient, the more appropriate is the use of ultrasound for interventional procedure guidance of at least the initial access phase of an interventional procedure. Physicians whose practice includes mostly adults often regard a baby as a fragile, dangerous patient. On the contrary, children tolerate levels of pH, creatinine, P o 2 , and sedation that might cause major complications in adults. The pediatric patient is often quite unconcerned with the details of the disease and treatment, and all but the sickest patients simply want to leave the imaging department with the greatest amount of play and the least amount of anxiety and discomfort possible. Conversely, the parents are often more difficult to manage than the child. Understanding of the different needs of the parents and the child is essential from the beginning of the interaction.
Adequate equipment and experienced assistants are essential for successful and safe pediatric intervention. Although most interventional radiologists should be able to perform basic ultrasound-guided procedures on children, some cases are not appropriate for the inexperienced or occasional operator. A commitment to careful, graded learning, including the use of training phantoms, is needed, as is a good knowledge of regional anatomy or the willingness to learn and review the relevant anatomy before attempting challenging procedures.
By its nature, the timing of interventional practice is not always predictable or convenient, and it is common for the general ultrasound department to resent calls for borrowing ultrasound equipment on short notice. Despite the inconvenience, the interventionist should insist on the best technical ultrasound equipment available. The ideal situation is to have dedicated interventional ultrasound equipment housed in the interventional suite. Some major pediatric radiology departments have moved the interventional suite to the operating room environment. This integration of interventional radiology services within the operating room environment has generally resulted in increased cooperation between interventional radiologists and surgeons, especially involving intraoperative ultrasound assistance during traditional surgical procedures.
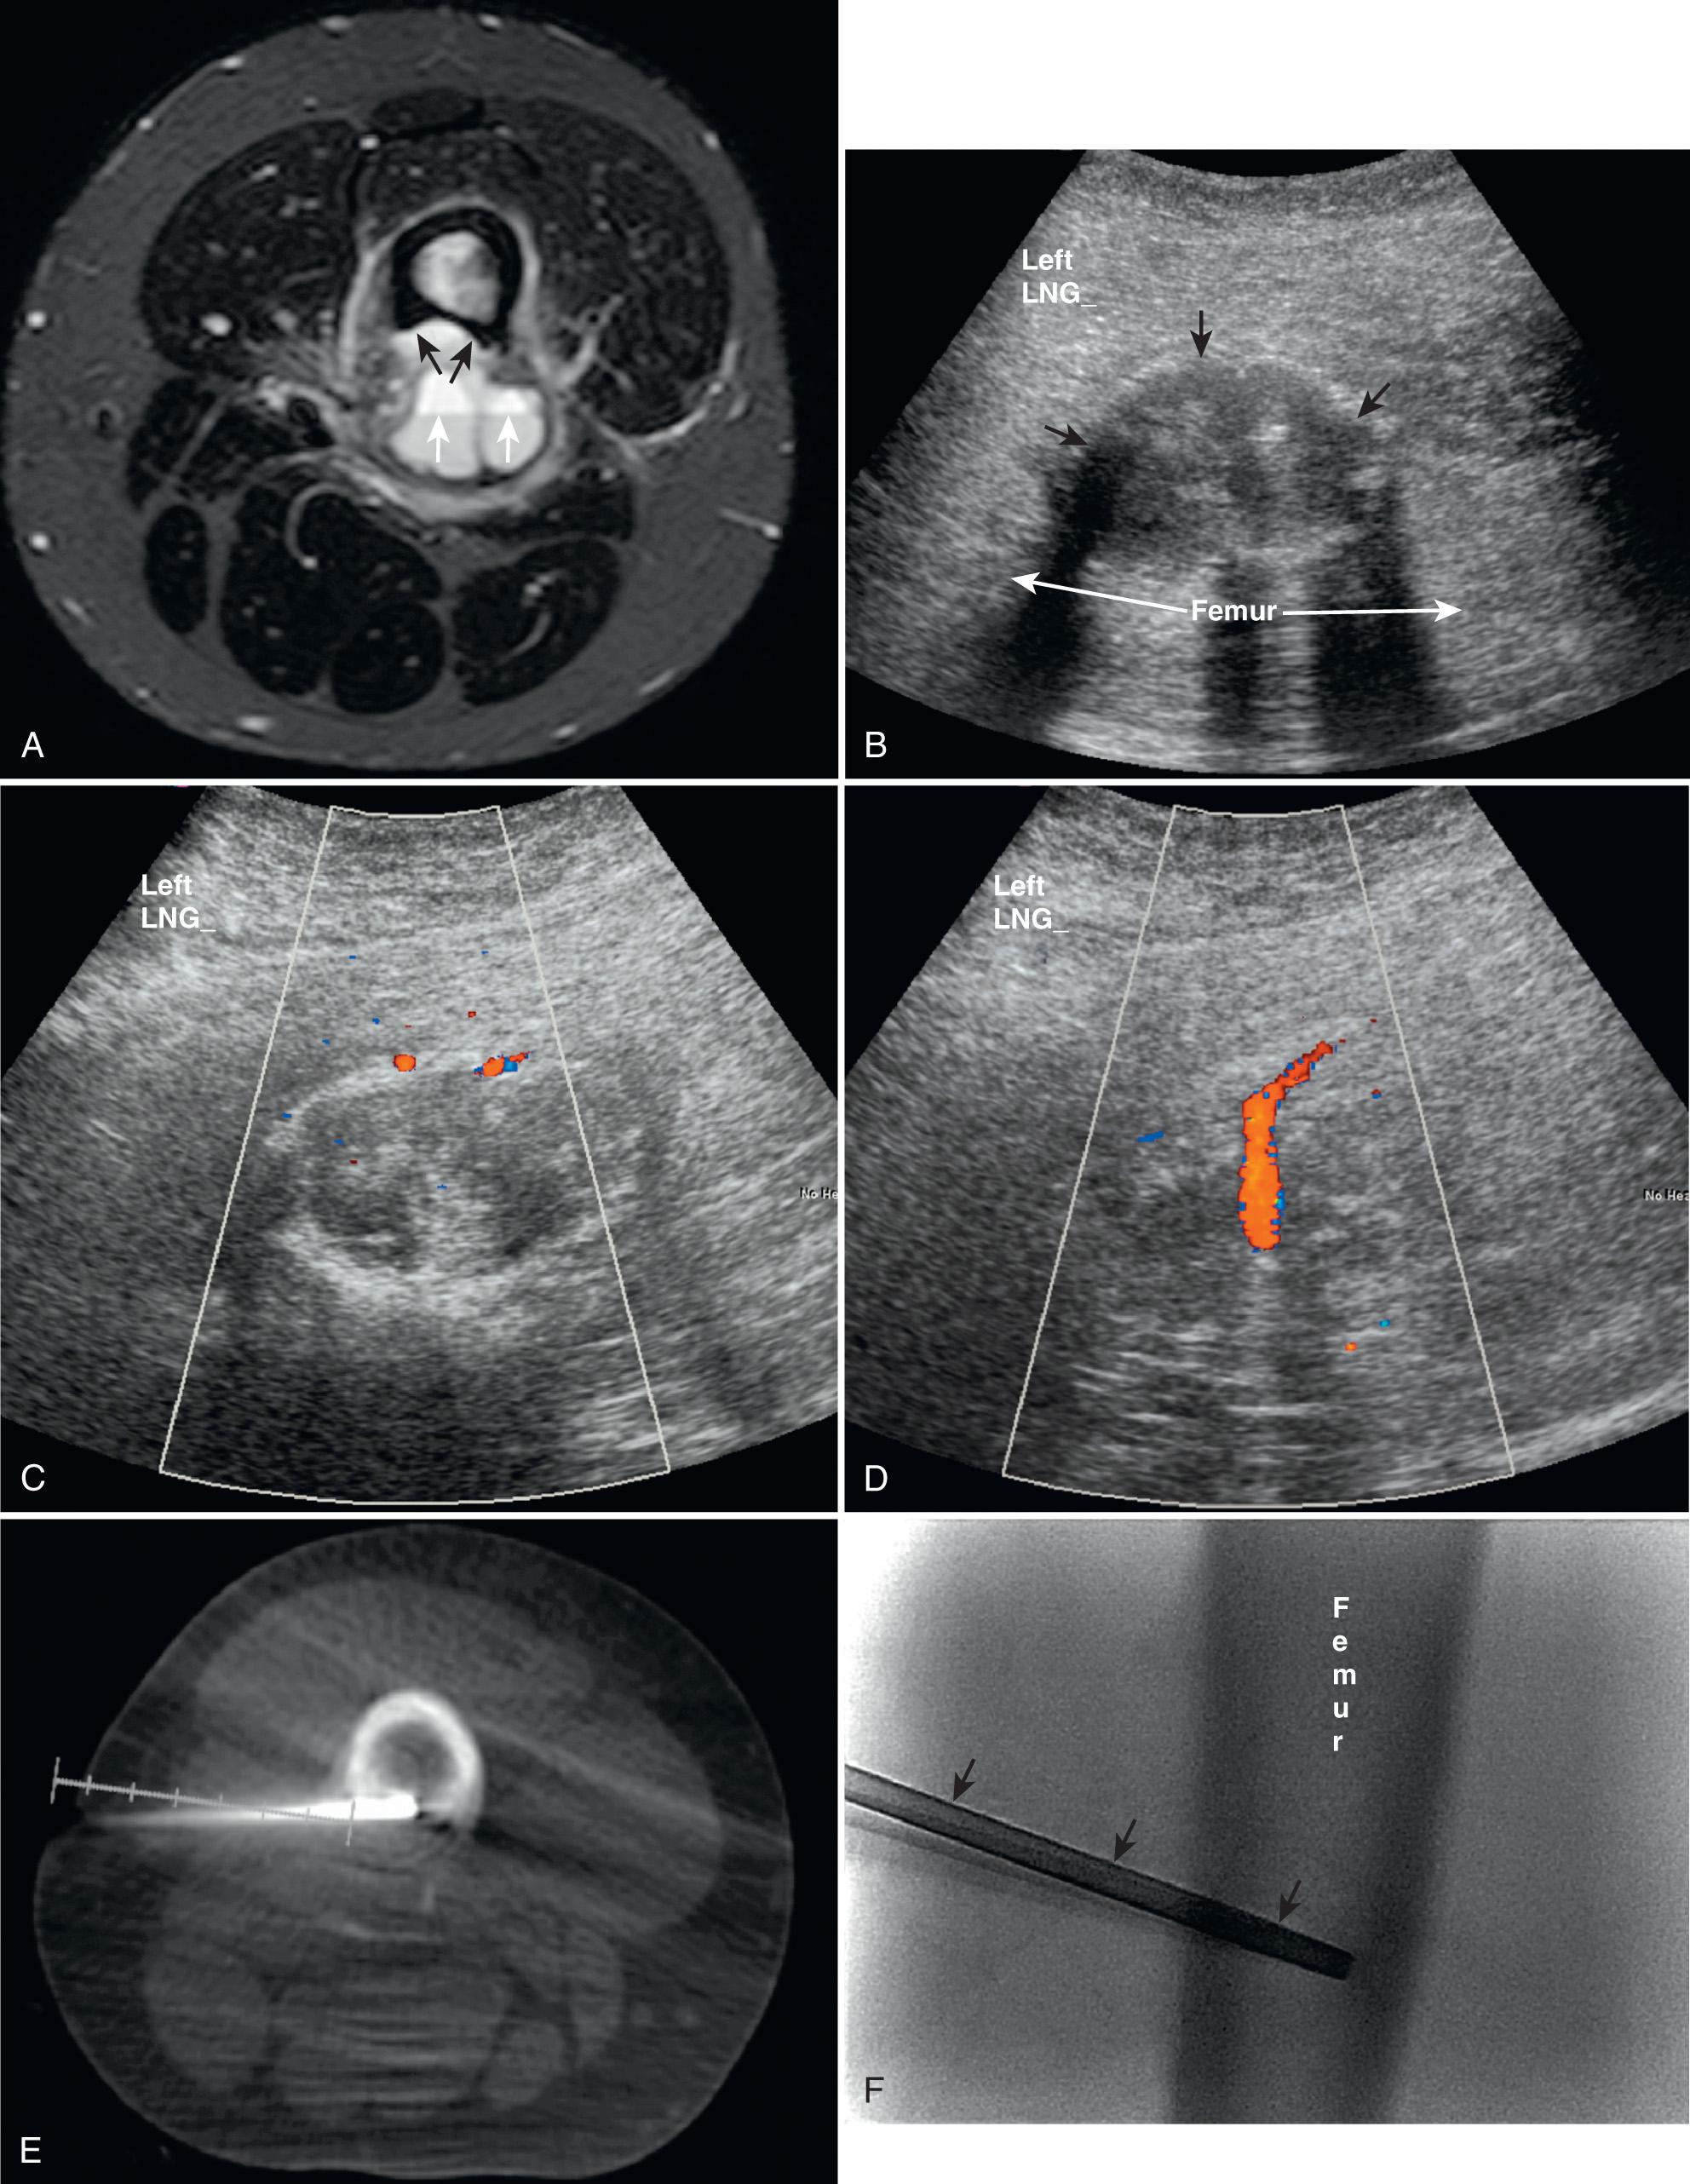
Computed tomography (CT) is necessary for some procedures, especially for procedures involving bone, but in most other cases, ultrasound-guided access with either ultrasound or fluoroscopic monitoring of wire and catheter placement is ideal ( Table 56.1 ). Ultrasound can be used in the CT suite to complement a predominantly CT-guided procedure. Radiation dose to children undergoing CT procedures has recently aroused significant controversy, so ultrasound can be used to lower the need for CT.
| CT | Ultrasound | |
|---|---|---|
| Ionizing radiation | Radiation dose to pediatric patients is an important current issue in pediatric imaging, particularly for interventional procedures, when more than one scan may be needed | None |
| Scan plane | Typically limited to initial axial images (especially difficult near the diaphragm) | Unlimited, except by bone or gas |
| Resolution | Excellent, although lack of fat in children can limit visualization | Excellent except for membranes in fluid collections |
| Convenience | More difficult to schedule | High |
| Cost | High | Intermediate |
| Monitoring | By repeat scan; no real-time ability; recovery from kinked wires difficult | Real time |
| Gas and bowel | Excellent, especially with contrast | Poor |
The recent availability of cone-beam CT software installed on advanced angiography equipment with virtual three-dimensional (3-D) guidance enables combined complex interventional procedures involving ultrasound guided access, CT-like 3D imaging, live guidance graticules superimposed over 3-D images, and conventional fluoroscopy, all in the same interventional radiology suite.
Magnetic resonance imaging (MRI) guidance in pediatrics is uncommon. An example of multimodality guidance is shown in Fig. 56.1 .
A selection of transducers is essential. Small patient size and lack of subcutaneous fat in most children allow use of high-frequency transducers. Procedures performed around ribs, such as thoracentesis, are best done with small-footprint sector transducers. Vascular access procedures are best performed with a linear high-frequency transducer. Color Doppler is useful for localization of major blood vessels. Transducers with good near-field resolution are used for superficial lesions and for initial accurate placement of local anesthetic on the peritoneum, deep fascia, or organ capsule.
It is common for inexperienced operators to require a technologist or another radiologist to perform the ultrasound scanning. This should be vigorously discouraged. Although large, simple fluid collections can be drained this way, the necessary skills for accurate needle placement in small organs or near critical structures will never be learned. A single practitioner using an ultrasound transducer in one hand and the access needle or other device in the other hand is far superior to the “where's my needle now?”–type verbal communication required when there are two operators.
Most ultrasound equipment manufacturers supply well-designed mechanical guides that attach to a transducer and allow a predictable needle path to be visualized. These guides are useful for keeping the needle in the plane of the ultrasound beam and can be used for lesions with a simple approach path or a wide access window. Most devices require a disposable sterile kit when the device is used, adding to the cost of the procedure. Special needle guides are useful for the initial puncture for transrectal abscess drainage, although many practitioners use simple freehand ultrasound guidance imaging of the rectal puncture needle using an anterior view through the filled bladder.
Freehand guidance is more difficult to learn but allows much more flexibility of approach. When the needle can be positioned 45 to 90 degrees to the beam, even fine, 30-gauge needles are easily visible. Freehand guidance allows the operator to choose the most advantageous transducer geometry and to steer the needle or biopsy device around other structures on the way to the lesion. Accurate placement of local anesthetic on the peritoneum, pleura, and other sensitive structures is made easier by freehand technique.
Color Doppler has been advocated for visualization of the moving needle during interventional procedures, but our experience has been that the potential for better visualization of the needle tip is outweighed by the degradation of the gray-scale image and flash artifacts when color Doppler is active. Various needle tracking devices are available to enhance the visualization of the needle, but with the exception of the Yueh (Cook, Bloomington, IN) and Skater (InterV, Stenlose, Denmark) type sheathed access devices, which have very small holes in the catheter tip, these devices all add complexity and expense and are generally unnecessary if accurate ultrasound technique is learned.
Freehand technique requires that the transducer be held in one hand and the needle or biopsy device in the other. The interventional physician needs to be able to use either hand as the needle or operating hand. For example, a biopsy specimen of the liver might be obtained by placing the transducer on the anterior abdominal wall using the right hand and making the needle approach from the patient's right lateral position, parallel to the table, using the left hand. A left-sided biopsy would best be performed by using the left hand for the transducer and the right hand for the needle approach from the left flank. With some practice and some simple rules, it is not difficult to use the nondominant hand as the needle hand.
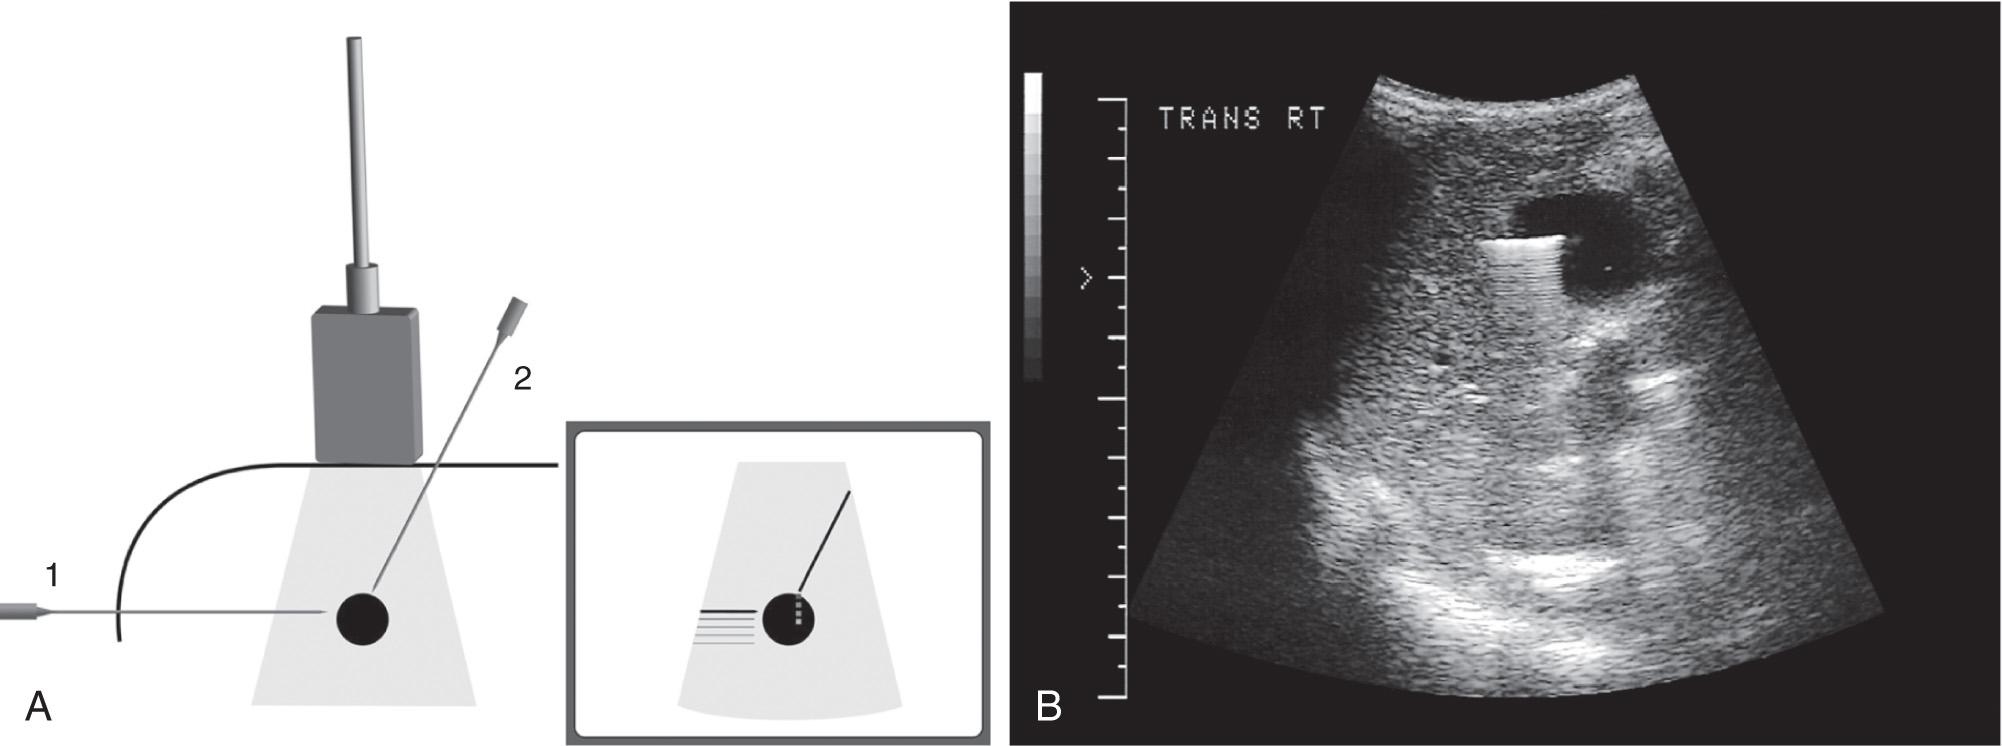
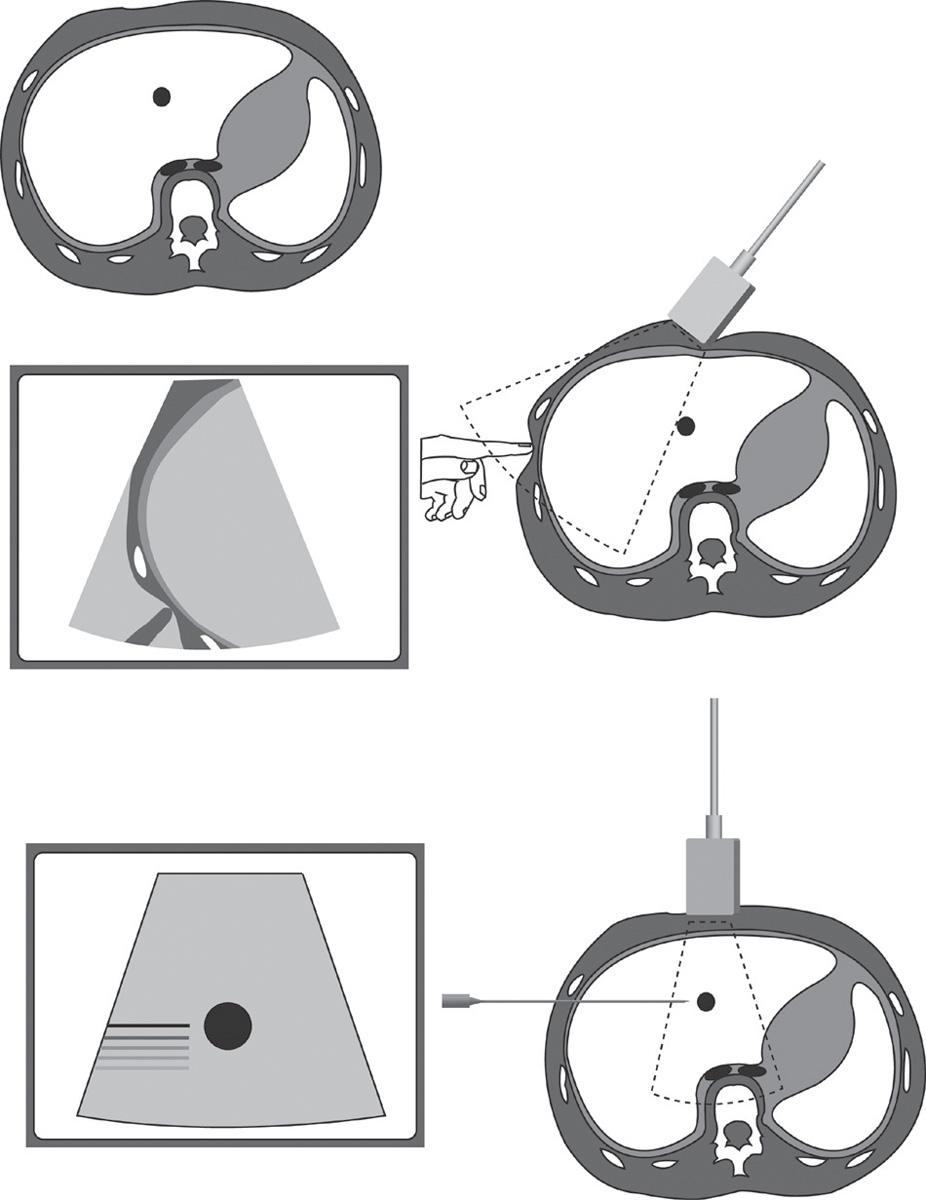
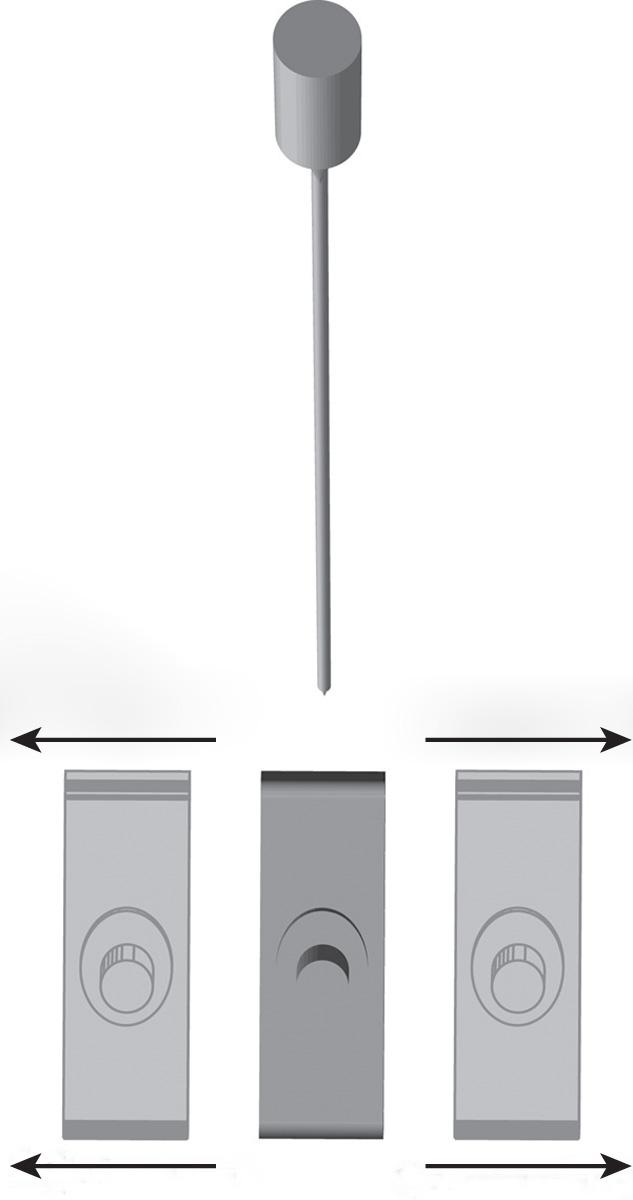
The most important technique to learn in freehand sonography is needle localization. These rules work equally well for a needle entry site near the transducer or one at a distance ( Fig. 56.2 ). The entry point is chosen after careful consideration of the anatomy and important structures such as ribs, large vessels, diaphragm, and bowel. Indentation of the entry site using a finger to compress the skin ( Fig. 56.3 ) allows the exact entry site to be assessed. Once the entry site is chosen, a last check can be made by placing the transducer exactly over the marked entry point for a “needle's-eye view” to ensure that there will be no surprises such as the internal mammary artery during mediastinal biopsy or inferior epigastric artery during paracentesis or abdominal abscess drainage, which may be overlooked unless specifically localized. Once the entry path has been chosen and after proper application of local anesthetic, the needle or biopsy device is placed through the skin toward the target. The needle and transducer need to be precisely in the same plane. This can be checked by looking directly down onto the top of the transducer and needle just before the initial placement is made ( Fig. 56.4 ). The depth of the target should be measured and remembered before needle placement.
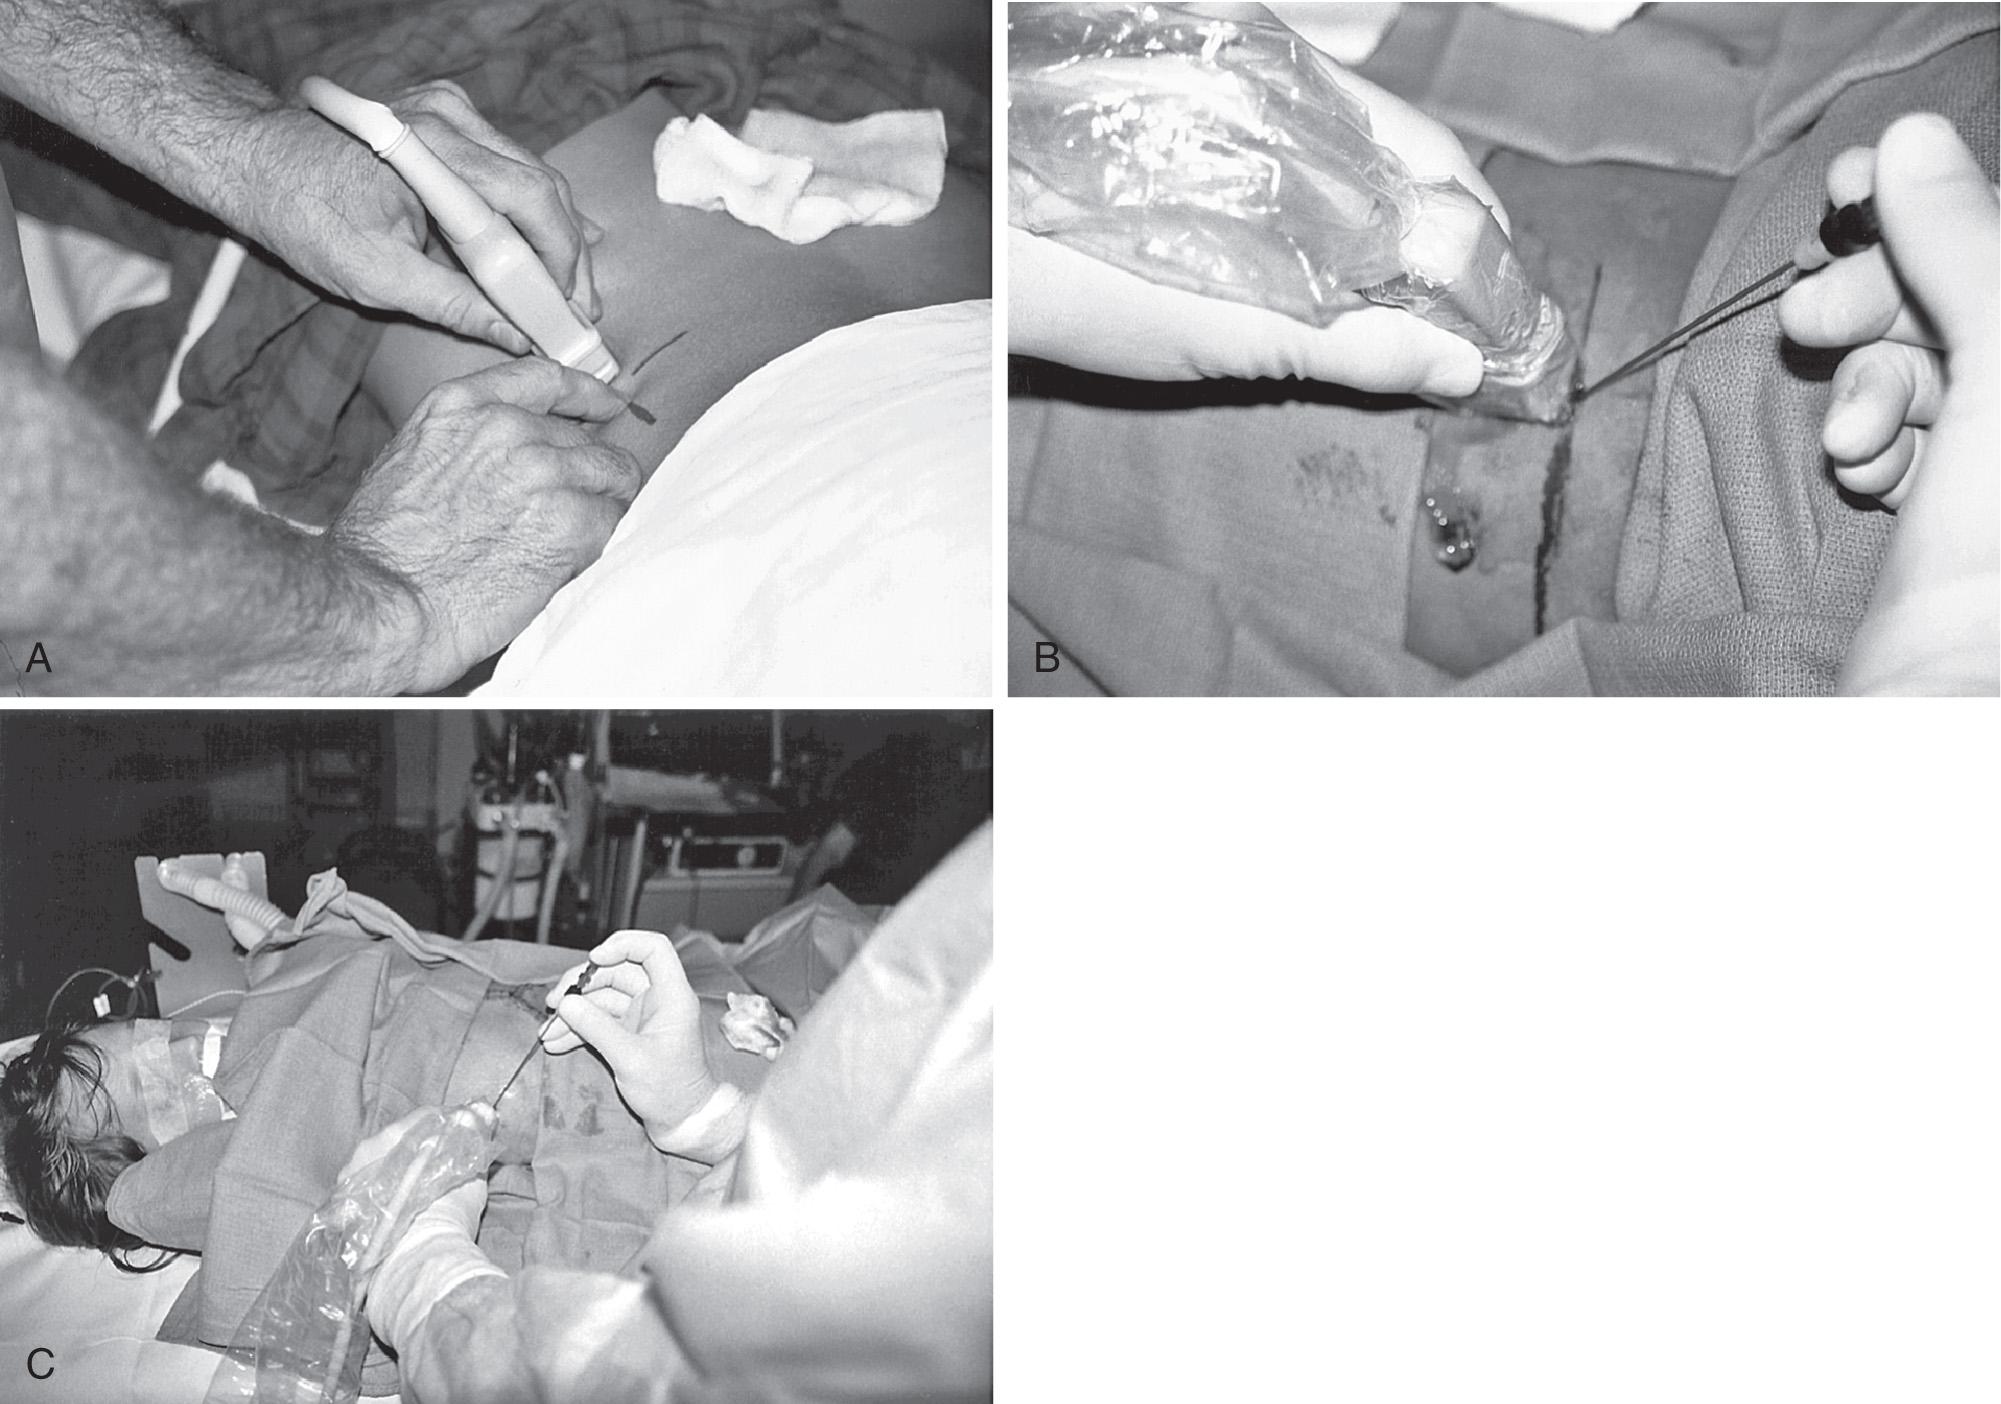
The needle should be initially advanced about one-half of the distance to the target under direct ultrasound monitoring. If necessary, the preplanned distance of insertion can be marked on the needle with a Steri-Strip. Inexperienced operators often have an uncontrollable urge to keep pushing the needle, hoping that it will magically make the needle visible. Radiologists who usually work with adults may not appreciate the short insertion distances required in small children and babies.
With experience, it is possible to keep the needle visible starting from the moment of insertion, but if not, the needle must be localized before any further advancement is made. Check that the transducer and needle are parallel to each other by looking down the cable of the transducer with one eye closed. If the two are not parallel, adjust the position of the transducer, not the needle. Once the transducer and needle are parallel, keep the transducer in that plane and move the transducer a few millimeters back and forth strictly in the plane of the needle ( Fig. 56.5 ). It is often useful to anchor the transducer hand on the patient by placing the fourth and fifth digits or the hypothenar border of the transducer-holding hand firmly on the patient's skin, using the thumb and the second and third digits to hold and move the transducer. It is important not to jab the needle in and out aggressively or to try to move the needle and transducer in complex directions or angles all at once in a hopeful, and usually ineffective, attempt to localize the needle tip.
If the whole length of the needle is not visible, it may be at an angle oblique to the plane of the transducer, resulting in an erroneous impression of the position of the needle's tip ( Fig. 56.6 ). Usually, only a few degrees of transducer rotation are required to obtain an image of the whole of the needle shaft.
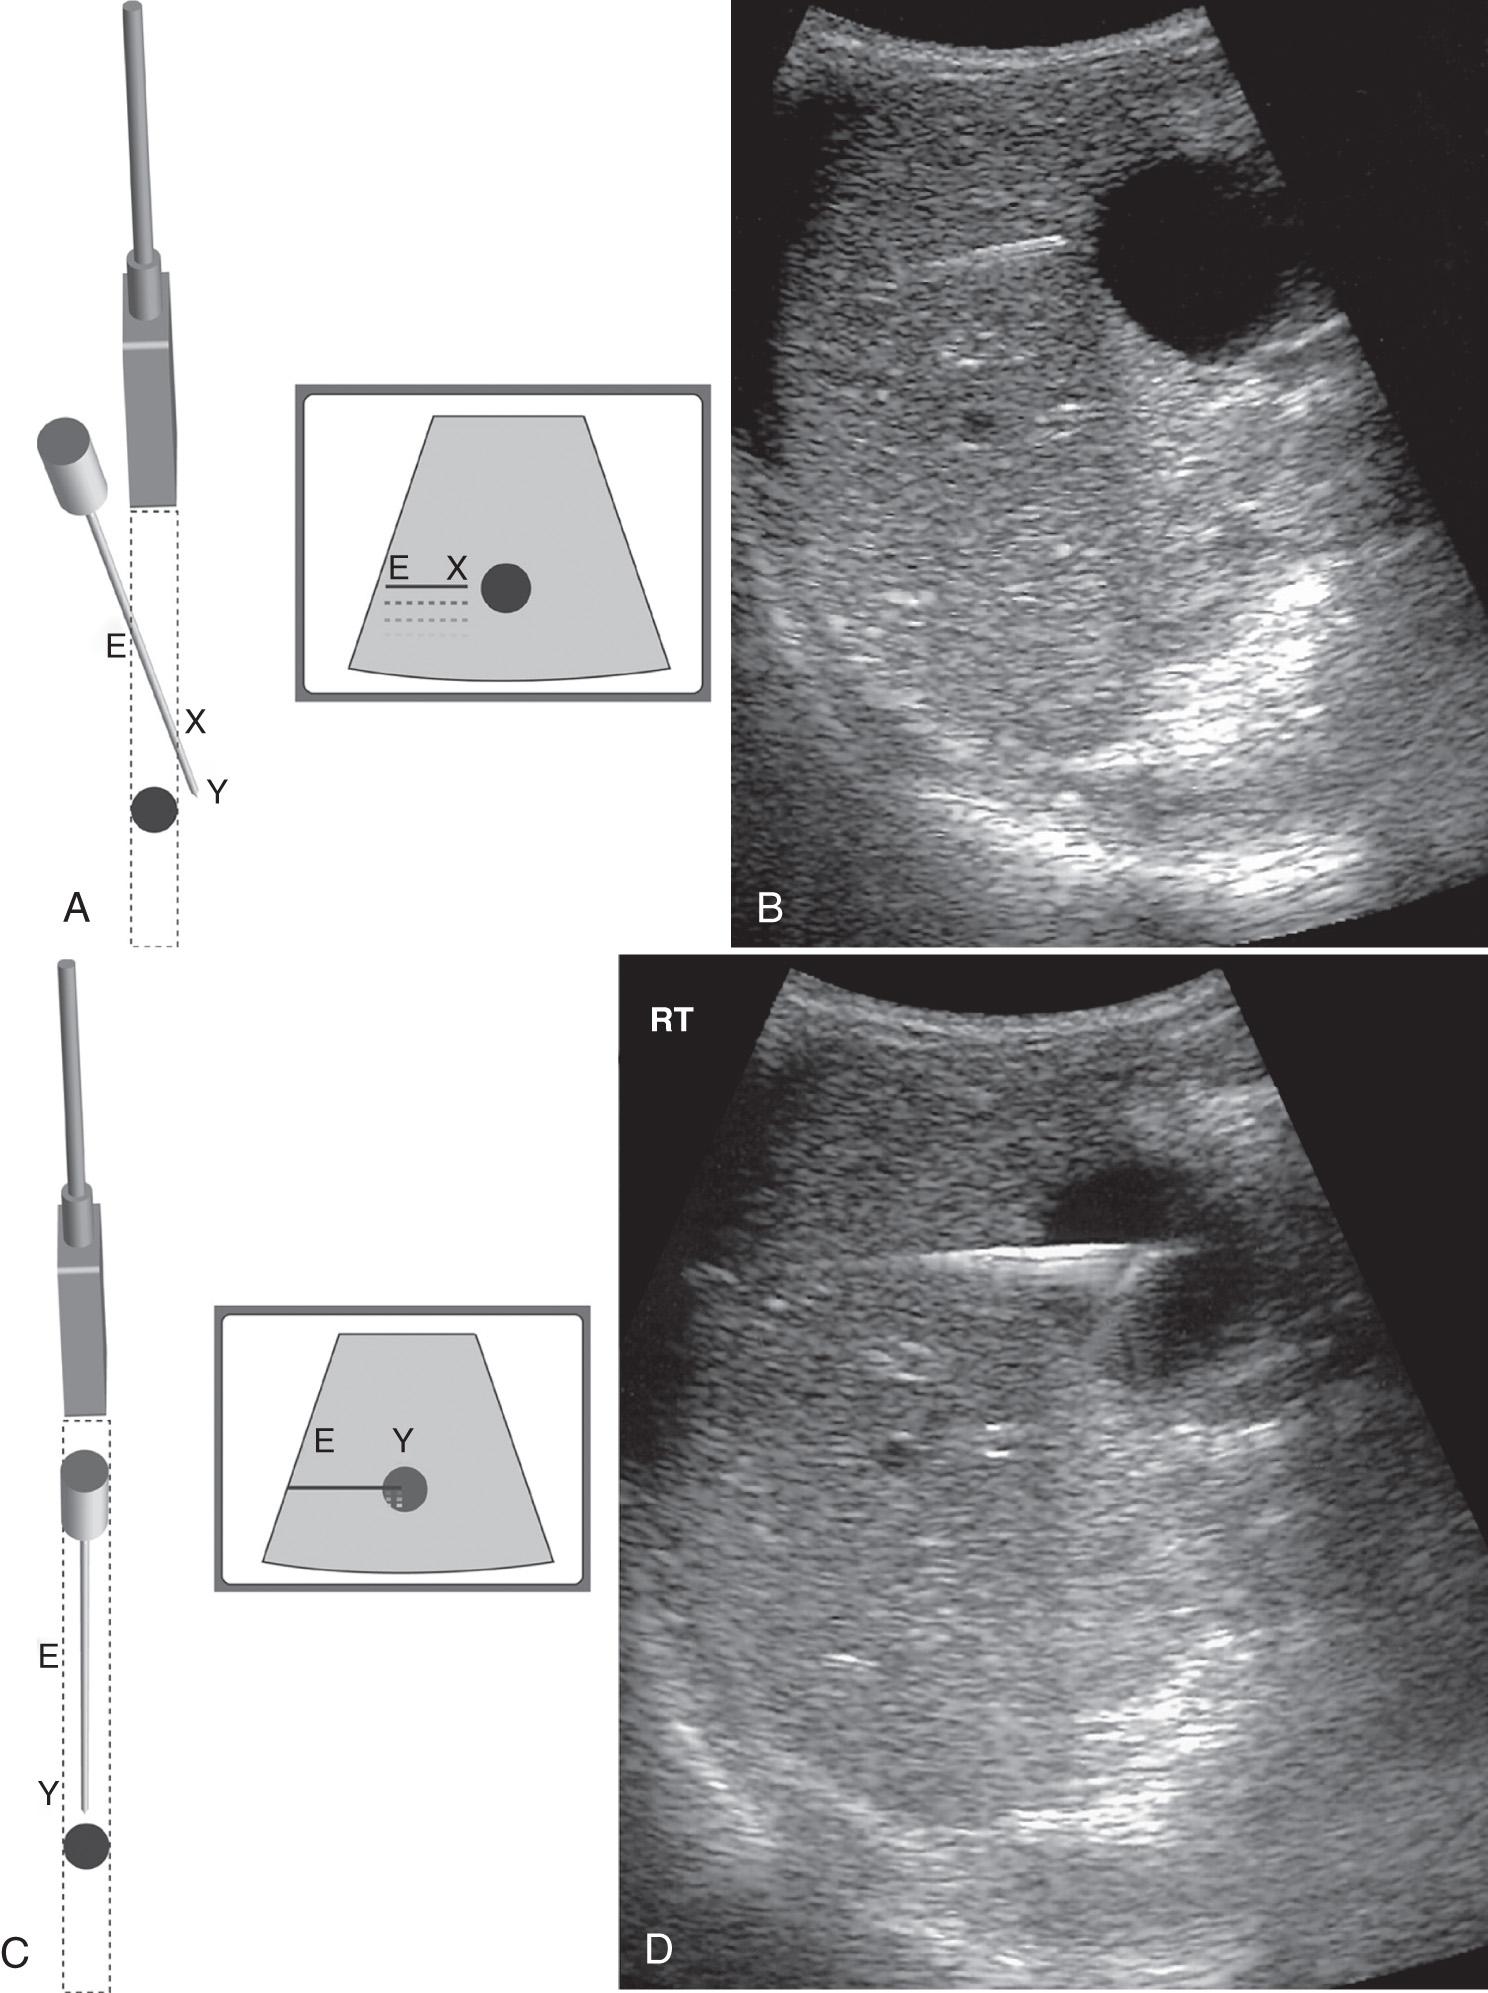
The localization of the needle after initial placement must be a thoughtful and purposeful process that involves moving the transducer back and forth (“translation”), then adjusting and rotating its position in small increments until the whole length of the needle is visible.
If the needle is visible and the target is visible and the needle is pointing at the target, the needle is simply advanced toward the target. The needle may need a short sharp jab to enter the target, particularly if the target is a normal structure such as the gallbladder, a renal calyx, or a bile duct. The organs and tissue planes of children are soft and compliant (ballotable) and can sometimes “float” away from the needle tip as it is advanced, but the short jab required to puncture such organs or structures must always be made under control and with a purpose. Conditions such as some collagen disorders and prune belly syndrome cause even greater difficulties in initial organ or structure puncture.
The most common problem is that either the needle is not pointing at the target or the target is no longer visible in the scan plane.
If the needle and target are visible in the one image, but the needle angle is incorrect, do not attempt to radically change the angle of the needle while it is deep in an organ. Doing so, especially with a rigid biopsy needle, may result in significant bleeding and other complications. Instead, the needle is partly withdrawn until it is subcutaneous, the angle is adjusted, and the device is reinserted under direct ultrasound monitoring as before ( Fig. 56.7 ).
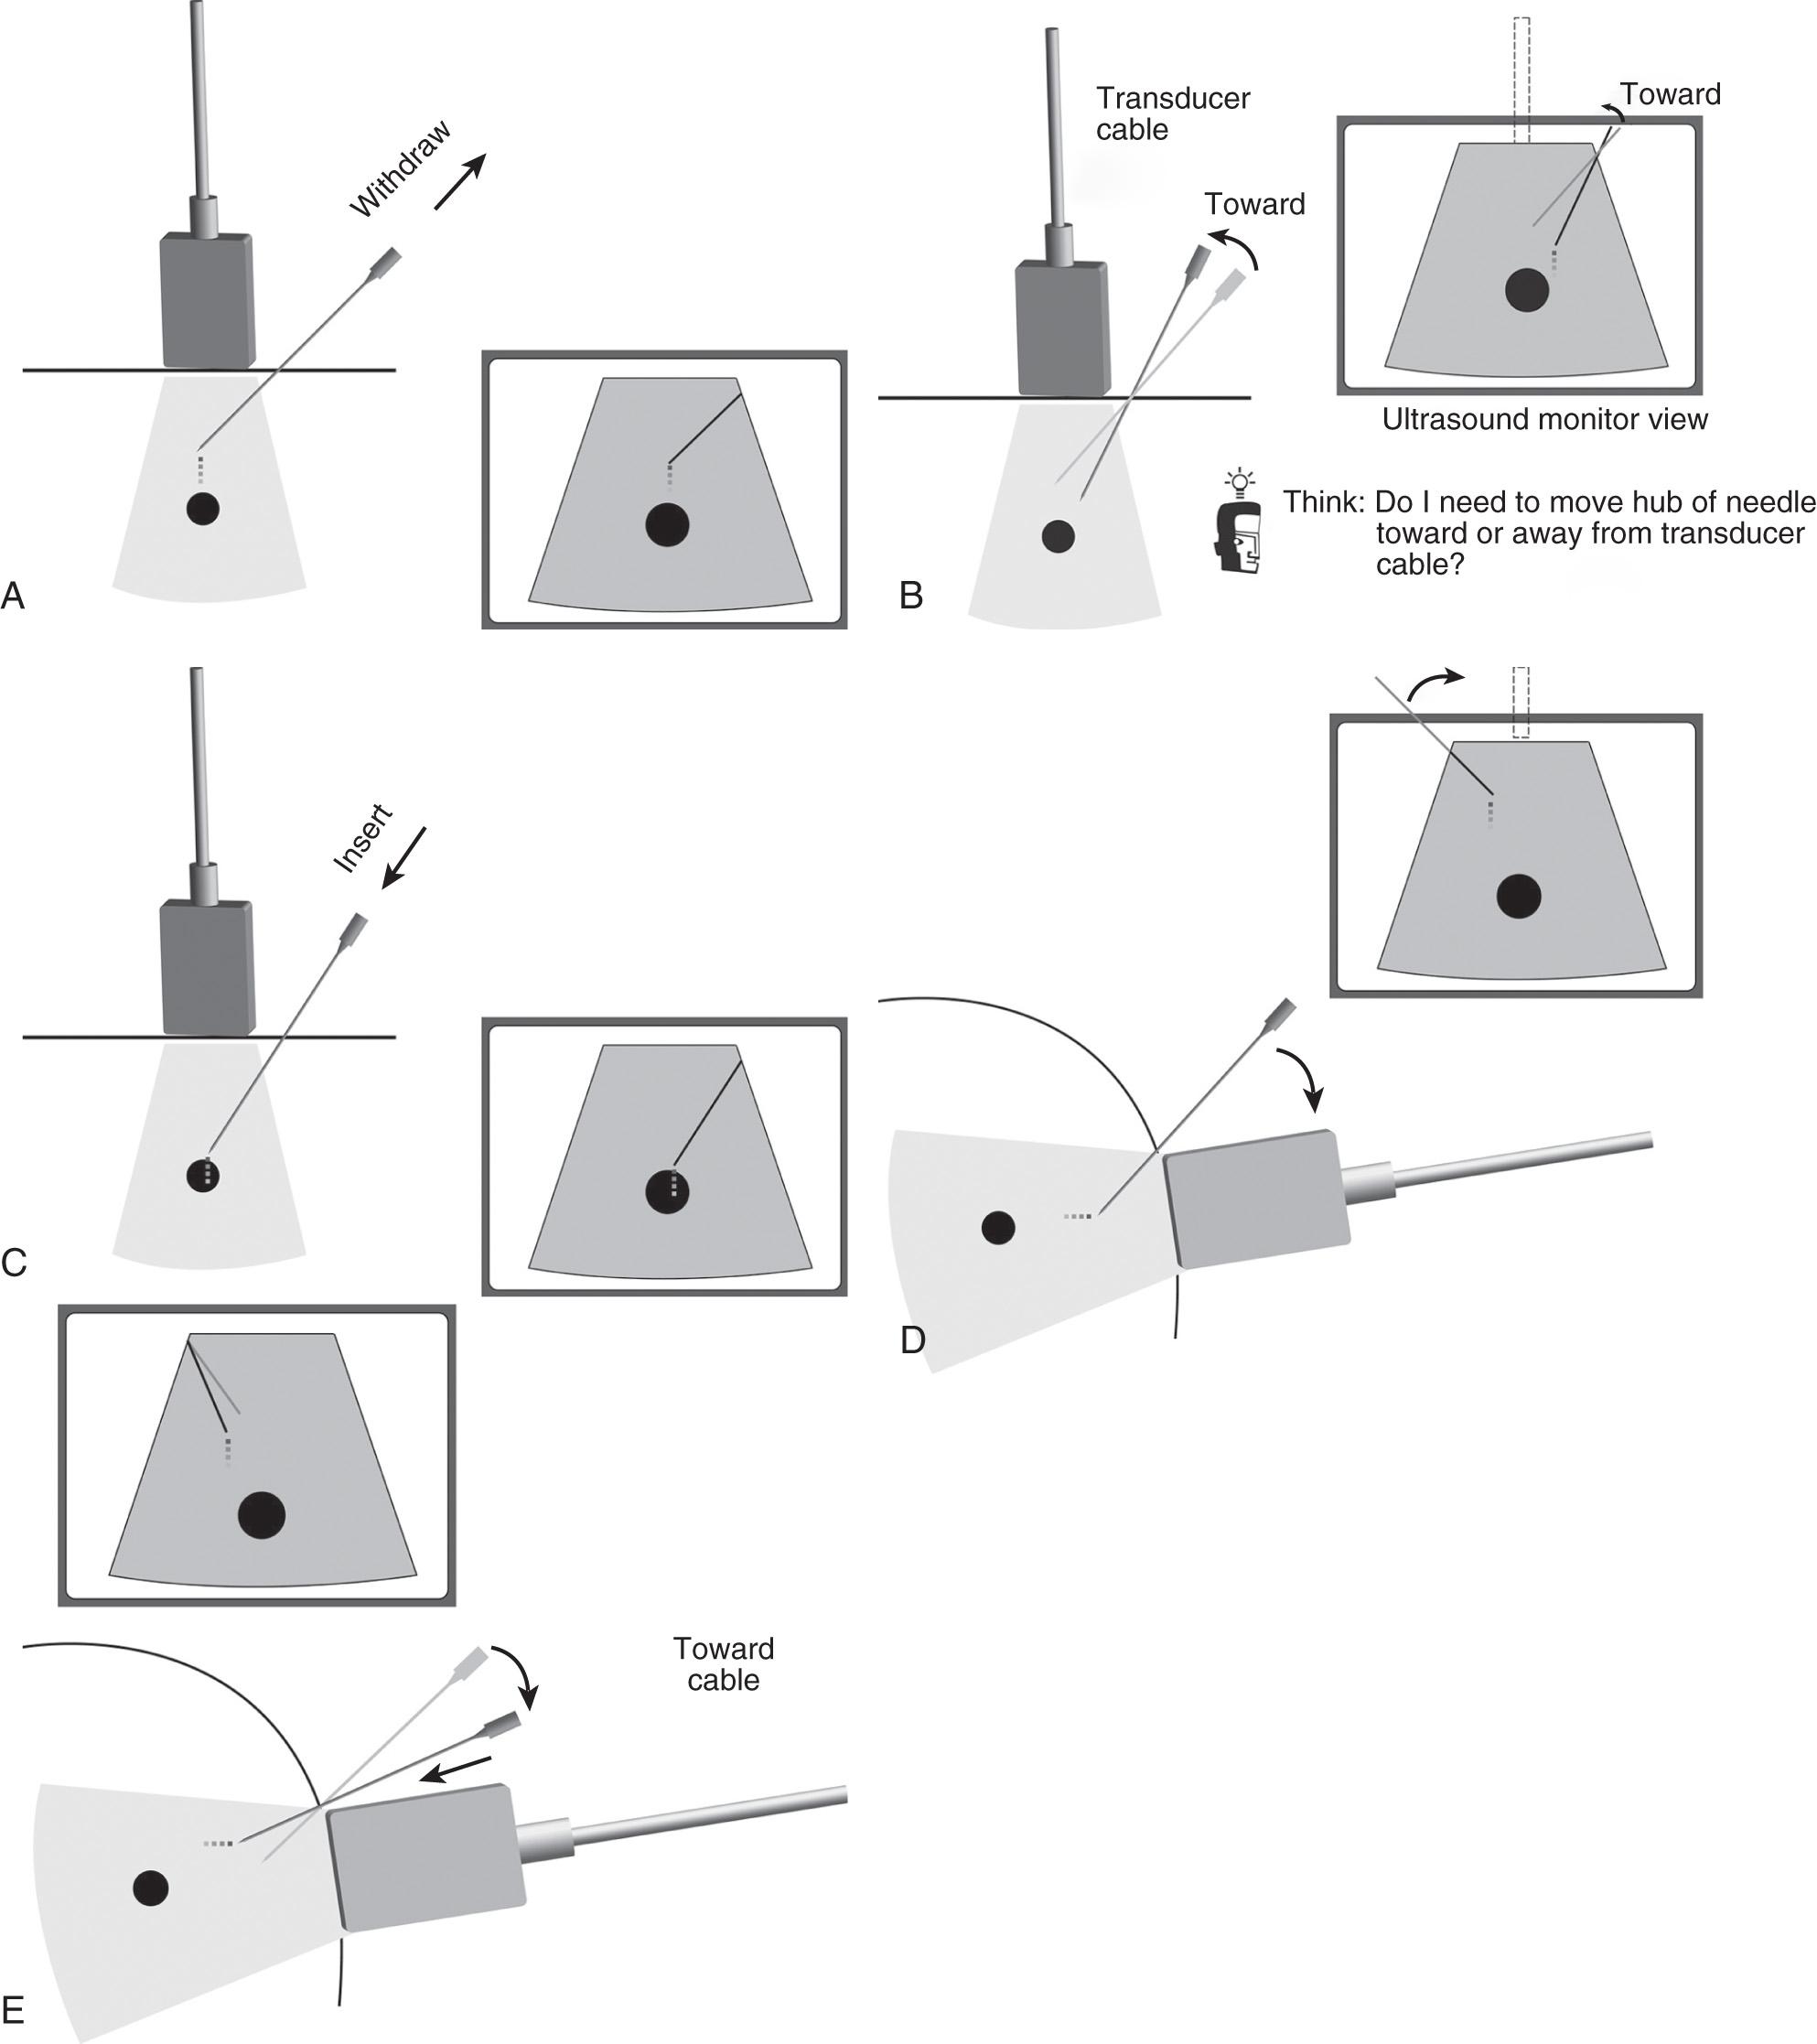
If the transducer is not vertical, it is sometimes difficult to decide which way to adjust the needle's angle. The following simple rule will always work. Consider the position of the transducer cable and move the needle in relation to it ( Fig. 56.7D-E ). It is important, however, to know which side of the transducer belongs to which side of the ultrasound monitor screen. One should always test the orientation of the image before beginning a procedure by running a finger over the transducer face and noting where the finger appears on the screen. Otherwise the image of the needle is expected on one side of the screen but is actually on the other side of the screen where it is not noticed and is well on its way toward the aorta or some other significant structure.
If the needle is visible but the target is not, move the transducer parallel to the plane of the needle, first one way and then the other, until the target is reestablished. Remember which way the transducer needed to be moved to reimage the target, then withdraw the needle to the skin, move the skin entry site in the same direction by moving the needle tip in the subcutaneous tissues, and advance the needle once again into the patient.
Become a Clinical Tree membership for Full access and enjoy Unlimited articles
If you are a member. Log in here