Physical Address
304 North Cardinal St.
Dorchester Center, MA 02124
Knowledge of the characteristics of the fetal head and maternal pelvis is necessary to understand the dynamic relationship between these two anatomic structures during labor. The fetal head, through a process of molding and flexion followed by internal rotation, passes through the maternal pelvis during the first and second stages of labor. At delivery (expulsion), there is external rotation of the fetal head.
After the delivery of the fetal head at the end of the second stage of labor, attention must be directed to the management of the third and fourth stages of labor. The third stage of labor is a period when women are at risk for postpartum hemorrhage. Hemorrhage is the leading cause of maternal death worldwide and is among the top three causes of maternal death in the United States. Uterine atony is the leading cause of postpartum hemorrhage, and its prevention and/or early management are essential.
Women rate pain during labor as one of the most uncomfortable experiences in life. Oxytocin is commonly used to increase the frequency and strength of uterine contractions, which also increases labor pain. Catecholamine release and maternal hyperventilation occur during labor. The resulting vasoconstriction of the uterine arteries decreases uterine blood flow and oxygen dissociation from hemoglobin, causing respiratory alkalosis. Whereas alternative methods offer some degree of pain relief, the gold standard during labor and childbirth is epidural (or combined spinal-epidural) analgesia, which not only provides near-complete relief but also improves uterine blood flow, fetal oxygenation, and the release of stress hormones. Fluid administration before neuraxial analgesia helps prevent hypotension, which, if it does occur, may be treated with small doses of vasopressors.
Approximately one in three women have a cesarean delivery in the United States. Although the use of general anesthesia for cesarean delivery is very safe, it has increased maternal and neonatal side effects as well as maternal mortality. Most intravenous and inhaled anesthetics cross the placenta. Regional anesthesia (spinal or epidural) is preferable. Some neonatal assistance is required in 10% of births, and vigorous resuscitation is required in 1%. Newborns are ventilated with lower concentrations of oxygen and titrated up as needed to achieve their normal physiologic oxygen saturation of 85-95% in the first minutes of life.
Normal labor is a process that permits a series of extensive physiologic changes in the mother to allow for the delivery of her fetus through the birth canal. Labor is defined as progressive cervical effacement and dilation resulting from regular uterine contractions that occur at least every 3 minutes and last 30 to 60 seconds each.
The role of the obstetrician and health care team is to anticipate and manage abnormalities that may occur during either the maternal or fetal birth process. When a decision is made to intervene, it must be considered carefully because each intervention carries not only potential benefits but also potential risks. In the vast majority of cases, the best management may be close observation and, when necessary, cautious intervention.
Successful vaginal delivery requires the accommodation, by molding and rotation, of the descending fetal head to the maternal pelvis.
The head is the largest and least compressible part of the fetus. Thus, from an obstetric viewpoint, it is the most important part, whether the presentation is cephalic or breech.
The fetal skull consists of a base and a vault (the cranium). The base of the skull has large, ossified, firmly united, and noncompressible bones. This serves to protect the vital structures contained within the brain stem and its spinal connections.
The cranium consists of the occipital bone posteriorly, two parietal bones bilaterally, and two frontal and temporal bones anteriorly. The cranial bones at birth are thin, weakly ossified, easily compressible, and interconnected only by membranes. These features allow them to overlap under pressure and to change shape to conform to the maternal pelvis, a process known as molding .
The membrane-occupied spaces between the cranial bones are known as sutures . The sagittal suture lies between the parietal bones and extends in an anteroposterior direction between the fontanelles, dividing the head into right and left sides ( Figure 8-1 ). The lambdoidal suture extends from the posterior fontanelle laterally and serves to separate the occipital from the parietal bones. The coronal suture extends from the anterior fontanelle laterally and serves to separate the parietal and frontal bones. The frontal suture lies between the frontal bones and extends from the anterior fontanelle to the glabella (the prominence between the eyebrows).
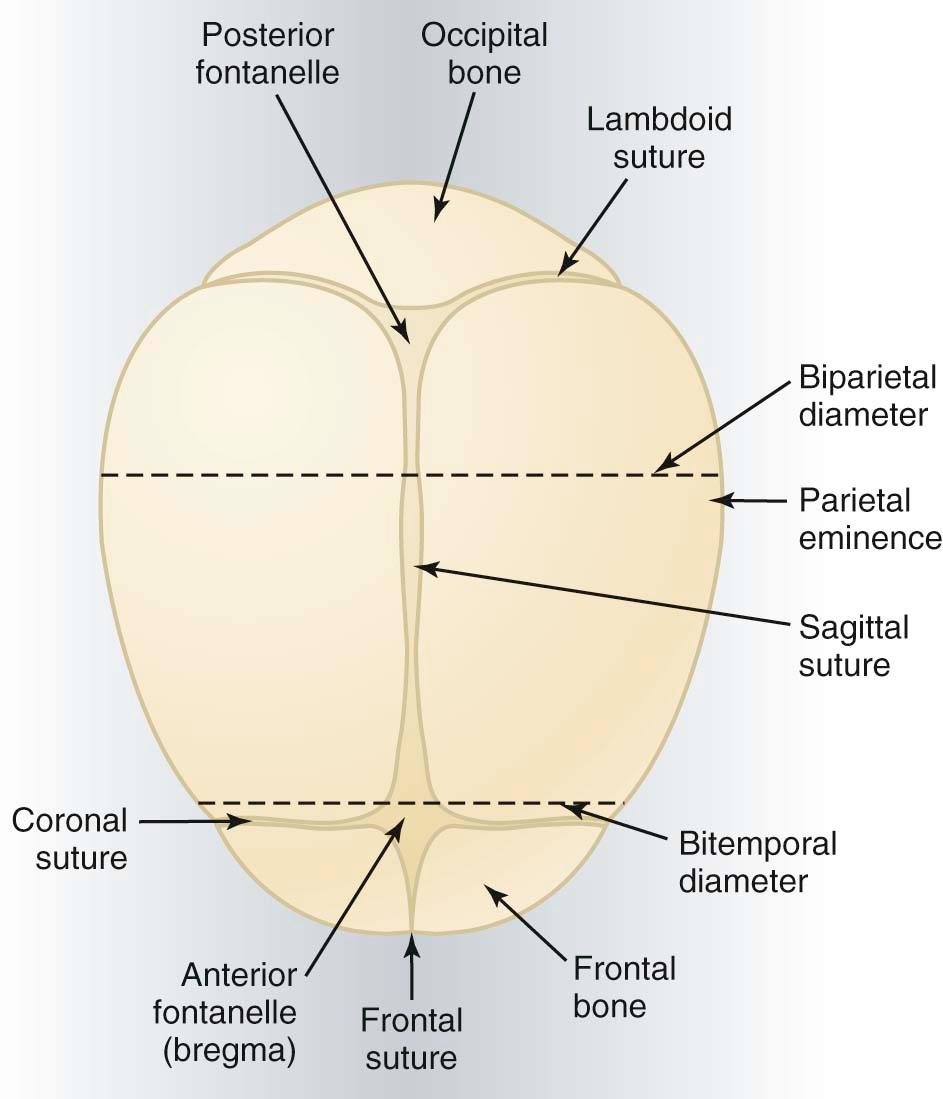
The membrane-filled spaces located at the point where the sutures intersect are known as fontanelles, the most important of which are the anterior and posterior fontanelles. Clinically, they are even more useful than the sutures for determining the fetal head position.
The posterior fontanelle closes at 6 to 8 weeks of life, whereas the anterior fontanelle does not become ossified until approximately 18 months. This allows the skull to accommodate the tremendous growth of the infant's brain after birth.
The anterior fontanelle (bregma) is found at the intersection of the sagittal, frontal, and coronal sutures. It is diamond-shaped, measures approximately 2 × 3 cm, and is much larger than the posterior fontanelle. The posterior fontanelle is Y- or T-shaped and is found at the junction of the sagittal and lambdoid sutures.
The fetal skull is characterized by a number of landmarks. From front to back, they include the following ( Figure 8-2 ):
Nasion: the root of the nose
Glabella: the elevated area between the orbital ridges
Sinciput (brow): the area between the anterior fontanelle and the glabella
Anterior fontanelle (bregma): diamond-shaped
Vertex: the area between the fontanelles and bounded laterally by the parietal eminences
Posterior fontanelle (lambda): Y- or T-shaped
Occiput: the area behind and inferior to the posterior fontanelle and lambdoid sutures
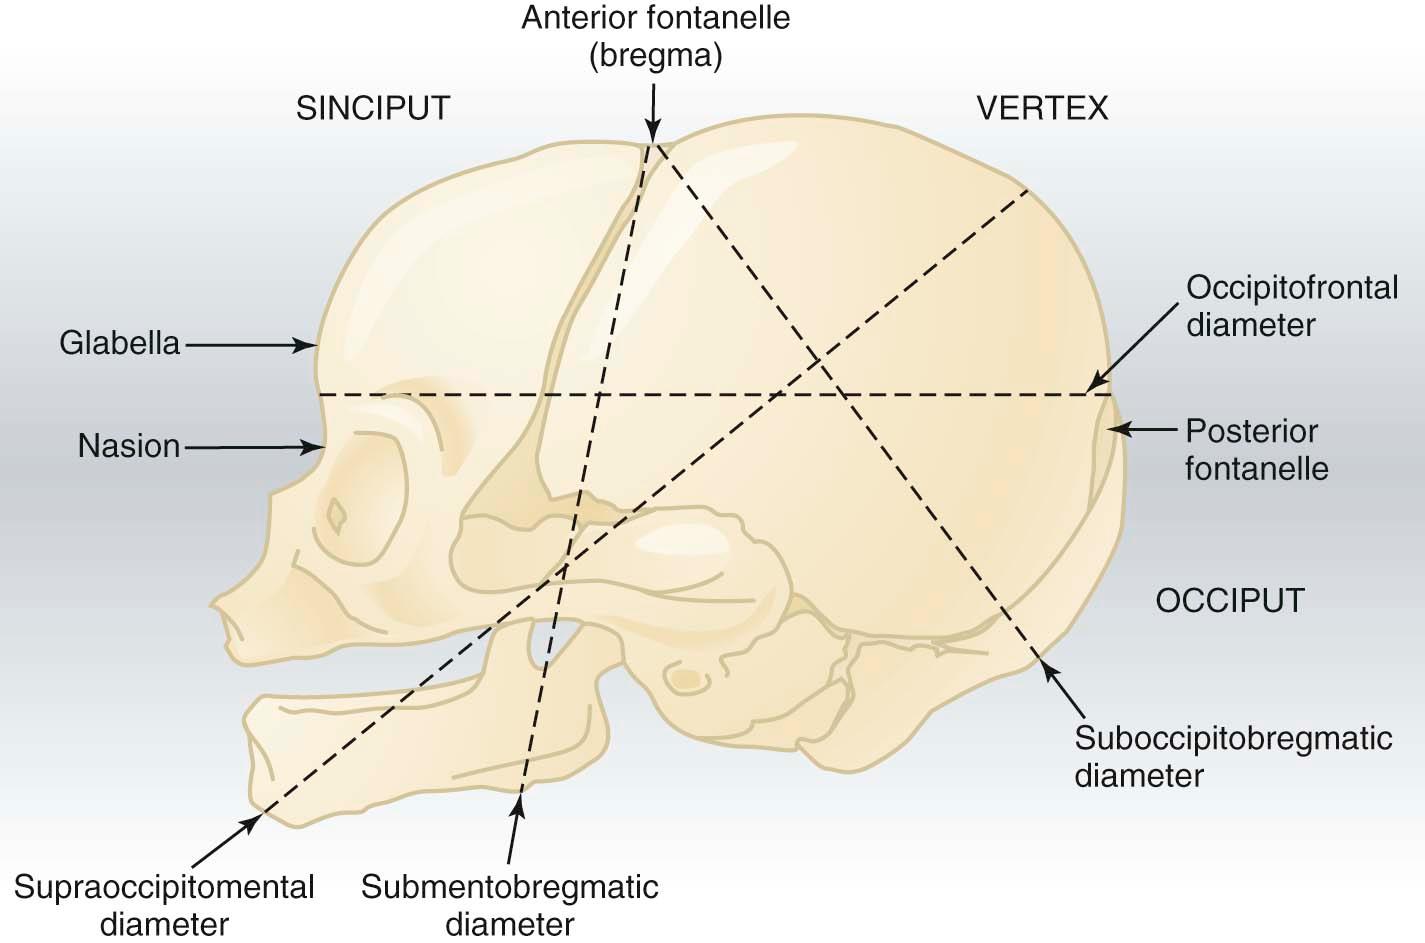
Several diameters of the fetal skull are important (see Figures 8-1 and 8-2 ). The anteroposterior diameter presenting to the maternal pelvis depends on the degree of flexion or extension of the head. It is important because the various diameters differ in length. The following measurements are considered average for a term fetus:
Suboccipitobregmatic (9.5 cm): the presenting anteroposterior diameter when the head is well flexed, as in an occipitotransverse or occipitoanterior position; it extends from the undersurface of the occipital bone at the junction with the neck to the center of the anterior fontanelle.
Occipitofrontal (11 cm): the presenting anteroposterior diameter when the head is deflexed, as in an occipitoposterior presentation; it extends from the external occipital protuberance to the glabella.
Supraoccipitomental (13.5 cm): the presenting anteroposterior diameter in a brow presentation and the longest anteroposterior diameter of the head; it extends from the vertex to the chin.
Submentobregmatic (9.5 cm): the presenting anteroposterior diameter in face presentations; it extends from the junction of the neck and lower jaw to the center of the anterior fontanelle.
The transverse diameters of the fetal skull are as follows:
Biparietal (9.5 cm): the largest transverse diameter; it extends between the parietal bones.
Bitemporal (8 cm): the shortest transverse diameter; it extends between the temporal bones.
The average circumference of the term fetal head, measured in the occipitofrontal plane, is 34.5 cm.
The bony pelvis is made up of four bones: the sacrum, coccyx, and two innominates (composed of the ilium, ischium, and pubis). These are held together by the sacroiliac joints, the symphysis pubis, and the sacrococcygeal joint. The union of the pelvis and the vertebral column stabilizes the pelvis and allows weight to be transmitted to the lower extremities.
The sacrum consists of five fused vertebrae. The anterior superior edge of the first sacral vertebra is called the promontory, which protrudes slightly into the cavity of the pelvis. The anterior surface of the sacrum is usually concave. It articulates with the ilium at its upper segment, with the coccyx at its lower segment, and with the sacrospinous and sacrotuberous ligaments laterally.
The coccyx is composed of three to five rudimentary vertebrae. It articulates with the sacrum, forming a joint, and occasionally the bones are fused.
The pelvis is divided into the false pelvis above and the true pelvis below the linea terminalis (the edge of the pelvic inlet). The false pelvis is bordered by the lumbar vertebrae posteriorly, an iliac fossa bilaterally, and the abdominal wall anteriorly. Its only obstetric function is to support the pregnant uterus.
The true pelvis is a bony canal and is formed by the sacrum and coccyx posteriorly and by the ischium and pubis laterally and anteriorly. Its internal borders are solid and relatively immobile. The posterior wall is twice the length of the anterior wall. The true pelvis is the area of concern to the obstetrician because its dimensions are sometimes not adequate to permit passage of the fetus.
The pelvis is divided into the following four planes for descriptive purposes ( Table 8-1 and Figures 8-3 and 8-4 ):
The pelvic inlet
The plane of greatest diameter
The plane of least diameter
The pelvic outlet
| Pelvic Plane | Diameter | Average Length (cm) |
|---|---|---|
| Inlet | True conjugate | 11.5 |
| Obstetric conjugate | 11 | |
| Transverse | 13.5 | |
| Oblique | 12.5 | |
| Posterior sagittal | 4.5 | |
| Greatest diameter | Anteroposterior | 12.75 |
| Transverse | 12.5 | |
| Midplane | Anteroposterior | 12 |
| Bispinous | 10.5 | |
| Posterior sagittal | 4.5-5 | |
| Outlet | Anatomic anteroposterior | 9.5 |
| Obstetric anteroposterior | 11.5 | |
| Bituberous | 11 | |
| Posterior sagittal | 7.5 |
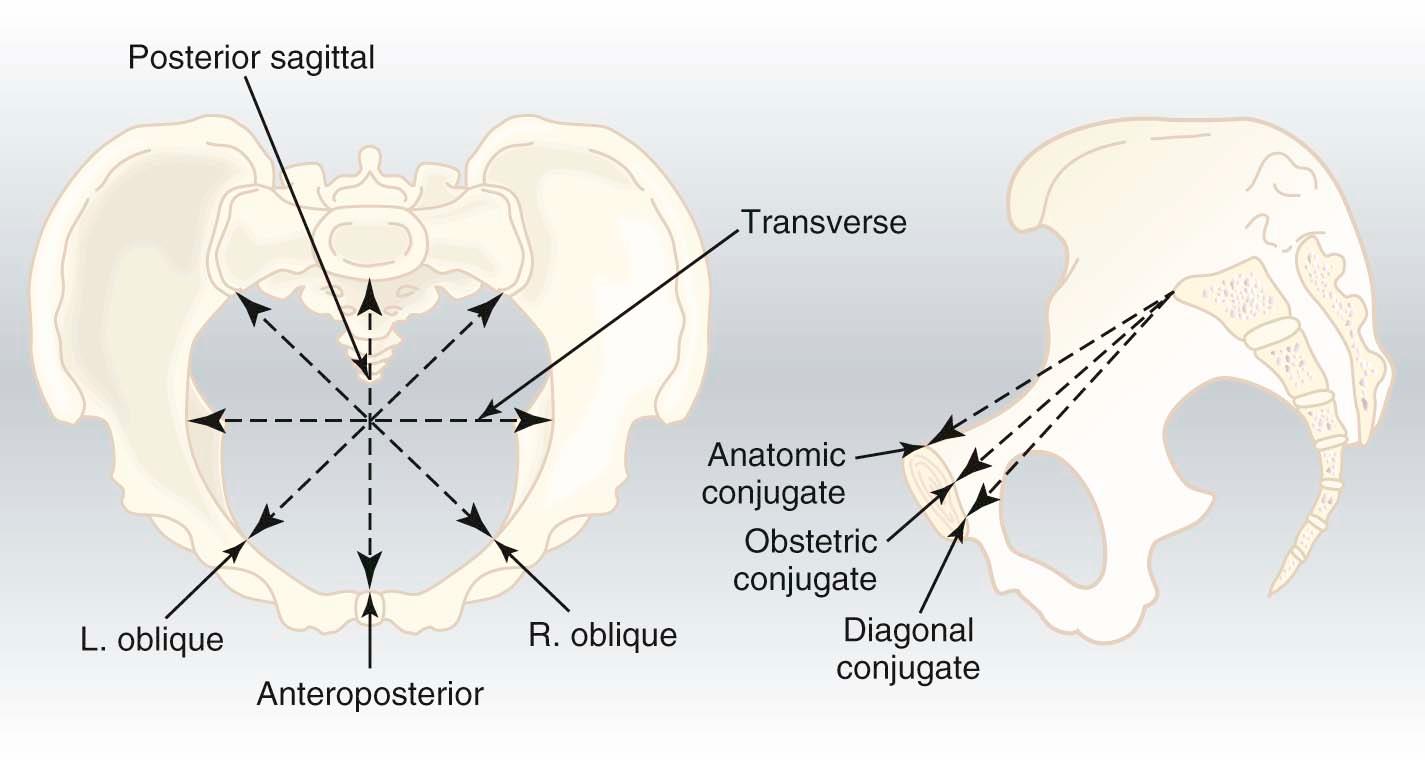
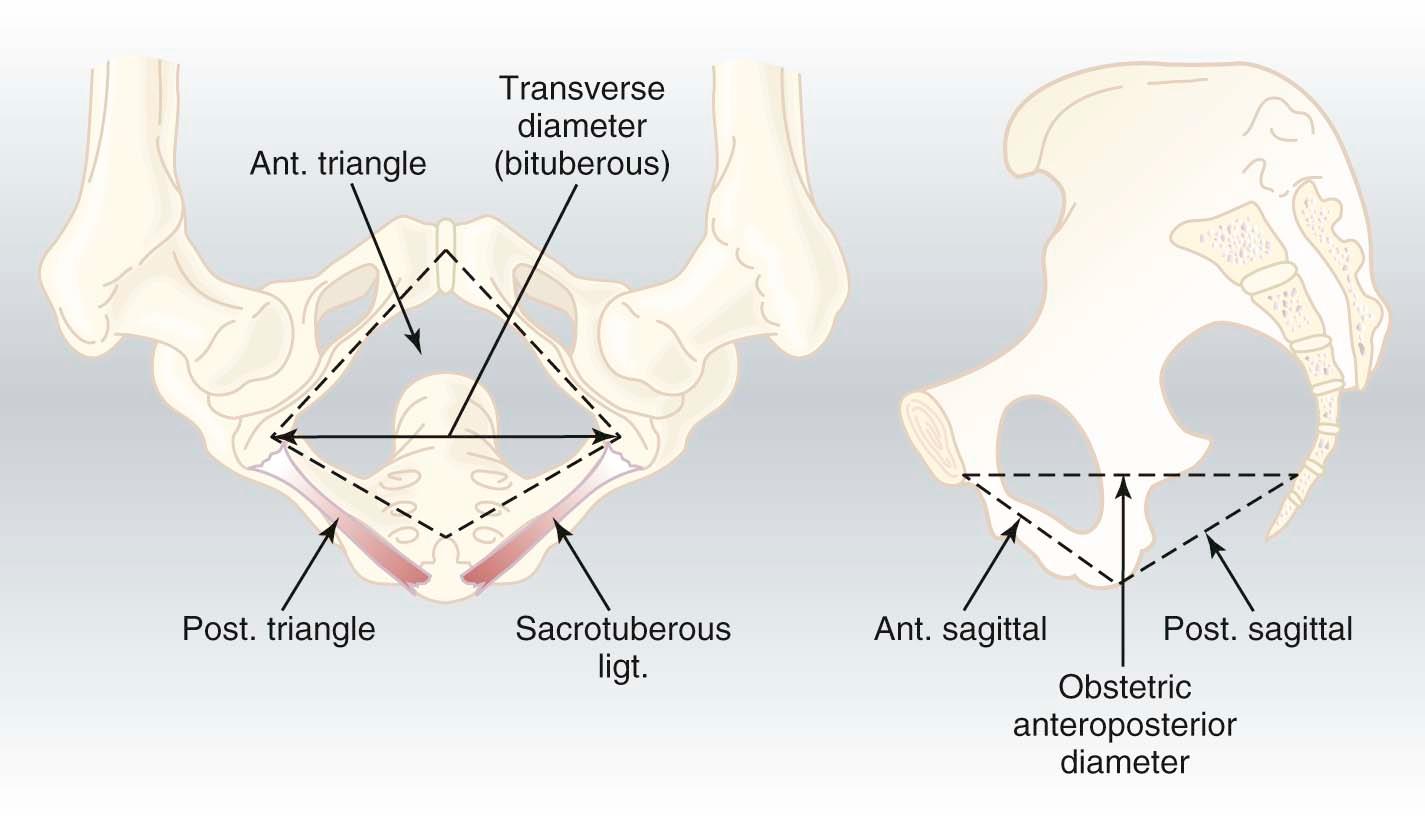
These planes are imaginary, flat surfaces that extend across the pelvis at different levels. Except for the plane of greatest diameter, each plane is clinically significant.
The plane of the inlet is bordered by the pubic crest anteriorly, the iliopectineal line of the innominate bones laterally, and the promontory of the sacrum posteriorly. The fetal head enters the pelvis through this plane in the transverse position.
The plane of greatest diameter is the largest part of the pelvic cavity. It is bordered by the posterior midpoint of the pubis anteriorly, the upper part of the obturator foramina laterally, and the junction of the second and third sacral vertebrae posteriorly. The fetal head rotates to the anterior position in this plane.
The plane of least diameter is the most important from a clinical standpoint because most instances of arrest of descent occur at this level. It is bordered by the lower edge of the pubis anteriorly, the ischial spines and sacrospinous ligaments laterally, and the lower sacrum posteriorly. Low transverse arrests generally occur in this plane.
The plane of the pelvic outlet is formed by two triangular planes with a common base at the level of the ischial tuberosities. The anterior triangle is bordered by the subpubic angle at the apex, the pubic rami on the sides, and the bituberous diameter at the base. The posterior triangle is bordered by the sacrococcygeal joint at its apex, the sacrotuberous ligaments on the sides, and the bituberous diameter at the base. This plane is the site of a low pelvic arrest.
The diameters of the pelvic planes represent the amount of space available at each level. The key measurements for assessing the capacity of the maternal pelvis include the following:
The obstetric conjugate of the inlet
The bispinous diameter of the midplane
The bituberous diameter of the outlet
The anteroposterior sagittal diameter of the outlet
The average lengths of the diameters of each pelvic plane are listed in Table 8-1 .
The pelvic inlet has five important diameters (see Figure 8-3 ). The anteroposterior diameter is described by one of two measurements. The true conjugate (anatomic conjugate) is the anatomic diameter and extends from the middle of the sacral promontory to the superior surface of the pubic symphysis. The obstetric conjugate represents the actual space available to the fetus and extends from the middle of the sacral promontory to the closest point on the convex posterior surface of the symphysis pubis.
The transverse diameter is the widest distance between the iliopectineal lines. Each oblique diameter extends from the sacroiliac joint to the opposite iliopectineal eminence.
The posterior sagittal diameter extends from the anteroposterior and transverse intersection to the middle of the sacral promontory.
The plane of greatest diameter has two noteworthy diameters. The anteroposterior diameter (see Figure 8-4 ) extends from the midpoint of the posterior surface of the pubis to the junction of the second and third sacral vertebrae. The transverse diameter is the widest distance between the lateral borders of the plane.
The plane of least diameter has three important diameters. The anteroposterior diameter extends from the lower border of the pubis to the junction of the fourth and fifth sacral vertebrae. The transverse (bispinous) diameter extends between the ischial spines. The posterior sagittal diameter extends from the midpoint of the bispinous diameter to the junction of the fourth and fifth sacral vertebrae.
The pelvic outlet has four important diameters (see Figure 8-4 ). The anatomic anteroposterior diameter extends from the inferior margin of the pubis to the tip of the coccyx, whereas the obstetric anteroposterior diameter extends from the inferior margin of the pubis to the sacrococcygeal joint. The transverse (bituberous) diameter extends between the inner surfaces of the ischial tuberosities, and the posterior sagittal diameter (not listed) extends from the middle of the transverse diameter to the sacrococcygeal joint.
Based on the general bony architecture, the pelvis may be classified into four basic types ( Figure 8-5 ): gynecoid, android, anthropoid, and platypelloid.
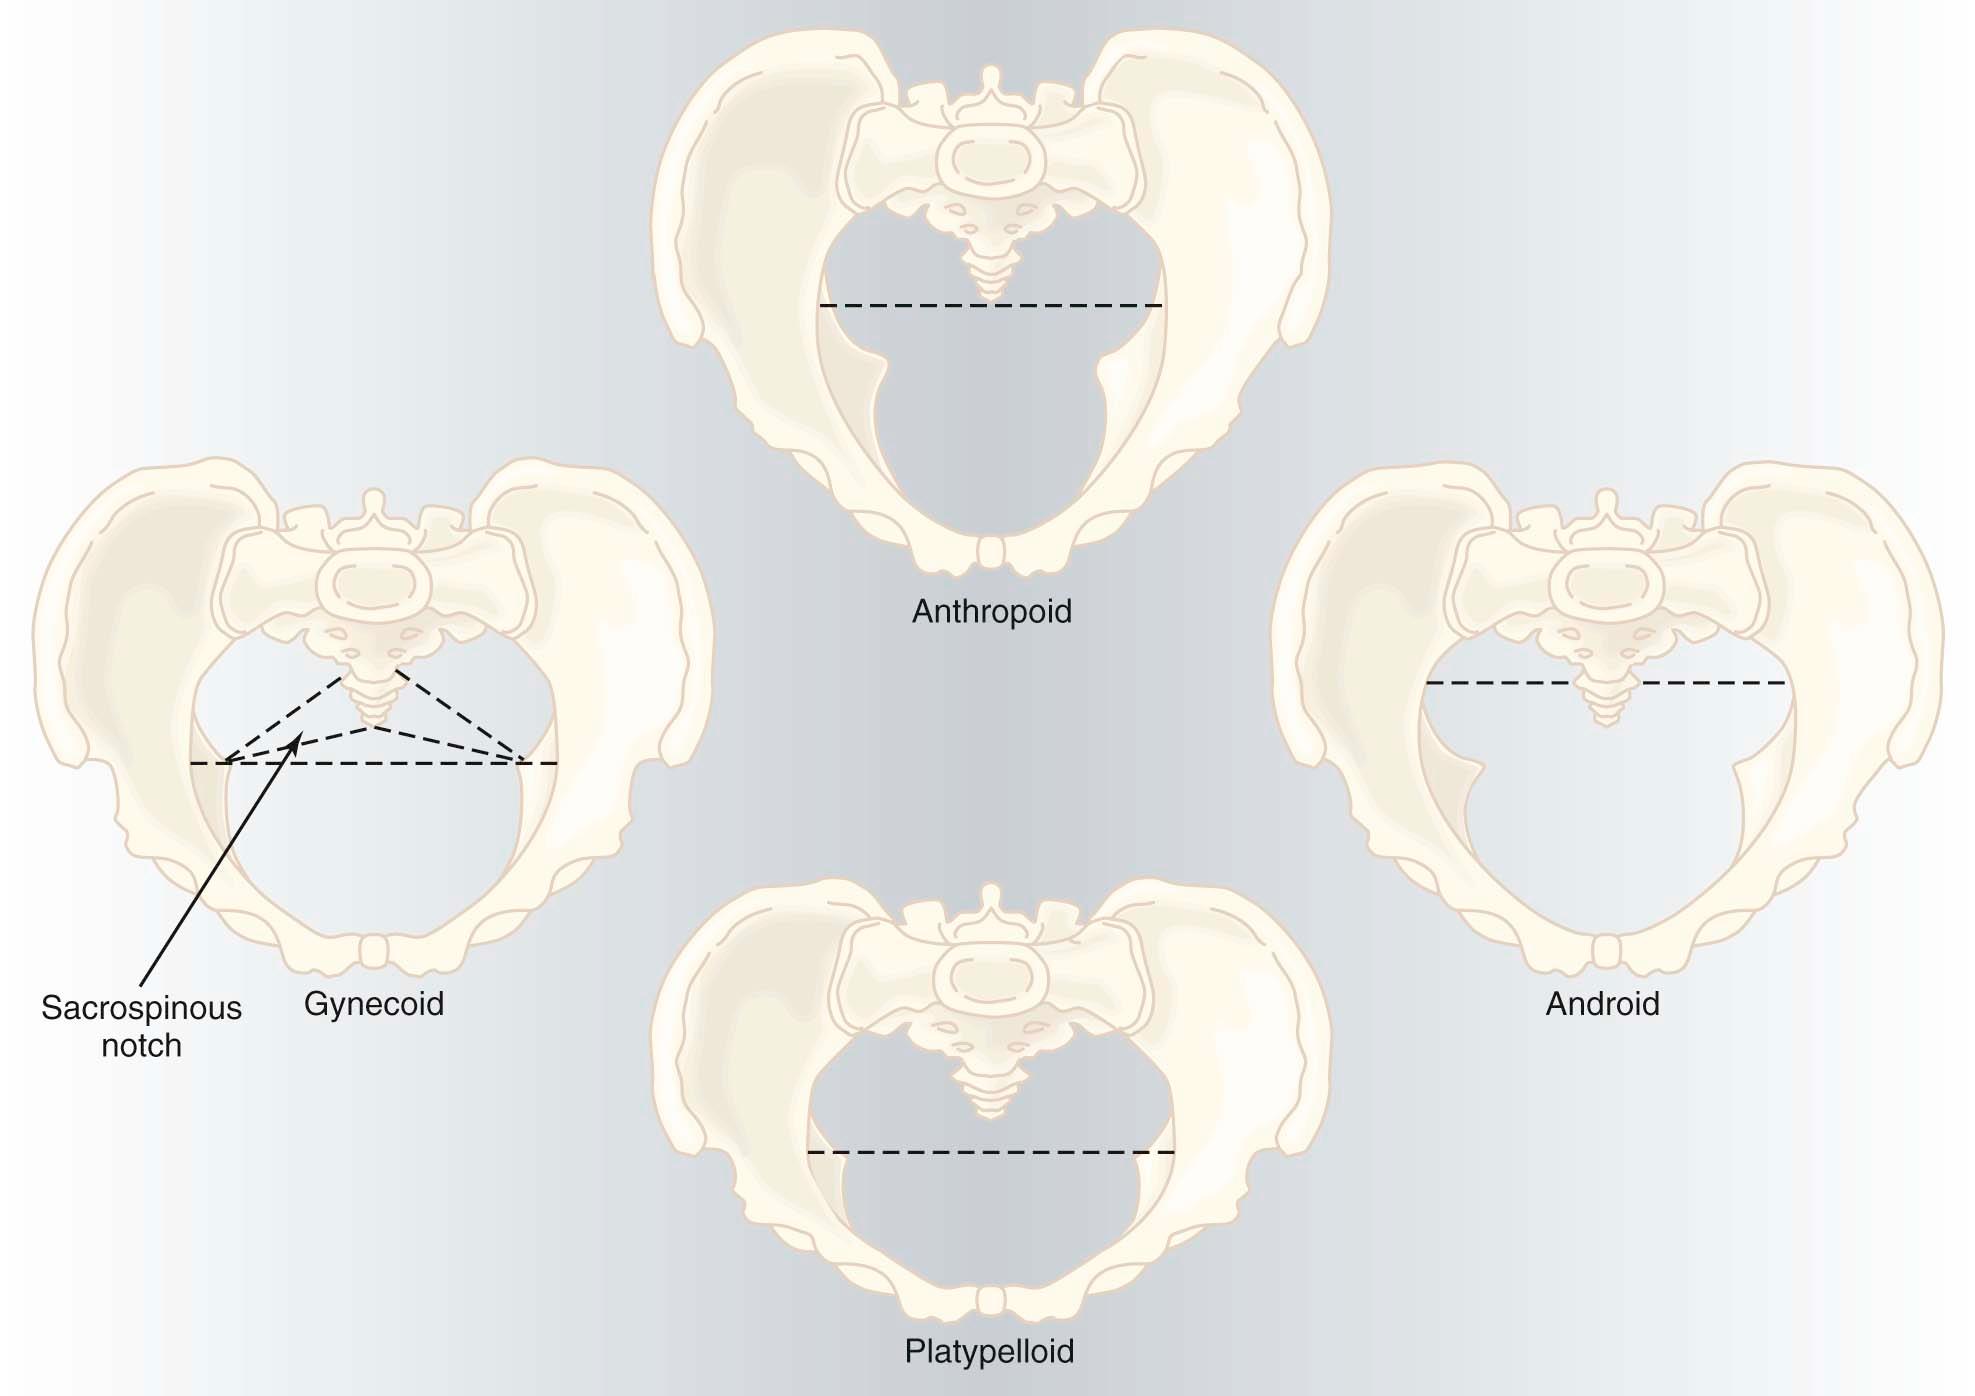
The gynecoid pelvis is the classic female type of pelvis and is found in approximately 50% of women. It has the following characteristics:
Round at the inlet, with the widest transverse diameter only slightly greater than the anteroposterior diameter
Sidewalls straight
Ischial spines of average prominence
Large sacrospinous notch (depicted in Figure 8-5 )
Well-curved sacrum
Spacious subpubic arch with an angle of approximately 90 degrees
These features create a cylindrical shape that is spacious throughout. The fetal head generally rotates into the occipitoanterior position in this type of pelvis.
The android pelvis is the typical male type of pelvis. It is found in less than 30% of women and has the following characteristics:
Triangular inlet with a flat posterior segment and the widest transverse diameter closer to the sacrum than in the gynecoid type
Convergent sidewalls with prominent spines
Shallow sacral curve
Long and narrow (small) sacrospinous notch (noted in Figure 8-5 in a gynecoid pelvis)
Narrow subpubic arch
This type of pelvis has limited space at the inlet and progressively less space as the fetus moves down the pelvis, because of the funneling effect of the sidewalls, sacrum, and pubic rami. Thus, the amount of space is restricted at all levels. The fetal head is forced to be in the occipitoposterior position to conform to the narrow anterior pelvis. Arrest of descent is common at the midpelvis.
The anthropoid pelvis resembles that of the anthropoid ape. It is found in approximately 20% of women and has the following characteristics:
A much larger anteroposterior than transverse diameter, creating a long, narrow oval at the inlet
Sidewalls that do not converge
Ischial spines that are not prominent but are close, because of the overall shape
Variable, but usually posterior, inclination of the sacrum
Small sacrospinous notch
Narrow, outwardly shaped subpubic arch
The fetal head can engage only in the anteroposterior diameter and usually does so in the occipitoposterior position because there is more space in the posterior pelvis.
The platypelloid pelvis is best described as being a flattened gynecoid pelvis. It is found in only 3% of women, and it has the following characteristics:
A short anteroposterior and wide transverse diameter, creating an oval-shaped inlet
Straight or divergent sidewalls
Posterior inclination of a flat sacrum
A wide bispinous diameter
Long but small sacrospinous notch
A wide subpubic arch
The overall shape is that of a gentle curve throughout. The fetal head has to engage in the transverse diameter.
Engagement occurs when the widest diameter of the fetal presenting part has passed through the pelvic inlet. In cephalic presentations, the widest diameter is biparietal; in breech presentations, it is intertrochanteric.
The station of the presenting part in the pelvic canal is defined as its level above or below the plane of the ischial spines. The level of the ischial spines is assigned as “zero” station, and each centimeter above or below this level is given a minus or plus designation, respectively.
In the majority of women, the bony presenting part is at the level of the ischial spines when the head has become engaged. The fetal head usually engages with its sagittal suture in the transverse diameter of the pelvis. The head position is considered to be synclitic when the biparietal diameter is parallel to the pelvic plane and the sagittal suture is midway between the anterior and posterior planes of the pelvis. When this relationship is not present, the head is considered to be asynclitic ( Figure 8-6 ).
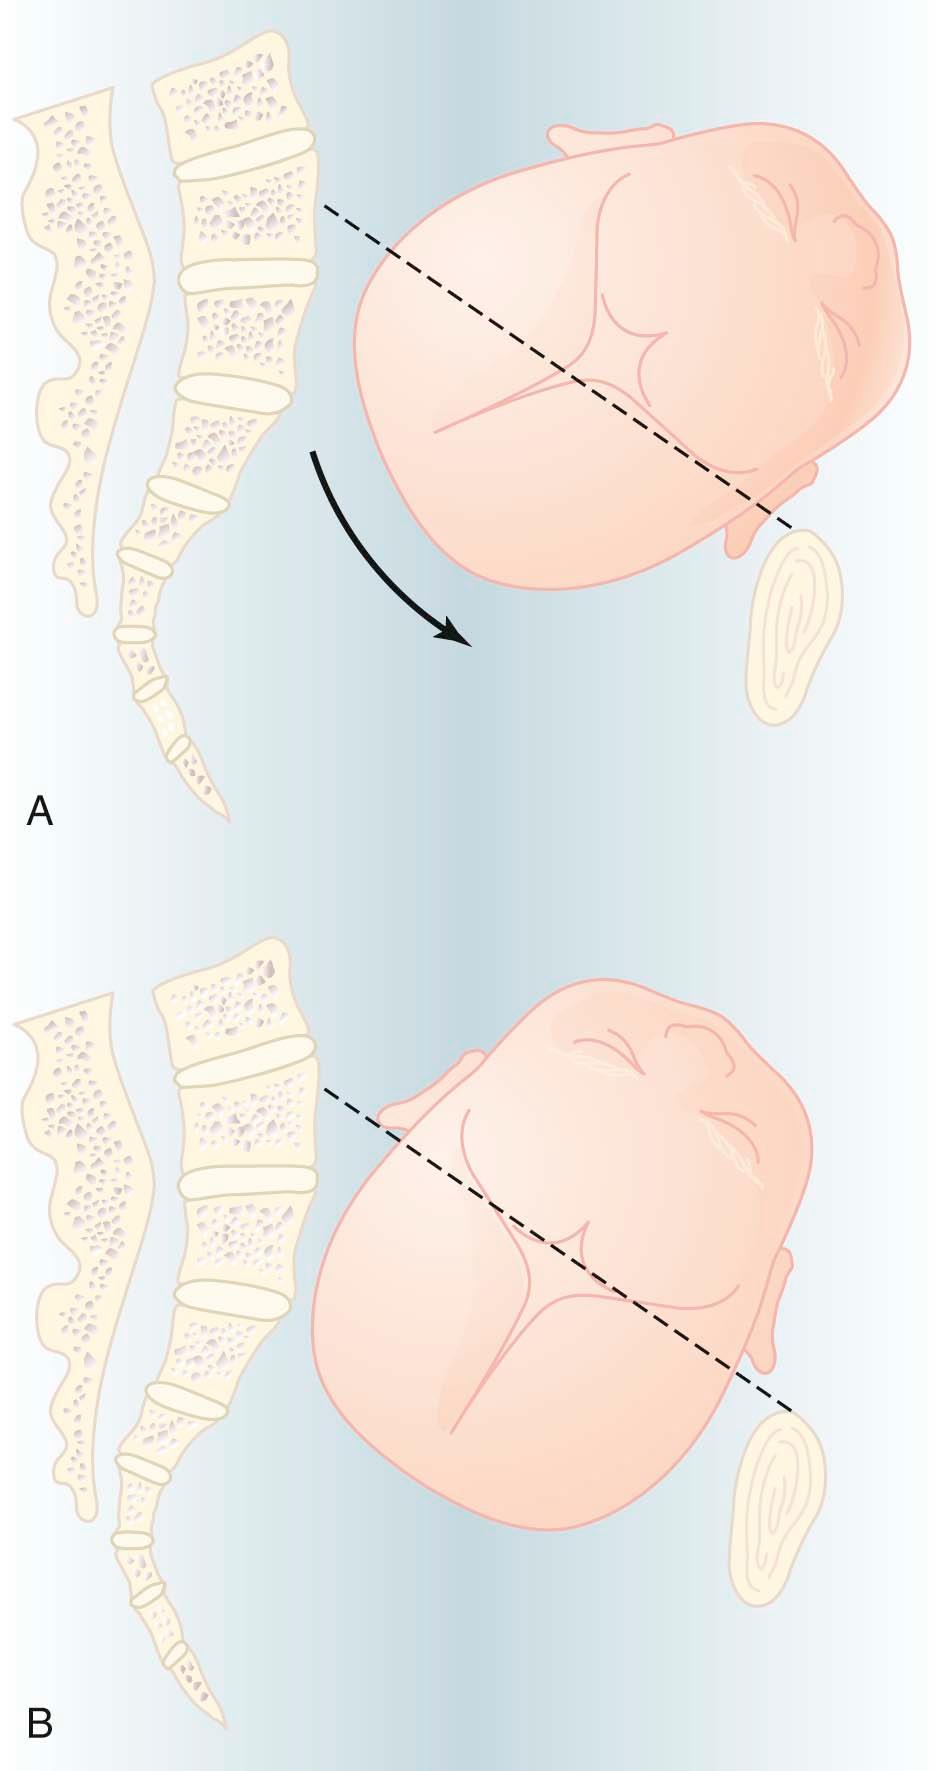
There is a distinct advantage to having the head engage in asynclitism in certain situations. In a synclitic presentation, the biparietal diameter entering the pelvis measures 9.5 cm; when the parietal bones enter the pelvis in an asynclitic manner, however, the presenting diameter measures 8.75 cm. Therefore, asynclitism permits a larger head to enter the pelvis than would be possible in a synclitic presentation.
The diameters that can be clinically evaluated can be assessed at the time of the first prenatal visit to screen for obvious pelvic contractions, although some obstetricians believe that it is better to wait until later in pregnancy, when the soft tissues are more distensible and the examination is less uncomfortable and possibly more accurate.
The clinical evaluation is started by assessing the pelvic inlet. The pelvic inlet can be evaluated clinically for its anteroposterior diameter. The obstetric conjugate can be estimated from the diagonal conjugate, which is obtained during clinical examination (see Figure 8-3 ).
The diagonal conjugate is approximated by measuring from the lower border of the pubis to the sacral promontory, using the tip of the second finger and the point where the base of the index finger meets the pubis ( Figure 8-7 ). The obstetric conjugate is then estimated by subtracting 1.5 to 2 cm, depending on the height and inclination of the pubis. Often the middle finger of the examining hand cannot reach the sacral promontory; thus, the obstetric conjugate is considered adequate. If the diagonal conjugate is greater than or equal to 11.5 cm, the anteroposterior diameter of the inlet is considered to be adequate.
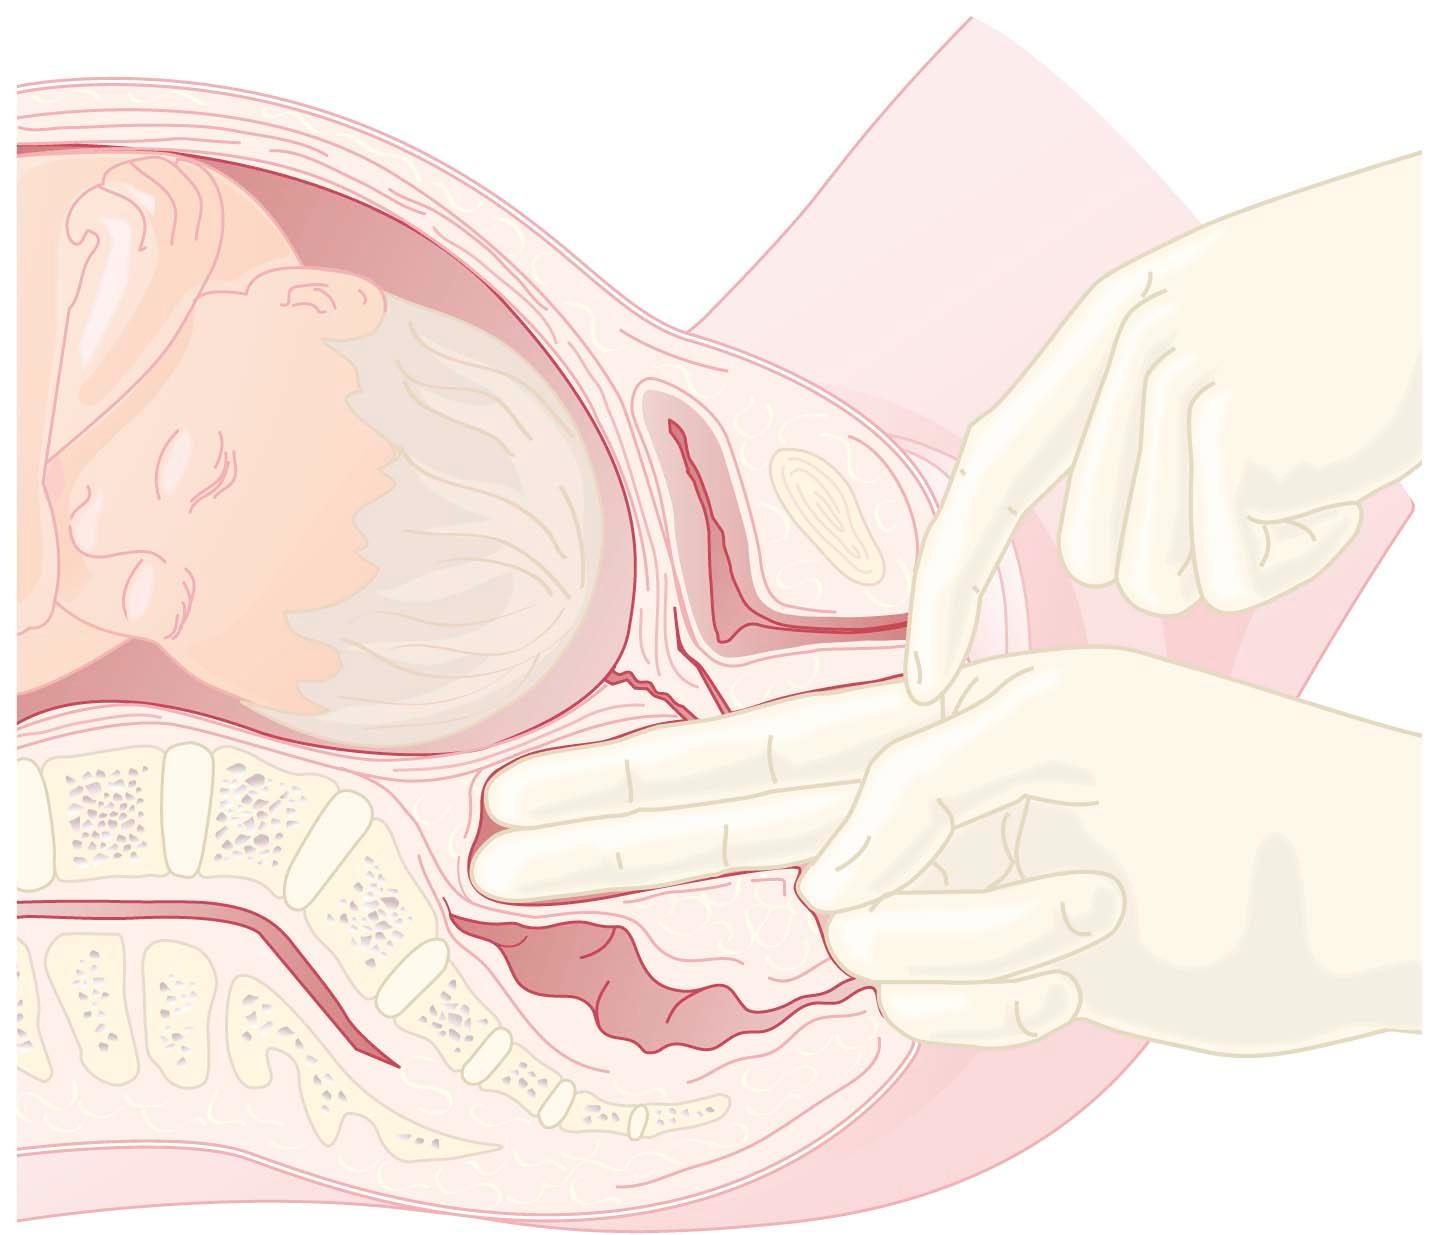
The anterior surface of the sacrum is then palpated to assess its curvature. The usual shape is concave. A flat or convex shape may indicate anteroposterior constriction throughout the pelvis.
The midpelvis cannot be measured accurately clinically in either the anteroposterior or transverse diameter. A reasonable estimate of the size of the midpelvis, however, can be obtained as follows. The pelvic sidewalls can be assessed to determine if they are convergent rather than having the normal, almost parallel, configuration. The ischial spines are palpated carefully to assess their prominence, and several passes are made between the spines to approximate the bispinous diameter. The length of the sacrospinous ligament is assessed by placing one finger on the ischial spine and one finger on the sacrum in the midline. The average length is three fingerbreadths. If the sacrospinous notch that is located lateral to the ligament can accommodate two-and-one-half fingers, the posterior midpelvis is most likely of adequate dimensions. A short ligament suggests a forward inclination of the sacrum and a narrowed sacrospinous notch.
Finally, the pelvic outlet is assessed. This is done by first placing a fist between the ischial tuberosities. An 8.5-cm distance is considered to indicate an adequate transverse diameter. The posterior sagittal measurement should also be greater than 8 cm. The infrapubic angle is assessed by placing a thumb next to each inferior pubic ramus and then estimating the angle at which they meet. An angle of less than 90 degrees is associated with a contracted transverse diameter in the midplane and outlet.
When an accurate measurement of the pelvis is indicated, nuclear magnetic resonance imaging (MRI) may be used. The advantage of MRI over x-ray or computed tomography for pelvic assessment is the lack of ionizing radiation exposure.
Clinical evidence or obstetric history suggestive of pelvic abnormalities
A history of pelvic trauma
It should always be questioned whether the results obtained by radiologic assessment will have sufficient influence on the patient's management to make the investigation worthwhile.
Before actual labor begins, a number of preparatory physiologic events usually occur.
Two or more weeks before labor, the fetal head in most primigravid women settles into the brim of the pelvis. In multigravida, this often does not occur until early in labor. Lightening may be noted by the mother as a flattening of the upper abdomen and an increased prominence of the lower abdomen.
During the last 4 to 8 weeks of pregnancy, the uterus undergoes irregular contractions that normally are painless. Such contractions appear unpredictably and sporadically and can be rhythmic and of mild intensity. In the last month of pregnancy, these contractions may occur more frequently, sometimes every 10 to 20 minutes, and with greater intensity. These Braxton Hicks contractions are considered false labor in that they are not associated with progressive cervical dilation or effacement. They may serve a physiologic role in preparing the uterus and cervix for true labor.
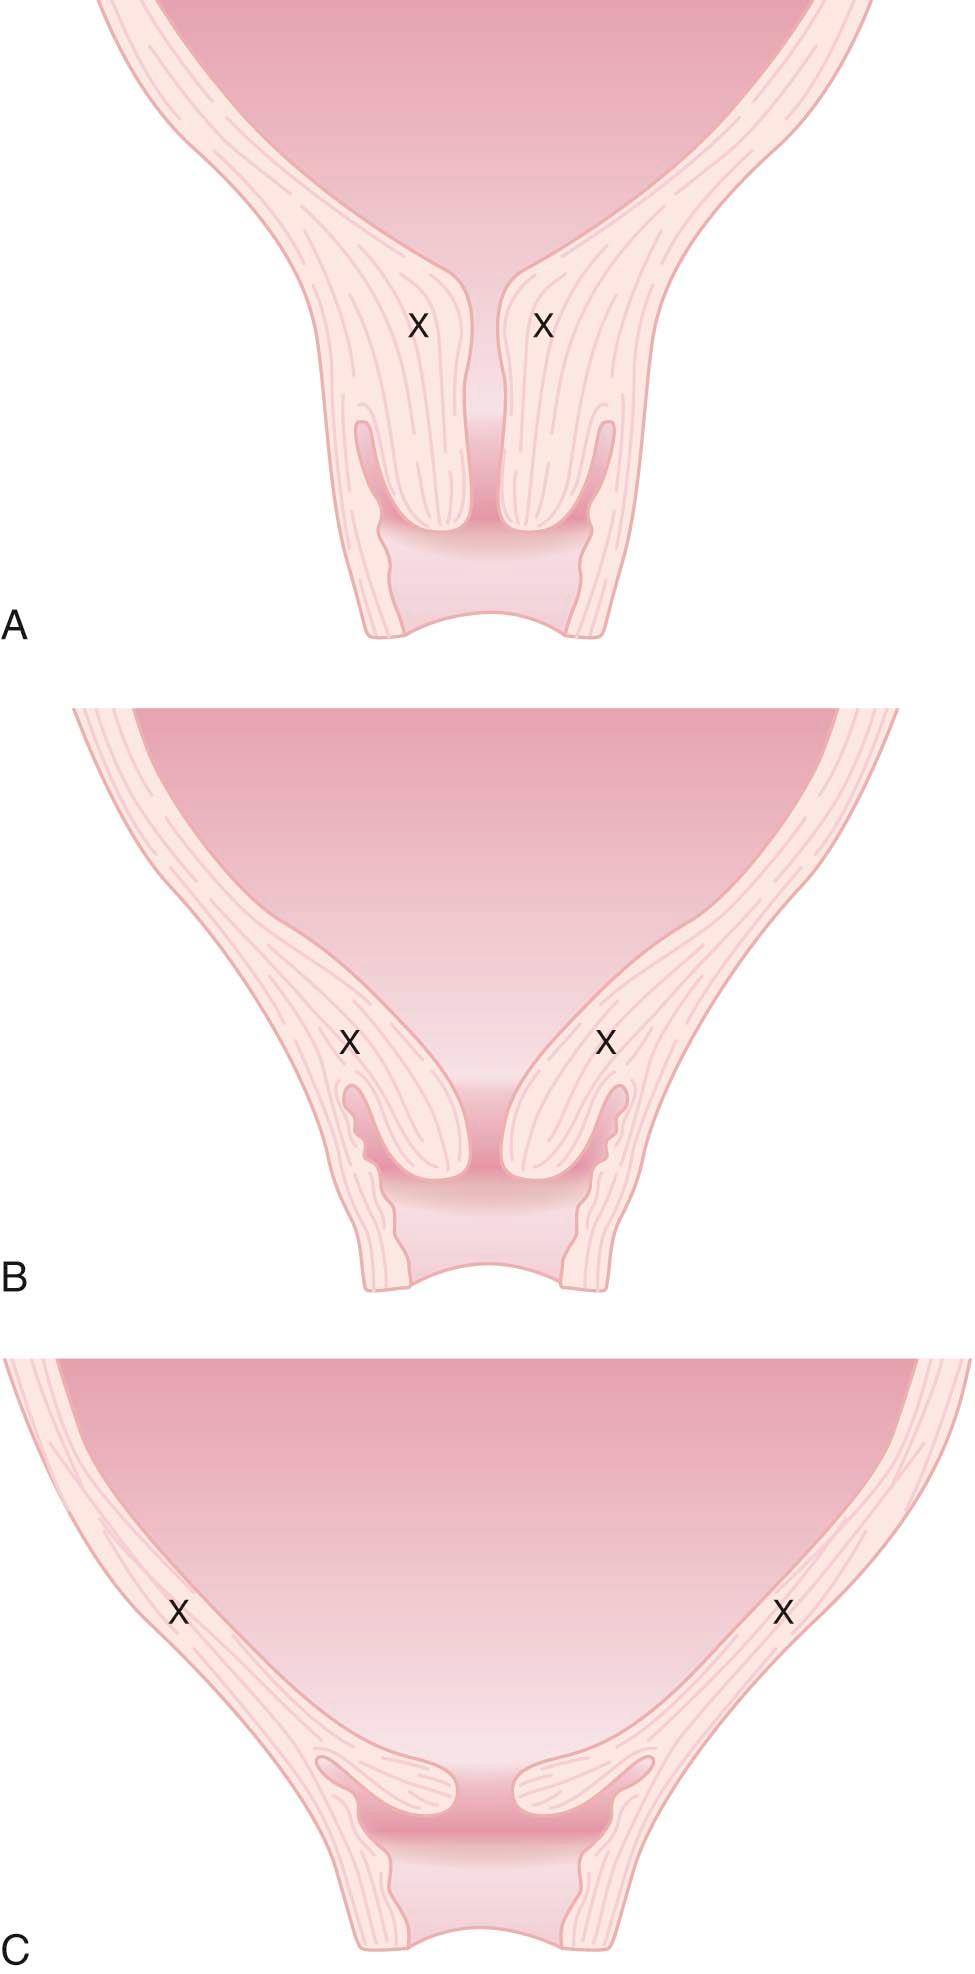
Before the onset of parturition, the cervix is frequently noted to soften as a result of increased water content and collagen lysis. Simultaneous effacement, or thinning of the cervix, occurs as the internal os of the cervix is taken up into the lower uterine segment ( Figure 8-8, B ). Consequently, patients often present in early labor with a cervix that is already partially effaced. As a result of cervical effacement, the mucous plug within the cervical canal may be released. The onset of labor may thus be heralded by the passage of a small amount of blood-tinged mucus from the vagina (“bloody show”).
Induction of labor is the process whereby labor is initiated by artificial means after appropriate assessment of the mother and fetus and an explanation to the patient of the indications for induction. In the case of high-risk pregnancies, induction is necessary to reduce the risk of morbidity to the mother and her fetus. In general, induction of labor is not used for the convenience of the mother or her family, and it should not be done before 38 weeks' gestation because of the possibility of neonatal morbidity. Augmentation is the artificial stimulation of labor that has begun spontaneously (see Chapter 11 ).
Cervical effacement and softening (ripening) occur before the onset of spontaneous labor. Cervical ripening frequently has not occurred before a decision to induce labor, yet the success of induction is dependent on these changes in the cervix.
Several mechanical and pharmacologic approaches may be used to promote cervical ripening before the actual induction of uterine contractions. Currently approved pharmacologic treatments include intravaginal application of prostaglandin E 2 using a vaginal insert (on a string) called Cervidil, which can be removed quickly if the medication causes hyperstimulation. Cytotec, a synthetic prostaglandin E 1 analogue, has also been approved for cervical ripening. One 25-µg tablet placed intravaginally effectively initiates cervical ripening. Although prostaglandin administration has been demonstrated to shorten the duration of labor induction, the impact on cesarean delivery rates due to failed induction has been minimal.
Other methods of cervical ripening may include intrauterine placement of a Foley catheter into the cervix and inflation of the balloon with 10 cc of saline. Manual separation of the chorioamnion from the lower uterine segment—referred to as “stripping the membranes”—does not necessarily speed up the onset of labor. Artificial rupture of the membranes is not recommended as a method to induce labor.
In addition to cervical ripening, induction of labor requires the initiation of effective uterine contractions. Oxytocin is identical to the natural pituitary peptide, and it is the only drug approved for induction and augmentation of labor. Pitocin is the synthetic preparation.
The physician must be fully aware of the indications and contraindications for the use of induction and augmentation of labor ( Table 8-2 ). The most common contraindication has been prior uterine surgery in which there has been complete transection of the uterine wall. However, a previous lower transverse incision is no longer considered a contraindication to a trial of labor. This is referred to as vaginal birth after cesarean, or VBAC.
| Induction | Augmentation |
|---|---|
| Indications | |
| Maternal | |
| Preeclampsia | Abnormal labor (in the presence of inadequate uterine activity) |
| Diabetes mellitus | Prolonged latent phase |
| Heart disease | Prolonged active phase |
| Fetoplacental | |
| Prolonged pregnancy | |
| Intrauterine growth restriction | |
| Abnormal fetal testing | |
| Rhesus type incompatibility | |
| Fetal abnormality | |
| Premature rupture of membranes | |
| Chorioamnionitis | |
| Contraindications | |
| Maternal | |
| Absolute | Same contraindications as for maternal and fetoplacental |
| Contracted pelvis | |
| Relative | |
| Prior uterine surgery | |
| Classic cesarean delivery | |
| Complete transection of uterus (myomectomy, reconstruction) | |
| Overdistended uterus | |
| Fetoplacental | |
| Preterm fetus without lung maturity | |
| Acute fetal distress | |
| Abnormal presentation | |
A hospital obstetric service must establish guidelines for the proper use of oxytocin for induction and augmentation of labor. In general, an assessment and plan of management should be outlined in the patient's medical record. It is helpful to assess the likelihood of success by a careful pelvic examination to determine the Bishop score, which is used to evaluate the status of the cervix and the station of the fetal head ( Table 8-3 ). A high score (9 to 13) is associated with a high likelihood of a vaginal delivery, whereas a low score (<5) is associated with a decreased likelihood of success (65-80%). Before induction is begun, the patient's blood must be typed and screened for antibodies. A blood specimen should be held in the laboratory in case crossmatching becomes necessary. Continuous electronic monitoring of the fetal heart rate and uterine activity is required during induction. An internal uterine catheter for monitoring uterine pressure is suggested if intensity cannot be adequately assessed.
| Physical Findings | Rating | |||
|---|---|---|---|---|
| 0 | 1 | 2 | 3 | |
| Cervix | ||||
| Position | Posterior | Mid | Anterior | — |
| Consistency | Firm | Medium | Soft | — |
| Effacement (%) | 0-30 | 40-50 | 60-70 | ≥80 |
| Dilation (cm) | 0 | 1-2 | 3-4 | ≥5 |
| Fetal Head | ||||
| Station | −3 | −2 | −1 | +1 |
Several principles should be followed when oxytocin is used to induce or augment labor:
Oxytocin must be given intravenously to allow it to be discontinued quickly if a complication such as uterine hypertonus or fetal distress develops. Because oxytocin has a half-life of 3 to 5 minutes, its physiologic effect will diminish quickly (within 15 to 30 minutes) after discontinuation.
A dilute infusion must be used and “piggybacked” into the main intravenous (IV) line so that it can be stopped quickly if necessary, without interrupting the main IV route.
The drug is best infused with a calibrated infusion pump that can be easily adjusted to deliver the required infusion rate accurately.
The induction of labor for a specific indication generally should not exceed 72 hours. In patients with a low Bishop score, it is not unusual for an induction to progress slowly. If the cervix effaces and dilates, it is recommended that the membranes be ruptured on the third day. If adequate progress is not made within 12 hours of rupturing the membranes, a cesarean delivery may be performed.
If adequate labor is established, the infusion rate and the concentration may be reduced, especially during the second stage of labor. Adherence to this principle avoids the risks of hyperstimulation and fetal distress, which frequently occur once labor has been established.
Substantial variation exists regarding the initial dose, incremental dose, and time interval between dose increments when oxytocin is used for labor induction and augmentation. Well-performed clinical studies have supported both low-dose (1 to 30 mU/min) and high-dose (4 to 40 mU/min) protocols, as shown in Table 8-4 . It is not surprising that many protocols use moderate doses of oxytocin. Generally, intervals between dose increments should be no less than 20 minutes to permit time for steady-state plasma levels of oxytocin to be achieved and to prevent an increased risk of uterine hyperstimulation.
| Low-Dose Protocol | High-Dose Protocol | |
|---|---|---|
| Starting dose | 1 mU/min | 4 mU/min |
| Increment | 1 mU/min | 4 mU/min |
| Interval | 20 min | 20 min |
| Limited by | 5 contractions in 10 min | 7 contractions in 15 min |
| Maximal dose | 20-30 mU/min | 40 mU/min |
The use of oxytocin for the induction and augmentation of labor can cause three major complications. First, an excessive infusion rate can cause hyperstimulation and thereby cause fetal distress from ischemia. In rare situations, a tetanic contraction can occur, which can lead to rupture of the uterus. Second, because oxytocin has a structure similar to that of antidiuretic hormone, it has an intrinsic antidiuretic effect and will increase water reabsorption from the glomerular filtrate. Severe water intoxication with convulsions and coma can occur rarely when oxytocin is infused continuously for more than 24 hours. Third, prolonged infusion of oxytocin can result in uterine muscle fatigue (nonresponsiveness) and postdelivery uterine atony (hypotonus), which can increase the risk of postpartum hemorrhage.
There are four stages of labor, each of which is considered separately. These stages in actuality are definitions of progress during labor, delivery, and the puerperium ( Table 8-5 ).
The first stage lasts from the onset of true labor to complete dilation of the cervix. The second stage spans from complete dilation of the cervix to the birth of the baby. The third stage lasts from the birth of the baby to delivery of the placenta. The fourth stage spans from delivery of the placenta to stabilization of the patient's condition, usually at about 6 hours postpartum.
There is currently controversy about how to define the progress of normal labor. Because the purpose of this chapter is to define normal labor, we will use the standard definitions provided by Friedman in 1978 ( Figure 8-9 ). The Friedman labor curve, as well as a recently suggested modification, is covered in Chapter 11 .
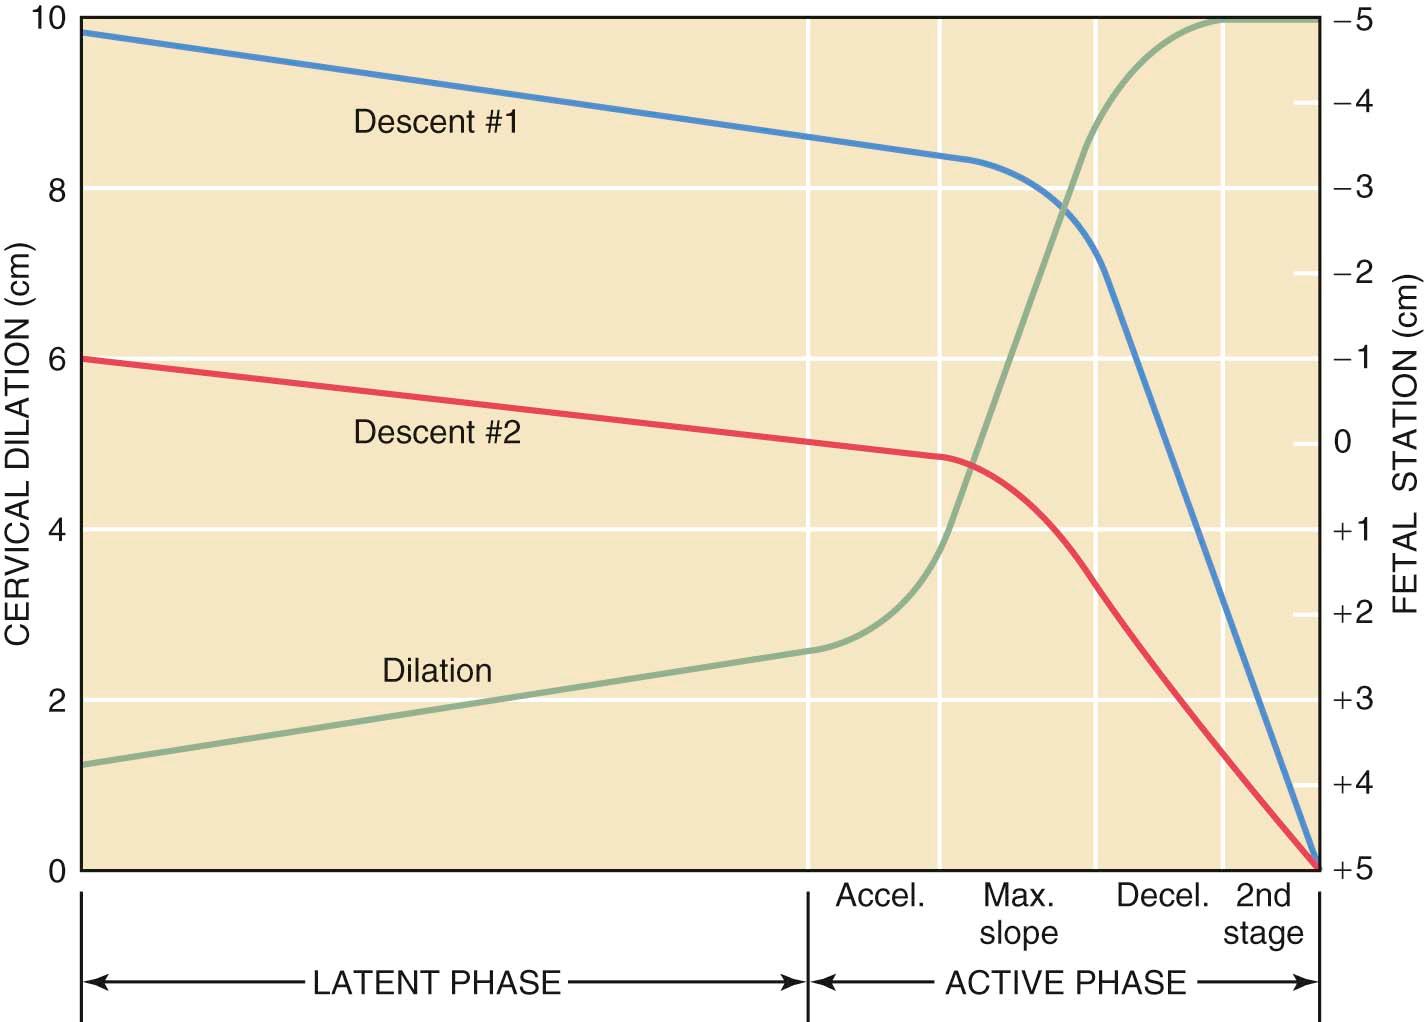
The first stage of labor consists of two phases: a latent phase, during which cervical effacement and early dilation occur, and an active phase, during which more rapid cervical dilation occurs (see Figure 8-9 ). Although cervical softening and early effacement may occur before labor, during the first stage of labor the entire cervical length (cervical os) is retracted into the lower uterine segment (see Figure 8-8 ).
The length of the first stage may vary in relation to parity; primiparous patients generally experience a longer first stage than do multiparous patients (see Table 8-5 ). Because the latent phase may overlap considerably with the preparatory phase of labor, its duration is highly variable. It may also be influenced by other factors, such as sedation and stress. The active phase begins when the cervix is dilated 4 cm in the presence of regularly occurring uterine contractions. The recent guidelines proposed by Zhang and colleagues regarding labor curves (see Chapter 11 ) suggest that the active phase may not begin until 6-cm dilation. The minimal dilation during the active phase of the first stage is nearly the same for normal primiparous and multiparous women: 1 and 1.2 cm/hr, respectively. If progress is slower than this, evaluation for uterine dysfunction, fetal malposition, or cephalopelvic disproportion should be undertaken.
| Characteristics | Primipara | Multipara |
|---|---|---|
| Duration of first stage | 6-18 hr | 2-10 hr |
| Rate of cervical dilation during active phase | 1 cm/hr | 1.2 cm/hr |
| Duration of second stage | 30 min to 3 hr | 5-30 min |
| Duration of third stage | 0-30 min | 0-30 min |
During the first stage, the progress of labor may be measured in terms of cervical effacement, cervical dilation, and descent of the fetal head. The clinical pattern of the uterine contractions alone is not an adequate indication of progress. After completion of cervical dilation, the second stage commences. Thereafter, only the descent, flexion, and rotation of the presenting part are available to assess the progress of labor.
Certain steps should be taken in the clinical management of the patient during the first stage of labor.
The mother may ambulate, provided that intermittent monitoring ensures fetal well-being and the presenting part is engaged in patients with ruptured membranes. If she is lying in bed, the lateral recumbent position should be encouraged to ensure adequate perfusion of the uteroplacental unit. When the patient is supine (on her back), the weight of the uterus and fetus can compress the vessels supplying the uterus.
Because of decreased gastric emptying during labor, oral fluids are best avoided. However, fasting results in the more rapid development of ketosis in pregnant women. Placement of a 16- to 18-gauge venous catheter is advisable during the active phase of labor. It has been shown that giving at least 125 mL/hr of 10% dextrose (D) in normal saline (NS), compared with 5% D/NS or just NS, results in significantly shorter labor. Thus, the IV route is used to hydrate the patient with crystalloids and provide calories during labor, to administer oxytocin after the delivery of the placenta, and for the treatment of any unanticipated emergencies.
Become a Clinical Tree membership for Full access and enjoy Unlimited articles
If you are a member. Log in here