Physical Address
304 North Cardinal St.
Dorchester Center, MA 02124
This should be utilized for a fracture below the level of the syndesmosis, usually with a stable syndesmosis that can be preserved
Fibular shortening
Fibular malrotation
Syndesmosis malreduction
Fibular malunion leads to abnormal mortise and ankle mechanics that can contribute to the development of posttraumatic arthritis.
Fibular malunion is poorly tolerated and therefore often necessitates revision surgery.
These malunions can be fractures that were missed, treated nonoperatively, or operatively repaired.
The patient will often complain of continued pain, swelling, loss or lack of motion, and difficulty regaining function after previous surgery.
Exam may reveal abnormal gait pattern, tenderness about the fracture site and ankle, and deficits in ankle motion.
Obtaining weight-bearing anterior-posterior, lateral, and oblique films is necessary.
A computed tomography (CT) scan may be helpful in assessing rotational deformity and malunion of the syndesmosis.
Obtaining previous operative reports will facilitate hardware removal.
Fibular osteotomy with revision fixation, three different levels of osteotomy based on the malunion fracture pattern. For a distal fibula fracture an oblique osteotomy through the fracture site
Syndesmosis fixation if necessary
Possible deltoid reefing and repair
The fibula acts a lateral buttress to lateral displacement of the talus ( Fig. 73.1 ).
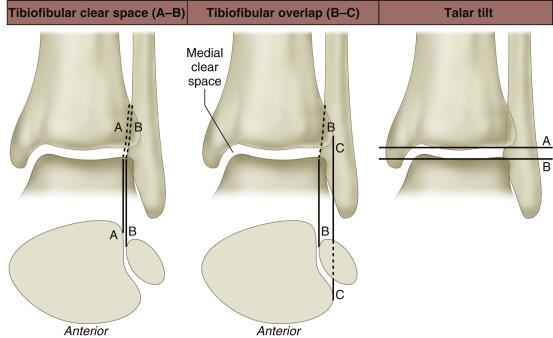
The deltoid is the main stabilizer of talar motion, and when it is disrupted, the fibula functions as secondary stabilizer.
Three criteria for normal distal fibula length can be seen on the mortise view: (1) equal joint space, (2) intact Shenton line of the ankle, (3) and unbroken curve between the lateral talus and the peroneal groove of the fibula ( Fig. 73.2 ).
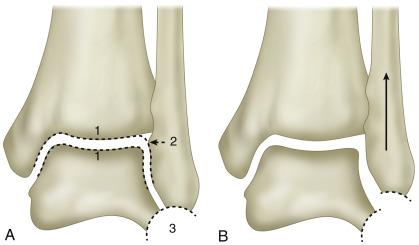
The syndesmosis is composed of the anterior inferior tibiofibular ligament, the posterior inferior tibiofibular ligament, inferior transverse ligament, and interosseous ligament. If the syndesmosis is disrupted, the ankle mortise will also be disrupted.
Supine with foot at the end of the bed ( Fig. 73.3 )
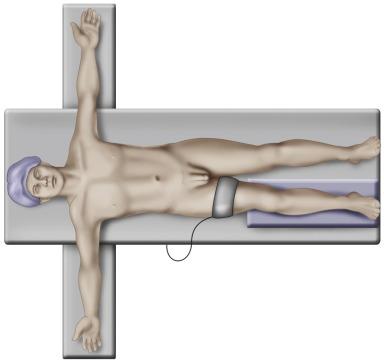
Bump under the operative hip
Tourniquet on operative thigh
Elevate the operative extremity with bone foam or blankets to obtain unobstructed lateral access to radiographic views.
Correct external rotation with a bump under the hip to allow easy access to the lateral ankle.
Failing to correct external rotation of the operative limb.
Overcorrection of external rotation may limit access to medial ankle/deltoid if necessary.
Radiolucent operative table
C-arm on the contralateral side perpendicular to the fracture
Blankets or bone foam
May opt to prep and drape the iliac crest for bone marrow aspirate/graft options.
Posterior lateral approach to the fibula
Medial ankle arthrotomy approach over the medial malleolus
Preserve a full-thickness layer of tissue over the fibula by subperiosteal dissection to facilitate closure over the fibular hardware.
Extend your incision to fully expose the malunion site with ease.
Expose the syndesmosis to allow for open reduction.
Expose and protect the superficial peroneal nerve at the proximal end of your incision.
This technique is often limited by previous incisions.
It may be necessary to reuse previous incisions to avoid skin compromise and ensure adequate skin bridge.
#15 blade
Periosteal elevator
Weitlander retractor or small Hohmann retractors can be used
Required instruments for hardware removal
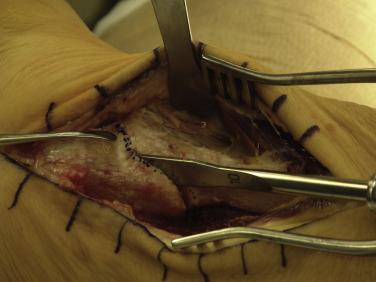
Start by exposing the fibula and malunion site ( Fig. 73.4 ).
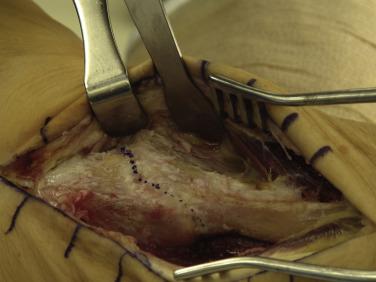
Once the fracture site is exposed, utilize a rongeur, pituitary, or osteotomes to clear any callus that is present.
It is often necessary depending on the healing at the previous fracture site to recreate the fracture with the use of an oscillating saw and/or osteotome. The direction should be from proximal lateral to distal medial ( Fig. 73.5 ).
Delicate handling of the soft tissues is necessary given the skin is compromised from previous surgery.
Adequate removal of all callus is necessary if working through the fracture site.
Protect the peroneal tendons while recreating the fracture site.
If robust healing has occurred, it may be difficult to define the fracture site.
Use of fluoroscopy may be necessary to determine where to make the osteotomy.
Small Hohmann retractors
Senn retractors
Weitlander for soft tissue retraction
Osteotomes
Rongeurs
Pituitary rongeur
Oscillating saw to recreate fracture site
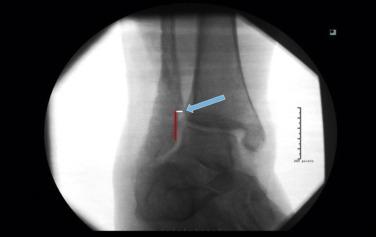
Now the most critical step is restoration of fibular length, rotation, and alignment ( Fig. 73.6 ). The arrow indicates fibular cortical step-off at the fracture, representing malreduction and malunion.
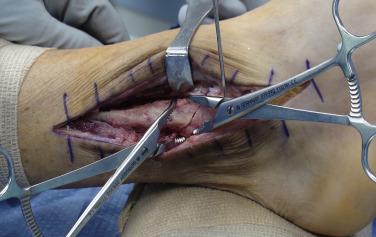
A standard reduction technique can often be utilized using reduction forceps/clamps ( Fig. 73.7 ).
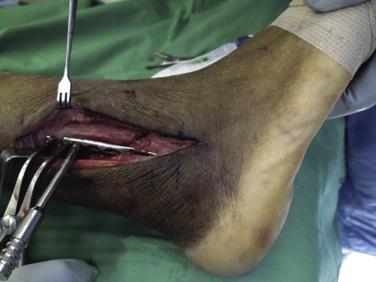
If this is unsuccessful, a push–pull technique can be utilized to establish and maintain fibular length ( Fig. 73.8 ).
Select the plate to be used and place distal fixation.
Complete internal fixation proximally.
Bone grafting at the osteotomy site may be necessary, although with this technique cortical contact should be maintained ( Fig. 73.9 ).
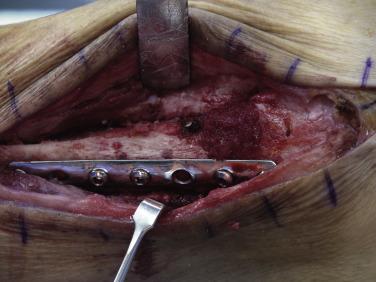
Verify reduction with fluoroscopy focusing on restoration of the Shenton line and mortise; talocrural angle and bimalleolar angles can also assist in determining length.
Bone marrow aspirate can be obtained from iliac crest and combined with allograft.
May be difficult to determine restoration of alignment due to the need for osteotomy.
Choice of fibular plate (one-third tubular, distal locking plate, mini fragment plates, or combination of plate options)
Laminar spreader to assist with push–pull method
Reduction clamps
After fibular fixation is obtained evaluate the syndesmosis with direct visualization and stress radiography. At this level is should be less likely but still needs to be evaluated.
If instability is present perform open reduction of the syndesmosis.
Place screws parallel to the joint approximately 2–3.5 cm above the joint line.
Confirm stability is achieved following fixation both by direct visualization and with stress radiographs.
A 2.0-mm wire (K-wire) can be utilized to hold syndesmotic reduction; predrill the fibula and first tibial cortex with a 1.8-mm drill to avoid bone necrosis with placement.
Large periarticular clamps can also assist with reduction.
Interposed tissue in the medial gutter may prevent adequate reduction. It may be necessary to open medially to remove interposed tissue to obtain reduction.
3.5-mm or 4.0-mm cortical screws
A tight-rope device can be utilized as well although that is not the author’s preferred device
A 2.0-mm K-wire
Large periarticular clamps to assist with reduction
The number of cortices used for syndesmotic fixation is determined by the physician’s preference.
The number of screws is based on stability after fixation.
Syndesmotic screw removal is a topic of controversy: while removal is not an absolute, it can be considered if there is persistent pain, obvious loosening, and patient preference.
An anteromedial arthrotomy may have already been made to clear and débride scar tissue and interposed tissue and to facilitate reduction of the medial clear space.
The superficial deltoid is identified and can be reefed and imbricated using an interrupted suture technique.
If the deltoid has been completely avulsed from the medial malleolus, an anchor or suture button technique can be considered.
Roughening the anterior aspect of the medial malleolus may facilitate healing.
0 Vicryl suture or FiberWire
Option of using suture anchor or suture button
Close the wound in layers with careful handling of the skin.
Become a Clinical Tree membership for Full access and enjoy Unlimited articles
If you are a member. Log in here