Physical Address
304 North Cardinal St.
Dorchester Center, MA 02124
Acknowledgments: The author would like to acknowledge Dr. Bogdan A. Matache for his assistance with the preparation of this manuscript.
Arthroscopy of the elbow, similar to other joints, has undergone a transition from simple diagnostic procedures to the ability to conduct complex advanced procedures for the management of stiffness, fractures, and arthritis. The technical advances in elbow arthroscopy have come through an improved understanding of the anatomy, the use of safe portals, and via improved instruments and motorized tools specific to arthroscopy. Presently, the accepted indications for elbow arthroscopy include the treatment of rheumatoid arthritis, degenerative arthritis, lateral epicondylitis, synovitis, osteochondritis dissecans (OCD), loose bodies, symptomatic plica, infection, contracture, instability, and fractures of the coronoid, capitellum, trochlea, and radial head. Unfortunately, as the complexity of elbow arthroscopy increases, so does the risk of complications. Complications encountered with elbow arthroscopy include nerve injury, vascular injury, infection, instability, and stiffness. The purpose of this chapter is to describe the various techniques of elbow arthroscopy for the management of the aforementioned disorders. Specifically, debridement of an osteoarthritic elbow with hypertrophic osteophytes requiring a capsulectomy will be used as a representative example.
The detailed disease-specific evaluation of the patient that may benefit from elbow arthroscopy is beyond the scope of this chapter. In general, a comprehensive history is mandatory, detailing symptoms, pain, location, exacerbation, occupation, numbness, hand dominance, mechanism of injury, past medical history, medications, prior treatment, allergies, and prior surgeries. Signs and symptoms specific to the disease process should be sought after. For example, with rheumatoid arthritis, the history should assess for pain and swelling affecting multiple joints, cervical spine involvement, and the use of biologic agents.
Elbow-specific symptoms should also be documented, such as impingement pain at the extremes of flexion and extension, joint locking or snapping, instability, numbness, and the location of pain (anterior, medial, lateral, or posterior).
Examination of the elbow should include a general approach consisting of inspection, palpation, active and passive range of motion, and a neurovascular evaluation. Additionally, disease-specific special tests should be conducted as indicated.
Inspection of the elbow should include an assessment of deformities, muscle bulk, swelling, masses, and surgical incisions. The elbow has several discrete bony and soft tissue landmarks that should be palpated for tenderness, such as the epicondyles, the biceps and triceps tendons, the ulnar nerve, the collateral ligaments, and the joint lines. Active and passive range of motion of the elbow, including flexion, extension, supination, and pronation, should be measured with a long-arm goniometer and documented. Patients with limited range of motion should have their end range assessed for bony or soft tissue endpoints. Also, anterior and posterior bony impingement tests for symptomatic impinging osteophytes should be conducted.
A standard neurovascular examination is appropriate. The ulnar nerve, however, does require special attention. Ulnar neuritis or neuropathy is commonly associated with elbow disorders. Also, the location of the ulnar nerve is important when considering arthroscopic portals, especially the anteromedial portals. Furthermore, an ulnar nerve in situ release or transposition may be indicated as an associated procedure in the arthroscopic management of the stiff elbow, especially in patients with limited flexion or if there are any preoperative ulnar nerve symptoms.
A prior ulnar nerve transposition or a subluxating nerve is not an absolute contraindication to elbow arthroscopy; however, particular attention must be directed to identifying the location of the nerve via palpation, ultrasound, or a miniopen technique. Alternatively, if the elbow disorder allows, anterior joint arthroscopy may be conducted via two lateral-based portals, avoiding the anteromedial portals altogether.
Several disease-specific elbow tests exist, which should be well known to the elbow arthroscopist. For example, common elbow pathologies with special tests include posterolateral rotatory instability, medial collateral ligament insufficiency, lateral epicondylitis, and radiocapitellar plica syndrome. Finally, examination of the elbow should conclude with an examination of the hand, shoulder, and cervical spine. In many cases, ipsilateral joint involvement may have an effect on the elbow. For example, patients with rheumatoid arthritis may have profound shoulder stiffness, which may influence ideal positioning during the surgical setup for elbow arthroscopy.
In preparation for elbow arthroscopy, standard anteroposterior, oblique, and lateral elbow radiographs are indicated. The radiographs should be scrutinized for alignment, deformity, arthritis, osteophytes, heterotopic ossification, loose bodies, and fractures. In cases with osteoarthritis, rheumatoid arthritis, posttraumatic arthritis, bony deformity, posteromedial impingement, OCD, and loose bodies, computed tomography (CT) is recommended. Three-dimensional (3D) reconstructions are particularly helpful in preoperative planning. These allow for a much more rapid assessment of bony architecture. For osteoarthritis, 3D CT reconstructions allow for visualization of the orientation, size, and location of impinging osteophytes. Typically, with osteoarthritis of the elbow ( Fig. 26.1 ), posterior osteophytes are identified within the olecranon fossa and along the medial and lateral aspects of the olecranon process. Anteriorly, osteophytes are usually located on the coronoid tip and within the radial and coronoid fossae. Additionally, occult osteophytes may be found along the posterior aspect of the capitellum that may impinge against the radial head in extension (see Fig. 26.1E ).
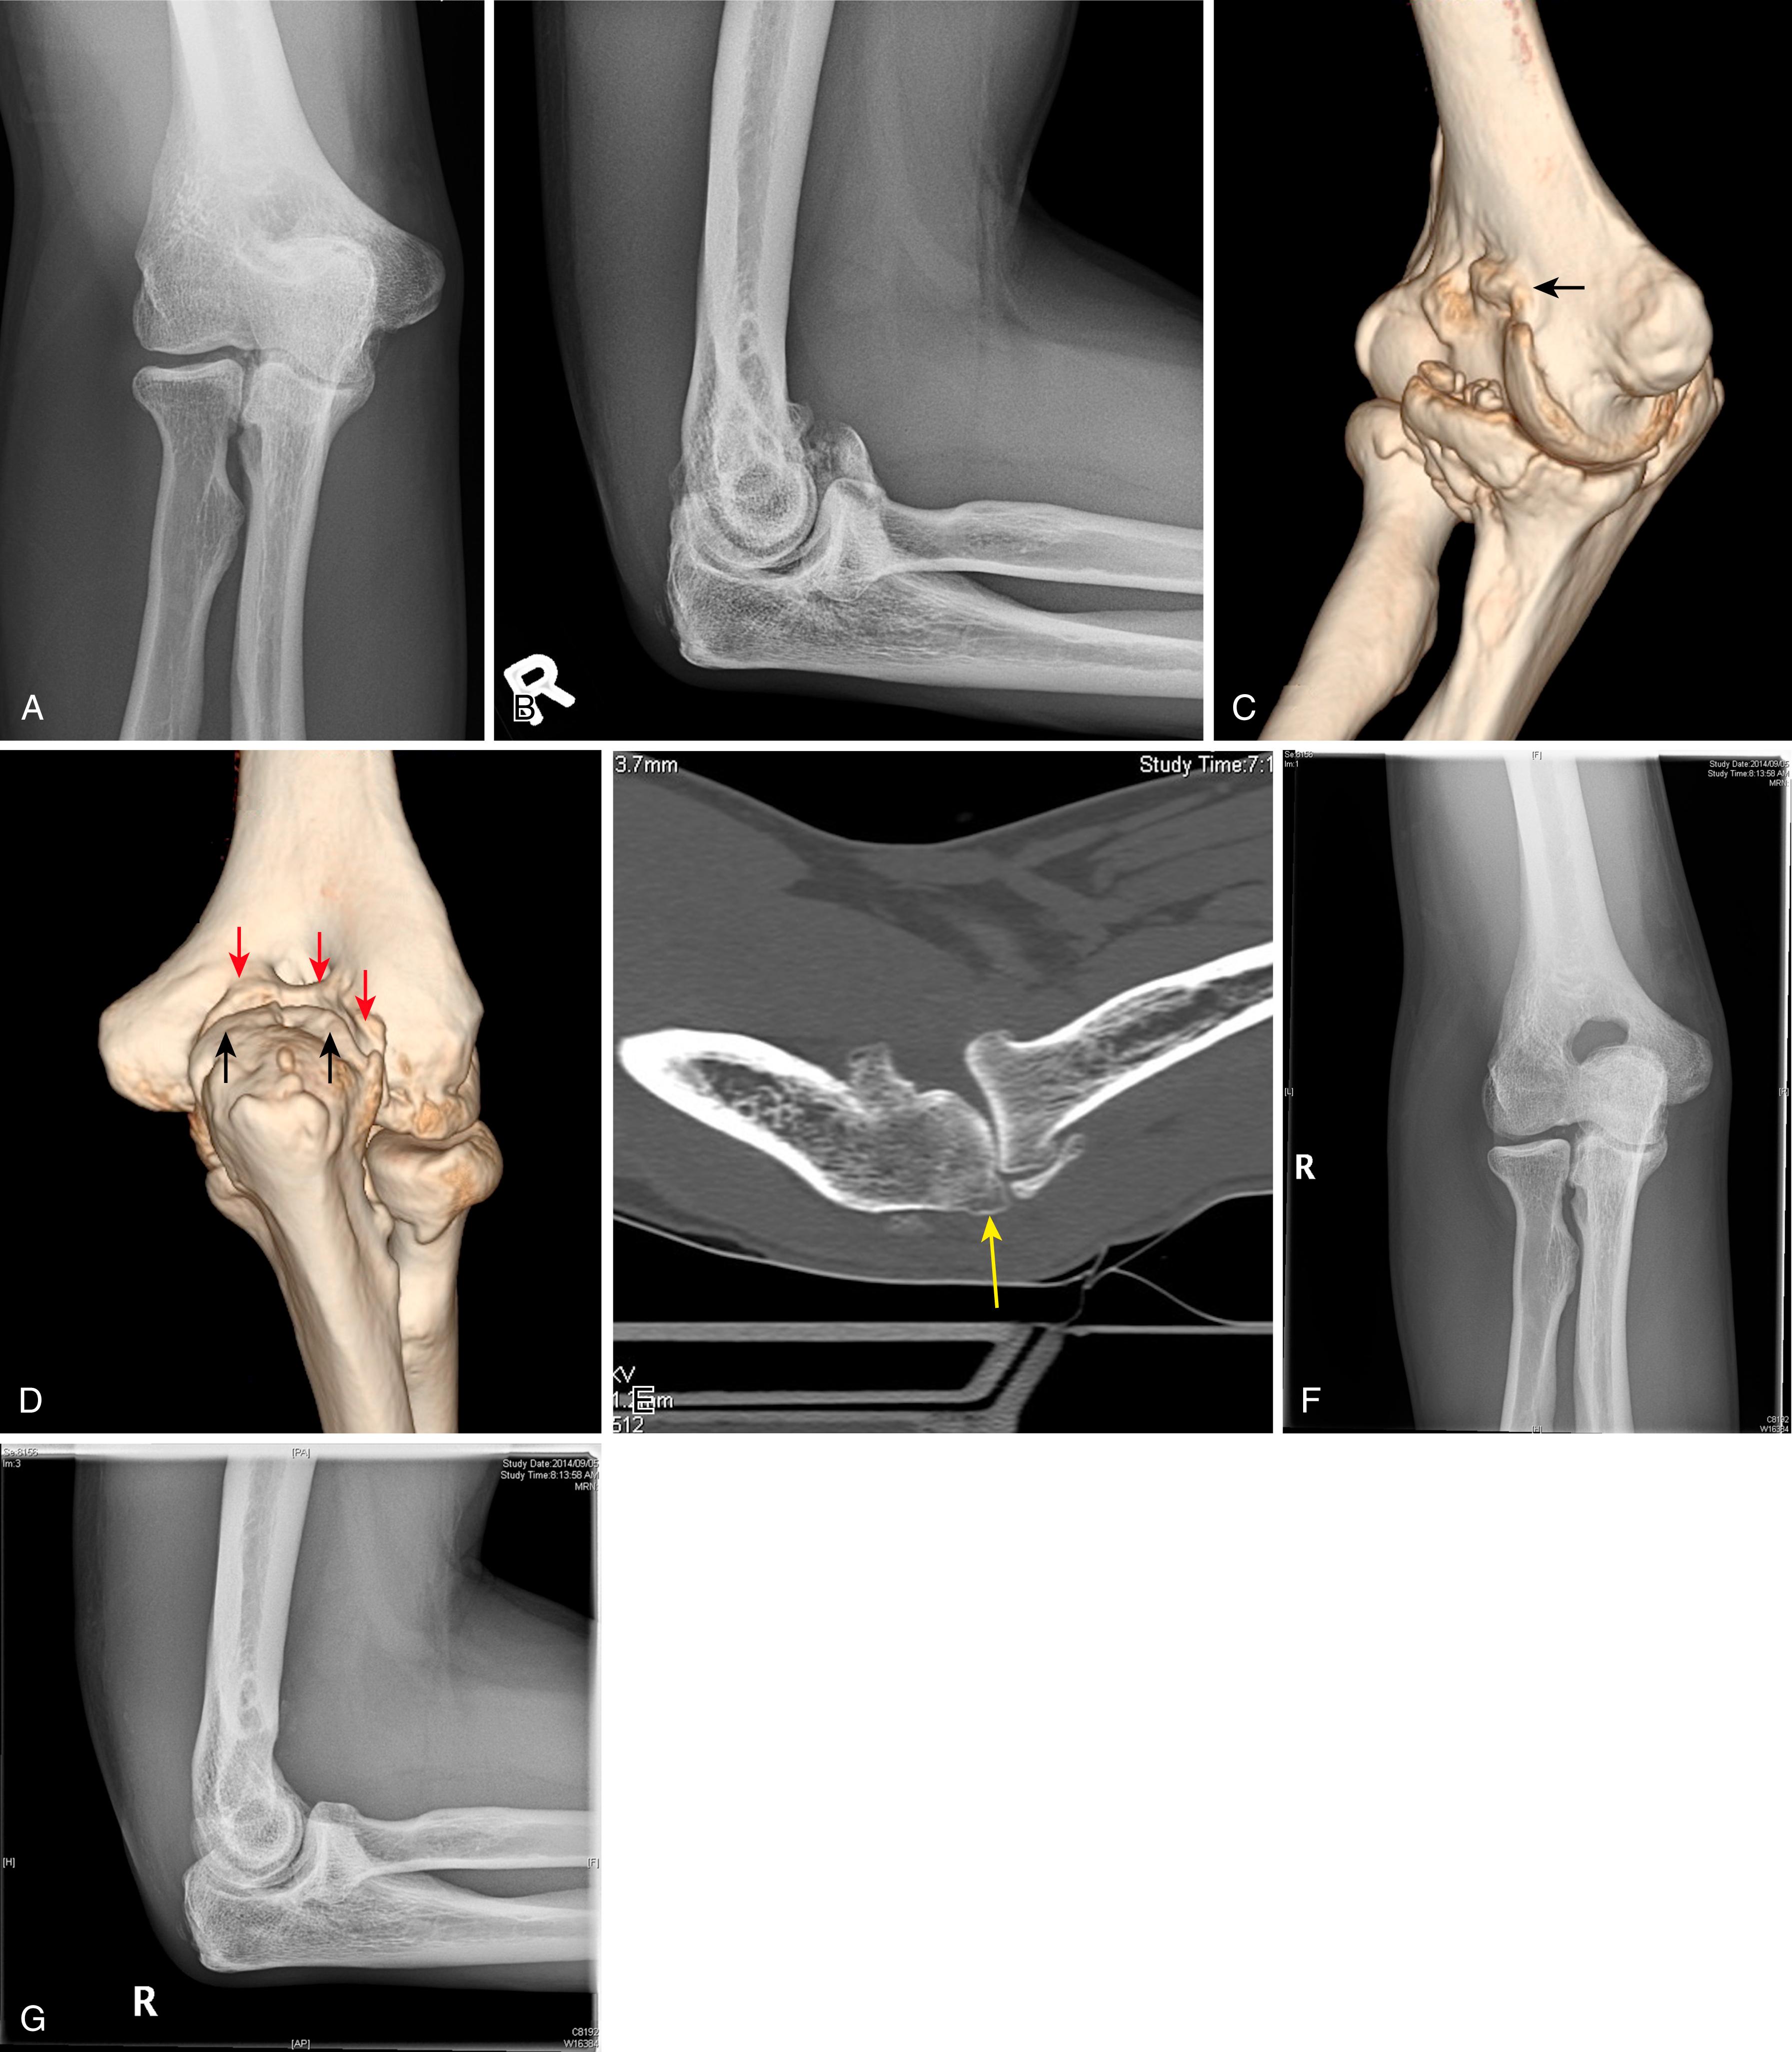
CT is also useful for characterizing fractures that are amenable to arthroscopic fixation, such as fractures of the coronoid, capitellum, distal humerus, and radial head. Additionally, the size, orientation, and depth of OCD lesions can be appreciated along with characterization of the OCD fragment to determine its size and reparability. In cases of loose body symptoms, many may be cartilaginous, and therefore a CT arthrogram or magnetic resonance imaging (MRI) may be beneficial if standard imaging techniques are normal.
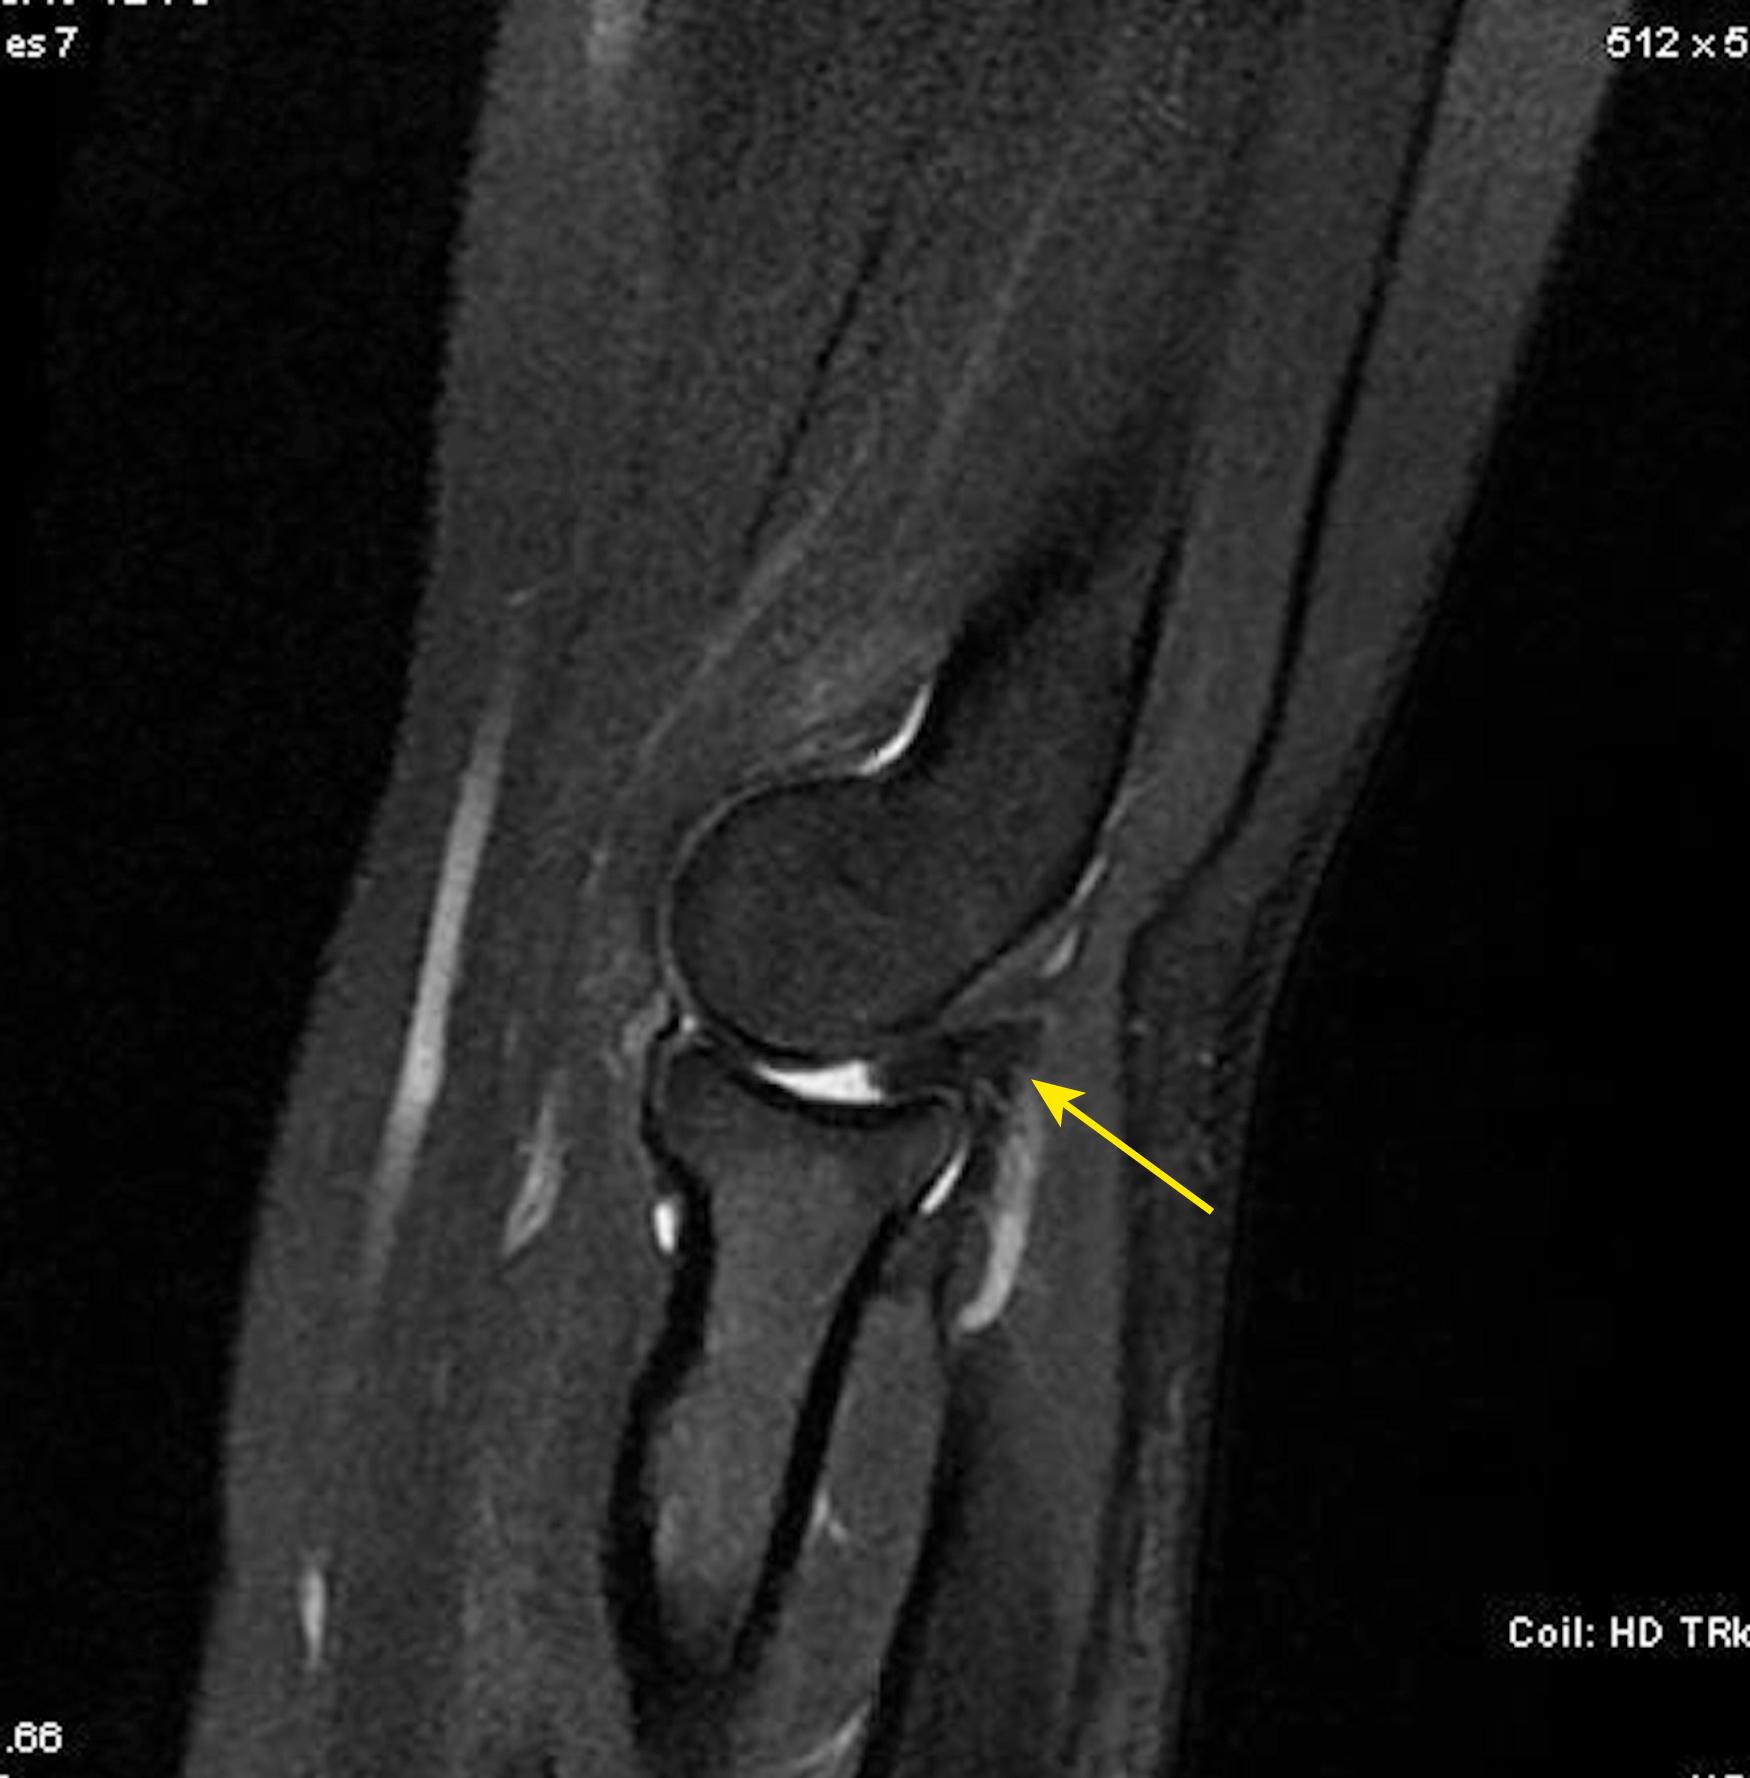
MRI is a useful imaging modality if required to assist with the diagnosis of soft tissue–related disorders. Typically, many soft tissue disorders can be diagnosed on clinical examination, such as tears of the medial collateral ligament, lateral epicondylitis, medial epicondylitis, triceps tears, and distal biceps tears. In cases of intraarticular pathology, MRI is helpful, such as with imaging of a radiocapitellar plica ( Fig. 26.2 ), OCD lesions, or cartilaginous loose bodies.
Elbow arthroscopy may be performed under a general anesthetic or a regional anesthetic. A general anesthetic has the advantage of muscle relaxation and ease of patient positioning. For arthroscopy, patients may be positioned either lateral decubitus or prone, both of which are positions poorly tolerated by awake patients. Regional anesthetic techniques, such as supraclavicular and interscalene blocks, are also common; however, patients should be educated on the length of the procedure and the requirement to remain still. In addition to regional blocks, intravenous sedation may be beneficial for patient relaxation. However, it must be emphasized that prone positioning with a regional block and sedation does put the patient at risk for hypoventilation and hypoxia.
After appropriate anesthesia, patient positioning, and arthroscopy setup are important first steps to a successful procedure. A poorly positioned patient will result in challenges with portal design and creation, joint instrumentation, and potentially limited visualization. For positioning, as noted above, patients are typically prone or lateral. Supine positioning is a less common option. Positioning typically depends on surgeon preference; however, certain pathologies may lend themselves to one form of positioning over another.
The supine position was first reported by Andrews and Carson and involves abducting the extremity to 90 degrees and flexing the elbow to 90 degrees. The wrist and/or forearm are then secured to an overhead traction device. The advantage of this arrangement is that it is well known to anesthesia and nursing, airway access is routine, and there is a lower risk of positioning-related complications, such as compressive neuropathies. Another advantage of supine positioning is that the arthroscopic procedure can be easily converted to open. Disadvantages of supine positioning include the need for overhead traction and more difficult access to the posterior elbow compartment.
Prone positioning was described by Poehling et al. and involves placing the patient flat on chest bolsters. The arm is abducted to 90 degrees and the elbow is flexed over an elbow positioner. An advantage of prone positioning is that the posterior compartment of the elbow and the ulnar nerve are easily accessible, and a traction device or holder is not required. Disadvantages with the prone position are that it typically takes longer to set up, airway access is limited, and patients are susceptible to compression-related complications. Additionally, prone positioning is poorly tolerated with regional anesthetic techniques.
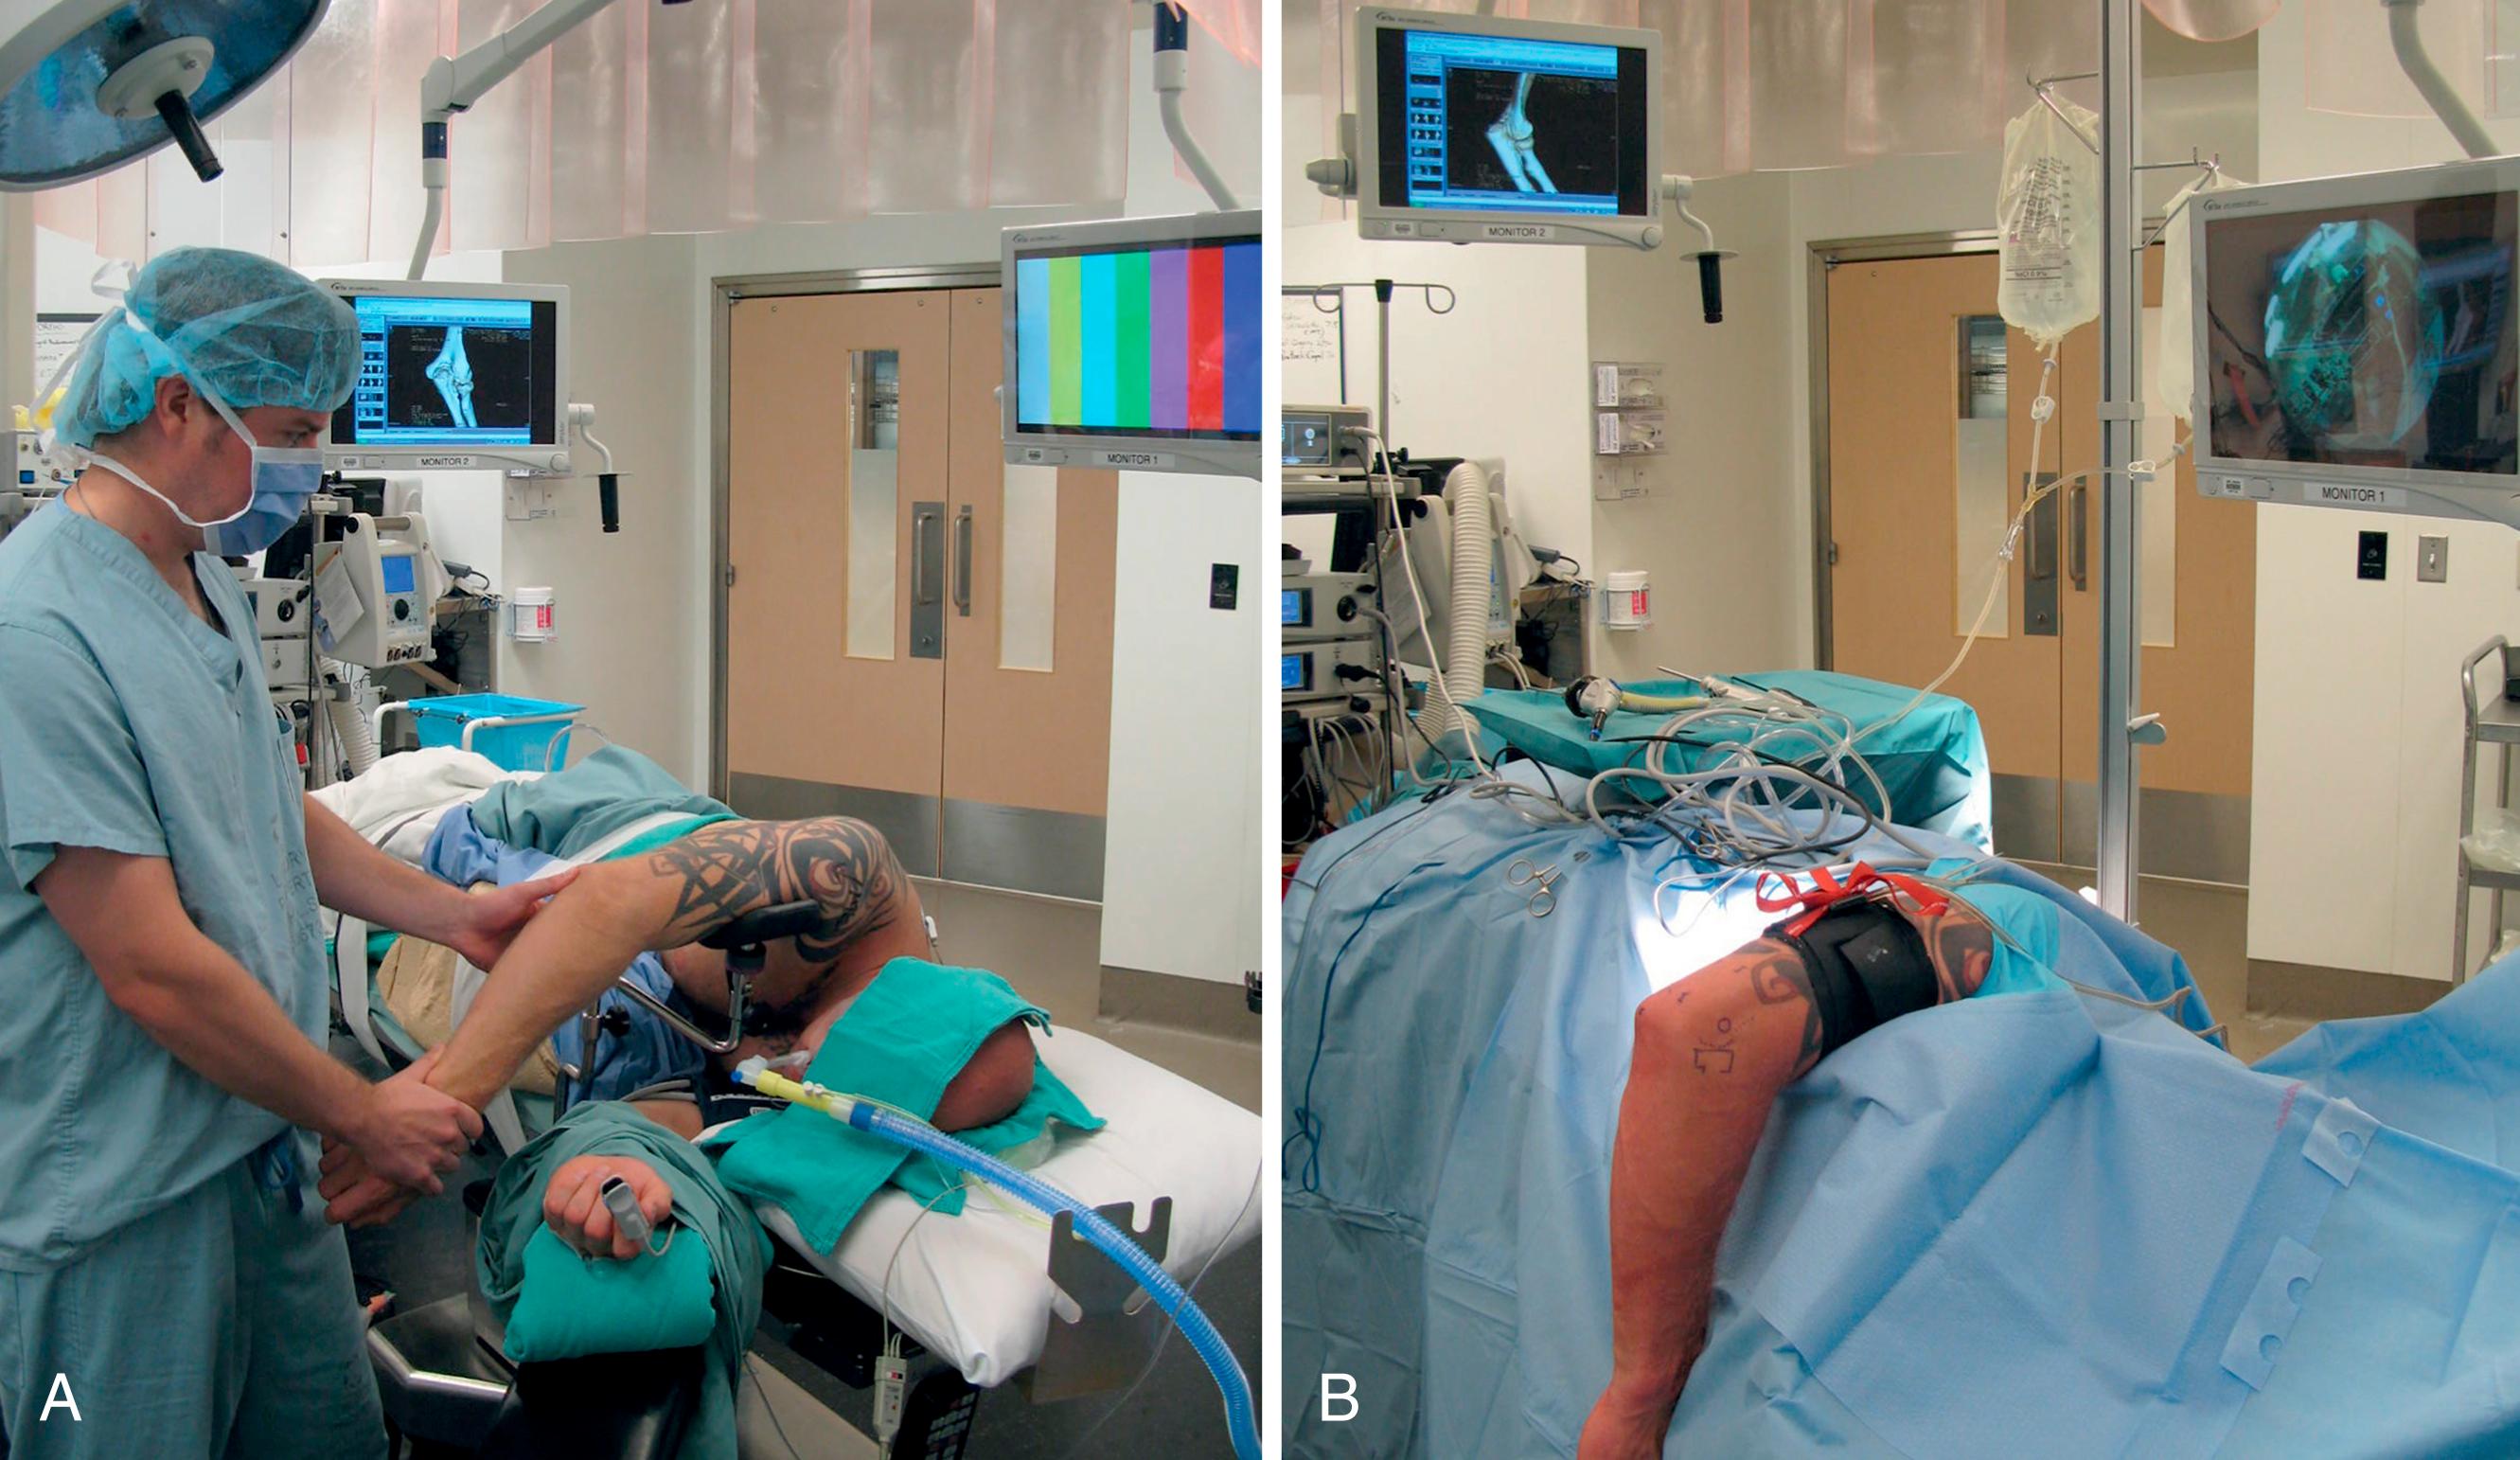
Lateral positioning, which is the author’s preferred position, involves positioning the patient operative side up on a bean bag. The nonoperative arm is placed in 90 degrees of forward elevation and 90 degrees of elbow flexion and rested on an arm board. A well-padded axillary roll is placed slightly distally in the nonoperative axilla to decrease pressure on the contralateral brachial plexus. Additionally, pillows and pads are placed between the legs and beneath the malleoli and fibular head of the lower leg. The operative arm is forward elevated to 90 degrees, internal rotated at the shoulder, and the elbow is flexed over an arm positioner ( Fig. 26.3 ). Advantages of lateral positioning include easier access to the posterior compartment, easier positioning than prone, and better access to the airway than prone positioning. Additionally, for awake regional anesthetic techniques, patients better tolerate the lateral position than the prone position. Disadvantages of lateral positioning include longer time to position compared with supine, risk of compression-related complications, and that conversion to open debridement may require repositioning. Shoulder mobility is also more limited in the lateral decubitus position compared with being fully prone.
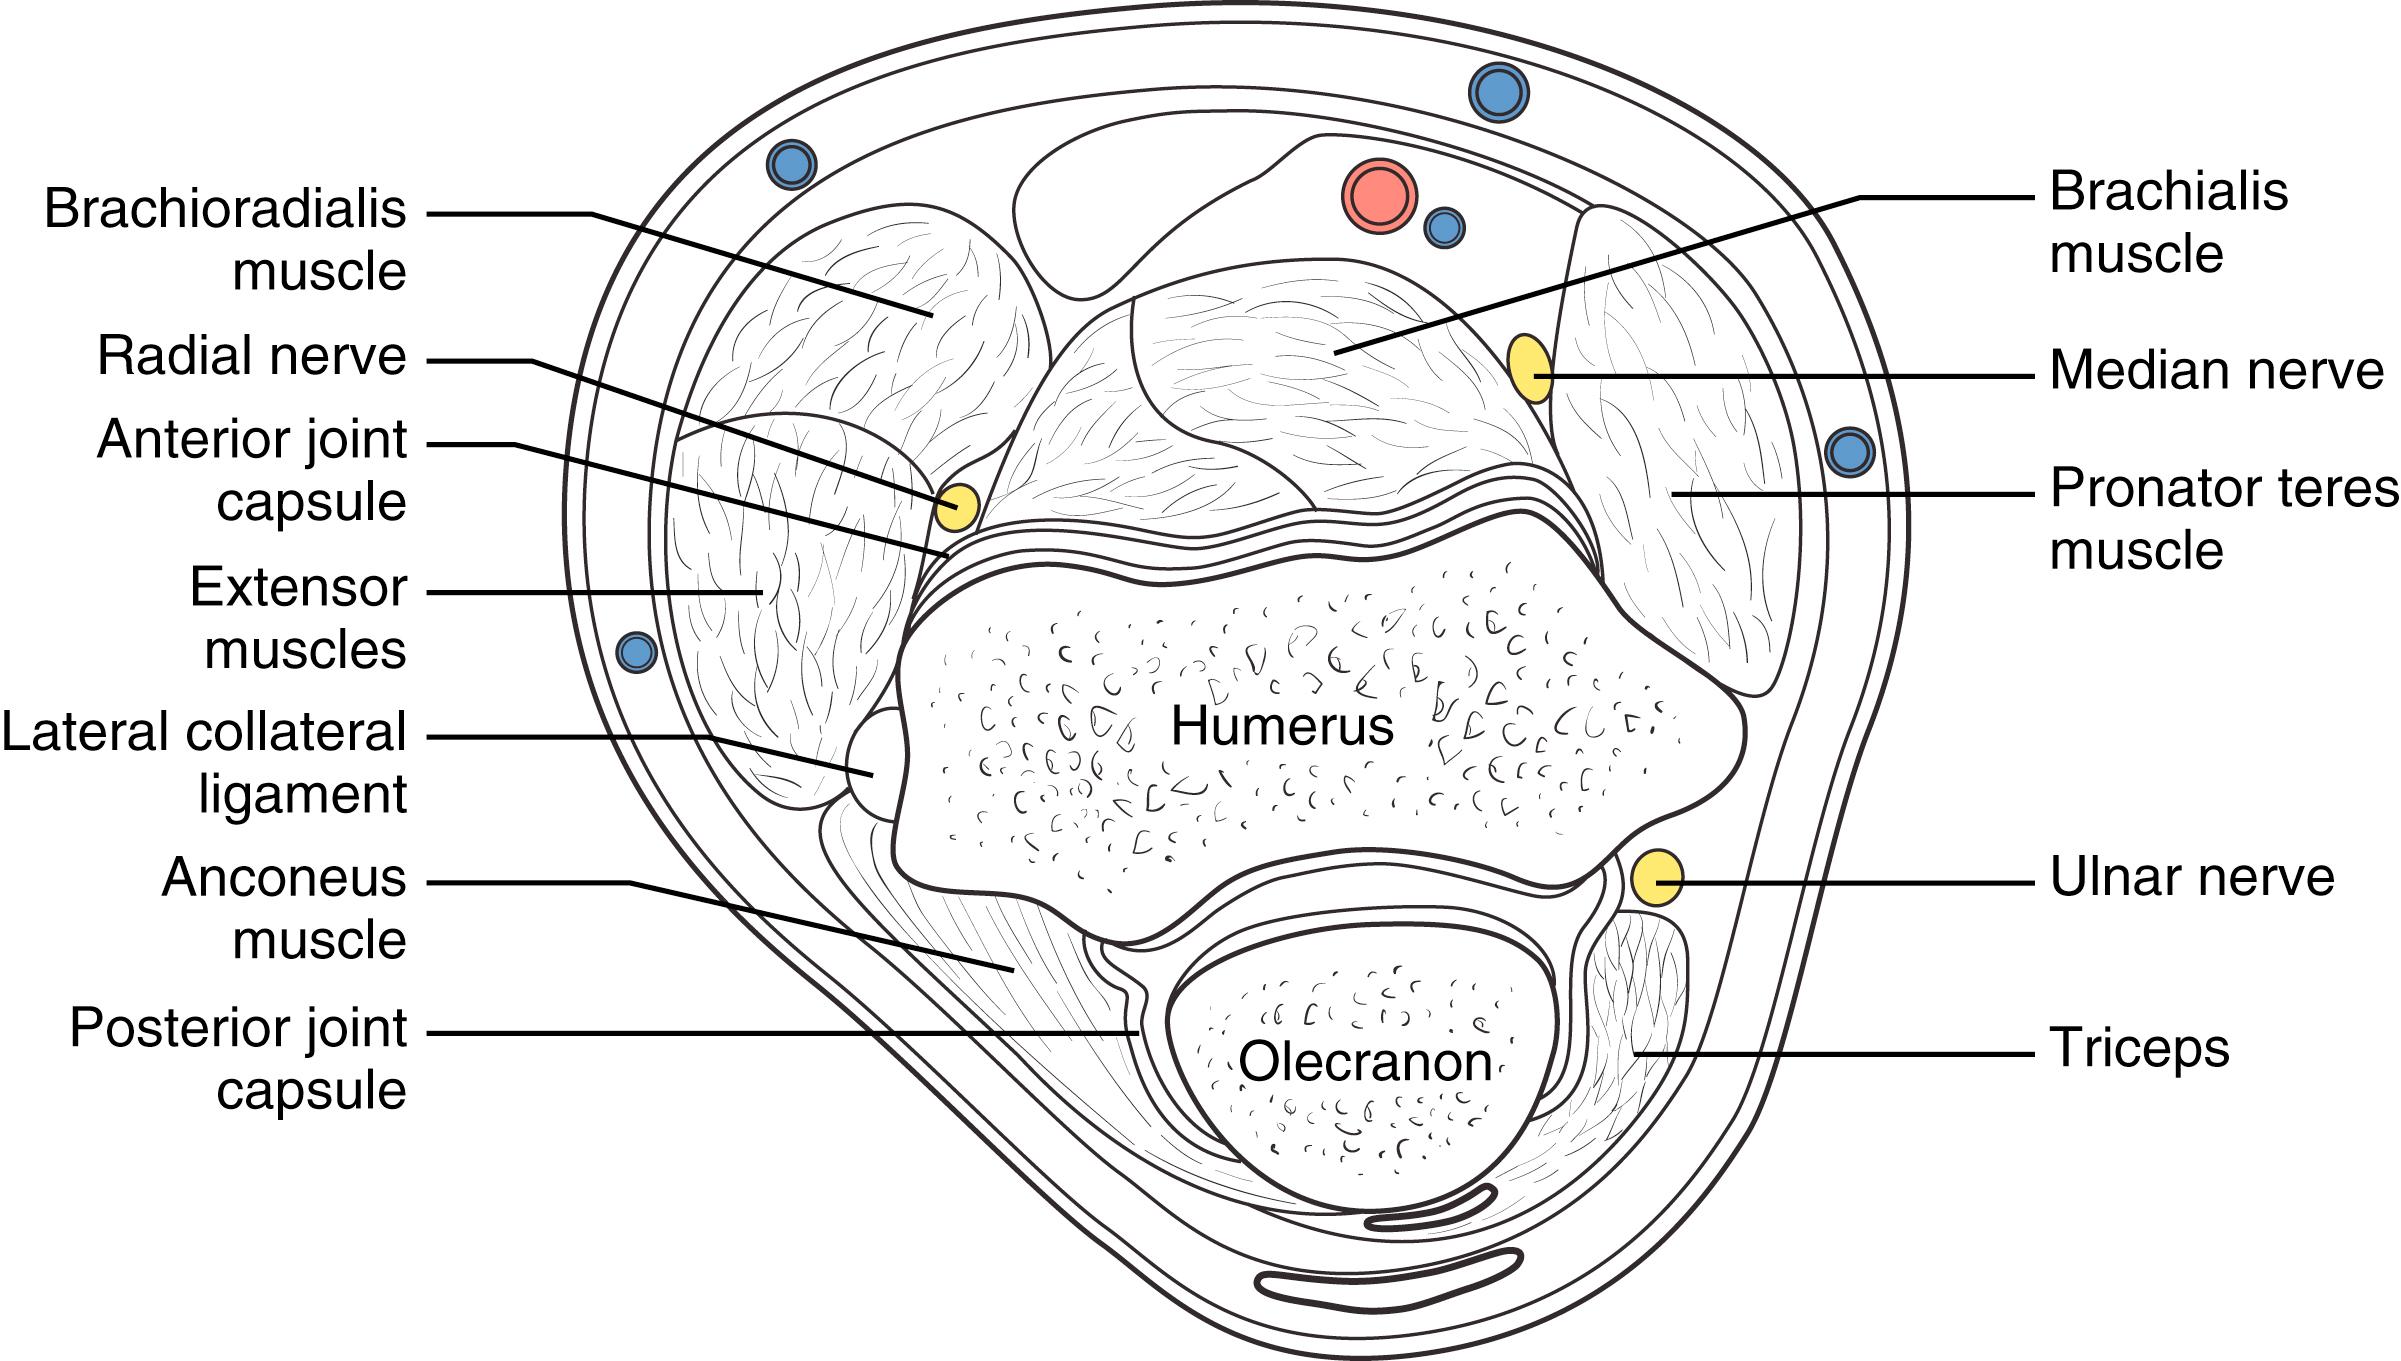
The elbow, fortunately, has several subcutaneous bony landmarks that can assist with orientation, location of neurovascular structures, and creation of safe portals. The neurovascular structures are of special importance due to their close proximity to arthroscopic portals and the joint capsule ( Fig. 26.4 ). The median nerve and brachial artery are located just superficial to the anteromedial joint capsule and brachialis muscle. On the anterolateral side of the elbow, the radial nerve splits into the superficial sensory branch and the posterior interosseous nerve. The posterior interosseous nerve is just superficial to the anterior joint capsule and at the level of the radiocapitellar joint; it courses longitudinally along the medial side of the capitellum. At the level of the joint, a thin layer of brachialis lies between the posterior interosseous nerve and the capsule; however, distally at the level of the radial neck, the nerve may come in direct contact with the capsule. As such, capsular resection at the level of the radial neck should be avoided or conducted with extreme caution as the nerve may be adherent to the joint capsule. Finally, the ulnar nerve is located just superficial to the posteromedial joint capsule and should be identified and assessed for anterior subluxation with palpation. Alternatively, if any concerns exist with respect to the ulnar nerve, it can be identified via arthroscopic exposure or by a miniopen incision.
The locations of the above nerves can be predicted based on an assessment of surface anatomy. Typically, landmarks that are marked on the elbow prior to starting arthroscopy are the medial epicondyle, ulnar nerve, olecranon, lateral epicondyle, and radial head. Special care is taken to draw out the path of the ulnar nerve.
Arthroscopy of the elbow joint can be divided into three compartments: anterior, posterior, and posterolateral (posterior radiocapitellar). Several portals may be used to address pathology within a compartment. It is not unusual to use four to six portals for a simple elbow arthroscopy and up to seven or eight for more complex cases.
There are five commonly described anterior joint arthroscopy portals. On the medial side of the elbow, two portals are commonly utilized: the anteromedial portal and the proximal anteromedial portal. On the lateral side, three portals are described: the proximal anterolateral, midanterolateral, and distal anterolateral. All portals are typically created with the elbow flexed to 90 degrees. Prior to creating portals, a sterile tourniquet is inflated to 250 mm Hg, and 20 to 40 mL of saline is injected into the joint for distension. The saline is injected with a syringe either through the soft spot (triangle between the lateral epicondyle, radial head, and olecranon) or percutaneously through the triceps tendon into the olecranon fossa.
The proximal anteromedial portal is likely the most frequently used anteromedial portal ( Fig. 26.5 ). It was described by Poehling et al. to be located approximately 2 cm proximal to the medial epicondyle and just anterior to the medial intermuscular septum. To create this portal, the medial intermuscular septum is palpated and a surgical marker is used to mark a location approximately 2 cm proximal to the medial epicondyle. The location of this portal in the proximal–distal direction will vary according to patient size. The goal of this portal is to have entry into the joint just proximal to the level of the superior aspect of the medial trochlea. Prior to incising the skin, the location of the ulnar nerve posterior to the medial epicondyle is confirmed. After the skin is incised, to create a portal, a blunt trocar can be used or dissection carried down to the capsule with a hemostat. It is the author’s preference to use a dull switching stick to enter the joint aiming toward the capitellum, while keeping contact with the anterior humerus. Inserting a standard 30-degree arthroscope through this portal will allow visualization of the entire anterior joint compartment, including the radial head, capitellum, trochlea, and coronoid.
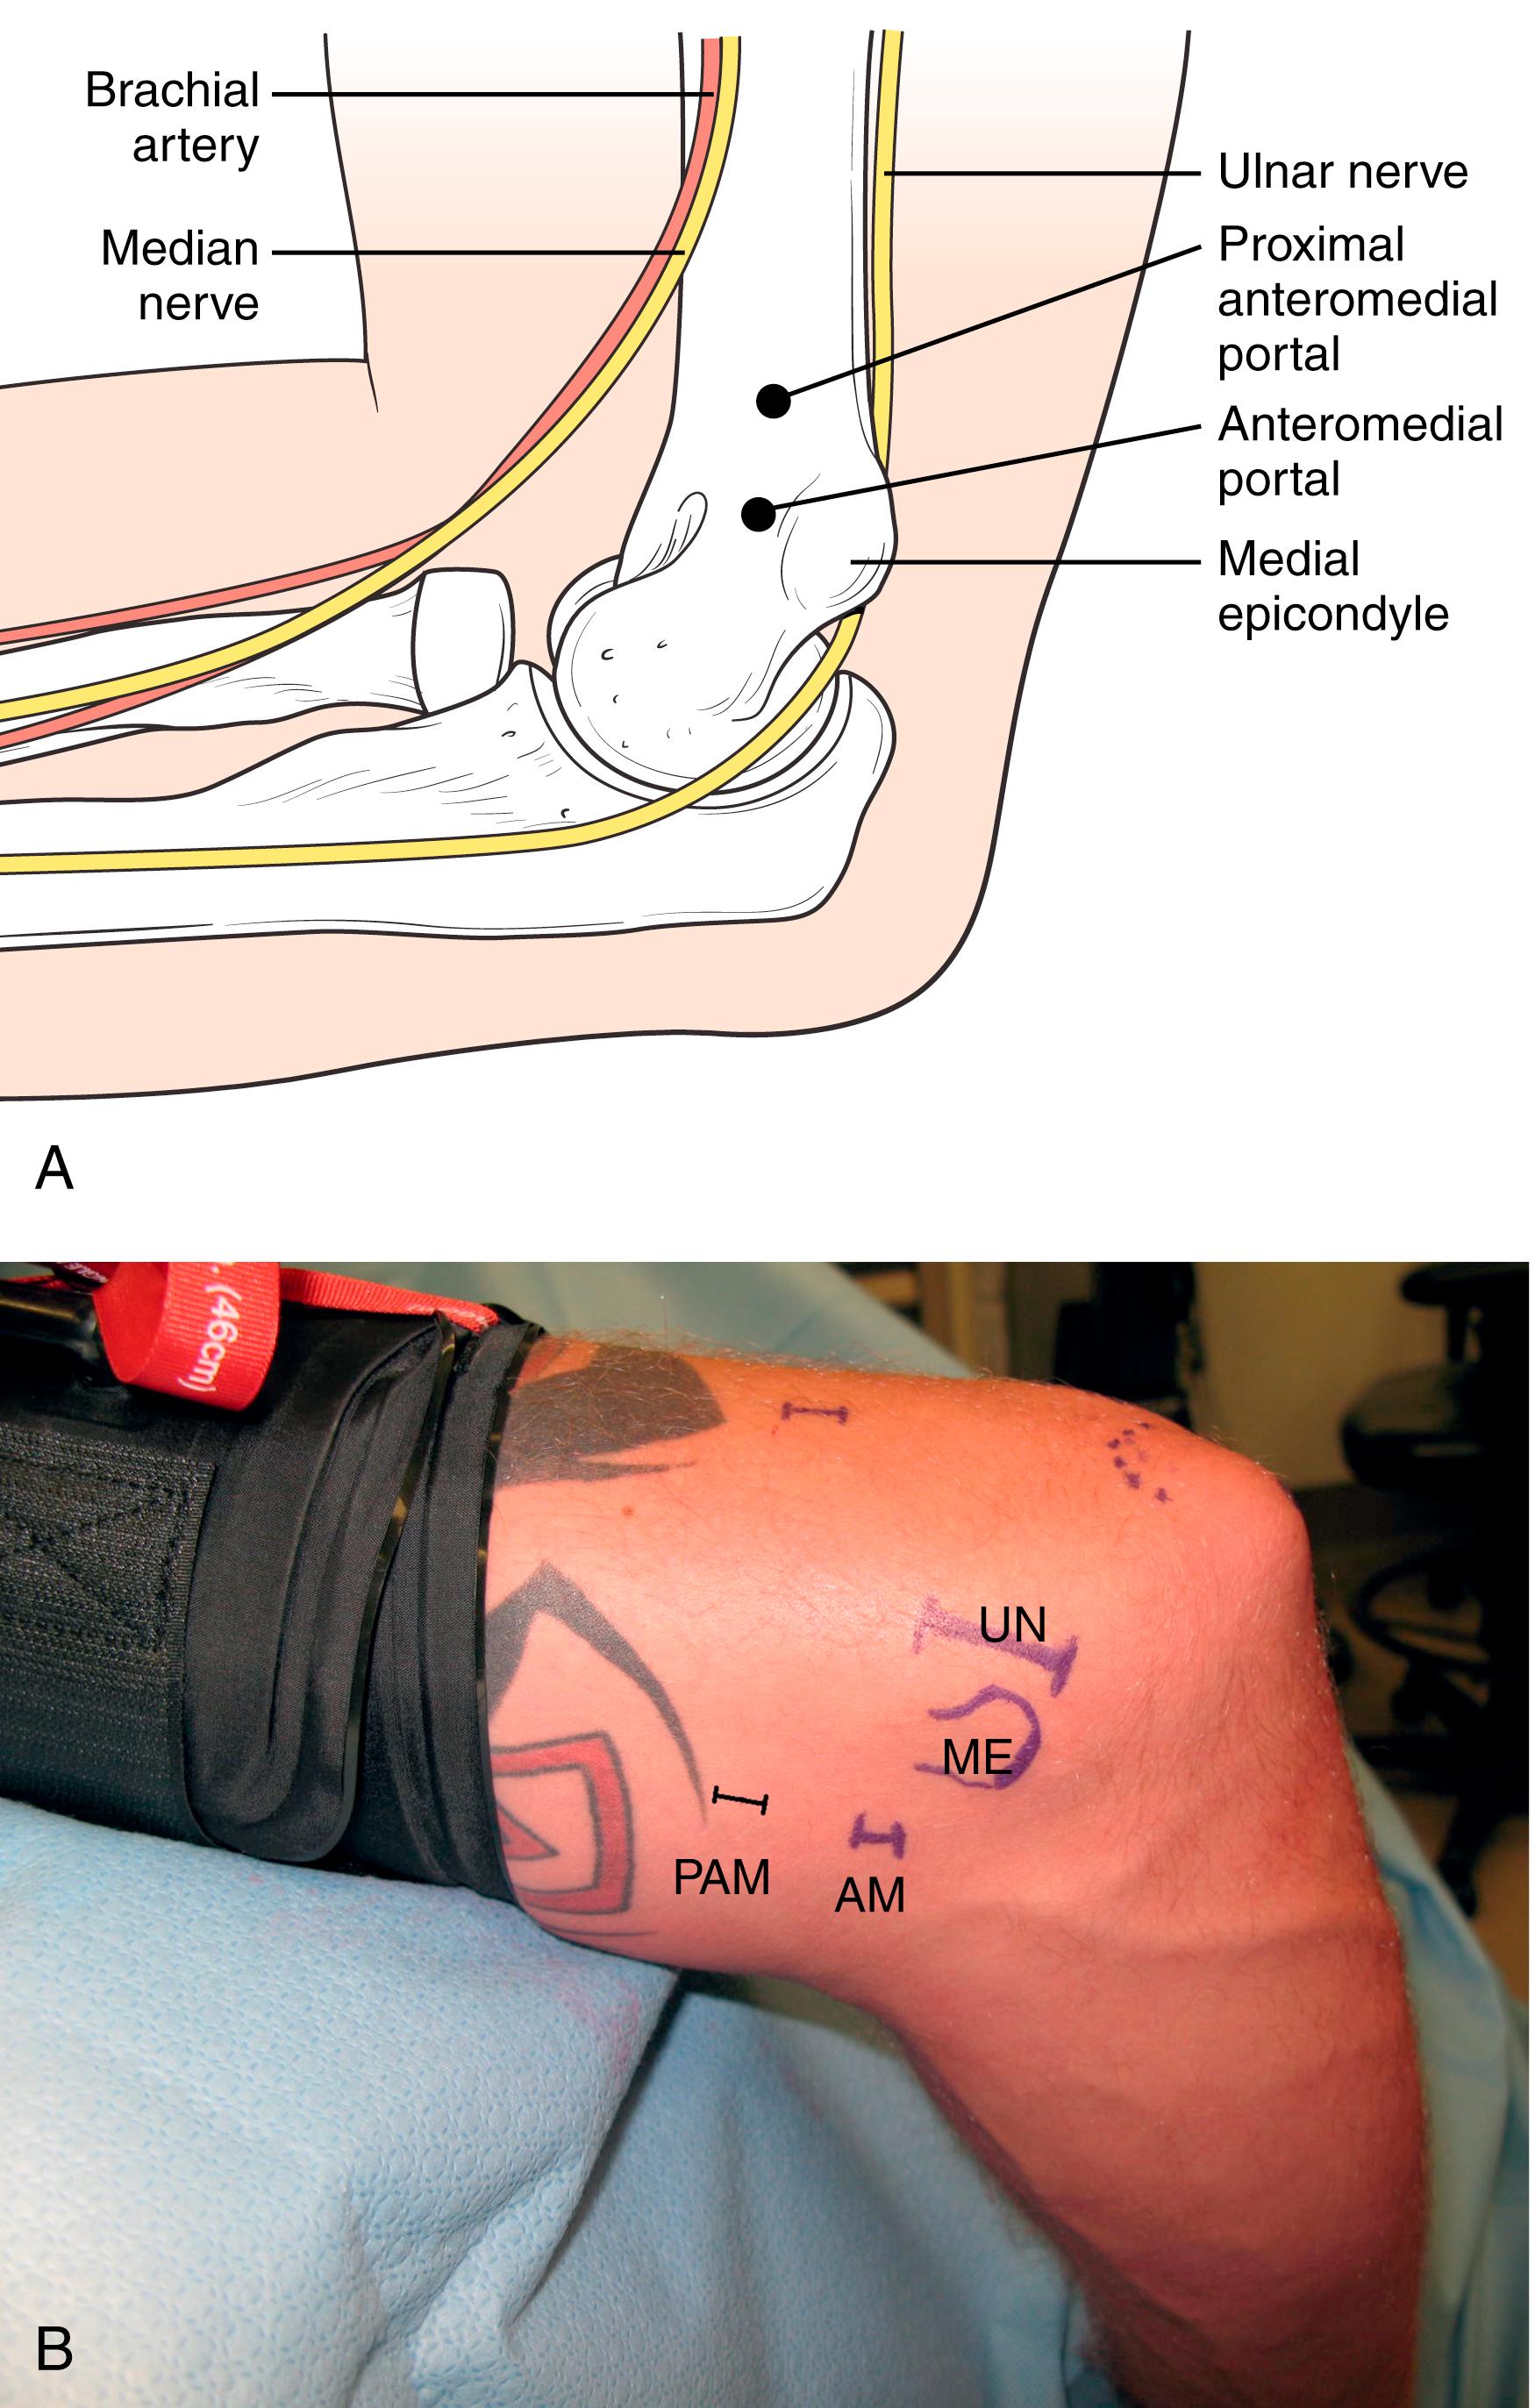
The standard anteromedial portal is described as 2 cm distal and 2 cm anterior to the medial epicondyle. This portal enters the elbow at the level of the anteromedial joint line. The portal is created by directing the trocar directly laterally, which does place this portal in very close proximity to the median and medial antebrachial cutaneous nerves. The standard anteromedial portal, although described in the literature, is not recommend by the author of this chapter as the proximal anteromedial portal affords better visualization and is farther away from local nerves.
There are three commonly described anterolateral portals for anterior compartment arthroscopy: proximal anterolateral, midanterolateral, and distal anterolateral.
The proximal anterolateral portal has been described by several authors. , It is templated 2 cm proximal and 1 to 2 cm anterior to the lateral epicondyle. The portal is directed toward the center of the joint with the tip of the trocar maintaining contact with the anterolateral humerus ( Fig. 26.6 ). This portal has been described as the safest of the anterolateral portals. Through this portal, the entire anterior compartment can be visualized, especially the anteromedial joint structures, such as the medial trochlea and anteromedial coronoid. When working through this portal, good access is obtained to the capitellum, radial head, radial fossa, anterolateral joint capsule, and extensor tendon origin. When viewing from the medial side, this portal can be made using an outside-in technique with a spinal needle for localization.
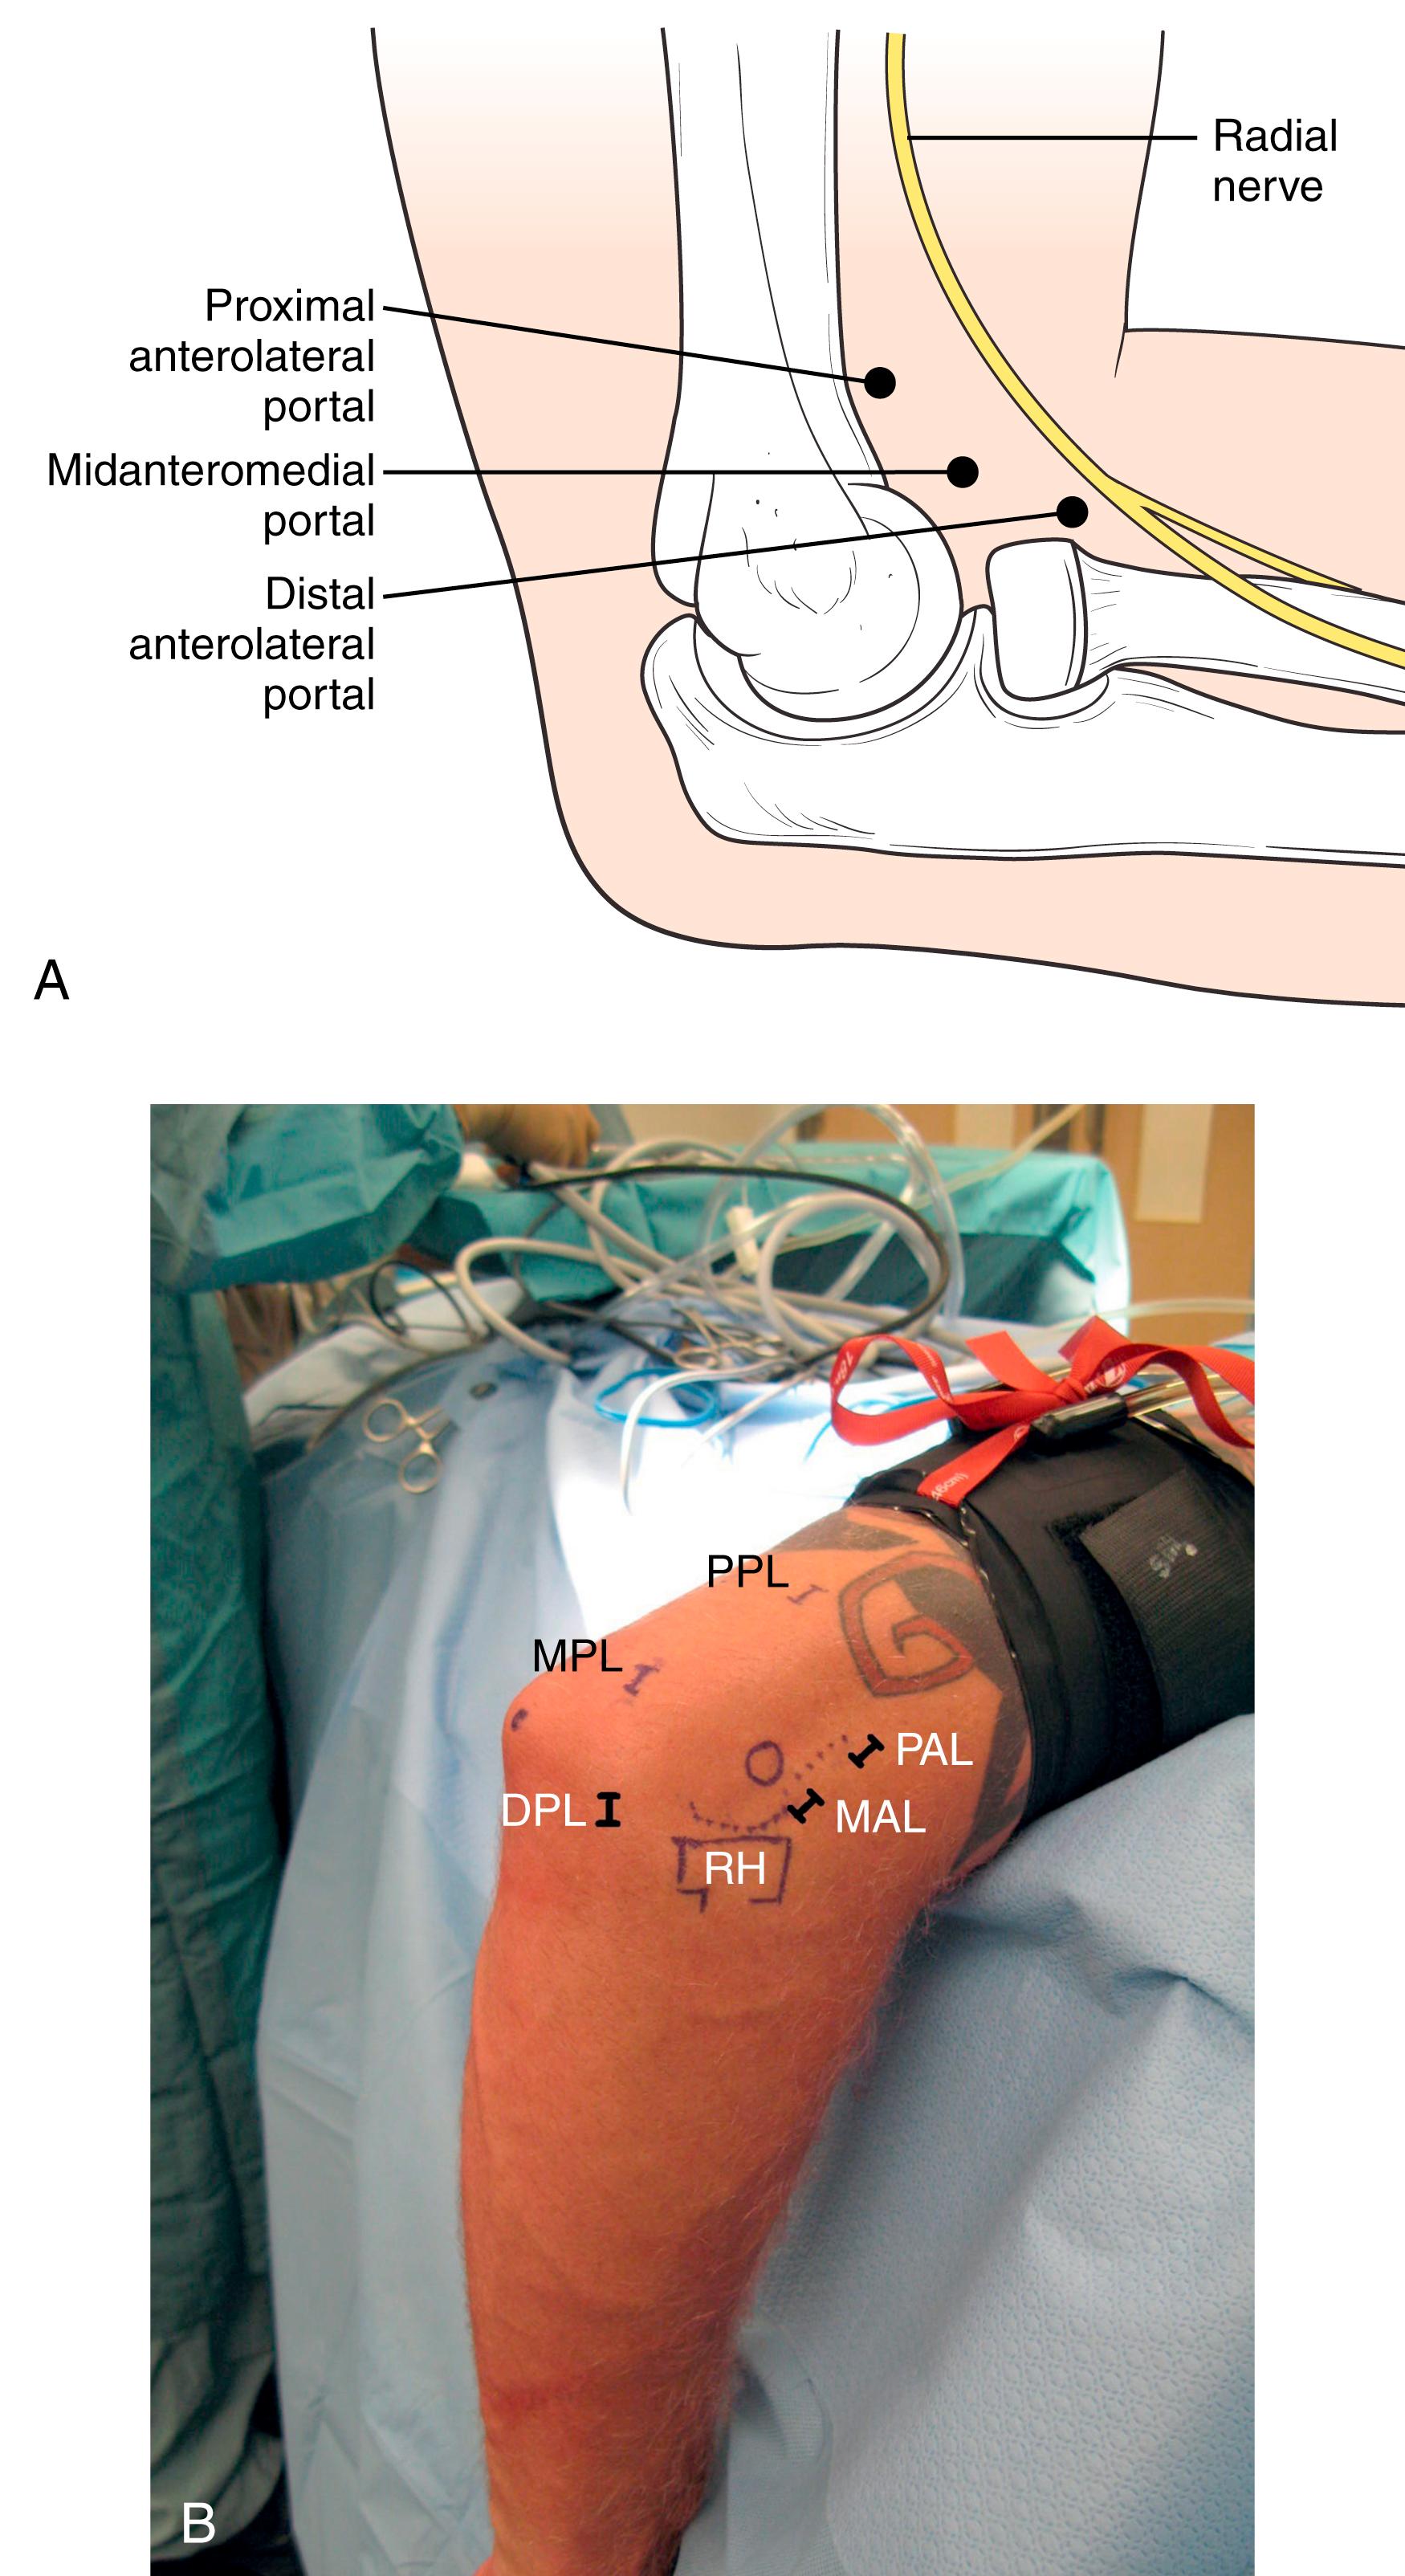
The midanterolateral portal is also known as the anterosuperior lateral portal. This portal is landmarked 1 cm anterior to the lateral epicondyle (see Fig. 26.6 ). This portal can be made via an outside-in or inside-out technique. The portal enters the elbow joint at the superior aspect of the radiocapitellar joint and is multipurpose. It can be used as a viewing portal, an instrumentation portal, or an accessory portal.
The distal anterolateral portal is also known as the original anterolateral portal. This portal was described by Andrews and Carson and is located 3 cm distal and 1 cm anterior to the lateral epicondyle. This portal has been shown to be quite close to the radial nerve and the posterior antebrachial cutaneous nerve. Due to the proximity of this portal to neurologic structures, and because the midanterolateral and proximal anterolateral portals offer similar capabilities, most would recommend against its use.
There are typically three posterior compartment portals: the posterior central portal, the proximal posterolateral portal, and the midposterolateral portal.
The posterior central portal is also referred to as the straight posterior portal or the direct posterior portal. This portal is located midline approximately 3 cm proximal to the tip of the olecranon ( Fig. 26.7 ). The orientation of the portal is obliquely directed through the musculotendinous junction of the triceps mechanism to the olecranon fossa. This portal functions as both a working portal and a viewing portal.
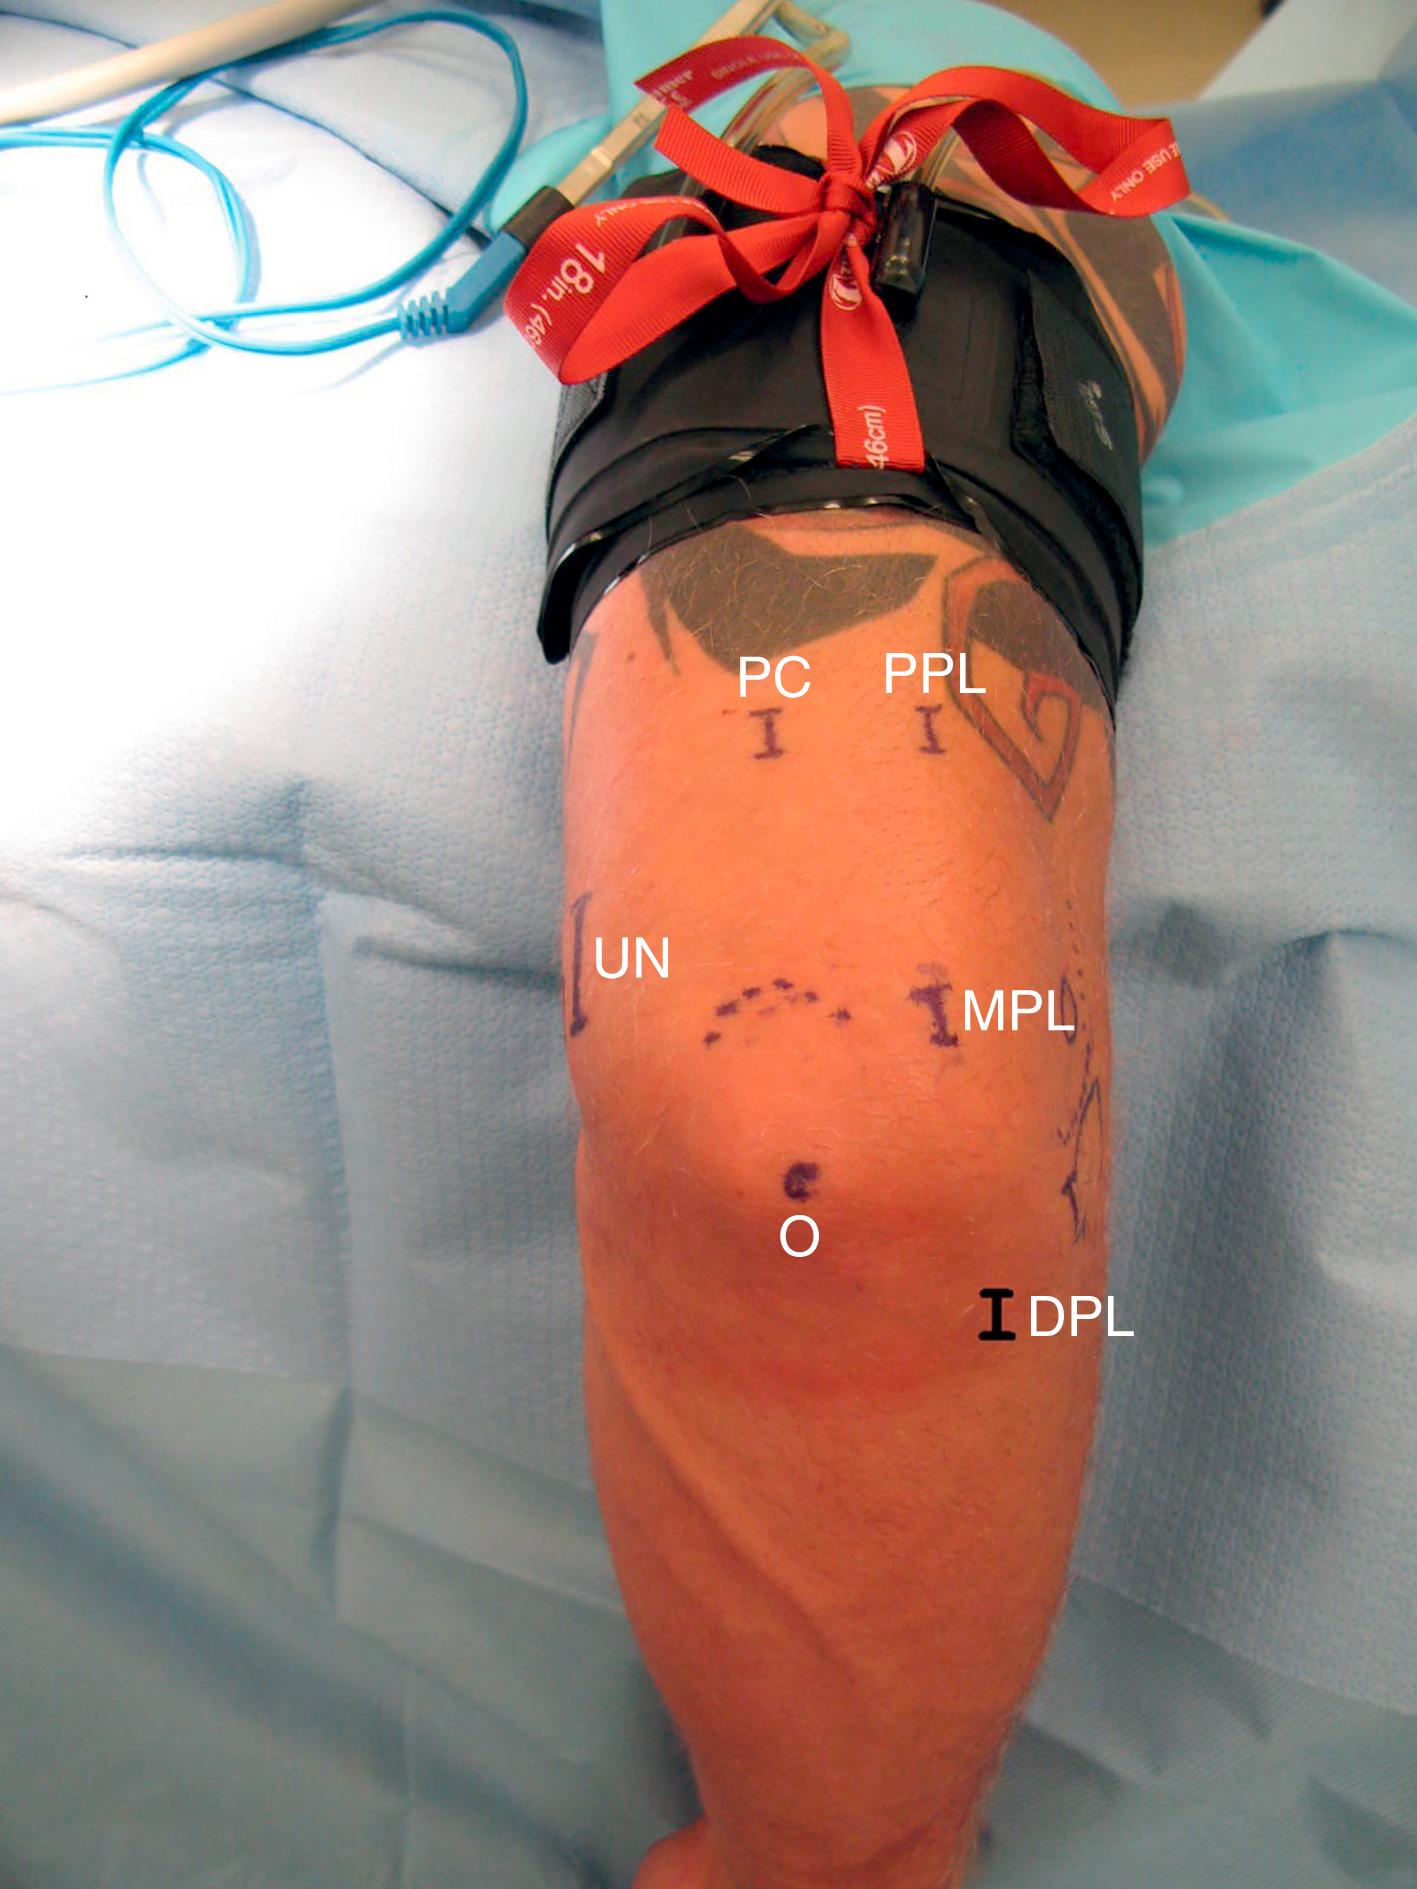
The proximal posterolateral portal is located adjacent to the posterior central portal along the lateral margin of the triceps (see Fig. 26.7 ). This portal is typically made with an outside-in technique using a spinal needle or trocar. This portal typically functions as a viewing portal as it provides good visualization of the olecranon process, olecranon fossa, and the medial gutter of the elbow joint. When conducting a medial gutter debridement with the camera in the proximal posterolateral portal, a retractor may be introduced through the posterior central portal to protect the medial gutter capsule and the immediately adjacent ulnar nerve.
The midposterolateral portal is usually the starting viewing portal for posterior joint arthroscopy. This portal is located in the proximal aspect of the lateral gutter as it enters the olecranon fossa. The landmarks for this portal require drawing a line from the subcutaneous olecranon tip to the lateral epicondyle. The midpoint of this line is typically located over the posterolateral ulnohumeral joint (lateral gutter). The midposterolateral portal is made approximately 1 cm more proximal, and the portal trajectory is into the olecranon fossa (see Fig. 26.7 ). By placing this portal 1 cm proximal to the lateral gutter, a 30-degree scope can be used to visualize past the olecranon tip and down the medial gutter. Additionally, any instrumentation inserted through this portal can be used in the medial gutter.
The posterolateral compartment is composed of the posterior aspect of the radiocapitellar joint and the distal lateral aspect of the ulnohumeral joint. The posterolateral compartment can be visualized and instrumented by several portals: midposterolateral, distal posterolateral, and the distal ulnar.
The midposterolateral portal is described above as a posterior compartment portal. This portal can also be used to visualize the posterolateral elbow compartment. By advancing the scope distally along the lateral margin of the ulnohumeral joint, the posterolateral compartment can be reached.
The distal posterolateral portal is also referred to as the midlateral portal, the direct lateral portal, or the soft spot portal. This portal is created at the center of a triangle created between the olecranon tip, radial head, and lateral epicondyle. This portal traverses through the anconeus muscle. This portal can be used as a working portal with visualization obtained from the midposterolateral portal. In larger individuals and in some conditions such as osteochondritis of the capitellum, a second distal posterolateral portal can be made adjacent to the first one. This allows direct visualization of the inferior hemisphere of the capitellum and the radial head. With side-by-side distal posterolateral portals, one portal is used for visualization and the other for instrumentation (see Fig. 26.7 ).
The distal ulnar portal is described as 3 to 4 cm distal to the posterior aspect of the radiocapitellar joint and just lateral to the palpable subcutaneous border of the ulna. The trajectory of the portal is directed deep and obliquely toward the posterior radiocapitellar joint. This portal is usually used as a viewing portal, which renders the standard distal posterolateral portal available for a working portal.
Fluid management techniques for elbow arthroscopy include gravity inflow versus commercially available arthroscopic pumps. In general, it is the author’s preference to use gravity inflow with two 3-L bags of normal saline placed to a height of approximately 5 ft. The gravity method is cheap and easy to use; however, vigilance is required to monitor the elbow for swelling. It is the author’s preference to use a sterile tourniquet, although a nonsterile tourniquet may also be used.
In general, a standard 4-mm 30-degree arthroscope is used; however, smaller scopes may be required for smaller elbows or to visualize tight areas. Cannulas may or may not be used, depending on surgeon preference. Standard arthroscopic instruments include a dull switching stick, a pointed switching stick, an arthroscopic grasper (or pituitary grasper), a motorized arthroscopic shaver, and a motorized arthroscopic bur ( Fig. 26.8 ). Other instruments that may be beneficial during elbow arthroscopy include a Howarth retractor, which is used to retract tissues such as the joint capsule or to protect neurovascular structures. Curved and/or straight 5- to 8-mm osteotomes may be useful for removing osteophytes. Additionally, curved curettes may be useful to clear out spaces, such as the coronoid fossa and the radial fossa along the anterior aspect of humerus.
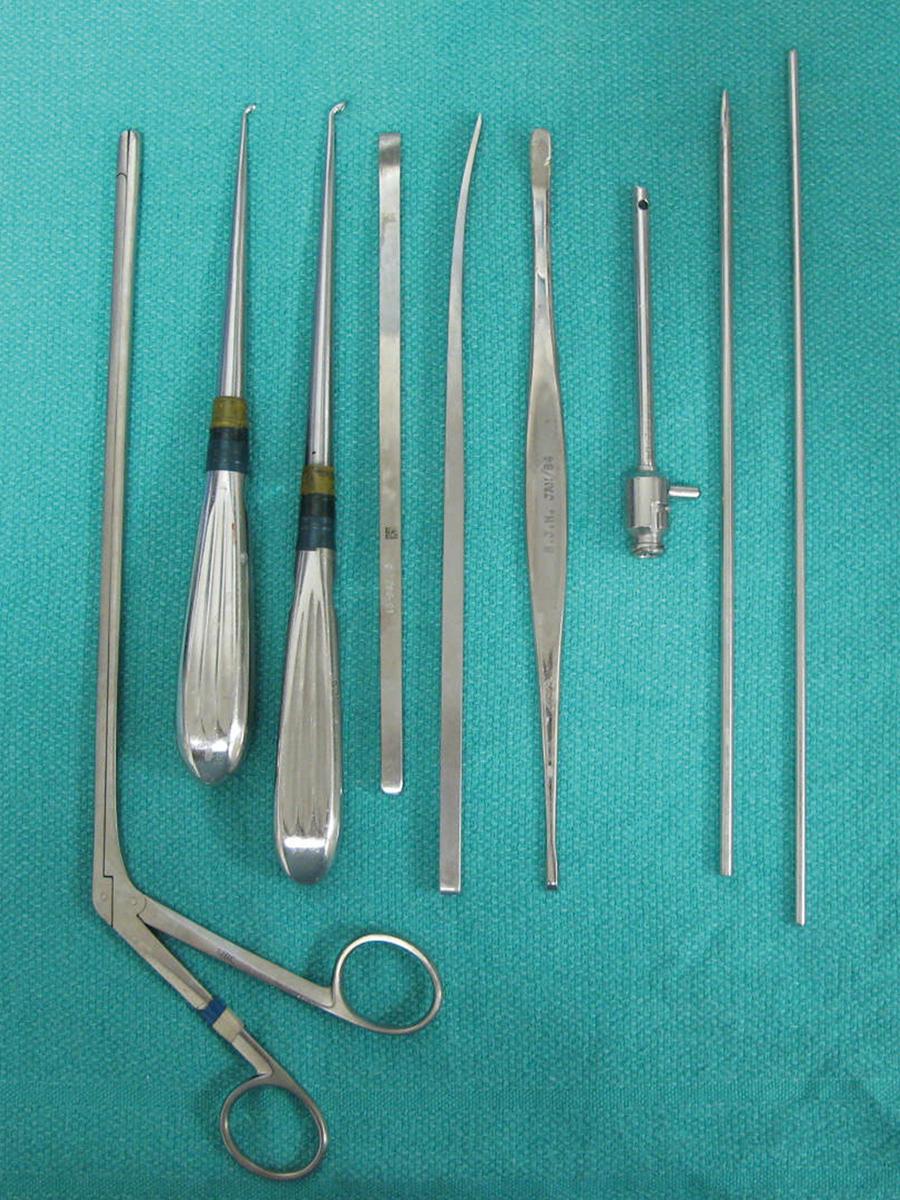
Specialized instrumentation may be required depending on the case being conducted. For example, arthroscopic fixation of fractures may require cannulated screws, fracture reduction clamps, and intraoperative fluoroscopy. The treatment of OCD with osteochondral grafts will require specialized arthroscopic harvest and insertion instruments.
In 1931, the elbow was described as a joint that was not suitable for arthroscopic examination. As little as 1 year later, the elbow was described as arthroscopically appropriate. Table 26.1 lists the historically important advancements in elbow arthroscopy.
| Author | Publication Date | Main Area of Contribution | Significance |
|---|---|---|---|
| Burman | 1932 | Technique | Reported that elbow arthroscopy was technically feasible |
| Andrews and Carson | 1985 | Technique | Described the initial technique of diagnostic arthroscopy and loose body removal |
| Guhl | 1985 | Technique and indications | Described the technique. Established indications for inflammatory synovectomy, debridement of OCD, excision of osteophytes, and treatment of fractures. |
| Lynch et al. | 1986 | Neurovascular anatomy | The proximity of neurovascular structures to portals described |
| Clarke | 1988 | Plica | Described the arthroscopic features of a radiocapitellar plica |
| O’Driscoll et al. | 1990 | Anatomy | Reported the intraarticular volume of the elbow joint |
| O’Driscoll et al. | 1992 | Risks | Reported on the complications associated with elbow arthroscopy |
| Jones et al. | 1993 | Contracture | Described the arthroscopic release of elbow flexion contractures |
| Lo and King | 1994 | Indications | Reported on arthroscopic excision of the radial head |
| Ogilvie-Harris et al. | 1995 | Indications | Described posterior joint debridement for osteoarthritis |
| Baker et al. | 2000 | Anatomy | Reported the arthroscopic appearance and classification of lateral epicondylitis |
| Hardy et al. | 2002 | Indications | First report of arthroscopic management of capitellar fractures |
| Smith et al. | 2003 | Anatomy | Defined the safe zone for arthroscopic tennis elbow release to be anterior to an intraarticular line bisecting the radial head |
| Adams et al. | 2007 | Fractures | Arthroscopic fixation of coronoid fractures is described |
| Athwal et al. | 2009 | Triceps tendon | Described the technique of arthroscopic triceps tendon repair |
| Yeoh et al. | 2012 | Indications | The evidence-based indications for elbow arthroscopy are reported. |
| O’Brien and Savoie | 2014 | Ligament repair | An arthroscopic repair of the lateral collateral ligament is described. |
Become a Clinical Tree membership for Full access and enjoy Unlimited articles
If you are a member. Log in here