Physical Address
304 North Cardinal St.
Dorchester Center, MA 02124
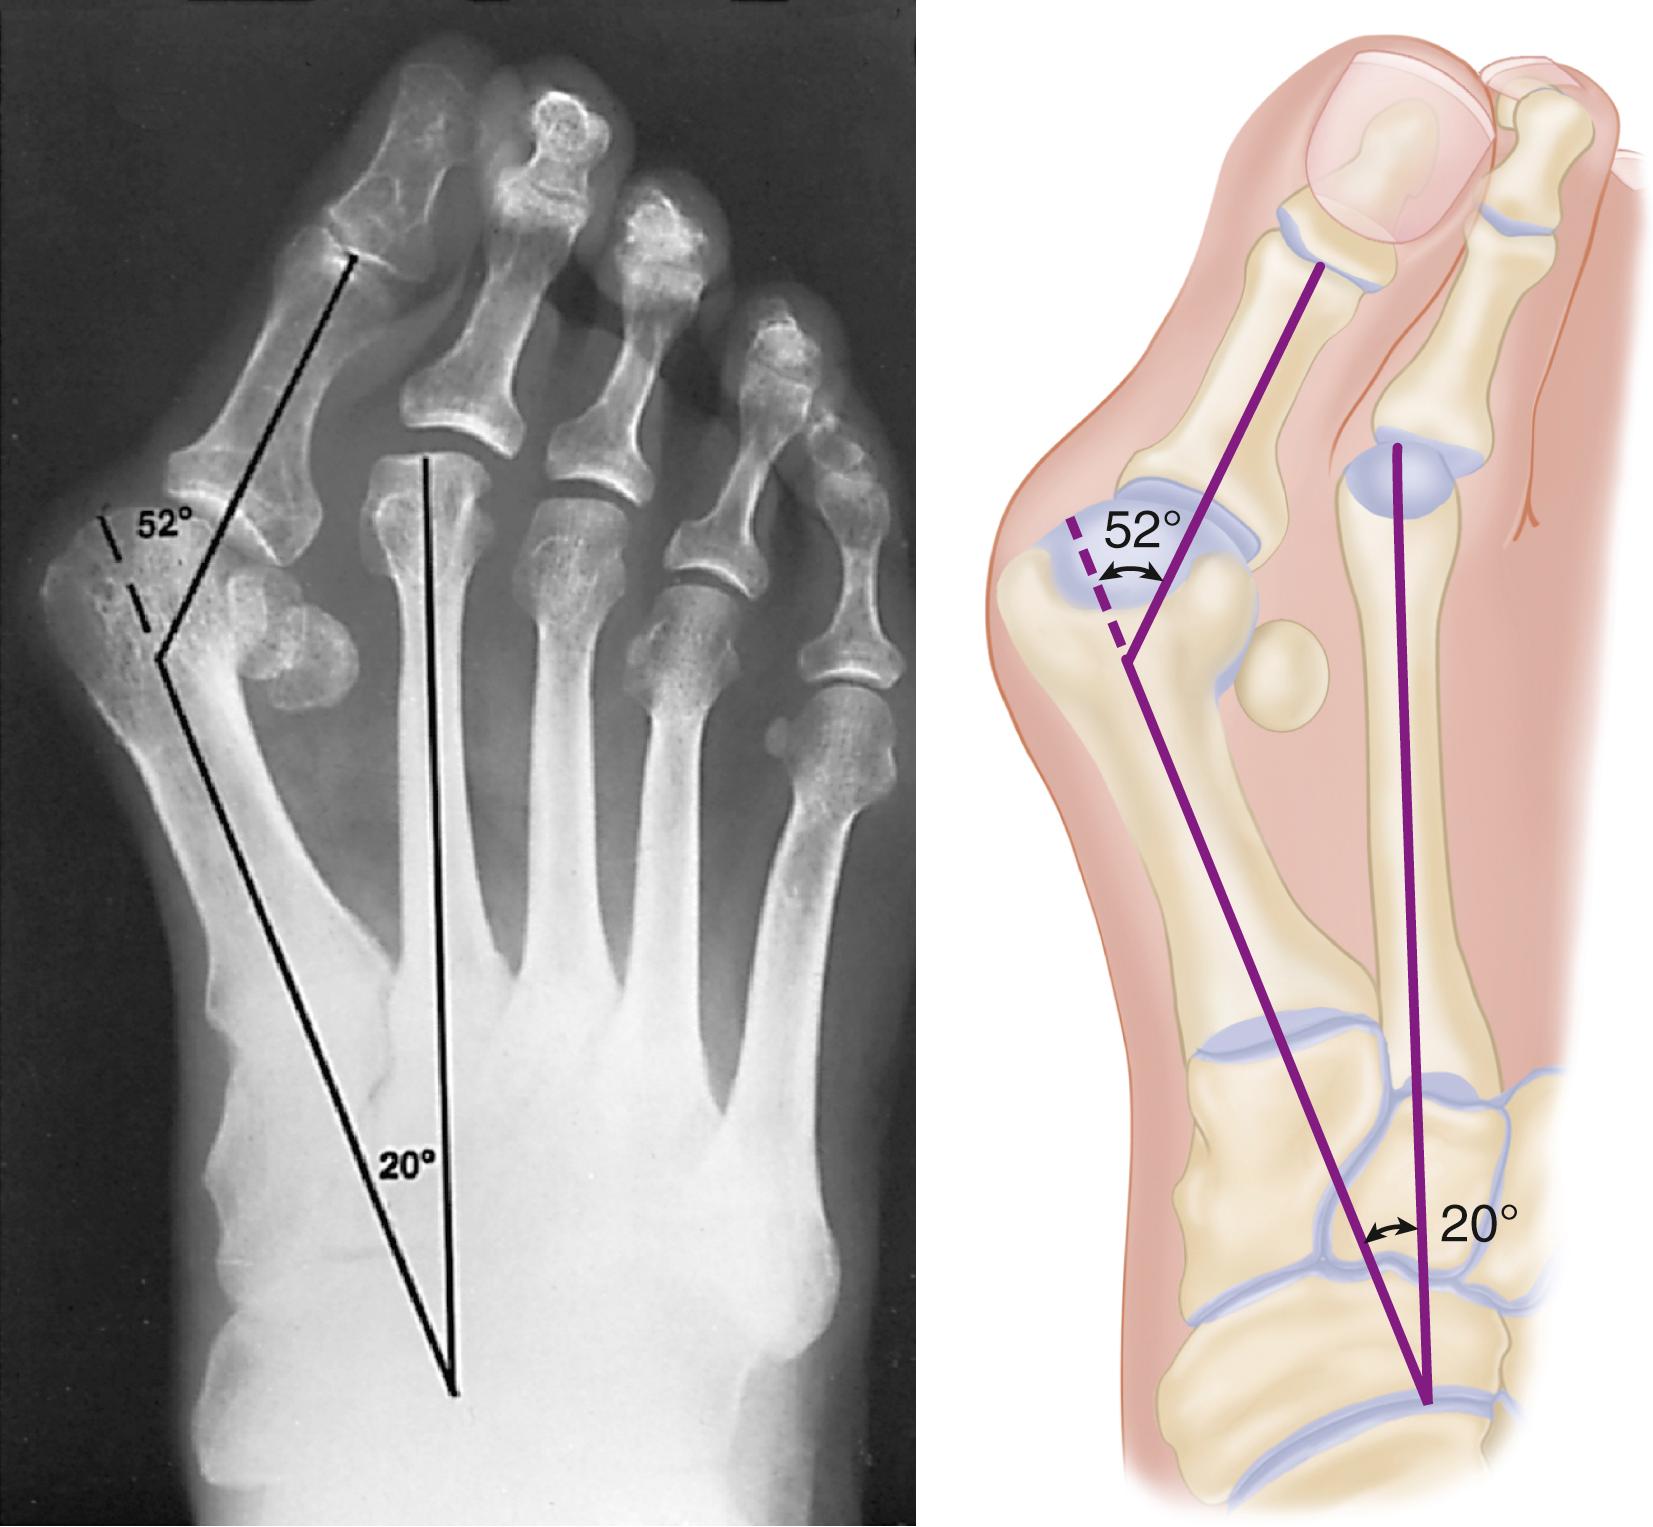
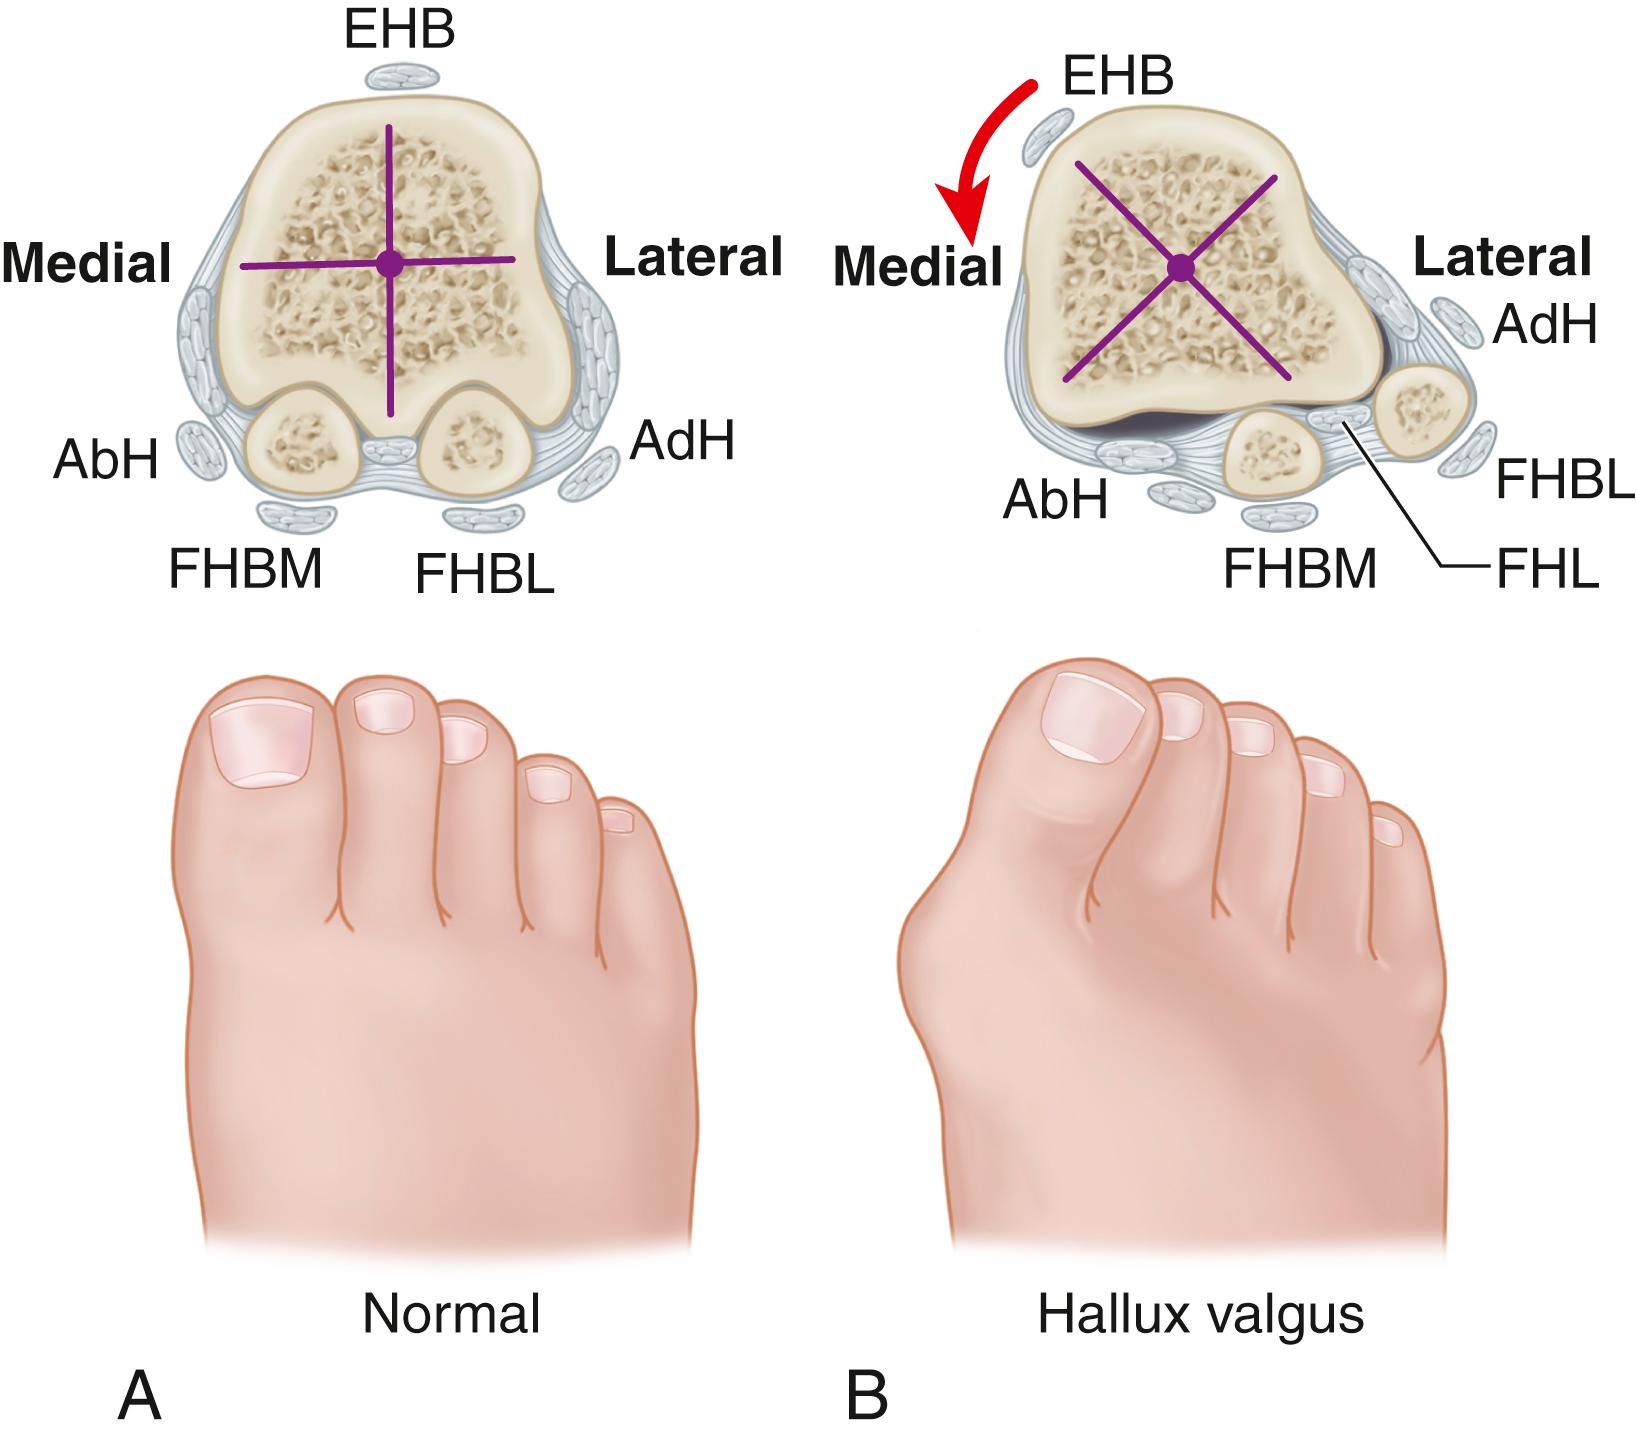
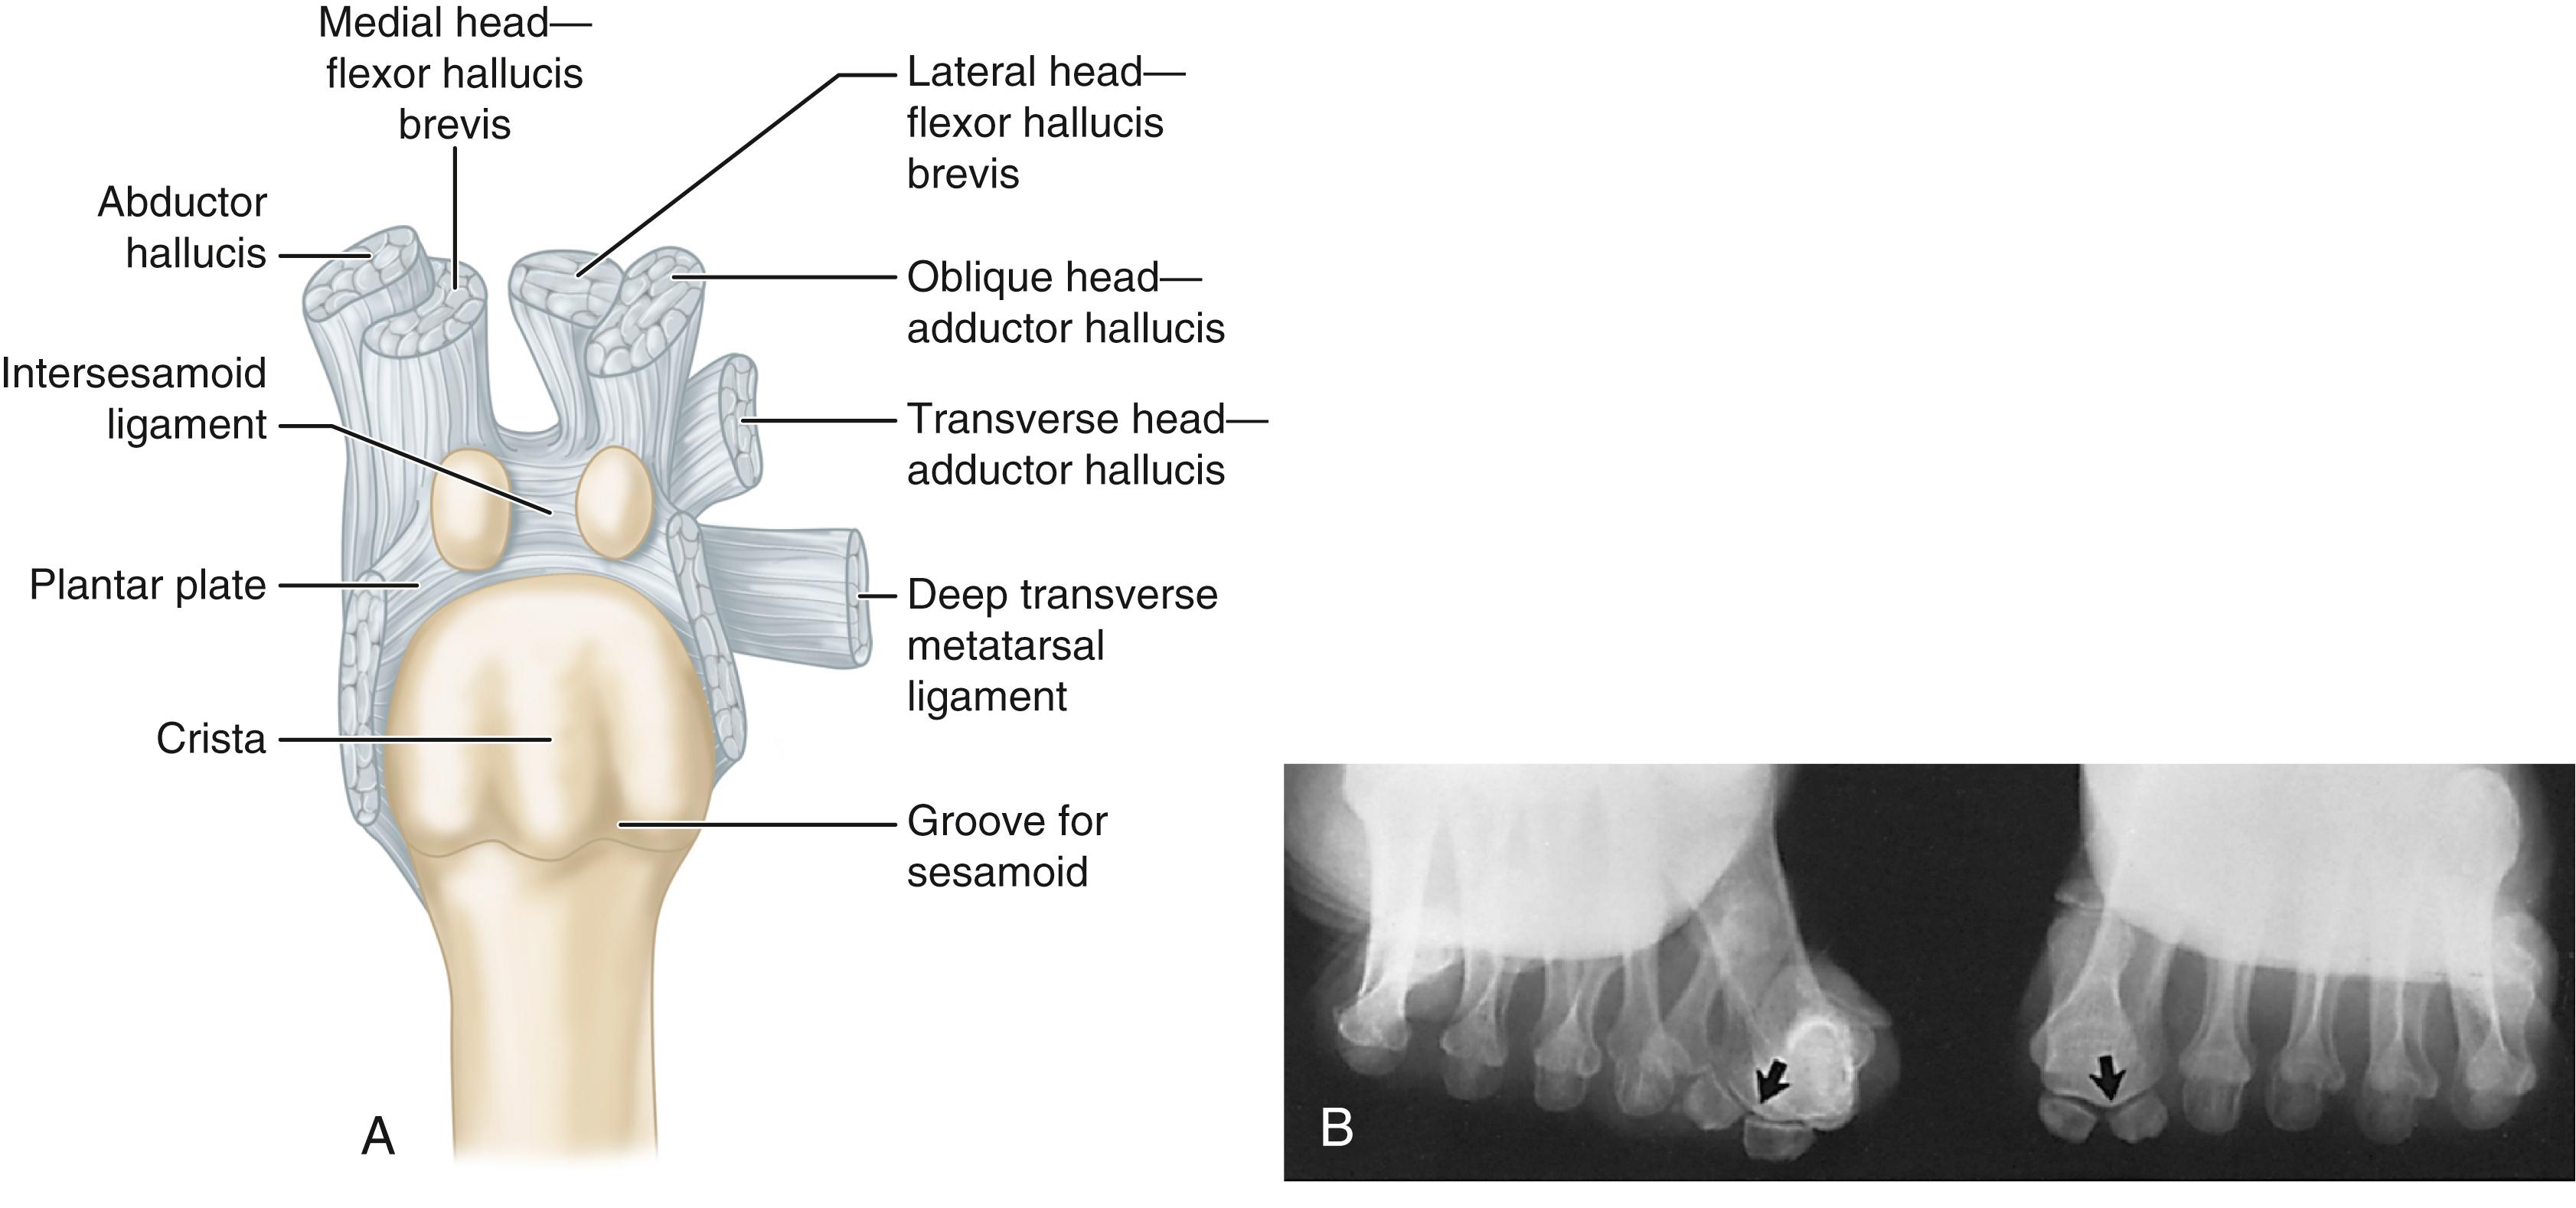
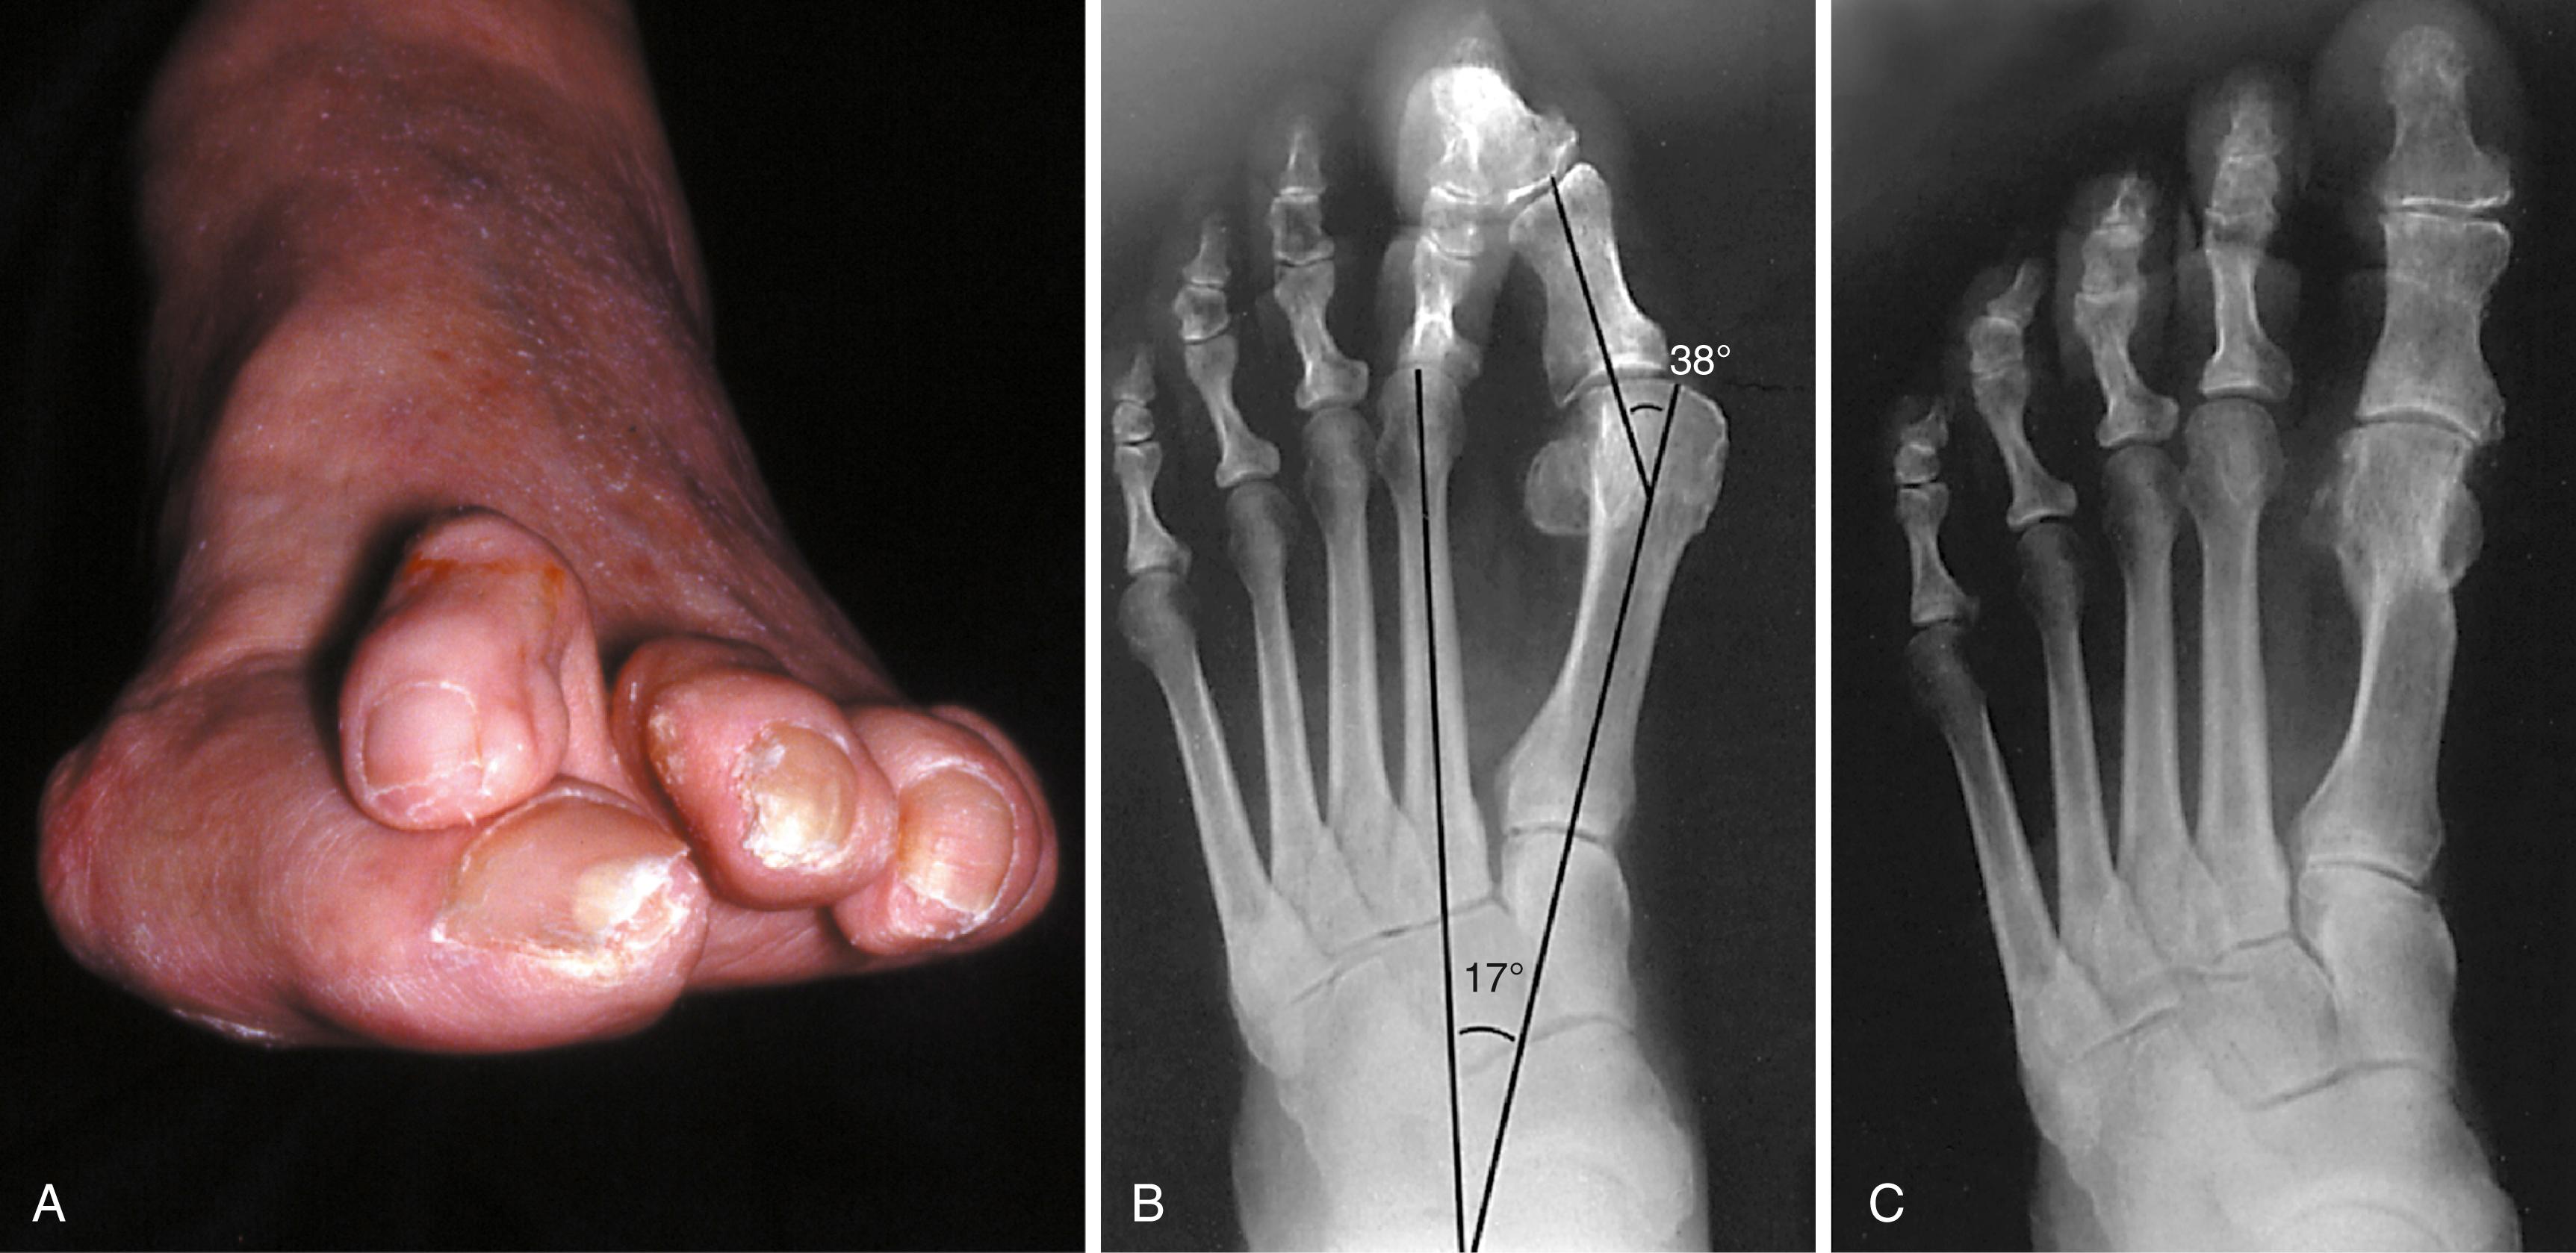
Hallux valgus (lateral deviation of the great toe) is not a single disorder, as the name implies, but a complex deformity of the first ray that frequently is accompanied by deformity and symptoms in the lesser toes. Often the angle between the first and second metatarsals is more than the 8 to 9 degrees usually considered to be the upper limits of normal. The valgus angle of the first metatarsophalangeal joint also is more than the 15 to 20 degrees considered to be the upper limits of normal ( Fig. 82.1 ). If the valgus angle of the first metatarsophalangeal joint exceeds 30 to 35 degrees, pronation of the great toe usually results. With this abnormal rotation, the abductor hallucis, which is normally plantar to the flexion-extension axis of the first metatarsophalangeal joint, moves farther plantarward ( Fig. 82.2 ). In this case, the only restraining medial structure is the medial capsular ligament with its capsulosesamoid portion (inserting into the base of the proximal phalanx) and capsulophalangeal portion (inserting into the plantar plate). The adductor hallucis, which is unopposed by the abductor hallucis, pulls the great toe farther into valgus, stretching the medial capsular ligament (particularly the capsulosesamoid), attenuating this structure, and allowing the metatarsal head to drift medially from the sesamoids. In addition, the flexor hallucis brevis, flexor hallucis longus, adductor hallucis, and extensor hallucis longus increase the valgus moment at the metatarsophalangeal joint, further deforming the first ray. The deep transverse intermetatarsal ligament runs between the plantar plates at the metatarsophalangeal joints and does not insert into bone on the adjacent sides of the metatarsal heads. Finally, the sesamoid ridge on the plantar surface of the first metatarsal head (the crista) flattens because of pressure (abutment) from the tibial sesamoid ( Fig. 82.3 ). With this restraint lost, the fibular sesamoid displaces partially or completely into the first intermetatarsal space (see Fig. 82.1 ). In this situation, the patient is bearing less weight on the first ray and more on the lesser metatarsal heads, increasing the likelihood of transfer metatarsalgia, callosities, and stress fracture of a lesser metatarsal.
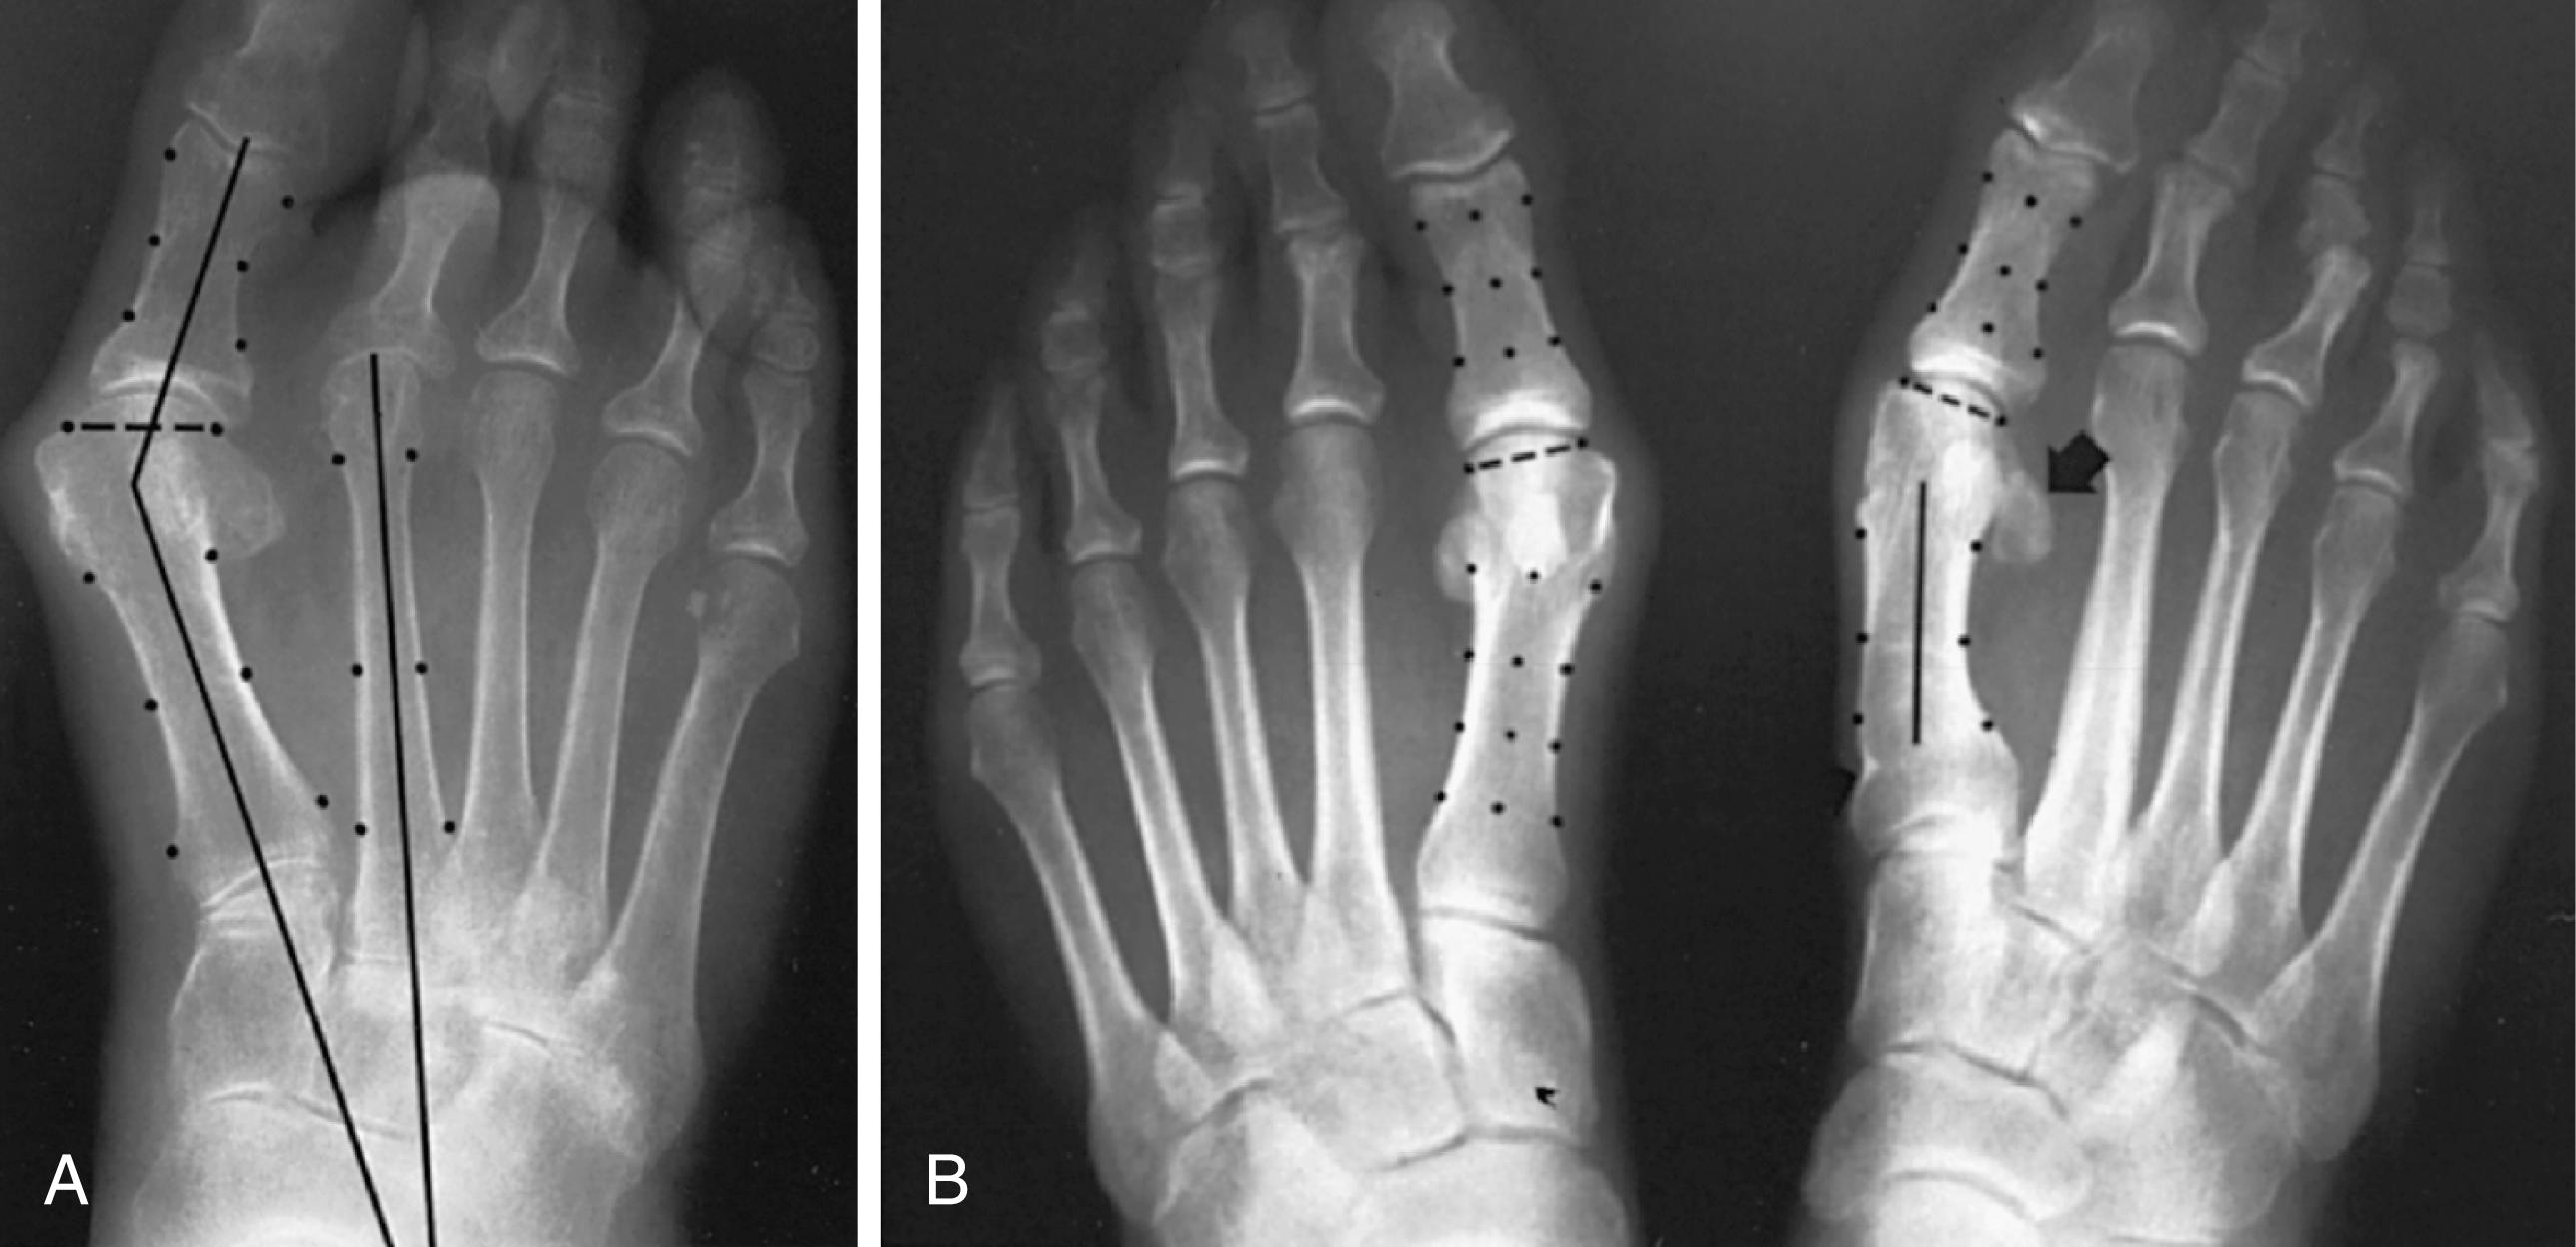
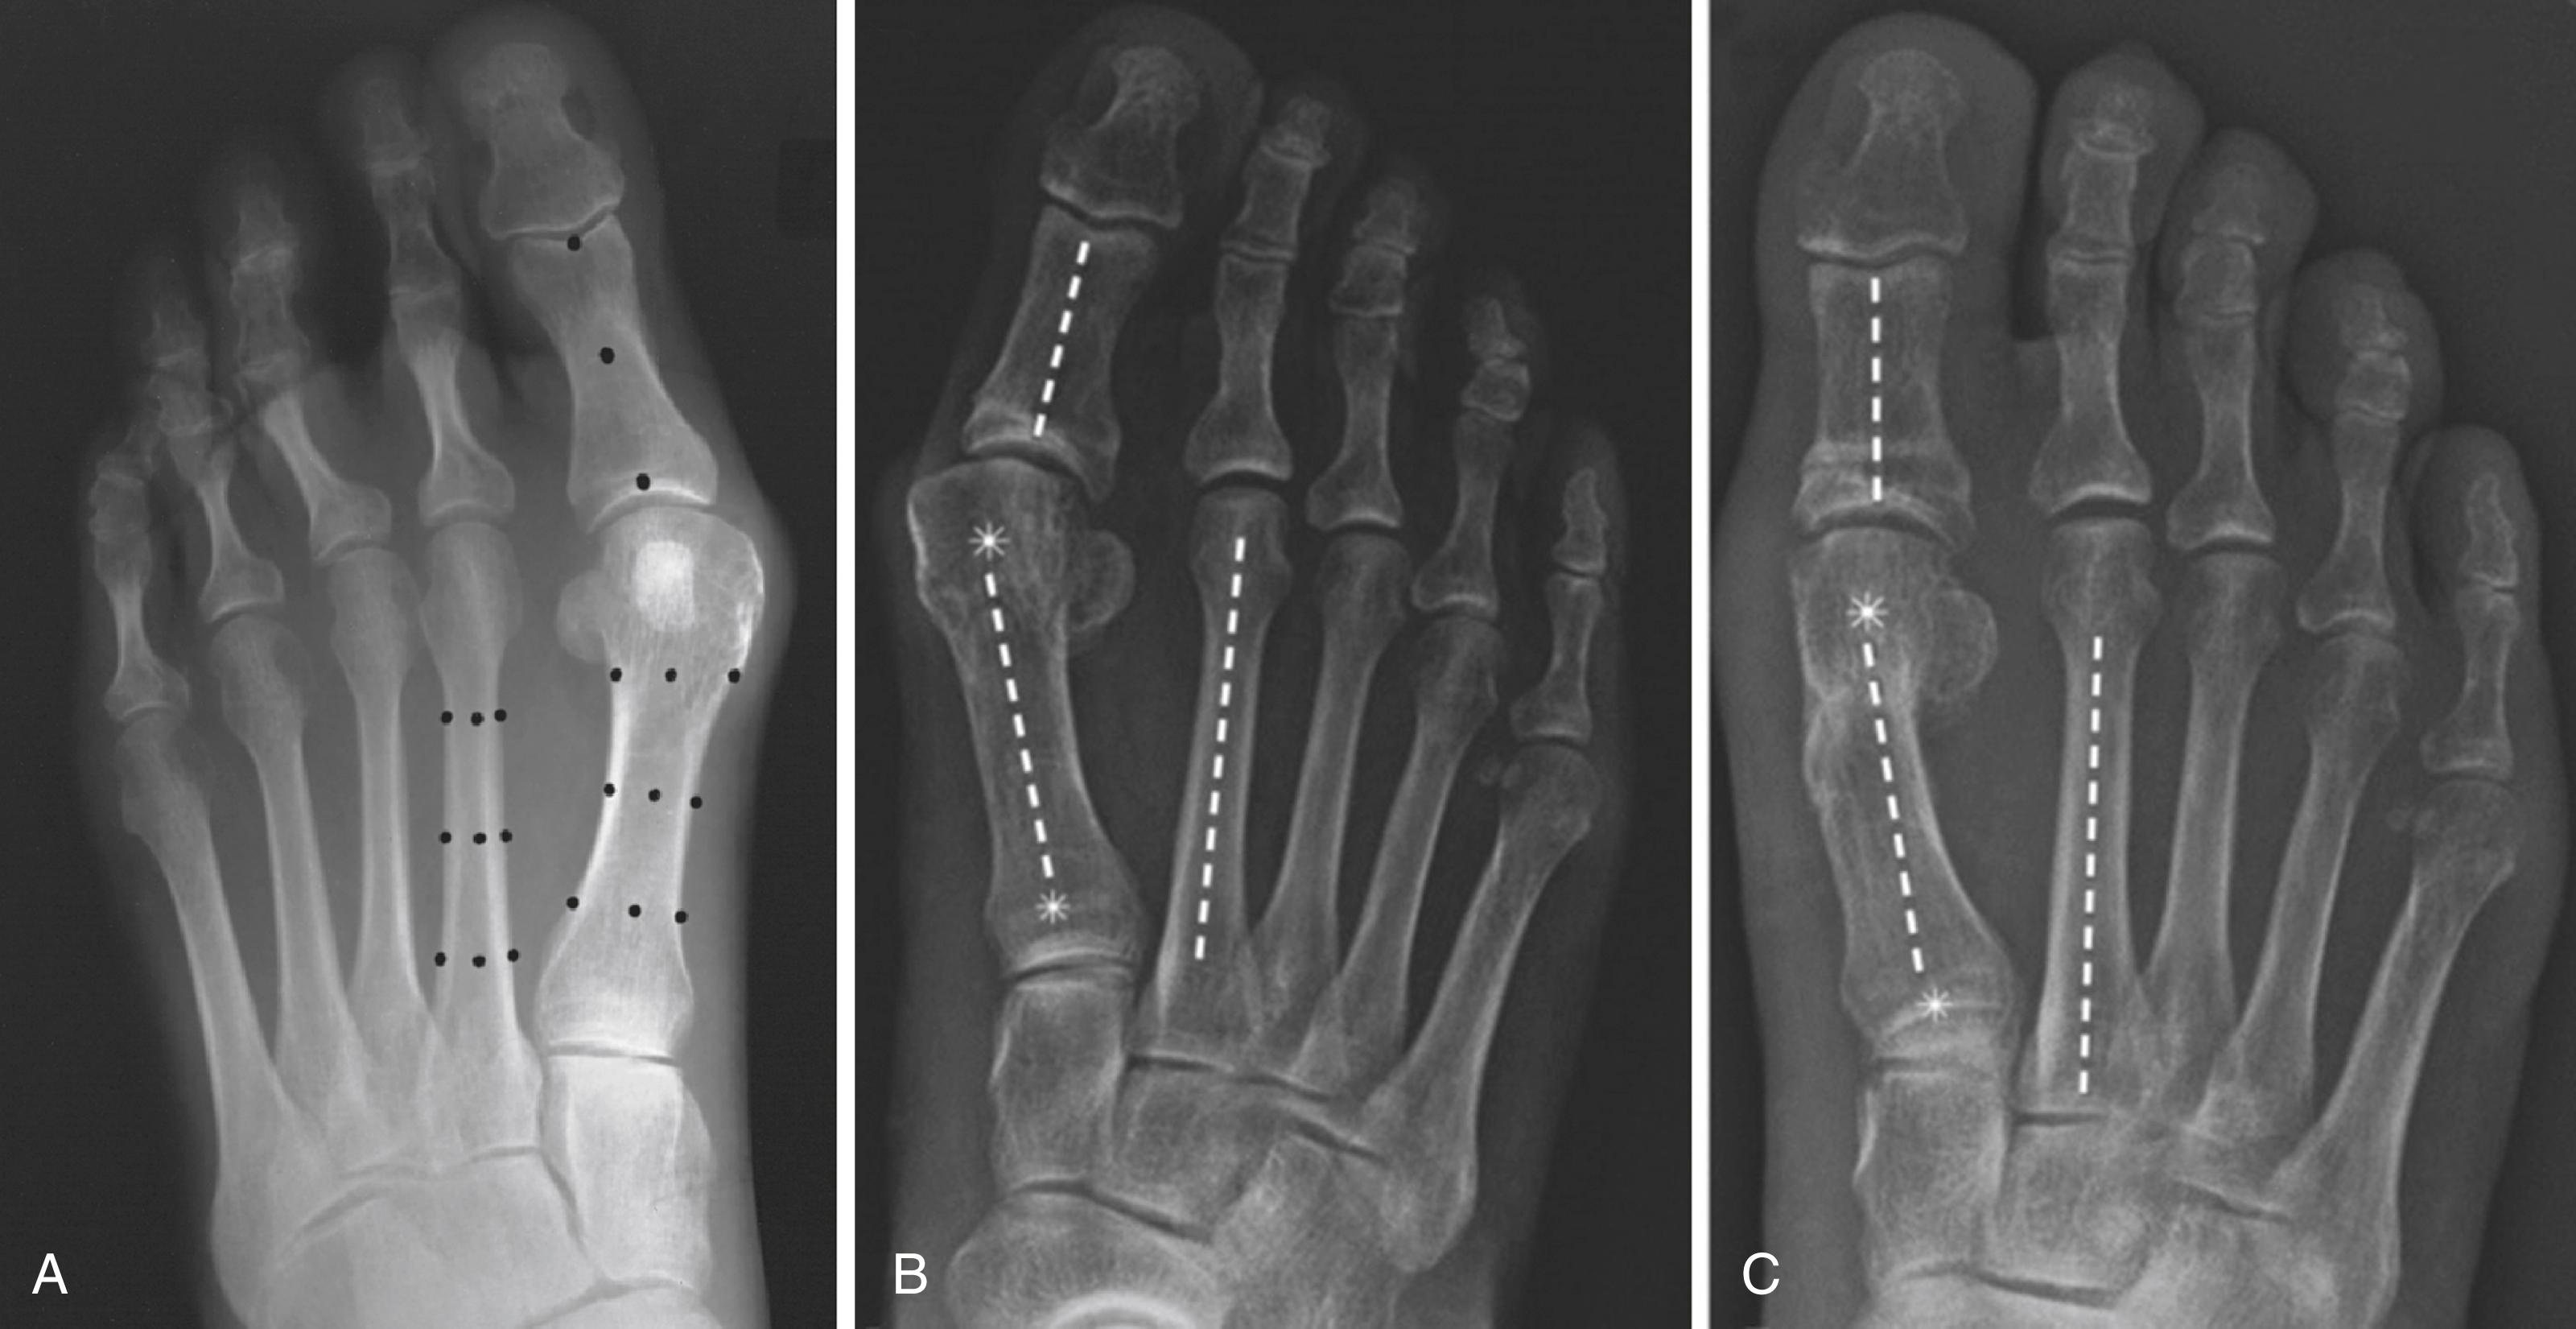
Two other anatomic variants involving the articular surface of the first metatarsophalangeal joint can lead to hallux valgus. In the first variant, the articular surface of the metatarsal head is offset, resembling a scoop of ice cream sitting at an angle on a cone ( Fig. 82.4 ). This has been described as the distal metatarsal articular angle ( Fig. 82.5 ). In the second, the articular angle of the base of the proximal phalanx in relation to its longitudinal axis is offset. This has been described as the phalangeal articular angle ( Fig. 82.6 ). Although the normal range of these angles is generally considered to be 7 to 10 degrees for the phalangeal articular angle and 10 to 15 degrees for the distal metatarsal articular angle, exact measurements are difficult to reproduce because of the variability of radiographic and measurement techniques (see Fig. 82.6 ). Increasing evidence indicates, however, that the failure to correct these two deformities, especially the distal metatarsal articular angle, can cause unsatisfactory results after surgery in some patients. Forceful straightening of the hallux should be avoided if it sacrifices a congruent metatarsophalangeal articulation; phalangeal osteotomy or distal metatarsal osteotomy, rather than tightening of the medial capsular repair, should be used for further correction.
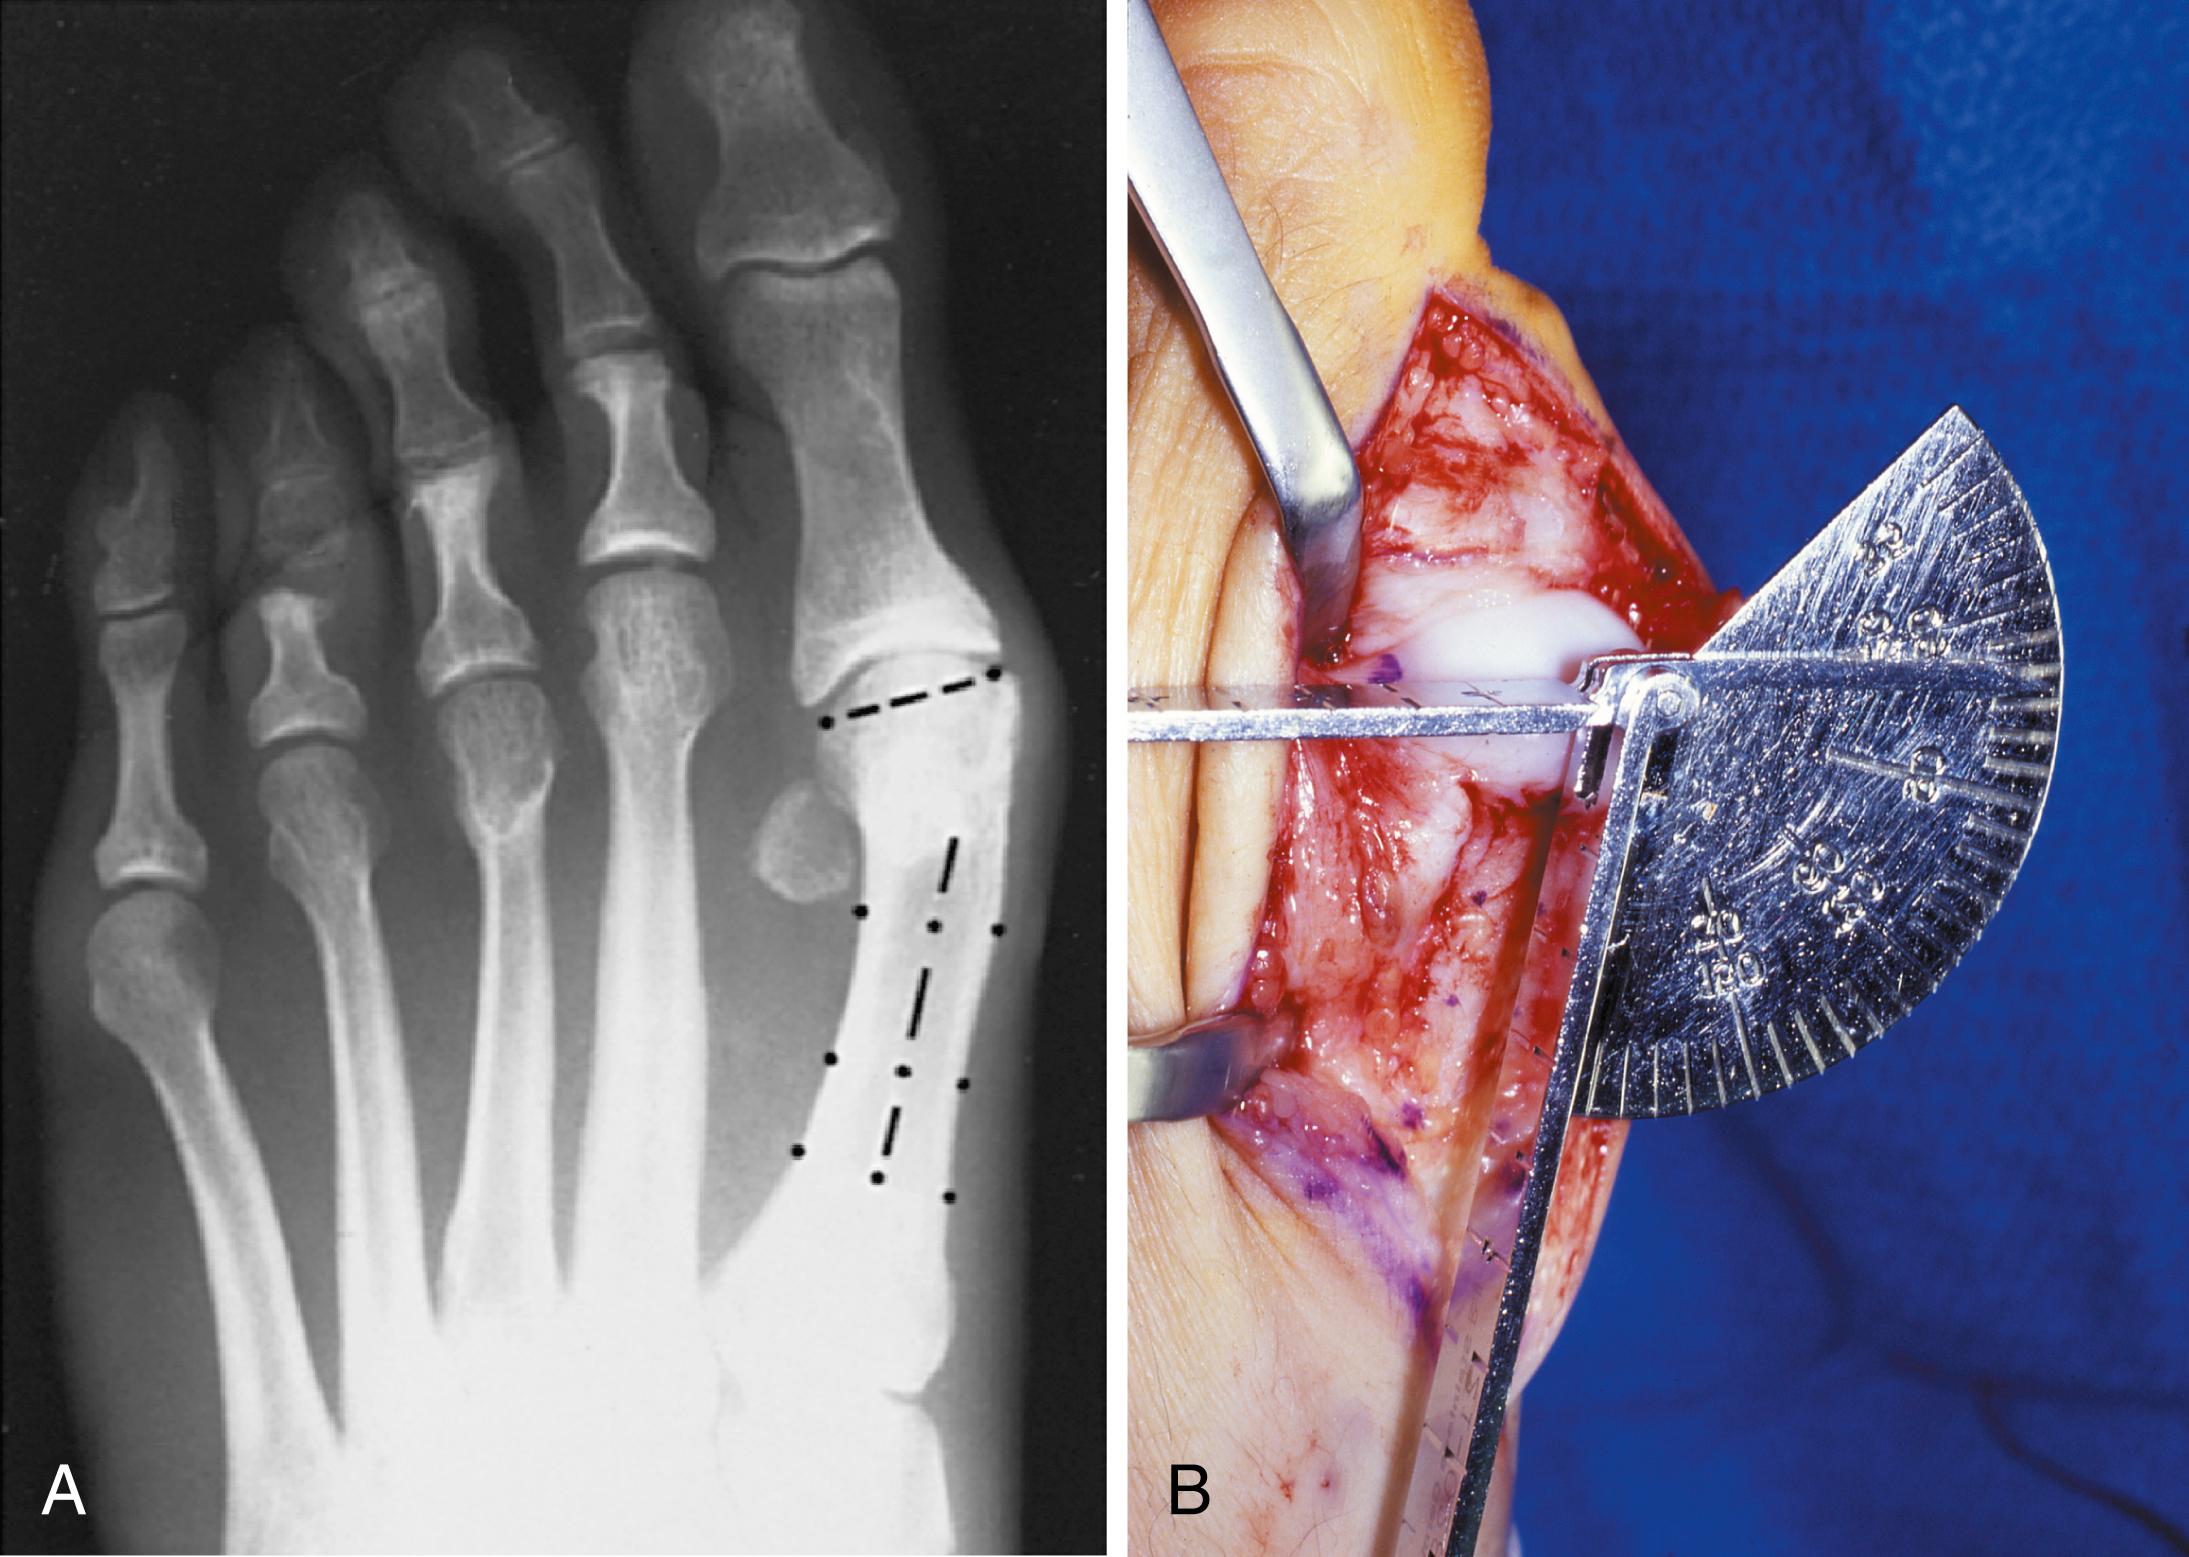
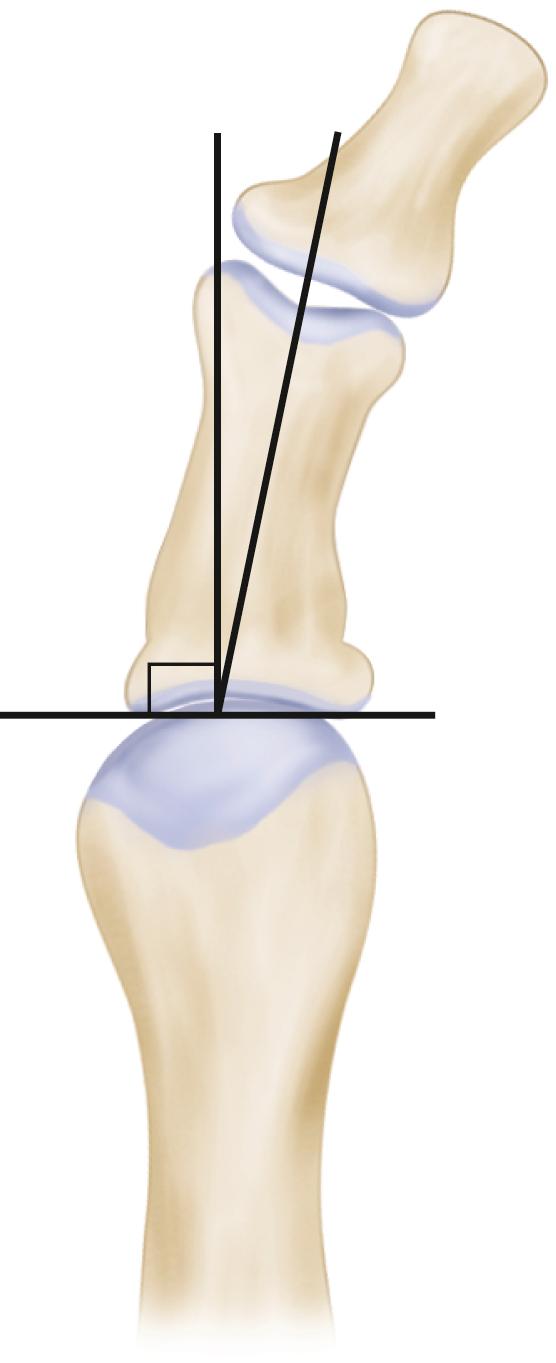
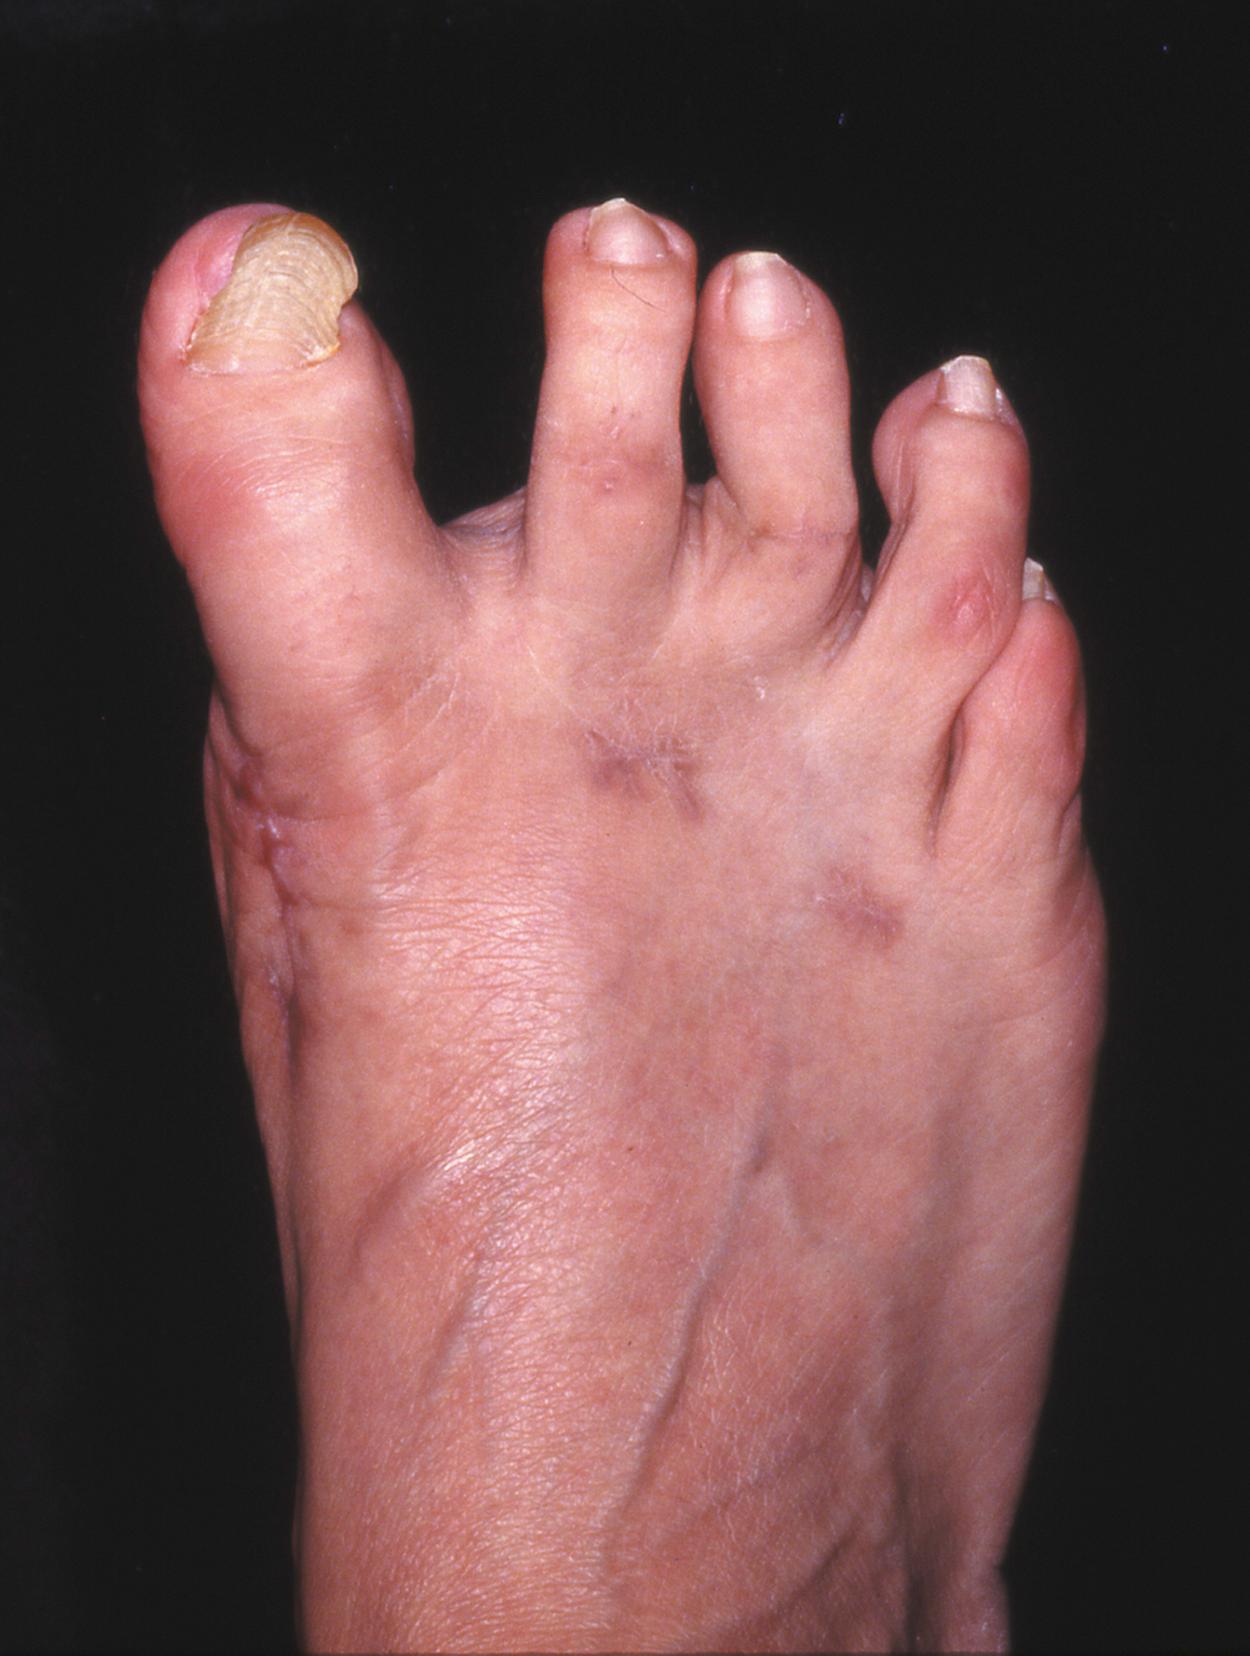
The valgus posture of the great toe frequently causes a hammer toe–like deformity of the second toe ( Fig. 82.7 ). In addition, the splaying of the forefoot makes the wearing of shoes more difficult; with shoes that have a narrow toe box, corns often develop, as does bursal hypertrophy over the medial eminence of the first metatarsal head (bunion). With valgus subluxation of the first metatarsophalangeal joint, osteoarthritis frequently develops. In this case, the entire spectrum of hallux valgus is present: varus deformity of the first metatarsal, valgus of the great toe, bunion formation, arthritis of the first metatarsophalangeal joint, hammer toe of one or more toes, corns, calluses, and metatarsalgia. The entire forefoot must be evaluated for these multiple components of hallux valgus before surgical planning is complete and recommendations can be made to the patient.
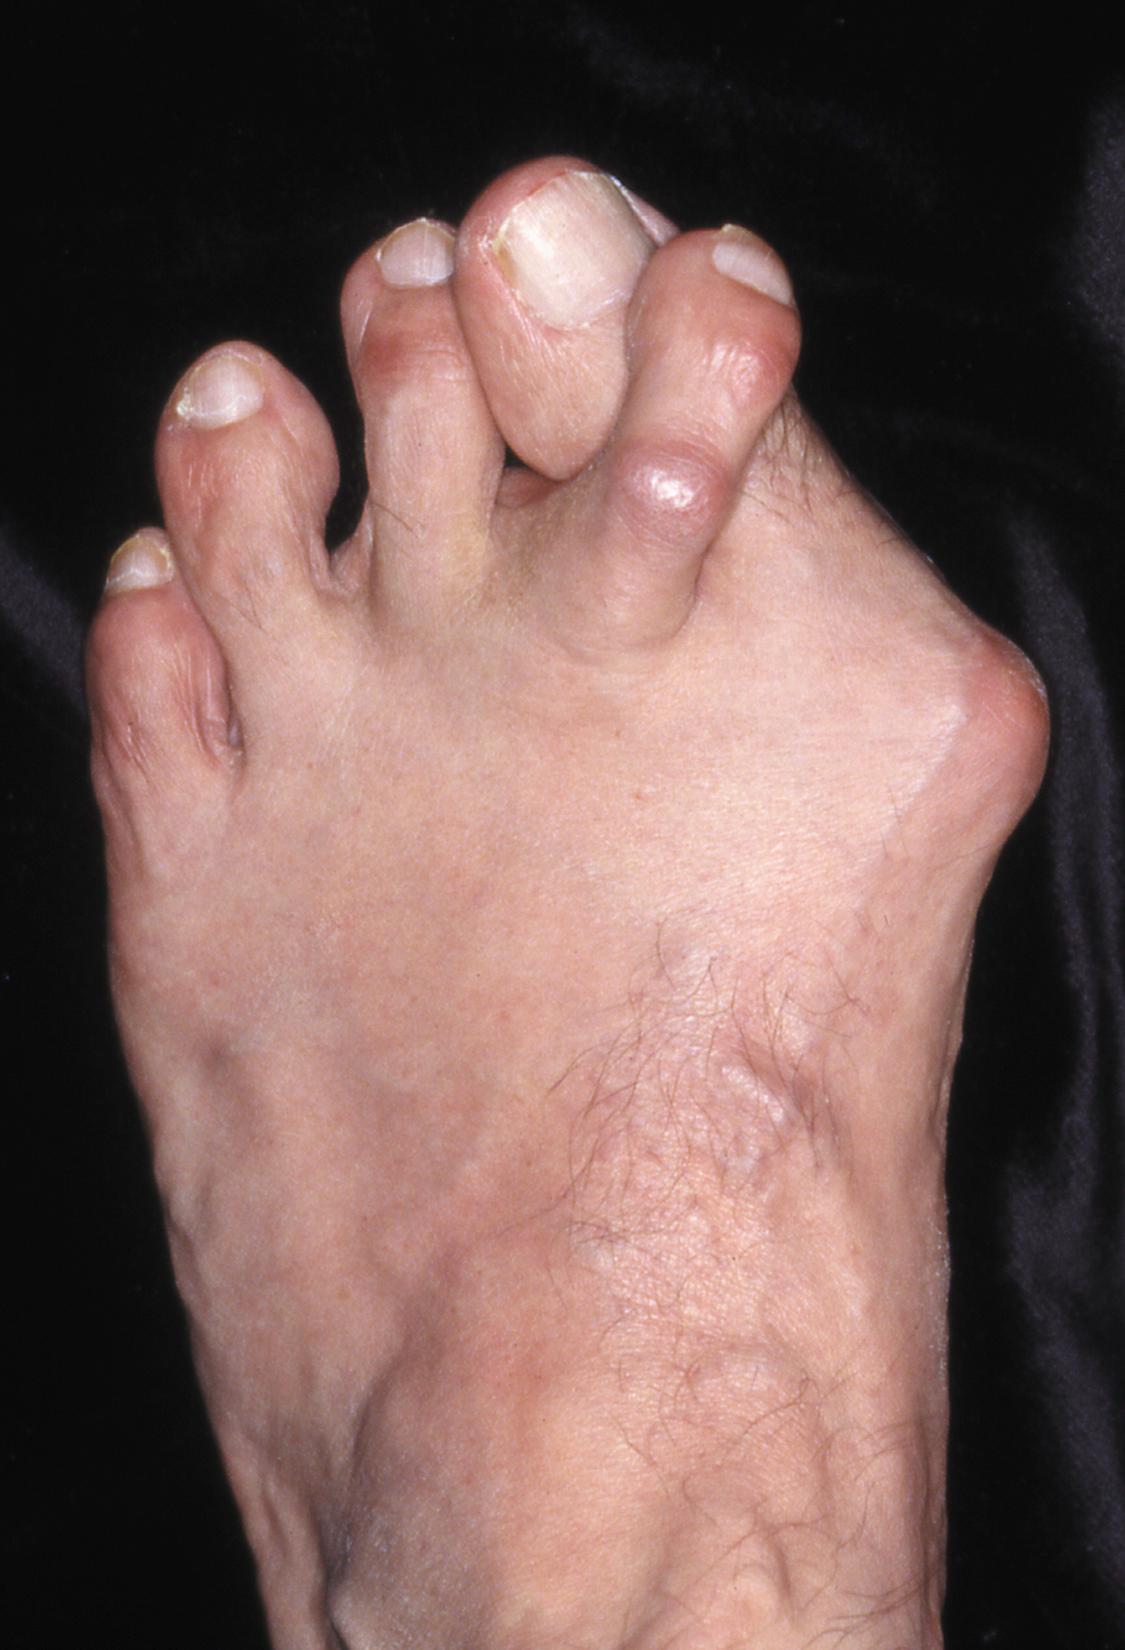
The controversy continues over which deformity is the essential lesion in hallux valgus: metatarsus primus varus or lateral deviation of the great toe. Each is incriminated as the cause of the other. The strongest data probably support lateral deviation of the great toe as the primary deformity in most patients, followed by medial angulation of the first metatarsal, but metatarsus primus varus may be the principal cause in adolescents. Further controversy surrounds the role of footwear as the prime offender in the development of hallux valgus. Most orthopaedic surgeons have seen unilateral hallux valgus when both feet are clinically and radiographically the same structurally except that one foot has a bunion deformity and the other foot is normal. Evidence supports that hallux valgus may be familial, especially when it occurs in adolescents. Although no study of shod and unshod societies has implicated inappropriate footwear as the sole cause of hallux valgus, after genetic factors and binding, unphysiologically designed footwear probably is the major cause in modern societies.
Hypermobility of the first ray also has been suggested as a causative factor in the development of hallux valgus and first metatarsal varus, but this is controversial. Dietz et al. reviewed pedobarographic studies, clinical examinations, and standard weight-bearing radiographs in patients with hallux valgus, correlating the findings with radiokinematic first ray instability in the sagittal plane. Their analysis showed an association between a wide intermetatarsal angle and increased maximal dorsiflexion of the first ray during walking. They noted that first tarsometatarsal joint instability increased the maximum transfer of force to the central forefoot, which increases the risk of metatarsalgia.
Finally, anatomic and structural abnormalities almost certainly play a causative role in hallux valgus. Pronated flatfeet, abnormal insertion of the posterior tibial tendon, increased obliquity of the first metatarsomedial-cuneiform joint, an abnormally long first ray, incongruous articular surfaces of the first metatarsophalangeal joint, and excessive valgus tilt of the articular surface of the first metatarsal head and proximal phalangeal articular surface may contribute alone or in combination to the deformity and influence the recommended treatment. Hypertrophy of the medial eminence has been described as a component of hallux valgus deformity since the earliest reports; however, more recent investigations have found that bony proliferation is not a component of the pathoanatomy of hallux valgus and that the prominence of the medial eminence results from the combination of metatarsus primus varus and medial deviation that uncovers the articular surface.
With more than 130 operations recommended for the treatment of hallux valgus, it is practical to describe only a few. Although Spiers made the following observation in 1920, most procedures to correct hallux valgus still use one or more of the components he described:
An operative attempt to relieve the pain and disability accompanying hallux valgus is far from a new procedure. Removal of the exostosis, dissection of the bursa, tenotomy and transplantation of the tendons, removal of the sesamoids, partial and complete removal of the head of the first metatarsal, and removal of the proximal end of the proximal phalanx, together with numerous combinations of the foregoing, have all been advocated and practiced.
This chapter presents in detail the soft-tissue procedures, bony procedures, and procedures combining soft-tissue and bony correction that have endured the clinical test of adequate numbers of patients, lengthy and detailed review, and reports by multiple observers using essentially the same techniques. Different groups of procedures are successful for different surgeons, and none of the following treatment recommendations is meant to be the conclusive opinion on “bunion surgery.” Surgeons should be technically comfortable with several different procedures for the correction of hallux valgus, including one or more bony, soft-tissue, or combined procedures. Several authors have described algorithms for selecting the appropriate operative procedure in the treatment of hallux valgus and hallux rigidus ( Fig. 82.8 ). Regardless, without surgery the quality of life in patients with symptomatic hallux valgus is lower than in the general population. The decision on whether to proceed with correction, as well as the type of surgery to perform, should be based not only on the severity of the deformity but also on the patient’s symptoms.
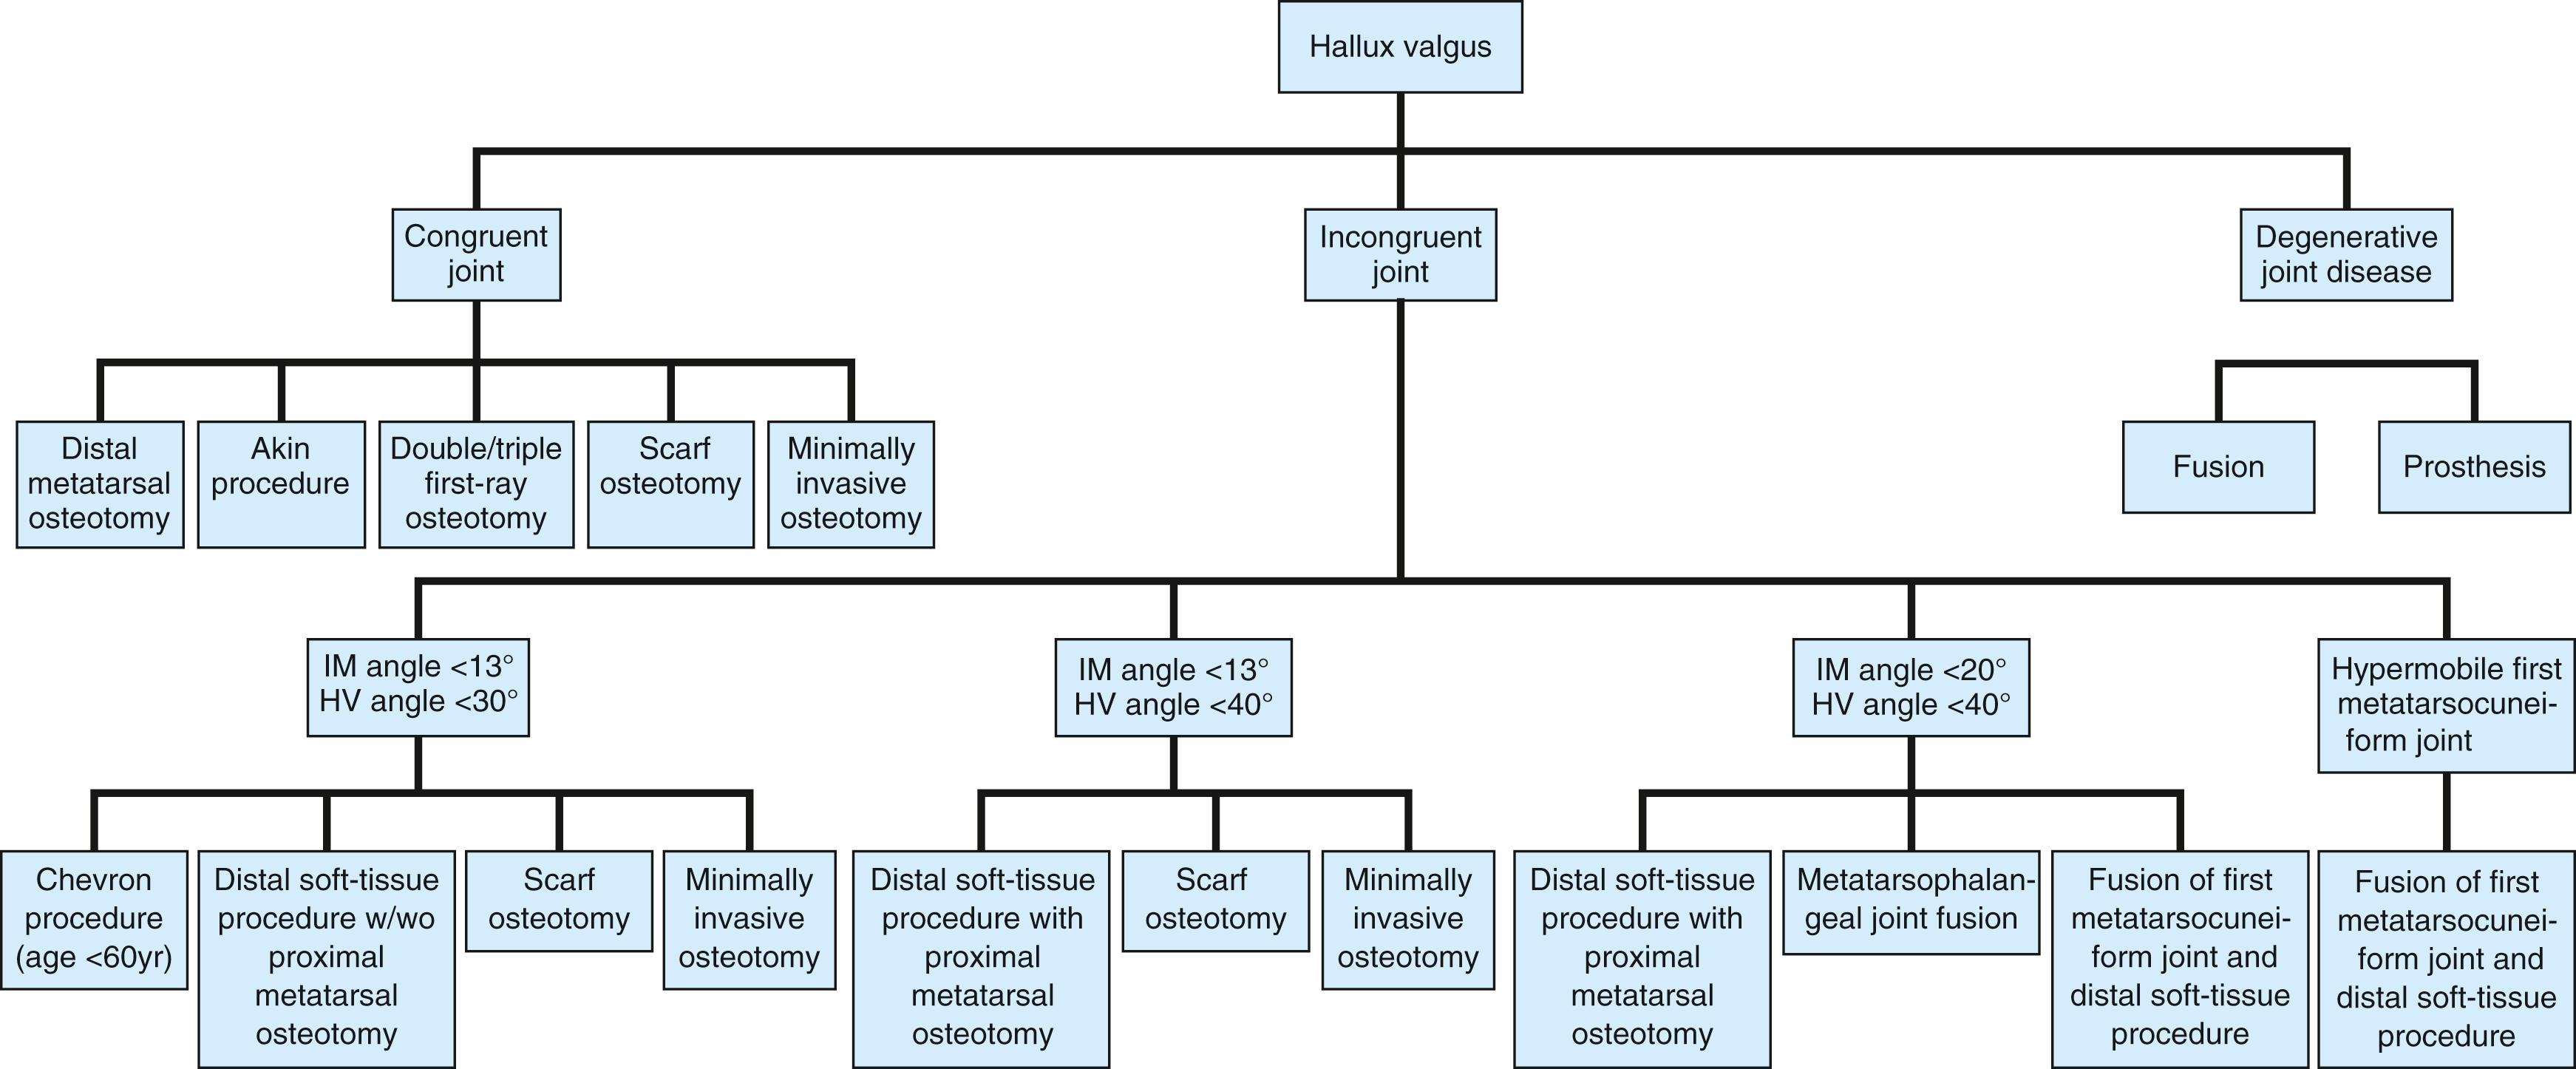
No procedure should be recommended until the entire foot, not just the first ray, is thoroughly examined clinically while the patient is standing, sitting, and lying supine and prone (if practical). Particular attention should be given to the remainder of the forefoot, and corns, calluses, warts, interdigital neuromas, bunionettes, hammer toes, and claw toes should be identified. Although pain and deformity may be relieved after correction of the hallux valgus, the result can be marred if symptoms in the lesser toes or the metatarsals remain. This should be explained carefully to the patient before surgery to avoid false expectations and disappointment. Finally, the midfoot and hindfoot must be examined carefully before making treatment recommendations for forefoot surgery.
Initially, most patients can be treated nonoperatively with appropriate shoe modifications, exercises, and activity adjustments. Operative treatment of hallux valgus for cosmetic reasons alone is seldom indicated except in an adolescent with a significant progressive deformity. Even the mildest symptoms in an adolescent often worsen, especially when there is a family history of hallux valgus. Correction of hallux valgus in adolescents can be difficult and often disappointing.
Any procedure chosen must take into account the following physical examination components:
Patient desires for activity and shoe requirements
Morphology of the toe (i.e., a short, wide toe as opposed to a long, thin toe)
Lesser toe deformities, especially varus or valgus of the second toe (quality-of-life measures are significantly worse with lesser toe deformity or metatarsalgia than with hallux valgus alone)
Plantar callosities of the forefoot or tenderness under the lesser metatarsal heads
Arch height
Clinical pronation of the great toe
Range of motion of the toe (the toe pronates as it is extended, an indication of intrinsic malalignment)
Sensation about the toe, especially the dorsal medial hallucal nerve (terminal branch of the dorsal medial cutaneous nerve)
Contracture of the gastrocsoleus complex
Smoking status
Patient weight
Patient age and sex (men and adolescents commonly have congruent joints)
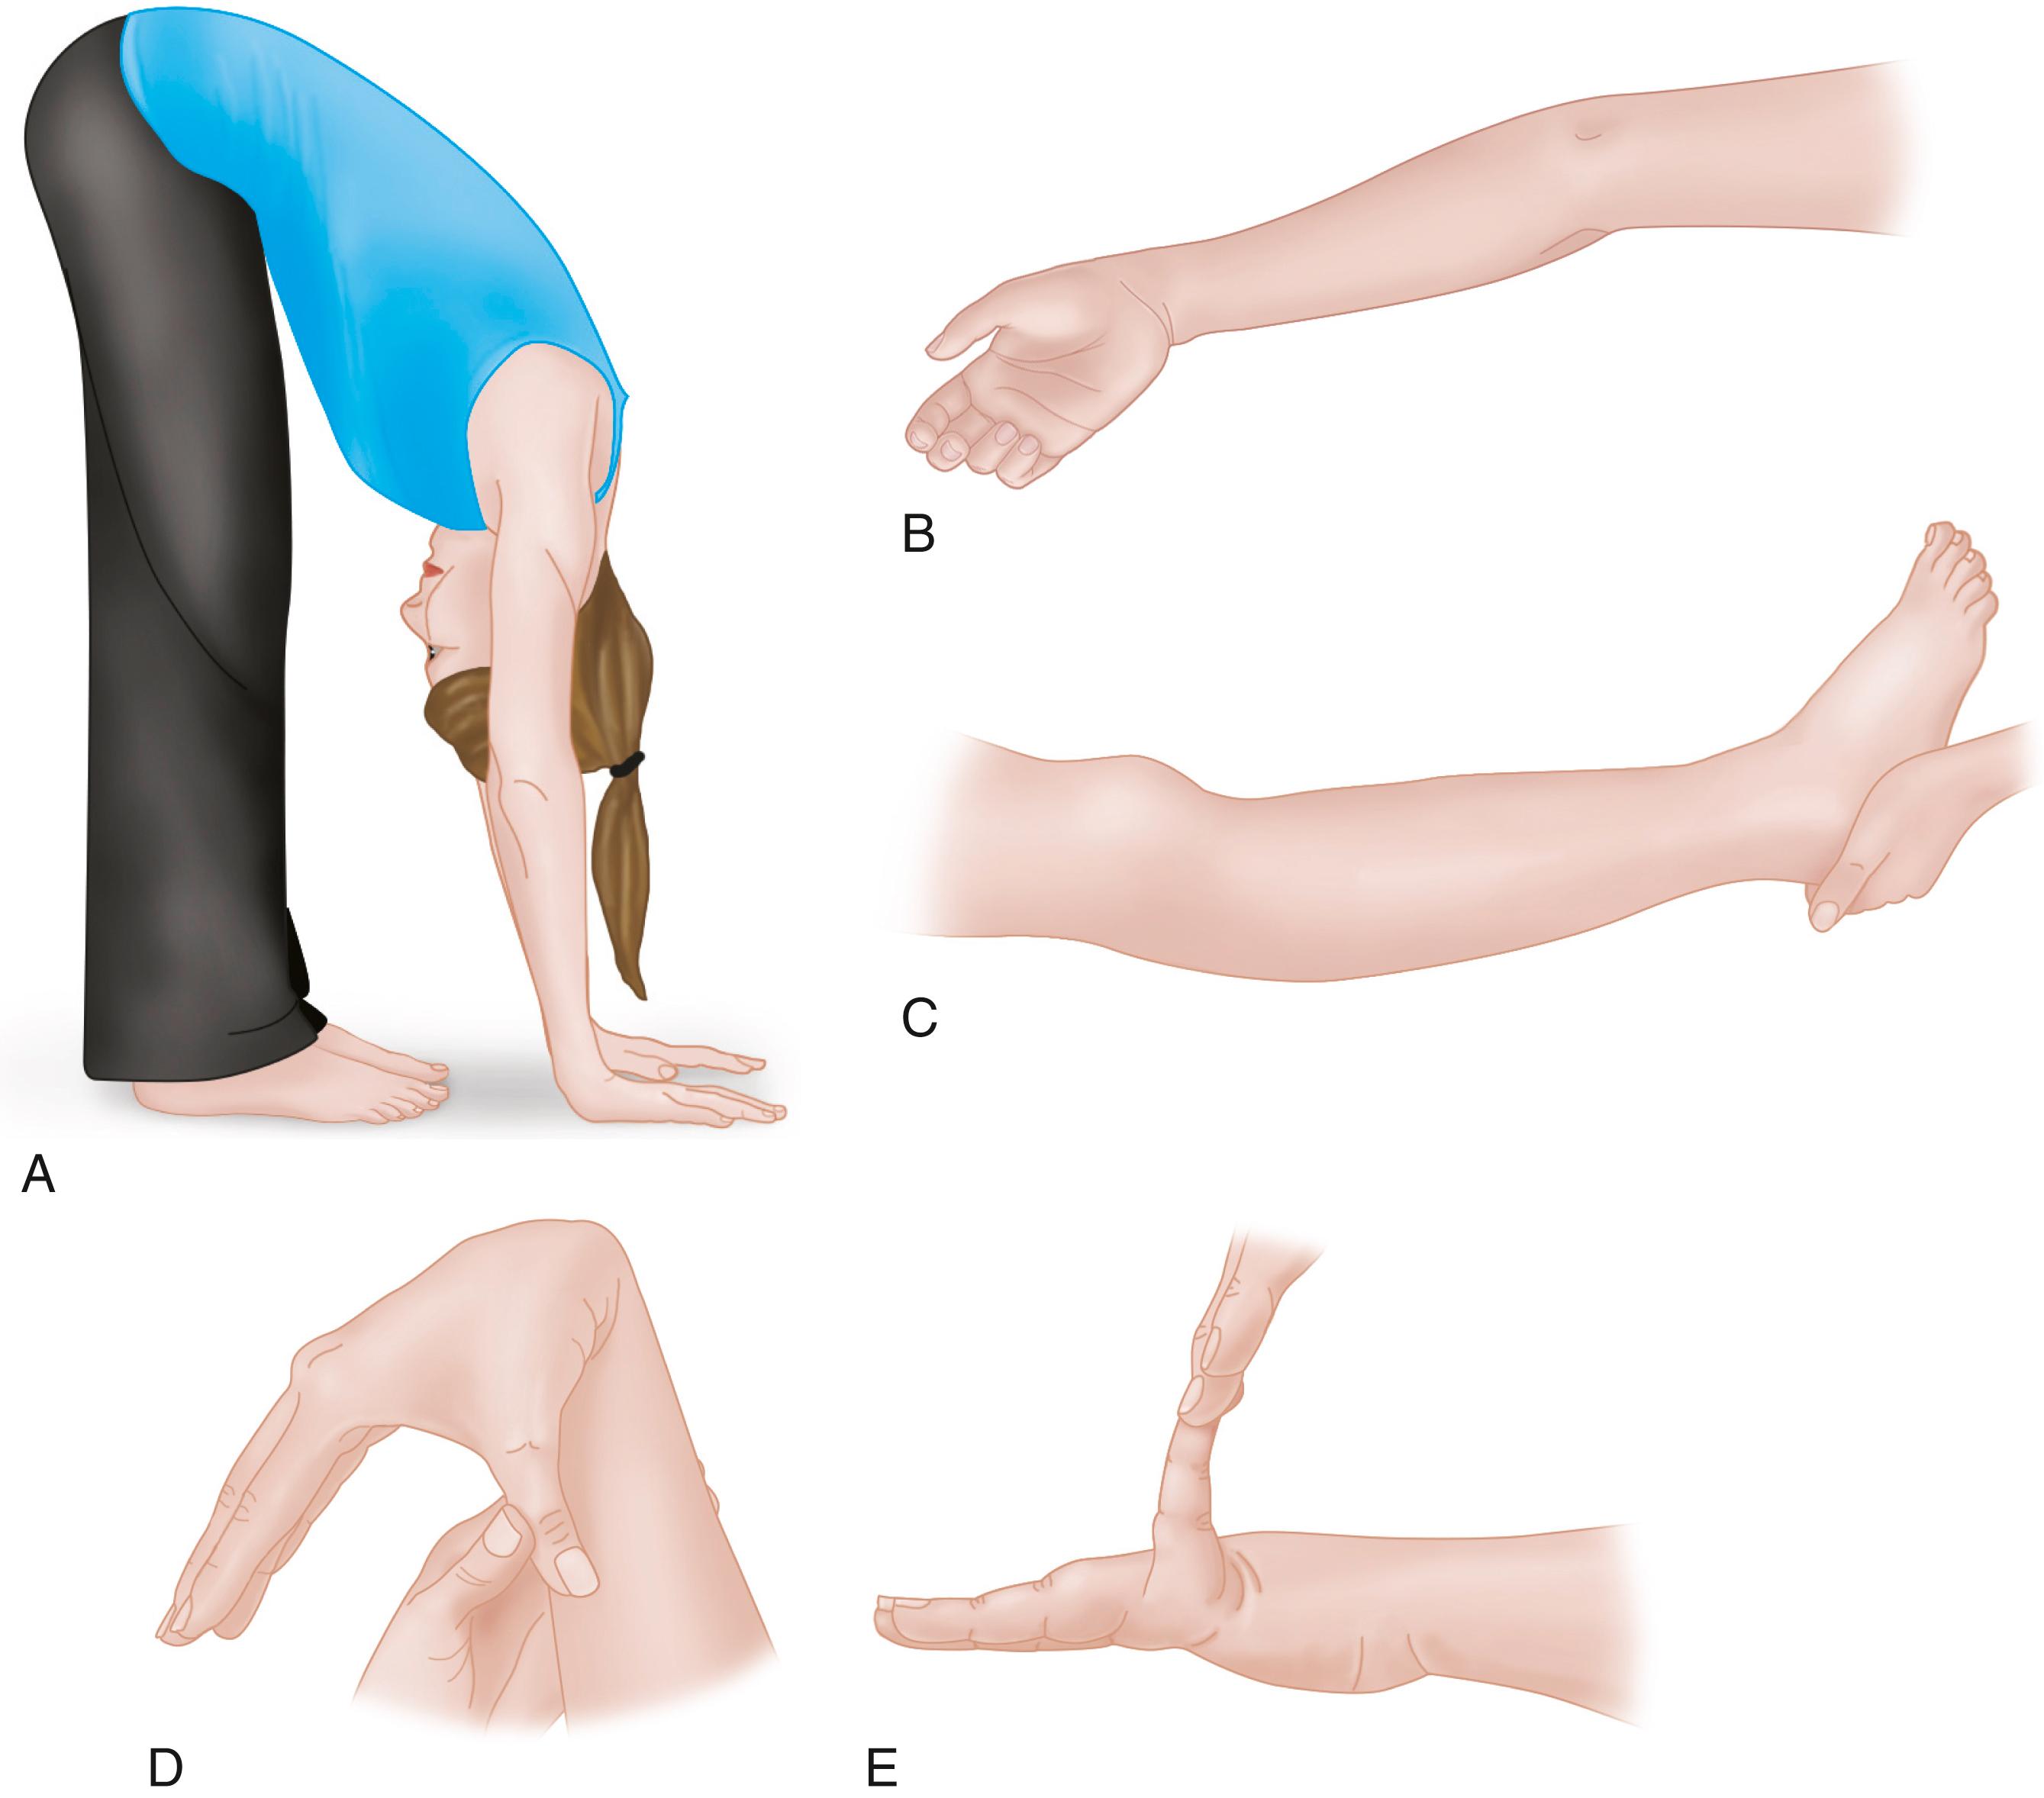
Generalized hypermobility ( Fig. 82.9 )
The following radiographic parameters should be taken into account:
Valgus deviation of the great toe (hallux valgus)
Varus deviation of the first metatarsal
Pronation of the hallux or first metatarsal, or both
Hallux valgus interphalangeus
Arthritis and limitation of motion of the first metatarsophalangeal joint
Length of the first metatarsal relative to lesser metatarsals
Excessive mobility or obliquity of the first metatarsomedial cuneiform joint
The medial eminence (bunion)
The location of the sesamoid apparatus
Intrinsic and extrinsic muscle-tendon balance and synchrony
Presence of metatarsus adductus
Width of the first metatarsal (wider metatarsal in the presence of the same intermetatarsal angle will allow greater lateral translation of a distal osteotomy)
Deformity of the lesser toes
Inadequate vascularity or sensibility should be investigated thoroughly before bunion surgery is considered. In addition, the position of the articular surface of the metatarsal head in relation to the longitudinal axis of the first metatarsal should be determined (see Fig. 82.5 ).
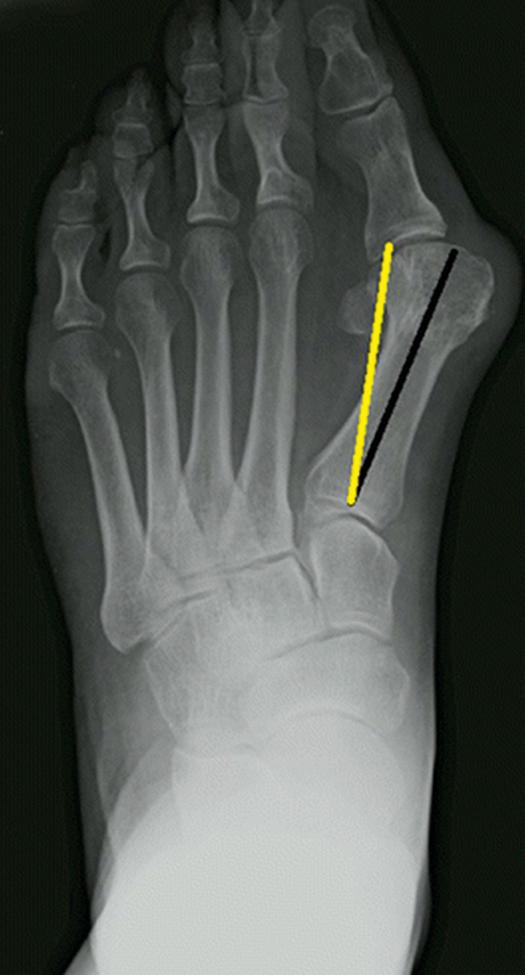
Standard preoperative radiographs should include standing dorsoplantar and lateral views, a nonstanding lateral oblique view, and axial sesamoid views. Some authors have found a discrepancy between anteroposterior and axial views in determining the tibial sesamoid position, especially in sesamoid positions 4 and 5 of the Hardy and Clapham scale. We believe that an axial sesamoid view helps to determine the extent of intrinsic malalignment, especially if the tibial sesamoid is in position 4 or 5 on an anteroposterior view. The hallux valgus angle and the first-second intermetatarsal angle should first be drawn on the standing dorsoplantar view by bisecting the shafts of the bones ( Fig. 82.10 ), with an awareness of the normal ranges. These angles are most frequently cited as guidelines for treatment decisions, but Donnelly et al. reported that interobserver measurements of the hallux valgus angle varied by approximately 6 degrees and those of the intermetatarsal angle by 4 degrees. They cautioned that potential errors in measurement should be considered when these parameters are used to make treatment decisions. Ortiz et al. defined a new angular measurement that they termed “angle to be corrected (ATC)” in which a line is drawn from the first metatarsal head center to the center of the first metatarsal base and a second line from the metatarsal base through the sesamoid complex midpoint ( Fig. 82.11 ). They found this measurement angle to be as reliable as the intermetatarsal angle.
The hallux valgus interphalangeus angle and any evidence of degenerative arthritic changes at the first metatarsophalangeal or metatarsocuneiform joints should be documented. Oddities may be present and, if overlooked, may compromise a technically well-done procedure. The presence of an os intermetatarseum between the bases of the first and second metatarsals might preclude the effectiveness of a soft-tissue procedure alone to provide sufficient correction of the increased intermetatarsal angle. Likewise, accessory sesamoids and prominent ungual tuberosities at the interphalangeal joint contribute to a painful callus at the tibial side of this joint. An os tibiale externum frequently is associated with excessive hallux valgus interphalangeus. Varus of the first metatarsal might be a significant part of the overall deformity of the foot even with an intermetatarsal angle of less than 10 degrees. Metatarsus varus with a relatively small hallux valgus angle (15 to 20 degrees) may produce significant deformity even though the angles are not excessive.
The usefulness of computer-assisted compared with manual measurement of the intermetatarsal angle, hallux valgus angle, and distal metatarsal articular angle is still uncertain. Both methods have closer interobserver and intraobserver correlation in measurement of the intermetatarsal angle and hallux valgus angle than in measurement of the distal metatarsal articular angle. The reliability of either method has such a wide range (5 degrees). Measurements of these angles, although useful as a guide, do not provide a completely reliable indication of the magnitude of deformity. Schneider et al. reported two methods of determining angular measurements based on distinctly different reference points: (1) a longitudinal axis of the first metatarsal using middiaphyseal reference points and (2) a center-head technique using a center head (center of the articular surface) and center base (center of the proximal diaphysis) as reference points. They found that measured correction of the hallux valgus and intermetatarsal angles varied by approximately 9 degrees depending on which reference points were used. Recommendations of Coughlin, Saltzman, and Nunley (American Orthopaedic Foot and Ankle Society Ad Hoc Committee on Angular Measurements) included standardized radiographic technique, specific placement of reference points, use of a protractor rather than a goniometer for measurements, and, after distal osteotomies, dual measurements using a center-head technique and a Mose sphere. Farber et al. determined that the use of a computer-assisted angle measurement on digital radiographs provided more reliable results than use of a goniometer and plain films: interobserver and intraobserver agreement improved from 66% to 80% ( Box 82.1 ).
Varus of first metatarsal (normal intermetatarsal angle is ≤9 degrees)
Severity of valgus of hallux (normal hallux valgus angle is ≤15 degrees)
Congruity or incongruity of first metatarsophalangeal joint (hallux valgus deformity can exist even in a congruous joint)
Length of first metatarsal relative to second (is second metatarsal >6-7 mm longer than first?)
Subluxation of sesamoid bones (if present, to what extent?)
Well-developed facet between first and second metatarsals, suggesting difficulty displacing first metatarsal laterally at first metatarsocuneiform joint
Sloping of first metatarsocuneiform articulation laterally to medially at a severe angle
Degenerative arthritic changes at interphalangeal, metatarsophalangeal, or metatarsocuneiform articulations
Hallux valgus interphalangeus of ≤10 degrees in neutral flexion and extension of interphalangeal joint
Excessive distal metatarsal articular angle (normal distal metatarsal angle is ≤15 degrees)
Convex medial bowing of proximal phalanx
Kimura et al. recommended evaluating the hallux valgus deformity using a weight-bearing CT image because it can provide detail in three dimensions. They created a loading device that can be used in conventional scanners to simulate a weight-bearing state. Standing radiographic measurements of the hallux valgus angle, the first–second intermetatarsal angle, the lateral talo–first metatarsal angle, and the calcaneal angle correlated well with those measured using their device, indicating that this may be a suitable substitute for standing radiographs when measuring three-dimensional joint angles.
First ray pronation may have a role in the development and progression of hallux valgus as well as treatment. Although pronation of the first ray is frequently present, especially in patients with severe deformities, it remains technically difficult to measure. Eustace et al. described a method of detecting pronation in a cadaver model and found significant correlations between pronation of the proximal phalanx and the intermetatarsal angle, as well as between pronation of the first metatarsal and pronation of the proximal phalanx. As the intermetatarsal angle increased so did first metatarsal pronation. They concluded that pronation and varus deviation of the first metatarsal are linked. Saltzman et al. also found a weak relationship between first metatarsal pronation and the hallux valgus angle, and Gómez Galván et al. noted a relation between hallux valgus severity and pronation of the proximal phalanx. A study by Campbell et al. using CT and a three-dimensional computer-aided design geometric method did not find a significant correlation between the intermetatarsal angle or hallux valgus angle and the severity of pronation of the first metatarsal; however, pronation of the first metatarsal relative to the second metatarsal was significantly larger in patients with hallux valgus. They noted, however, that this lack of correlation could have been the result of differences in bunions, as they did not classify patients by the type of bunion. Nevertheless, they concluded that surgical correction must take into account the triplanar deformity involved in hallux valgus, including pronation of the great toe and pronation of the first metatarsal. They advised caution using any clinical or radiographic measures until these have been more clearly defined.
Although the use of radiographic angles is important when deciding treatment for patients with hallux valgus, Matthews et al. found that the angles do not correlate well with patient-reported outcomes and suggested that too much emphasis is being placed on these preoperative and postoperative values. Using weight-bearing radiographs and correct foot positioning are necessary to obtain correct angle measurements. According to Kuyucu et al., the hallux valgus angle was more susceptible to false weight-bearing radiographs obtained in different positions than the intermetatarsal angle.
Hallux valgus correction is one of the most frequently performed surgeries in the United States. Most patients benefit in terms of pain and function after surgery; however, as many as a third of patients continue to have some degree of pain for 6 to 18 months postoperatively, with most being pain free by 2 years. Postoperative pain management can be challenging, especially as it pertains to opioid prescriptions. With the opioid epidemic, it is necessary to individualize prescriptions for pain by patient and type of procedure. Finney et al., in a review of 36,562 patients who underwent correction for hallux valgus, found that persistent opioid use affected a large number of patients (6.2%). Patients who had first metatarsal–cuneiform arthrodesis were more likely to persistently use opioids compared with patients who had a distal metatarsal osteotomy. Other associated factors included surgeon prescribing patterns and coexisting mental health and pain disorders in patients. Rogero et al. compared four different procedures and found no significant differences between prolonged opioid use and surgery, although they did find significant associations between prolonged opioid consumption and preoperative visual analog pain scores and younger patient age.
Shakked et al. studied the relationship between depression and outcomes after hallux valgus surgery in 239 patients. Although patients with depressive symptoms had more pain at baseline and less pain after surgery than patients without depression, their satisfaction scores and functional outcomes were lower. The reasons for this were unclear but should be considered when counseling patients regarding outcomes. Lai et al. evaluated the role that mental health status has on postoperative outcomes after the scarf osteotomy. They found that patients with preoperative mental component scores (MCS) of more than 50 had significantly higher postoperative functional scores than patients with preoperative MCS of less than 50.
Return to driving after hallux valgus surgery is a frequent question posed by patients, especially when the surgery involves the right lower extremity. Studies on lower extremity fractures have cited 6 weeks after initial weight bearing for safe return to driving. McDonald et al. conducted a study in 60 patients after first metatarsal osteotomy for hallux valgus correction, assessing their driving readiness by visual analog scale survey and testing of reaction times. They determined that some patients can return as early as 6 weeks, depending on their readiness survey, and most were able to return to driving at 8 weeks postoperatively.
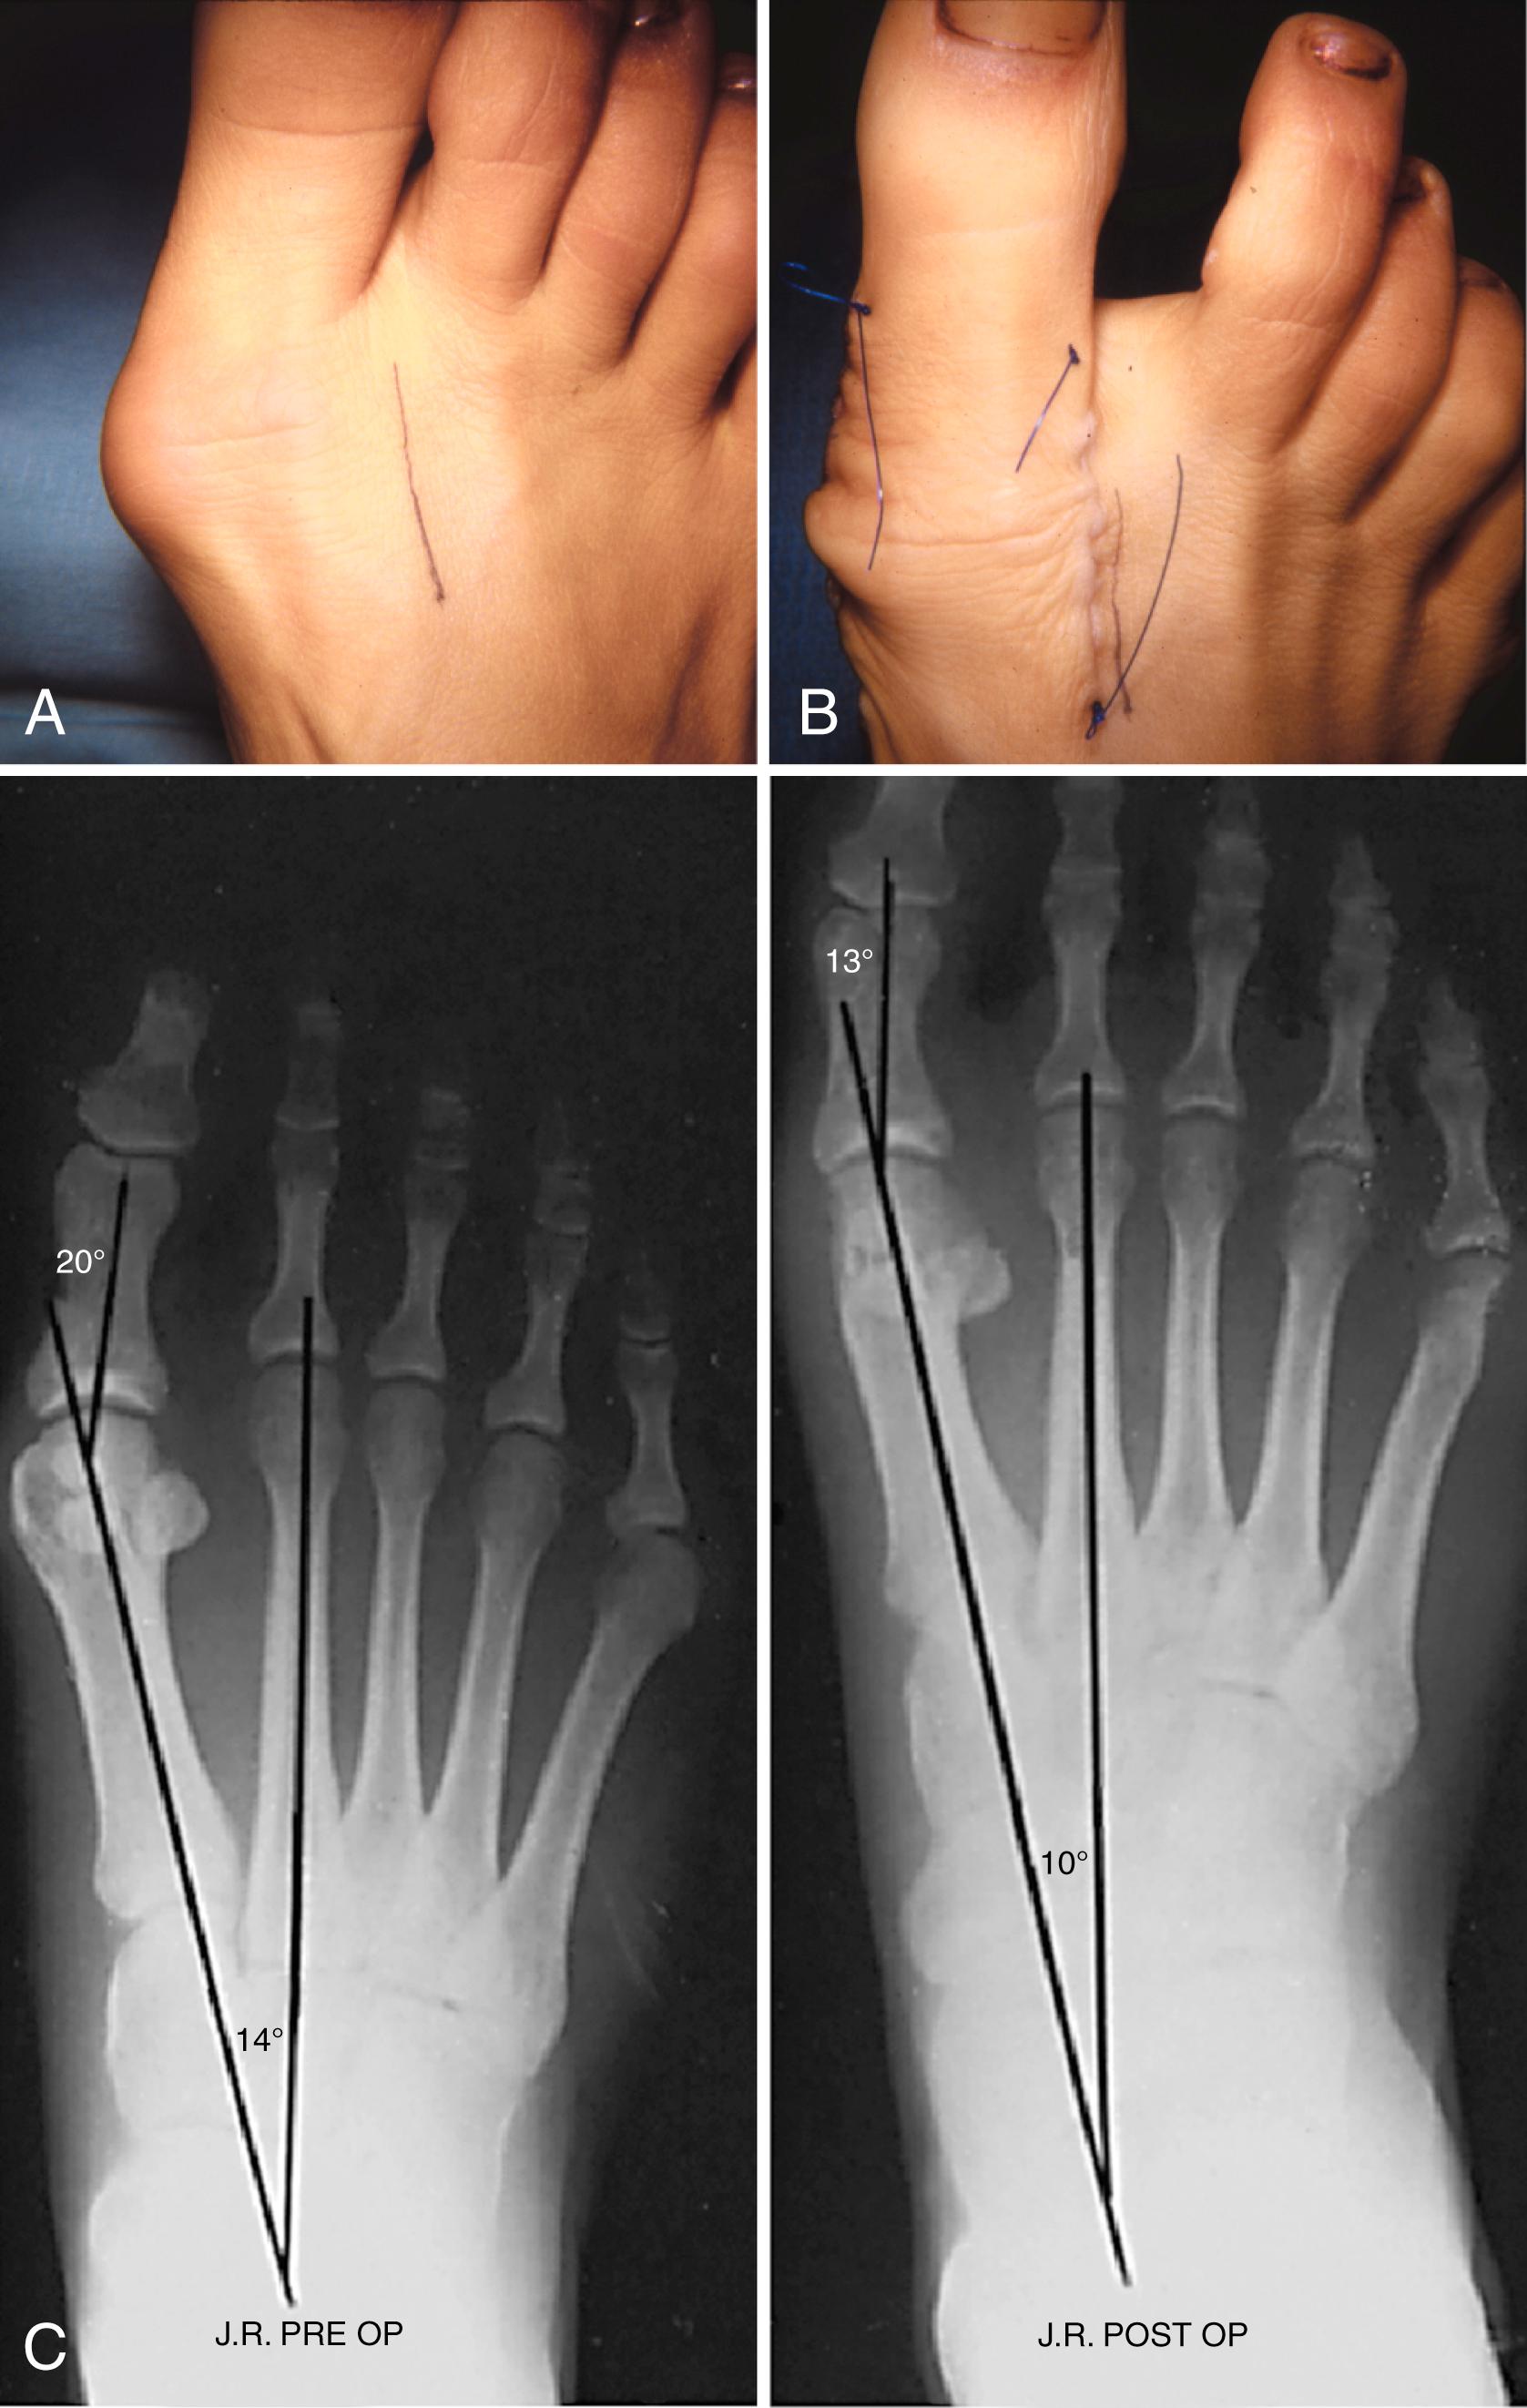
The usual candidate for soft-tissue correction of the hallux valgus complex is a 30- to 50-year-old woman with clinical symptoms and a valgus angle at the metatarsophalangeal joint of 15 to 25 degrees, an intermetatarsal angle of less than 13 degrees, valgus of the interphalangeal joint of less than 15 degrees, no degenerative changes at the metatarsophalangeal joint, and a history of conservative management failure. The modified McBride procedure is basically a combination of the procedures described by Silver in 1923 and McBride in 1928 and later modified by DuVries and popularized by Mann. The results of this procedure are successful in properly selected patients ( Fig. 82.12 ). Stress view radiographs can help determine which patients can be treated with a modified McBride procedure. “Booking open” of the medial side of the metatarsocuneiform joint on stress views may indicate incongruous motion, lateral impingement, and loss of bony support and the medial capsule acting as a spring on stretch. Osteotomy usually is indicated in patients with this medial wedged opening of the joint. If a firm forefoot wrap reduces the intermetatarsal angle to a normal value and decreases the hallux valgus angle, however, while congruously rotating the base of the first metatarsal on the medial cuneiform without levering the joint open medially, the McBride procedure can correct the deformity. Correction is improved by excision of the fibular (lateral) sesamoid because the adductor hallucis and lateral head of the flexor hallucis brevis are released, markedly reducing the valgus moment at the first metatarsophalangeal joint. In addition, the pull of the fibular sesamoid on the flexor hallucis longus through its tendon sheath and pulley system is prevented, reducing another important valgus-producing force on the hallux at the metatarsophalangeal joint. If the fibular sesamoid is excised, the medial capsule should be repaired with the hallux held in 10 to 15 degrees of valgus. This position must be maintained by a postoperative dressing for 3 or 4 weeks. It seems convincing that correction of the sesamoid position in hallux valgus surgery occurs by placing the metatarsal head over the sesamoid rather than by reducing the sesamoids by pulling them under the metatarsal head. A study by Huang et al. of 165 patients with hallux valgus treated with reconstruction found that sesamoid correction correlated with first to second intermetatarsal correction. Their results did not support the concept that medial plication pulls the sesamoids under the first metatarsal.
For a mild or moderate deformity, a regional anesthetic can be used. For severe deformity, the patient should be placed under general anesthesia with a supplemental block given.
For a mild or moderate deformity, an ankle tourniquet can be used; however, it should be released before final closure of the capsule because the tension on the long flexor and extensor to the toe limit the assessment of the final position of the toe. For severe deformity, we advise using a thigh tourniquet so that intraoperative decision making and technique are not influenced by the ankle tourniquet producing contracture of the flexor hallucis longus or extensor hallucis longus.
With the patient supine and a tourniquet on the limb, extend a midline, straight, medial incision from the middle of the proximal phalanx to 2 cm proximal to the junction of the medial eminence with the metatarsal shaft ( Fig. 82.13 ). This incision usually is in an internervous plane between the most medial branches of the superficial peroneal nerve dorsally and the medial proper digital branch of the medial plantar nerve plantarward. (McBride recommended a single incision beginning at the first web space and extending proximally and medially across the metatarsal, ending on the medial side of the first metatarsal proximal to the exostosis.)
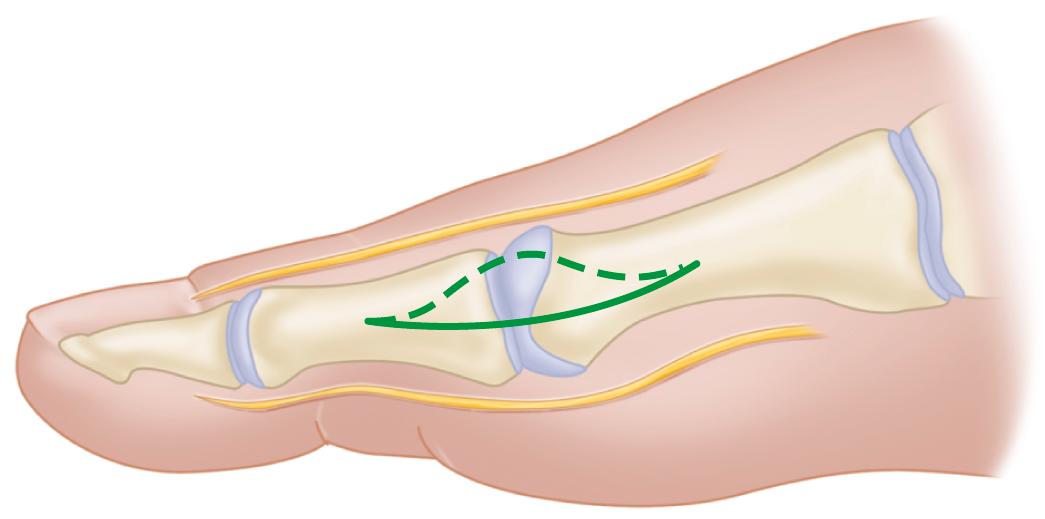
Mobilize the skin 2 to 3 mm dorsally and plantarward to ensure that no sensory nerve would be injured by the capsular incision.
Coagulate the superficial veins as encountered to minimize postoperative bleeding.
Use delicate, two-tooth retractors and 1.5-mm forceps in this initial dissection to avoid unnecessary skin trauma.
Make a longitudinal capsular incision (the original McBride capsular incision was transverse) 3 to 4 mm plantar to the line of the skin incision ( Fig. 82.14 ).
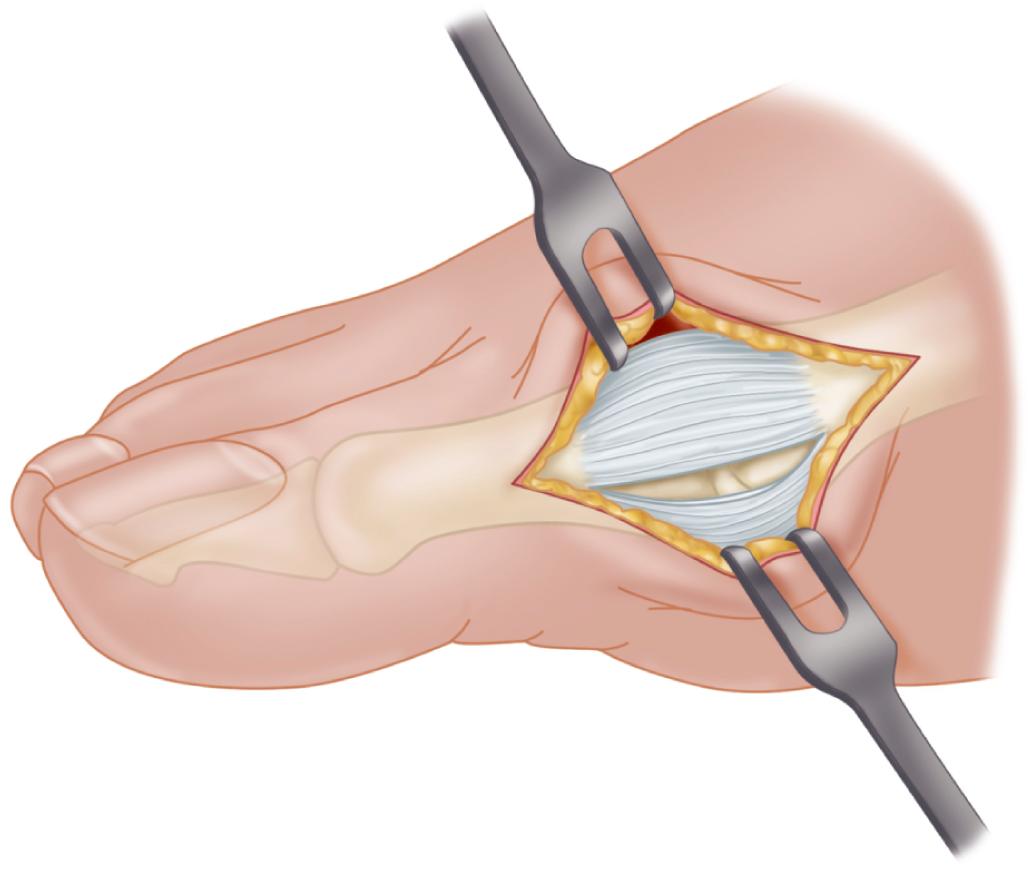
By sharp dissection, raise the periosteum and the capsule dorsally and plantarward from the base of the proximal phalanx to the proximal edge of the medial eminence ( Fig. 82.15 ). At the proximal end of the medial eminence, avoid releasing the proximal bony attachments of the medial capsule on the metatarsal neck (especially in the dorsal direction) in an attempt to expose the medial emi nence. To ensure adequate exposure without disruption of this proximal attachment, a longitudinal capsular incision is suggested.
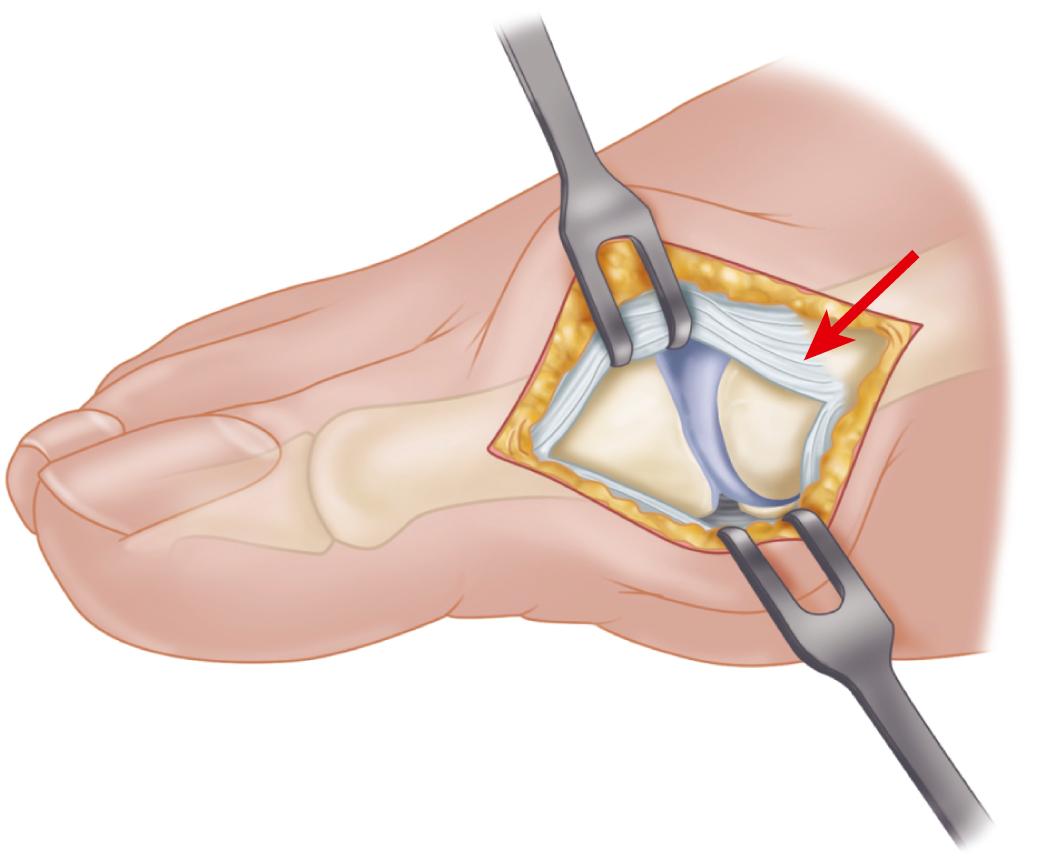
Elevate the capsule by sharp dissection dorsalward and plantarward to expose the dorsal aspect of the metatarsal head, the entire medial eminence, and the plantar plate. A periosteal elevator is not recommended because of the possibility that the proximal attachments of the capsule may be released.
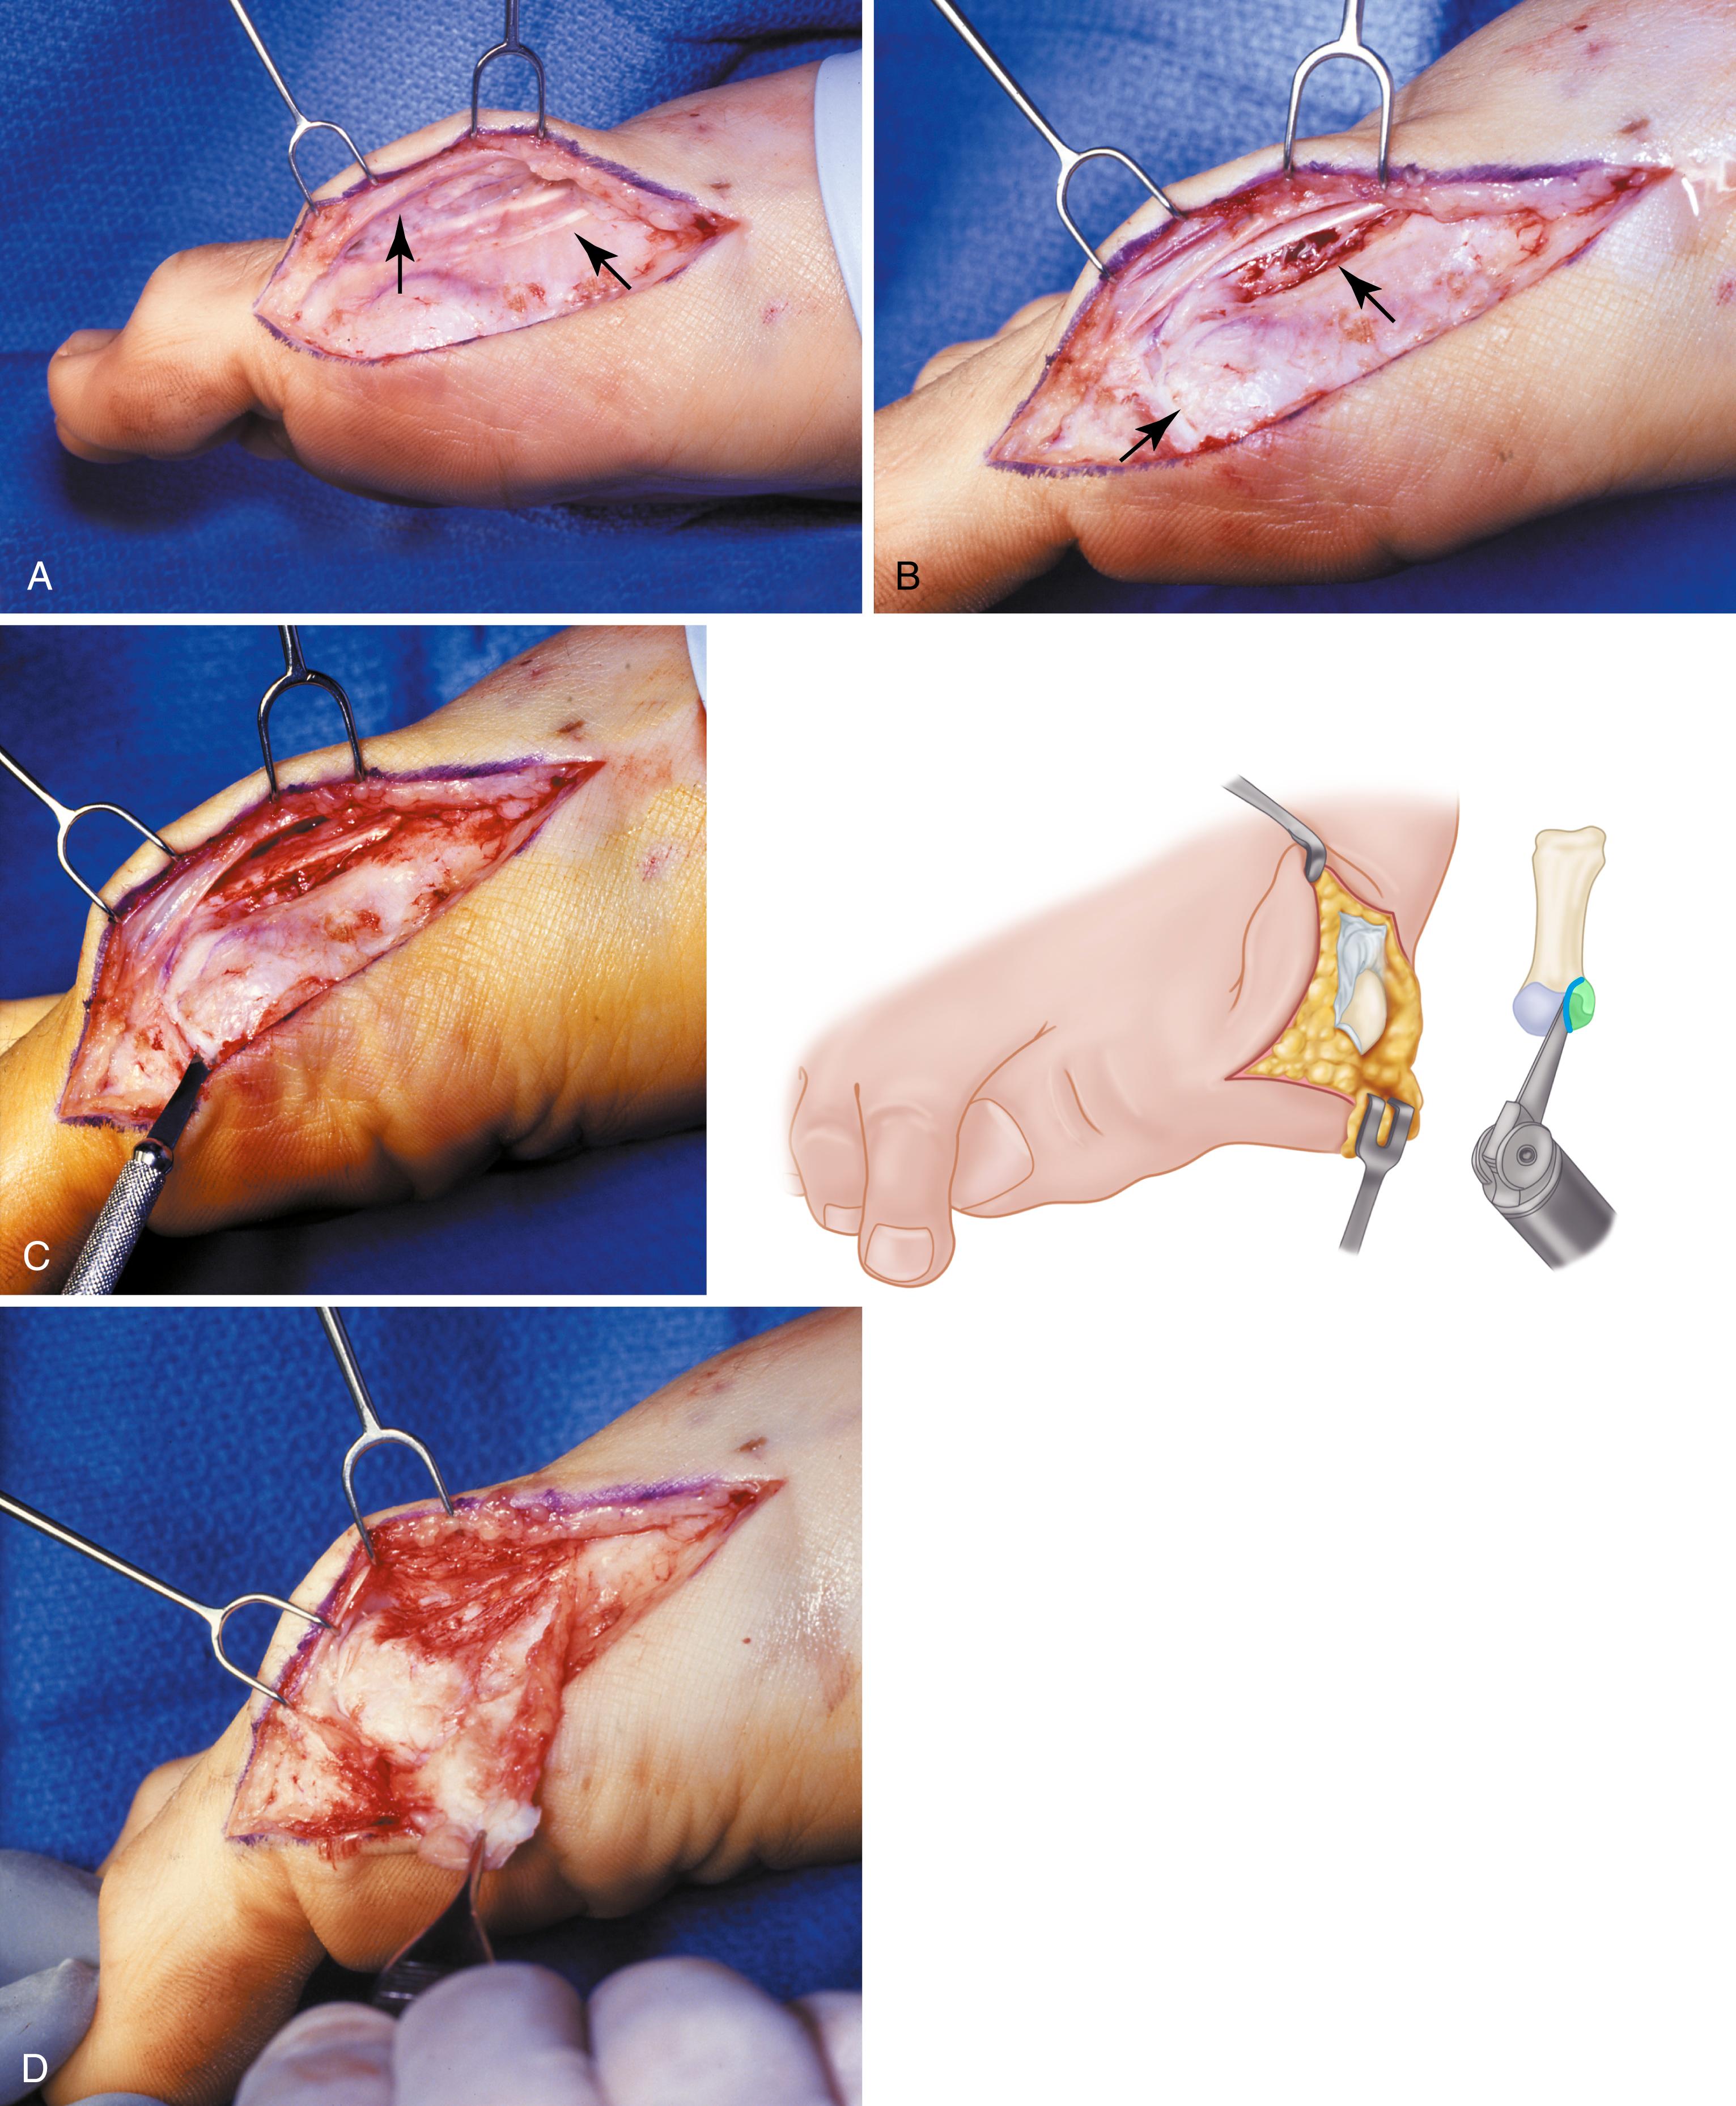
Alternatively, a capsular incision in an inverted-L shape can be made ( Fig. 82.16A ).
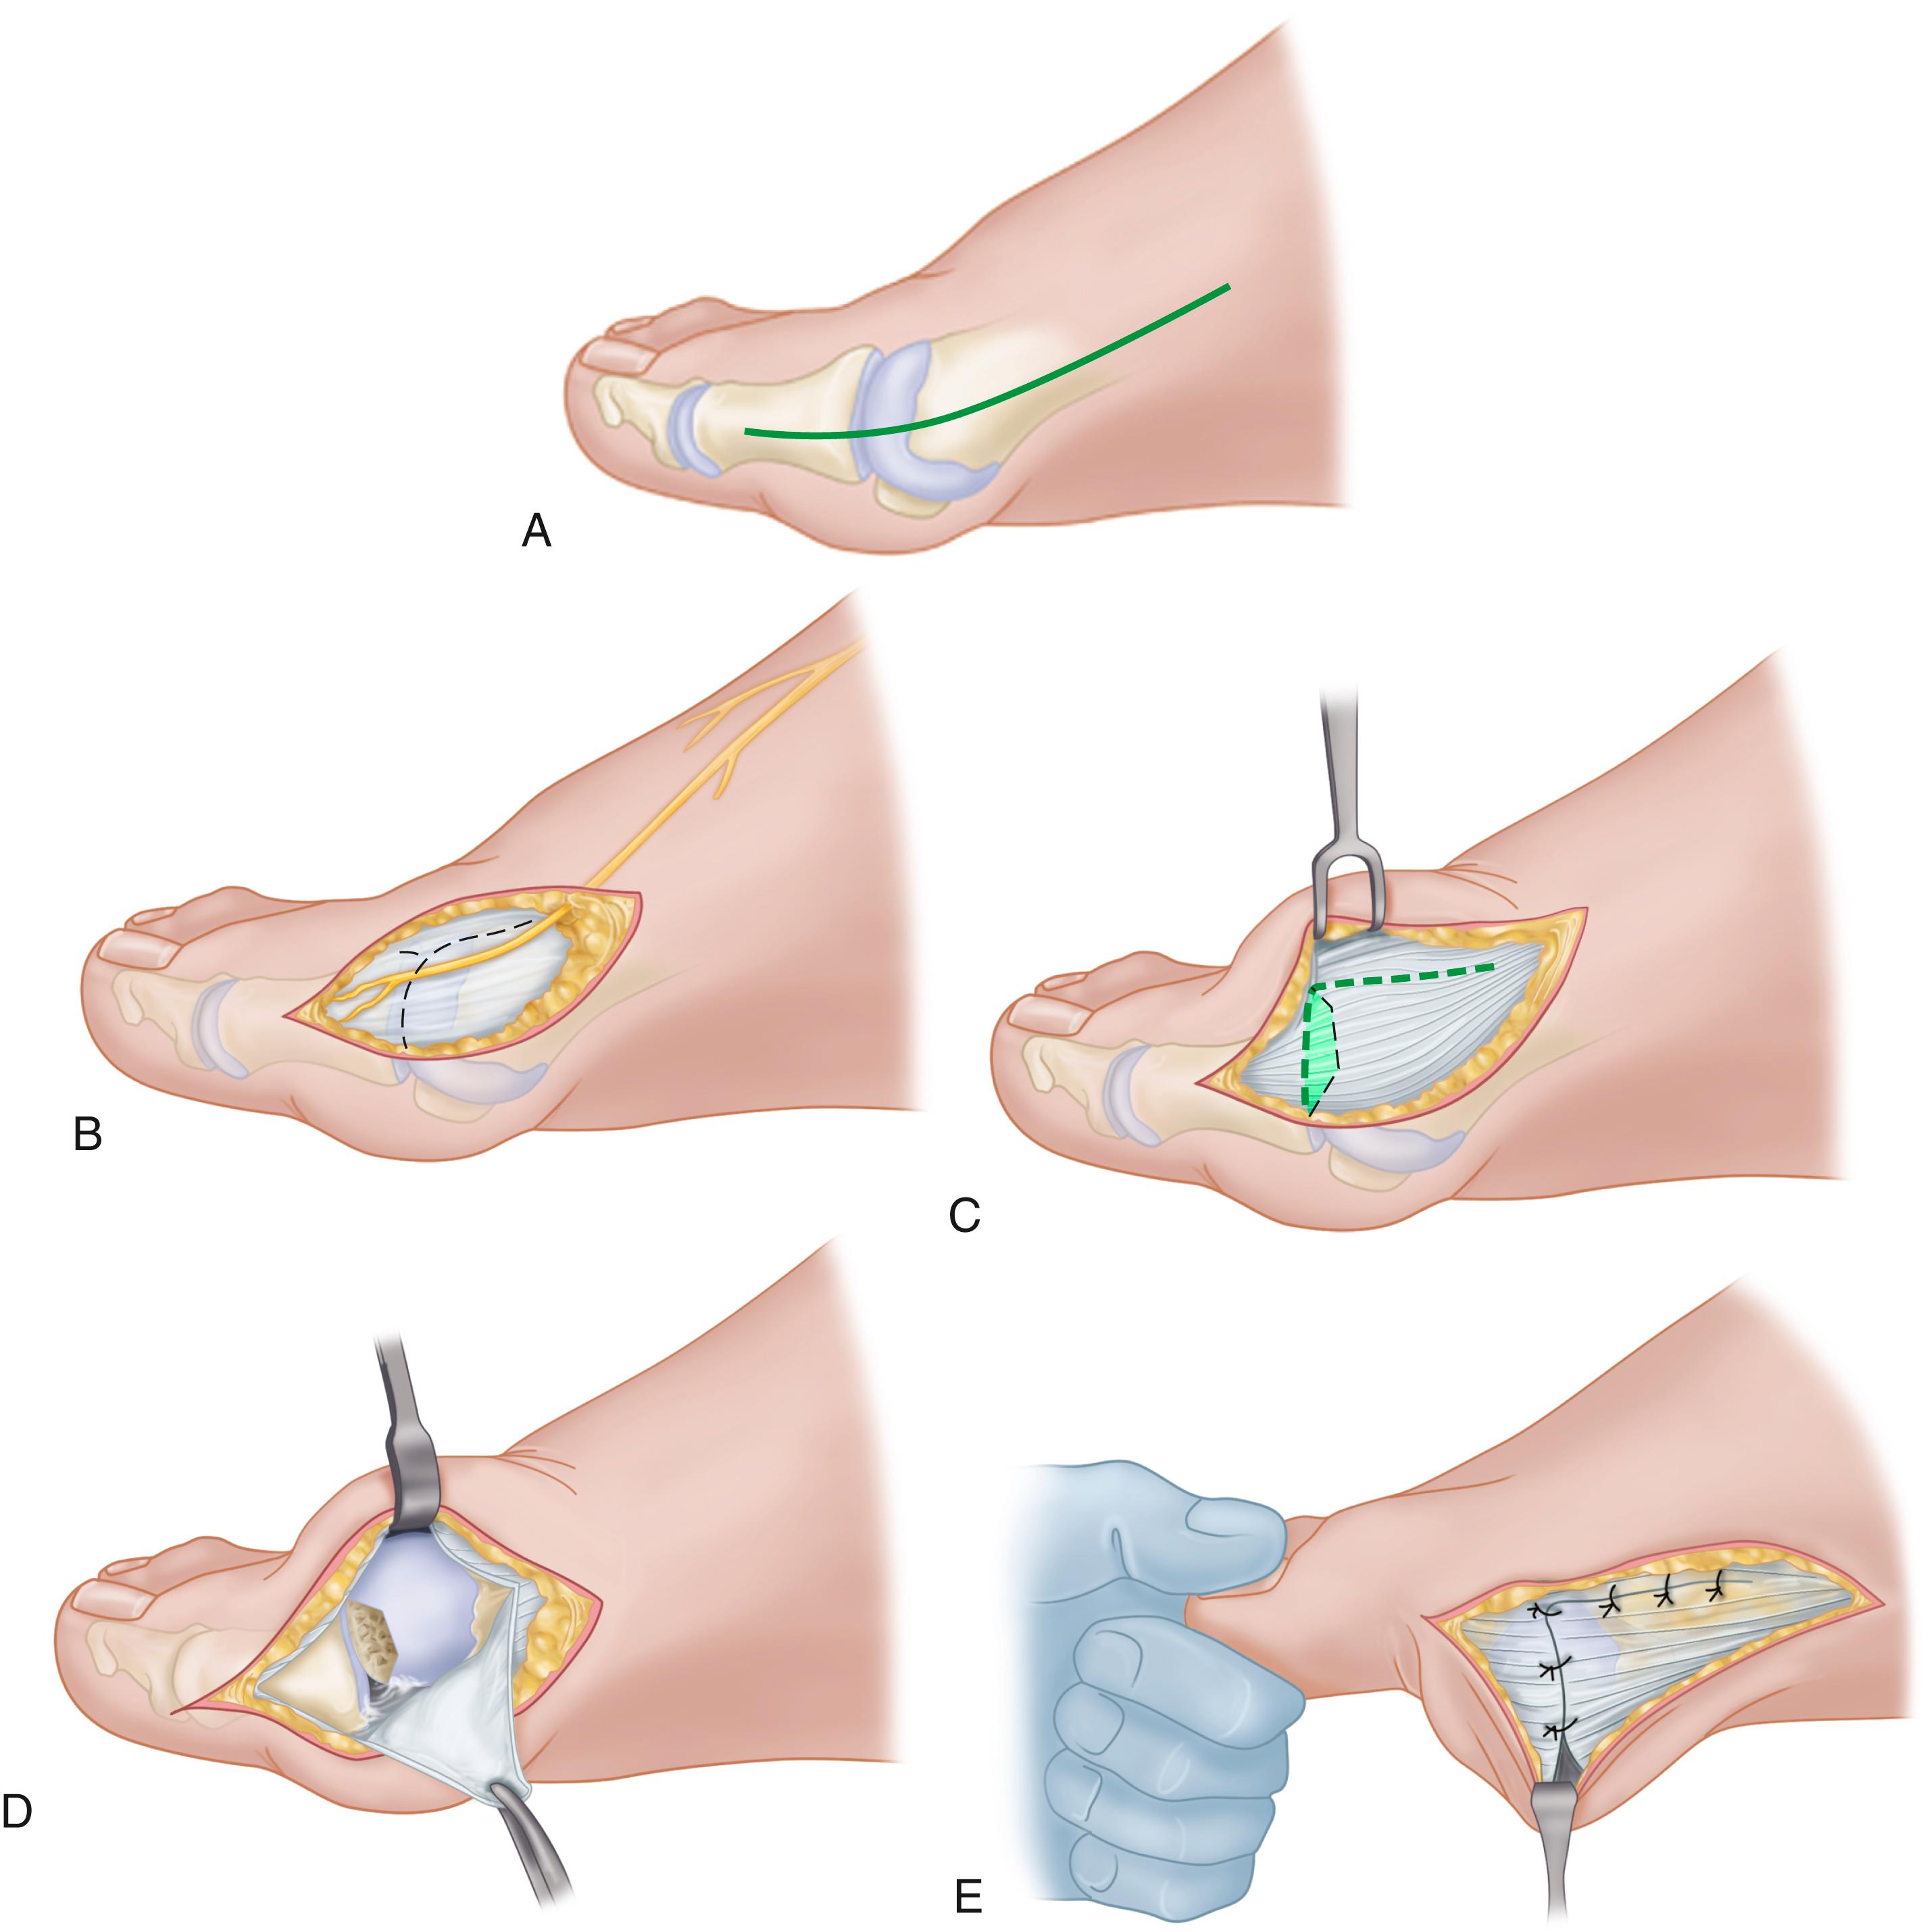
Make an incision ( Fig. 82.16A ) and raise the dorsal flap deep to the nerve and veins until the accessory slip of the extensor hallucis longus tendon is seen in the proximal portion of the incision where it is easier to identify ( Fig. 82.16B ). The tendon almost always can be located with careful searching. If it is not seen at the dorsomedial aspect of the first metatarsal, however, begin the longitudinal limb of the incision at this slope of the metatarsal from dorsal to medial.
Begin the incision proximally on the dorsomedial side of the first metatarsal shaft and 2 to 3 mm medial to the accessory slip of the extensor hallucis longus tendon. Carry the incision to the bone at the level of the first metatarsal joint, extending proximally 4 to 6 cm ( Fig. 82.16C ).
Make the transverse limb of the capsular incision at the level of the joint, stopping 2 to 3 mm from the tibial sesamoid bone; this limb transects the capsular insertion of the abductor hallucis muscle (see Fig. 82.16C ).
Beginning on the plantar aspect of the incision, remove the capsule from the medial eminence from the inside out. Avoid buttonholing the capsule at the junction of the medial eminence and the metatarsal by directing the small-bladed knife down the slope of the eminence.
Free the capsule subperiosteally on its dorsomedial surface and retract it proximally and plantarward ( Fig. 82.16D ).
Insert one small Hohmann retractor over the dorsolateral surface of the metatarsal head and another beneath the head at the head and neck junction, while distracting and plantarflexing the hallux to expose the articular surface of the metatarsal head for evaluation of its condition and orientation. Reduce the hallux congruently on the metatarsal head.
If the hallux is in more than 15 degrees of valgus after reduction, a distal metatarsal osteotomy is needed.
After inspecting the metatarsophalangeal joint for degenerative changes, loose bodies, or synovial abnormalities, remove the medial eminence by first scoring with an osteotome its proximal edge where the eminence meets the shaft. Always consult the preoperative radiographs to determine how much of the medial eminence should be removed.
Using the same osteotome or a power saw, begin the exostectomy distally at the parasagittal groove and direct it medially toward the scored area on the metatarsal shaft ( Fig. 82.17 ). If a power saw is used, a 9-mm blade, rather than a 4- to 5-mm blade, is preferred. The medial direction of the osteotomy prevents splitting of the metatarsal shaft, especially if the proximal edge of the osteotomy has been scored as recommended.
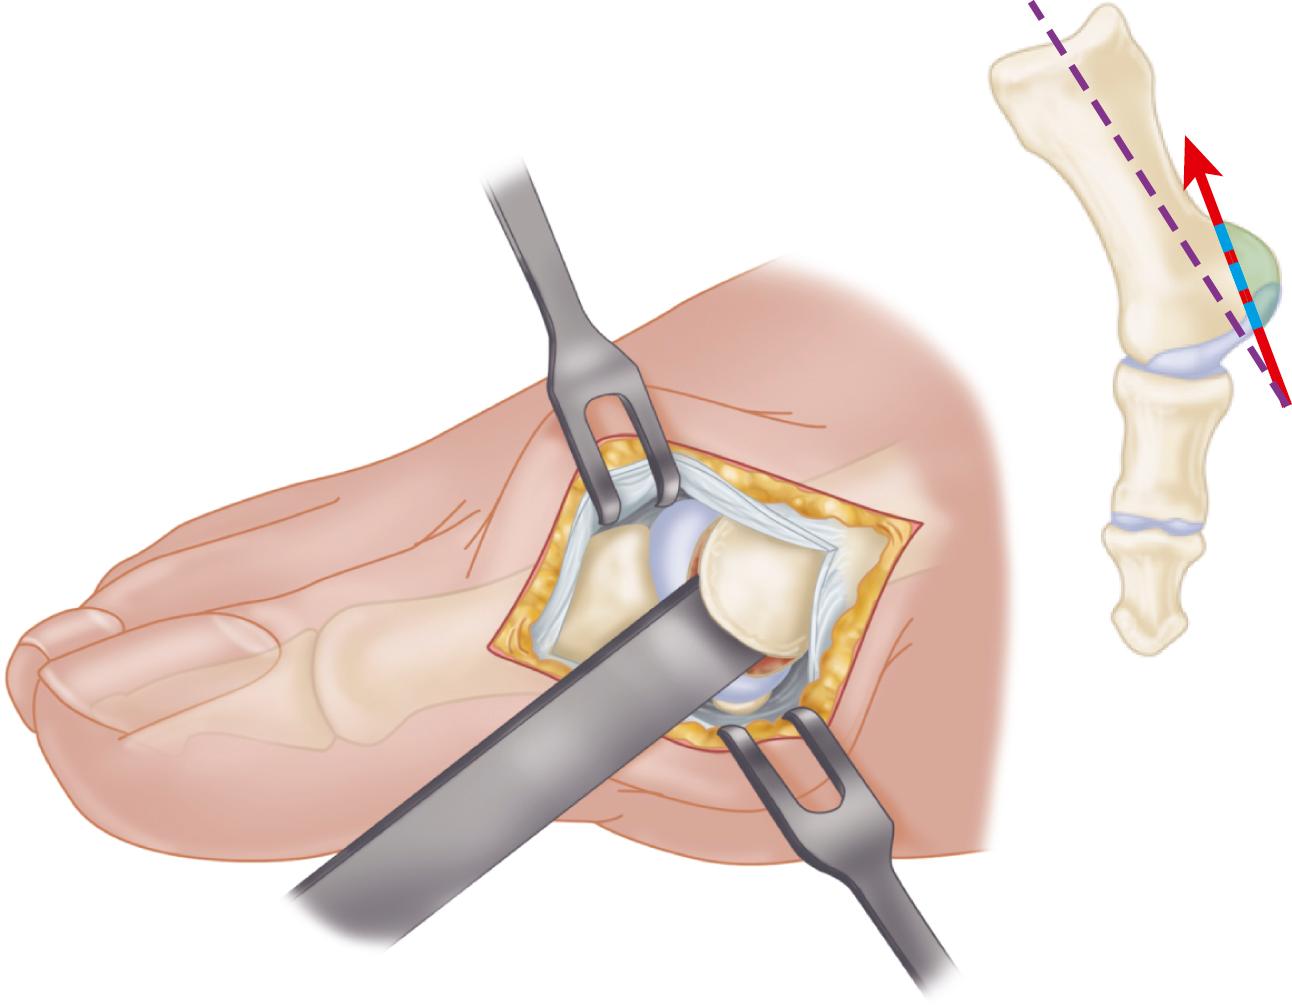
After the medial eminence has been removed, use a small rongeur to round off the dorsal and plantar edges of the medial aspect of the metatarsal head. Rasping the raw bone concludes the initial stage of the procedure. Use bone wax on the raw surfaces of bone of the metatarsal head.
Begin the second stage with a dorsal longitudinal incision beginning 2 to 3 mm proximal to the dorsal aspect of the first web space to avoid web contracture postoperatively; extend it proximally between the first and second metatarsal heads for 3 to 4 cm ( Fig. 82.18 ). This allows adequate exposure of the adductor insertion into the base of the proximal phalanx, the lateral head of the flexor hallucis brevis muscle converging on the fibular sesamoid, and the entire lateral capsule from the extensor hallucis longus muscle to the plantar plate.
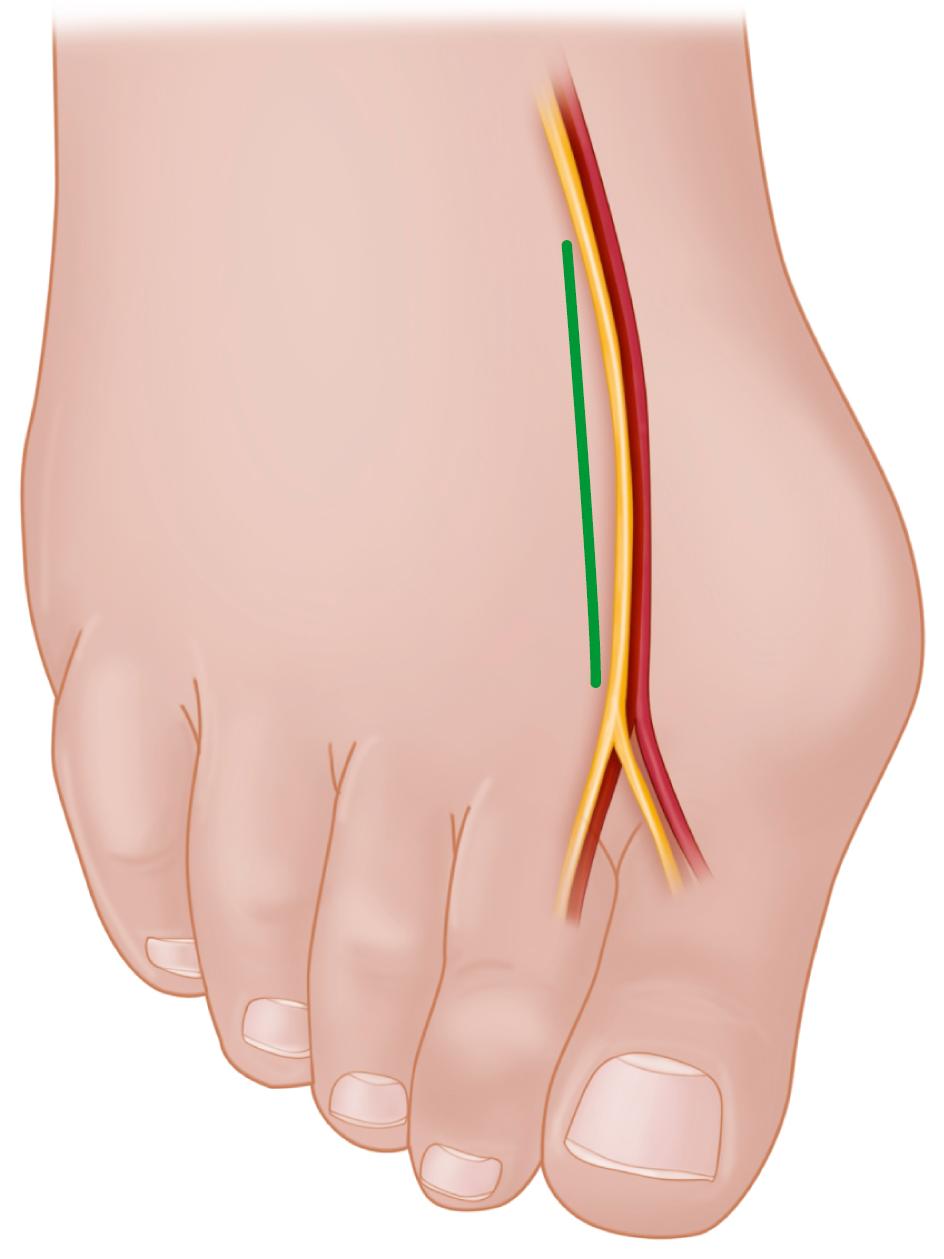
Delicate retraction of the skin exposes the dorsal digital branches of the veins, which should be cauterized if they obscure the deeper dissection. The terminal branches of the first dorsal intermetatarsal artery may be encountered at a location adjacent to the proper digital branches of the deep peroneal nerve to the first web space.
The main portion of the adductor tendon inserts into the base of the proximal phalanx just plantar to the longitudinal axis of the phalanx. It also has a smaller insertion, along with the lateral head of the flexor hallucis brevis muscle, into the fibular sesamoid. The simplest technique to identify the insertion of the adductor hallucis tendon is to place a small, pointed, curved hemostat on the dorsolateral base of the proximal phalanx, slide it firmly plantarward, and lift the hemostat dorsally and laterally; the tip of the instrument usually rests in the axilla of the insertion of the adductor tendon ( Fig. 82.19A ). This is comparable to securing the iliopsoas tendon for tenotomy at the lesser trochanter.
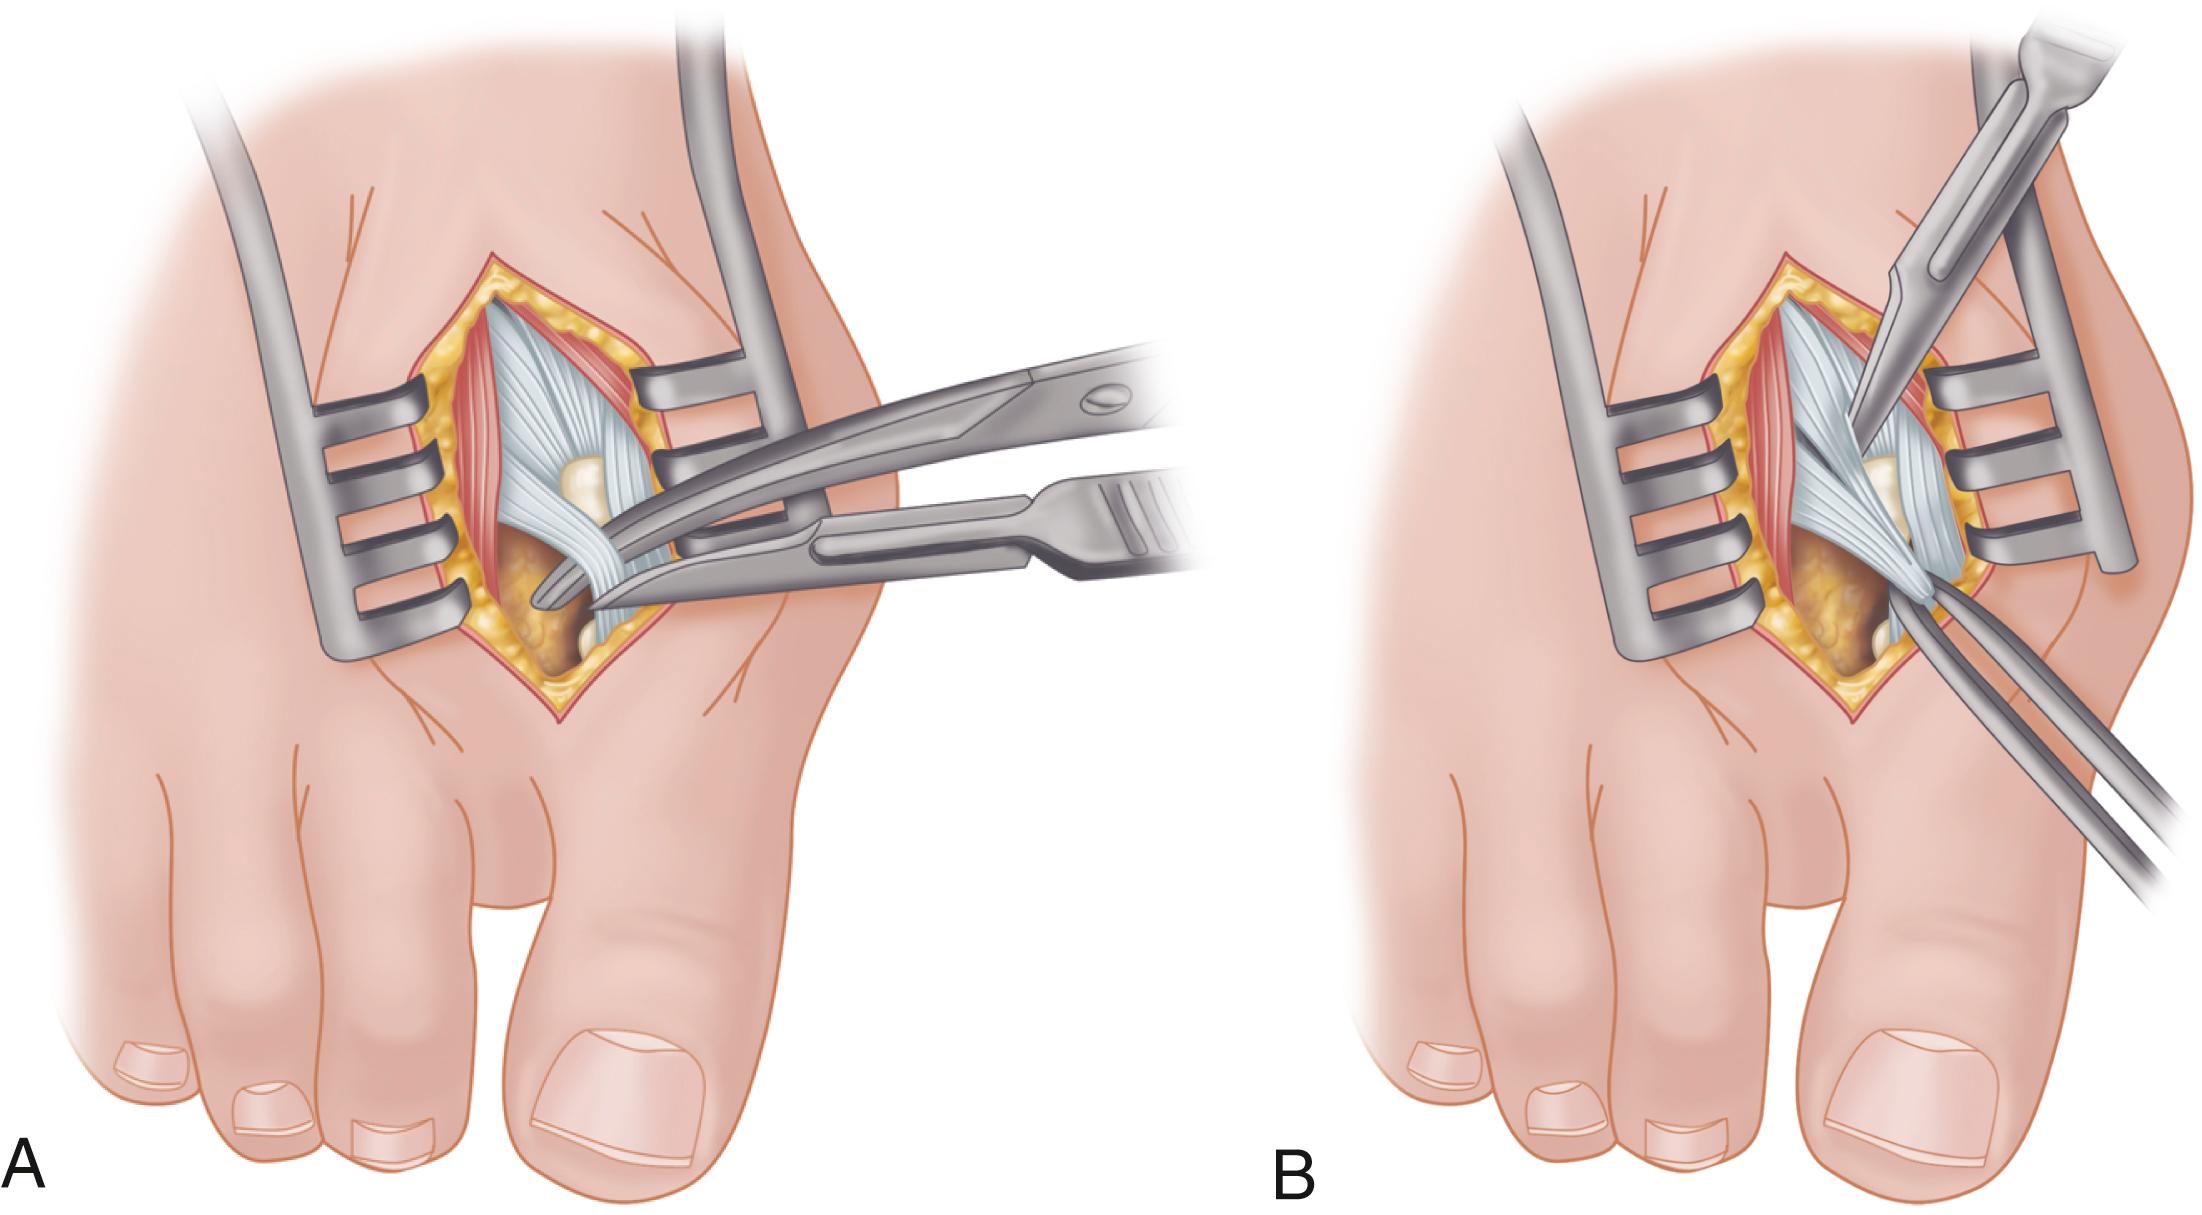
When the primary insertion is released, grasp the tendon with forceps or a hemostat and, with traction, displace it dorsally and laterally toward the second metatarsal so that further dissection is on the medial side of the adductor, or push the sesamoid sling laterally through the previously placed medial incision to aid exposure.
While spreading the first and second metatarsal heads with a small Inge retractor, heavy-duty two-tooth retractors, or a Weitlaner retractor, hold the adductor tendon under tension, which facilitates exposure. The lateral head of the flexor hallucis brevis muscle, the lateral border of the fibular sesamoid, and the slip of the adductor tendon (confluent with the lateral head of the flexor hallucis brevis muscle) come into view in the depths of the wound.
All attachments of the adductor into its conjoined insertion with the lateral head of the flexor hallucis brevis muscle into the fibular sesamoid must be severed; with traction on the adductor, it freely and independently moves without tethering the fibular sesamoid ( Fig. 82.19B ).
This deep transverse intermetatarsal ligament, which lies just plantar to the adductor, may be released by the incision along the lateral border of the sesamoid. If not, release this ligament, carefully preserving the neurovascular bundle immediately beneath it and incise the lateral capsule. Mann emphasized that release of the deep transverse metatarsal ligament endangers the neurovascular bundle to the first web space, which lies immediately beneath this ligament. Sliding a small Freer elevator between this ligament and the neurovascular bundle would protect the latter structures.
If after complete adductor hallucis release, and preferably after a lateral capsular release, a fibular sesamoidectomy is needed to correct the valgus deformity of the great toe fully, it should be done at this time.
Adequately separate the first and second metatarsal heads for exposure.
Plantarflex the metatarsophalangeal joint 10 to 20 degrees, which reduces tension on the sesamoids.
Grasp the fibular sesamoid with a small Kocher clamp or sturdy tissue forceps and pull it laterally into the intermetatarsal space ( Fig. 82.20 ).
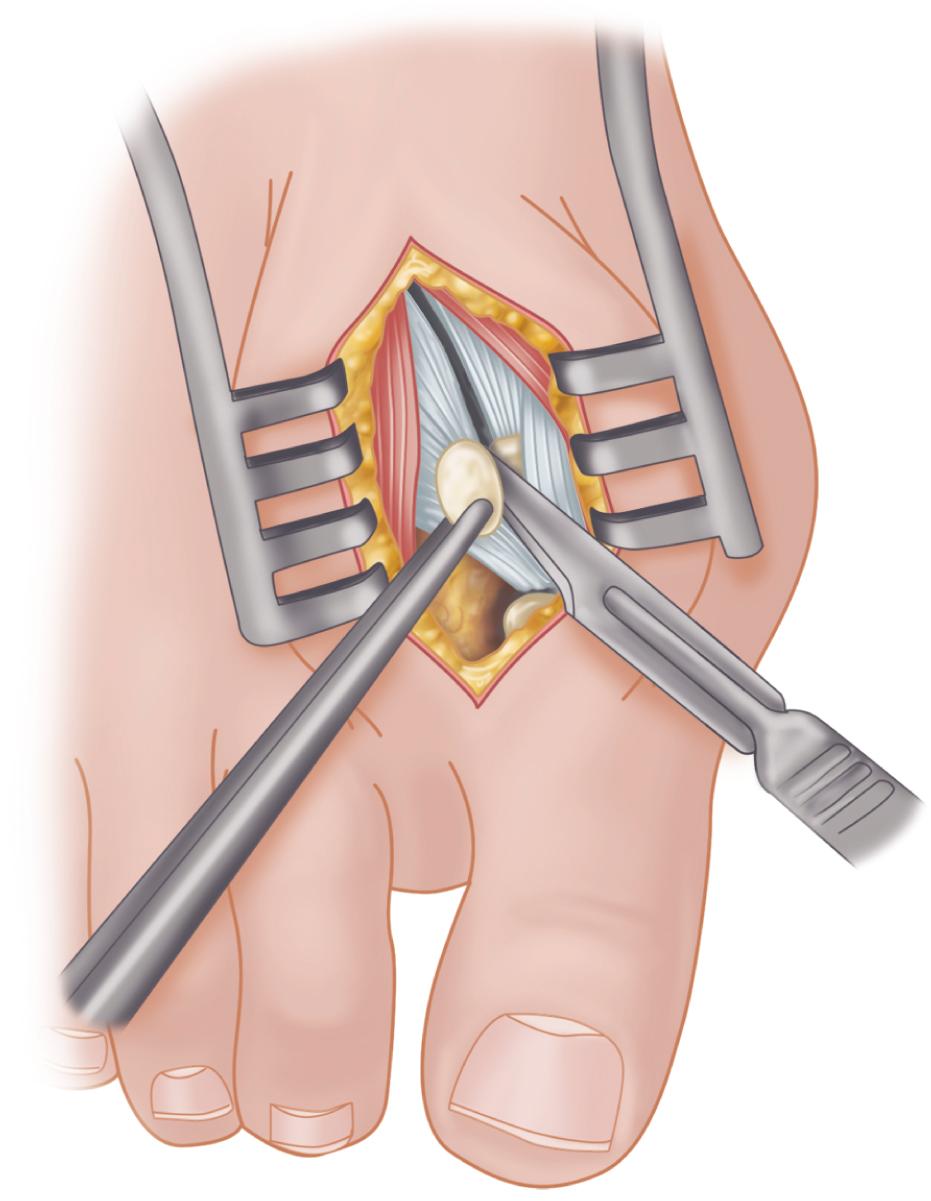
Release the intersesamoid ligament. When this ligament has been incised, bring the fibular sesamoid into the intermetatarsal space, where its removal is straightforward. Care must be taken when incising the intersesamoid ligament to avoid severing the flexor hallucis longus tendon immediately plantar to it. If the tendon is severed, it probably should not be repaired at this level; loss of the tendon causes little if any functional impairment, and repair may result in a fixed flexion contracture of the interphalangeal joint.
An alternative to fibular sesamoidectomy was recommended by Mauldin, Sanders, and Whitmer, who released part or all of the flexor hallucis brevis lateral head at its insertion into the fibular sesamoid. This release of the sesamoid is needed only if fixed valgus remains after the adductor hallucis has been released, a lateral capsulotomy has been performed, and the fibular sesamoid has been mobilized. Also, in this situation, a metatarsal osteotomy may be needed, rather than a fibular sesamoidectomy. Performing both may cause hallux varus.
With an assistant holding the metatarsophalangeal joint in a congruously reduced position in the varus-valgus and flexion-extension planes, imbricate the medial capsule in the following manner ( Fig. 82.21 ).
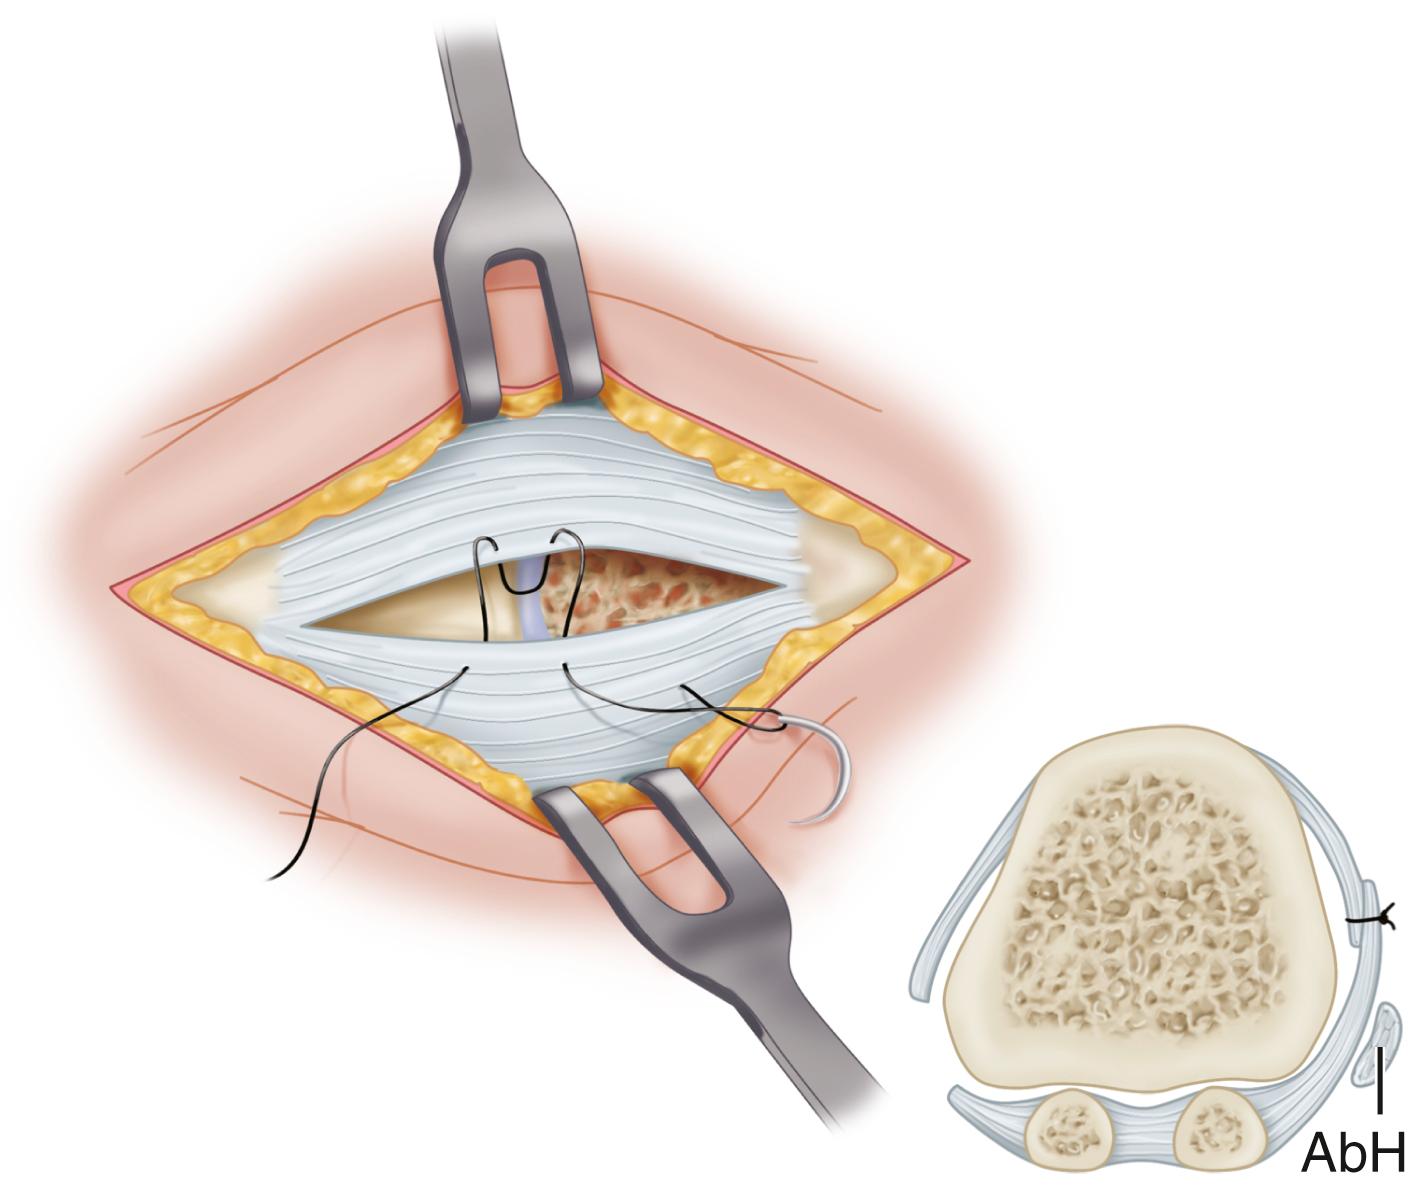
Using absorbable 3-0 or interrupted sutures, place the initial suture through the plantar flap of the capsule at a point 4 to 5 mm medial to the proximal medial border of the medial (tibial) sesamoid and in an outside-to-inside direction.
Turn the needle on itself and pass it through the dorsal flap at the same level in an outside-to-inside direction. Immediately pass the suture back through the dorsal flap from inside out and finally through the plantar flap from inside out (a swedged-on needle would suffice, but a small cutting needle is recommended).
With the hallux held in the desired position, tie this suture, bringing the plantar flap over the dorsal flap and pulling the plantar-displaced abductor hallucis toward the midline of the longitudinal axis of the proximal phalanx and first metatarsal.
Allow the toe to rest unassisted to judge its resting posture and the tension on the capsular repair.
If the fibular sesamoid has been removed, do not imbricate the medial capsule to avoid pulling the tibial sesamoid medial to the metatarsal head ( Fig. 82.22 ). If a large medial eminence has persisted for many years with increased capsular reaction and redundancy, a portion of the dorsal flap may need to be excised before closure.
It is imperative to avoid pulling the medial side of the tibial sesamoid medial to the articular surface of the first metatarsal head; do not uncover the tibial sesamoid ( Fig. 82.23 ).
If the resting posture of the hallux is acceptable, close the remaining portion of the capsule with interrupted 2-0 or 3-0 absorbable sutures.
Begin the closure proximally using 3-0 sutures on a small swedged-on needle; bending the needle to increase the curve makes passage easier in a small wound (see Fig. 82.16E ).
While an assistant applies tension distally on the free corner of the capsule, place the most proximal suture in the longitudinal limb of the capsular incision; place two or three sutures at 5-mm intervals. Do not place the corner suture.
Begin to close the transverse limb of the incision at the medial plantar corner.
Hold the hallux reduced on the metatarsal head while tying all sutures.
Unless the capsule is redundant, do not imbricate the medial capsule over the area of eminence removal. Close this portion of the transverse limb with side-to-side sutures and place the imbricating suture in the dorsomedial corner of the capsulotomy.
Begin this final suture distally on the transverse limb of the inverted L, passing the needle from the outside in.
Reverse the needle and enter the capsular flap from the outside in on the transverse limb.
Reverse the needle and reenter the capsular flap from the inside out on the longitudinal limb of the flap.
Make the final pass of the needle from the inside out on the dorsal side of the longitudinal limb of the incision. Holding the joint in its reduced position, tie the suture.
If the joint reduction is congruent but the hallux is still in an unacceptable valgus position, metatarsal osteotomy should be considered.
If the transverse limb of the capsular repair is too loose, allowing the hallux to slide into valgus, remove the midline medial suture in the transverse limb. While holding the hallux in the proper position, place the suture 2 to 3 mm farther away from the incision or excise more capsule from the proximal portion. Take care in removing any extra capsule because removal of even a small portion results in a significant correction of capsular laxity and may cause varus of the hallux.
At the conclusion of the procedure, the hallux should rest on the metatarsal head in about 5 degrees of valgus and 10 degrees of extension.
If an elastic wrap has been used as a tourniquet, remove it and have the patient flex and extend the toe (if a local anesthetic has been used) to assess function and congruence of the repositioned hallux.
Lavage the wound, secure hemostasis, and close the skin with interrupted or simple mattress sutures. If simple sutures are used, ensure that the skin edges are not inverted or overlapped. If everted mattress sutures are used, do not evert the edges so much that they do not approximate evenly.
A bulky compression dressing is applied to the forefoot, and the foot is placed in a position of maximal elevation for 48 to 72 hours. Bathroom privileges only are allowed, and the patient must wear a wooden-soled shoe. Increased ambulation after 72 hours is allowed as tolerated by the patient. The need for crutches or a walker varies, but assisted ambulation is not encouraged unless the patient is unsteady.
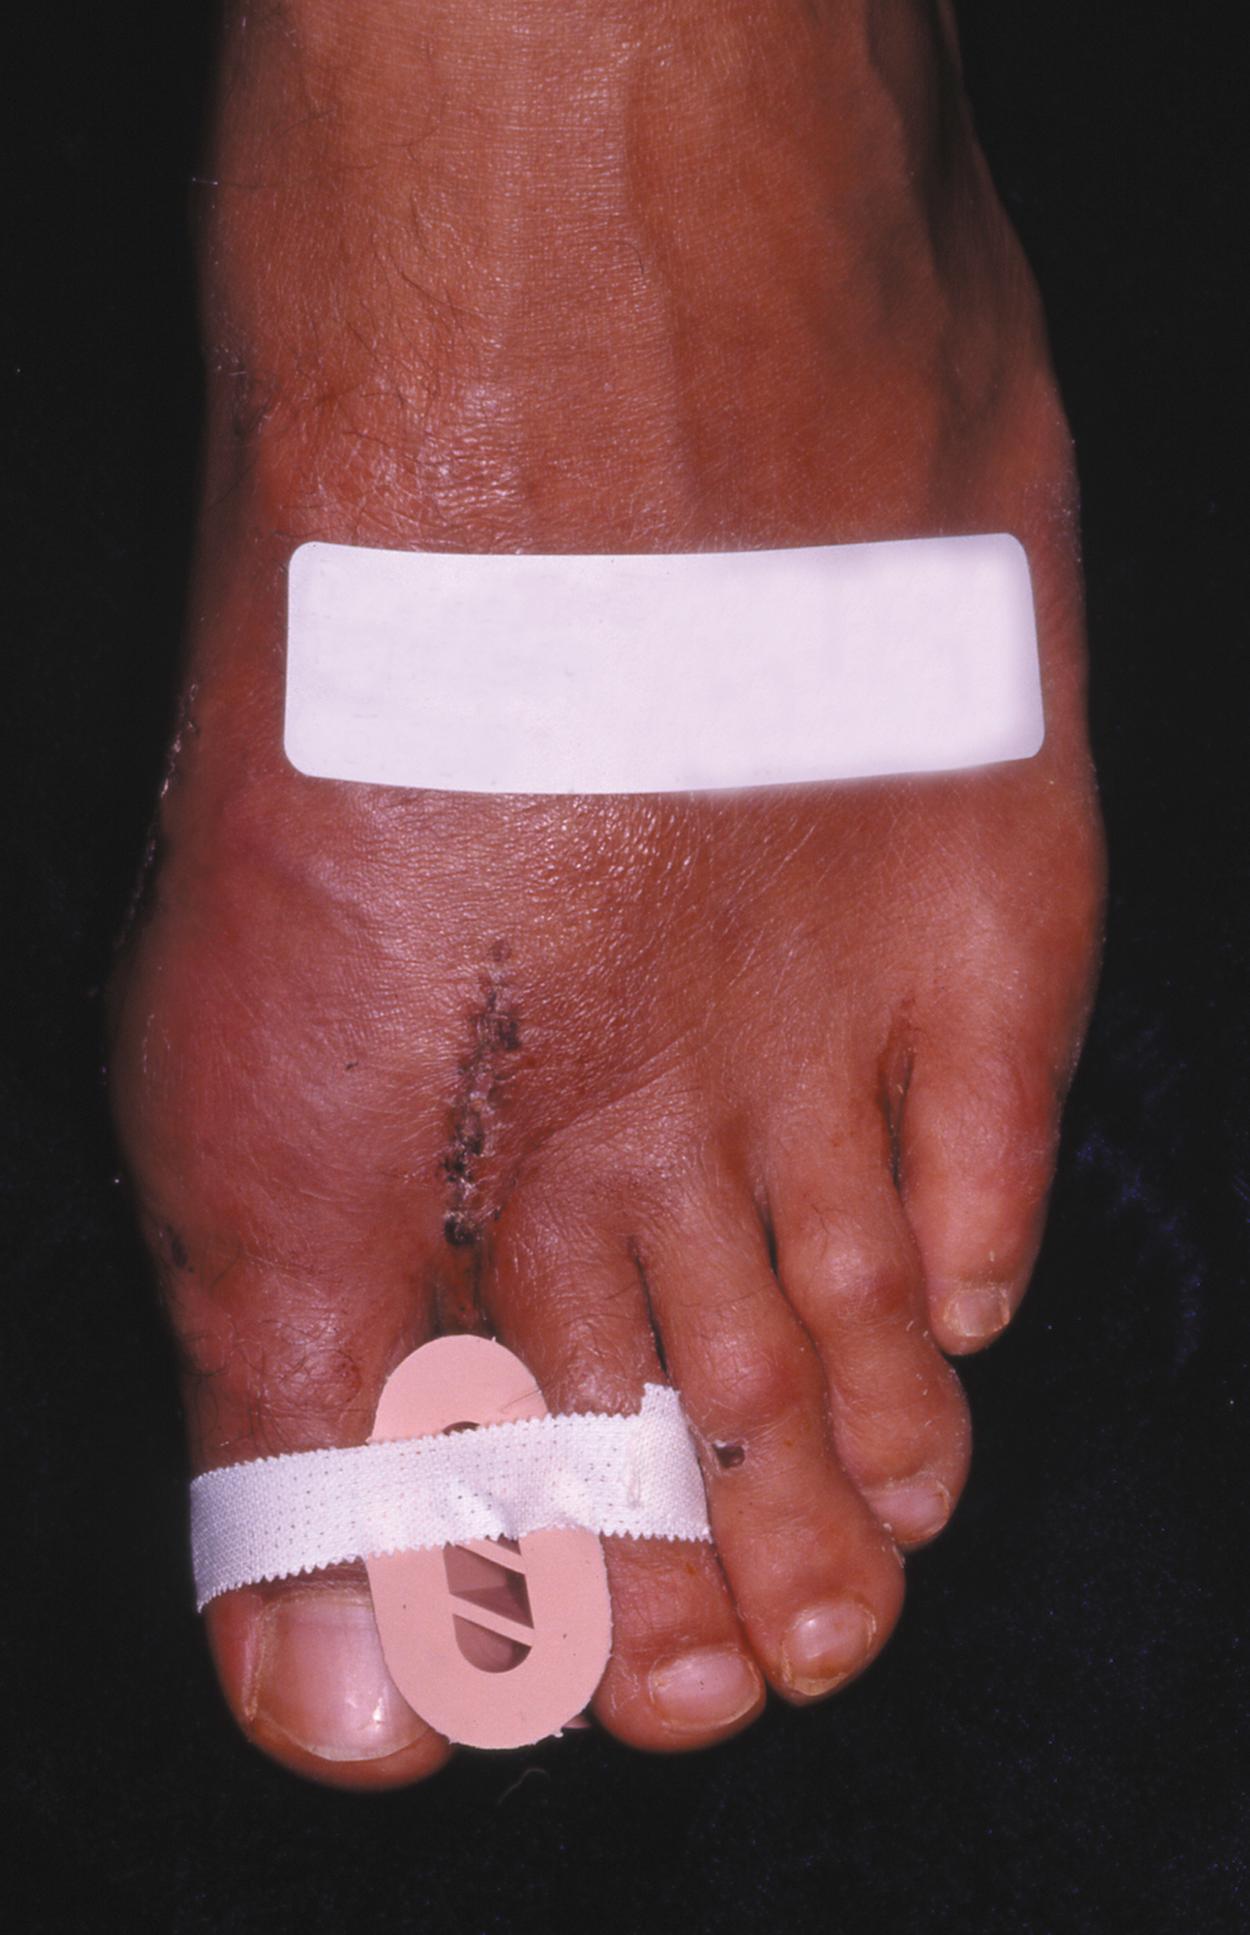
At 3 weeks, if the wounds are healed, the sutures are removed and adhesive strips are applied if needed; leaving the sutures in longer has no untoward effect. Some type of immobilizer or toe spacer to hold the toe in proper alignment is used ( Fig. 82.24 ). The wooden-soled shoe is used for 3 to 4 weeks, at which time a deep shoe with a wide toe box is recommended; a jogging shoe is sufficient; an extra-depth orthopaedic shoe with a soft toe box also is permissible. The toe spacer is worn for 6 weeks. At 12 to 14 weeks, a reasonably attractive shoe usually can be worn. The period of postoperative edema varies, however, and it may take 4 to 6 months before this type of shoe is tolerated. This is explained to the patient before surgery.
DuVries and Mann made major modifications in the McBride bunionectomy, including the following:
Reattach the adductor hallucis muscle to the periosteal cuff on the lateral aspect of the first metatarsal head.
Suture the medial capsule of the second metatarsal head to the lateral capsule of the first metatarsal, with interposition of the released adductor hallucis tendon.
Perform a coronal or vertical medial capsulotomy beginning 2 to 3 mm proximal to the base of the proximal phalanx. This initial capsular incision is the most distal limb of a partial capsulectomy. The proximal incision is parallel to the first and 5 to 8 mm proximal to it. The two parallel incisions are joined by an inverted-V incision made dorsally with its apex ending 5 mm medial to the extensor hallucis longus tendon. The plantar V incision, joining the plantar ends of the parallel incisions, ends at the medial margin of the tibial sesamoid. The intervening capsule is removed and rarely exceeds 8 mm in width.
Close the capsule while the hallux is held in a varus angle of 5 degrees.
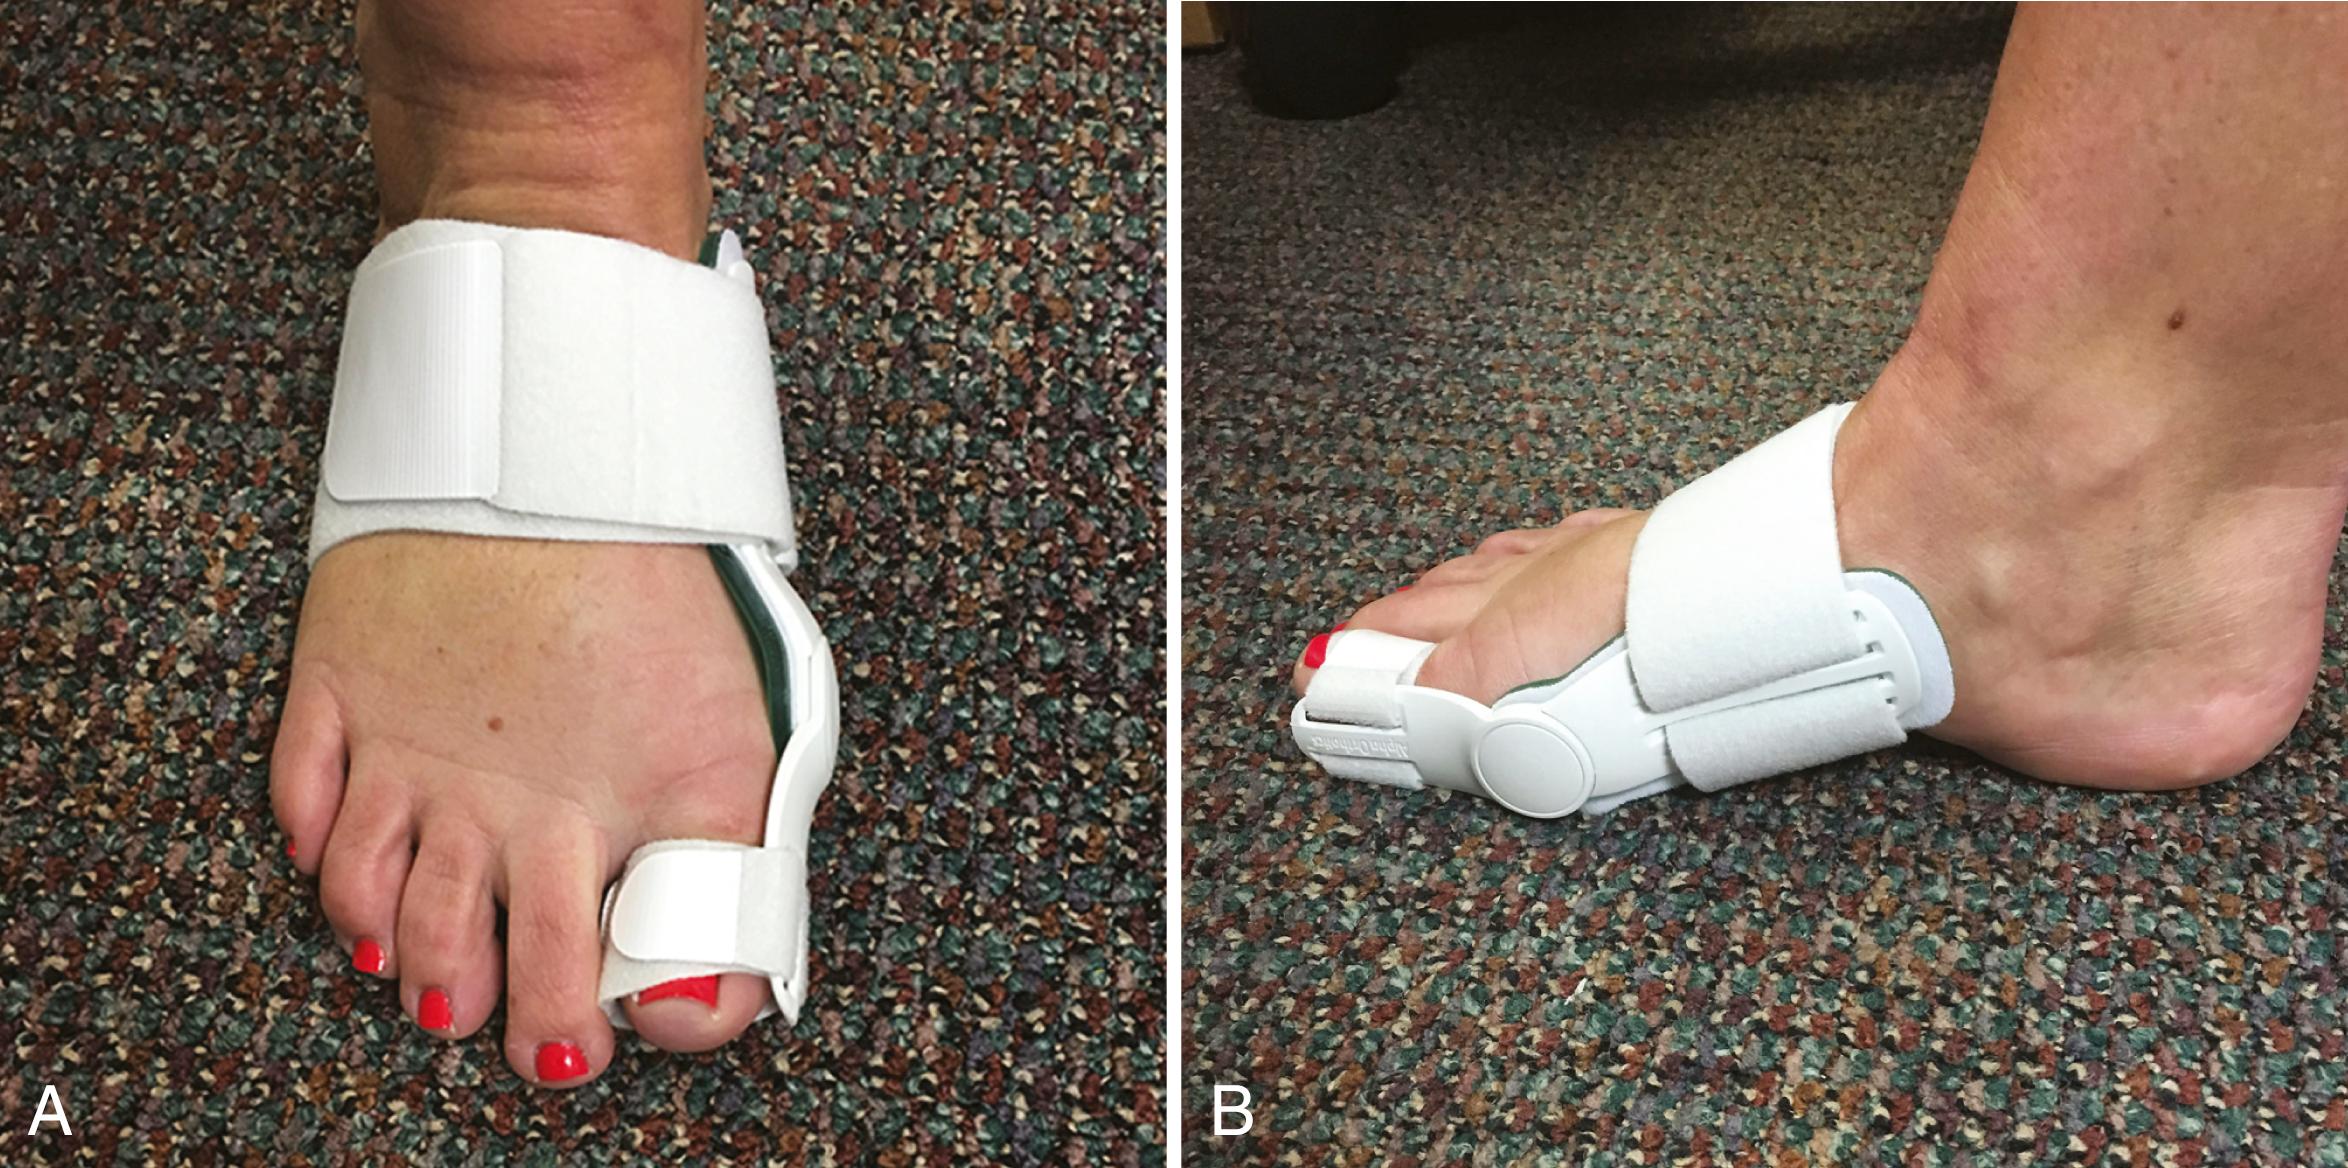
Weekly postoperative dressing changes for 6 to 8 weeks are emphasized, followed by use of a night splint that holds the hallux in position until the end of the third month ( Fig. 82.25 ).
The McBride procedure rarely is used alone (10% to 15% of patients) for hallux valgus correction. The decision is made intraoperatively by checking reduction of the intermetatarsal angle with manual lateral displacement of the first metatarsal. If the reduction is secure, no proximal metatarsal osteotomy is necessary; if it is not secure, proximal crescentic first metatarsal osteotomy is done in addition to the distal soft-tissue realignment.
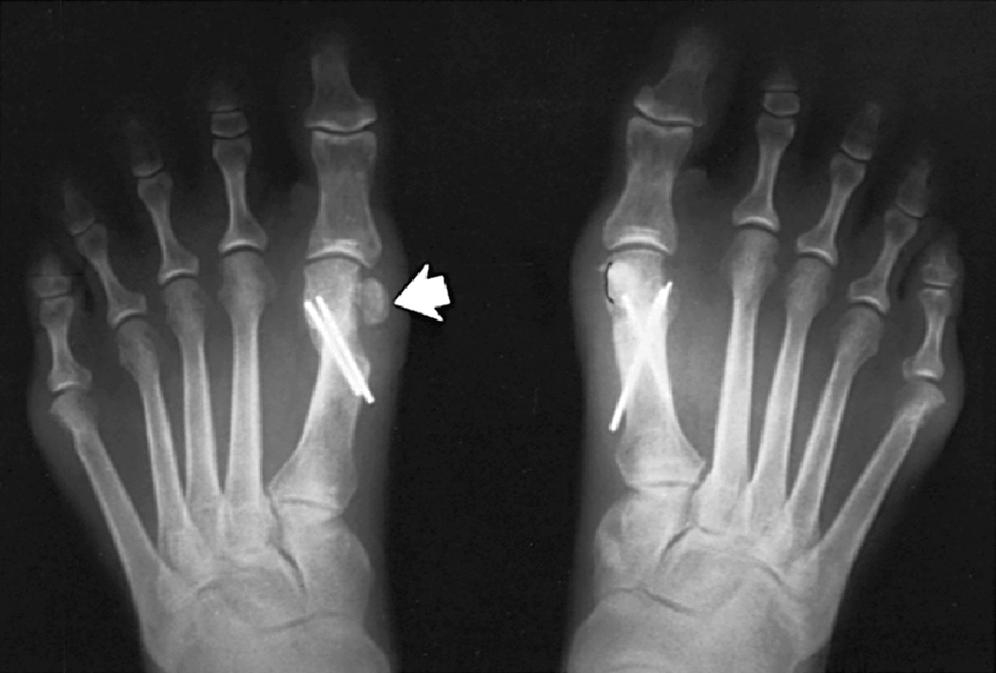
The Keller procedure combines resection hemiarthroplasty of the first metatarsophalangeal joint with removal of the medial eminence of the first metatarsal ( Fig. 82.26 ). Although removing the base of the proximal phalanx decompresses the joint and mobilizes the hallux, allowing marked correction of valgus, the varus of the first metatarsal is not corrected and therefore maintaining correction of the valgus of the hallux is difficult. Other complications of the Keller procedure have been emphasized in the literature to such an extent (with neither the incidence nor the severity of such complications clearly documented) that the indications for this procedure have been limited severely. In our experience, however, complications are uncommon if patients are selected carefully. Modifications in the original technique also have allowed expansion of the indications for the Keller bunionectomy.
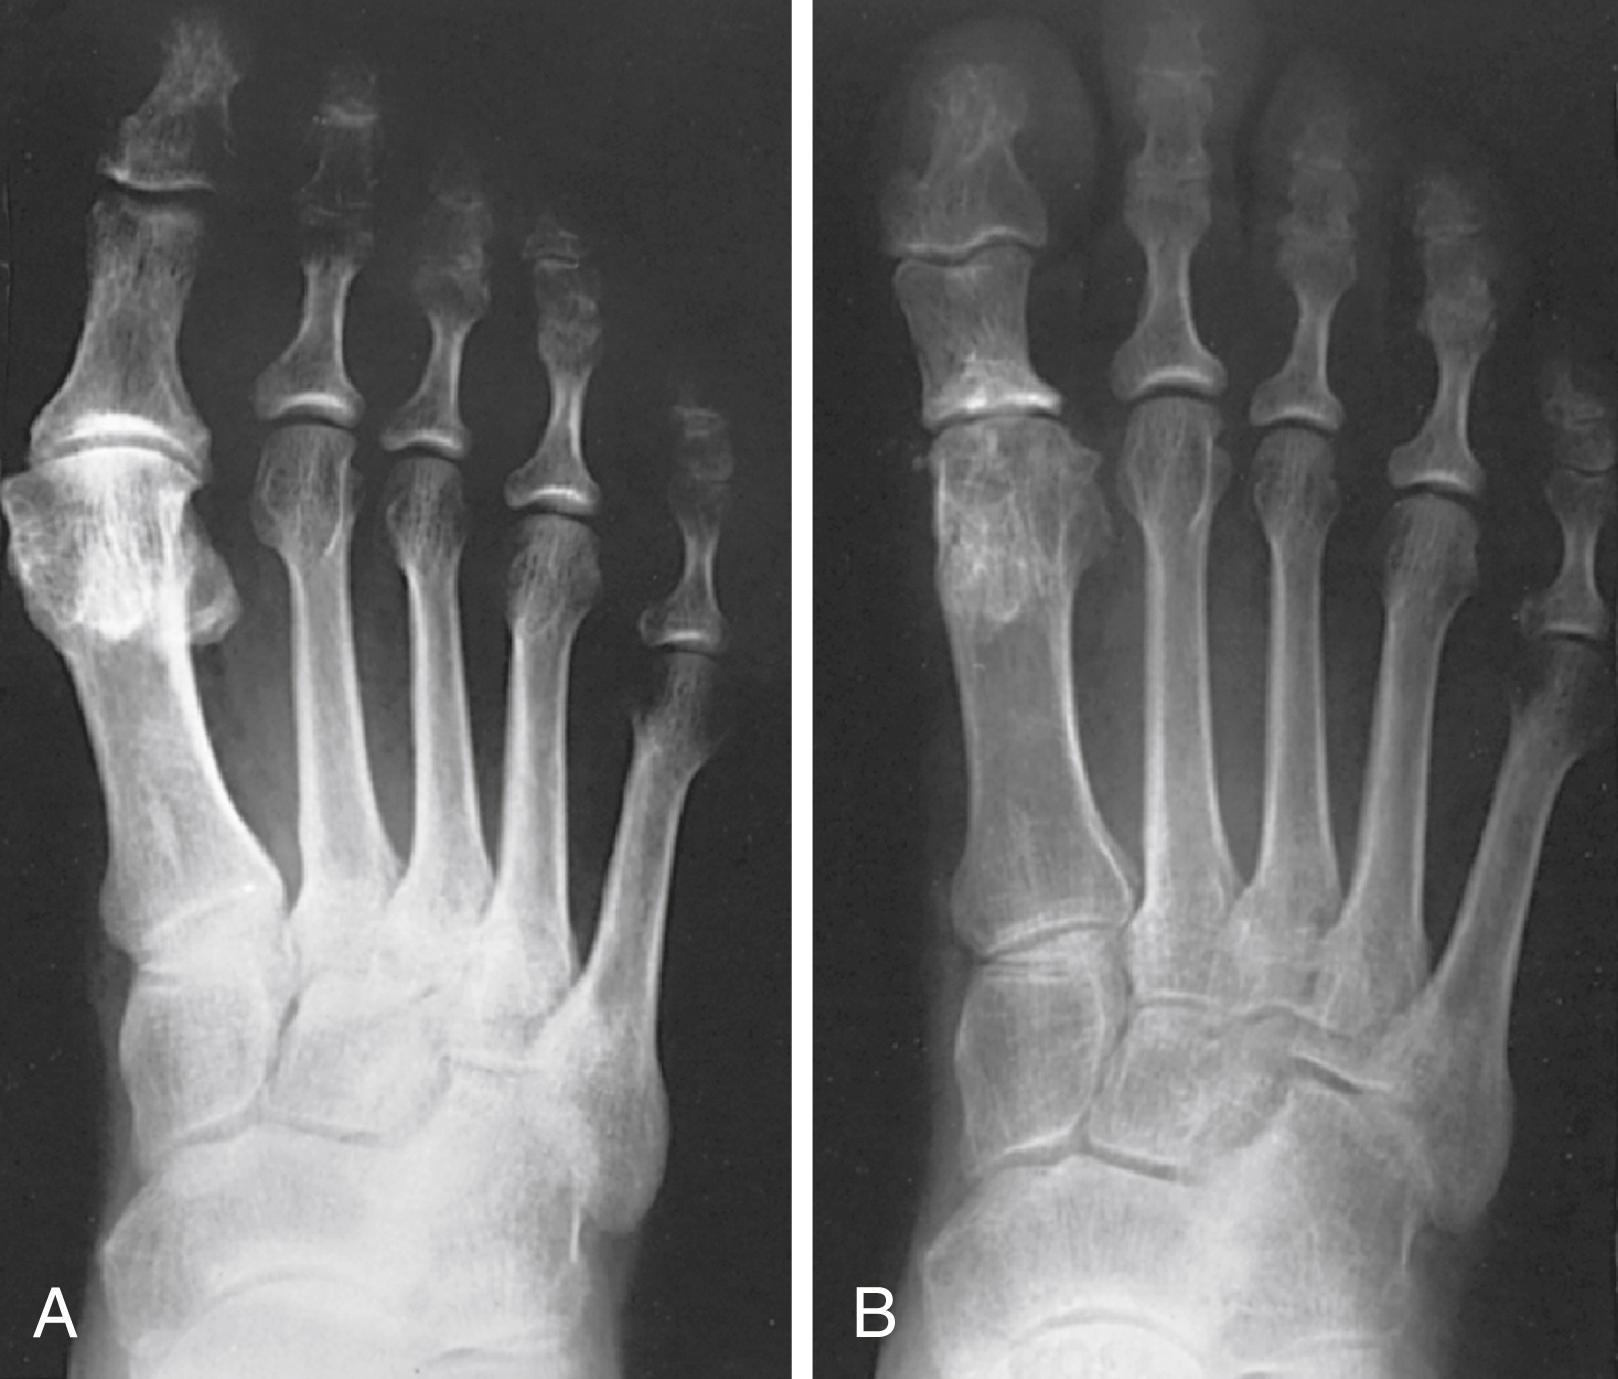
Candidates for the Keller procedure are generally over the physiologic age of 70 years, have a more sedentary lifestyle, have a hallux valgus angle of over 30 degrees, have a moderate intermetatarsal angle (13 to 16 degrees), and often have mild to moderate arthritis of the first metatarsophalangeal joint. An incongruous first metatarsophalangeal joint caused by lateral subluxation of the phalanx on the metatarsal head, severe lateral displacement of the sesamoids, and any evidence of degenerative cartilage changes in the joint all are radiographic indications for the Keller procedure.
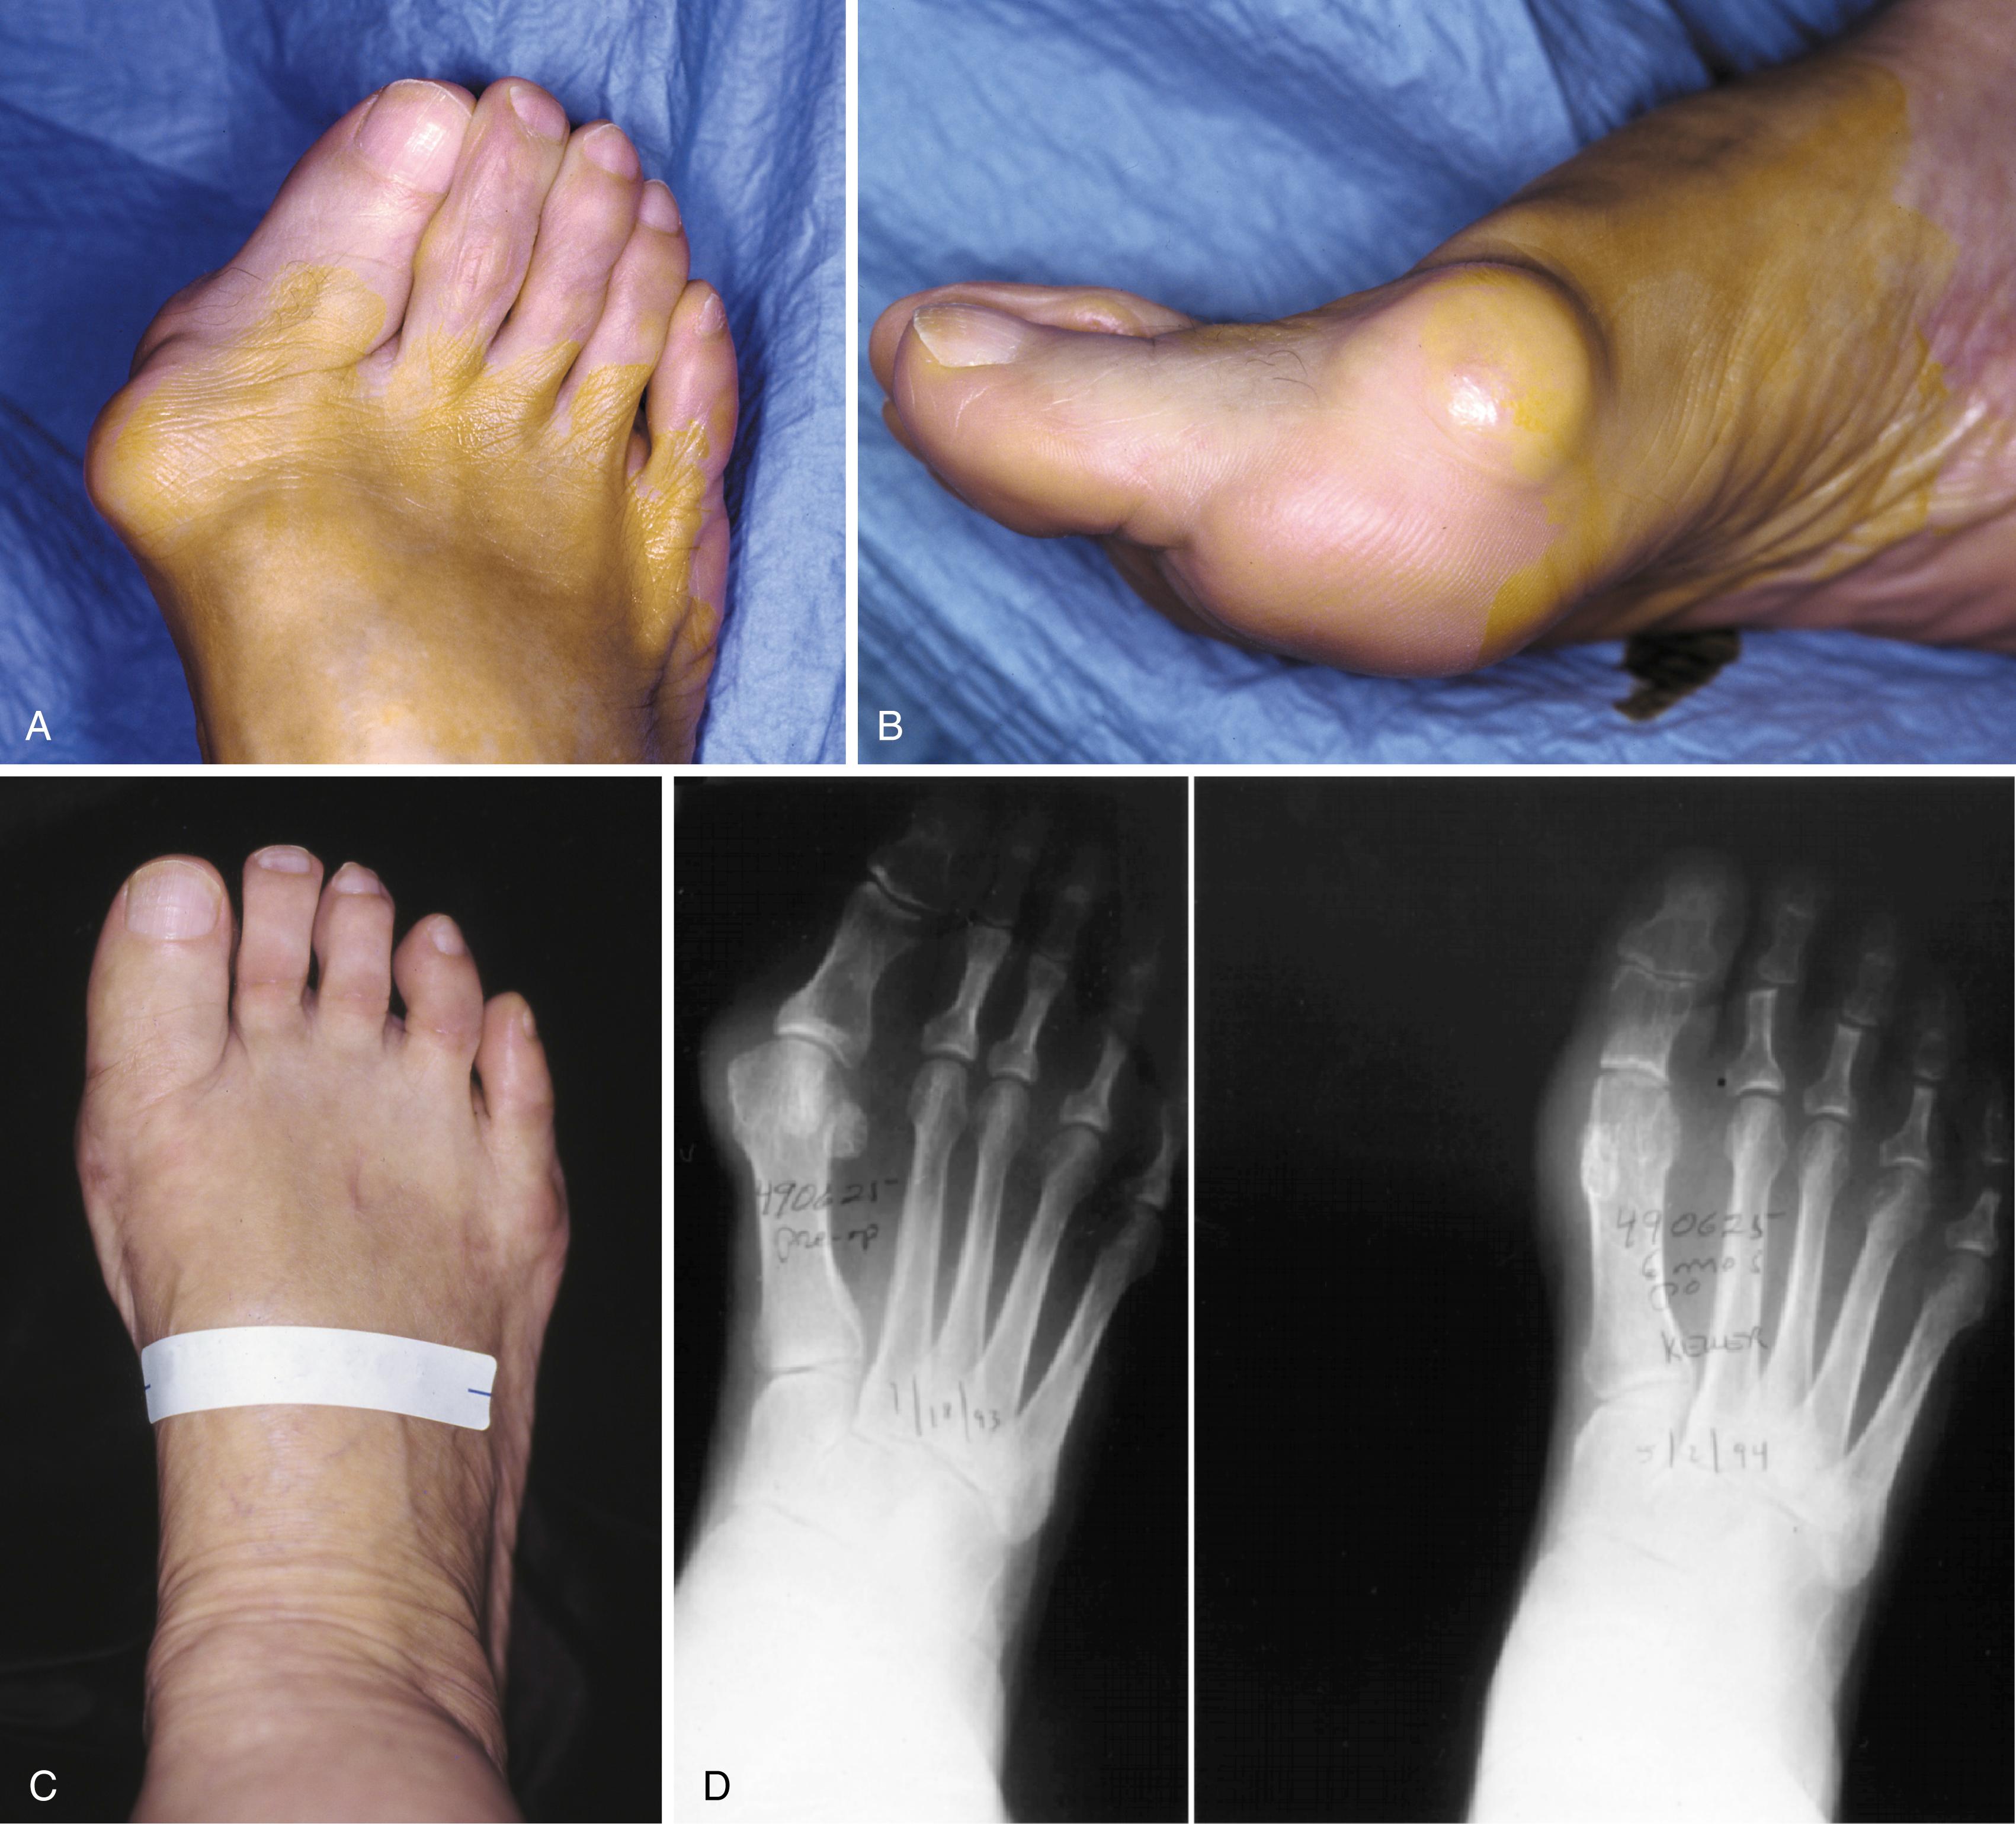
Two modifications in technique can expand these indications, however, to include patients with more severe deformities ( Fig. 82.27 ) (but not to include younger patients): fibular sesamoidectomy and lateral displacement of the first metatarsal. Patients with 50 degrees or more of valgus of the hallux (18 to 20 degrees of varus of the first metatarsal), complete lateral dislocation of the sesamoids, marked degenerative changes, and severe pronation of the hallux may benefit functionally and cosmetically from alterations of the standard technique.
Whether the Keller resection arthroplasty is useful in patients with hallux valgus and hallux rigidus is still undetermined. Putti et al., in a retrospective review of 32 patients, reported excellent and good subjective results in 39% and 37% of patients, respectively. They did have a significant number of complications; however, these did not affect the final result. Their study suggests a role for Keller arthroplasty in patients with hallux valgus and hallux rigidus.
If pedal pulses are good, use an Esmarch wrap tourniquet (see Technique 82.1 for tourniquet use and anesthetic).
Use 1% lidocaine (Xylocaine) and 0.5% bupivacaine (Marcaine) in equal portions within standard dose limits for the forefoot block.
Make a straight midline medial incision 1 cm proximal to the interphalangeal joint of the hallux and extend it proximally to the junction of the distal and middle thirds of the first metatarsal. This lengthy incision is made to avoid excessive traction tension on the skin.
By blunt dissection, locate the most medial branch of the superficial peroneal nerve at the proximal-dorsal edge of the medial eminence and retract it for protection.
Carry the dissection to the first metatarsal in the midline medially, beginning in the proximal limit of the wound and extending distally across the midline of the medial eminence and along the proximal phalanx to the distal extent of the wound.
Raise the deep flap of tissue by sharp dissection dorsally, beginning at the junction of the medial eminence and shaft of the first metatarsal.
Raise the periosteum and capsule dorsally up to one third to one half the width of the metatarsal.
At the joint, continue the capsular elevation along the extensor hallucis brevis insertion until the proximal third of the proximal phalanx is exposed as far laterally as possible under direct vision. To make exposure easier, have an assistant pronate the hallux as the dissection proceeds laterally. Subperiosteal dissection should expose only the portion of the proximal phalanx that is to be removed.
Plantarly dissect just enough to expose the plantar aspect of the medial eminence proximally, the tibial sesamoid in the center of the wound, and the plantar-medial corner of the proximal phalanx.
Supinate the proximal phalanx to expose the plantar corner and proximal third of the shaft for the sharp dissection. The proximal phalanx is round on three sides, but its plantar surface is flat and even concave in the midline where the flexor hallucis longus tendon passes. This change in contour must be taken into account when dissecting to avoid injury of the flexor hallucis longus tendon.
By blunt dissection, identify the flexor hallucis longus tendon and retract it plantarward with a small right-angle retractor to protect it throughout the dissection of the proximal phalanx.
Resect the medial eminence at the sagittal groove, beginning dorsally at its distal edge and directing a 9-mm oscillating blade (or osteotome) plantarward and slightly medially (5 to 10 degrees).
Remove the base of the proximal phalanx at the metaphyseal-diaphyseal junction, which usually constitutes the proximal third of the phalanx ( Fig. 82.28A,B ). To prevent damage to the flexor hallucis longus and the neurovascular bundles, place a retractor over the bone dorsally and plantarward and rotate the phalanx into view. Also, do not allow the saw blade to exit bone more than 1 to 2 mm.
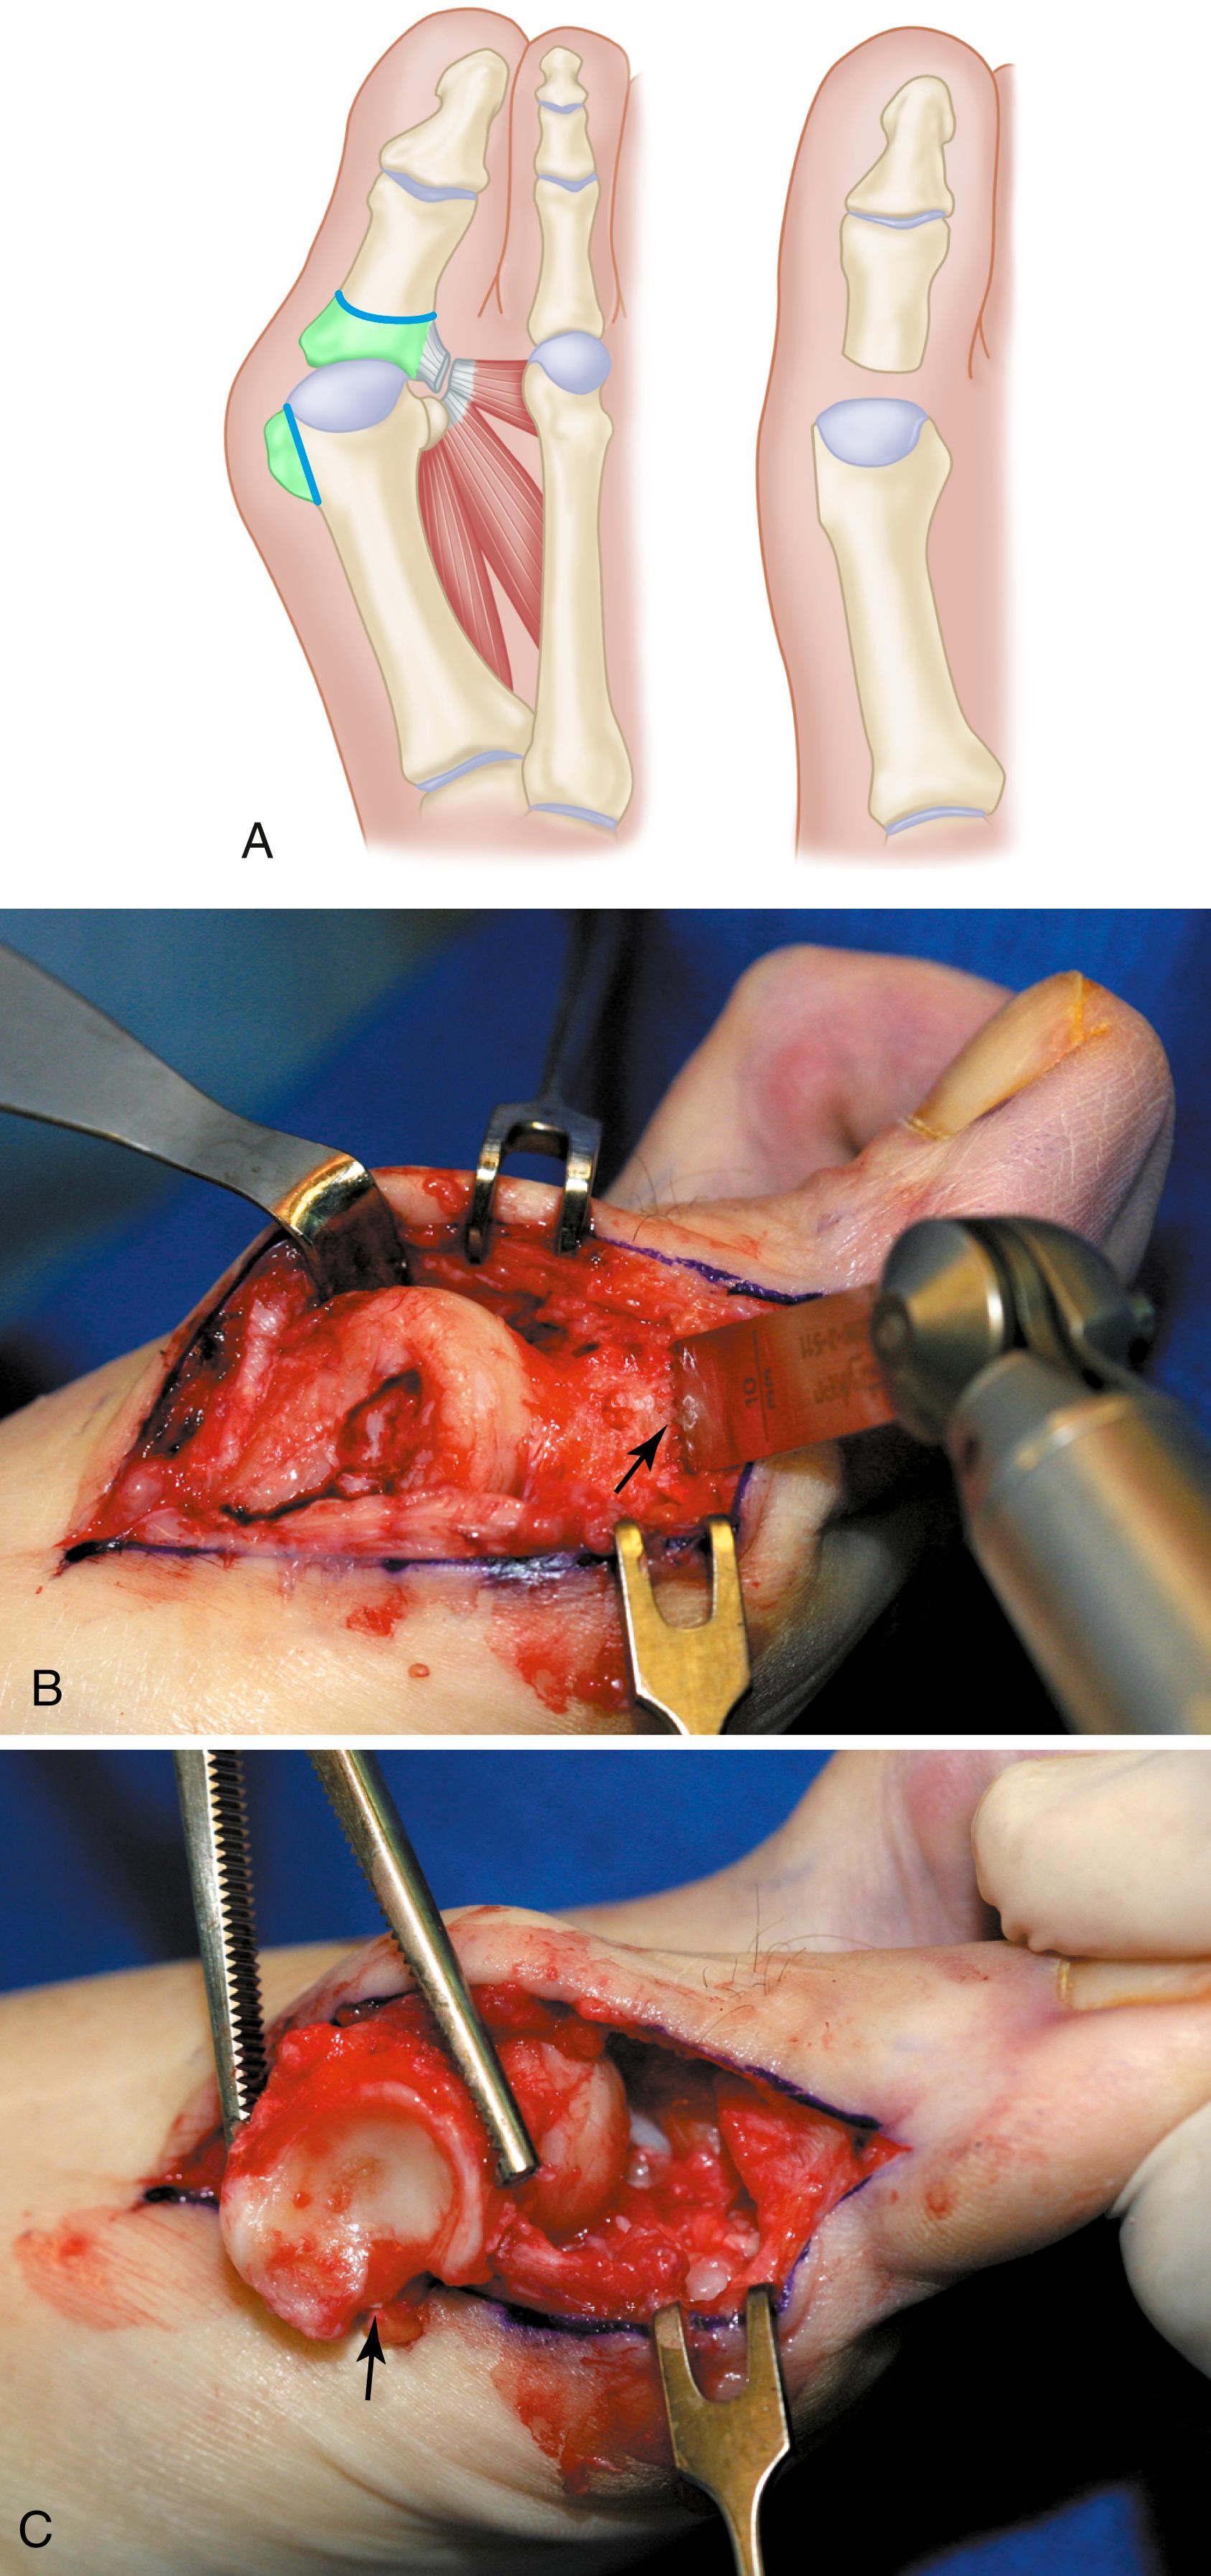
When the osteotomy has been completed, grasp the basilar fragment with a small Kocher clamp or towel clip and rotate the fragment while applying medial pull to excise it. Lift it away from its lateral attachments, which are primarily the lateral collateral ligaments and the adductor muscle tendinous insertion ( Fig. 82.28C ).
With the ankle at 90 degrees, bring the hallux into a corrected position while manually pushing the first metatarsal as far laterally as possible. Evaluate the alignment, keeping the metatarsal and hallux straight.
Grasp the hallux in one hand and displace the proximal remnant medially so that, under direct vision, two longitudinal 0.062-inch Kirschner wires can be inserted.
Hold the interphalangeal joint straight while drilling the wires from proximal to distal, emerging a few millimeters plantar to the nail plate.
Return the foot to the corrected position and drill the wires into the metatarsal head.
While holding the metatarsal as far laterally as possible, cross the joint and drive the wires out the plantar cortex just proximal to the head, while holding the hallux in 10 to 15 degrees of extension, neutral abduction, adduction, and rotation and with no translation dorsally or plantarward on the metatarsal head. The wires should penetrate only 2 to 3 mm past the cortex to avoid tenderness over the wires with weight bearing.
If the Kirschner wires tend to “walk” on the rounded articular surface of the metatarsal head, use a small hemostat snugged up against the wire while it is being drilled to allow accurate placement. Proper placement of the wires and the desired position of the hallux on the metatarsal may require several attempts. The medial aspect of the proximal phalanx should not rest medial to the medial aspect of the metatarsal head.
Place the hallux in the neutral mediolateral plane and in 10 degrees of extension.
Before the second wire is driven into the first metatarsal head, place the hallux in proper rotation, using the plane of the nail as a guide. The initial length of the hallux is maintained by the wires. Later, collapse occurs when the wires are removed, but improved encapsulation of the hemiarthroplasty, by maintaining length for the first few weeks, may help maintain a more desirable position long term.
Cut the wires 2 to 3 mm distal to the skin edge.
Remove the tourniquet and secure hemostasis.
Close the capsule with interrupted 2-0 or 3-0 absorbable sutures. A firm, complete capsular closure is imperative. A box stitch is recommended. Increasing the curve of the needle manually is helpful.
Starting proximal and plantarward, pass the suture through the capsule from the outside in.
The second pass of the suture is from the inside out through substantial soft tissue on the plantar-medial aspect of the phalangeal base.
Reenter the soft tissue at the base of the proximal phalangeal remnant dorsomedially for the third pass. Move the suture back and forth to ensure uninhibited excursion.
Make the fourth pass from inside out through the dorsal capsule in line with the initial plantar capsular suture. Have an assistant grasp the ends of the capsule, pulling them together, while the tie is completed. This is basically a four-corner box stitch, which may leave a small area of capsule in the middle that cannot be approximated, but this is of no consequence.
Intersperse interrupted sutures as needed to complete a firm closure.
Release the tourniquet and close the skin with nonabsorbable 4-0 sutures.
Apply a compression forefoot dressing extending just distal to the tarsonavicular tuberosity so that only the toenails are exposed and no loose edges of gauze are raised above the dressing. A snug but nonconstricting, layered, contoured forefoot dressing is vital to reduce edema.
Cover the tips of the wires with circular adhesive bandages or commercially available “pin balls.”
Several modifications of the Keller technique can expand the indications for its use with more severe deformities.
When the medial eminence and phalangeal base have been excised, remove the fibular sesamoid.
Place a sturdy two-toothed retractor beneath the metatarsal head and have an assistant lift it dorsally.
Using a Freer elevator or a small osteotome for its strength, mobilize the fibular sesamoid ( Fig. 82.29A-C ). This may be difficult in elderly patients with significant deformity and adherence of the sesamoid to the metatarsal head. Lift the metatarsal dorsally for exposure ( Fig. 82.29D,E ).
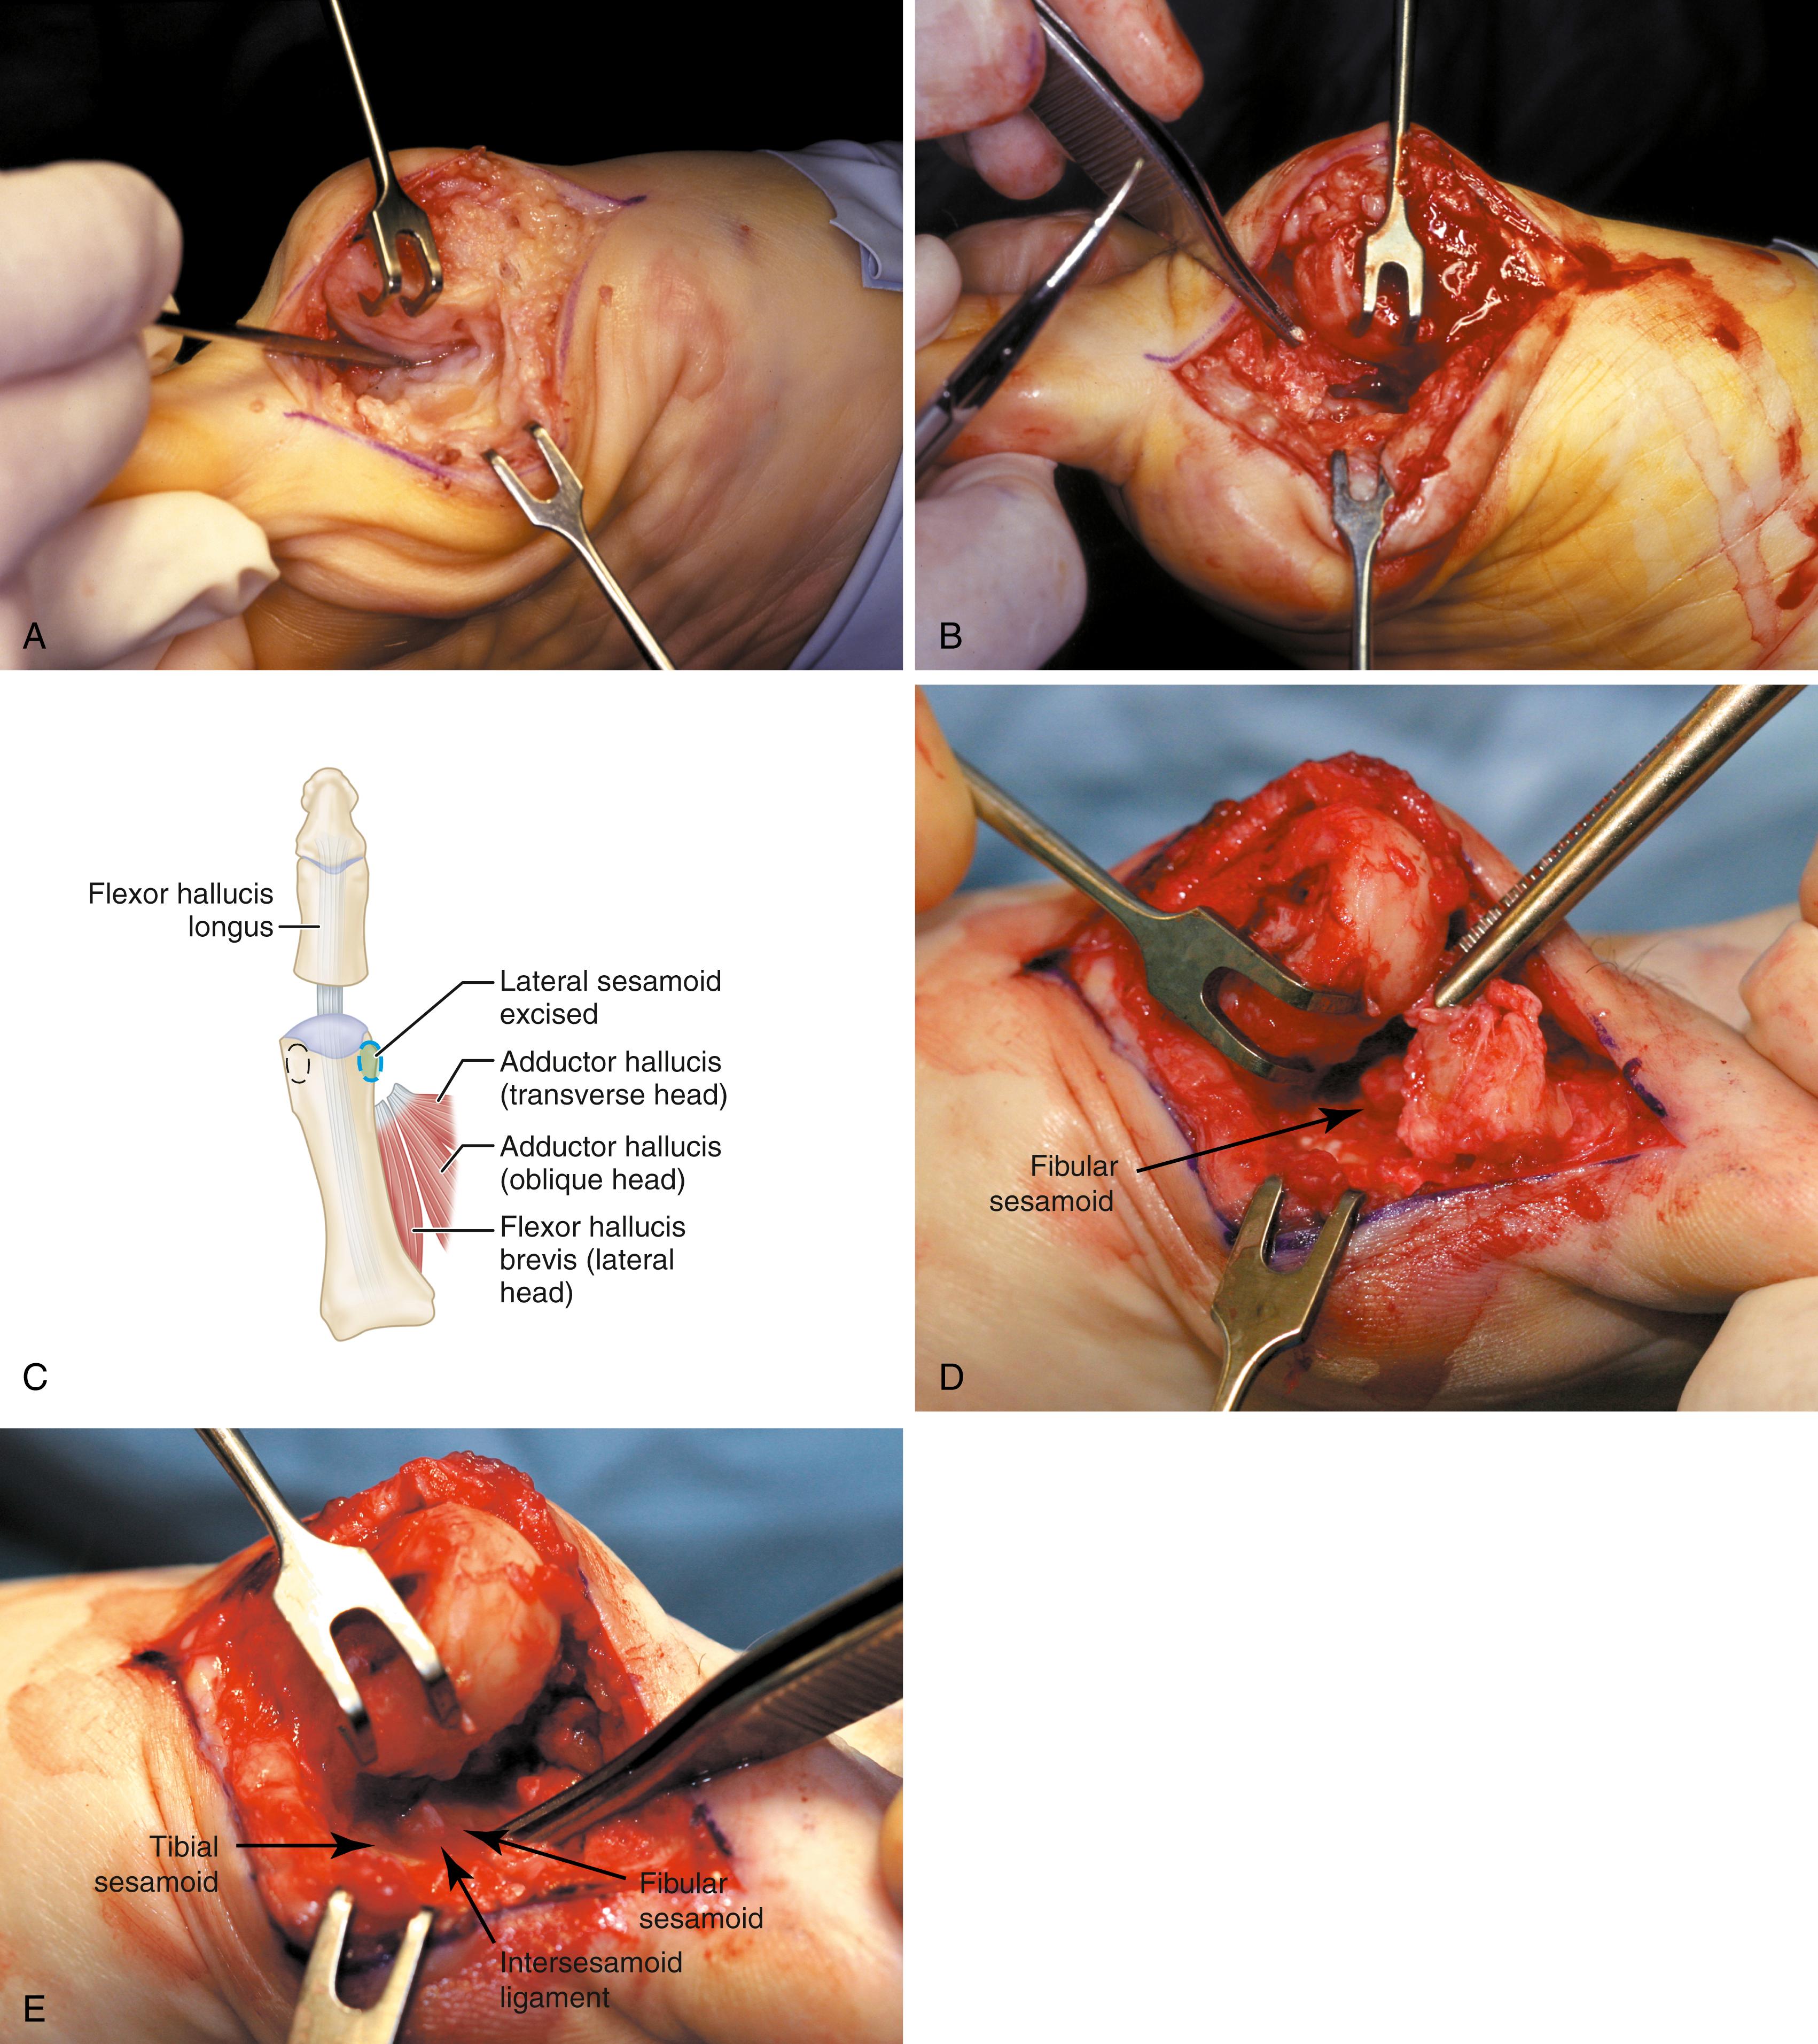
When the sesamoid is mobile, identify the flexor hallucis longus tendon by placing traction on the hallux and flexing and extending the interphalangeal joint of the hallux. The tendon is visible just distal to and in alignment with the sesamoids, which straddle it.
Identify and expose the lateral neurovascular bundle just lateral to the tendon by blunt dissection.
Pull the plantar-medial capsule medially. This requires a firm grasp on the capsule. The medial traction brings the intersesamoid “ligament” into better view.
Incise the intersesamoid ligament longitudinally with a No. 67 Beaver or No. 15 Bard-Parker blade. If tenotomy scissors are used, place one arm of the scissors under the ligament (this arm rests on the dorsal side of the flexor hallucis longus) and the other arm dorsal to the ligament.
When the intersesamoid ligament is incised, grasp the sesamoid firmly with forceps or a small Kocher clamp, flex the toe at the interphalangeal and metatarsophalangeal joints to relax the flexor hallucis longus tendon, and pull the fibular sesamoid distally and medially.
With release of the intersesamoid ligament, the medial surface of the fibular sesamoid is free from soft tissue. Distally, the sesamoid is free because of resection of the base of the proximal phalanx. This leaves two sides of the sesamoid, distal and medial, free of soft tissue.
While pulling the sesamoid distally and medially, use a small blade to incise along the lateral margin of the sesamoid under direct vision. Keep pulling the head of the metatarsal dorsally and holding the hallux distracted and in flexion. This greatly aids in identification of the margins of the fibular sesamoid, particularly laterally and proximally.
The most difficult part of the sesamoidectomy and that which should be done last is release of the proximal lateral corner of the sesamoid where the flexor hallucis brevis lateral head inserts. While incising the lateral capsular attachments to the sesamoid, do not bury the blade of the knife because the neurovascular bundle to the lateral side of the hallux is just lateral to the capsule.
Now all attachments to the fibular sesamoid have been removed except the lateral head of the flexor hallucis brevis, which inserts on the proximal lateral margin of the sesamoid. This is a difficult section to remove; however, this section can be released under direct vision by pulling the sesamoid distally and medially and lifting the metatarsal head dorsally with a strong two-toothed retractor.
When the sesamoid has been removed, insert two 0.062-inch Kirschner wires retrograde from the tip of the toe 2 to 3 mm plantar to the nail bed, leaving about 5 to 7 mm of the pins exposed at the base of the phalangeal remnant to help align the phalanx on the metatarsal before antegrade passage of the pins into the metatarsal ( Fig. 82.29F ).
Push the metatarsal laterally several times. Occasionally, this does not move the metatarsal, but some lateral mobility usually is present.
While standing next to the patient looking distally at the dorsum of the foot, dorsiflex the ankle to neutral.
Viewing the foot as the patient would, hold the first metatarsal firmly and move its distal end laterally. Hold this position with one hand and use the other hand to place the hallux on the metatarsal head and out to length.
While holding the first ray straight with the foot vertical, have an assistant insert the wires from distal to proximal ( Fig. 82.29G ). Often these wires, which run through the first metatarsal and hallux, hold the first ray straight, and most of this correction is maintained after the wires have been removed.
Close the capsule with a purse-string suture as previously described in the original technique ( Fig. 82.29H-J ).
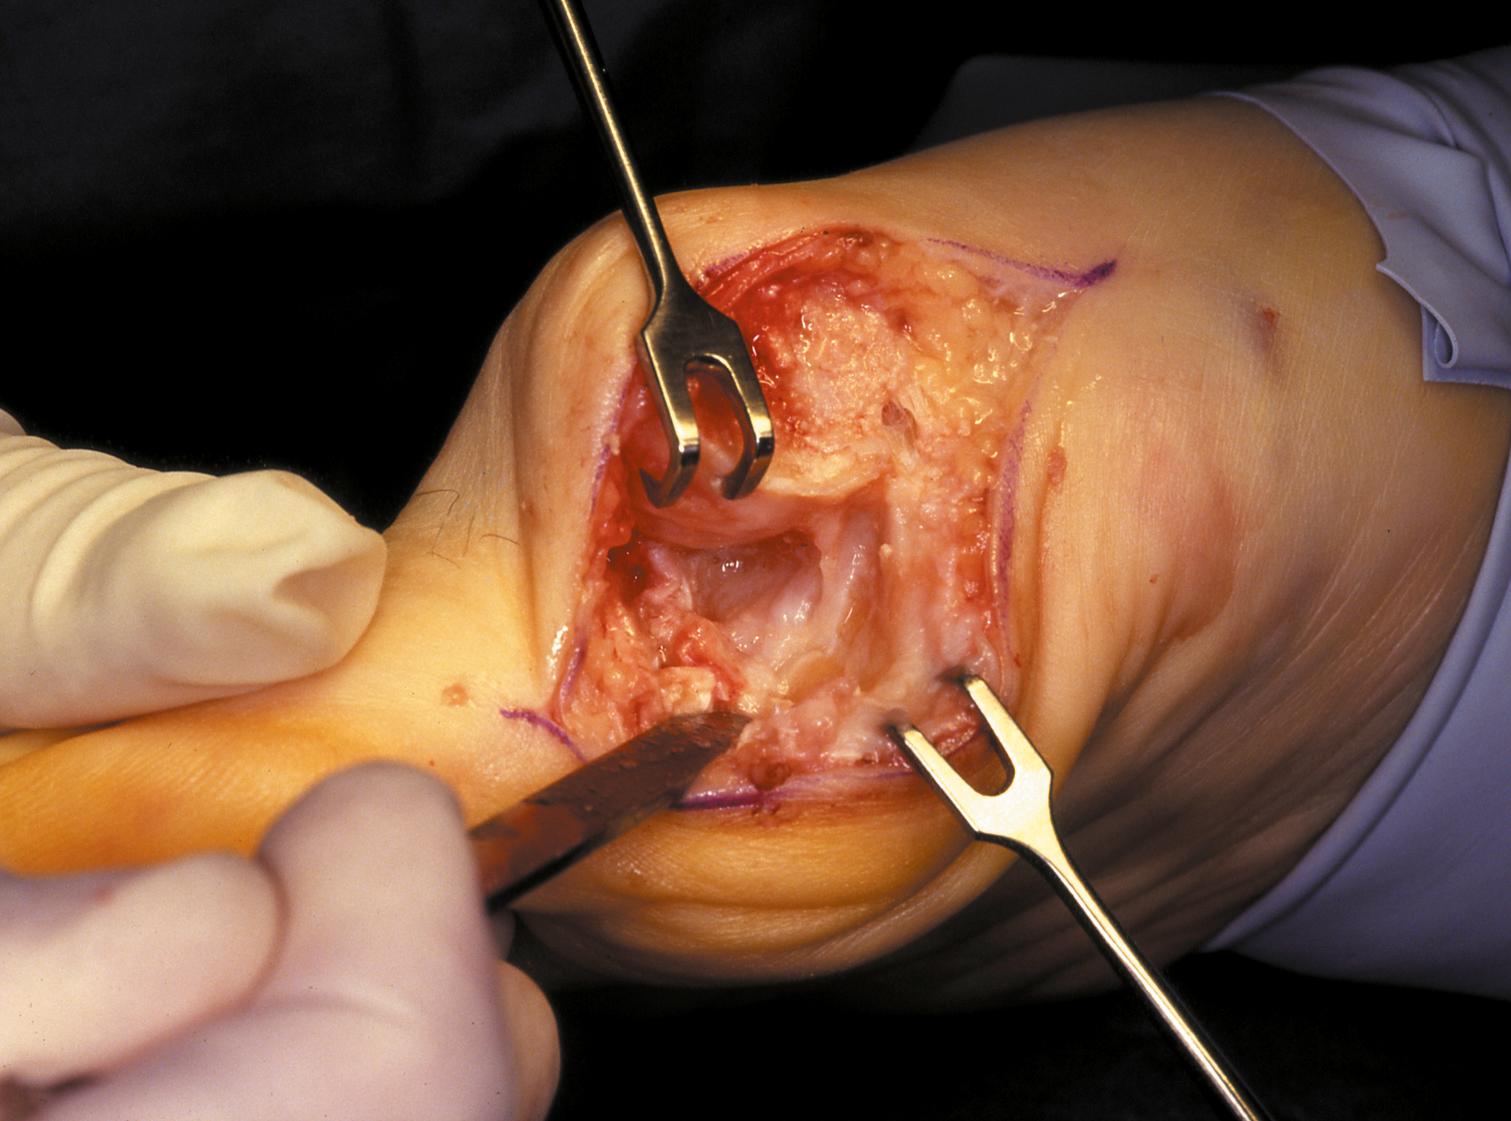
Presumably, the laterally displaced fibular sesamoid, when pulled proximally by the lateral head of the relaxed flexor hallucis brevis, pulls the flexor hallucis longus laterally through the sesamoid apparatus, which encases it and contributes to recurrent hallux valgus. In addition, while reoperating after a failed Keller procedure, we observed a strong, linear, fibrous attachment of the fibular sesamoid to the proximal phalangeal remnant ( Fig. 82.30 ), which pulled the hallux into valgus when tension was applied to it. For these reasons, when the deformity is severe, the hallux and first metatarsal maintain better alignment if excision of the fibular sesamoid and lateral displacement of the metatarsal are added to the procedure.
See also .
A firm-soled, postoperative shoe is worn, and weight bearing is allowed to tolerance with or without the assistance of crutches or a walker. Bathroom privileges only are allowed for the first 72 hours. The foot is elevated except during meals and bathroom visits. After this period, the patient may be up and about as symptoms allow. Taking more pain medication to allow increased activity is discouraged. For 7 to 10 days after surgery, the foot should be elevated when the patient is sitting.
The dressing is changed at 19 to 23 days, and the wires remain in place for 21 to 28 days. If the hallux migrates proximally on the wires and the wires protrude too far before time to remove them, the tips are cut 1 to 2 mm distal to the skin edge. The Kirschner wires are removed in the office by placing a large or medium-sized needle holder longitudinally over the tip of the wire, rotating it back and forth gently, and pulling with gentle traction. To prevent excessive bleeding, the foot is elevated for 5 minutes after the wires have been removed. A good method of elevation is to place the patient supine with the unoperated knee flexed 90 degrees and the foot flat on the table and then to place the ankle of the operated foot on the flexed knee. A small plastic strip bandage is placed over the holes when the bleeding has stopped.
A small or medium-sized toe spacer (commercially available) is worn in the first web for an additional 4 to 6 weeks; this spacer is removed only for bathing. A wide, soft shoe is allowed after the pins have been removed. Dress shoes are allowed only after most of the edema has resolved, which may take 3 to 4 months. The expected results are a satisfactorily well-aligned hallux with 40 to 50 degrees of motion at the metatarsophalangeal joint, relief of pain, and some improvement in the variety of shoes that can be worn.
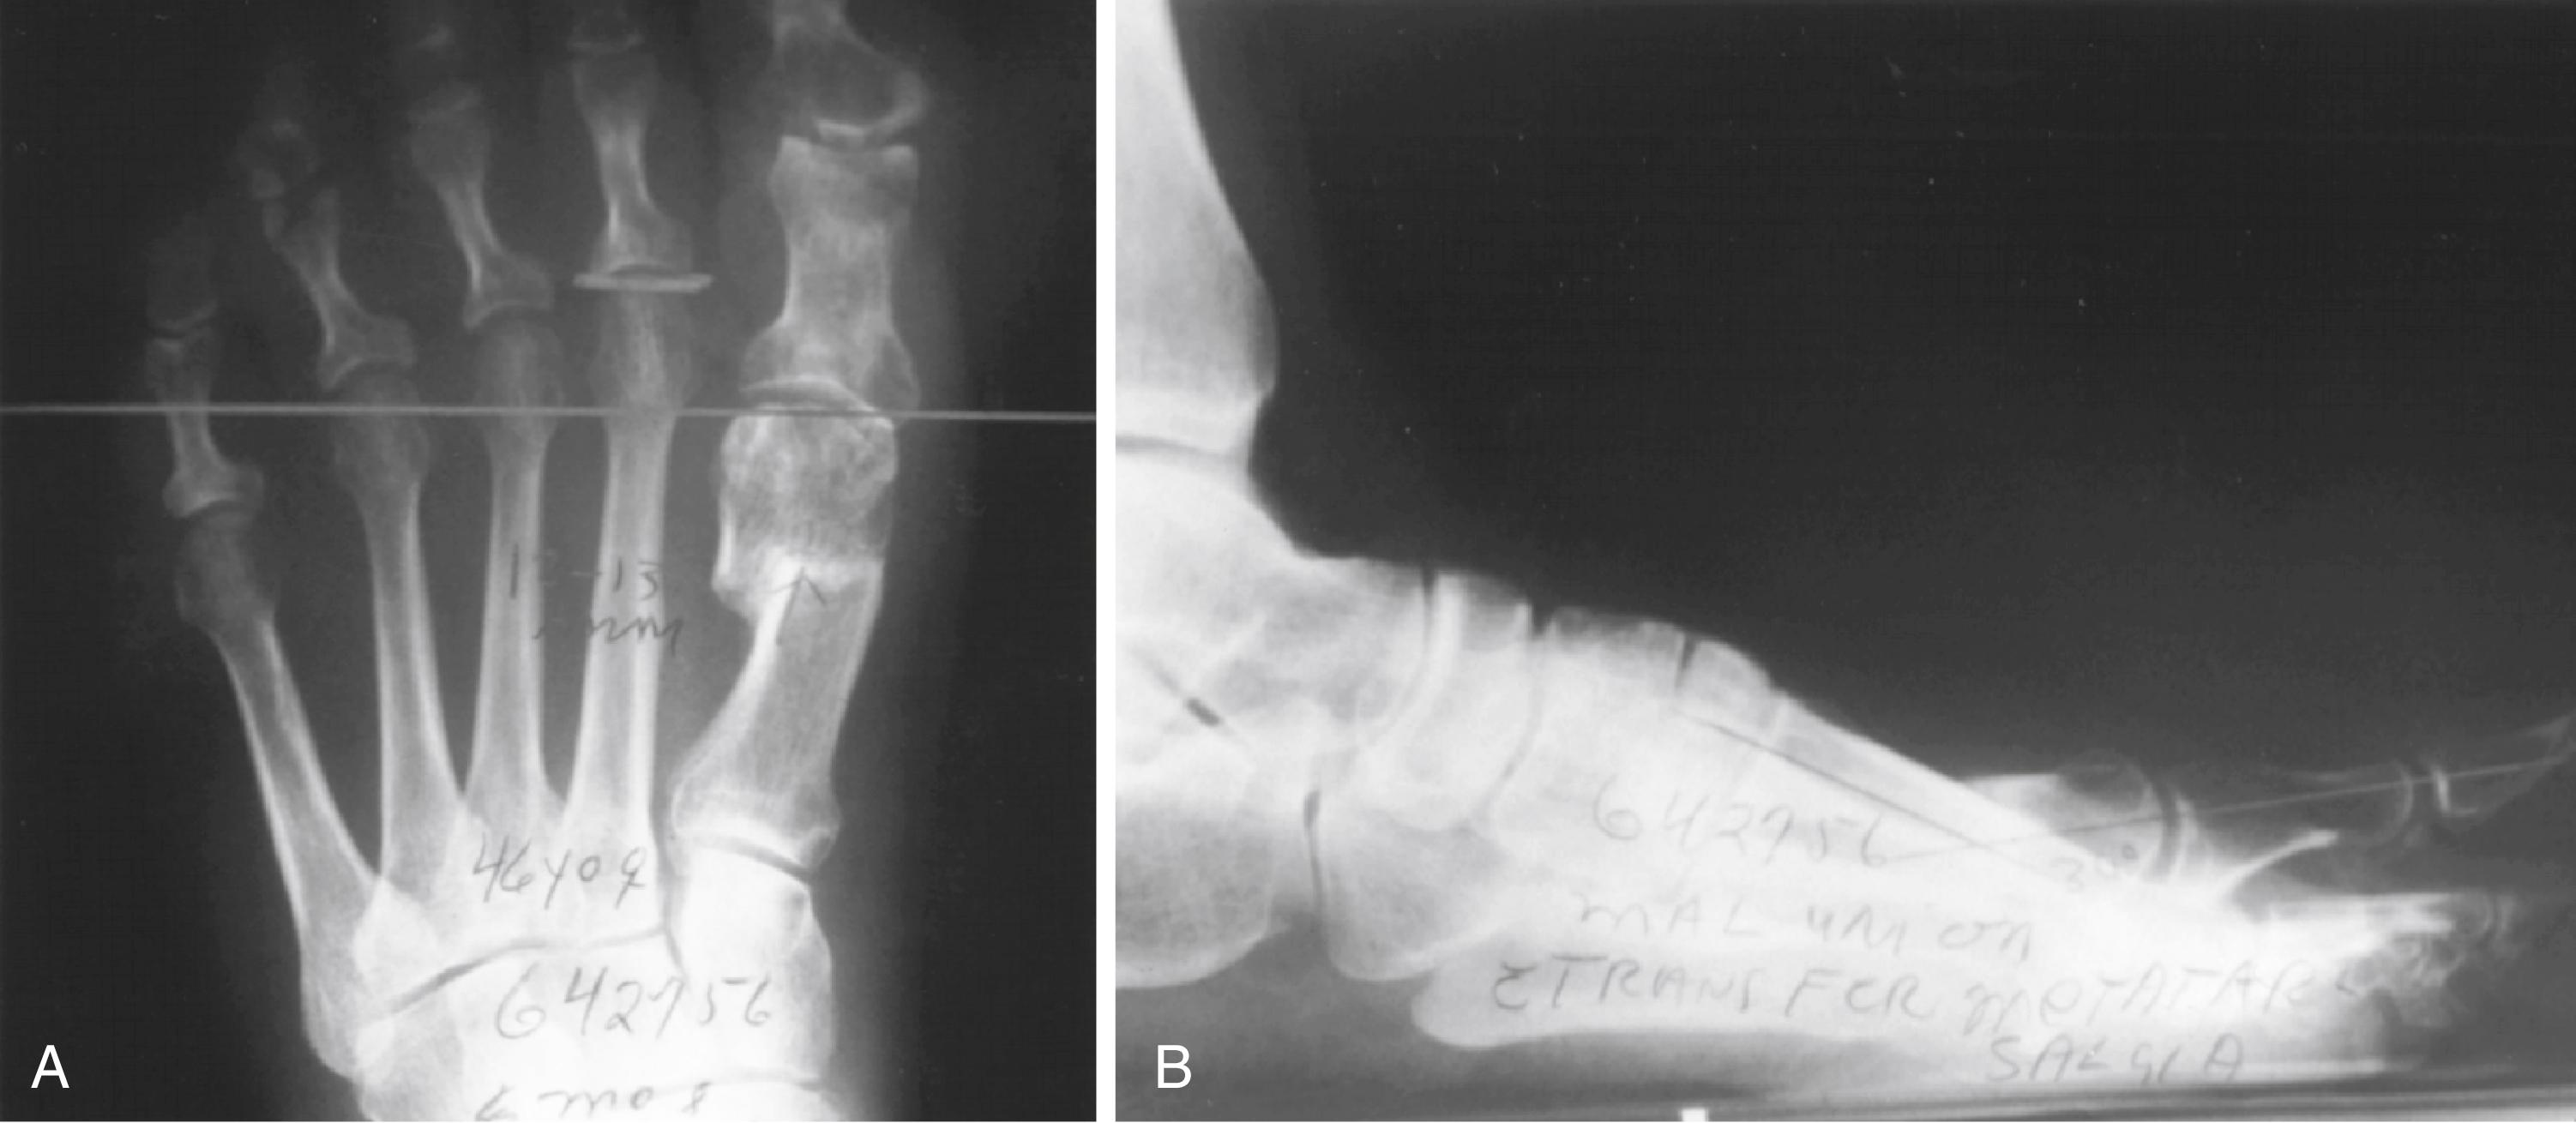
Although distal metatarsal osteotomies were described by a number of authors, including Reverdin, Hohmann, Trethowan, and Truslow, a report by Mitchell of 100 osteotomies gave the procedure his name. The Mitchell osteotomy procedure consists of (1) removal of the medial eminence, (2) an osteotomy of the distal portion of the first metatarsal shaft, (3) lateral displacement and angulation of the capital fragment, and (4) medial capsulorrhaphy. Several large retrospective reviews of the Mitchell operation reported satisfactory results ranging from 74% to 94%, with a negligible nonunion rate and infrequent recurrence. However, the procedure is not without complications, the most troublesome being metatarsalgia, attributable to dorsiflexion malunion of the distal fragment or excessive shortening of the metatarsal, or both ( Fig. 82.31 ). Metatarsalgia also has been reported after the peg-in-hole procedure. The Mitchell osteotomy, described in previous editions, is now rarely used.
A closing wedge osteotomy at the subcapital level of the first metatarsal to correct valgus of the hallux has its proponents. Although some emphasize that metatarsus primus varus is worsened, and recurrence of the valgus deformity of the great toe is likely, published series have not confirmed this. The issue of when a lateral release is indicated in the setting of a distal osteotomy remains. Schneider et al. evaluated three techniques of lateral release in 15 cadaver feet and found that release of the deep transverse metatarsal ligament and the adductor hallucis muscle did not contribute to correction of the valgus deformity. Transection of the lateral metatarsosesamoid suspensory ligament, however, led to successful release in this study. Much has been written in recent years about transarticular release with distal metatarsal osteotomy. The studies found that limited transarticular release provides comparable outcomes to a classic lateral release, with the advantage that it is a simple technique, patients can ambulate early, and there is no dorsal scarring. Ahn et al. emphasized that different precautions need to be taken for each procedure to avoid complications. As a general guide, we use the following procedures .
Open dorsal release (adductor hallucis, lateral metatarsal sesamoid ligament, transverse metatarsal ligament, and lateral collateral ligament) :
The toe is pronated in the resting position
Worsening pronation of the toe as it is extended
Sesamoid view indicates the tibial sesamoid is lateral to the crista; the crista is completely eroded
Sesamoid view indicates the fibular sesamoid is located in the first web space and likely will block any attempted lateral translation of the metatarsal head
Transarticular release of the lateral structures (lateral metatarsal sesamoid ligament and lateral collateral ligament) :
Minimal resting position of the toe in pronation
Mild pronation of the toe as it is extended
Tibial sesamoid position at or medial to the crista on the sesamoid view
Open dorsal release with removal of fibular sesamoid:
Keller procedure (see Technique 82.2)
Severe recurrent deformity with persistent intrinsic malalignment (increases risk of subsequent varus)
A popular osteotomy of the distal metatarsal is the chevron intracapsular osteotomy, which was described by Corless in 1976 as a modification of the Mitchell procedure to correct the bunion associated with mild-to-moderate metatarsus primus varus. The procedure consists of two parts: (1) correction of metatarsus primus varus by a V-shaped osteotomy in the sagittal plane through the metatarsal head and neck, followed by lateral shifting of the metatarsal head and trimming of the proximal fragment without internal fixation (because of the inherent stability of the osteotomy) and (2) correction of the hallux valgus by suturing a previously raised flap of joint capsule into the abductor hallucis tendon.
Several series of this osteotomy with adequate clinical follow-up have been published, with most reporting good results in 85% to 95% of patients, regardless of age. Modifications of the chevron osteotomy have included placing the arms of the V-shaped osteotomy at a 90-degree angle (instead of a 45- to 60-degree angle) and using a 2-mm drill hole as a marker at the apex of the intended V-shaped osteotomy (Horne et al.); placing the bone wedge taken from the exostosis into the dorsal limb of the osteotomy to supinate, plantarflex, and distract the metatarsal (Borton and Stephens); increasing the lateral displacement of the osteotomy to more than 50% of the width of the metatarsal head to expand its use to deformities with an intermetatarsal angle of up to 18 degrees (Murawski and Beskin; see Technique 82.6); and inclusion of an intracapsular-to-extracapsular extension of the osteotomy cuts, with the apex of the osteotomy at or slightly proximal to the center of the metatarsal head. The angle of the osteotomy is about the same (50 to 70 degrees), but the length of the two cuts can be modified to accommodate the small amounts of bone removal needed to correct metatarsals with excessive valgus position of the articular surface of the metatarsal head. Some stability is sacrificed at the osteotomy site, however, and internal fixation is recommended. Shifting the capital fragment laterally more than 5 to 6 mm is not recommended because of the loss of bone apposition. The primary advantage of the slightly more proximal placement of the osteotomy cuts is the correction of a wider range of deformities. Improved fixation techniques, however, may allow larger translation.
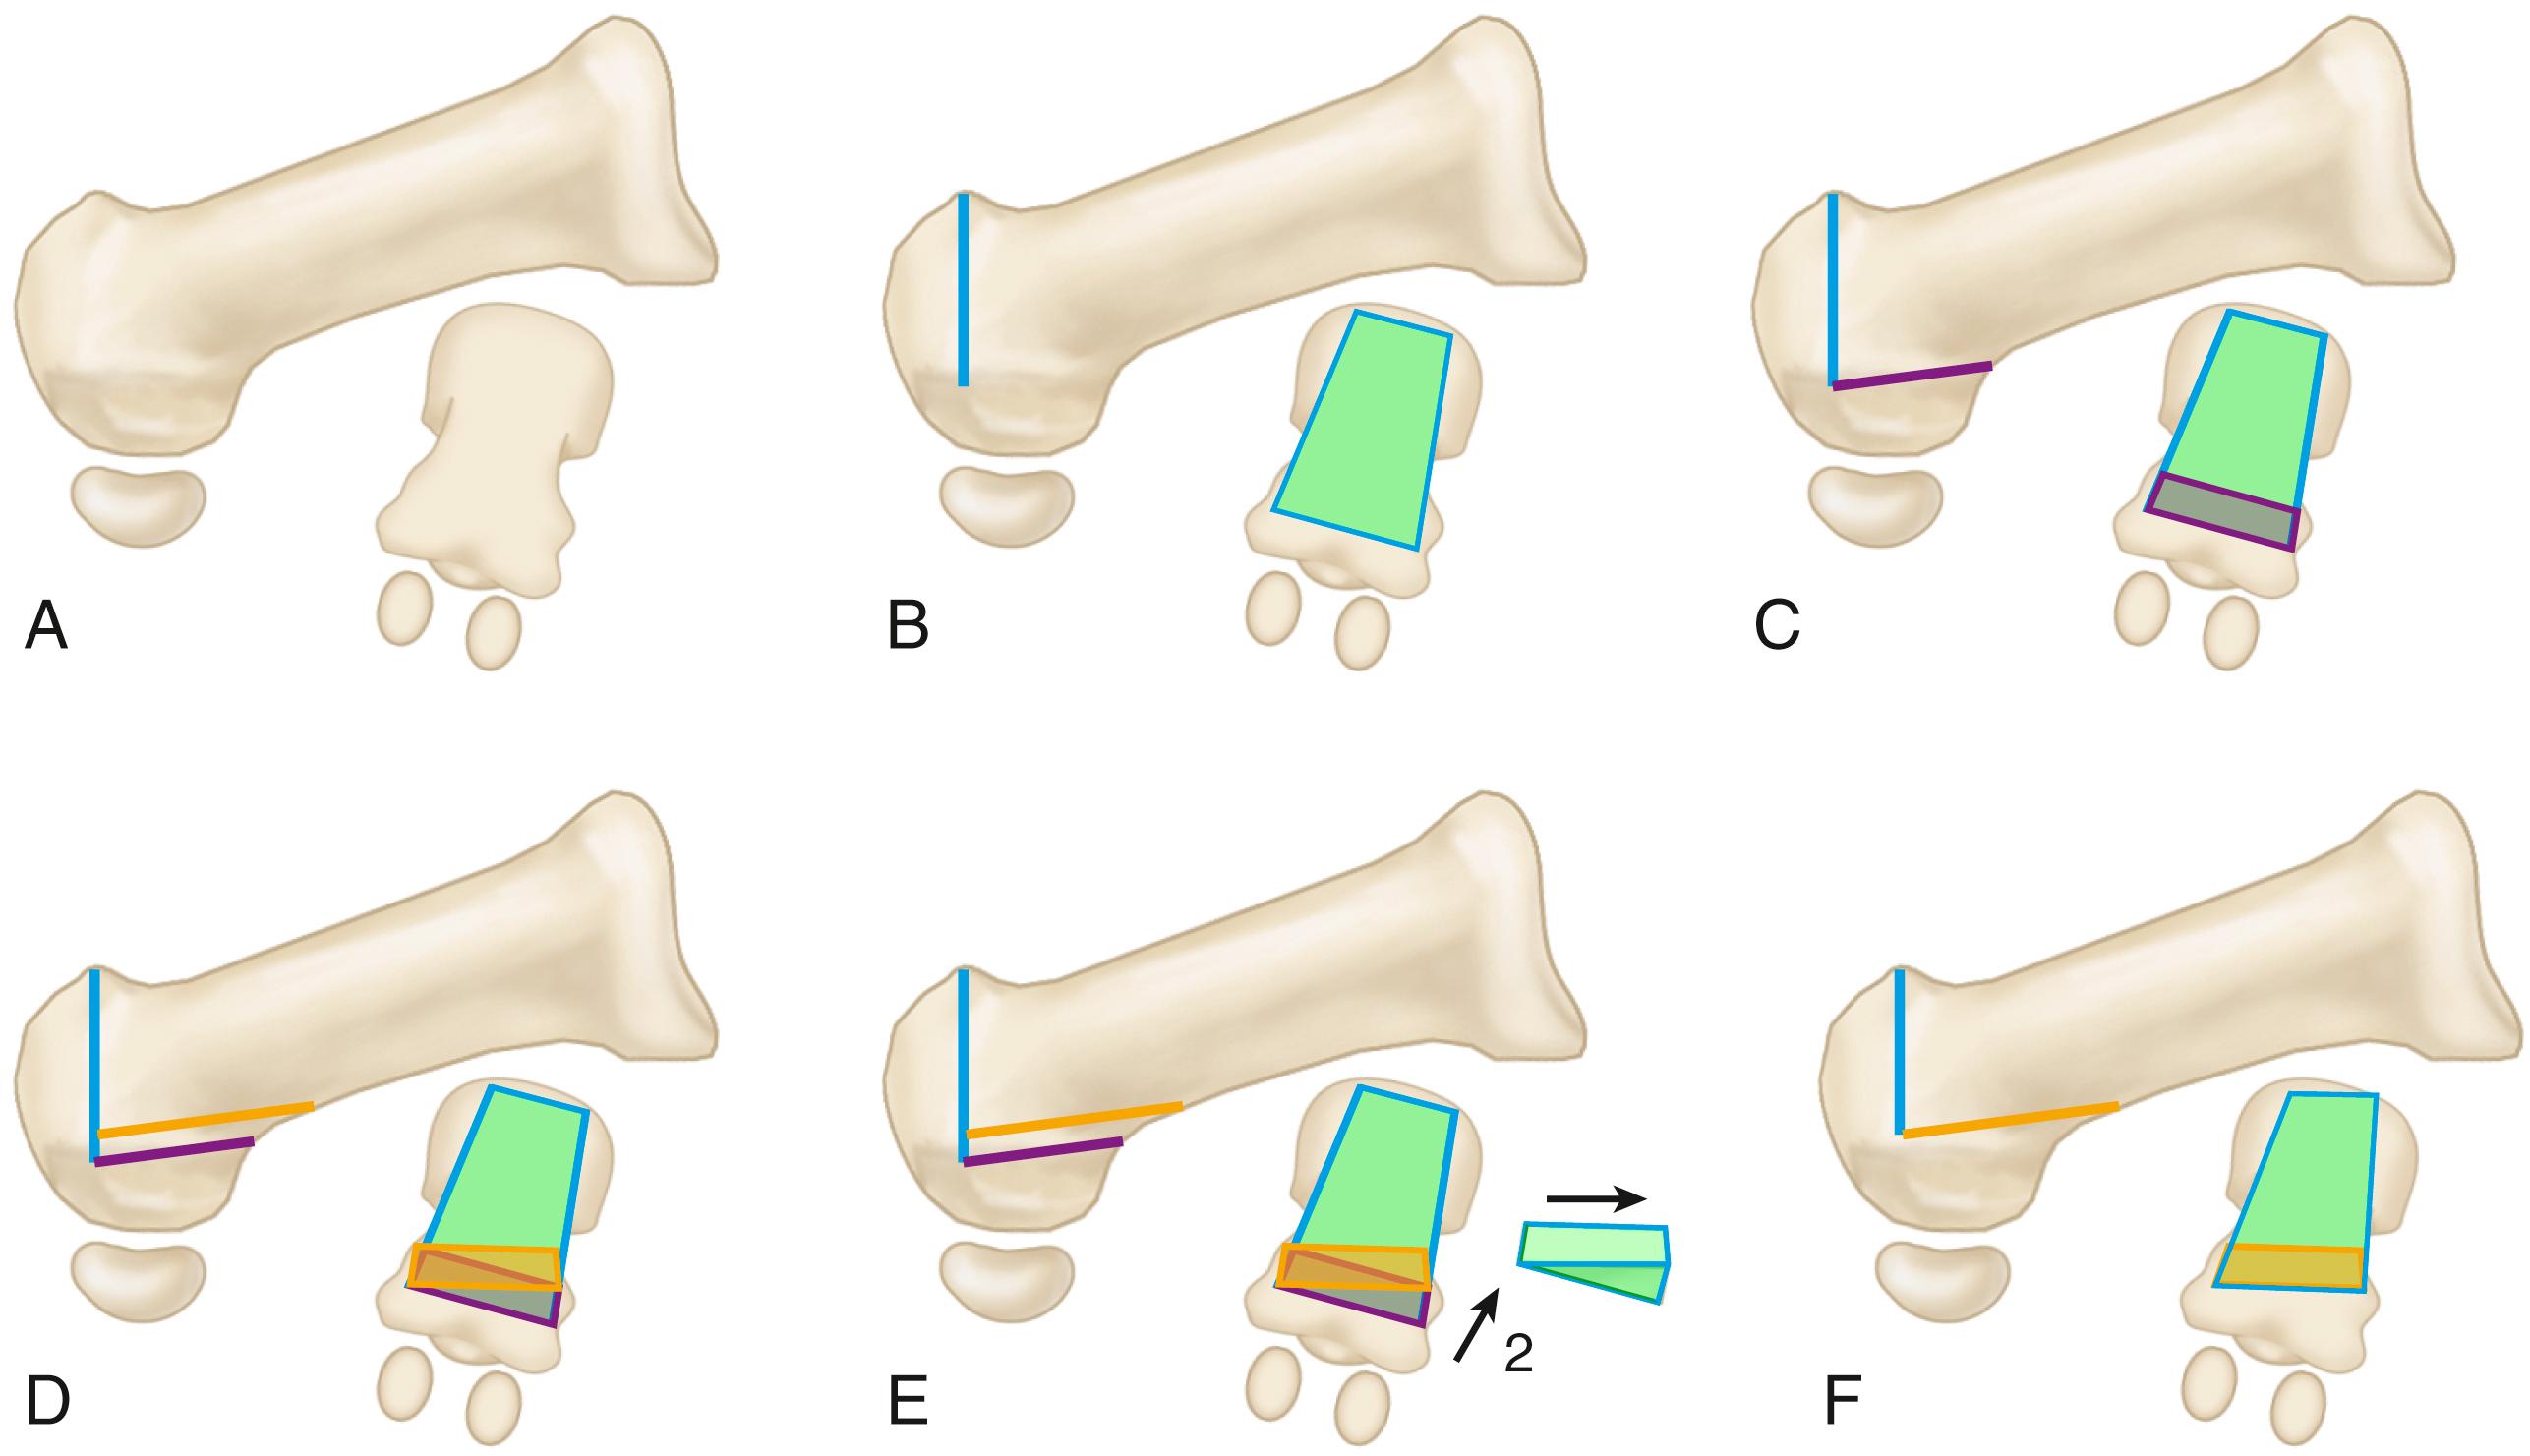
Prado et al. proposed a modification of the biplanar chevron osteotomy to treat internal rotation of the first metatarsal bone. After displacement of the distal metatarsal fragment laterally as in the conventional chevron procedures, the metatarsal rotational deformity is corrected by removing a medial wedge from the plantar fragment of the osteotomy. This allows the metatarsal head to be rotated, facilitating correction of pronation ( Fig. 82.32 ).
The chevron osteotomy generally is recommended for patients younger than 50 years old with a hallux valgus angle of less than 40 degrees and an intermetatarsal angle of less than 15 degrees. Advantages of the chevron osteotomy over metatarsal neck osteotomy (the Mitchell procedure and its modifications) include its location through cancellous bone, less shortening of the metatarsal, and its inherent stability. If the hallux valgus angle is more than 35 degrees, however, the hallux frequently is pronated and cannot be corrected by medial capsulorrhaphy alone or at the osteotomy. A hallux valgus angle of more than 30 degrees is not consistently correctable to a cosmetically acceptable angle (10 to 20 degrees), especially if the intermetatarsal angle is more than 12 degrees.
This procedure is most useful for younger patients (adolescence through the 30s) with a hallux valgus angle of 30 degrees or less and an intermetatarsal angle of less than 13 degrees; however, successful outcomes also have been reported in patients 50 years old or older. It narrows the forefoot, brings the hallux into cosmetically acceptable valgus (when combined with a medial capsulorrhaphy), and maintains adequate dorsiflexion of the first metatarsophalangeal joint to allow some variety in footwear.
The procedure consists of (1) medial eminence removal, (2) a V-shaped intracapsular osteotomy through the first metatarsal head, (3) lateral displacement of the capital fragment, (4) removal of the resulting projection of the first metatarsal, and (5) medial capsulorrhaphy. Fixation of the osteotomy with one or two Kirschner wires, a cortical screw, or a biodegradable pin adds stability to the osteotomy.
Although the intracapsular chevron procedure is included because of its longevity and results, in practice this osteotomy is rarely used at our institution. The modified extracapsular chevron is the workhorse distal osteotomy for mild to moderate deformity. It is most useful in the patient with a wide metatarsal and an intermetatarsal angle of less than 16 degrees, and can be used with or without a lateral release as long as care is taken not to overly strip the dorsal capsule from the head of the metatarsal (see Technique 82.4).
(JOHNSON; CORLESS)
For tourniquet use and anesthesia, see Technique 82.1. Begin a dorsomedial incision at the midportion of the proximal phalanx and gently curve it dorsally and proximally over the medial eminence so that, coursing plantarward, it ends 2 cm proximal to the medial eminence along the medial subcutaneous surface of the first metatarsal shaft. Currently, we use a straight midline medial incision.
Raise the skin flap gently, being careful to preserve the sensory nerve (the terminal branch of the medial division of the superficial peroneal nerve) to the dorsomedial aspect of the hallux. Protect as many branches of the superficial venous system as possible to decrease postoperative edema.
Make a longitudinal capsular incision in the midline (medial) of the medial eminence and extend it distally along the shaft of the proximal phalanx and proximally along the metatarsal shaft until the medial eminence is exposed.
Be careful not to loosen all the proximal attachments of the capsule on the metatarsal neck (an alternative capsular incision is the Y-shaped capsular incision).
In addition, to preserve vascularity to the capital fragment, do not strip the capsule from the dorsolateral and lateral aspects of the metatarsal head and neck.
Begin the osteotomy dorsomedially at the parasagittal groove and direct the blade (9 mm wide) proximally and medially, angled toward the junction of the medial eminence with the metatarsal shaft.
If using a power saw with a small blade (4 mm wide), take care not to scoop out a portion of the cancellous bone in the metatarsal head because this decreases the surface contact of the osteotomy and can delay union.
Using a power saw with a 9-mm-wide blade, begin the dorsal arm of the osteotomy in the metatarsal head near the subchondral bone. This usually is 3 to 4 mm proximal to the medial edge of the articular surface of the head of the first metatarsal. Angle the blade dorsally about 30 degrees from the longitudinal plane of the metatarsal.
In a similar manner, angle the plantar arm of the osteotomy 30 degrees from the longitudinal plane of the metatarsal, making the angle between the two limbs 60 to 70 degrees. This angle is suggested to maximize metaphyseal cancellous bone contact while maintaining stability of the osteotomy when it is displaced. The stability decreases as the angle increases. An angle of less than 50 to 60 degrees places the proximal ends of the osteotomy limbs in the cortical bone of the metatarsal neck instead of in the cancellous bone of the metatarsal head.
When making the second limb of the osteotomy, avoid diverging the blade from or converging it toward the first cut because this makes displacement of the capital fragment difficult.
The arms of the V usually are 10 to 12 mm long. Do not overpenetrate the bone with the blade to avoid placing the blood supply to the head of the metatarsal further at risk.
Stabilize the metatarsal shaft manually or with a towel clip while shifting the capital fragment laterally by thumb pressure. This lateral displacement should be 4 to 5 mm and no more than 40% to 50% of the width of the metatarsal.
Care should be taken to avoid making the osteotomy unstable, which may occur if an instrument is used to lever the osteotomy open to facilitate displacement.
After displacement of the capital fragment laterally, a medial projection of the metatarsal on the proximal side of the osteotomy remains. Shape this projection into the contour of the metatarsal neck and distal shaft by beginning a saw cut dorsomedially and directing it medially and proximally.
A small rongeur can be used, taking small bites with its beveled side, to smooth the medial surface of the two fragments further.
Bring the hallux into 5 degrees of valgus and inspect the osteotomy.
If it is stable, proceed with the capsulorrhaphy; if not, internally fix the osteotomy and perform the capsulorrhaphy, which holds the hallux in 5 to 10 degrees of valgus.
We prefer the pants-over-vest technique because of its strength, but excising a portion of the capsule dorsally and closing the capsule side-to-side also is appropriate. Pulling the plantar flap of the capsule dorsally (instead of vice versa) repositions the sesamoids if no contracture exists.
Release of the adductor through the joint before the osteotomy is suggested if the hallux valgus angle is 30 degrees or more.
Three days after surgery, the bulky soft dressing is removed, a small dressing and a short leg walking cast with dorsal and plantar toe plates are applied, and touch-down weight bearing is allowed with crutches until the osteotomy has healed (6 to 8 weeks).
The modified chevron osteotomy is simply a more proximal placement of the apex of the osteotomy in the metatarsal head. Potential problems of this modification of the chevron osteotomy are instability of the osteotomy and insufficient metaphyseal bony contact. Proper placement of the osteotomy cuts is mandatory. The metatarsal osteotomy must be internally fixed. With some modifications, however, the chevron osteotomy can be used for more severe deformities (up to 35 degrees of hallux valgus and up to 15 degrees of first to second intermetatarsal diversion) ( Fig. 82.33 ). As an alternative, the valgus appearance of the hallux can be corrected by an additional few degrees with an additional osteotomy of the proximal phalanx (see Akin procedure). This phalangeal osteotomy augments cosmetic correction only if the metatarsophalangeal joint has been rendered congruent in the corrected position. Also, a basal osteotomy of the proximal phalanx adjacent to the distal metatarsal osteotomy may cause more limitation of motion of the first metatarsophalangeal joint than a single osteotomy. The patient should be informed of this possibility.
In patients with mild to moderate deformity in whom a wide metatarsal is present, an absorbable pin is used for fixation ( Fig. 82.34 ). For more severe deformity or in patients in whom there is a narrow metatarsal, fixation with Kirschner wires or screws is recommended as described below. Recent reports, as well as our experience, indicate significant patient satisfaction with this procedure even in more severe deformity. A more precise determination of the upper limits of deformity that can be treated with this procedure remains to be defined. Park et al. compared clinical and radiographic results of proximal and distal chevron osteotomies (both with soft-tissue release) in 110 patients with severe hallux valgus. They noted comparable results, with both methods resulting in significant improvement. Kim et al. also obtained good results in 56 patients with moderate or severe deformity. They noted that distal chevron osteotomy with lateral soft-tissue release can be useful in severe deformity if the lateral soft-tissue contracture is not severe and if the metatarsocuneiform joint is adequately flexible. Song et al. reported good results in 82.6% of 46 feet with moderate hallux valgus and in 82% of 42 feet with severe hallux valgus using an extended distal chevron osteotomy with a distal soft-tissue release. Seven complications were reported in each group.
See Technique 82.1 for use of the tourniquet and anesthesia. Make a medial midline incision as described in Technique 82.3, protecting the dorsal veins and dorsal and plantar sensory nerves to the medial side of the hallux ( Fig. 82.35A ).
When the capsule is exposed, make a longitudinal incision along the dorsomedial aspect of the first metatarsal.
Begin the second limb of the capsulotomy 1 to 2 mm proximal to the base of the proximal phalanx and in a coronal plane at right angles to the first limb of the capsulotomy ( Fig. 82.35B ).
Extend the coronal incision plantarward 1 to 2 mm proximal to the junction with the tibial sesamoid ( Fig. 82.35C ).
Raise the capsule, beginning medially and plantarward, by sharply dissecting it from the inside out and off the most prominent part of the medial eminence until its dorsal aspect is reached ( Fig. 82.35D ).
Maintain the incision close to bone, curving over the medial eminence as the contour demands, and take a full-thickness piece of capsule from the medial eminence and proximally along the metatarsal shaft for 3 to 4 cm. This should leave the fascial attachment of the abductor hallucis in continuity with the periosteum and fascial covering of the first metatarsal shaft.
Ensure that the plantar aspect of the metatarsal head where it meets with the shaft is adequately exposed so that the plantar osteotomy cut can be made under direct vision. Remove the medial eminence.
Using a 0.062-inch Kirschner wire, and starting 1 to 1.3 cm proximal to the subchondral bone and in the center of the first metatarsal head, drill a hole from medial to lateral marking the apex of the intended osteotomy ( Fig. 82.35E,F ).
Mark the limbs of the osteotomy with a sharp osteotome or a marking pen and begin the osteotomy with the dorsal cut. Avoid pushing the saw blade in and out of the bone; slowly glide the blade across the head-neck fragment with gentle back-and-forth rather than in-and-out movements.
When there is no further resistance to the blade laterally, extract it and return to the centering hole. Ensure that the dorsal and lateral aspects of the cortical bone have been incised.
Begin the plantar limb of the osteotomy at a point approximately 30 degrees from the midline or 60 degrees from the original dorsal osteotomy. Make this cut slowly and deliberately at right angles to the bone, exiting plantarward 2 to 3 mm proximal to where the articular surface of the metatarsal head meets the shaft ( Fig. 82.35G ). A small, right-angle retractor pulling the capsule plantarward increases exposure.
If the osteotomy cuts have been made appropriately, the capital fragment usually displaces laterally with minimal lateral pressure; if this is not the case, either the osteotomy cuts are not parallel, or the plantar cortex or dorsal cortex, or both, has not been penetrated laterally.
If gentle pressure on the head fragment does not displace it laterally while the shaft fragment is held stable, reposition the saw blade, being careful not to start the saw until the blade is in the depths of the osteotomy cut.
When the capital fragment has been freed from the proximal fragment, shift it laterally 4 to 5 mm ( Fig. 82.35H ).
Impact the head fragment on the shaft by applying gentle pressure to the hallux.
While holding the capital fragment straight on the metatarsal shaft, internally fix the osteotomy. Insert one or two 0.062-inch Kirschner wires obliquely across the osteotomy site ( Fig. 82.35I ).
Begin inserting the first wire dorsomedially and far enough proximally in the shaft to leave cortical bone between the pin and the cancellous portion of the distal-medial shaft when the overhanging ridge of bone is made flush with the capital fragment. Direct the wire so that it reaches the lateral aspect of the capital fragment.
Insert the second wire into the metatarsal head at a point 3 to 4 mm plantar and parallel to the first.
Test the osteotomy for stability and gently open the metatarsophalangeal joint by pushing the toe laterally.
Examine the entire surface of the metatarsal head with a small Freer elevator to locate any Kirschner wire points. If the joint has been entered, retract the wire slightly so that it rests in subchondral bone. Because the entrance of the wire into subchondral bone and its exit through the cartilage of the head usually can be felt while drilling, withdrawing the wire about 2 mm usually places it in the proper position.
Circumduct the hallux on the first metatarsal head; if any catching occurs, reinspect the joint for wire points. If there is any doubt, obtain radiographs.
Incise the overhanging segment on the medial side of the proximal fragment and with a rasp smooth it flush with the capital fragment ( Fig. 82.35J,K ).
Place the hallux on the metatarsal head in a congruous position, which can be determined by flexing, extending, abducting, adducting, and rotating the hallux on the first metatarsal head and observing the foot from the top ( Fig. 82.35L ).
While an assistant holds the toe reduced, close the capsular incision by first closing its proximal part with two or three interrupted 2-0 or 3-0 absorbable sutures.
Dorsally, pass the needle through the periosteum and deep fascia, over the metatarsal shaft, and through the accessory extensor hallucis longus tendon.
Plantarward, the strong tissue is the deep, investing fascia over the abductor hallucis and the tendinous edge of this muscle; anchoring the capsular repair proximally before beginning the distal repair is important. Close the plantar-medial corner of the capsule with one or two interrupted sutures.
The most important sutures, which hold the hallux congruously on the metatarsal head, form a pants-over-vest closure as follows. Enter the transverse limb of the capsular incision 2 to 3 mm plantar to the apex of the incision from the outside in; turn the needle 180 degrees, and reenter the corner of the capsule from the outside in. Reverse the needle 180 degrees and reenter it from the inside out, still on the proximal part of the capsule. Place the final pass of the stitch through the distal capsule on the dorsal side of the apex of the incision. Pull the capsule into the corner in a pants-over-vest manner and suture it. During capsular closure, observe the dorsal aspect of the foot while an assistant externally rotates the foot slightly to judge the proper alignment of the hallux.
To obtain more correction of the valgus deformity, carefully imbricate the transverse or coronal limb of the capsulotomy. Do not attempt to correct hallux valgus interphalangeus by pulling the hallux into a more varus position at the metatarsophalangeal joint with imbricating sutures during capsular repair because hallux varus can develop if the imbrication is too tight. In most instances, close the transverse limb by approximating the edges, unless the capsule is so redundant that it requires partial excision. Finish closing the capsule at any weak points.
The hallux should be in neutral to 5 degrees of valgus at completion of the capsulorrhaphy. Correct any varus by removing capsular sutures one at a time and observing the position of the hallux. Begin by removing one or more transverse limb sutures. If necessary, remove all of the distal capsular repair and start over.
Secure hemostasis and close the wound in layers. Apply a forefoot dressing with the hallux taped in the proper position.
Alternatively, an absorbable pin that can be trimmed may be used for fixation ( Fig. 31.35M ).
The dressing and sutures are removed at 19 to 23 days, and a toe spacer is worn to hold the hallux in the proper position. A wooden-soled shoe is worn for 4 weeks, and then a deep, wide jogging shoe with a toe spacer is worn for the next 6 to 8 weeks. Usually by the third or fourth month a reasonably attractive shoe can be worn, but this varies. A short leg walking cast worn for 4 weeks after surgery is an alternative, but it is not routinely recommended except in adolescents. The Kirschner wires can be removed at 3 months or earlier if they cause symptoms, or they may be left if the patient is asymptomatic.
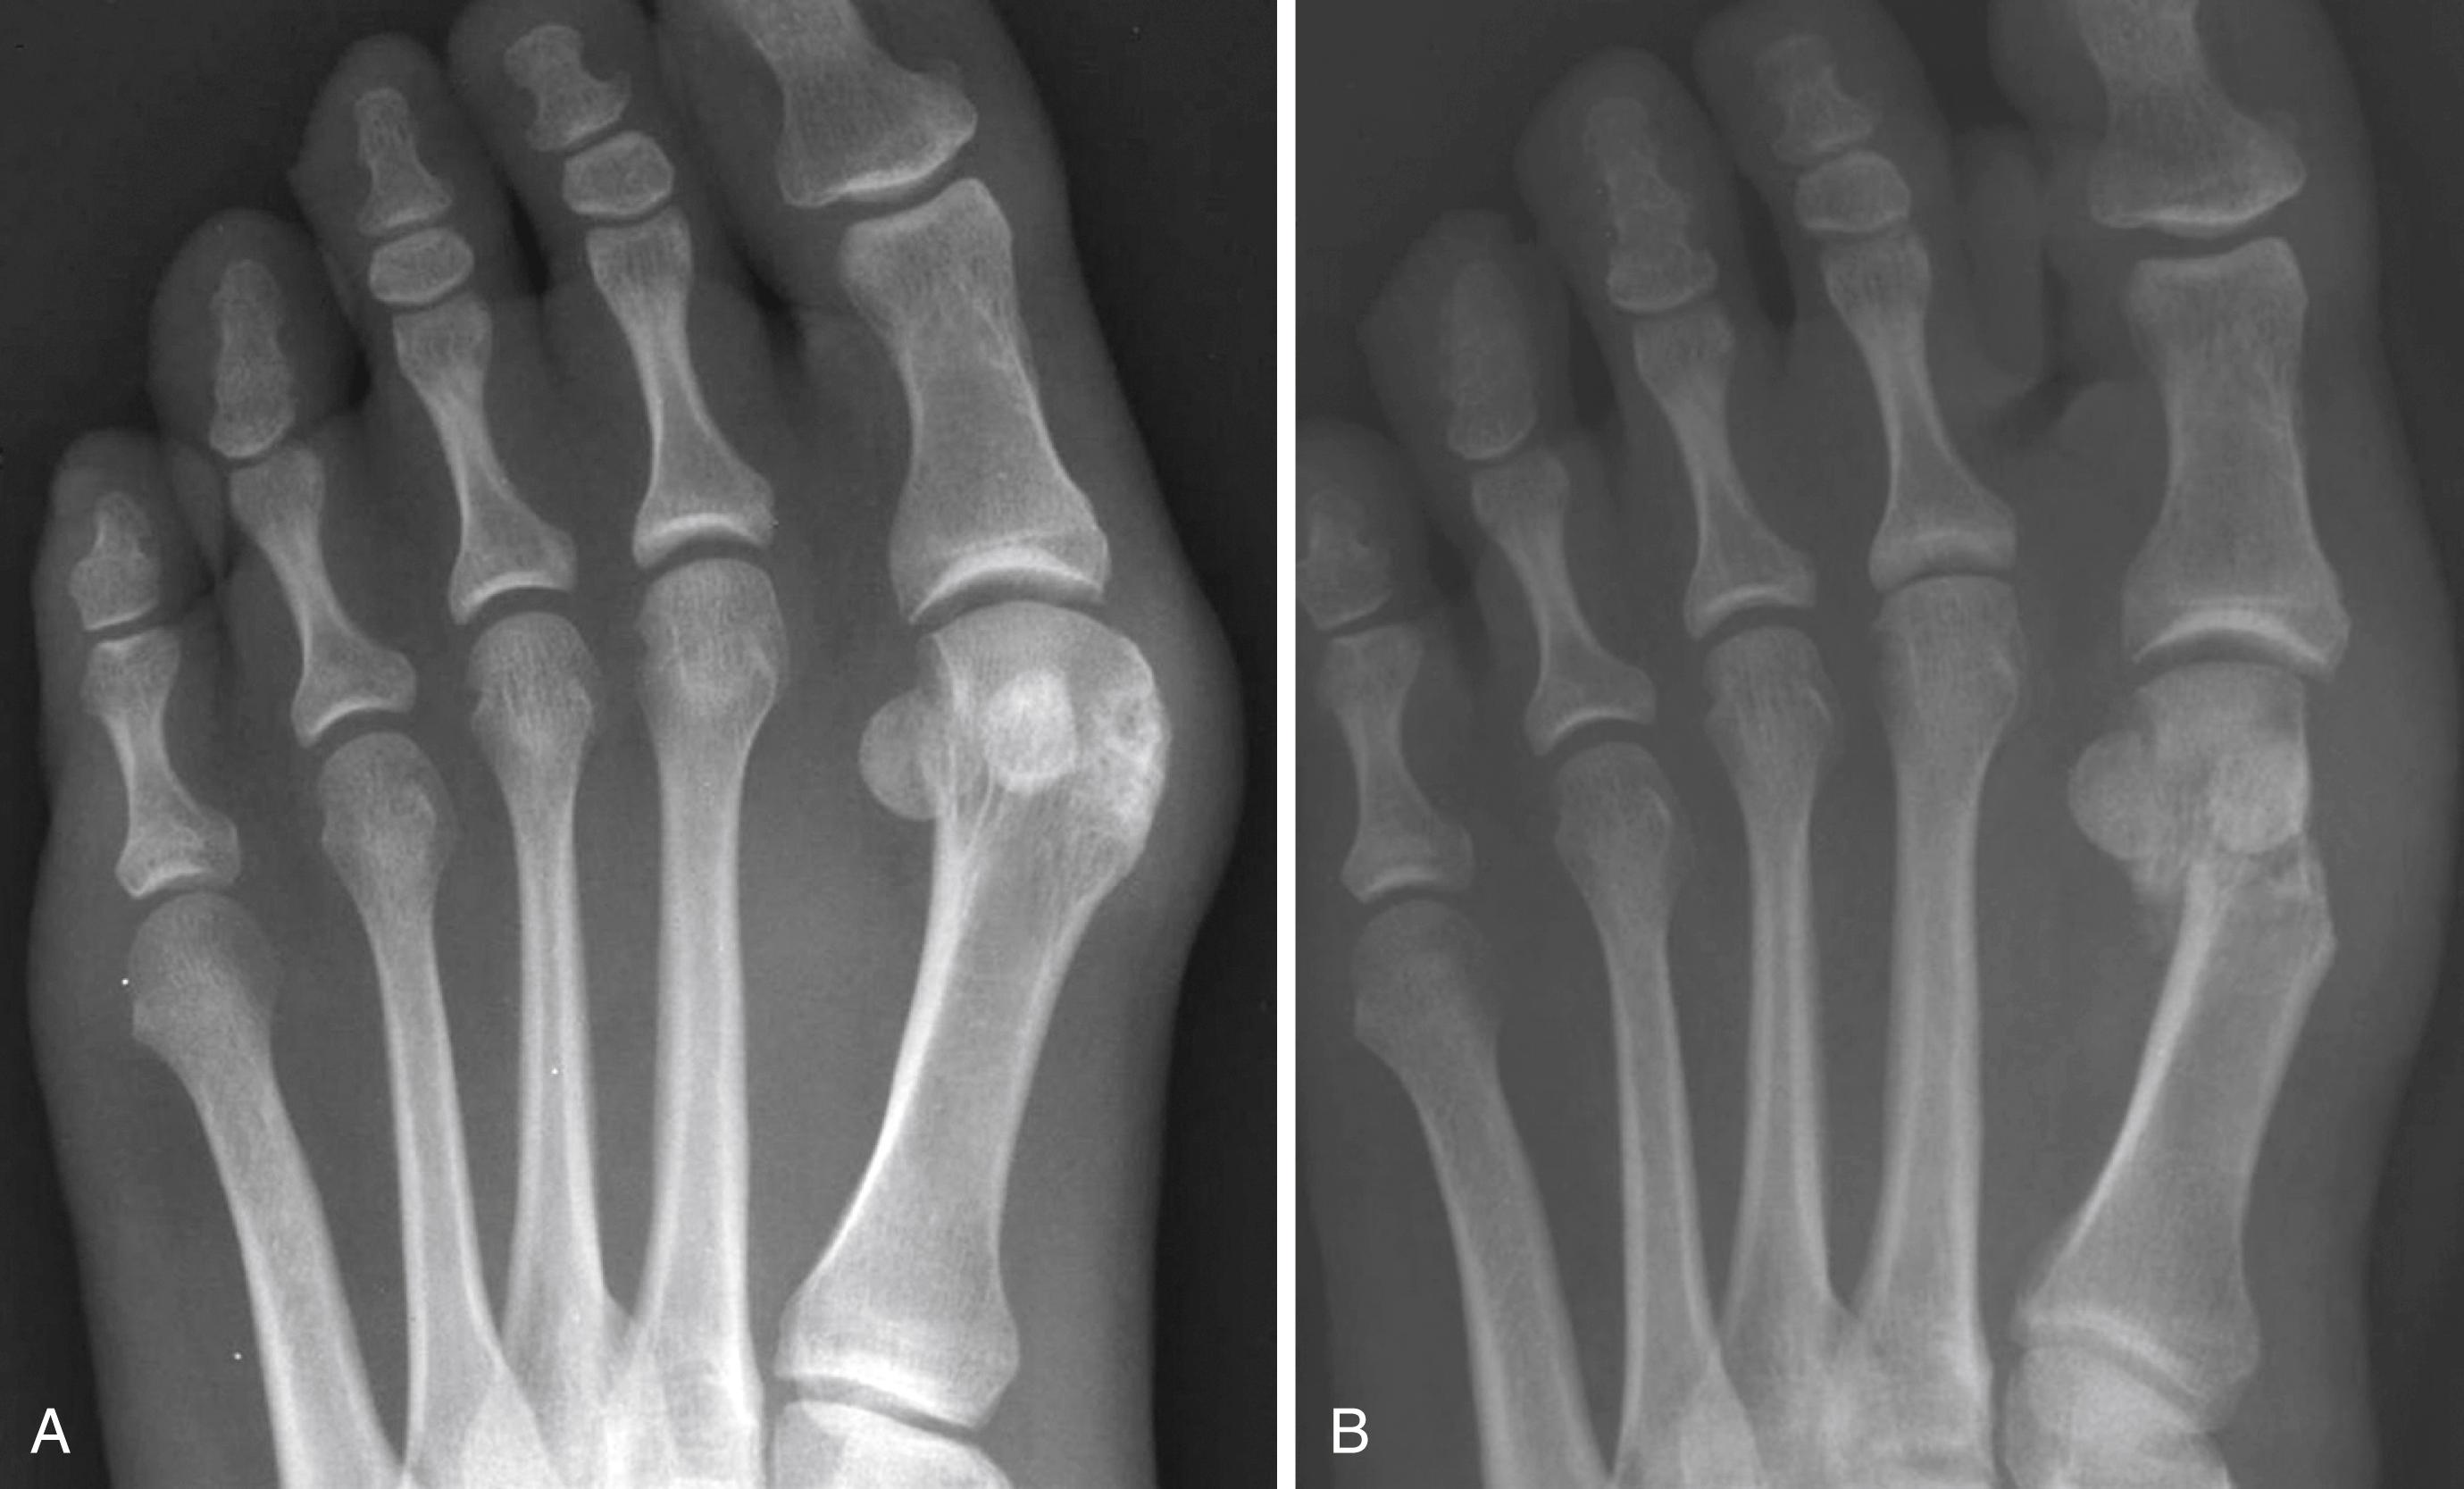
Johnson, who popularized the chevron osteotomy, also modified it by changing the length and position of the limbs of the osteotomy in the metatarsal head, which extended the indications for the osteotomy to severe deformities with intermetatarsal angles of 15 or 16 degrees. Also, in the modified procedure, a 2.7-mm screw is used for internal fixation. Johnson did not recommend this osteotomy for patients older than 60 years or for patients who had previous hallux valgus surgery or diminished joint mobility with crepitance.
(JOHNSON)
See Technique 82.1 for tourniquet use and anesthesia. Make a midline, longitudinal, medial capsular incision and expose the medial eminence.
Expose the metatarsal head dorsally and plantarward just enough to see the dorsal and plantar limbs of the osteotomy, laterally enough to place a 2.7-mm screw. Avoid excessive stripping of the capsule.
Using a power saw with a 9-mm blade, remove the medial eminence at an angle that is parallel to the medial border of the foot as opposed to the medial border of the cortical shaft or metatarsal.
Begin the inferior or plantar limb of the osteotomy 5 or 6 mm proximal to the medial articular surface of the first metatarsal and midway between the superior and inferior margins of the metatarsal head in its center portion. This plantar extension of the osteotomy exits extracapsularly at the inferior aspect of the metatarsal head and neck junction or just proximal to that.
The lateral portion of this osteotomy cut can be difficult, so ensure that it is completely through the bone before attempting to shift the metatarsal head laterally.
Make the second limb of the osteotomy from the apex or distal extension of the first osteotomy and direct it dorsally at an approximate angle of 70 degrees to the first limb of the osteotomy. Exit this limb of the osteotomy dorsally just proximal to the dorsal border of the articular surface of the head of the metatarsal.
Stabilize the metatarsal shaft proximally with a manual grip or a towel clip while the capital fragment is displaced laterally 4 to 6 mm without any tilting or opening of the osteotomy site medially, laterally, superiorly, or inferiorly.
Compress the great toe longitudinally on the head of the metatarsal shaft fragment to impact the osteotomy site.
For insertion of a 2.7-mm screw, use a 2-mm bit to drill a hole in the dorsal surface of the distal shaft of the metatarsal just proximal to the dorsal limb of the osteotomy. Leave an approximately 3-mm ledge of bone between the drill hole and the superior arm of the osteotomy.
Direct the drill bit from proximal to distal at about a 10-degree angle and 10 to 15 degrees lateralward to place the screw in the substance of the transposed capital fragment.
Pass the 2-mm drill bit through the dorsal cortex of the distal shaft of the metatarsal and then through the cancellous bone of the capital fragment into subchondral bone of the fragment.
Ream the proximal aspect of the hole with a 2.7-mm drill bit to create a lag effect at the osteotomy and then measure the screw length (usually 16 to 18 mm) with a depth gauge.
Tap the drill hole with a 2.7-mm tap. Insert the 2.7-mm screw and tighten it to close the osteotomy. Do not allow the screw to exit through the articular surface of the metatarsal head because it may impair sesamoid glide.
Use a power saw to contour the overhang of the medial aspect of the distal metatarsal that resulted from lateral shift of the capital fragment with the medial aspect of the first metatarsal shaft. Do not skive laterally into the center of the shaft of the metatarsal. Use a small rongeur to smooth the dorsomedial aspect of the metatarsal head.
Overlap the capsule while holding the hallux in neutral flexion and extension and about 10 degrees of varus and excise any excess capsule (usually 3 to 5 mm). Close the capsule with multiple 2-0 or 3-0 nonabsorbable sutures.
After capsular closure is completed, the hallux should rest in a straight position with the medial aspect of the proximal phalanx resting against the medial aspect of the displaced capital fragment.
Apply the dressing in such a way as to hold the hallux in proper position and to take some of the pressure off the medial capsular repair (see Fig. 82.35L ).
The patient is allowed partial weight bearing with crutches for the first 3 to 4 days; then the dressing is changed, and a short leg walking cast is applied. The cast, which should extend distal to the great toe for gentle support, is primarily for comfort and patient mobility, allowing ambulation without crutches or a walker. It is removed approximately 1 week later, and gentle exercises of the great toe are begun. A hallux valgus night splint is applied to protect the medial capsular repair, and a stiff-soled postoperative shoe is worn for approximately 3 weeks; after this a deep, wide, soft shoe can be worn.
The correction obtained by distal osteotomies is limited by the fact that approximately 1 mm of lateral translation corresponds to 1 degree of intermetatarsal angle correction. Murawski and Beskin described increasing the amount of displacement at the osteotomy more than 6 mm or the 50% maximum generally recommended in the literature for correction of severe deformities. Their indications for this procedure were symptomatic moderate-to-severe hallux valgus with an intermetatarsal angle of 18 degrees or less. They reported correction similar to that obtained with proximal crescentic osteotomy and chevron osteotomy with lateral soft-tissue release; however, the risk of hallux varus appears to be increased with their technique. A “medial diaphyseal bump” also was present in five of their 33 patients and was symptomatic in three. This procedure is technically difficult, and meticulous surgical technique is required.
(MURAWSKI AND BESKIN)
See Technique 82.1 for tourniquet use and anesthesia. If a lateral soft-tissue release is required for marked sesamoid subluxation, expose the lateral capsule through a dorsal first web space incision and use a Freer elevator to identify the dorsal margin of the subluxed lateral sesamoid. Incise the capsule longitudinally from the phalanx to well proximal to the lateral sesamoid, which will allow medialization of the sesamoid complex during medial capsular repair at the end of the procedure.
Make a standard medial incision centered over the metatarsophalangeal joint, followed by a longitudinal capsulotomy slightly plantar to the midaxis of the metatarsal.
Reflect the capsule and remove the medial eminence with a sagittal saw, 1 to 2 mm medial to the articular margin or sagittal groove.
Mark the apex and the limbs of the osteotomy with a surgical pen. The apex is 15 to 20 mm proximal to the joint, and the limbs are made with an angle of 35 to 45 degrees, exiting the diaphysis of the metatarsal ( Fig. 82.36A ). The position of the limbs is important: if they are too short, instability may be excessive, and if they are too long, translation or rotation of the distal head portion is difficult.
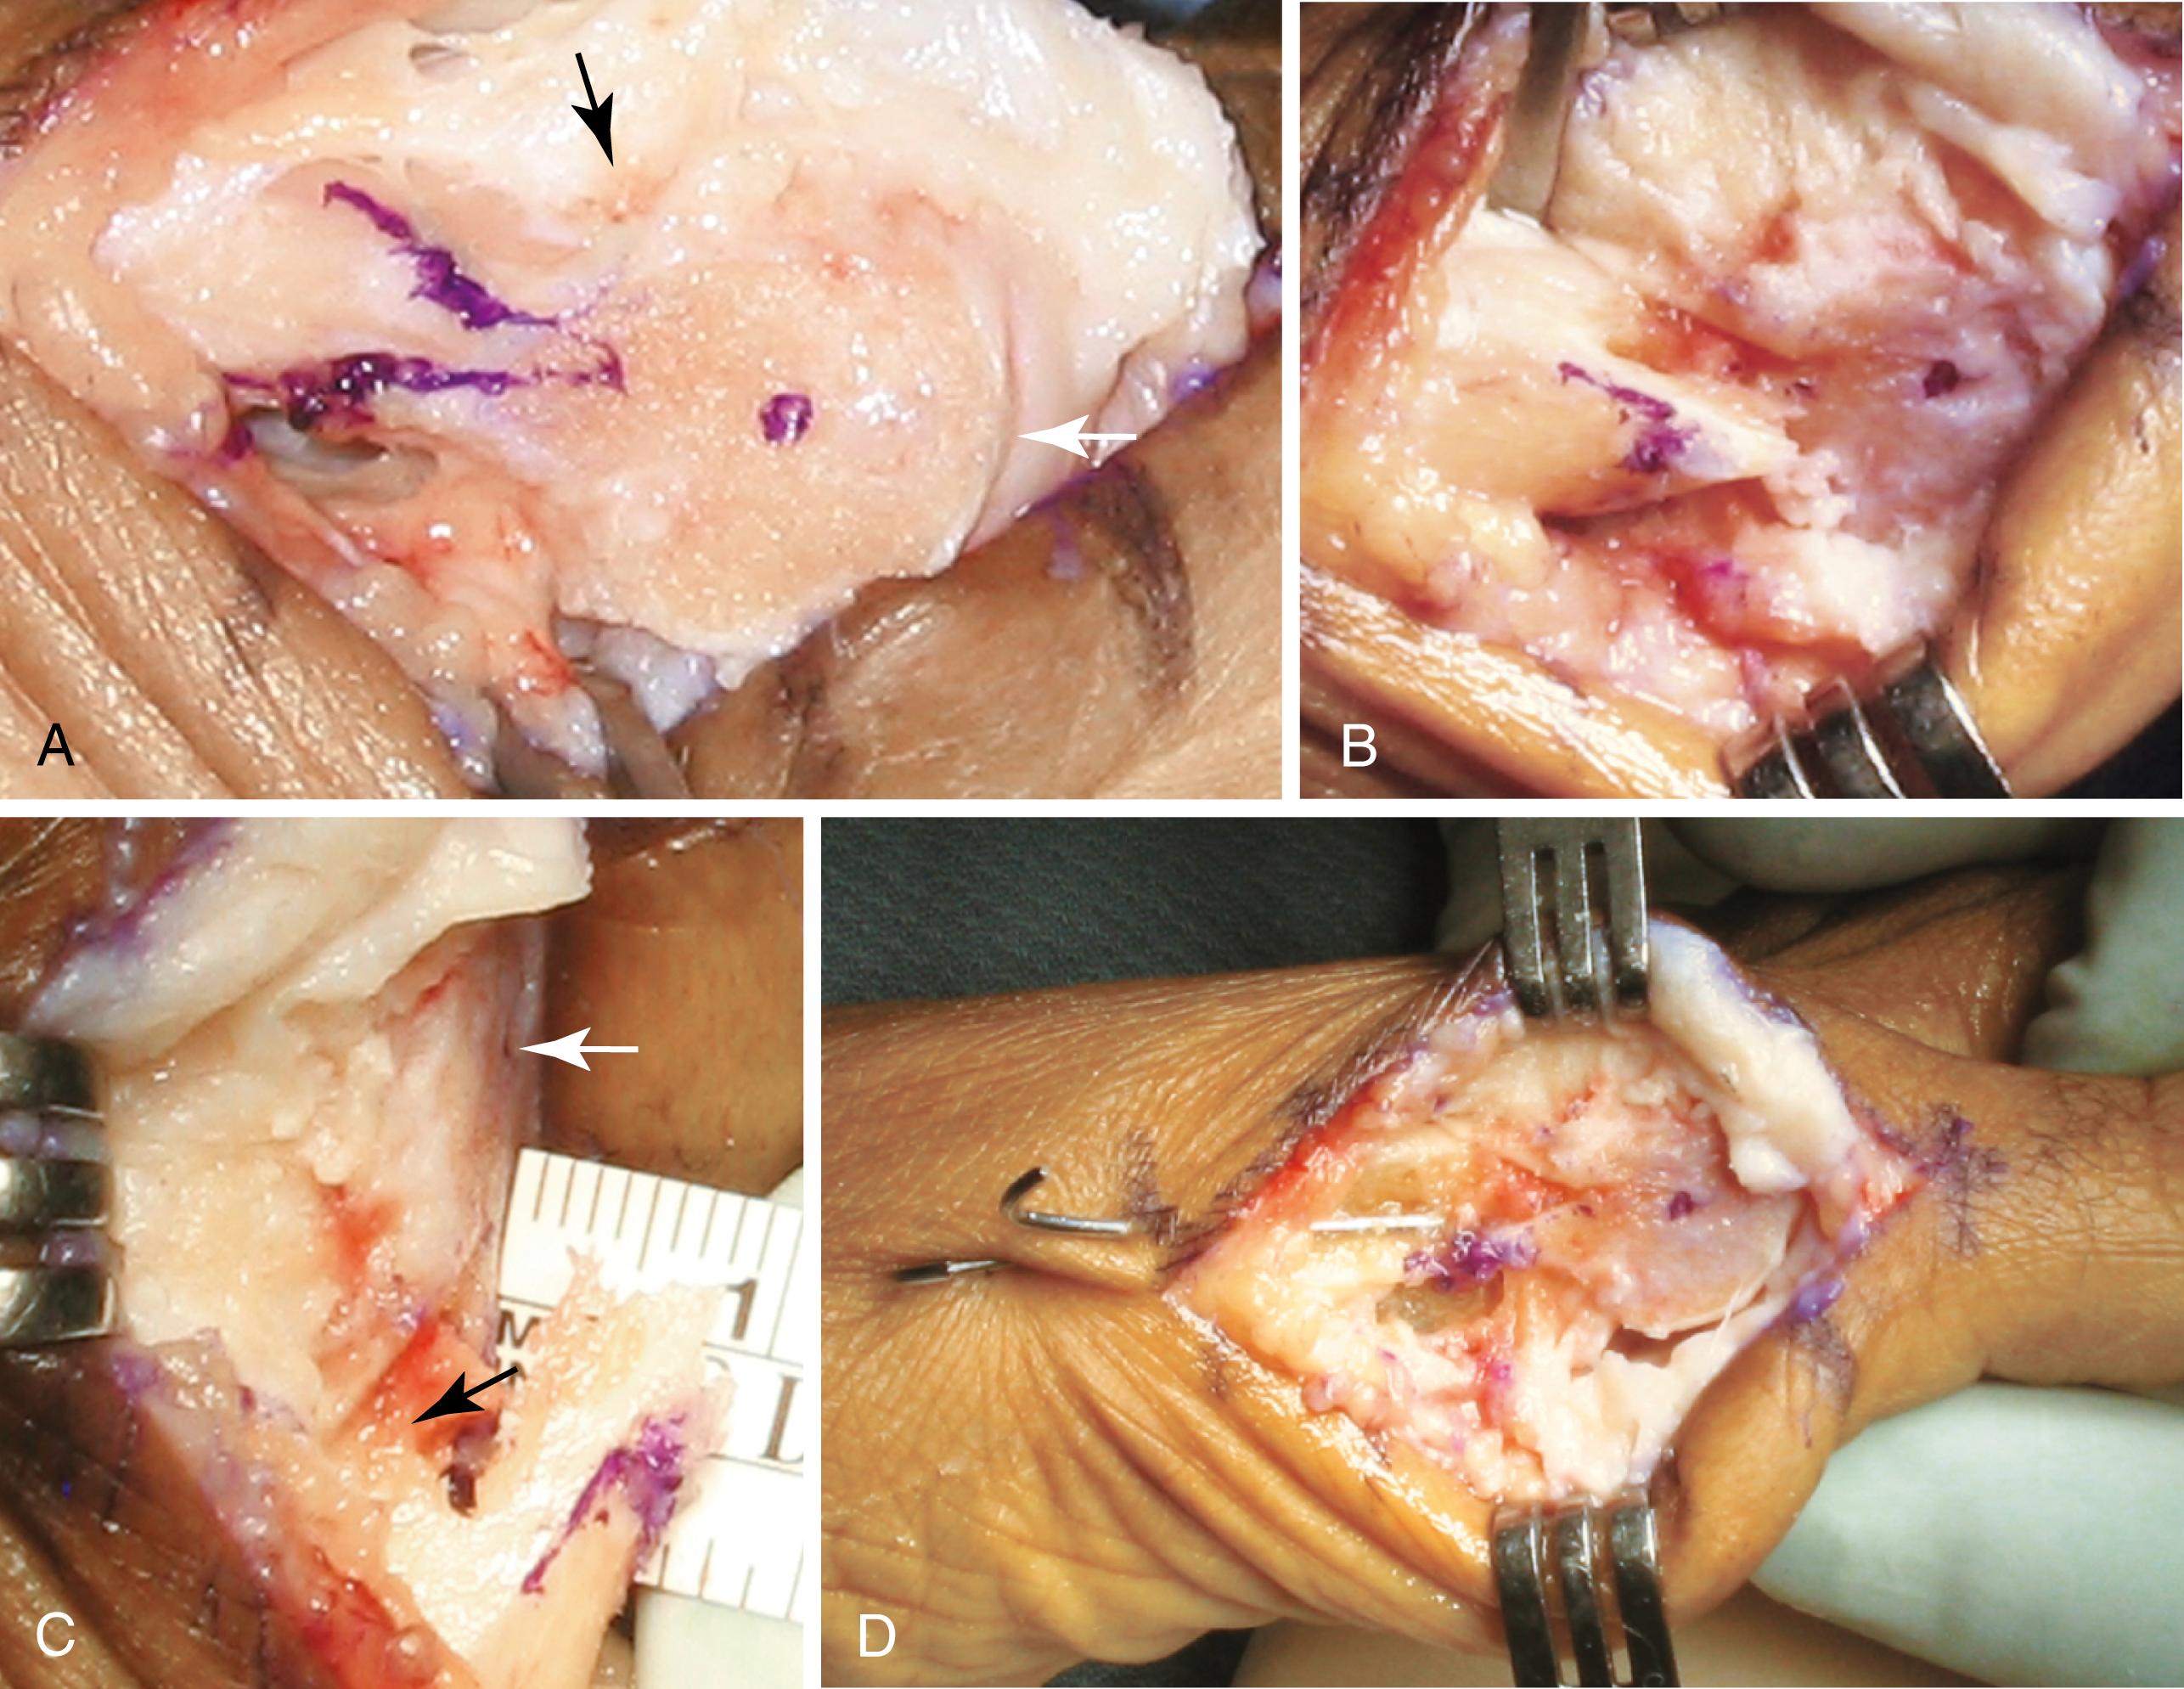
Use a Freer elevator to gently strip the periosteum and soft tissue over the anticipated osteotomy cuts. To minimize vascular compromise, leave intact tissues distal to the osteotomies on the metatarsal head.
Complete the osteotomy with a sagittal saw and gently translate the distal head fragment laterally while applying traction to the toe ( Fig. 82.36B ). Position the head fragment on the lateral spike of the proximal fragment ( Fig. 82.36C ). Up to 90% translation is possible and can be satisfactorily stabilized by two 0.054-inch smooth Kirschner wires.
Insert the Kirschner wires percutaneously from the medial aspect of the proximal fragment, across the osteotomy site, and into the head fragment. Bend the pins and leave them percutaneous for ease in later removal.
Cut and contour the large bony prominence on the proximal-medial metatarsal so that it is in line with the distal head at the medial margin ( Fig. 82.36D ).
During closure of the medial capsule, remove a U-shaped wedge of tissue from the plantar portion near the level of the medial sesamoid. Close this defect with figure-of-eight sutures to correct the hallux valgus.
Use a pants-over-vest suture configuration to close the plantar capsule to the dorsal capsule to improve sesamoid position.
After closure, apply a standard soft dressing that gently supports the hallux in the corrected position.
Patients are allowed to bear weight immediately on their heels with a stiff-soled postoperative shoe and crutches as needed. At 2 weeks, the sutures are removed and another bunion dressing is applied. Pins are removed 5 to 6 weeks after surgery, at which time the dressing and stiff shoe are discontinued. With larger osteotomy correction, radiographic healing can take 3 months or more, but the osteotomy usually is stable enough for normal activities of daily living within 2 months. Sports and strenuous activities should be delayed until 3 to 5 months after surgery.
Mitchell and Baxter described a combination of the chevron and Akin osteotomies to gain greater correction of mild-to-moderate hallux valgus deformities. They reported satisfactory results in 95% of 24 feet in 16 patients using this combined procedure. They cautioned, however, that this procedure should not be used in feet that have advanced sesamoid subluxation with wide intermetatarsal angles.
(MITCHELL AND BAXTER)
See Technique 82.1 for tourniquet use and anesthesia. Make a longitudinal medial skin and capsular incision to expose both osteotomies, and make the distal metatarsal osteotomy first ( Fig. 82.37A ).
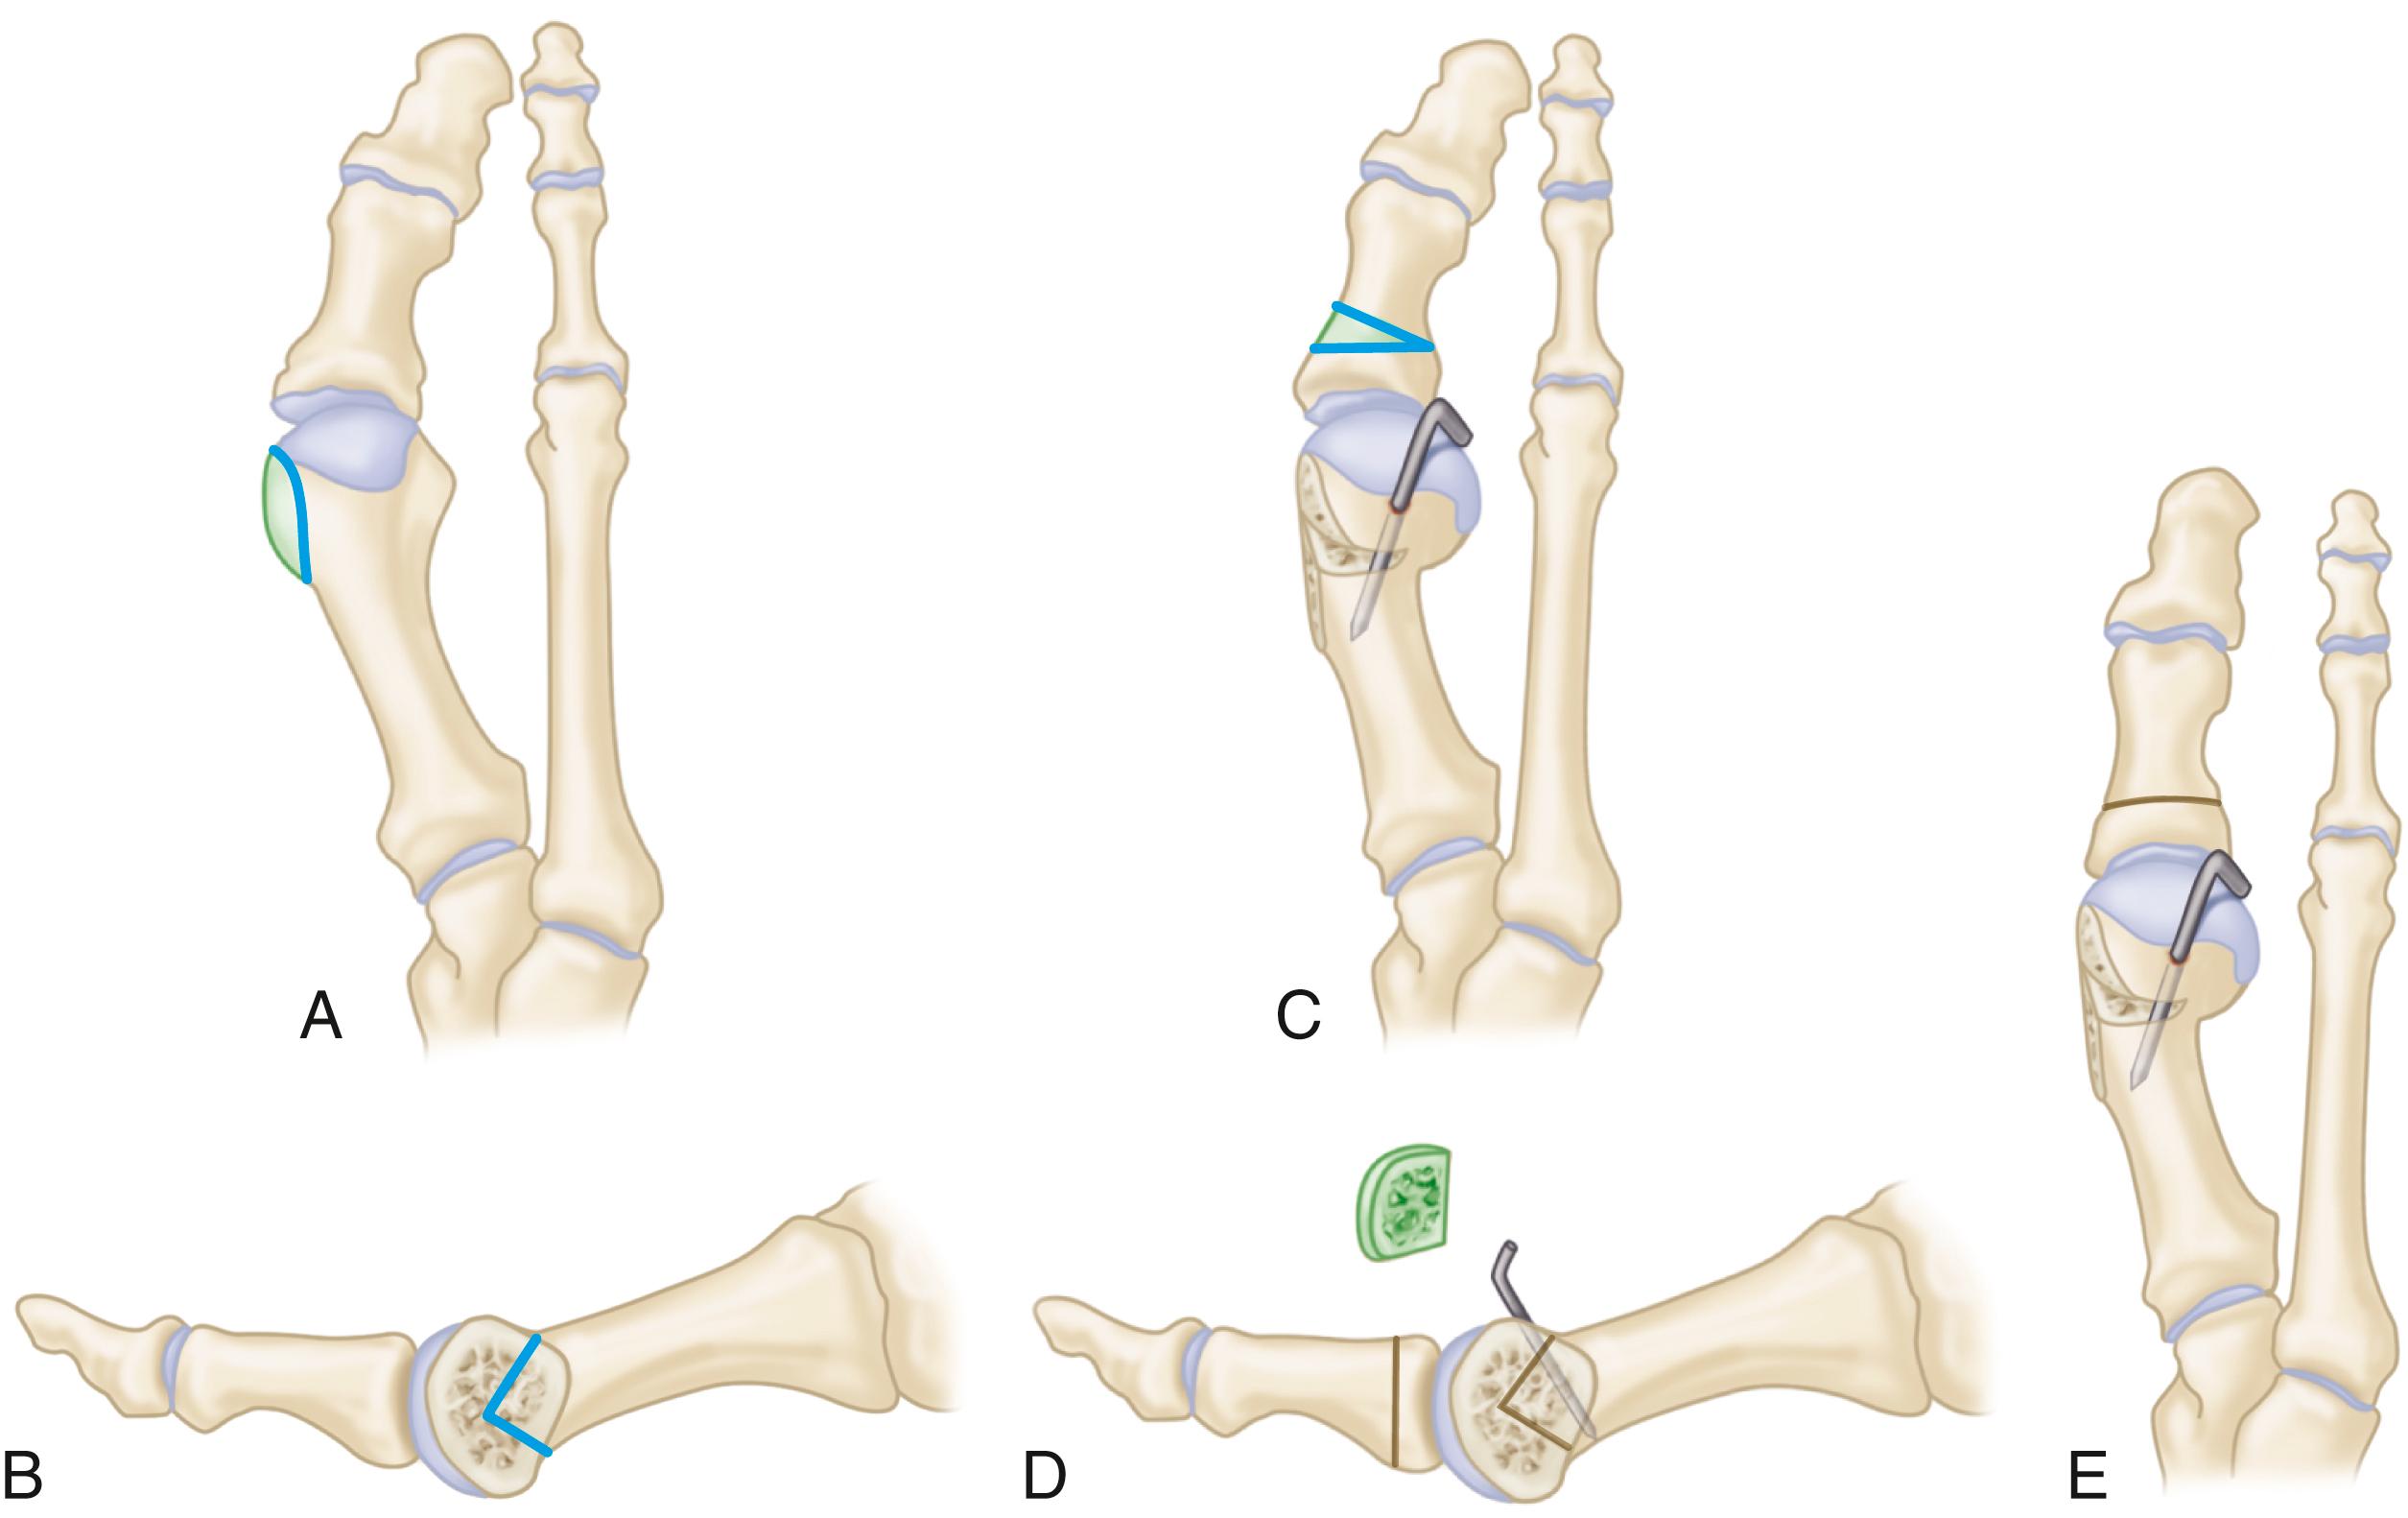
Perform the chevron osteotomy as described in Technique 82.3 except place a single 0.045-inch smooth pin percutaneously dorsal to plantar and in a slightly more proximal position to secure the distal metatarsal osteotomy ( Fig. 82.37B ,C).
The lateral displacement of the metatarsal head is approximately 3 mm.
Do not perform an adductor tenotomy.
Expose the proximal phalanx subperiosteally and perform a phalangeal closing wedge osteotomy as described in Technique 82.12. Direct the cut away from the articular surface so as to parallel the concavity of the base of the proximal phalanx, and remove a 1-mm wedge of bone ( Fig. 82.37D ). Do not attempt to remove the contiguous lip of the proximal phalanx.
Place a 3-0 polyglactin 910 (Vicryl) suture from the periosteum on the distal side of the cut through the proximal undisturbed capsular tissues to maintain the osteotomy closure ( Fig. 82.37E ).
Carefully imbricate the capsular incision with absorbable sutures to hold the toe in the corrected position.
Close the skin with interrupted silk sutures and apply a bulky compressive dressing.
Ambulation is allowed in a postoperative sandal the day of surgery as tolerated by the patient. The gauze wrap dressing is changed weekly for 2 weeks. The pin is removed, and an elastic bandage is used to hold the corrected toe position. Passive and active plantarflexion and dorsiflexion exercises of the great toe are encouraged at 2 weeks after surgery. At 4 weeks, the wearing of shoes is gradually resumed.
Bennett and Sabetta reported a distal chevron metatarsal osteotomy bunionectomy using an intramedullary plate system in 63 feet with mild to moderate hallux valgus. Without fixation these osteotomies can displace, causing recurrence of the deformity; implants should therefore be strong and low-profile to avoid implant prominence. The implant they used allows for more translation of the capital fragment due to its intramedullary placement. All of their osteotomies healed, with no implant problems. They had seven minor complications; two patients complained of stiffness with no loss of motion, one patient developed a bursa over the area of the plate, and two patients had recurrence of the deformity.
(BENNETT AND SABETTA)
After a tourniquet is applied mid-calf, make a longitudinal incision on the medial side, centered over the first metatarsophalangeal joint. Make a longitudinal capsulotomy to expose the medial eminence.
Resect the medial eminence with a sagittal saw in a line perpendicular to the sole of the foot, remaining medial to the sagittal sulcus.
Make a chevron osteotomy 1 cm proximal to the metatarsophalangeal joint, perpendicular to the cut surface of the medial eminence at a 60-degree angle.
Laterally translate the metatarsal head and impact onto the metatarsal shaft.
Stabilize the osteotomy site with the Tornier Mini Maxlock Extreme ISO plate system (Tornier, Wright Medical, Memphis, TN), placing the implant down the canal and securing it to the metatarsal head with two 2.4-mm locking screws placed medial to lateral. Insert the oblique nonlocking 2.4-mm screw to secure the implant to the metatarsal shaft ( Fig. 82.38 ).
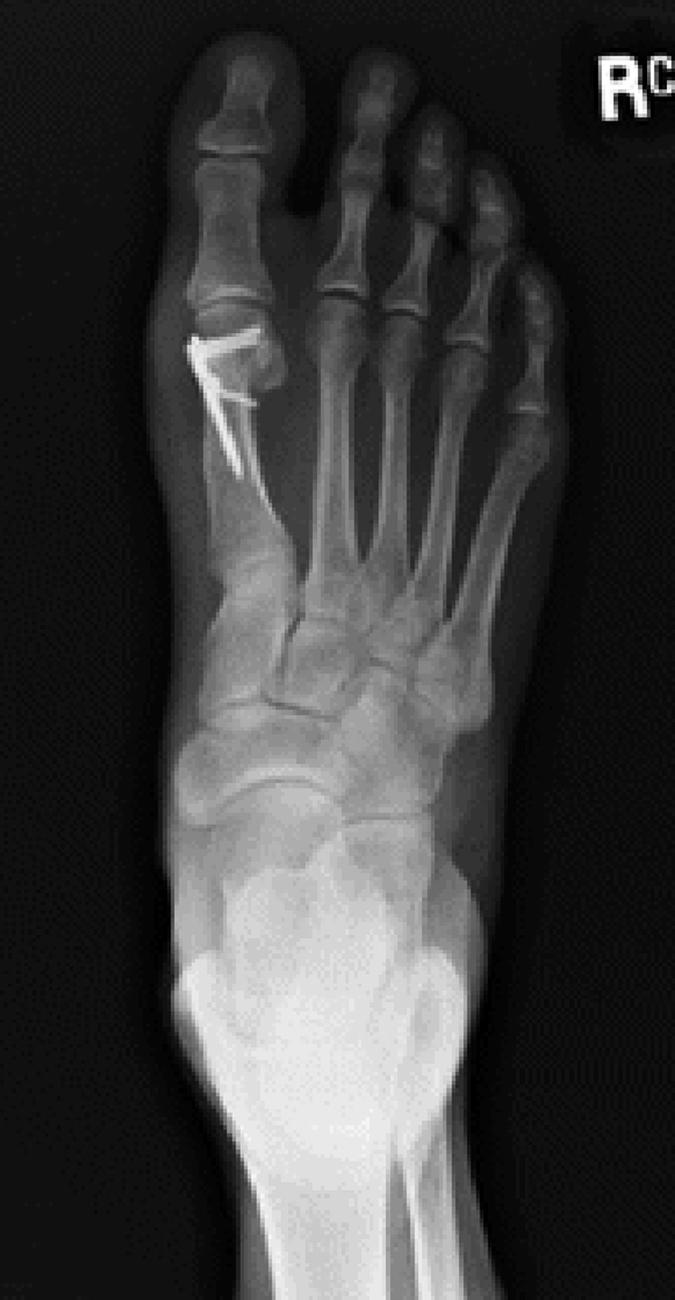
Verify deformity correction and position of the implant with fluoroscopy.
Close the skin in the usual fashion and apply a bulky dressing to the foot.
Patients are kept minimally weight bearing for 1 week, then placed in a short boot and allowed heel weight bearing for a total of 5 weeks. Patients are weaned from the boot to an accommodative shoe, increasing activities as tolerated.
There has been a growing interest in minimally invasive techniques for hallux valgus surgery, including large patient series. Although some authors have reported mixed or less than favorable results in the past, most now report satisfactory results with the percutaneous Akin or chevron-Akin osteotomies in patients with mild to moderate hallux valgus, especially with third-generation techniques. Magnan et al. noted that they may even have utility in cases of recurrence. Comparison studies of open versus percutaneous techniques have shown comparable radiographic and clinical outcomes, with minimal soft-tissue dissection, avoidance of capsular disruption and lateral cortex penetration with the saw, decreased risk of vascular disruption, less perioperative pain, reduced operating time, use of distal ankle-blocks, high union rate, early weight bearing, and less risk of wound complications with the percutaneous techniques. Herrera-Perez et al. did note, however, that delayed union was common in their patients after the percutaneous Akin procedure.
A recent systematic review of four minimally invasive techniques (Bösch, MIS chevron-Akin, Reverdin-Isham, and Endolog) showed an overall complication rate of 13% among 23 studies (2279 procedures). Determining which procedure was the most effective could not be elucidated because there were too few studies on each surgical technique. However, the hallux valgus angle improved most with the chevron-Akin technique and the intermetatarsal angle with the Endolog technique ( Fig. 82.39A ,B). Another study of 80 patients found the combined Reverdin-Isham and Akin ( Fig. 82.39C ) percutaneous osteotomy to be a reliable procedure for mild to moderate hallux valgus at 48-month follow-up, but the procedure had a steep learning curve, and results were less encouraging in patients with severe deformity. Complications of this technique included lack of joint congruency, stiffness, and recurrence (6% to 60%). The complication rates after the Bösch technique (SERI: simple, effective, rapid, inexpensive; Fig. 82.39D ) have been reported to be between 0% and 22%, with reduced range of motion and dorsal or plantar malalignment of the metatarsal head being the most frequently reported. An anatomical study suggested intensive training for surgeons using the Bösch technique because the dorsal cutaneous nerve is at risk during this procedure.
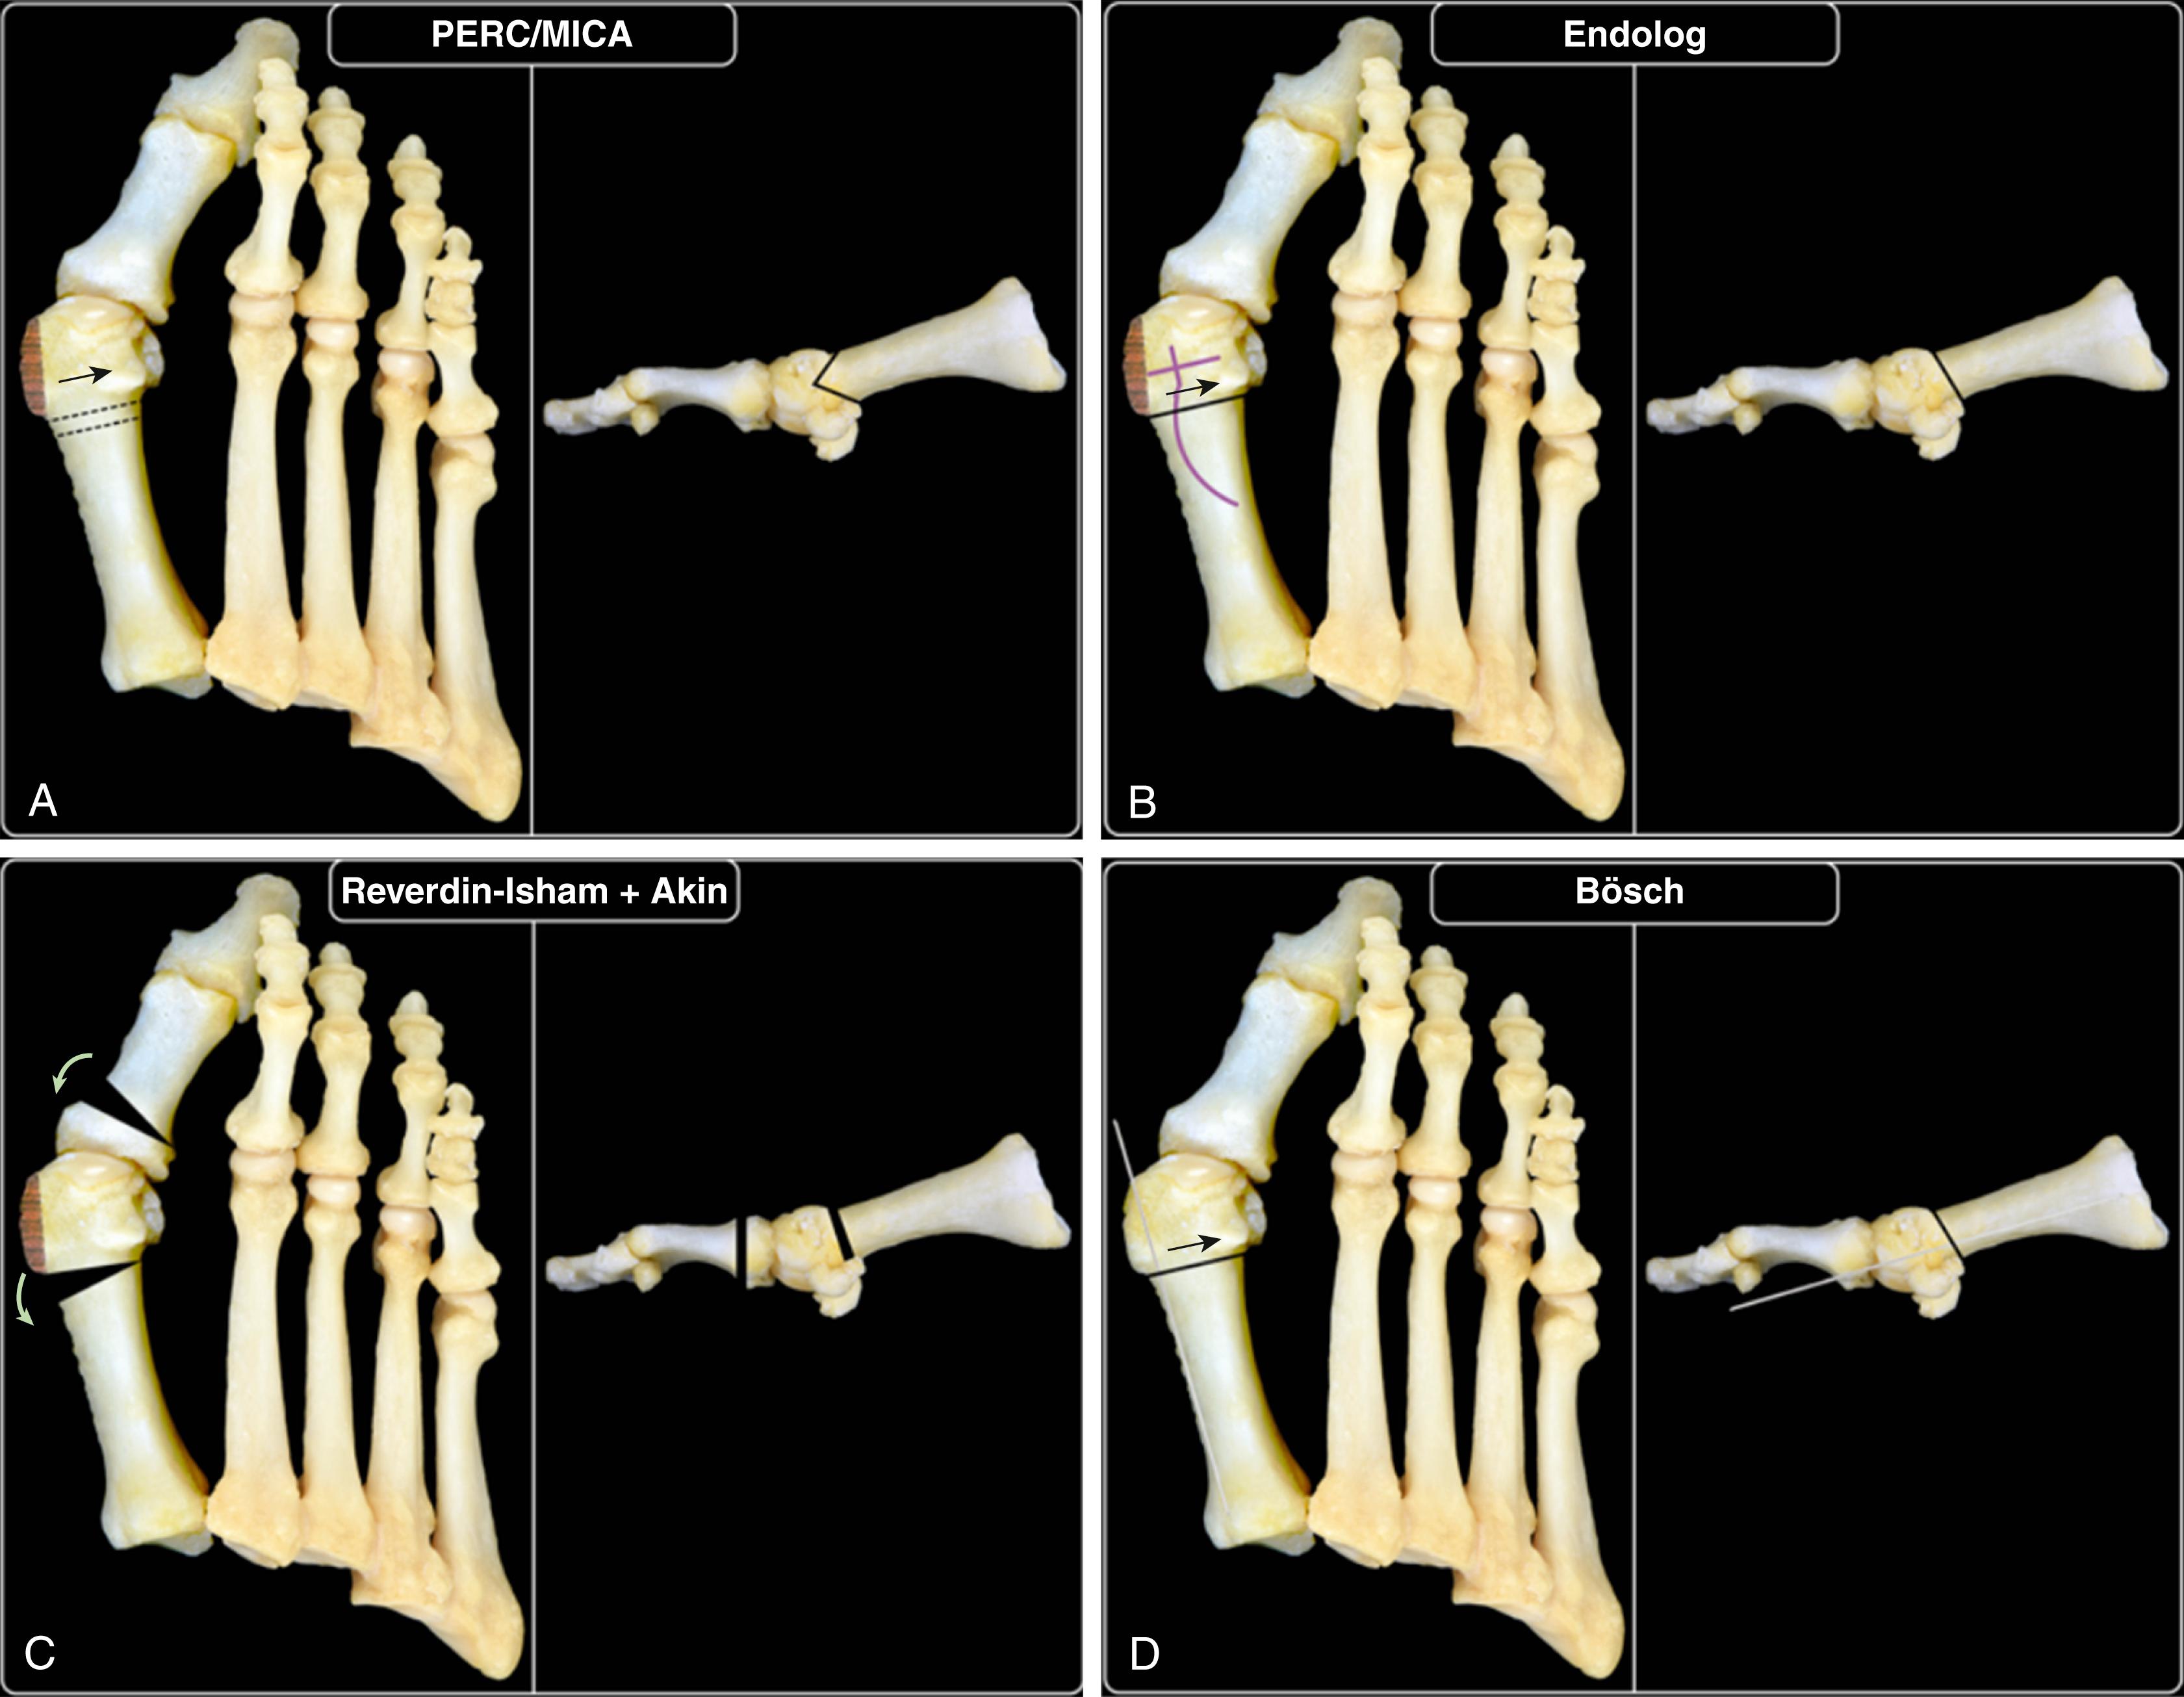
Fernandez performed double (or triple when necessary) percutaneous osteotomies in 52 feet, reporting results comparable to other, more established techniques. He recommended this technique for intermetatarsal angles over 15 degrees and increased distal metatarsal articular angles in congruent joints. Lucattelli et al. obtained satisfactory preliminary results with a percutaneous procedure without using internal fixation in 195 patients. Overall, good results are being reported from centers that have developed these techniques, but longer-term follow-up and comparative trials are still needed.
Holme et al. and Lee et al. followed patients who had a third-generation minimally invasive chevron-Akin osteotomy and compared this new technique with older minimally invasive and open procedures, respectively. Their findings support the safety and success of this technique for hallux valgus correction. Lee et al. in a prospective randomized trial comparing 25 minimally invasive chevron-Akin procedures with 25 open surgeries obtained excellent results in 84% of patients and good results in 16%, with a complication rate of 24% (minimally invasive group) mainly due to prominent screws. Holme et al. used headless screw fixation with excellent results in 40 consecutive patients at 12 months, and with a 10% complication rate.
(LEE ET AL. AND HOLME ET AL.)
With the patient supine and the feet over the end of the operating table, draw the dorsal and plantar outline of the first metatarsal.
Make 3-mm incisions over the medial aspect of the first metatarsophalangeal joint and at the base of the flare of the medial eminence. Make a 5-mm incision at the medial aspect of the first tarsometatarsal joint ( Fig. 82.40A ).
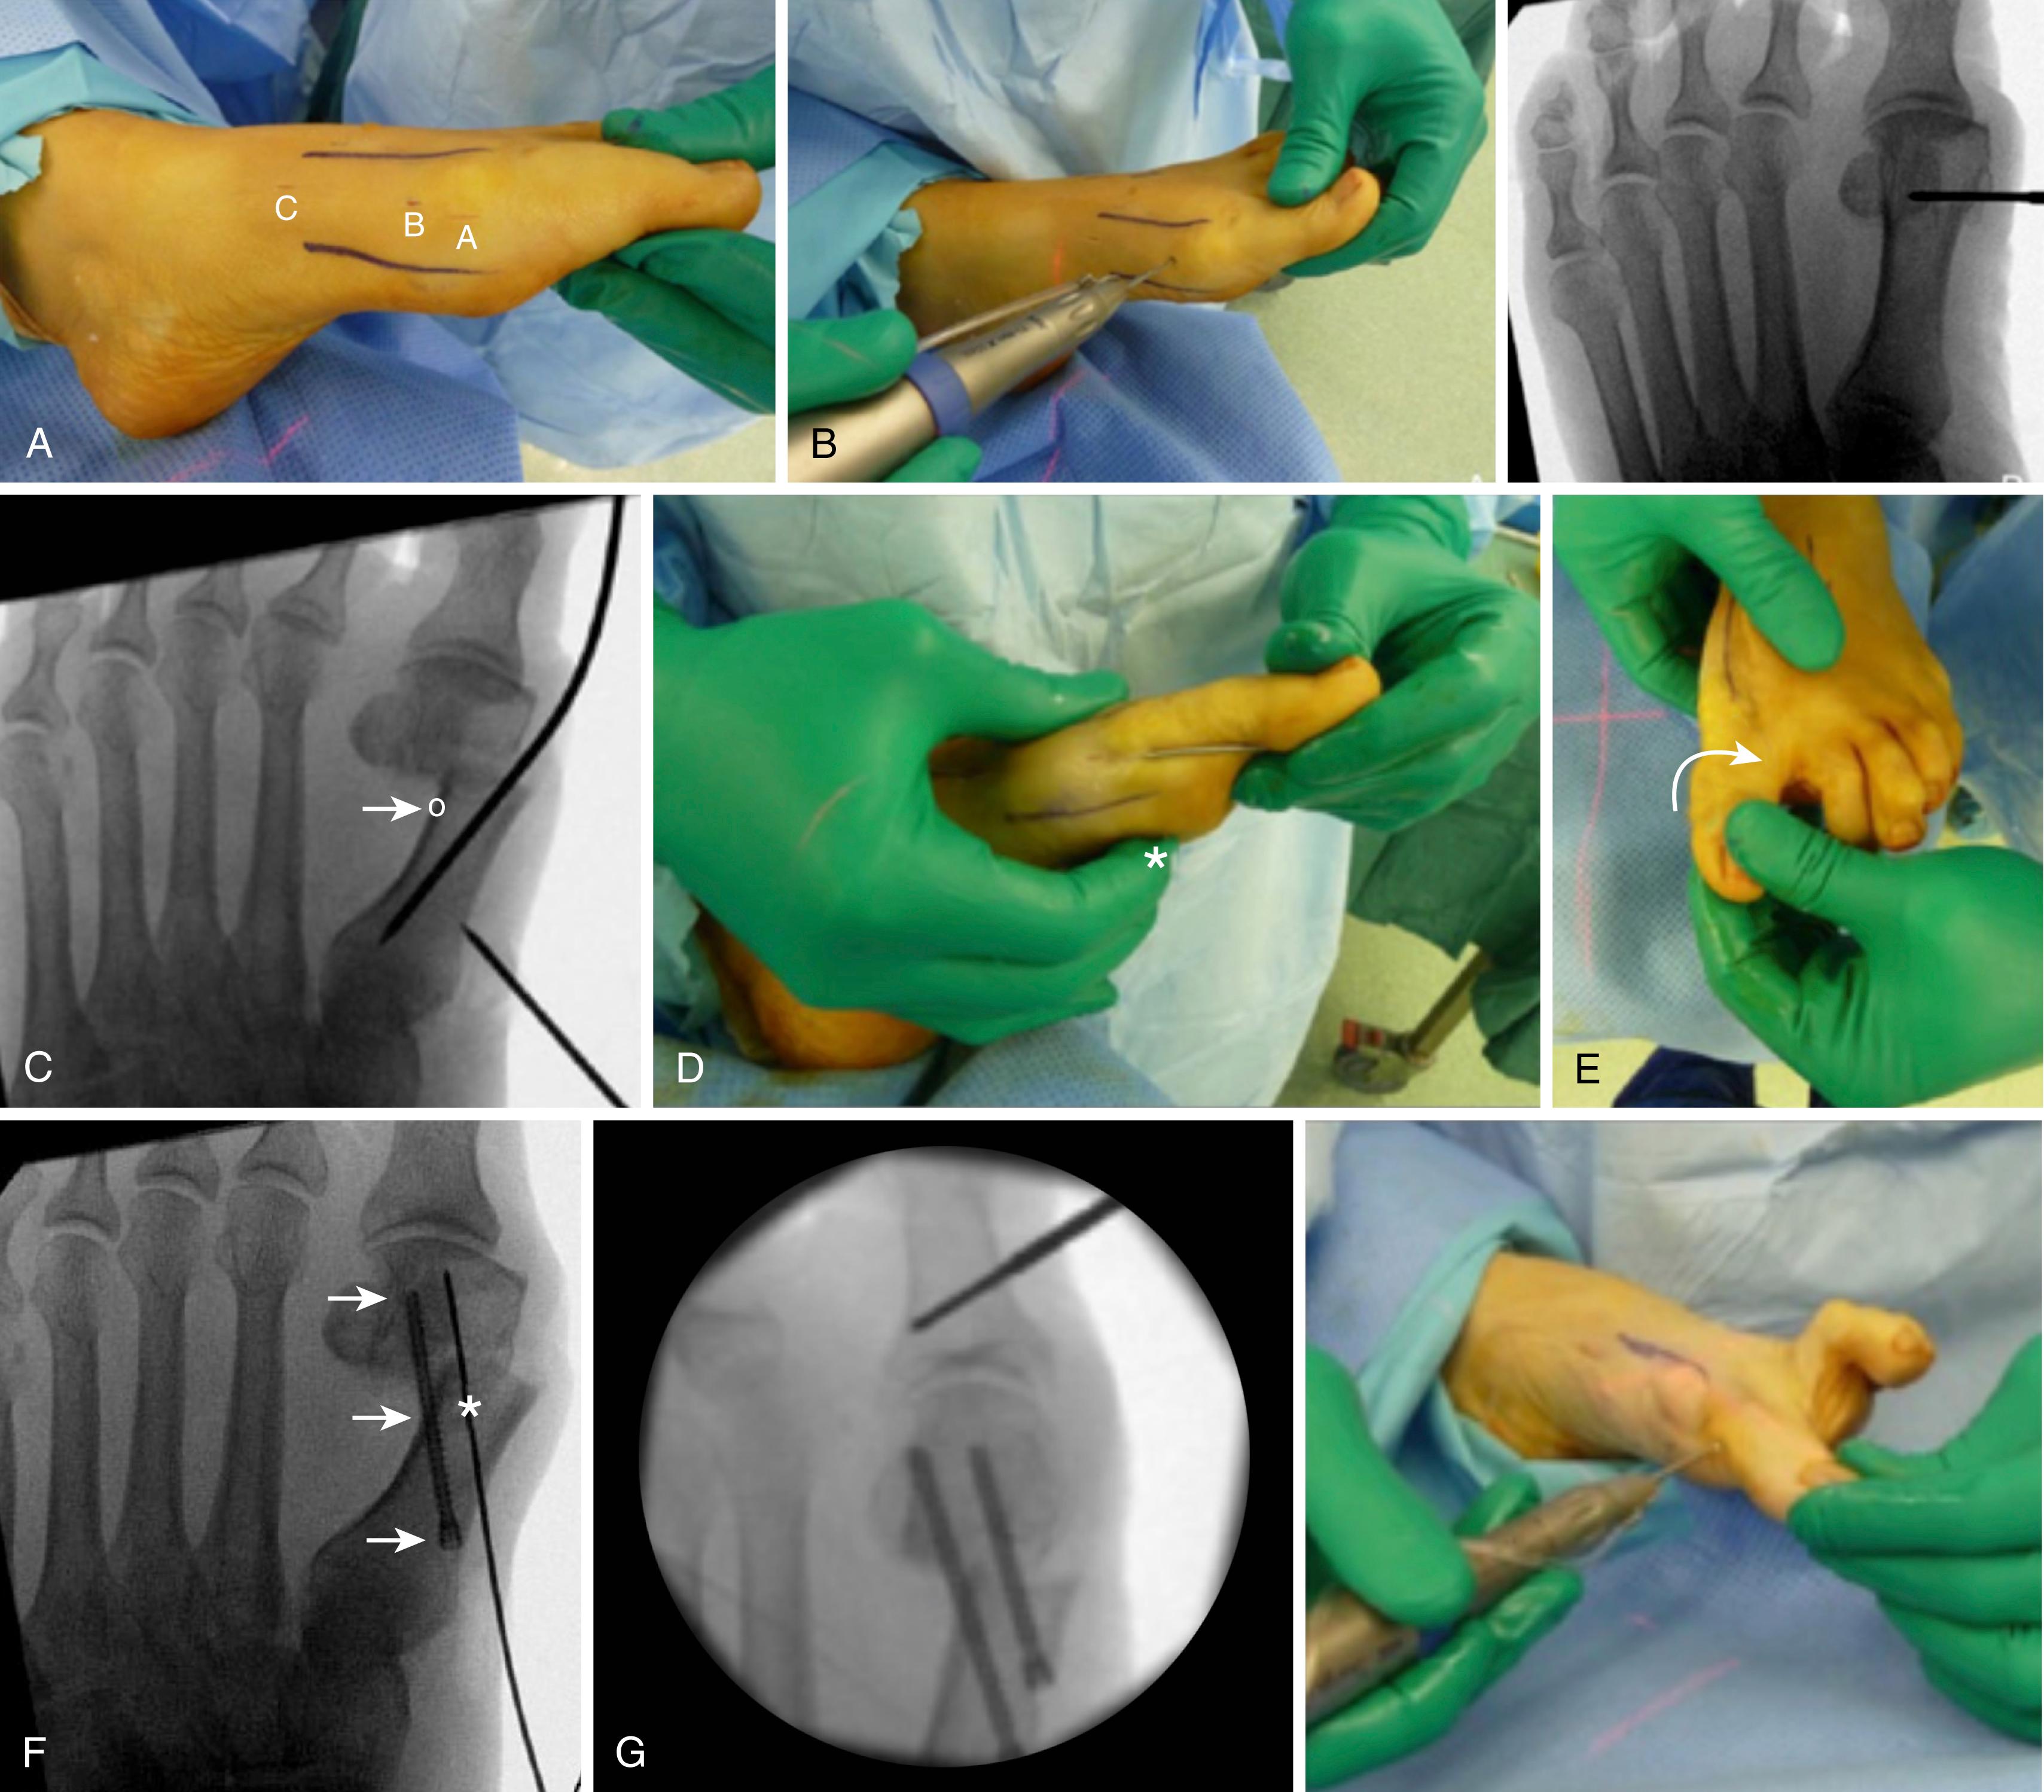
Introducing a 2 × 20-mm Shannon burr through the incision over the flare of the medial eminence, create a chevron osteotomy, removing 2 to 3 mm of bone. Direct the burr perpendicular to the axis of the second metatarsal ( Fig. 82.40B ). As the metatarsal head displaces laterally, the head fragment displaces distally by approximately 3 mm, counteracting shortening of the burr and ultimately the first metatarsal. The burr is also directed plantarly. In patients with a long first metatarsal, the burr can be directed more proximally to allow shortening of the first metatarsal.
Perform the dorsal limb of the osteotomy vertically. For the plantar cut, direct the burr toward the skin of the heel to provide a short plantar limb.
After the osteotomy is complete, introduce a 1.6-mm Kirschner wire from the medial base of the first metatarsal proximally, into the midaxis of the metatarsal bone, perforating the far cortex of the distal first metatarsal so that the wire exits the bone approximately 1 cm proximal to the osteotomy ( Fig. 82.40C-E ). Withdraw the Kirschner wire and insert a 1-mm guidewire through the holes. This aids in placement of the proximal screw with three-point fixation.
For screw insertion insert a 2-mm-diameter guidewire through the incision in the medial aspect of the first metatarsophalangeal joint and through the osteotomy into the shaft of the first metatarsal to allow displacement of the metatarsal head. This reduction maneuver is important. Use the right hand to ensure the head is in alignment in the lateral plane (see Fig. 82.40D ); this prevents plantar and dorsal displacement of the first metatarsal head. Use the left hand and the 2-mm wire to displace the head laterally (see Fig. 82.40C-E ), then correct pronation of the metatarsal head.
Once alignment is corrected, advance the 1-mm guidewire into the displaced first metatarsal head, then insert the 3.0-mm headless cannulated screw. To provide rotational stability and strength to the construct, insert a second screw ( Fig. 82.40F ).
Obtain internal oblique views of the foot to confirm that the head of the screws are engaged in bone, as they may appear to be engaged on the anteroposterior view but are actually not.
Perform an Akin osteotomy with a 2 × 12-mm Shannon burr and use a headless, cannulated 3.0-mm screw introduced from the medial base of the distal phalanx for fixation ( Fig. 82.40G ,H).
For the soft-tissue release, insert a beaver blade from the dorsum of the first metatarsophalangeal joint just lateral to the extensor hallucis longus tendon ( Fig. 82.40I ,J). The blade divides the lateral plantar plate and the lateral sesamoid phalangeal ligament when varus force is applied to the big toe.
Through the flare of the medial eminence, puncture the medial capsule just distal to the capsular attachment on the medial prominence using a periosteal elevator. Remove the medial eminence with a 3.1-mm-wedge burr and remove any medial prominence of the proximal first metatarsal at the site of the osteotomy. Confirm adequate removal on image intensification.
Apply a nonadherent dressing, dry gauze, soft band, and crepe bandage.
Patients are allowed full weight bearing as tolerated with the aid of crutches and a flat postoperative shoe for 2 weeks. To reduce swelling, the foot should be elevated for the first 10 days after surgery. Gentle plantar flexion stretching exercises of the first metatarsophalangeal joint are started after 2 weeks and scar massage is performed. Patients are allowed to wear sneakers with a straight medial last after 2 weeks.
If varus of the first metatarsal, whether primary or secondary, contributes to the hallux valgus complex, correction near the origin of the deformity is reasonable, combined with a soft-tissue procedure at the first metatarsophalangeal joint to correct the valgus of the hallux. In addition, a few degrees’ shift of the metatarsal at its base causes marked improvement at the distal end of the metatarsal; the forefoot is narrowed, and the chance of pressure symptoms over the former bunion is reduced. A patient without significant degenerative arthritis in the first metatarsophalangeal joint and with hallux valgus of more than 35 degrees and an intermetatarsal angle of more than 10 degrees (or a first to fifth intermetatarsal angle of ≥30 degrees with a hallux valgus of ≥35 degrees) may benefit from a proximal metatarsal osteotomy and a distal soft-tissue procedure at the metatarsophalangeal joint. Deformities with intermetatarsal angles of 13 degrees or less and hallux valgus angles of 30 degrees or less can be corrected by a less technically demanding procedure.
An osteotomy at the base of the metatarsal has the following advantages:
Cancellous bone and broad contact surfaces of the fragments promote early stability (3 to 5 weeks) and union (6 to 8 weeks).
Small changes in position at the osteotomy produce excellent correction at the distal end of the metatarsal where symptoms are most often located.
The metatarsal is shortened minimally, if at all, unless the surgeon chooses a technique that intentionally shortens it (the width of the osteotomy cut itself is more than compensated for by the “straightening of the bone”).
Large angles between the first and second metatarsals can be corrected.
Slightly tilting the distal fragment plantarward reduces load bearing by the second metatarsal, decreasing the chance of transfer metatarsalgia.
Narrowing of the forefoot improves the variety of footwear possible and gives an excellent cosmetic result.
This type of osteotomy has the following disadvantages:
Extensive soft-tissue dissection is required.
The distal fragment tends to displace dorsally or migrate medially to its original position unless securely fixed internally.
The second ray may be overloaded if the fragment displaces or migrates.
Three incisions are required if the basilar osteotomy is performed dorsally.
The procedure is more difficult to perform with regional block anesthesia.
The immediate convalescence usually is characterized by more pain, swelling, and immobility than the convalescence that follows a distally placed osteotomy.
Cast immobilization is more frequently needed.
Currently, the most frequently used proximal metatarsal osteotomies are the crescentic, chevron, Ludloff, and scarf osteotomies ( Fig. 82.41 ). The specific technique of a proximal osteotomy probably is not as important as is meticulous attention to detail. Any proximal osteotomy that allows the first metatarsal to deviate laterally and remain stable in that position with no dorsal tilt to the distal fragment should accomplish the goal of narrowing the intermetatarsal angle. Overcorrection of this angle is possible, but this should not occur with careful attention to detail. If, however, the hallucal sesamoids are not reduced into their respective facets on the metatarsal head, recurrent metatarsus primus varus and hallux valgus may occur regardless of the degree of bony correction. Wagner et al. proposed a new proximal rotational metatarsal osteotomy to correct axial malrotation that may coexist with hallux valgus. It is performed through a single metatarsal oblique osteotomy and achieves correction through rotation only, with no second cut for wedge removal necessary. The procedure is indicated in moderate to severe deformities in patients younger than 50 years and only when there is axial malrotation present ( Fig. 82.42 ).
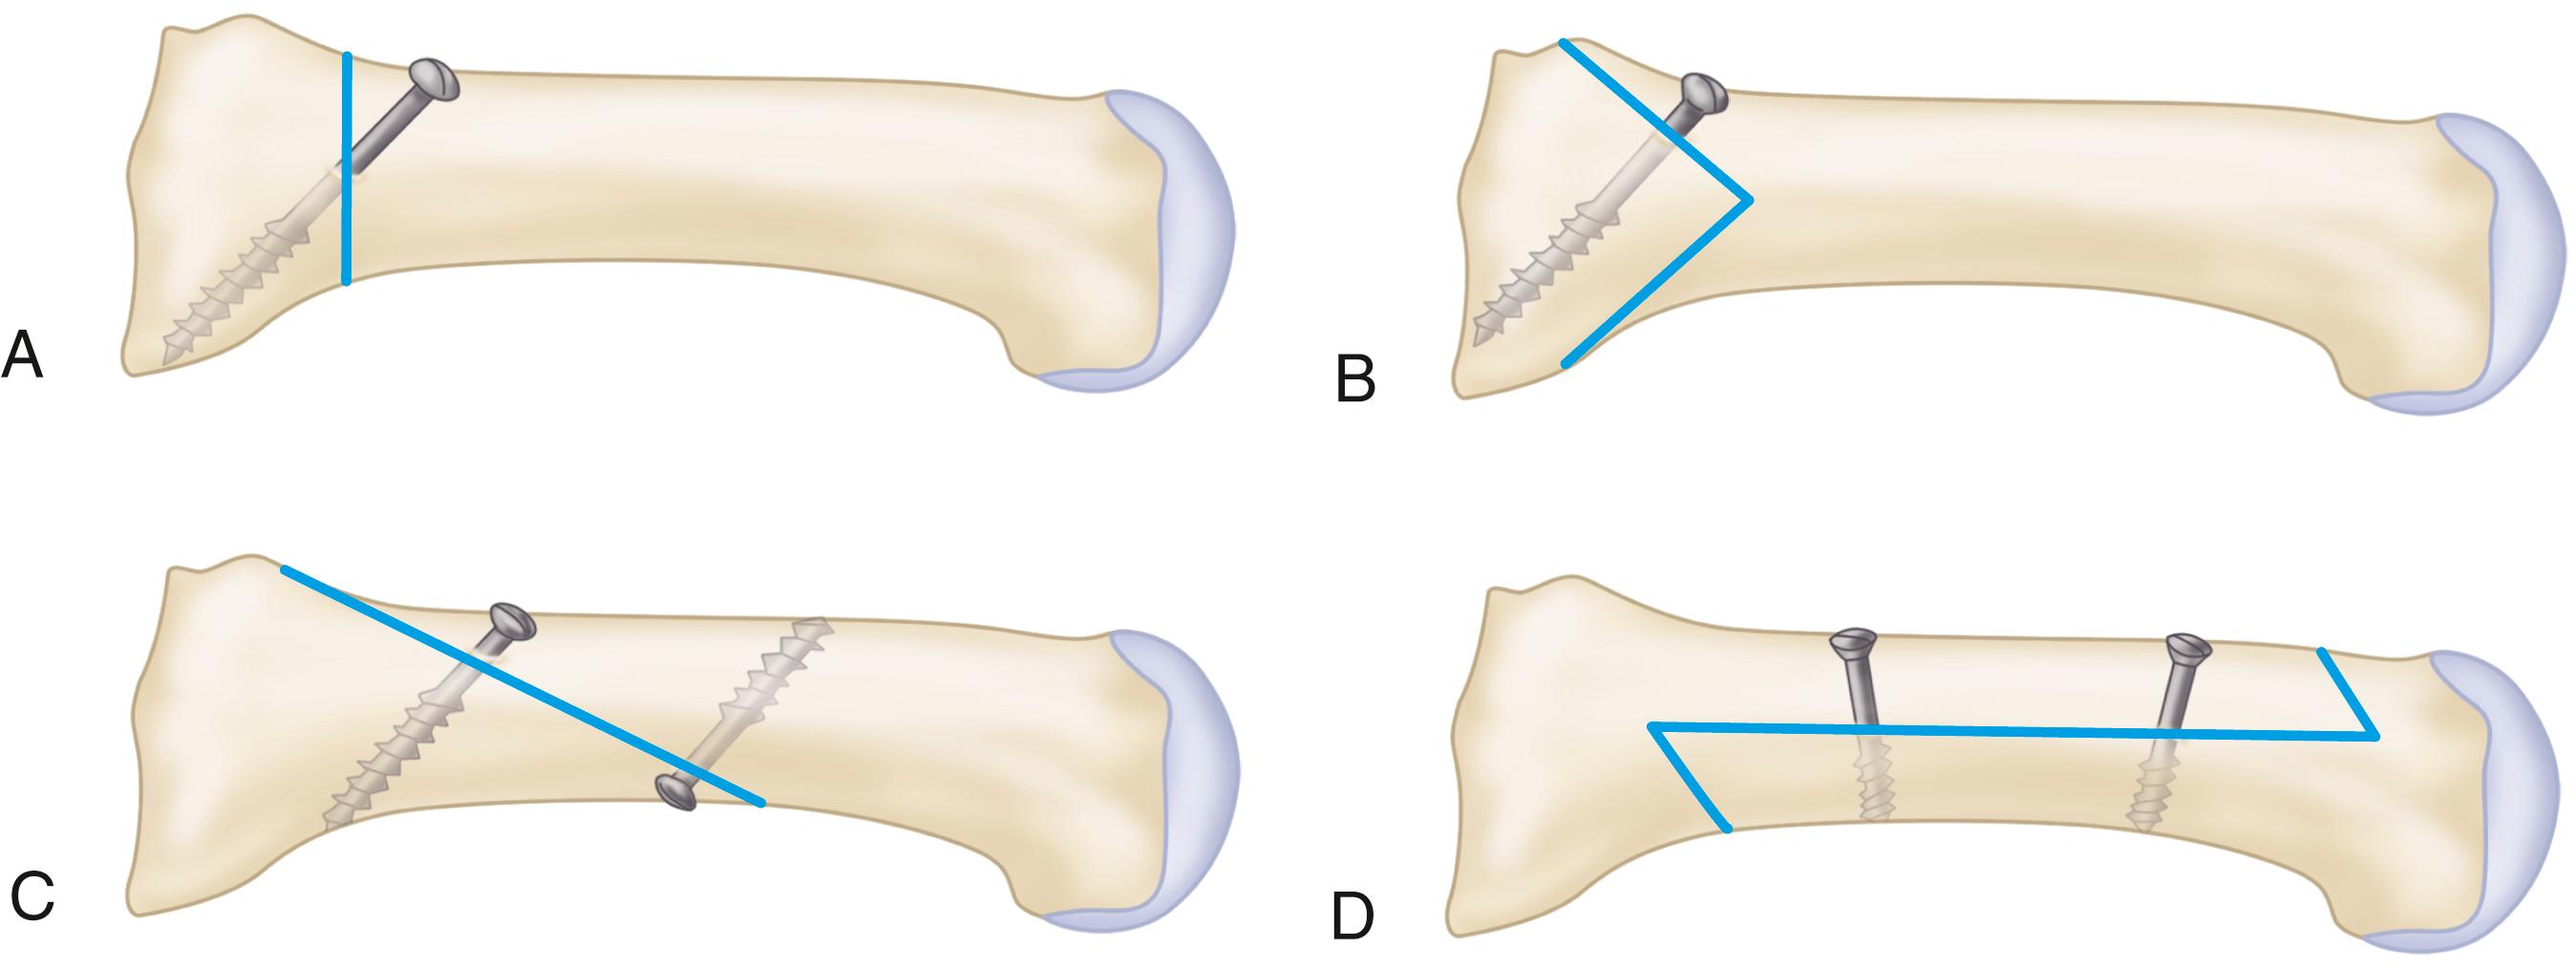
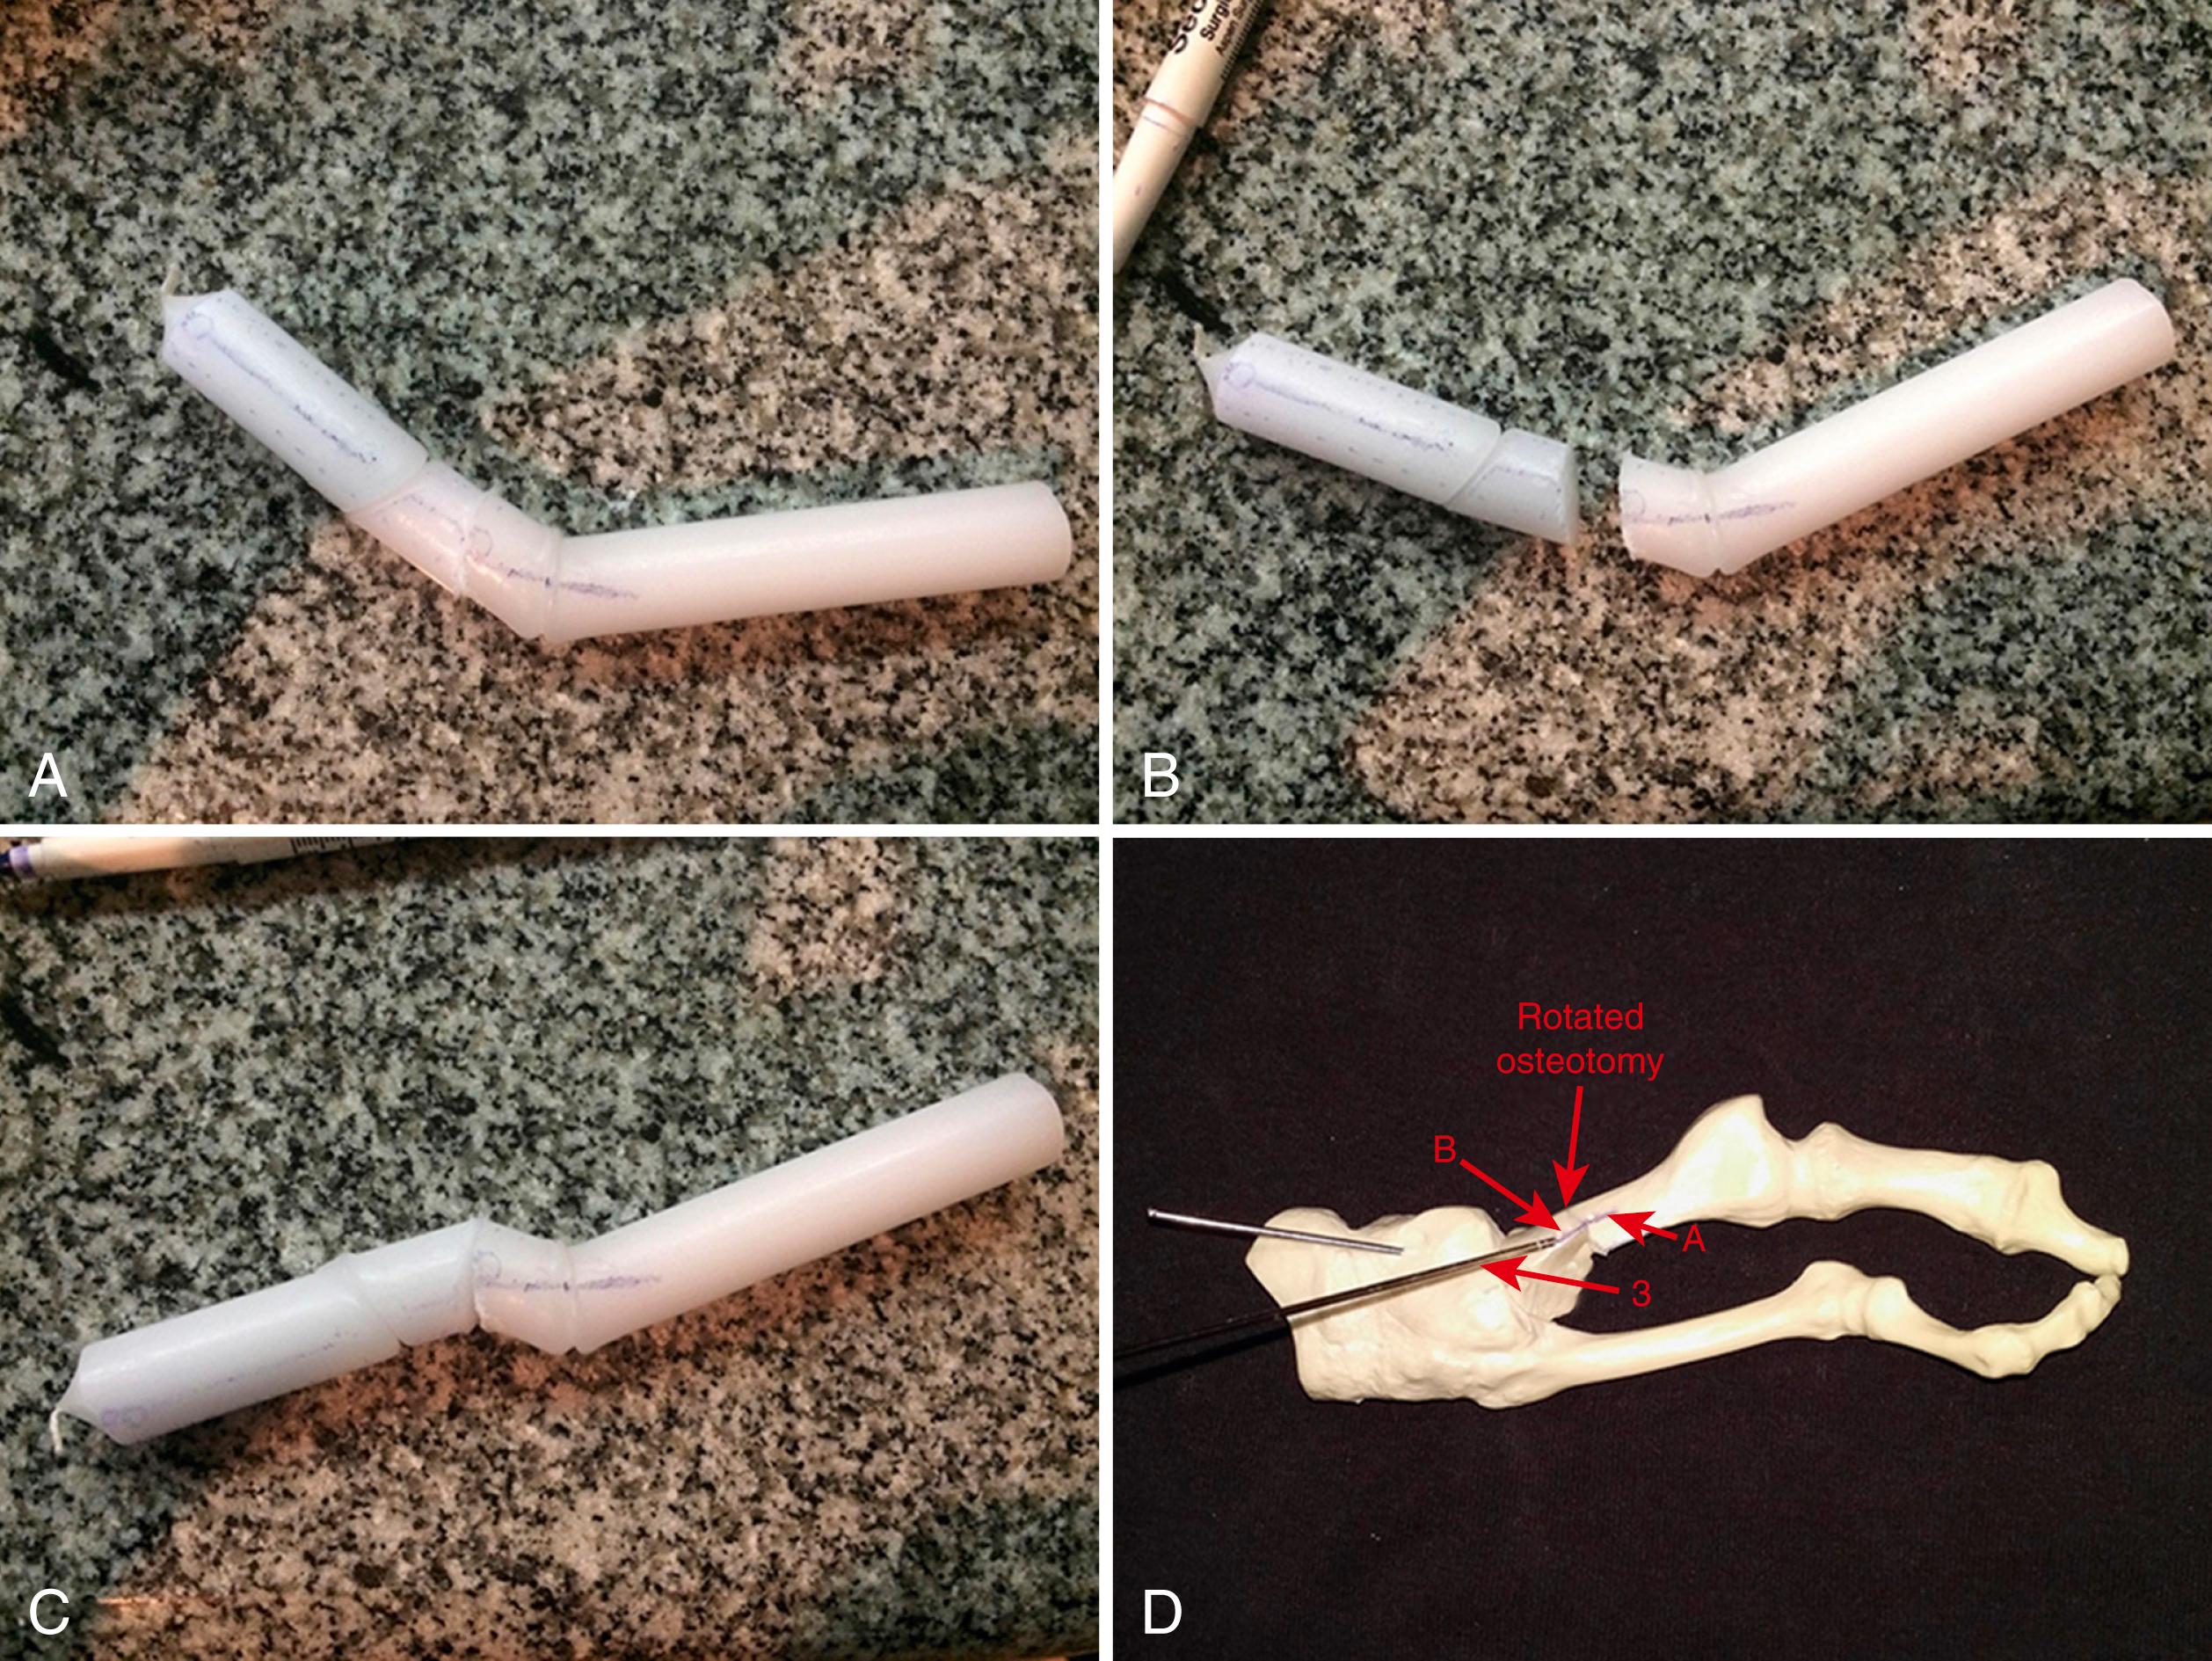
Mann, Rudicel, and Graves popularized the proximal crescentic osteotomy with a distal soft-tissue repair and documented their results in 109 feet. Of their patients, 93% had satisfactory results; only 7% were dissatisfied and continued to have pain or recurrence of the deformity. Although this procedure is technically demanding, it corrects intermetatarsal angles of 20 to 25 degrees and hallux valgus angles of 40 to 50 degrees. For patients with mild-to-moderate deformity, however, a simpler procedure may provide similar good results.
Most hallux valgus deformities that require a distal soft-tissue procedure also require a proximal osteotomy. This procedure is not recommended if excessive valgus posturing (>15 degrees) of the distal metatarsal articular angle is present on the weight-bearing radiograph or in patients with moderate-to-severe degenerative arthritic changes of the metatarsophalangeal joint ( Fig. 82.43 ). The decision to perform an osteotomy should be made at the time of surgery by passively reducing the intermetatarsal angle. If the first metatarsal does not move laterally, or if it springs back quickly into varus after the laterally directed pressure is released, a basilar osteotomy should be done.
(MANN AND COUGHLIN)
For tourniquet use and anesthesia, see Technique 82.1. This procedure is performed through three incisions. The first incision is made dorsally in the intermetatarsal space to release the adductor hallucis, the deep transverse intermetatarsal ligament, and the lateral capsule of the first metatarsophalangeal joint. The second incision is made midline-medial over the medial eminence to remove the medial eminence and perform a capsulorrhaphy. The third incision is made dorsally over the proximal end of the first metatarsal and extends a few millimeters over the medial cuneiform.
Make the first incision in the first intermetatarsal space beginning at the proximal end of the web space and extending proximally 3 to 4 cm.
Dissect the soft tissue with scissors to identify the branches of the deep peroneal nerve and be sure to protect them.
Place a Weitlaner retractor in the first intermetatarsal space and widen this space to expose the adductor hallucis.
Use a sponge to clear away the soft tissue in the first web space.
The adductor hallucis approaches the base of the proximal phalanx in an oblique direction. When it has been identified, release it completely from the base of the proximal phalanx and from the lateral edge of the fibular sesamoid ( Fig. 82.44A ).
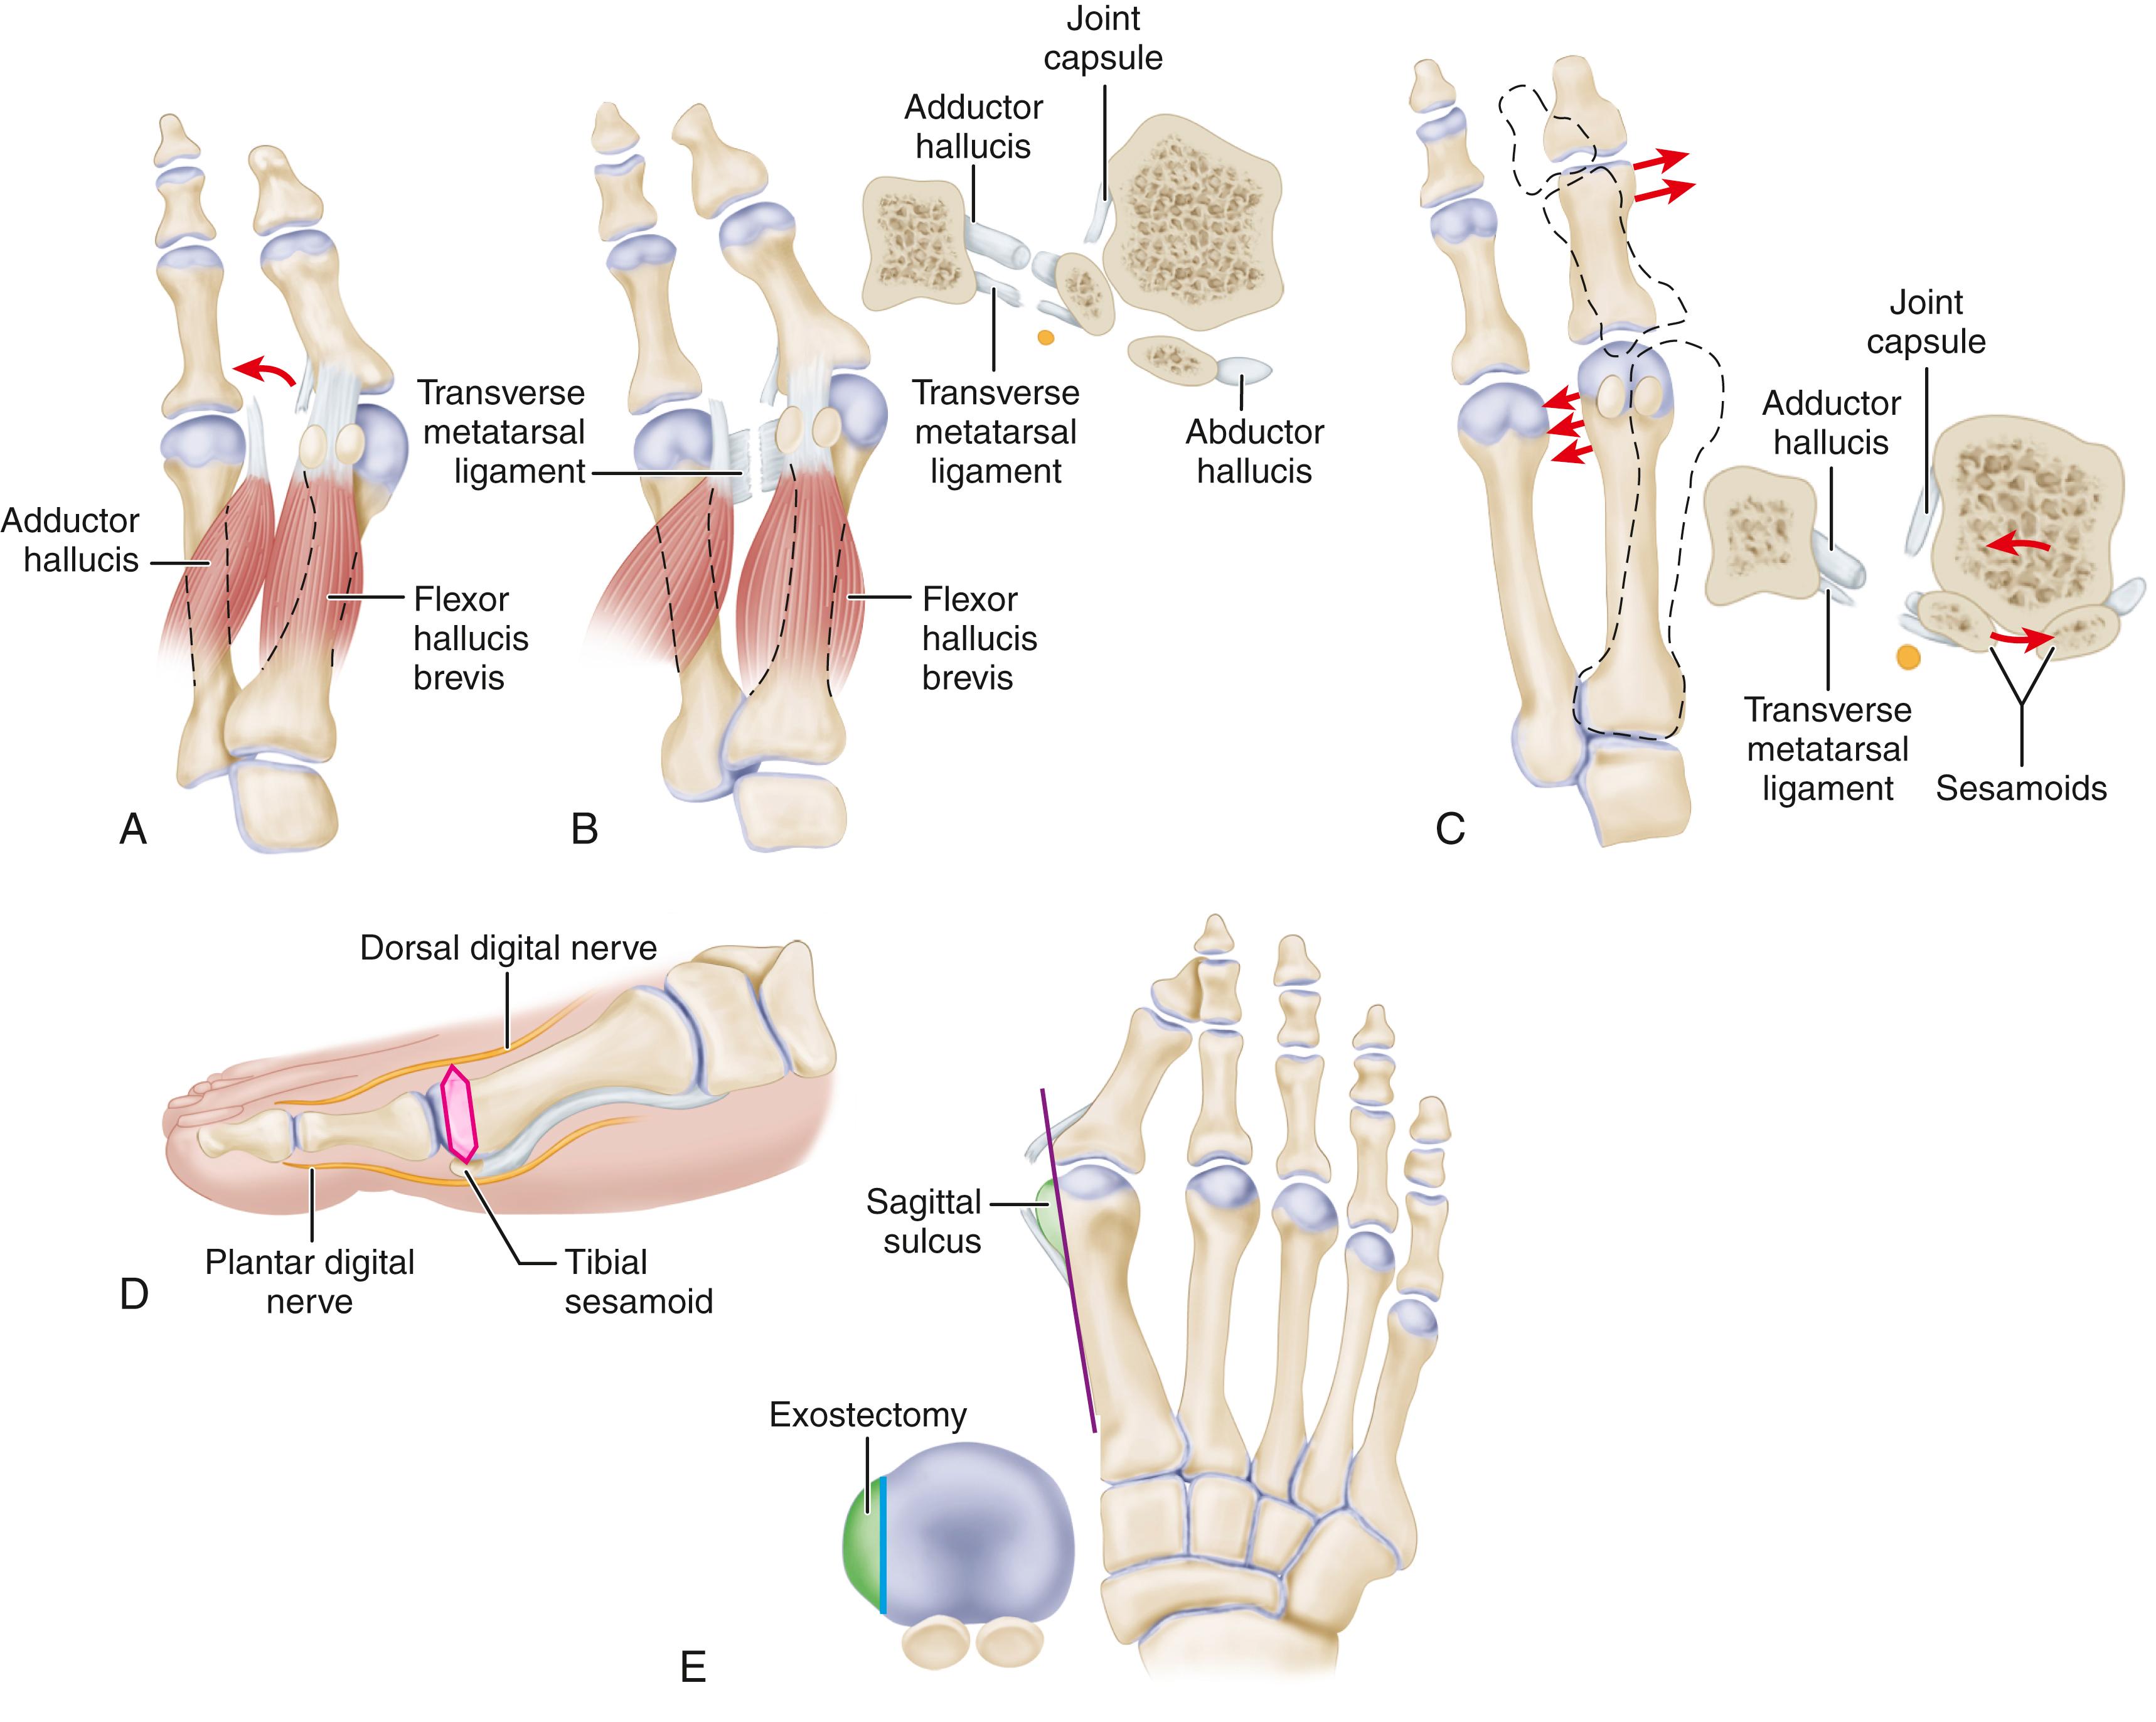
Release the deep transverse intermetatarsal ligament that is plantar to this tendon ( Fig. 82.44B ). Because the neurovascular bundle to the first web space is immediately plantar to the transverse intermetatarsal ligament, use just the tip of the blade to release this. Placing a small Freer elevator on the plantar surface of this ligament helps avoid the neurovascular bundle as the incision is made.
Make multiple small stab wounds in the lateral capsule.
Complete the capsular release by manually forcing the hallux into 25 to 30 degrees of varus and pushing the first metatarsal lateralward.
When the lateral release has been completed, release the deep transverse intermetatarsal ligament that attaches to the fibular sesamoid. Releasing the deep transverse intermetatarsal ligament prevents its deforming force on the fibulosesamoid from pulling the sesamoid apparatus laterally from under the metatarsal head.
Push the first metatarsal head laterally. If it tends to rest in that position, an osteotomy is not necessary; however, if it springs back to the varus position, an osteotomy should be performed ( Fig. 82.44C ).
Return to the adductor hallucis, which is completely freed, and lift it up into the wound from the bottom of the foot.
Pass three absorbable 2-0 sutures first through the lateral capsule on the first metatarsal head just proximal to the lateral capsular release. Make a second throw of the suture through the adductor hallucis tendon and a third throw through the capsuloligamentous intrinsic tendinous tissue on the medial side of the second metatarsal head. Do not tie these sutures, but hold them with hemostats and allow them to fall into the first web space.
Make a second midline incision ( Fig. 82.44D ), avoiding the dorsal sensory branch of the superficial peroneal nerve dorsalward and the proper branch of the medial plantar nerve to the medial side of the hallux plantarward. Continue this incision down to the capsule and raise the dorsal flap deep to the dorsal sensory nerve.
Raise the plantar flap on the capsule until the plantar aspect of the abductor hallucis muscle is reached, which is just a few millimeters from the tibial sesamoid. This is best done with the hallux in about 30 degrees of flexion, which relaxes the digital nerve just plantar to the dissection.
Make a vertical incision in the capsule 2 to 3 mm proximal to the base of the proximal phalanx extending from a few millimeters medial to the extensor hallucis longus tendon in a plantar direction through the medial capsule and through the thickened portion of the capsule plantarward, which is actually the abductor hallucis tendon capsule junction. This vertical limb ends 2 mm medial to the tibial sesamoid. The most inferior portion of this vertical limb is best made from plantar to dorsal to avoid the digital nerve.
Depending on the enlargement of the medial eminence and the subsequent redundancy and stretching of the medial capsule, remove an elliptical wedge of the capsule, measuring 4 to 8 mm wide at its widest section. Dorsally and plantarward, taper this incision into a V shape and excise the elliptical wedge of the capsule.
Extend the capsular incision proximally, beginning at the dorsal edge of the vertical limb. This limb of the incision (an inverted L) should end 2 to 3 mm proximal to the junction of the medial eminence with the metatarsal shaft.
Raise this capsular flap from dorsal distal to plantar proximal to expose the entire medial eminence.
Remove the medial eminence. Do this in a plane parallel to the shaft of the first metatarsal and begin just medial to the sagittal groove ( Fig. 82.44E ).
Begin a third incision on the dorsal aspect of the proximal third of the metatarsal. Extend this incision proximally over the dorsal surface of the medial cuneiform. Avoid the superficial peroneal nerve sensory branch to the hallux. Retract or ligate the dorsal venous arch.
Identify the metatarsocuneiform joint and incise the periosteum of the first metatarsal and medial cuneiform longitudinally medial to the extensor hallucis longus tendon.
Score the dorsal aspect of the metatarsal transversely at 1- and 2-cm levels distal to the metatarsocuneiform articulation. The first scored mark represents the osteotomy site, and the second represents the area for placement of the screw for internal fixation of the osteotomy ( Fig. 82.44F ).
Release the soft tissue dorsally, medially, and laterally, being careful to avoid the penetrating branch of the dorsalis pedis artery in the proximal part of the first intermetatarsal space.
If a screw is to be used for fixation, make a glide hole. This is much easier to do at this point than when the metatarsal becomes less stable after the osteotomy.
Drill a 3.5-mm hole 1 cm distal to the osteotomy site in the center of the metatarsal shaft and direct it proximally 45 degrees to the metatarsal shaft, penetrating only the dorsal cortex.
Use a countersink to enlarge the entrance hole. It is important to enlarge this at its most distal extension rather than at the proximal edge of the drill hole because it gives the screw head a place to sit and does not permit it to rise dorsally, which might crack the cortical bridge into the osteotomy site as the screw is tightened.
If a
-inch smooth Steinmann pin is to be placed in an oblique direction from distal medial to proximal lateral, drill the hole in the medial aspect of the metatarsal before the osteotomy.
Using a
-inch drill bit, drill a hole in the medial aspect of the metatarsal in an oblique direction, crossing the osteotomy site.
After the osteotomy is complete and the intermetatarsal angle has been corrected, the pin is placed through the drill hole into the proximal fragment and into the tarsus if necessary ( Fig. 82.44G ).
Using an oscillating saw with a crescent-shaped saw blade ( Fig. 82.45 ) placed convex distally, begin the osteotomy on the most proximal scored mark.
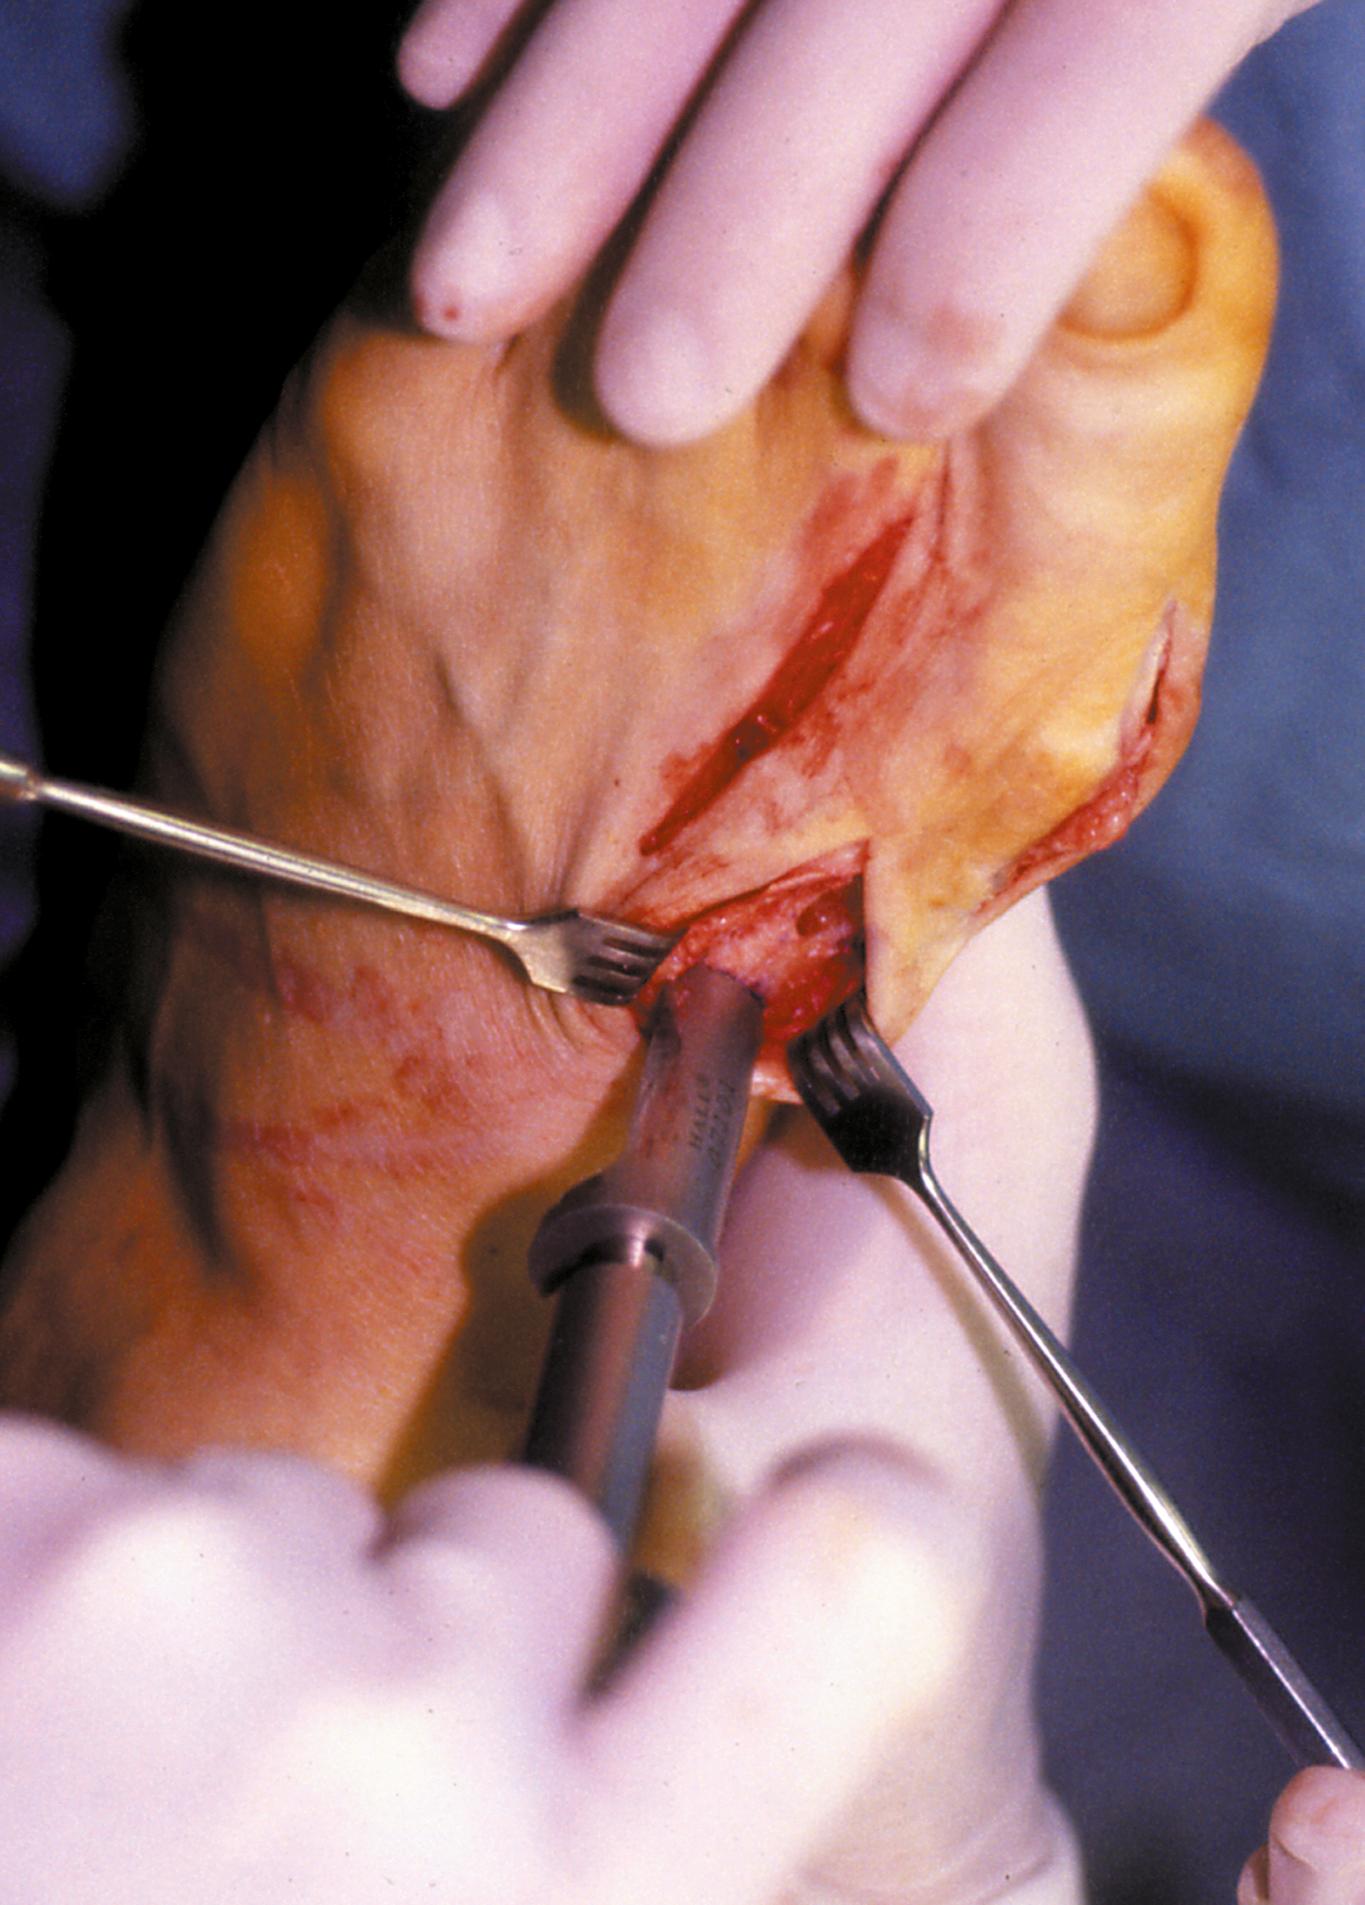
The initial cut should just be a deeper scoring. Place the saw blade gently into the first metatarsal base without oscillation or manual turning of the blade.
When this superficial scoring has been performed with the crescentic blade, evaluate the angle of the osteotomy carefully. It should not be perpendicular to the first metatarsal shaft, and it should not be perpendicular to the sole of the foot but should bisect that angle.
Drop the handle of the saw 10 to 15 degrees proximally to direct the osteotomy correctly.
When the dorsal cortex has been scored, complete the osteotomy by gently rocking the blade medially and laterally. Mann emphasized that the lateral aspect of the blade must exit the lateral side of the metatarsal shaft. It is not as important that the blade exit the medial side because a small osteotome can be used to complete that part of the osteotomy.
When the osteotomy is completed, use a Freer elevator to ensure that there are no periosteal attachments medially or laterally that would prevent displacement of the osteotomy (see Fig. 82.44H ).
The following steps are crucial:
Displace the proximal fragment medially and hold with a Freer elevator or some other instrument.
While holding the proximal fragment medially displaced, rotate the distal fragment around the osteotomy site (usually 2 to 4 mm of lateral displacement or rotation of the distal fragment).
Do not let the distal fragment slide dorsally or plantarward.
Have an assistant complete the drilling, tapping, and placing of the screw while the surgeon holds the osteotomy in the corrected position.
With the osteotomy held reduced, enter the initial hole with a centering device, sometimes referred to as a “golf tee” or “mushroom,” which guides the 2- or 2.5-mm drill bit into the basilar fragment.
Use a 4-mm tap and insert a 4-mm fully threaded cancellous screw (usually 26 mm long).
Be careful on the last few turns of the screw that the head of the screw does not rise dorsally on the cortex, because this would fracture the intervening cortical bridge. If this appears to be happening, remove the screw and countersink deeper so that part of the head of the screw would rest just plantar to the cortex.
According to Mann, making the osteotomy convex distally should prevent overcorrection of the intermetatarsal angle.
A useful technical tip is to use the countersink in the drill hole before placing the screw. This gently removes bone from the distal part of the screw hole, allowing the screw to sit firmly in the metatarsal ( Fig. 82.46A ). If this is not done, as the screw is placed the screw head abuts this bone distally and the screw displaces dorsally. This causes the fragile dorsal lip of bone between the screw hole and the osteotomy to break and lose the ability to achieve stable fixation with a screw. Because the screw is placed at an angle to the cortex, a true countersinking is not actually done but a pathway for the screw head to travel is created ( Fig. 82.46B ); a small burr can be used for this.
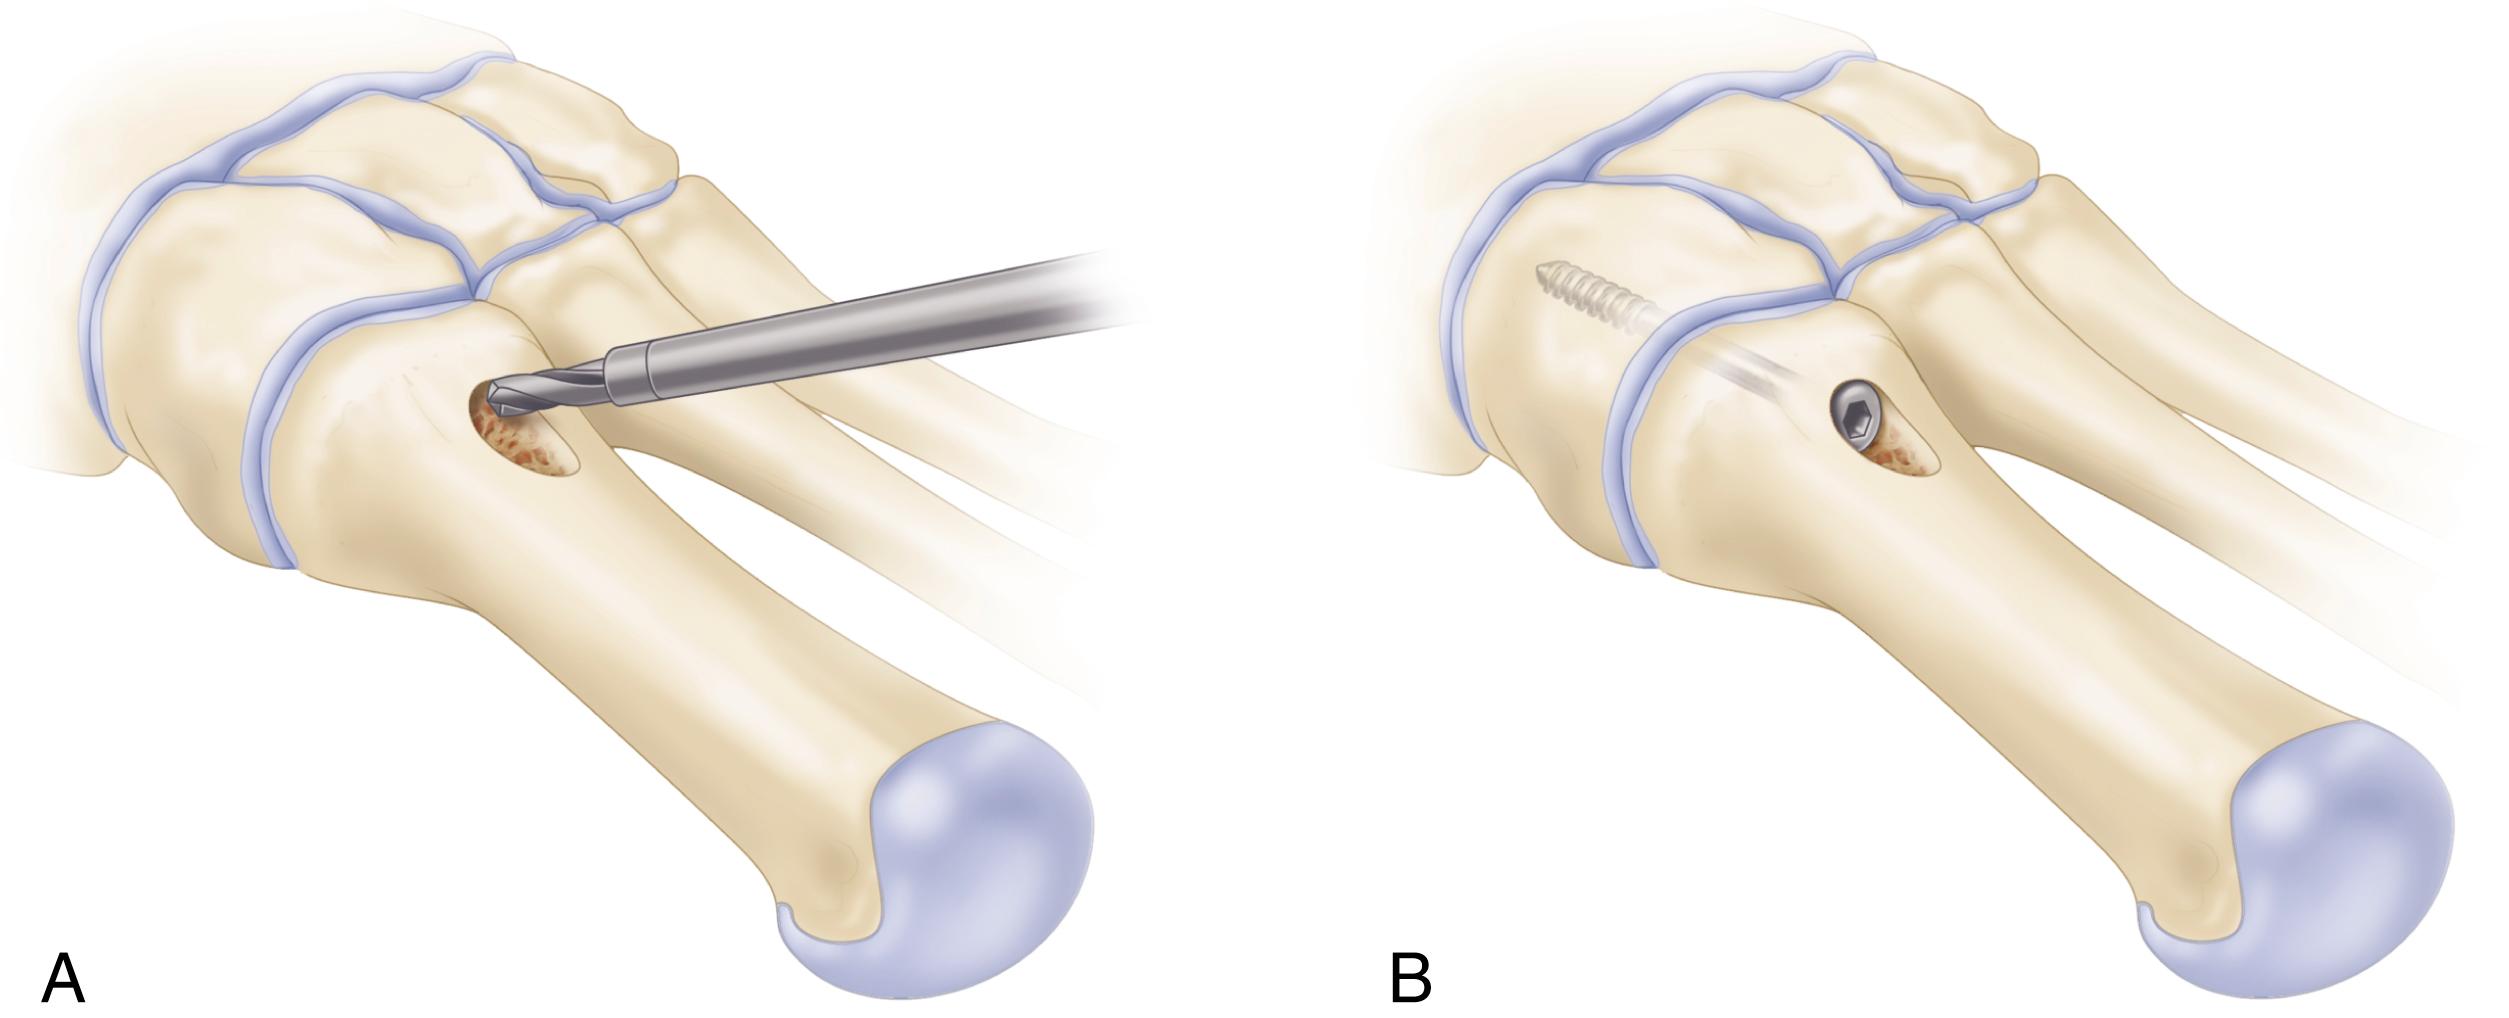
After completing screw or pin fixation of the osteotomy, return to the dorsal wound in the first intermetatarsal space and tie the three sutures to bind the adductor hal lucis and the first and second metatarsal heads together. The first ray should rest in a corrected position. An X-plate also has been described for fixation of this osteotomy ( Fig. 82.47 ).
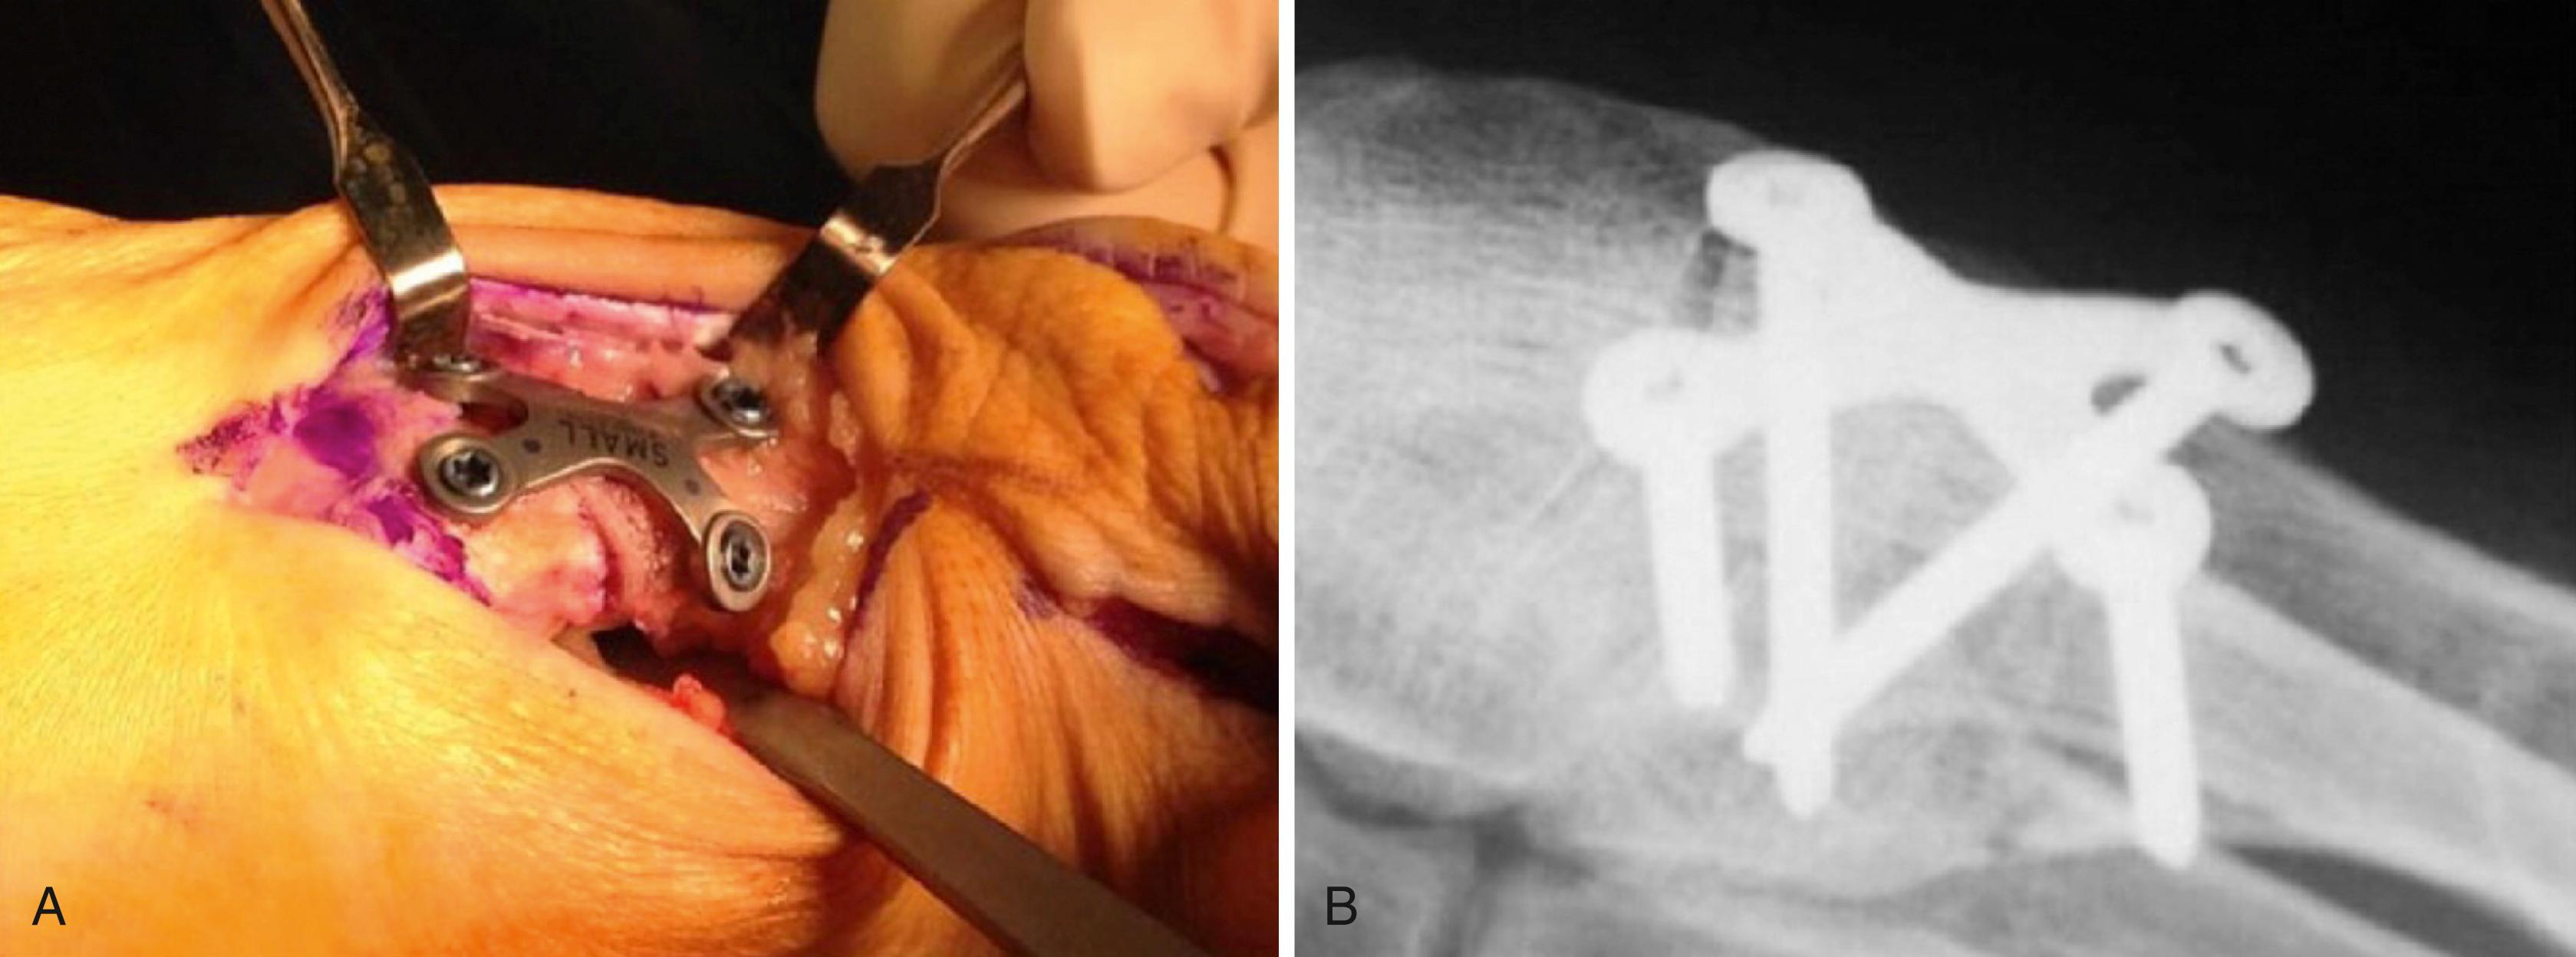
Close the medial capsule to hold it in place. Excise only the capsular overlap. Mann emphasized the importance of passing the sutures through the abductor hallucis tendon and capsule toward the plantar aspect of the vertical limb of the capsulotomy. Place the hallux in about 5 degrees of varus while the sutures are tied. It is unnecessary to close the dorsal proximal limb of the inverted-L capsulotomy.
Apply a bulky compression dressing and remove the tourniquet.
It is our practice after a proximal procedure to place the patient in a bulky bandage and a short leg walking cast and allow weight bearing, changing the cast at 2 weeks and allowing a postoperative shoe at 4 weeks. No benefit has been found to using postoperative taping after surgery.
The major complications of this procedure have been hallux varus, dorsiflexion malunion of the osteotomy site with transfer metatarsalgia, and limitation of motion of the first metatarsophalangeal joint; however, these complications are infrequent, and most patients are satisfied with their outcomes.
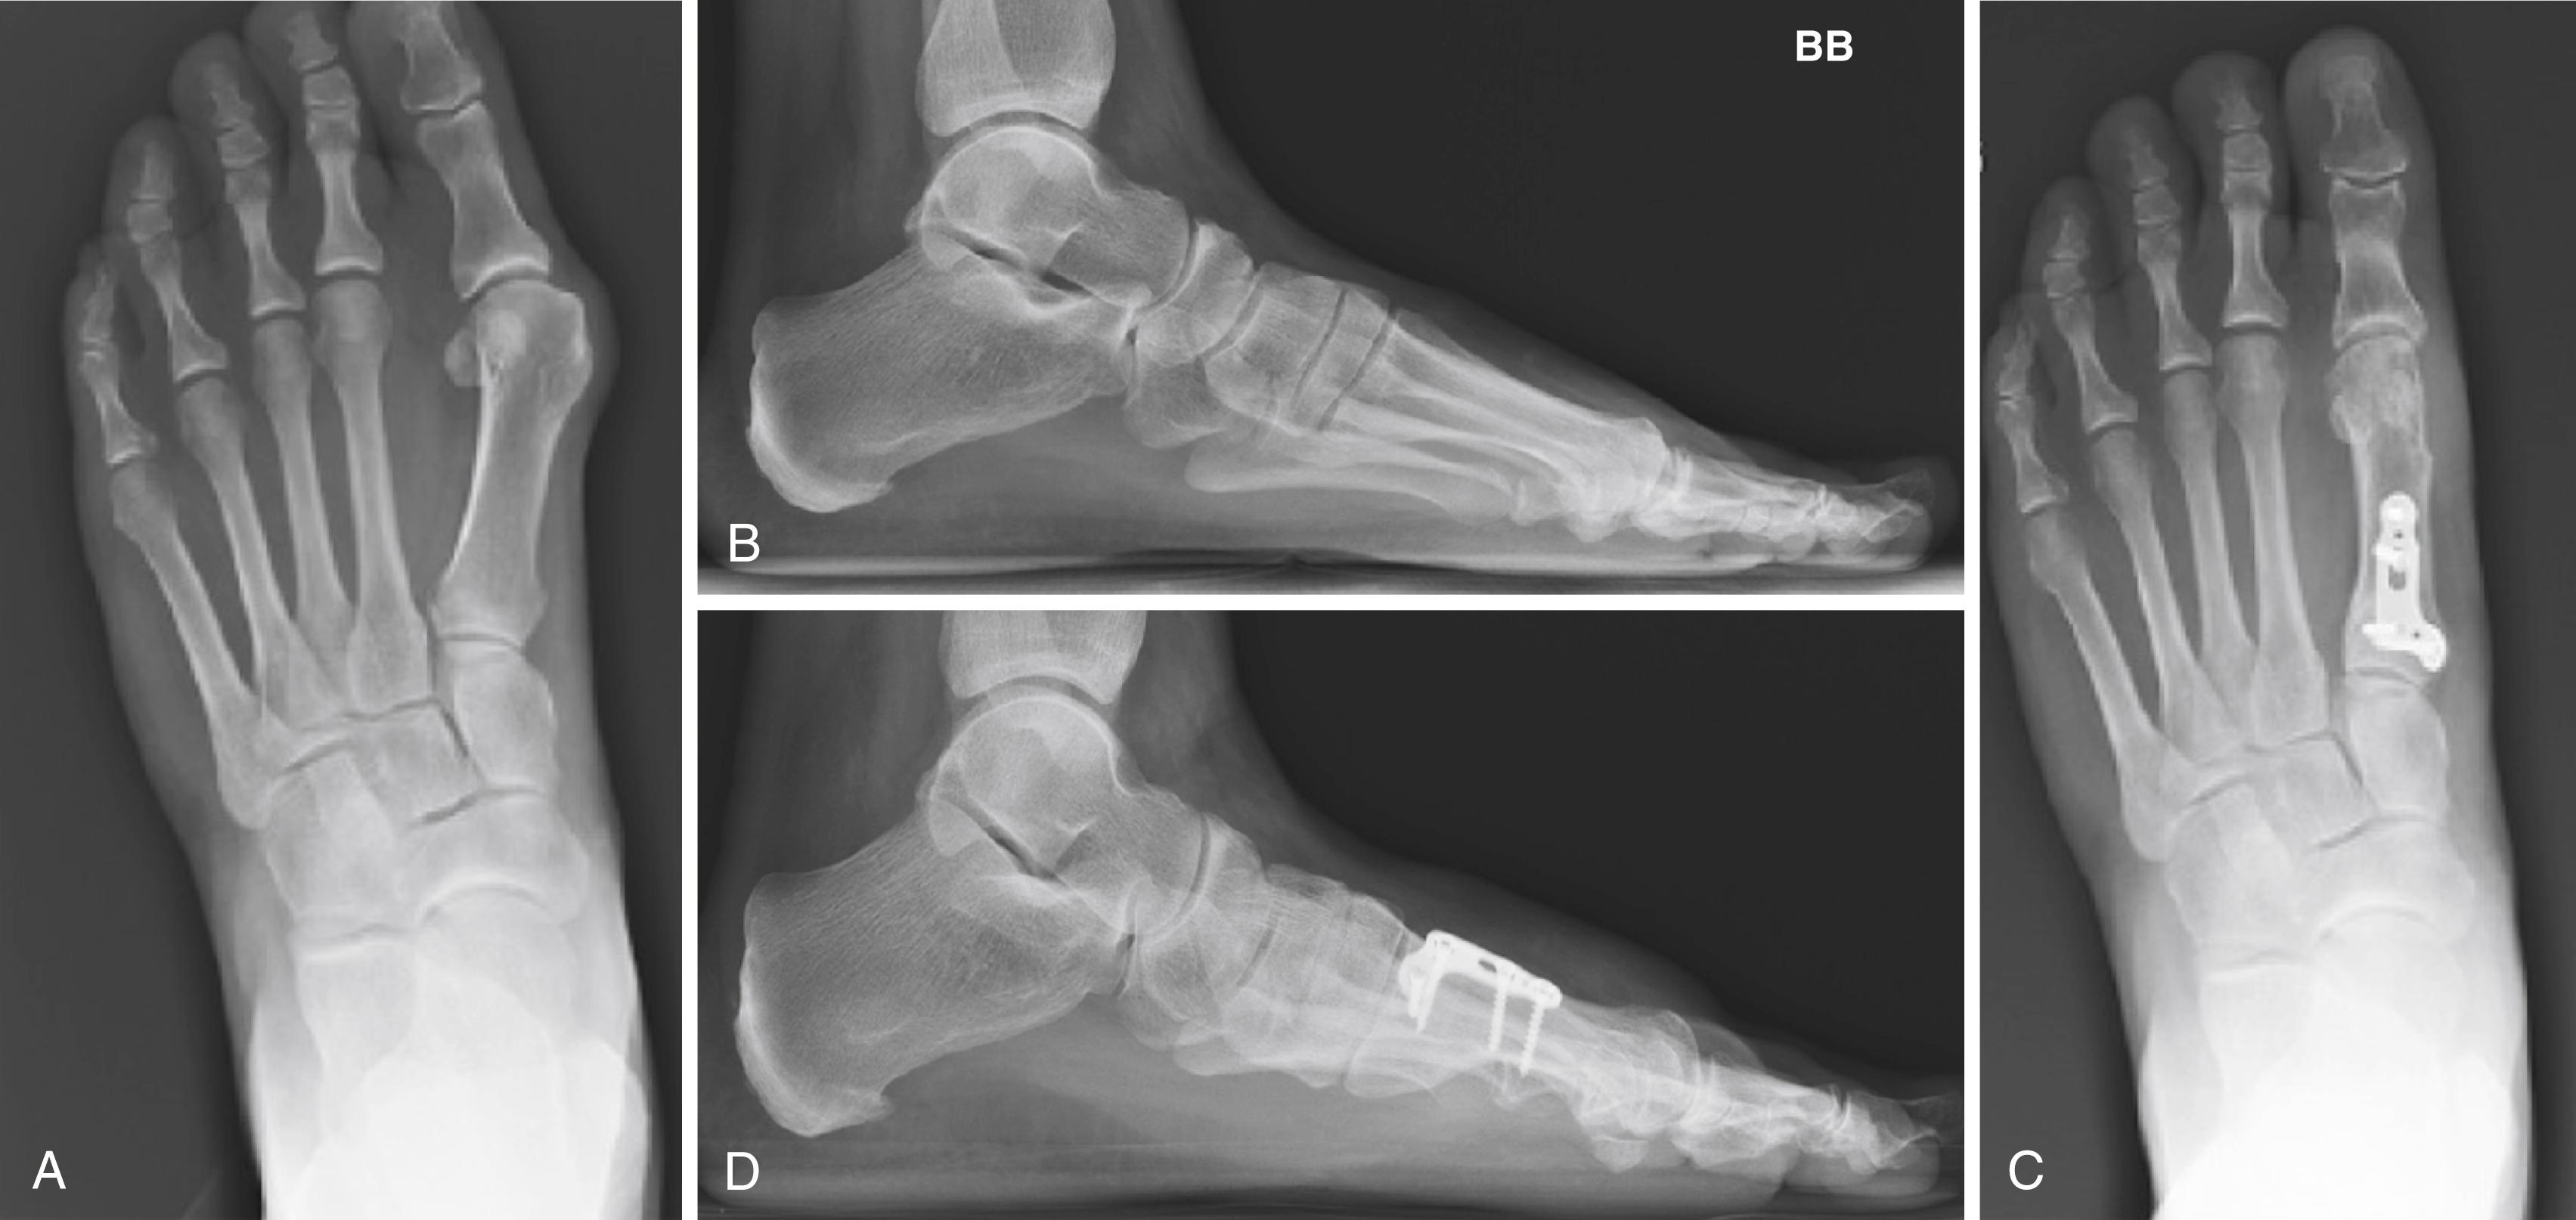
The scarf osteotomy is a horizontally directed displacement Z-osteotomy made at the diaphyseal level ( Fig. 82.48 ). In architectural and carpentry terminology, “scarf” refers to a joint made by notching, grooving, or otherwise cutting the ends of two pieces and fastening them together so that they overlap and join to form one continuous piece. This configuration has a high level of intrinsic stability, particularly in the sagittal plane, and provides a broad surface area for bony healing. Cadaver studies confirmed that under loaded conditions the scarf osteotomy has double the stability of a distal chevron or proximal crescentic osteotomy. Another reason for the popularity of the scarf osteotomy is its versatility. It allows lateral displacement of the plantar bone fragment to reduce the intermetatarsal angle, medial displacement of the capital fragment to correct hallux varus, plantar displacement to increase the load of the first ray, and elongation or shortening of the first metatarsal. The stability of the osteotomy allows early weight bearing and return to activities. The scarf osteotomy usually is combined with a lateral soft-tissue release, excision of the medial bony eminence, and medial capsulorrhaphy, and occasionally with a proximal phalangeal osteotomy.
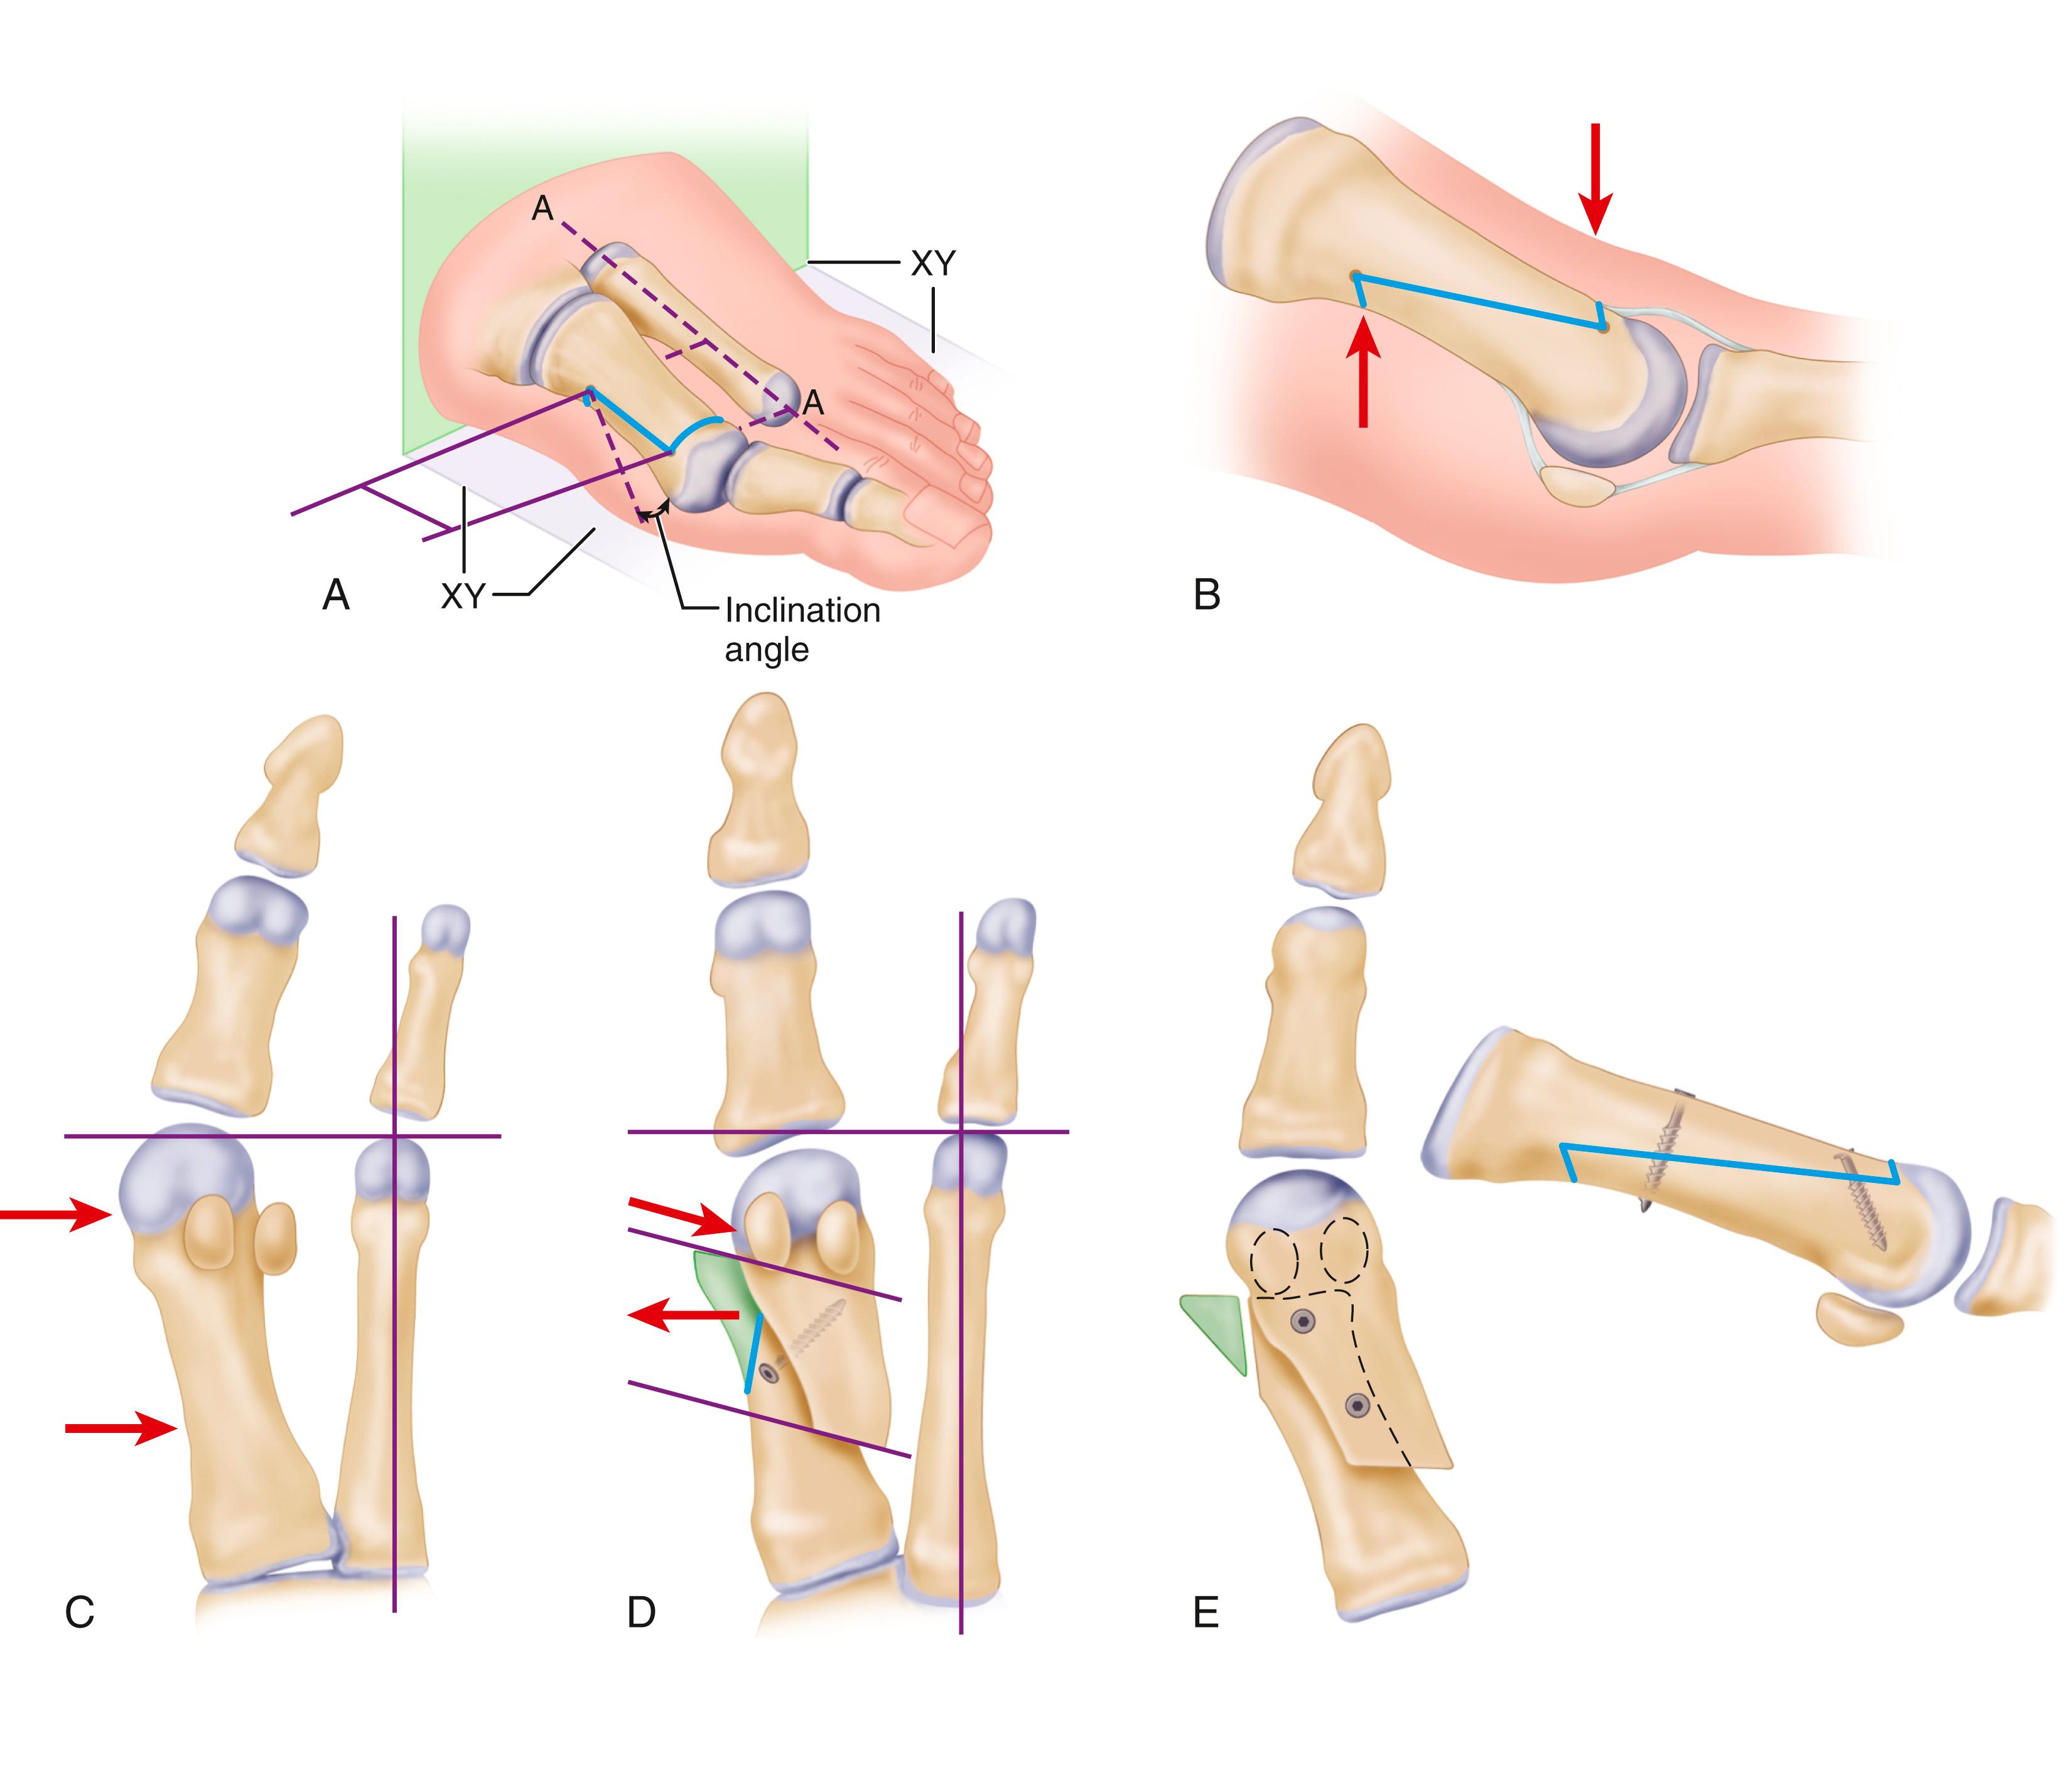
Reported patient satisfaction with the outcomes of the scarf osteotomy is approximately 90%; however, a frequently reported complication has been “troughing” of the metatarsal with loss of height resulting in functional malunion with elevation of the first ray, occurring in as many as a third of patients. Other reported complications include delayed union, rotational malunion, proximal fracture, infection, early deformity recurrence, transfer metatarsalgia, osteonecrosis of the first metatarsal head, prominent screw causing irritation, screw back-out, neuralgia, and complex regional pain syndrome (CRPS). In a more recent report of 150 patients followed for at least 2 years, 91% were satisfied with their results; only 14 patients had “significant” complications, which included severe undercorrection or overcorrection, pain, osteoarthritis, metatarsal head osteonecrosis, troughing, and recurrence of the deformity. Choi et al. evaluated the clinical and radiographic results in 51 patients after the scarf osteotomy of the first metatarsal with soft-tissue realignment, noting that it was a reliable procedure with a low rate of complications and recurrence. American Orthopaedic Foot and Ankle Society (AOFAS) hallux score, SF-36 score, and visual analog scores improved postoperatively, reaching statistical significance. In addition, statistically significant improvement was noted in all radiographic measures, including hallux valgus angle, intermetatarsal angle, and medial sesamoid position. The complication rate was 15% and included symptomatic hardware for which four patients required reoperation, hallux varus, and progression of first metatarsophalangeal joint arthritis.
Current indications for the scarf osteotomy are mild-to-moderate deformities (intermetatarsal angle of 11 to 18 degrees and hallux valgus angle of 20 to 40 degrees). Because the scarf osteotomy is an “overlapping” osteotomy, the limit of correction is not primarily the intermetatarsal angle but the width of the first metatarsal (the wider the metatarsal, the more correction possible). The minimal overlapping between the two fragments that still allows sufficient stability is one third of the metatarsal width, although very experienced surgeons might push this to one-fourth overlap. First ray instability caused by ligamentous laxity around the first Lisfranc joint rather than failure of the windlass mechanism secondary to hallux valgus deformity is a contraindication to the scarf osteotomy, but this is rare. Other contraindications are osteoarthritis of the metatarsophalangeal joint and severe osteoporosis.
This procedure is technically demanding, and there is a steep learning curve. Suggested methods for preventing “troughing” include avoiding the cancellous bone with the step-cuts, using a noncompressing screw, making the long limb of the osteotomy from the first metatarsal head to its base parallel to the inferior metatarsal shaft, and making the short limbs of the osteotomy 45 degrees to the long limb.
(COETZEE AND RIPPSTEIN)
With the patient supine, administer general or regional anesthesia and apply a thigh tourniquet (see Technique 82.1).
Make a skin incision that runs medially and longitudinally over the first metatarsophalangeal joint, extending from about the proximal half of the proximal phalanx to the middle part of the first metatarsal.
Subperiosteally free the dorsal aspects of the proximal phalanx and first metatarsal from the overlying soft tissues. To preserve the blood supply to the distal fragment, do not detach the soft tissues on the plantar aspect of the first metatarsal.
With the medial aspect of the first metatarsal exposed, make a three-cut Z-shaped osteotomy.
Begin the longitudinal cut at the level of the metatarsal head, 5 mm from the joint at the junction between the dorsal third and the plantar two thirds of the metatarsal. Depending on the severity of the deformity to be corrected, make this cut longer or shorter, but generally reaching the proximal part of the diaphysis. In the frontal plane, this cut is parallel to the weight-bearing plane or slightly oblique from dorsomedial to plantar-lateral to bring the metatarsal head more plantar if required.
Make the first transverse cut distally and dorsally, perpendicular to the long axis of the second metatarsal if the length of the first metatarsal has to remain equal. The transverse cut usually runs parallel to the cartilage line of the metatarsal head. To lengthen the metatarsal, orient the transverse (short) cut in the horizontal plane from medial-proximal to distal-lateral at an angle that will allow distal translation. If shortening of the first metatarsal is desired, orient the transverse cut from medial-distal to lateral-proximal in the horizontal plane; the more oblique the cut and the larger the lateral shift, the more shortening will occur.
Alternatively, shorten the metatarsal by removing a segment of bone of the amount of desired shortening by making a second cut just proximal to the first one. This is a more predictable method of obtaining shortening.
Make the second transverse cut strictly parallel to the first transverse cut, plantar at the proximal end of the longitudinal cut ( Fig. 82.49A ). Take care to avoid making this cut convergent to the first one because this would prevent the shifting of the head fragment (locking effect) ( Fig. 82.49B ).
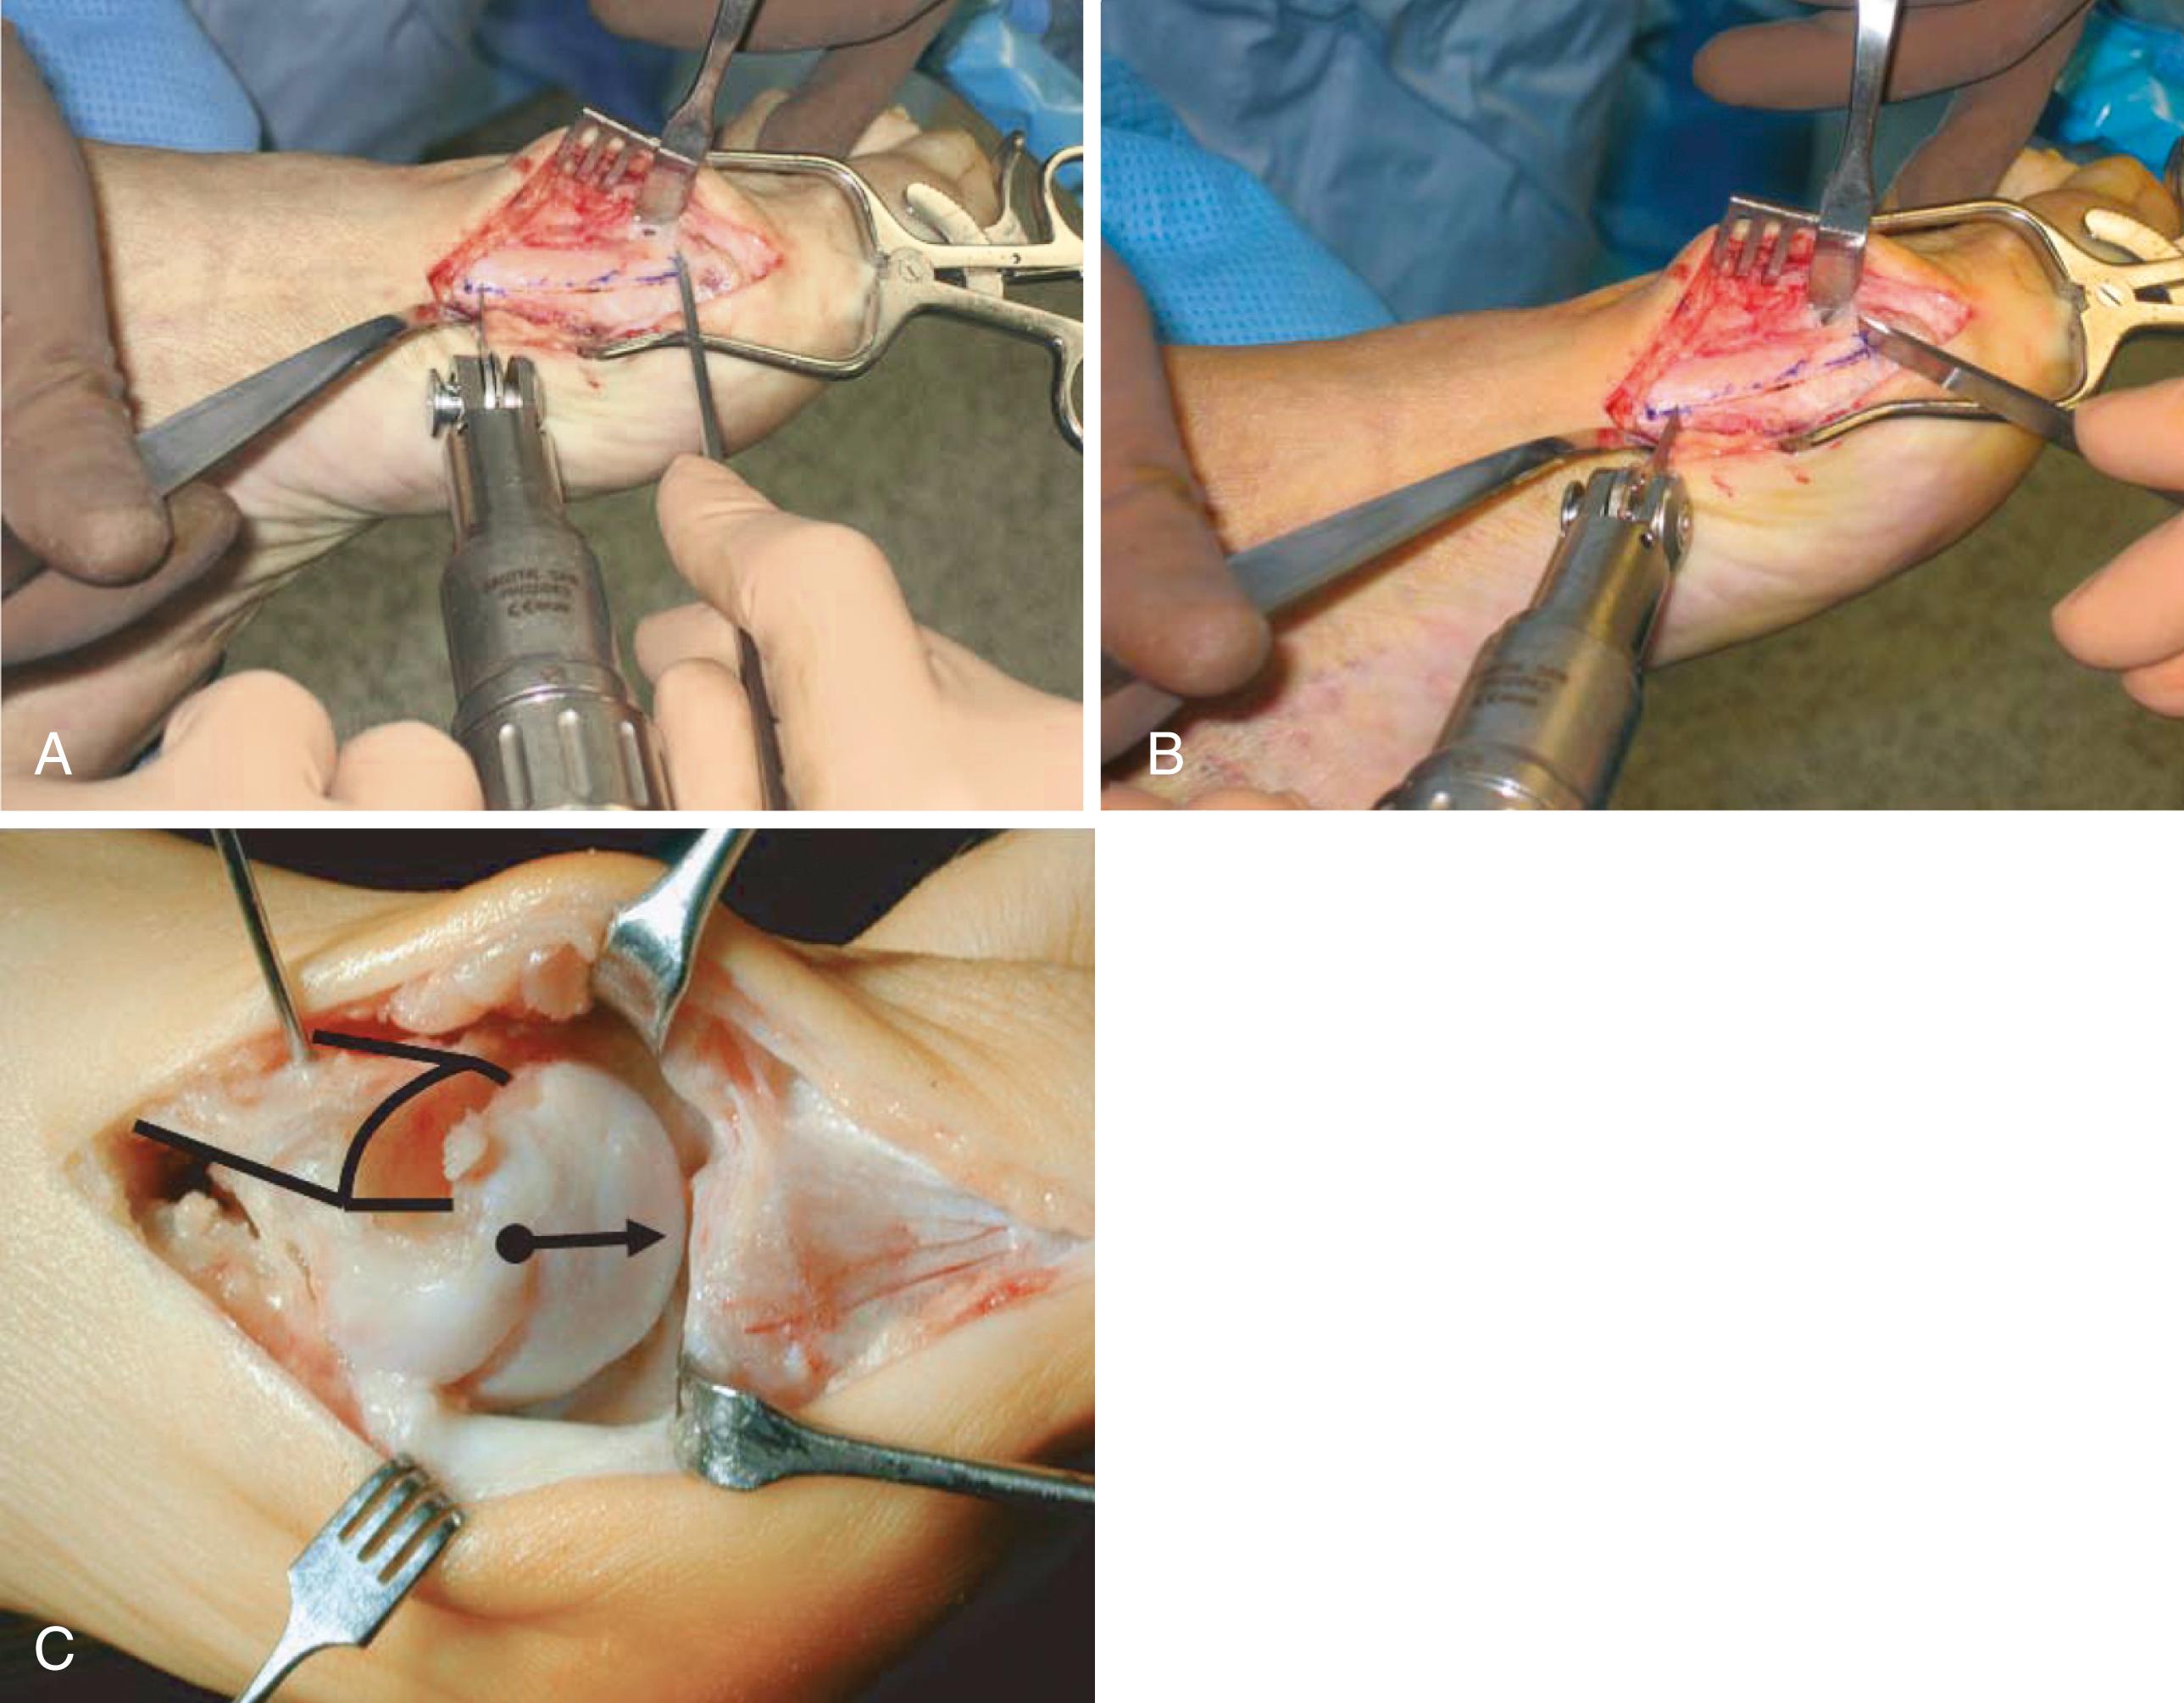
Translate the plantar-distal portion laterally to close the intermetatarsal gap ( Fig. 82.49C ). If necessary, rotation can be done to correct any pathologic distal metatarsal angle.
If the required distal metatarsal articular angle correction is important, the proximal-lateral corner of the head fragment can impinge on the second metatarsal, preventing full correction; in this situation, resect this corner.
Insert a Kirschner wire from the proximal fragment distally into the distal fragment, taking care to not place it where the distal screw will be placed for definitive fixation. The use of a wire instead of a clamp prevents stripping of the soft tissues beneath the distal fragment, better preserving its vascularity ( Fig. 82.50A ,B).
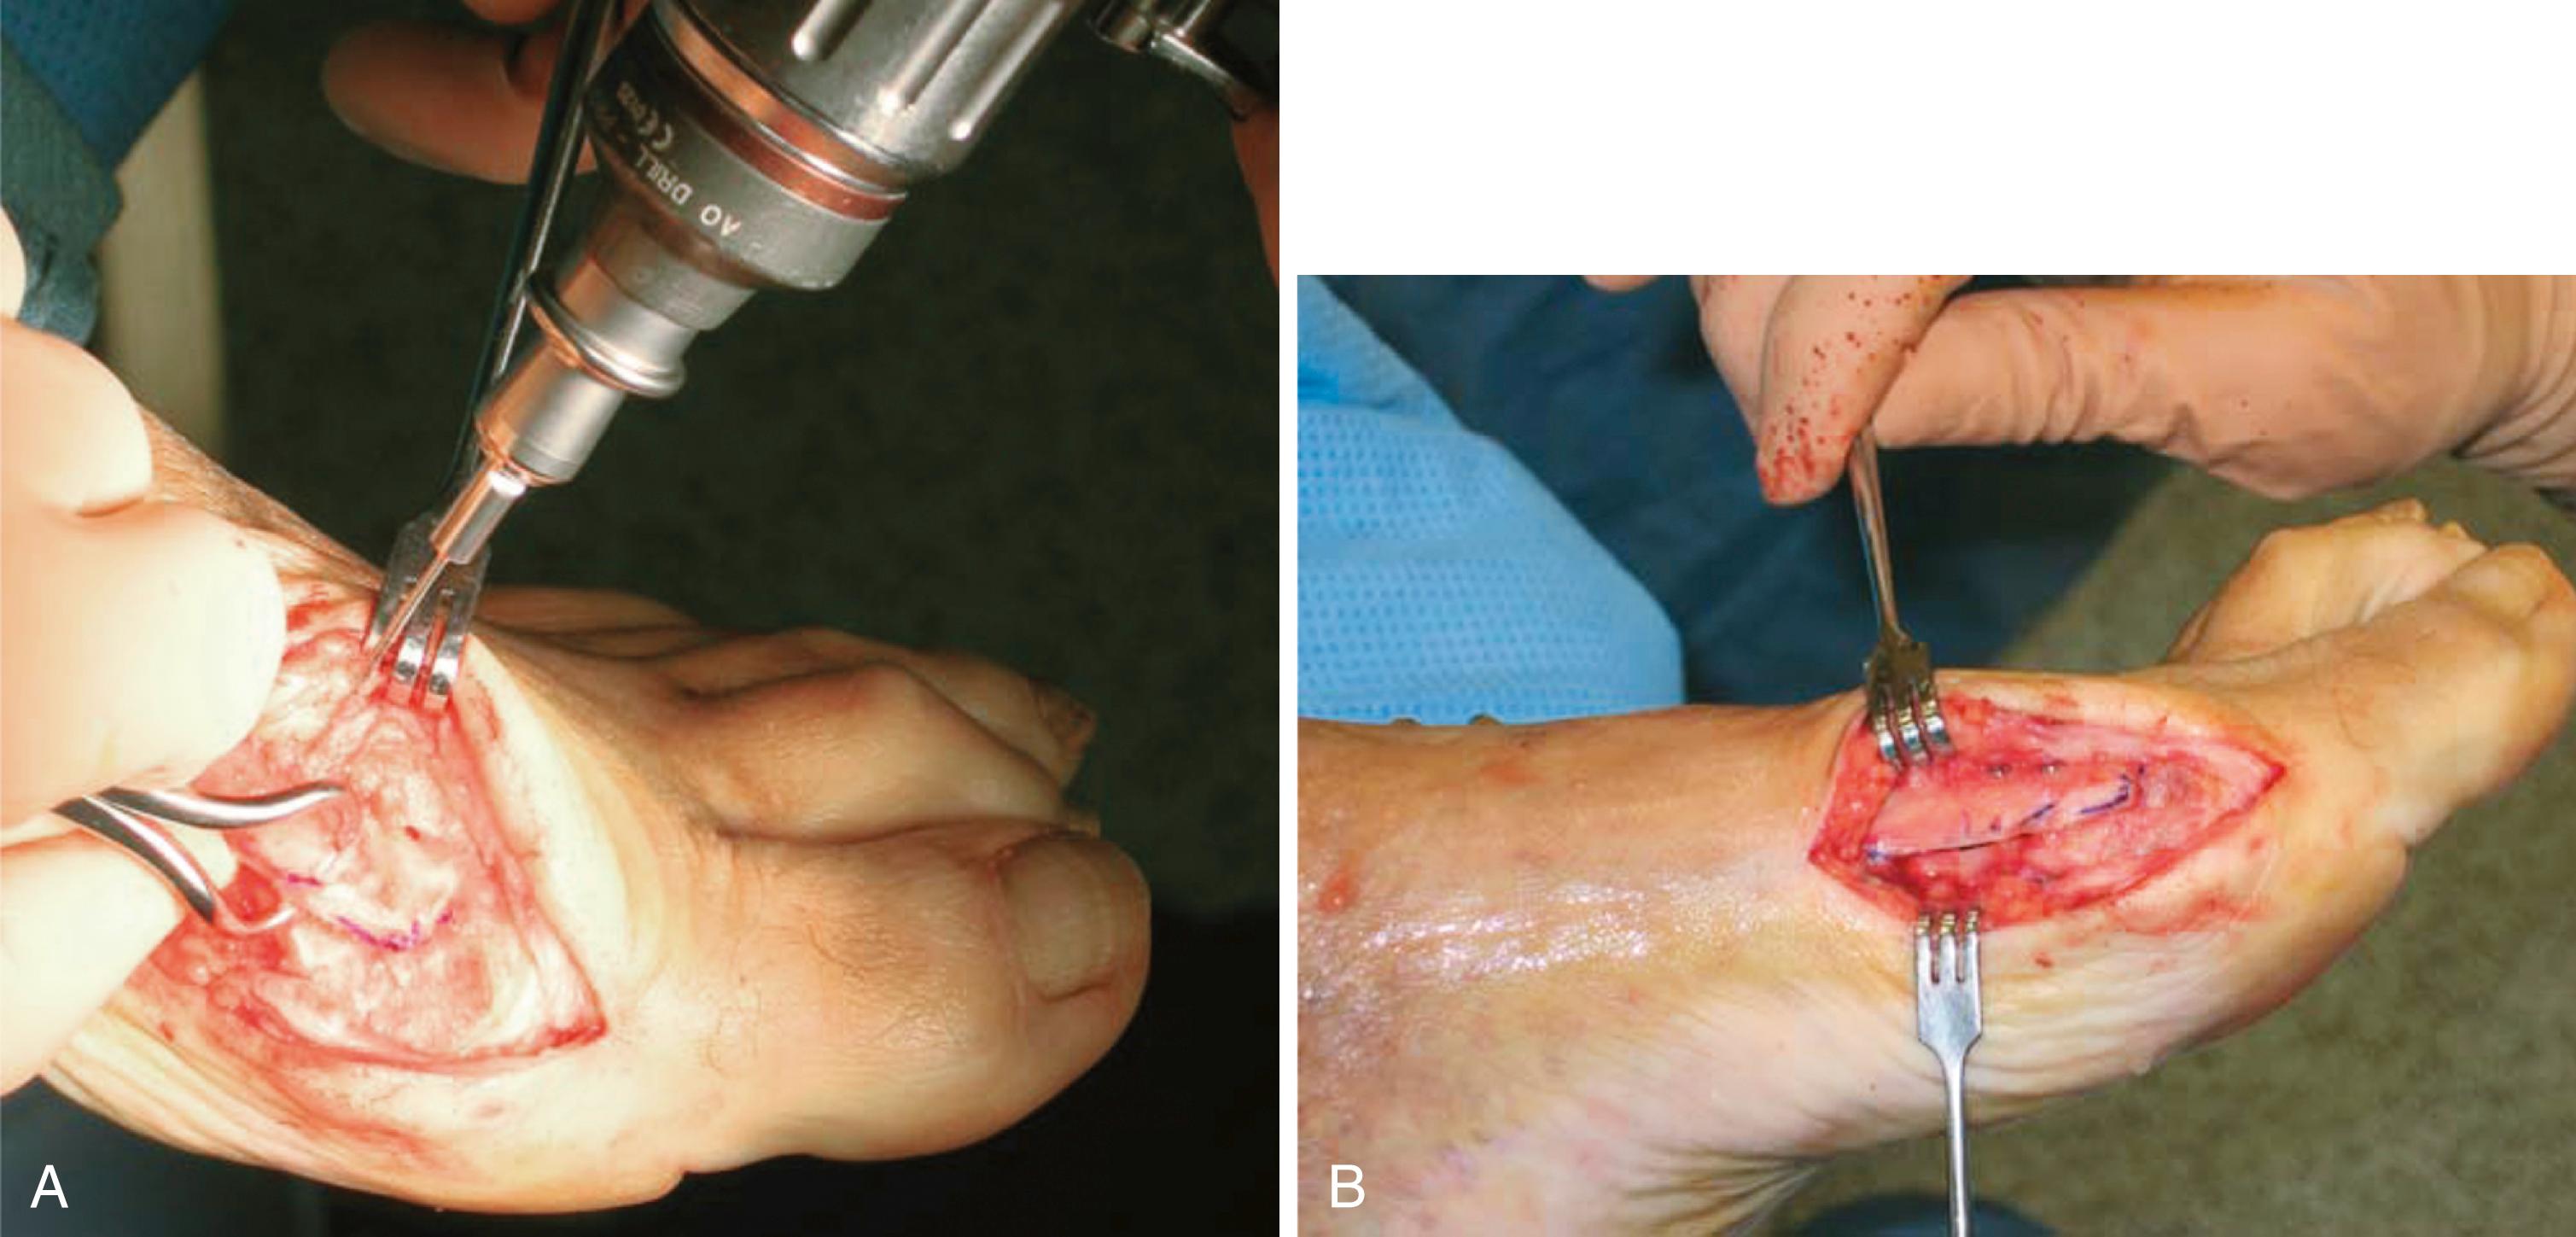
Perform a simulated loading test on the forefoot. The hallux should be reduced or nearly reduced on the metatarsal head, and the metatarsal head should be reduced over the sesamoids. If this is not the case, either an Akin osteotomy or an additional lateral soft-tissue release with tenotomy of the adductor tendon is done, depending on the cause of the residual subluxation. Check the sesamoid reduction either clinically or radiographically with a mini C-arm.
Use two minifragment screws (2 or 2.7 mm) to secure the osteotomy.
Remove the exposed medial eminence and dorsal-medial metatarsal shaft.
If any hallux valgus deformity remains, the cause of this residual deformity should be treated before closing the capsule medially, because the capsule will not be able to hold the correction over time if the hallux valgus deformity is not adequately corrected by osteotomy and soft-tissue release ( Fig. 82.51 ).
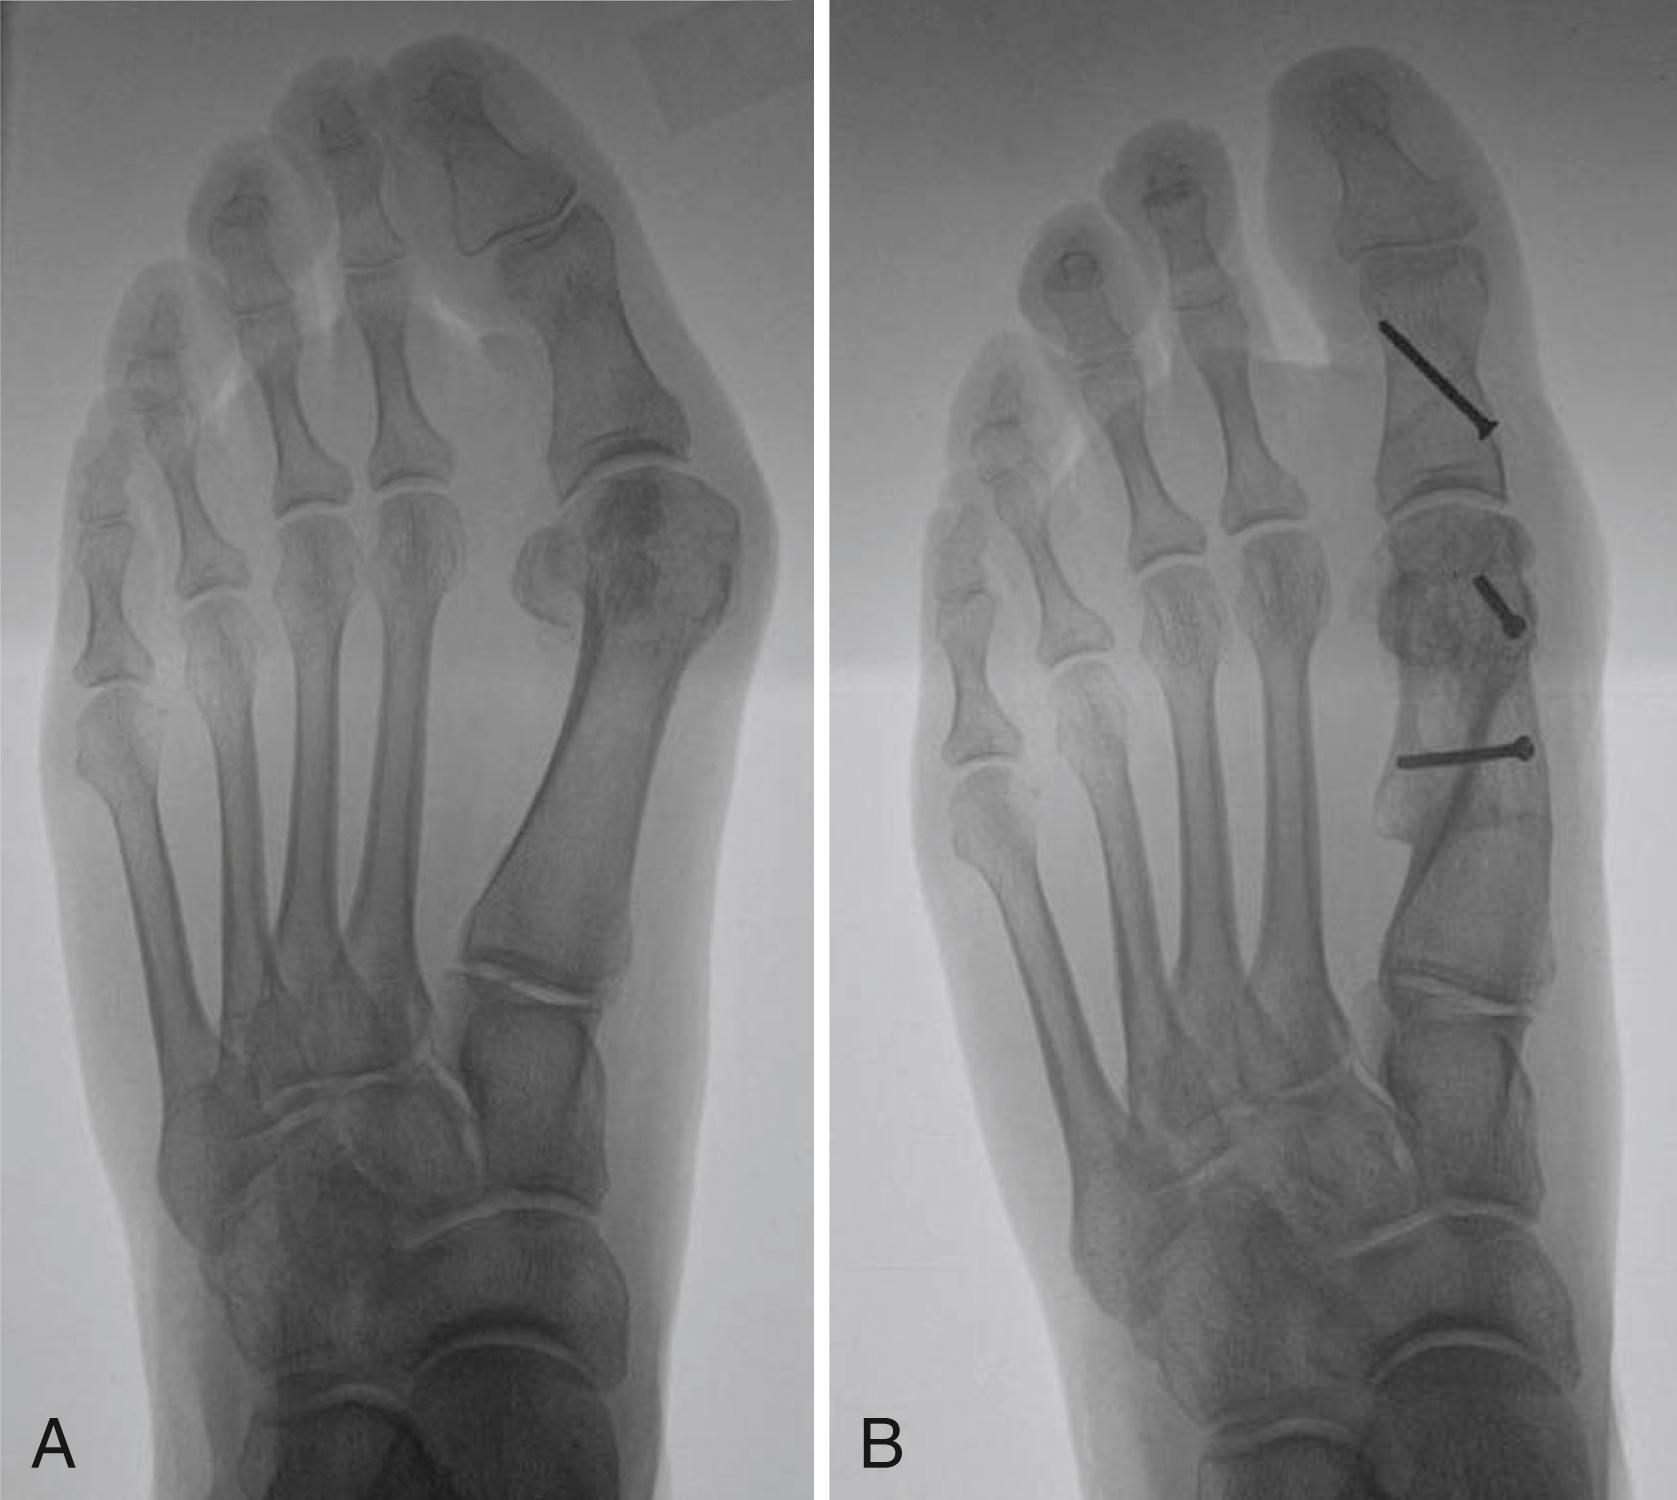
Repair the medial joint capsule, deflate the tourniquet, obtain hemostasis, and close the incisions in routine fashion.
Patients are allowed heel-touch weight bearing for 2 weeks in a postoperative shoe followed by 4 weeks of partial weight bearing before starting a rehabilitation program.
After many years of experience with the scarf osteotomy, Coetzee et al. made several recommendations for changes to the technique.
The distal and proximal arms of the Z should be limited to 2 to 3 mm in depth. Although this theoretically reduces the stability of the osteotomy, this has not been observed clinically, and the short cuts avoid the cancellous portion of the metatarsal, thus reducing the risk of troughing ( Fig. 82.52 ), which is the most frequent problem with this osteotomy. Troughing occurs when the cortices wedge into the softer cancellous bone of the metatarsal shaft, causing a functional elevation or dorsiflexion of the first ray that can lead to a pronated first metatarsal and lesser metatarsal overload ( Fig. 82.53 ). Shortening the short arms of the osteotomy either eliminates the problem or allows only 2 mm of subsidence. Another way to limit troughing is to keep the long arm of the Z as long as possible, which allows the short arms to be in the metaphysis that has a less dense cortex.
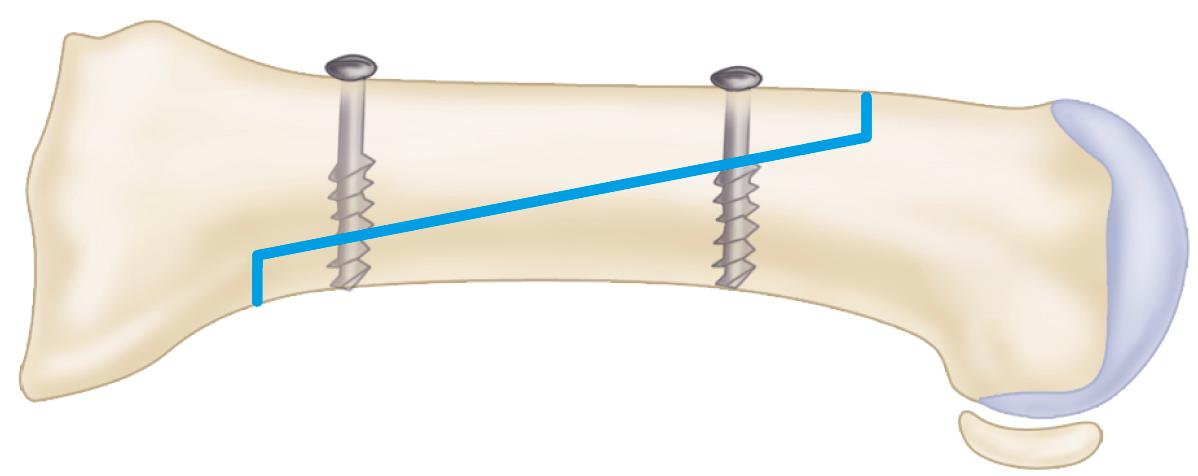
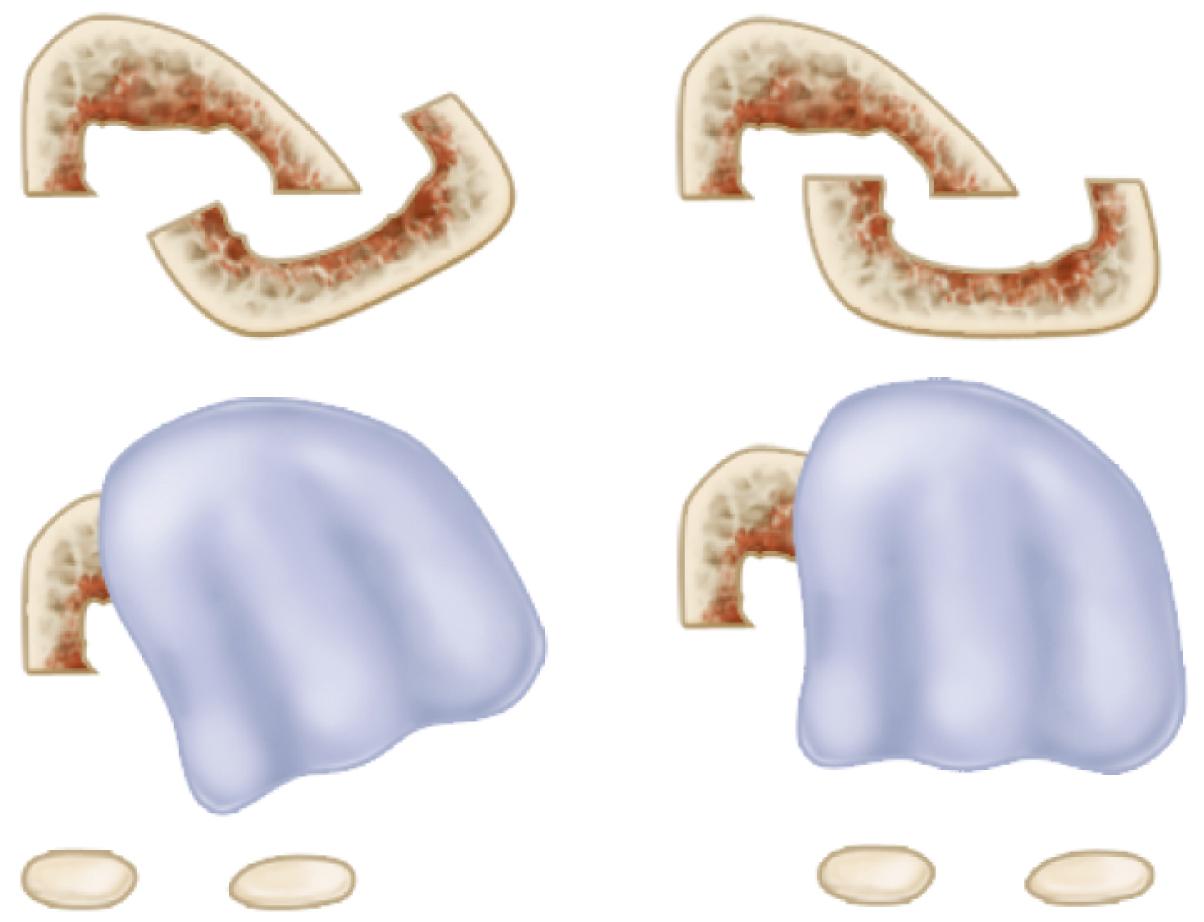

The procedure should be limited to younger people with strong healthy bone that prevents troughing. In elderly patients, the cancellous bone may be very soft and unable to support the cortical overlay.
Multiple adjustments should be made as needed. Depending on the direction of the long arm of the Z, the distal (capital) fragment can be displaced in a plantar or dorsal direction. Angling the long arm from dorsomedial to plantar lateral displaces the capital fragment plantarly by 1 to 2 mm, increasing the weight bearing under the first metatarsal ( Fig. 82.54 ). Plantarflexing or dorsiflexing the first metatarsal or adding a rotational component to the osteotomy increases its stability and versatility. The metatarsal can be lengthened a few millimeters without compromising the stability of the osteotomy by cutting the short arms of the Z parallel from proximal-medial to distal-lateral. Although seldom necessary, the metatarsal can be shortened by removing equal segments on the short arms of the Z.
In 1918, Ludloff described an oblique osteotomy of the first metatarsal oriented from dorsal-proximal to distal-plantar. He originally shortened the metatarsal without using internal fixation; this technique was abandoned for many years because of its inherent instability. With the development of newer fixation methods that added stability, the technique has gained popularity. Biomechanical studies have shown that the Ludloff osteotomy fixed with lag screw compression is more rigid than proximal crescentic and other proximal first metatarsal osteotomies and that it provides lateral and angular correction similar to those of crescentic and closing wedge osteotomies with less elevation and shortening. In addition to mechanical stability that allows early ambulation, suggested advantages of the Ludloff osteotomy include simplicity (involving only a single cut in the bone), angular correction through bony rotation that allows the surgeon to “dial in” the precise amount of correction desired, and slight supination of the cut (8 degrees) that allows plantarflexion of the first metatarsal, theoretically minimizing the risk of transfer metatarsalgia further. Reported complications include prominent hardware requiring removal, hallux varus, delayed union, superficial infection, and neuralgia.
(CHIODO, SCHON, AND MYERSON)
For tourniquet use and anesthesia, see Technique 82.1. Separate dorsal and medial incisions are used.
First make the dorsal incision aligned over the first web space and then release the transverse metatarsal ligament, adductor hallucis tendon, and lateral capsule.
Make an 8-cm medial longitudinal incision next, extending from the metatarsocuneiform joint to the base of the proximal phalanx, to expose the medial aspect of the first metatarsal and metatarsophalangeal joint.
Make a cruciate or L-shaped medial capsulotomy.
Begin the oblique osteotomy approximately 2 mm distal to the metatarsocuneiform joint and extend it from dorsal-proximal to plantar-distal; the plane of the osteotomy should be oriented at an angle approximately 30 degrees from the long axis of the first metatarsal so that it exits the plantar-distal metatarsal a few millimeters proximal to the sesamoids.
When the proximal three fourths of the osteotomy has been completed, loosely fix it with a cannulated lag screw (3 or 3.5 mm) placed perpendicular to the plane of the cut ( Fig. 82.55A ). Position this screw within the proximal rather than the middle portion of the osteotomy to bring the center of correction proximally toward the apex of the deformity to increase the correction and minimize shortening of the first metatarsal.
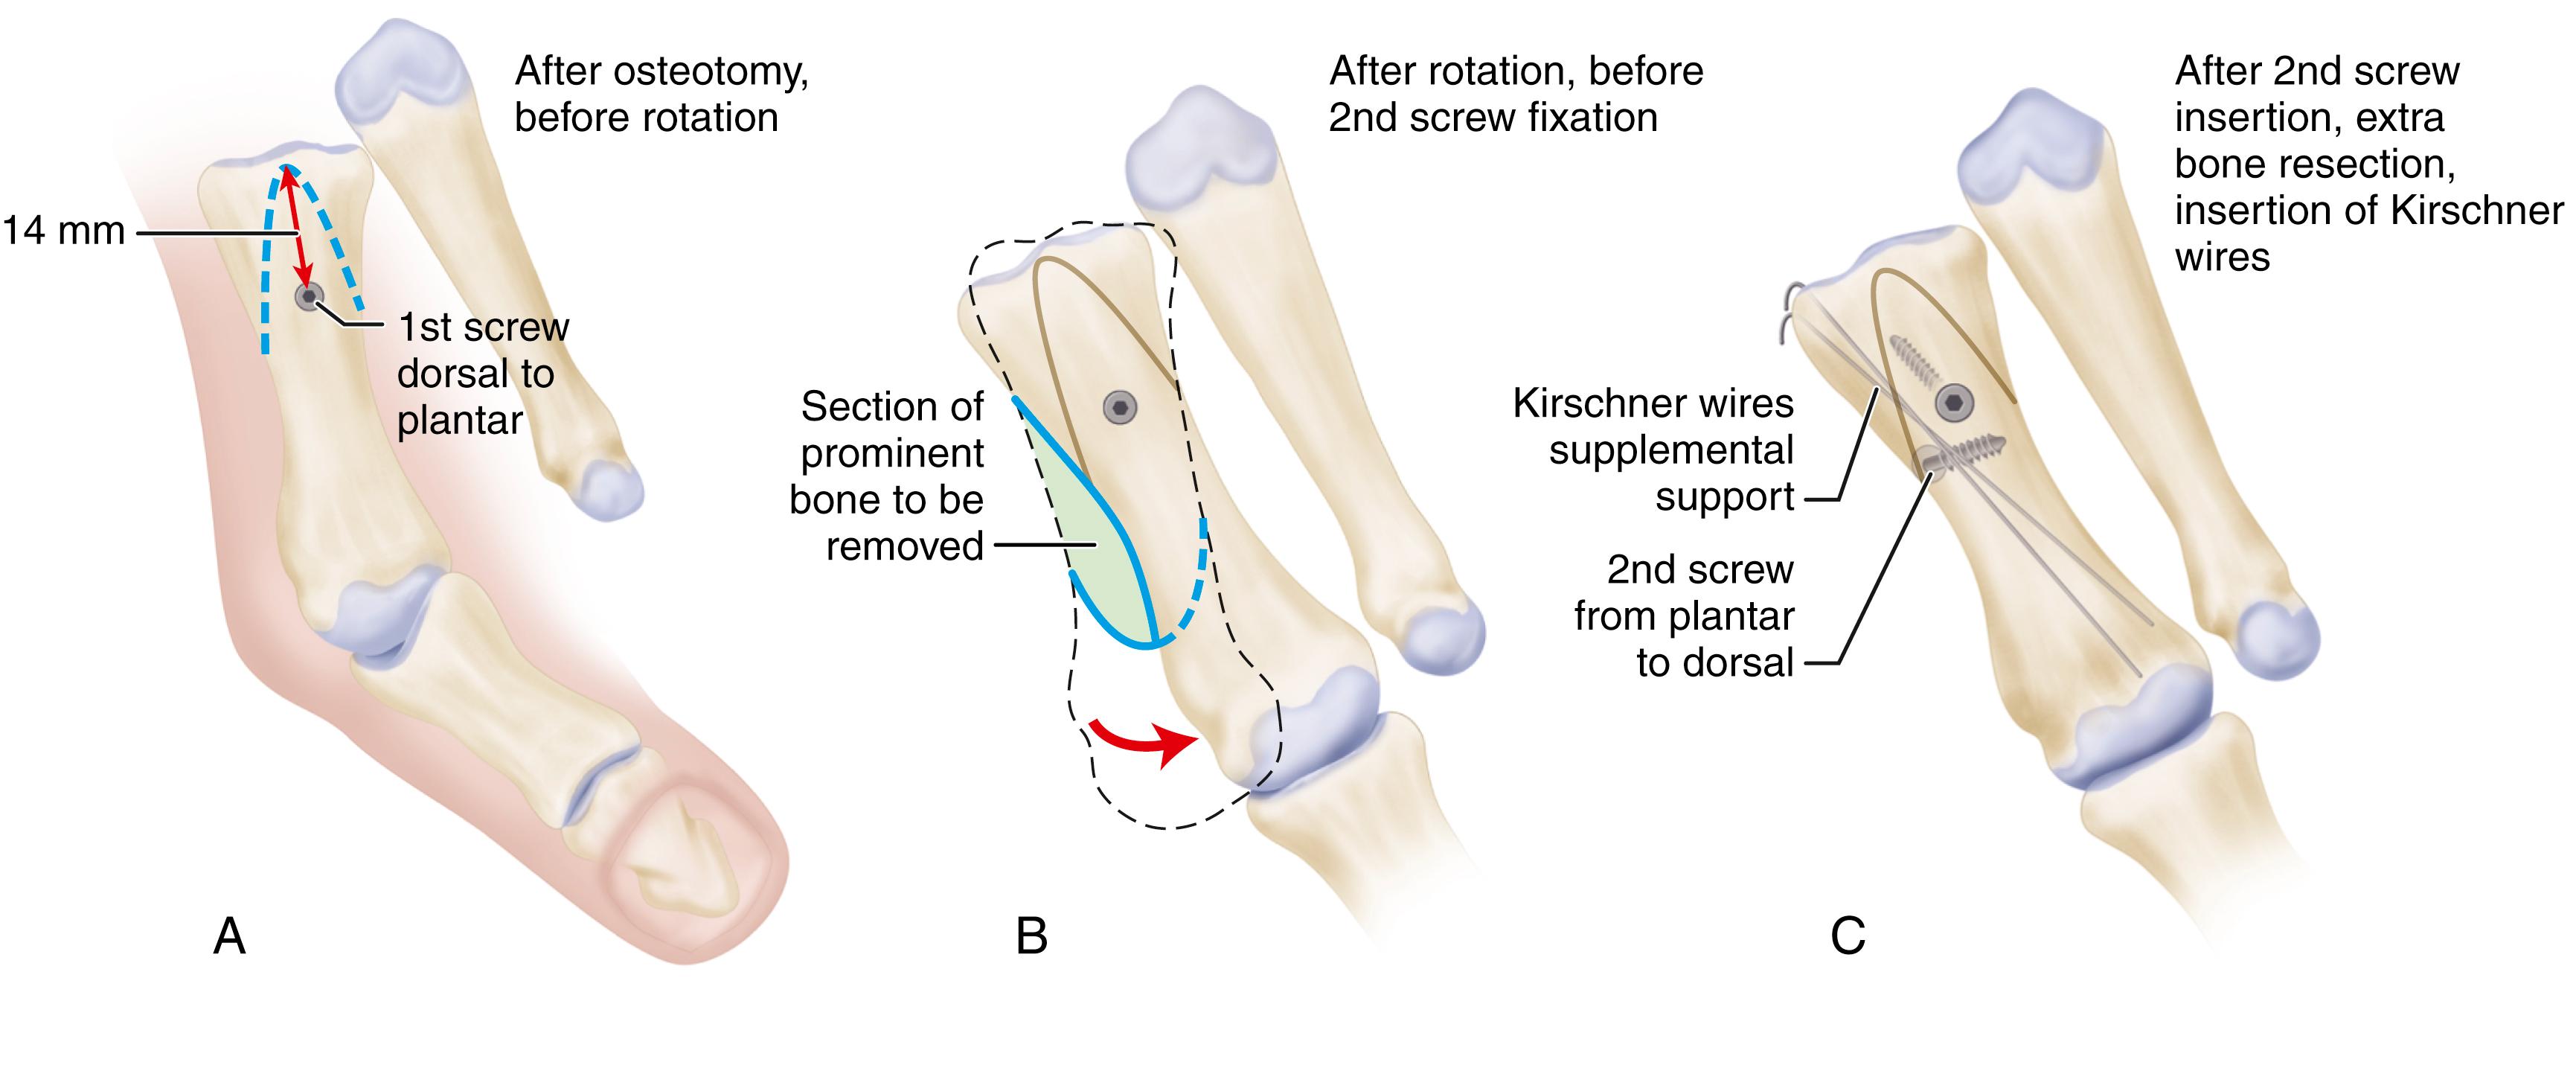
Complete the osteotomy and rotate the distal fragment around the axis of the screw until the desired correction of the intermetatarsal angle is obtained ( Fig. 82.55B ).
When the desired correction is obtained, tighten the screw.
Insert a second, more distal screw perpendicularly across the osteotomy ( Fig. 82.55C ).
If there is space, a third screw can be added. If screw purchase is poor for the second screw, two supplemental axial Kirschner wires can be used without significant loss of fixation strength. Fixation with threaded Kirschner wires alone provides adequate strength when screw fixation is impossible because of a short osteotomy or an intraoperative metatarsal fracture.
Become a Clinical Tree membership for Full access and enjoy Unlimited articles
If you are a member. Log in here