Physical Address
304 North Cardinal St.
Dorchester Center, MA 02124
Axial pattern flaps have a pedicle containing a named cutaneous artery, compared with random pattern flaps whose blood supply is based on the less robust subdermal plexus.
As a result of their robust blood supply, axial pattern flaps can reconstruct defects beyond the reach of random pattern flaps.
The paramedian forehead flap has a pedicle most commonly based on the supratrochlear artery. This staged interpolation flap can repair a wide variety of nasal defects.
The Abbe flap has a pedicle based on either the superior or inferior labial artery. This staged interpolation flap transfers full-thickness portions of the upper or lower lip to repair large defects of the opposite lip.
The dorsal nasal rotation flap has a pedicle based on the dorsal nasal artery. This single-staged flap can repair moderately sized defects of the distal nose.
Because axial pattern flaps rely on the blood supply of a named cutaneous artery, the surgeon must use anatomic landmarks to design and execute a flap that preserves the nutrient vessel.
Most flaps utilized in dermatologic surgery have either a random pattern blood supply based on the subdermal plexus or an axial blood supply from a named artery contained within the flap pedicle. Random pattern flaps survive as long as the perfusion pressure of the feeding vessels maintains blood flow through the arterioles of the dermal plexus. As the distance from the flap pedicle increases, perfusion pressure dissipates; and when the arterioles close, necrosis ensues. The limits of perfusion pressure restrict the length of random pattern flaps.
By contrast, axial flaps maintain perfusion from a named cutaneous artery within its pedicle, allowing a much greater length and a narrower pedicle. With their increased length and robust blood supply, axial flaps can reconstruct defects beyond the reach of random pattern flaps. This chapter will focus on two different staged axial flaps: the paramedian forehead flap and the Abbe flap; and a one-stage axial flap, the dorsal nasal rotation flap.
The forehead flap is a centuries-old two- or three-stage axial flap used to reconstruct nasal defects. The most common artery contained within the forehead flap pedicle is the supratrochlear artery (STA). A terminal branch of the ophthalmic artery from the internal carotid arterial system, the STA exits the orbit by piercing the orbital septum at the superomedial orbital rim within 5 mm lateral or medial to a vertical line drawn at the medial canthus. Its pulse can be palpated at its exit point, which is a mean distance of 12.2 mm (range: 10.2–14.5 mm) superior to the medial canthus. It has a mean diameter of 0.9 mm.
After emerging from the septum, the STA travels superficial to the periosteum and corrugator supercilii muscle and deep to the orbicularis oculi and frontalis muscles. It pierces the orbicularis oculi and frontalis muscles to reach the subcutaneous fat anywhere from 10–25 mm superior to the supraorbital rim. On the lower forehead, the artery and its branches travel in the deep subcutaneous fat closer to the frontalis muscle, usually on a path within 5 mm of a vertical line drawn at the medial canthus. On the superior third of the forehead, the artery runs nearer to the dermis as it courses cranially past the junction of the sagittal and coronal sutures at the top of the skull. Along its course, the STA has branches that communicate with numerous vessels, including the angular, supraorbital, paracentral, and central arteries.
The surgeon can use topographic landmarks to identify the course of the STA. The most prominent glabellar frown line corresponds to the junction of the medial corrugator and procerus muscles, and can be accentuated by pushing the medial brows inferomedially toward the midline. The STA is located anywhere from this glabellar frown line to 6 mm laterally. The STA pedicle can also reliably be found within 3 mm medial or lateral to the medial canthus. The pedicle base should therefore be wide enough to include these landmarks ( Fig. 18.1 ). Mapping the artery via topographic landmarks can fail to detect rare anatomic variations that could threaten flap survival. The STA can be absent or can rarely pass from superficial to deep to the frontalis muscle at the level of the mid-forehead, anatomic variations that risk necrosis of an aggressively thinned forehead flap. Tracing the path of the STA preoperatively with a Doppler probe identifies these rare anatomic variations and allows modification of flap design.
While the STA provides the primary blood supply to the paramedian forehead flap, detailed anatomic studies demonstrate additional contributions from branches of the angular artery, the dorsal nasal artery, and the central and paracentral arteries. A branch of the external carotid system, the angular artery courses along the nasofacial sulcus and can be found on the fascia approximately 5 mm medial to a vertical line drawn at the medial canthus. It has a mean diameter of 1.0 mm. Laterally, it has a communicating branch with the STA. A paracentral artery may arise either from the communicating branch or as a direct continuation of the angular artery toward the forehead. Medially, the angular artery anastomoses with the dorsal nasal artery, usually 5 mm above a horizontal line drawn at the medial canthus.
Like the STA, the dorsal nasal artery is another terminal branch of the ophthalmic artery, and it supplies blood to both the nasal tip and forehead. It emerges from the orbital septum immediately inferiorly to the STA, at a mean distance of 7.1 mm (range: 6.4–7.5 mm) superior to the medial canthus. It has a mean diameter of 0.82 mm. The dorsal nasal artery anastomoses with the contralateral dorsal nasal artery and the ipsilateral angular artery. It branches into the central artery, which runs superiorly toward the glabella and central forehead. The central artery anastomoses medially with its contralateral counterpart and laterally with the STA. The paracentral and central arteries may supply axial flow to a midline forehead flap.
Elevating flaps that preserve the venous anatomy of the forehead can minimize the risk for venous congestion and consequent flap necrosis ( Fig. 18.2 ). The mid-forehead and glabellar regions have two main venous drainage systems. The large ascending cutaneous vein, which is the most robust source of venous drainage, branches from the angular or transverse nasal root vein, pierces the procerus muscle, then runs cranially just beneath the dermis of the forehead skin. The course of the large ascending cutaneous vein usually does not accompany the STA. A minute reticular venous network surrounds the adventitia of the STA and provides a supplemental source of venous drainage. While some authors recommend including the large ascending cutaneous vein in the flap pedicle to avoid venous congestion, our experience indicates that careful preservation of the venous network at the base of the flap pedicle is sufficient to avoid venous congestion.
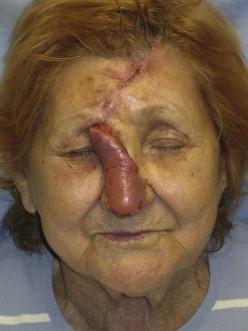
The paramedian forehead flap has sufficient length and blood supply to repair nasal defects at nearly any location. Distal nasal defects lie further from the donor site and require a longer pedicle, potentially requiring extension of the flap into the hair-bearing scalp. Distal defects are also more likely to require cartilage grafts for support, especially on the alar lobule where non-anatomic cartilage helps to preserve the position of the free margin and to maintain airway patency. Proximal defects of the nasal root, dorsum, and sidewall less commonly threaten airway function, since the septum and upper lateral cartilages gain support from their bony attachments, and the height of the forehead is usually sufficient to avoid extension of the flap into the hair of the scalp.
In general, soft tissue loss on the tip, dorsum, and sidewall without damage to cartilage poses little risk for airway compromise. By contrast, defects involving the ala frequently require non-anatomic cartilage grafting to support the airway and position of the free margin ( Fig. 18.3 ). Loss of cartilage increases the complexity of reconstruction, since free cartilage grafting may be necessary to restore nasal contour and projection and to stabilize the airway ( Fig. 18.4 ). Full-thickness nasal defects present the greatest challenge, as they require repair of mucosal lining, cartilage, and skin. Such defects are most common on the ala and soft triangle and may require a three-stage, rather than a two-stage, forehead flap.
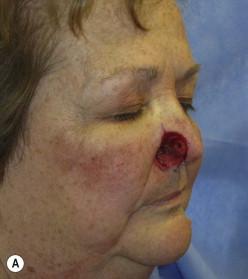
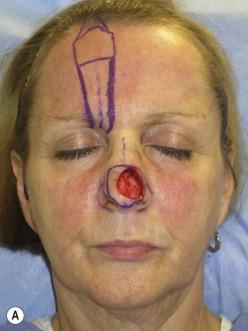
Modifying the depth and breadth of the defect can improve contour or place scars in cosmetic subunit junction lines. Except at the alar lobule, there are five distinct nasal soft tissue layers: the skin, subcutaneous fat, superficial musculoaponeurotic system (SMAS), deep areolar layer, and perichondrial or periosteal layer. In order for the forehead flap to reflect the contours of the underlying nasal skeleton, it is often preferable to remove all soft tissue to the level of perichondrium or periosteum. The anatomic layers of the alar lobule are unique. It does not contain cartilage, consisting of skeletal muscle and fat enveloped by dermis and epithelium on both sides. To avoid bulky contour, alar defects may be deepened to the level of the vestibular mucosa, taking caution to avoid an unnecessary full-thickness defect.
Enlarging a defect's breadth may also be desirable to camouflage scars within cosmetic subunit junction lines ( Fig. 18.5 ). The surgeon must weigh the benefits of defect extension against the risks of airway compromise and added donor site morbidity. Increasing the defect size may make donor site closure more difficult. It also may increase pedicle length and the likelihood that the donor site will involve hair-bearing scalp.
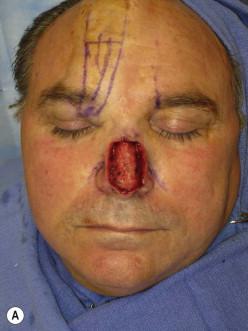
A few principles guide the decision whether to enlarge a defect. Horizontal scars across subunits are conspicuous, so extending defects to the free margin can hide scars. If the defect involves the alar lobule or nasal tip, it may be extended distally to the free margin. Caution must be observed with extending the breadth of an alar defect, because recreating the convex flare of the ala can be challenging. Even if cartilage grafts are placed, flattening of the alar margin (best seen from the swimmer's view) is common. Since midline scars heal well, one may consider extending the defect to a “hemitip” subunit, rather than the entire tip, if it involves only one side ( Fig. 18.6 ). The smaller surface area will facilitate donor site closure with little or no compromise of the nasal scar. Correct contour is more important than placing scars in subunit lines.
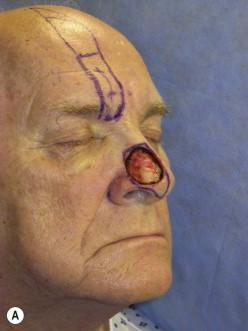
Once the final nasal defect has been created, the surgeon must make a template to size the flap. An oversized template will result in a bulky flap with poor contour and occurs most commonly when the nasal wound has a surface area greater than that of the skin removed. Wound expansion occurs to a greater degree on the dorsum and sidewalls, where the skin is looser, and to a lesser degree on the tip and ala, unless the wound is deep or full thickness, or cartilage integrity has been damaged. No matter the location, the template should reflect the surface area of the tissue removed, not the size of the expanded wound ( Fig. 18.7 ). The contralateral side of the nose, if intact, can serve as a reference for the true size of the removed tissue.
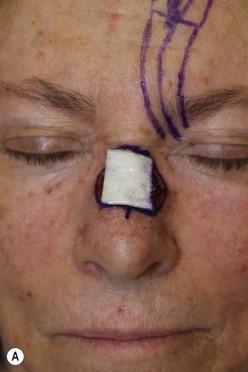
An undersized template will produce a forehead flap under excessive tension, and usually occurs when the template is designed without conforming to the three-dimensional surface of the defect's concavities and convexities. To avoid this error, it is useful to create the template with a flexible material that is stiff enough to retain a three-dimensional shape. Many surgeons use the aluminum foil of a suture package. Others create a soft cast of the nose by placing Steri-Strips over the wound and surrounding skin, then cutting out a precise template. Regardless of the material used, the surgeon will need to convert the three-dimensional template to a two-dimensional surface. The authors use a surgical marking pen to trace the defect's borders, then stamp the outline on a non-stick gauze or suture package, being careful to conform to its three-dimensional contour. The template is cut at the inside margin of the imprint and transferred back to the wound to confirm that the fit is precise.
After finalizing the template, the surgeon must identify a suitable donor site on the forehead. The proposed site must be inspected for concerning lesions before surgery, so that these may be appropriately addressed. Previous surgery or traumatic scars can alter the flap's blood supply, so the surgeon must also look for scars that could threaten flap viability.
Determining the side on which to base the flap depends primarily on defect location. For laterally based wounds of the ala, distal sidewall, or hemitip, the ipsilateral forehead is usually ideal. Ipsilateral flaps require less length to reach the wound and are therefore less likely to extend into scalp hair. For laterally-based wounds of the medial canthus and proximal nasal sidewall, contralateral flaps have less torque and still reach the defect without difficulty. Midline nasal wounds can use either side as the donor site.
After determining the side on which to base the flap, the surgeon maps the STA, whose path determines template placement. As described in the anatomy section, the surgeon may use the topographic landmarks of the prominent glabellar frown line or medial canthus to identify the location of the artery. If available, a Doppler device can confirm the presence of the artery.
Once the STA is mapped, the surgeon transfers the template to the forehead. To ensure proper orientation, the template is placed on the nasal wound, then rotated 180° toward the side on which the flap will be based. The template is placed in-line with the STA so that the portion corresponding to the distal wound lies just inferior to the hairline. Some patients have prominent vellus hairs on the upper forehead, and the template may therefore be placed lower to avoid hair transfer to the nose, assuming the pedicle has adequate reach. If the flap will not reach the defect, the template can be placed transversely instead, aiming at the contralateral forehead inferior to the hairline ( Fig. 18.8 ). Even without an axial blood supply, the distal flap will have sufficient perfusion via the subdermal plexus.
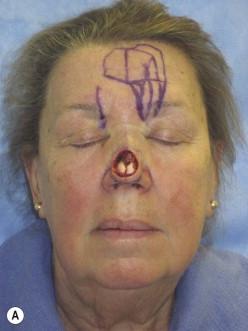
To ensure that the flap will reach the nasal defect, a gauze pad can be stretched from the most proximal part of the pedicle to the distal part of the template near the hairline. A surgical marking pen can be used to indicate the exact point at which the gauze meets the template's distal aspect. Keeping the gauze pressed against the pedicle base, its distal end is rotated 180° toward the midline, avoiding excessive tension, so as not to overestimate pedicle length. If the marked area does not reach the distal defect, the flap may be too short. The surgeon should then place the template more superiorly on the forehead or extend the base more proximally toward the medial canthus. After assuring adequate length, the surgeon can finalize the design. The template is situated at its precise forehead location, and its border outlined, with the proximal pedicle centered on the STA. A pedicle base width of 1.1–1.4 cm safely includes the STA and minimizes the increased torque experienced with a broad pedicle. The flap's templated portion is usually wider than its base. To optimize its blood supply, the narrow portion should widen progressively until it meets the templated portion.
When performing the forehead flap under local anesthesia, careful hemostasis not only maintains a clean surgical field, but it also avoids washout of local anesthesia and helps control patient anxiety. Preoperative oral benzodiazepines may help patients relax during the surgery. Approaching the dissection in a stepwise fashion allows the surgeon to control hemostasis in one area before moving to the next. This discussion addresses dissection of the flap in three separate regions: (1) the templated portion, or distal flap; (2) the mid-pedicle of the flap; and (3) the base, or the most proximal portion at the medial brow.
The plane of dissection of the templated portion of the flap depends on whether it has been planned as a two-stage or a three-stage process. The surgeon may choose a two-stage flap for defects limited to the skin (cartilage is intact) or when free cartilage grafting is possible during the initial stage. Three-stage flaps may be necessary if the defect involves the full thickness of the nose or when the defect has complex contours that would benefit from sculpting at an intermediate stage.
The initial incision is limited to the templated portion of the flap. For two-stage flaps, the thickness of the templated portion ideally matches the depth of the defect as nearly as possible, since aggressive thinning during pedicle division and inset may compromise blood supply. A two-stage flap that is too thick often requires revision, which may be challenging due to fibrosis and scar contraction.
The dissection plane of the templated portion of the flap may vary to match the gradations of the nasal defect. The distal edge of the flap may be cut with a beveled angle to match the delicate skin of the columella, infratip, soft triangle, or alar rim. Sharp dissection can proceed subdermally for 2–3 mm to match the thin nasal skin. The incision is then extended through the fat to reveal the frontalis muscle fibers or galea. The dissection proceeds immediately superficial to the frontalis muscle for most, and preferably all, of the remaining templated portion of the flap ( Fig. 18.9 ). As long as the dissection cleanly separates fat from frontalis, the STA branches, and therefore the flap's blood supply will remain intact. The thickness of the forehead skin usually approximates the thickness of nasal tip defects extending to perichondrium and alar defects extending to the nasal mucosa. If the incision extends through frontalis or galea before reaching the proximal 10–20% of the templated portion of the flap, the flap will usually have excessive volume.
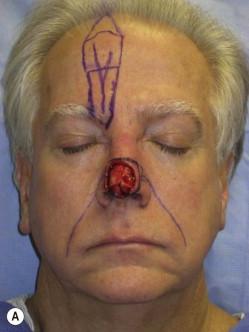
The three-stage forehead flap includes an intermediate stage to lift and contour the flap, usually 3 weeks after the primary inset. Perfect flap thickness at the time of primary inset is therefore neither necessary nor expected. The primary concept behind the three-stage flap is that minimal fibrosis occurs if the galea or frontalis muscle remains intact. The fat is then easier to manipulate during the intermediate procedure. The indications for a planned three-stage flap include full thickness defects requiring distal flap turnover to recreate lining; complex, multi-subunit defects requiring considerable contouring to restore symmetry; patients with a tenuous blood supply; and defects requiring delayed cartilage grafting. Unplanned three-stage flaps may be necessary if primary inset of an intended two-stage flap is too bulky. However, fibrosis after frontalis removal may make contouring more difficult.
Dissection of the templated portion of a planned three-stage flap is straightforward. The incision proceeds through galea and frontalis, and the flap is lifted in the plane deep to the muscle. The flap includes minimal loose connective tissue to minimize bulk. The thick flap usually has greater volume than the defect and can be difficult to inset within the distal nasal skin. The flap edge may be beveled to facilitate insetting ( Fig. 18.10 ).
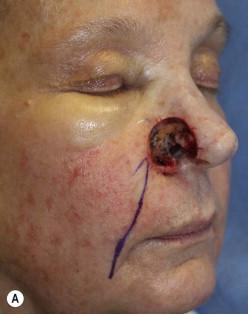
Once the templated portion of the flap is elevated and hemostasis is secure, the dissection proceeds through the frontalis and continues in the plane of the loose connective tissue ( Fig. 18.11 ). A scalpel or blunt-tipped scissors dissects the tissue away from muscle with minimal effort. This dissection strategy poses no risk to the STA and does not vary between a two- versus a three-stage flap.
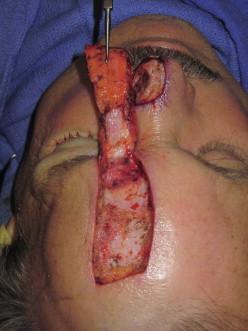
The dissection strategy at the base of pedicle is the same for a two- versus three-stage flap. As dissection of the mid-pedicle approaches the brow, the surgeon will see yellow fat deep to the corrugator muscle. At this point, an incision should be made through the fat to periosteum. The periosteum need not be incised to protect the STA.
Dissection at the pedicle base proceeds deep to the corrugator muscle. Cotton-tipped applicators can be used to push away the corrugator muscle fibers without causing bleeding of the superior orbital plexus ( Fig. 18.12 ). Vessels deep to the corrugator are left intact to minimize venous congestion, but can be precisely electrocauterized if necessary. Flap length is assessed by rotating the flap toward the midline, and the dissection stops when it reaches the nasal wound without tension.
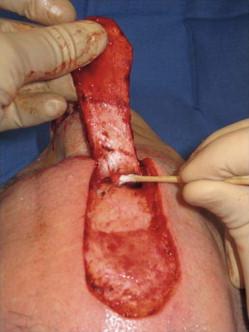
If the flap does not reach the distal defect, the dissection can be carried proximally beyond the orbital rim. Incisions at the lateral edges of the pedicle are carried through the orbicularis oculi, frontalis, and corrugator muscles; a cotton-tipped applicator is used to push all soft tissue away from the periosteum. This blunt dissection should be deliberate and carried out with precise hemostasis. By carrying the dissection proximally, the flap gains considerable length. If the flap still does not reach the nasal defect, horizontal incisions may be made across the frontalis at its undersurface to gain additional movement, being careful to avoid transecting the STA by inadvertently extending the incisions into fat. Intraoperative stretching of the pedicle by an assistant while closing the donor site can also provide some “tissue creep”.
Become a Clinical Tree membership for Full access and enjoy Unlimited articles
If you are a member. Log in here