Physical Address
304 North Cardinal St.
Dorchester Center, MA 02124
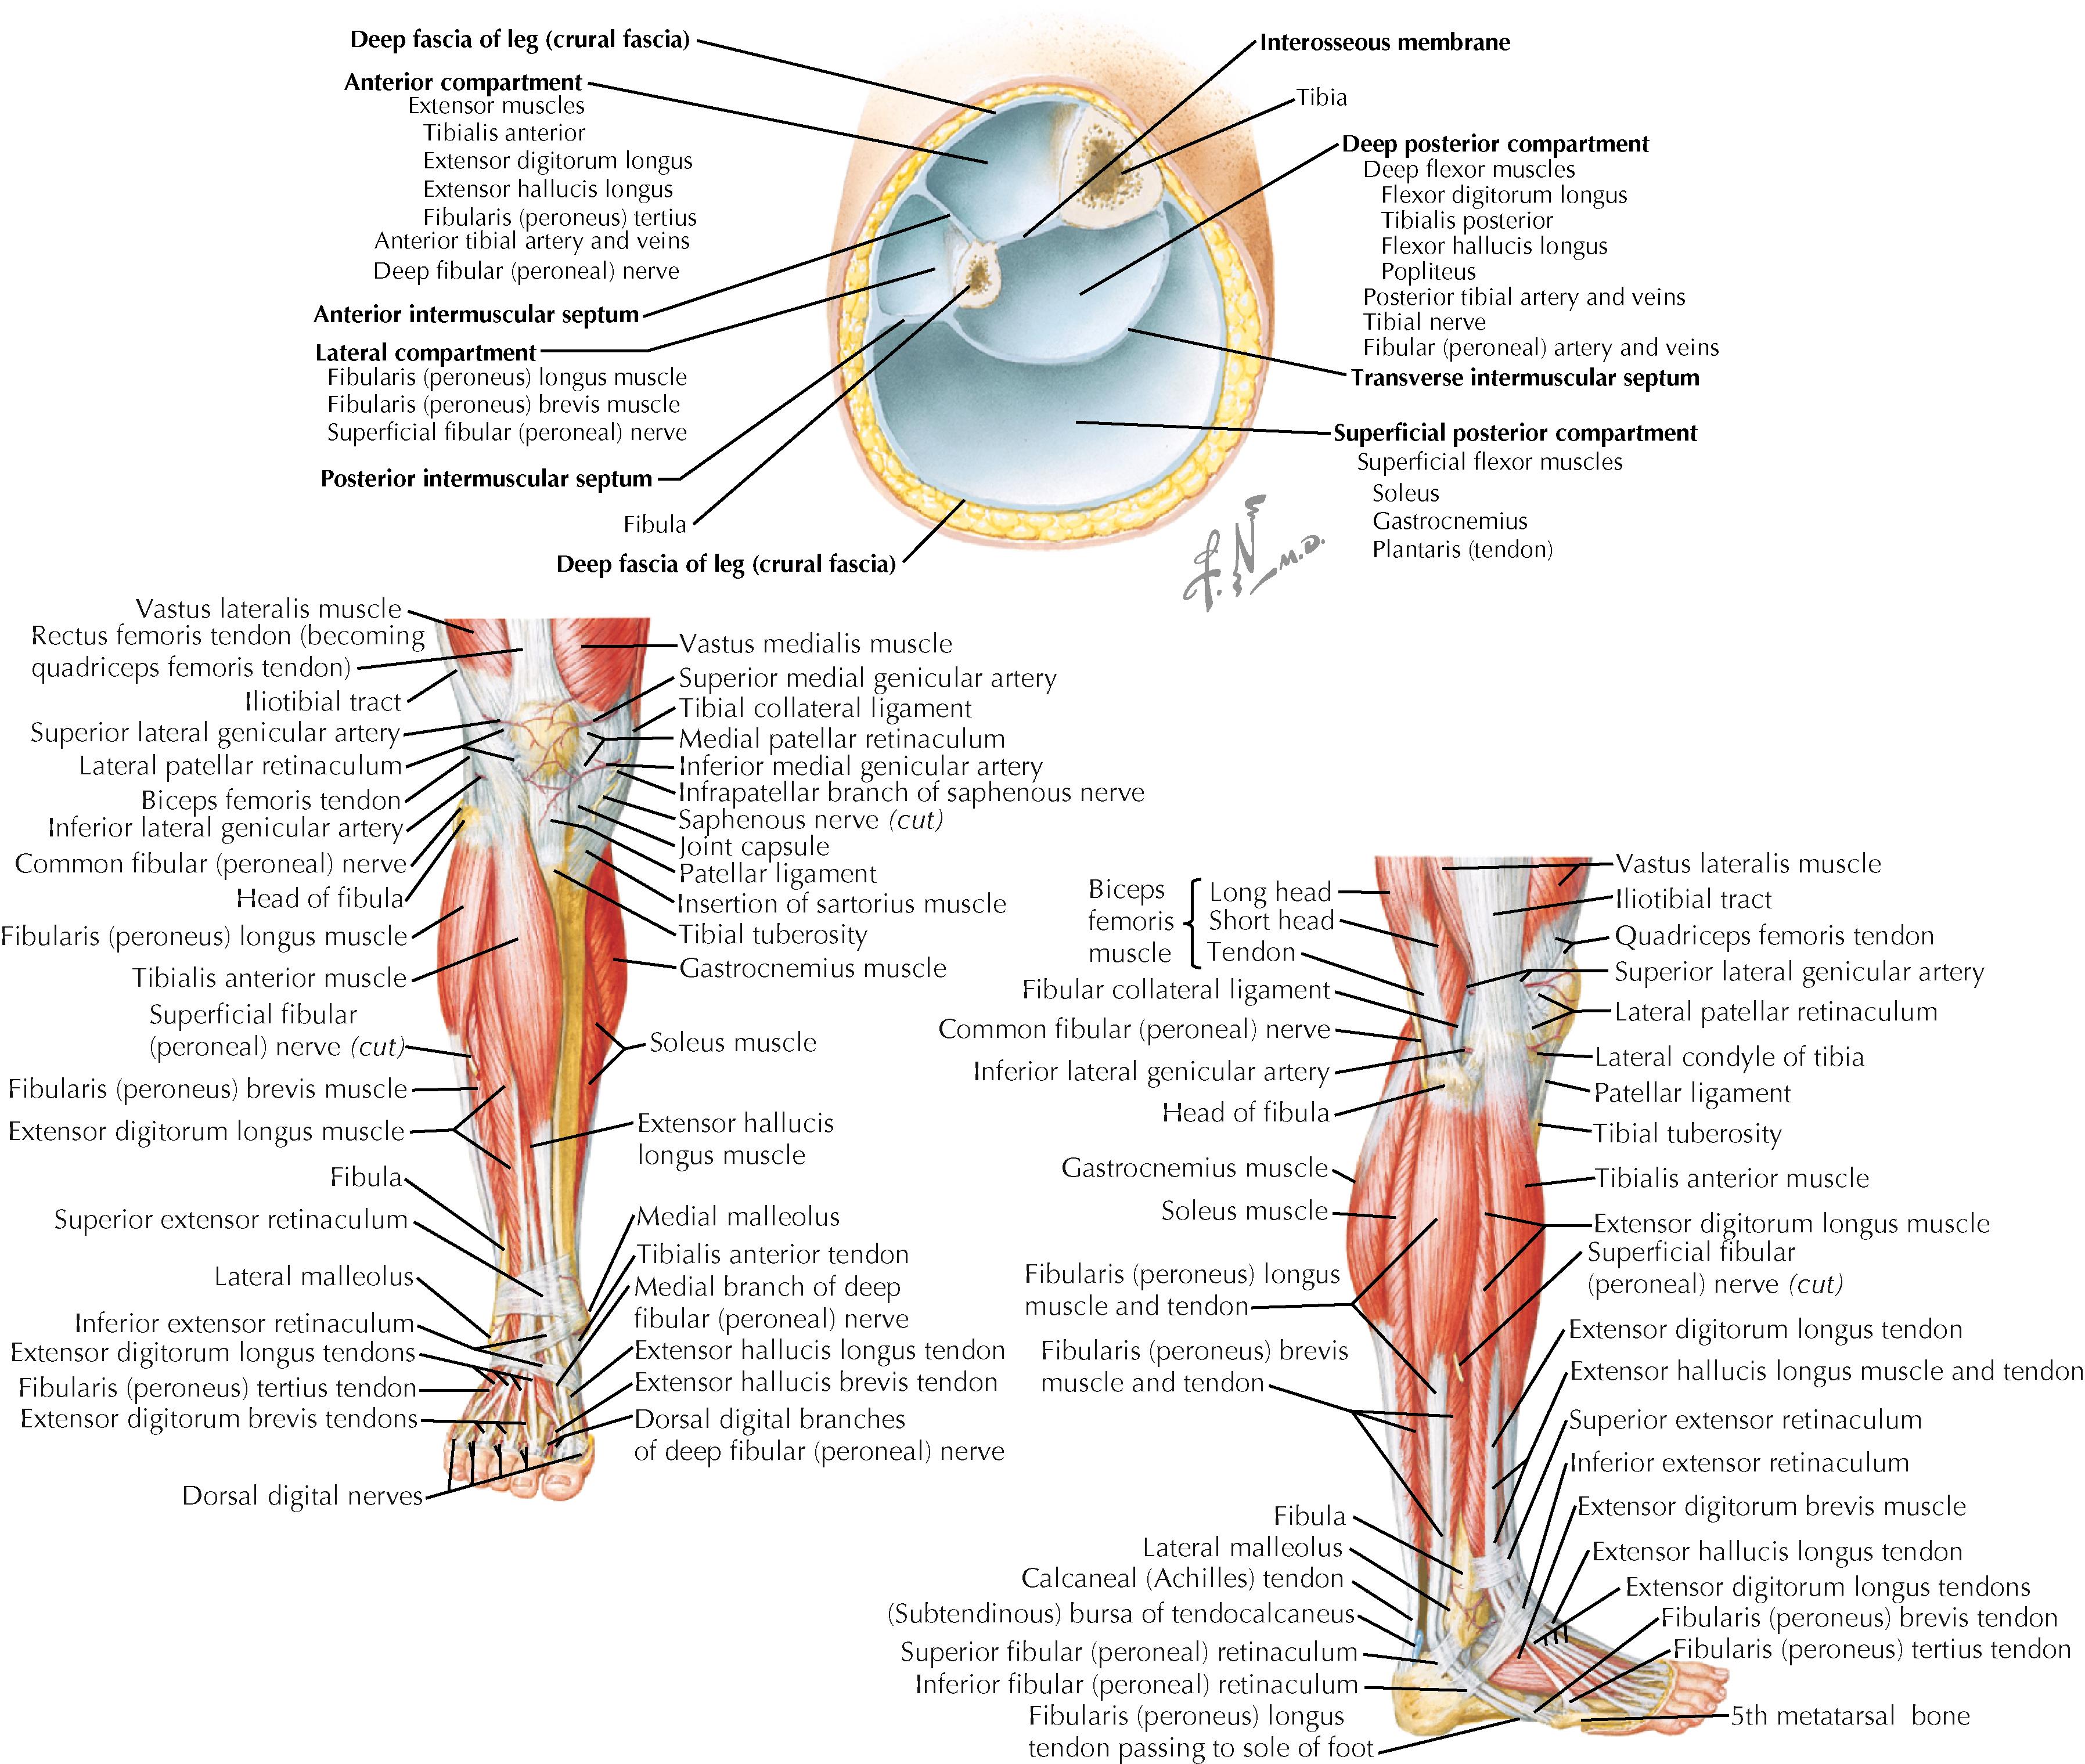
Leg and ankle injuries often occur concomitantly. Evaluation of one must include the other ( Fig. 56.1 ).

A neurovascular examination is essential in addition to making note of the amount of swelling.
Injuries that require immediate treatment include open fractures, dislocations, neurovascularly compromised extremities, and acute compartment syndrome.
Ankle sprains are the most common injury of the ankle.
Chronic pain and disability may result from missed injuries, delayed treatment, or inadequate rehabilitation.
Collect the detailed pain history, including onset, quality, severity, location, radiating and associated symptoms, and exacerbating and relieving factors.
Mechanism of injury will give clues as to the type of injury
Determine whether there is a history of prior injury or surgery. Prodromal symptoms may suggest stress fracture.
In open fractures, determine the timing of injury and environment in which the injury occurred to help guide antibiotic use.
Obtain the detailed history of training activities, including frequency, duration, and intensity.
Collect a detailed pain history.
Type of shoe worn and use of orthotics should be considered.
Evaluate the skin for lacerations and bleeding. Bleeding with fat globules suggests an open fracture.
Evaluate for a deformity that may indicate a displaced fracture or dislocation.
Note excessive swelling or skin tenting because these may lead to open wounds.
Palpation should be systematic, anatomically based, and end with the most painful area.
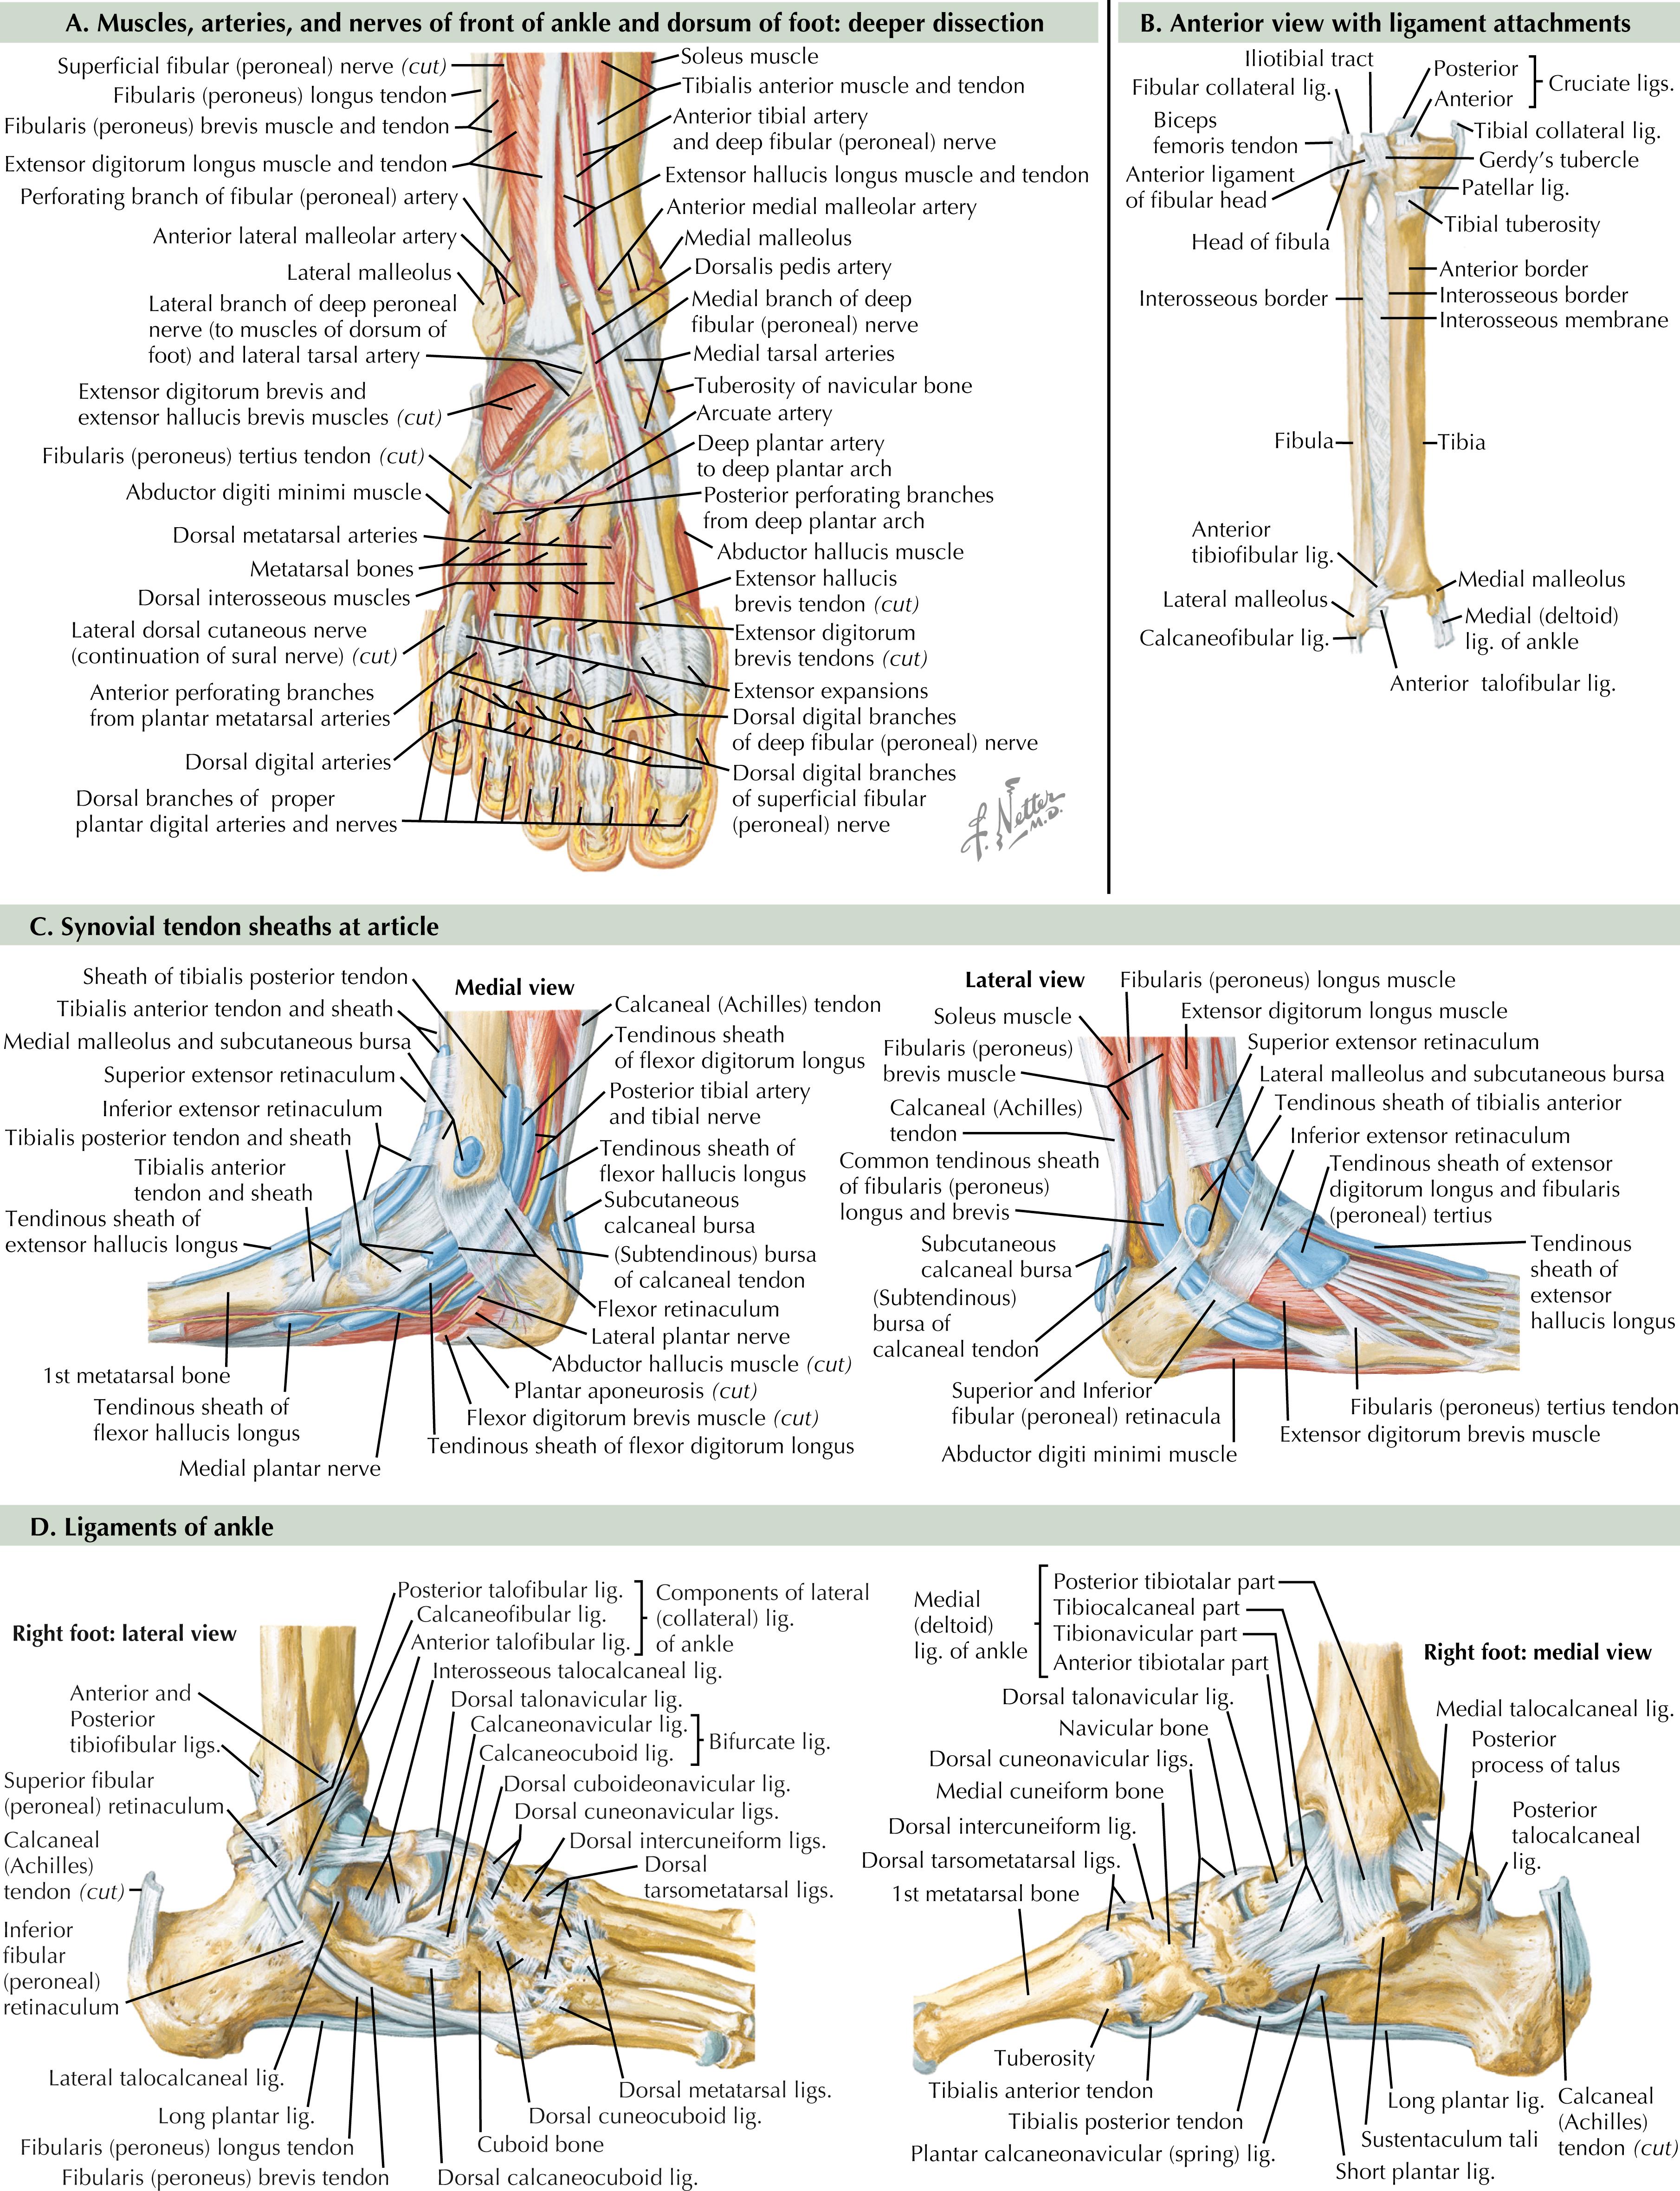
Palpation of pulses may be limited because of the location of pain: the posterior tibial artery is palpated behind the medial malleolus, the anterior tibial artery is palpated beneath the extensor hallucis longus or over the first intercuneiform joint at the dorsalis pedis, and the peroneal artery pulse is found anteriorly over the syndesmosis ( Fig. 56.2A and C ).

Neurologic examination should include the deep and superficial peroneal, saphenous, sural, and posterior tibial nerves.
Palpation of bony prominences should include the tibial crest from the knee to the ankle (see Fig. 56.2B ). Check the joints above and below the site of injury. Palpate the medial and lateral malleoli, beginning at the distal tips and moving proximally. Palpate the forefoot and midfoot.
Palpation of leg compartments should reveal supple compartments; firm compartments may indicate compartment syndrome.
Palpate the lateral ligaments. Tenderness of the syndesmosis is palpated anteriorly between the tibia and fibula just above the ankle joint line and extending proximally several centimeters. Palpate the medial ankle ligaments, including the superficial and deep deltoid ligaments. The anterior band of the deltoid between the medial malleolus and navicular is superficial and can be directly palpated (see Fig. 56.2D ).
Palpation of the tendons should include the Achilles, posterior tibial tendon, flexor hallucis longus (FHL), and the peroneals. Anterior tibial tendon and digital extensors can be individually palpated but are less frequently injured (see Fig. 56.2C ).
The ankle joint is directly palpated medial to the anterior tibialis over the anteromedial recess and lateral to the peroneus tertius over the anterolateral recess; joint effusion can be detected in these two areas.
Palpation of the ankle posteriorly on either side of the Achilles tendon may reveal tenderness caused by a fracture or injury of the trigonal process of the talus, os trigonum, FHL tendonitis, or posterior ankle impingement.
Ankle range of motion is assessed for dorsiflexion and plantarflexion with the knee flexed and extended.
Limitation of dorsiflexion with the knee extended may indicate contracture of the gastrocnemius.
Subtalar joint motion can be isolated by stabilizing the ankle joint with one hand on the lateral side of the ankle and calcaneus. The subtalar joint is then inverted and everted, while the tibiotalar joint is fixed.
Resisted ankle and toe dorsiflexion and plantarflexion should be tested. Tension in the tendons can be assessed at the same time.
Weak plantarflexion and loss of resistance to passive ankle dorsiflexion are hallmarks of Achilles tendon rupture. However, patients may demonstrate minor strength by using toe flexor tendons, posterior tibial tendon, or an intact plantaris muscle.
Resisted inversion with the foot plantarflexed and everted isolates the posterior tibialis muscle.
Resisted eversion tests the peroneals, and detection of instability is enhanced with the ankle in dorsiflexion as well; peroneal tendons can be palpated with the opposite hand from behind the ankle.
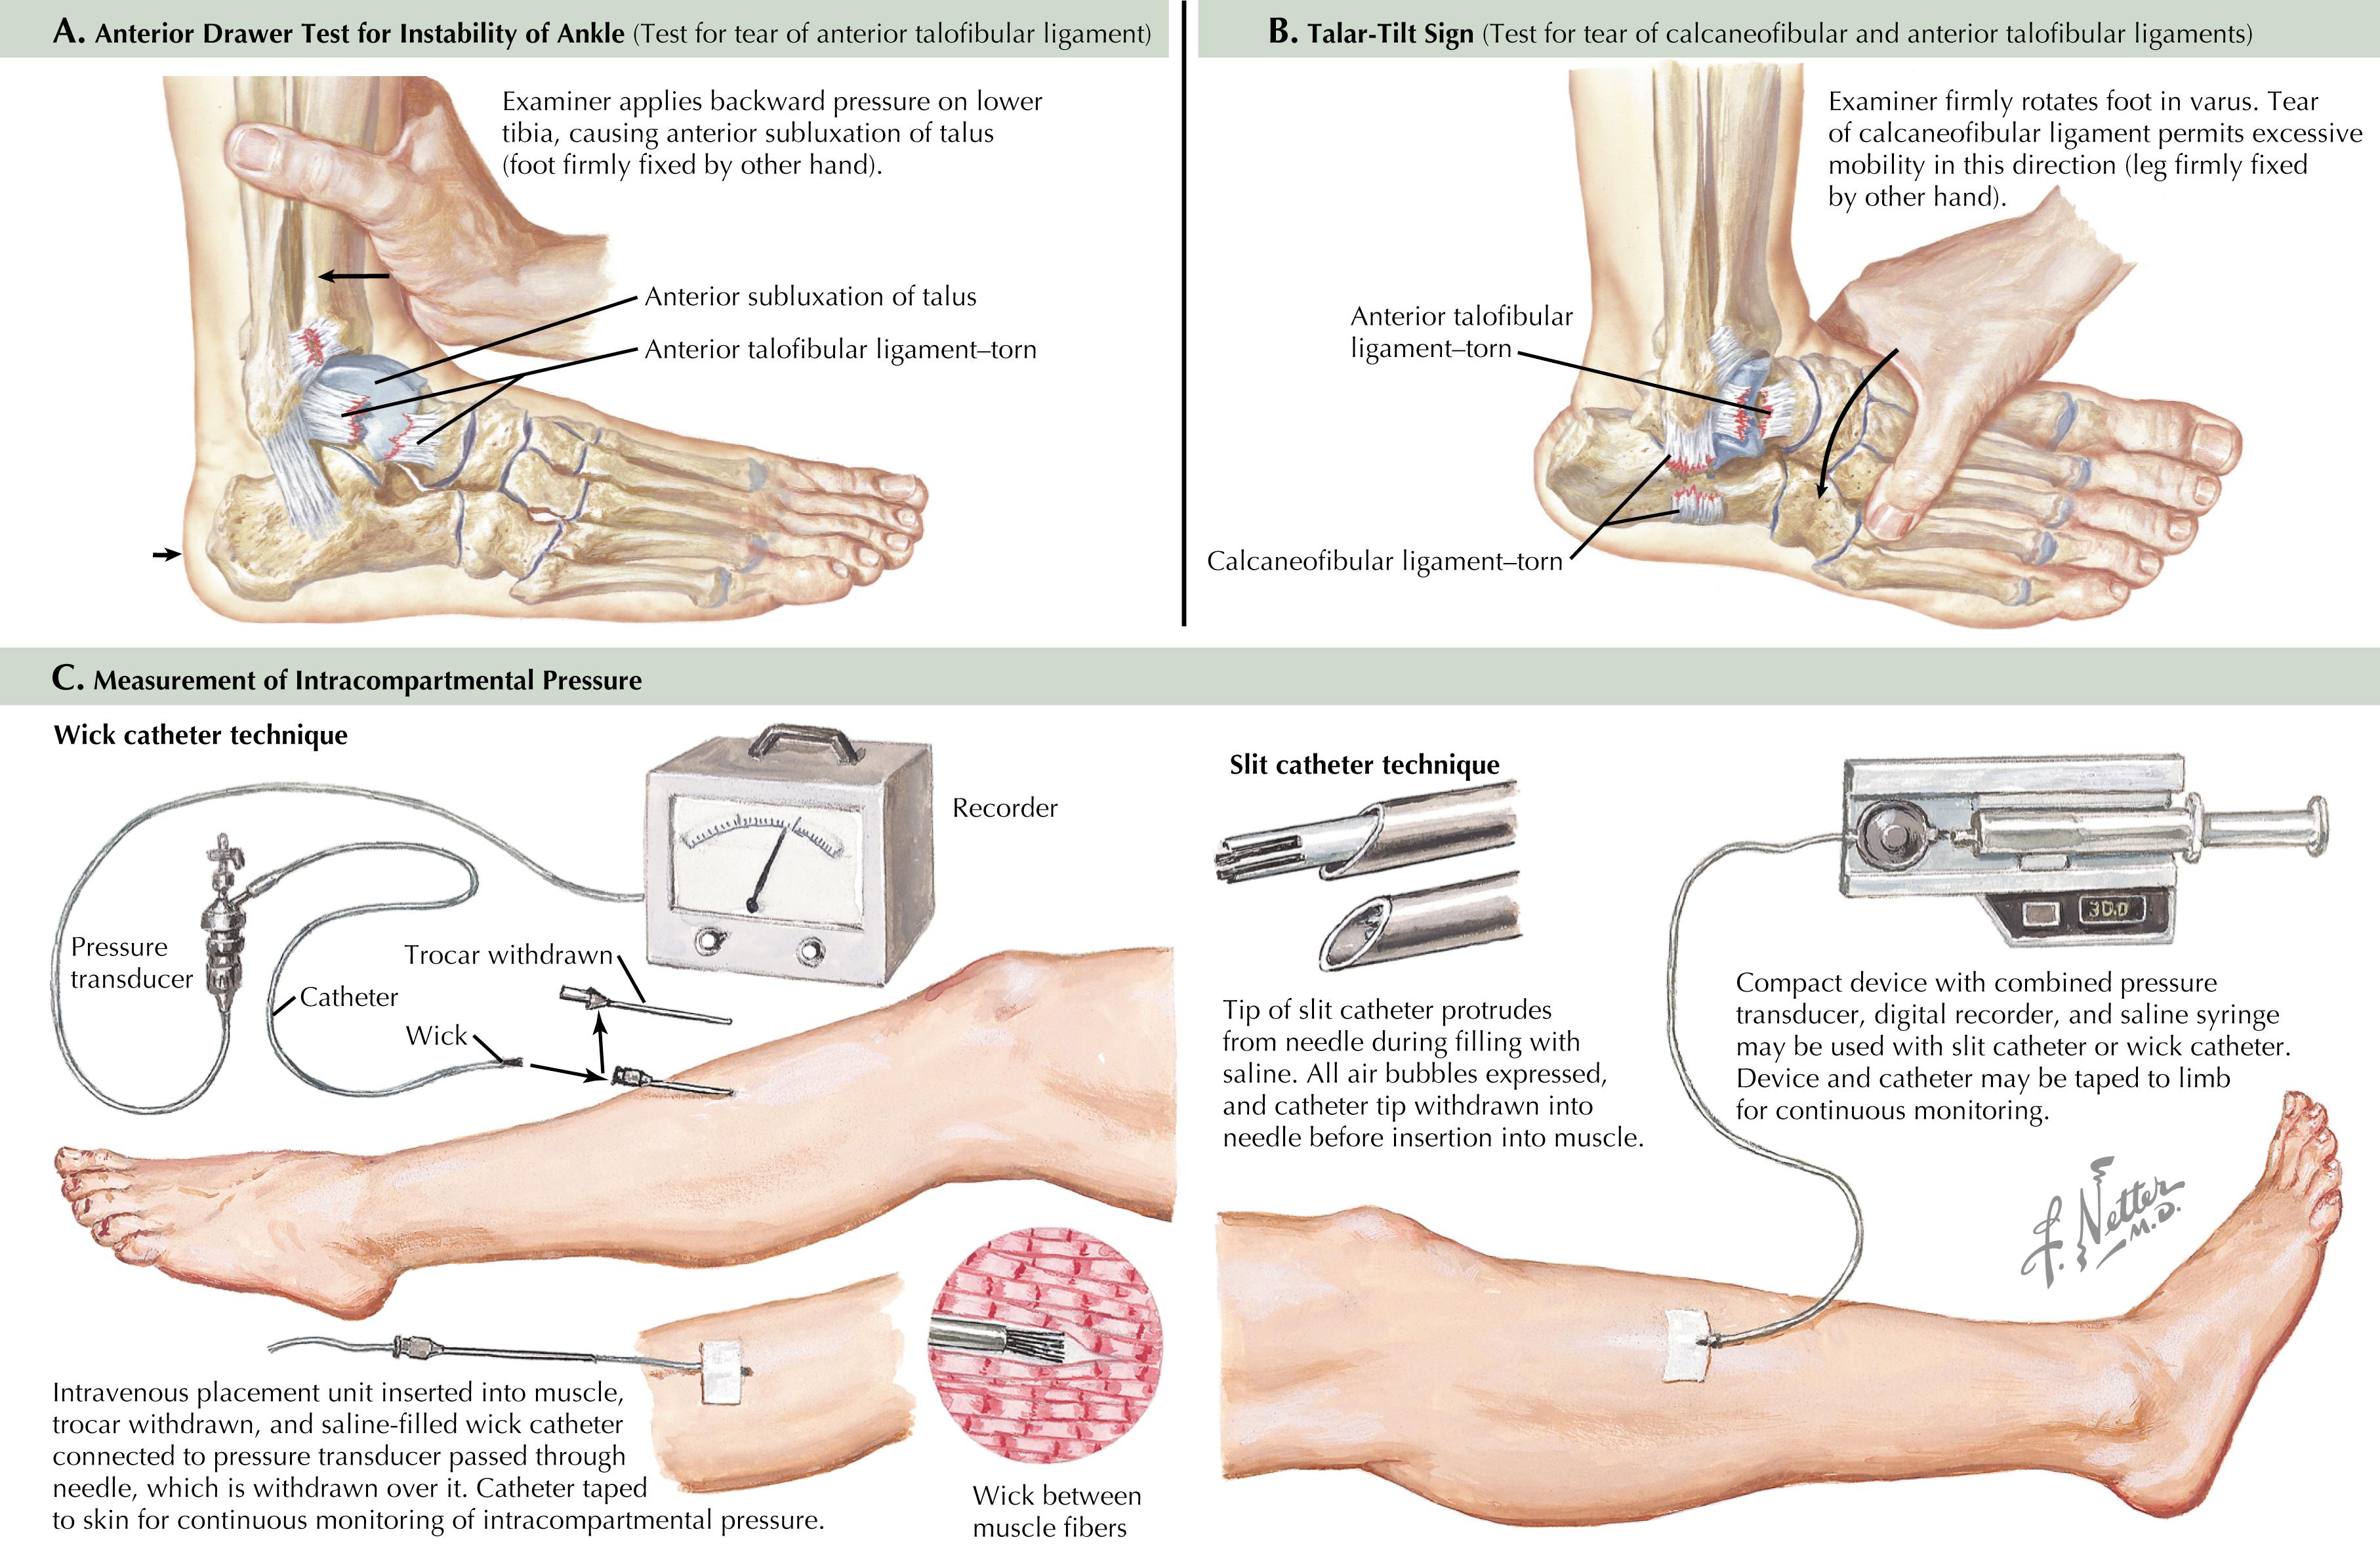
Anterior drawer test: Best performed seated with the knee flexed to relax the gastrocnemius muscle; the ankle is plantarflexed, and the examiner stabilizes the tibia with one hand, while the other hand is placed along the lateral side of the foot with the fingers wrapped around the heel. The ankle is then shucked back and forth gently with emphasis on detecting an anterior translation ( Fig. 56.3A ). This motion should be combined with internal rotation of the talus because true lateral ankle instability is a rotatory phenomenon. The examination is repeated on the contralateral ankle for comparison.

Talar tilt test: With the ankle in less plantarflexion, a varus force is applied to the hindfoot. Internal rotation can enhance the test, which is supposed to detect insufficiency of the calcaneal fibular ligament (CFL) ( Fig. 56.3B ).
External rotation stress test: Can reveal syndesmotic injury; stabilize the tibia and externally rotate the foot and ankle. This is performed with the knee flexed to 90 degrees and the heel locked in neutral. Pain and apprehension may indicate syndesmotic injury. If controlling tibial rotation is difficult, have the patient stand on the involved leg and rotate externally on the foot; this places a more realistic force across the syndesmosis.
Impingement testing: Performed in four locations with the joint in an “open” position and placing mild digital pressure at the point of impingement; the starting position is plantarflexion for anterior impingement and dorsiflexion for posterior impingement. With pressure held, the ankle is then passively moved into a “closed” position, which can then entrap the redundant tissue, reproducing the soft tissue impingement and pain. For bony impingement, the talar osteophyte can often be palpated while moving the ankle in dorsiflexion or plantarflexion with the examiner’s finger over the anteromedial or lateral recess of the ankle. This same maneuver can be performed for the subtalar joint with the foot in an inverted, plantarflexed position and moved into a dorsiflexed and everted position.
Compartment pressure measurement: Most common measuring devices are solid-state battery powered units that use a side-slit catheter (see Fig. 56.3C ). Compartment syndrome is a clinical diagnosis. Compartment pressure measurements should be used as adjuncts to a thorough clinical assessment. Measuring compartment pressures are particularly useful in obtunded or unconscious patients in whom an accurate clinical assessment is not possible. An absolute pressure >30 mmHg or a difference between the compartment pressure and a diastolic blood pressure <30 mmHg are very concerning. Hallmarks of compartment syndrome include pain out of proportion to the presenting injury, with particularly excruciating pain with passive stretching of the muscles in the affected compartment. Other features include firm compartments, pallor, paresthesia, paralysis, and loss of pulses. A diagnosis of compartment syndrome warrants emergent surgical release in the form of fasciotomies.
Plain radiographs: Should include area of injury and the joint above and joint below; a minimum of two views should be performed for each area. Standard views for feet include anteroposterior (AP), lateral, and oblique. Standard views for the ankle include AP, lateral, and mortise (30-degree oblique) views. Radiographs are often performed while patient is bearing weight.
Stress radiographs: Helpful to document instability about the ankle, which may often guide treatment decisions; best compared with a normal contralateral part
Anterior drawer test will show anterior translation of the talus relative to the tibia.
Talar tilt test will show varus tilting of the talus within the mortise.
External rotation stress test will show syndesmotic or medial ankle widening.
Nuclear medicine scans: Helpful to pinpoint bone pathology that is not seen on radiographs; positive findings often nonspecific, and several experts will prefer magnetic resonance imaging (MRI) before this modality
Computed tomography (CT) scans: Often used in the foot and ankle to confirm and better delineate fractures; excellent in showing bony details in three dimensions
MRI: Excellent visualization of soft tissue structures and bone marrow, making it very good at detecting early stress fractures
Become a Clinical Tree membership for Full access and enjoy Unlimited articles
If you are a member. Log in here