Physical Address
304 North Cardinal St.
Dorchester Center, MA 02124
![]() Please access Videos to view the corresponding videos for this chapter.
Please access Videos to view the corresponding videos for this chapter.
The aims of tympanoplasty are the elimination of disease and restoration of function. Restoration of function requires a tympanic membrane; an air-containing, mucosa-lined middle ear (so that the membrane vibrates); and a secure connection between the tympanic membrane and the inner ear fluids. This chapter presents one of the three major techniques of tympanic membrane grafting: the outer surface, or onlay, procedure. This technique is used with rare exceptions by physicians of the House Clinic. Before describing the surgical procedure, the evolutions of tympanic membrane grafting techniques, patient selection, and evaluation and counseling before surgery are discussed.
Systematic reconstruction of the tympanic membrane, the sine qua non of the modern era of reconstructive ear surgery, had its beginning with reports by Wullstein and Zollner. Split-thickness or full-thickness skin was placed over the deepithelialized tympanic membrane remnant. The initial results were very encouraging; however, graft eczema, inflammation, and perforation were common.
As a result of these experiences, most surgeons had begun changing to undersurface (underlay) connective tissue grafts by the late 1950s (see Chapter 10, Chapter 11 ). The House Clinic physicians continued using an onlay technique, but changed to “canal skin,” , which was in fact a periosteum graft covered by canal skin. This change was made in 1958 and resulted in an immediate improvement in results. Draining ears and total perforations continued to have a failure rate reaching 40%.
In 1961, Storrs published the results of a small series of cases in which temporalis fascia was used as an outer surface graft. Changing to this technique resulted in a dramatic improvement in results over the next 3 years: a graft take of greater than 90%.
A patient with chronic otitis media may consult a physician because of a hearing impairment or discharge from the ear. Occasionally, the patient may have symptoms of more advanced chronic ear pathology, such as pain, vertigo, or facial nerve paralysis. Careful evaluation of the symptoms and findings allows the otologist to determine the need for surgery, its urgency, and the anticipated result. Only by completing the evaluation can the patient be advised properly. A good surgical result should not be a disappointment to the patient if there is proper counseling.
Let us assume, for the purposes of this chapter, that the patient has a dry central perforation. The ear may drain briefly with upper respiratory infections or if water is allowed to get into the ear. This discharge responds promptly to local medication. The preoperative treatment of the draining ear is discussed in depth in Chapter 16 . When one is dealing with a dry central perforation, or inactive disease, surgery is elective, and the patient (or family) should be so informed. Assuming that the problem is unilateral, with only a mild hearing impairment, the only indication for surgery is to avoid further episodes of otorrhea.
In children it is best (from a psychological standpoint) to avoid elective surgery of any type from the ages of 4 to 7 years. In ear surgery it is wise to wait until after age 7 so as not to lay the groundwork for serous otitis media. If the problem is bilateral, hearing is impaired, and the ears do not drain often, fitting hearing aids in each ear may be preferable for children younger than 8 years of age; however, the parents have to make the decision. At age 8 and thereafter, the patient (and child) should be allowed to make the decision.
When contemplating tympanoplasty, the House Clinic physicians do not usually test to determine the status of the eustachian tube. The philosophy has been that tubal malfunction per se is not a contraindication to tympanoplasty, but that the operation would not be successful unless tubal function is reestablished. Many patients exhibiting no evidence of tubal function on the various available tests used in the past have been operated on to eliminate a chronic drainage problem. When the ear heals, the drum is usually mobile. Reexploration in some of these patients has revealed normal mucosa in the tubotympanum, where, before surgery, the mucosa was of very poor quality. It would seem that the surgery, in eliminating infection and sealing the ear, is in itself the best treatment for the obstructed tube.
What is the outlook with surgery, and what are the risks and complications? A surgeon must relate his or her own experience. House Clinic physicians explain that the likelihood of obtaining a permanently healed, dry ear, which may be treated normally, is better than 90%. “The only complication that happens with any degree of regularity, and is serious, is a total loss of hearing in the operated ear. That likelihood is no more than 1%. All of the other things listed here are either very remote or are temporary.” (“Listed here” refers to the Risk and Complications section of a patient Discussion Booklet. The Risk and Complications Sheet is given to the patient at the time the surgery is scheduled, which allows the patient to review the sheet at their leisure. Appendix 8.1 is the Risk and Complications Sheet.)
If the patient is a child, the preoperative visit occurs the day before surgery. The surgery is done under general anesthesia the following morning. The child is released to the parents’ care in the afternoon.
For adults, the preoperative visit is sometimes on the morning of surgery. The patient goes to the hospital for afternoon surgery, which is done under local or general anesthesia. The patient may be kept in the hospital overnight, depending on many circumstances.
The smoothness with which the operation proceeds depends on the ability of the surgeon, the organization of the team (anesthesiologist and surgical nurse), and the arrangements in the operating room. The patient’s hair is shaved 3 cm above and behind the ear. The skin is cleansed with an iodine-based soap and rinsed with water. A sterile plastic adhesive drape is placed after applying a tincture of benzoin. The mattress of the operating table is taped securely to the table to prevent it from slipping when the table is tipped from side to side or into the Trendelenburg position. The patient is placed on the table with his or her head at the foot of the table, which allows the circulating nurse or anesthesiologist free access to the table controls, which are at the feet of the patient. The patient’s head and shoulders should be as near to the surgeon’s side of the table as possible. A pillow is placed under the patient’s knees. The Bovie plate goes under the patient’s buttocks.
Ear surgery can be performed with the patient under local anesthesia in many cases. The decision depends on the age of the patient and other factors. Lidocaine with 1:100,000 epinephrine is used for postauricular and meatal incisions. Some of the injection material should find its way under the skin of the posterior superior wall of the canal (the vascular strip) and into the middle ear. General anesthesia is used in children, in most mastoid surgery, and in procedures that require more than 1.5 hours of operating time. The anesthesiologist should be at the feet of the patient (which is actually the head of the table) to allow the surgeon and scrub nurse complete freedom at the patient’s head.
A few useful suggestions for the anesthesiologist are as follows:
Have extra-long tubing for the gas machine to allow seating at the foot of the patient.
Start the intravenous infusion in the forearm, and extend the tubing to the foot of the table.
Place the blood pressure cuff on the arm opposite the ear to be operated on.
Be certain that the patient is secured to the table with wide adhesive tape. The eyes should be taped shut.
Particular attention should be paid to the operating room arrangement ( Fig. 8.1 ). The anesthesiologist is at the patient’s feet, far from the operative field, and the scrub nurse is directly across from the surgeon, where the nurse may be of the most assistance. The same arrangement, minus the anesthesiologist, is used for procedures performed with the patient under local anesthesia.
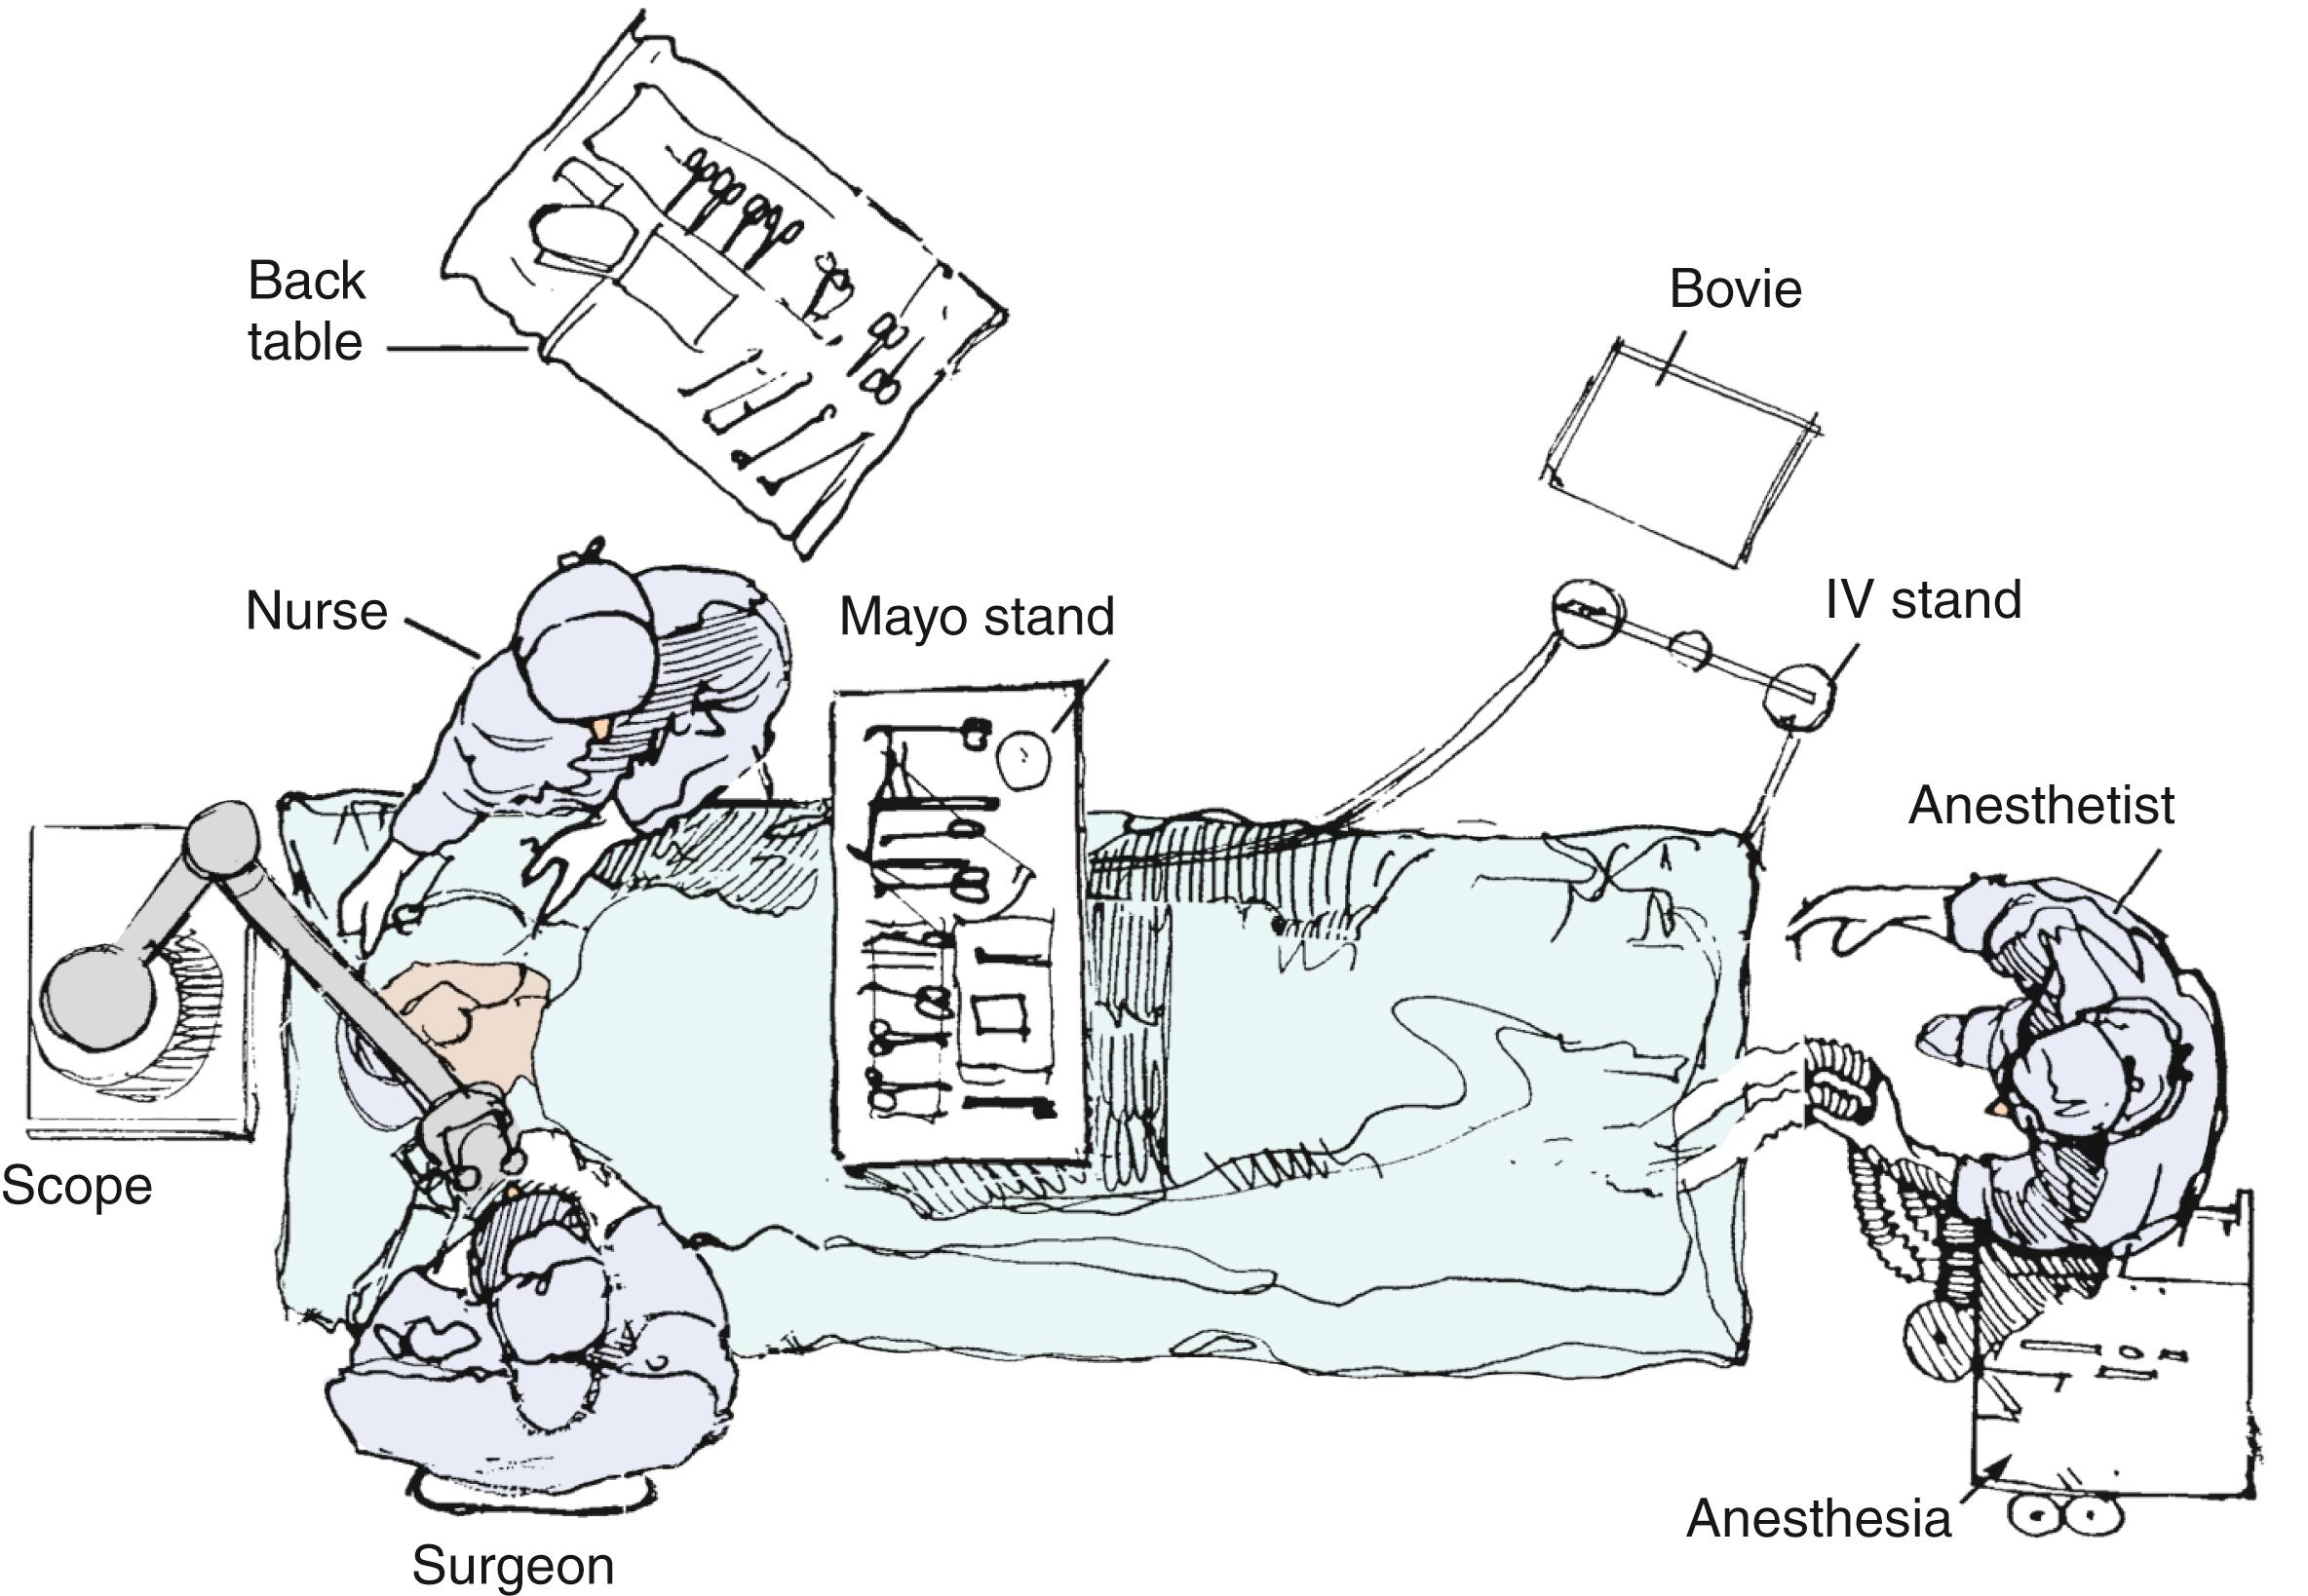
It is important for the comfort of the surgeon that the patient is in a satisfactory position. The table is usually placed in a few degrees of the Trendelenburg position and rolled slightly toward the surgeon. The patient’s head is adjusted as necessary, usually flexed slightly onto the opposite shoulder. The surgeon should be comfortably seated on a chair with a back support. The surgeon should use the back support and be in a comfortable position so that all the back and arm muscles are relaxed.
The lateral surface grafting technique involves eight steps: (1) transmeatal canal incisions, and elevations of the vascular strip; (2) postauricular exposure, and removal and dehydration of the temporalis fascia; (3) removal of the canal skin; (4) enlargement of the ear canal by removal of the anterior (and inferior) canal bulge; (5) deepithelialization of the tympanic membrane remnant; (6) placement of the rehydrated fascia on the outer surface of the remnant, but under the manubrium; (7) replacement of the canal skin; and (8) closure of the postauricular incision and replacement of the vascular strip transmeatally.
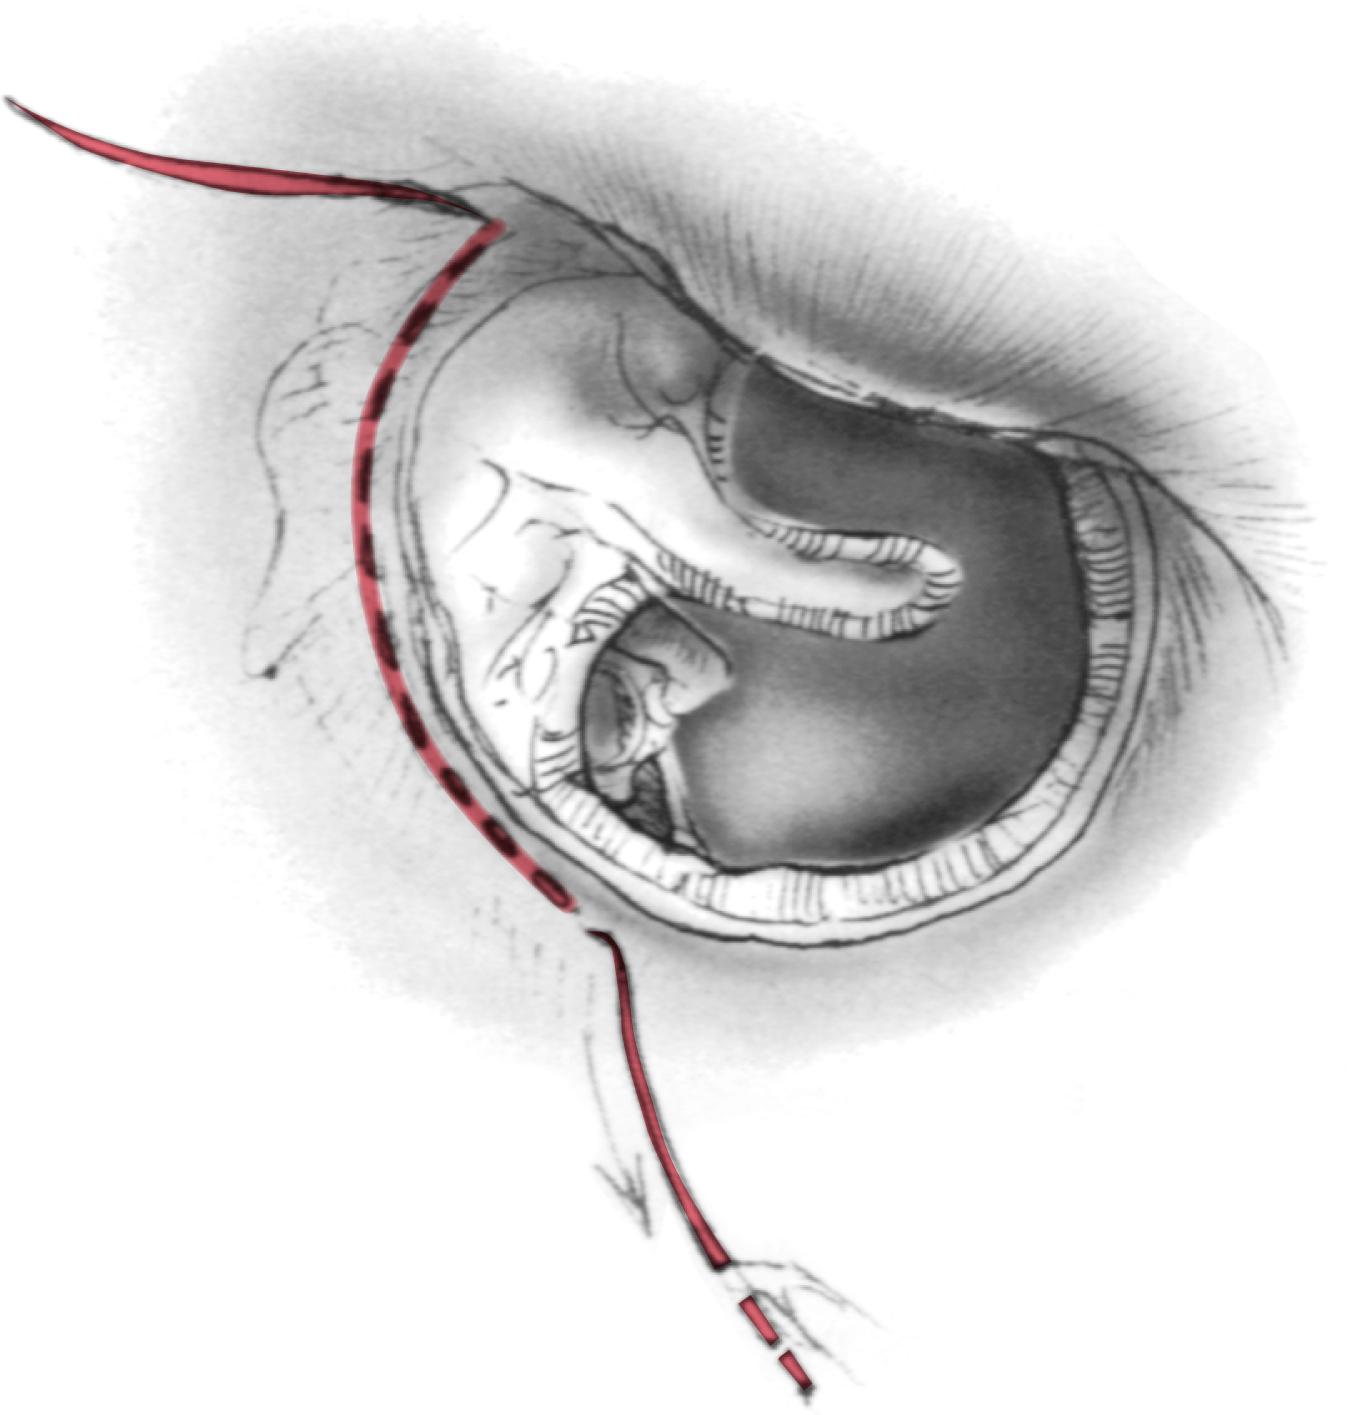
Incisions are made along the tympanomastoid and tympanosquamous suture lines, demarcating the vascular strip with a No. 1 (sickle) knife ( Fig. 8.2 ). The vascular strip is the area of the canal skin that covers the superior and posterior portions of the ear canal between these two suture lines. It is easily demarcated from the skin of the remainder of the ear canal because of its thickness and the fact that it balloons up when a local anesthetic is injected into the area. The vascular strip is elevated from the bone, from within to outward using a round knife ( Fig. 8.3 ).
A semilunar incision is made in the outer third of the ear canal, using a Beaver knife with a No. 64 blade, connecting the two incisions already made along the border of the vascular strip ( Fig. 8.4 ). The knife blade is angled toward the bone to thin the 1- or 2-mm section of the membranous canal included.
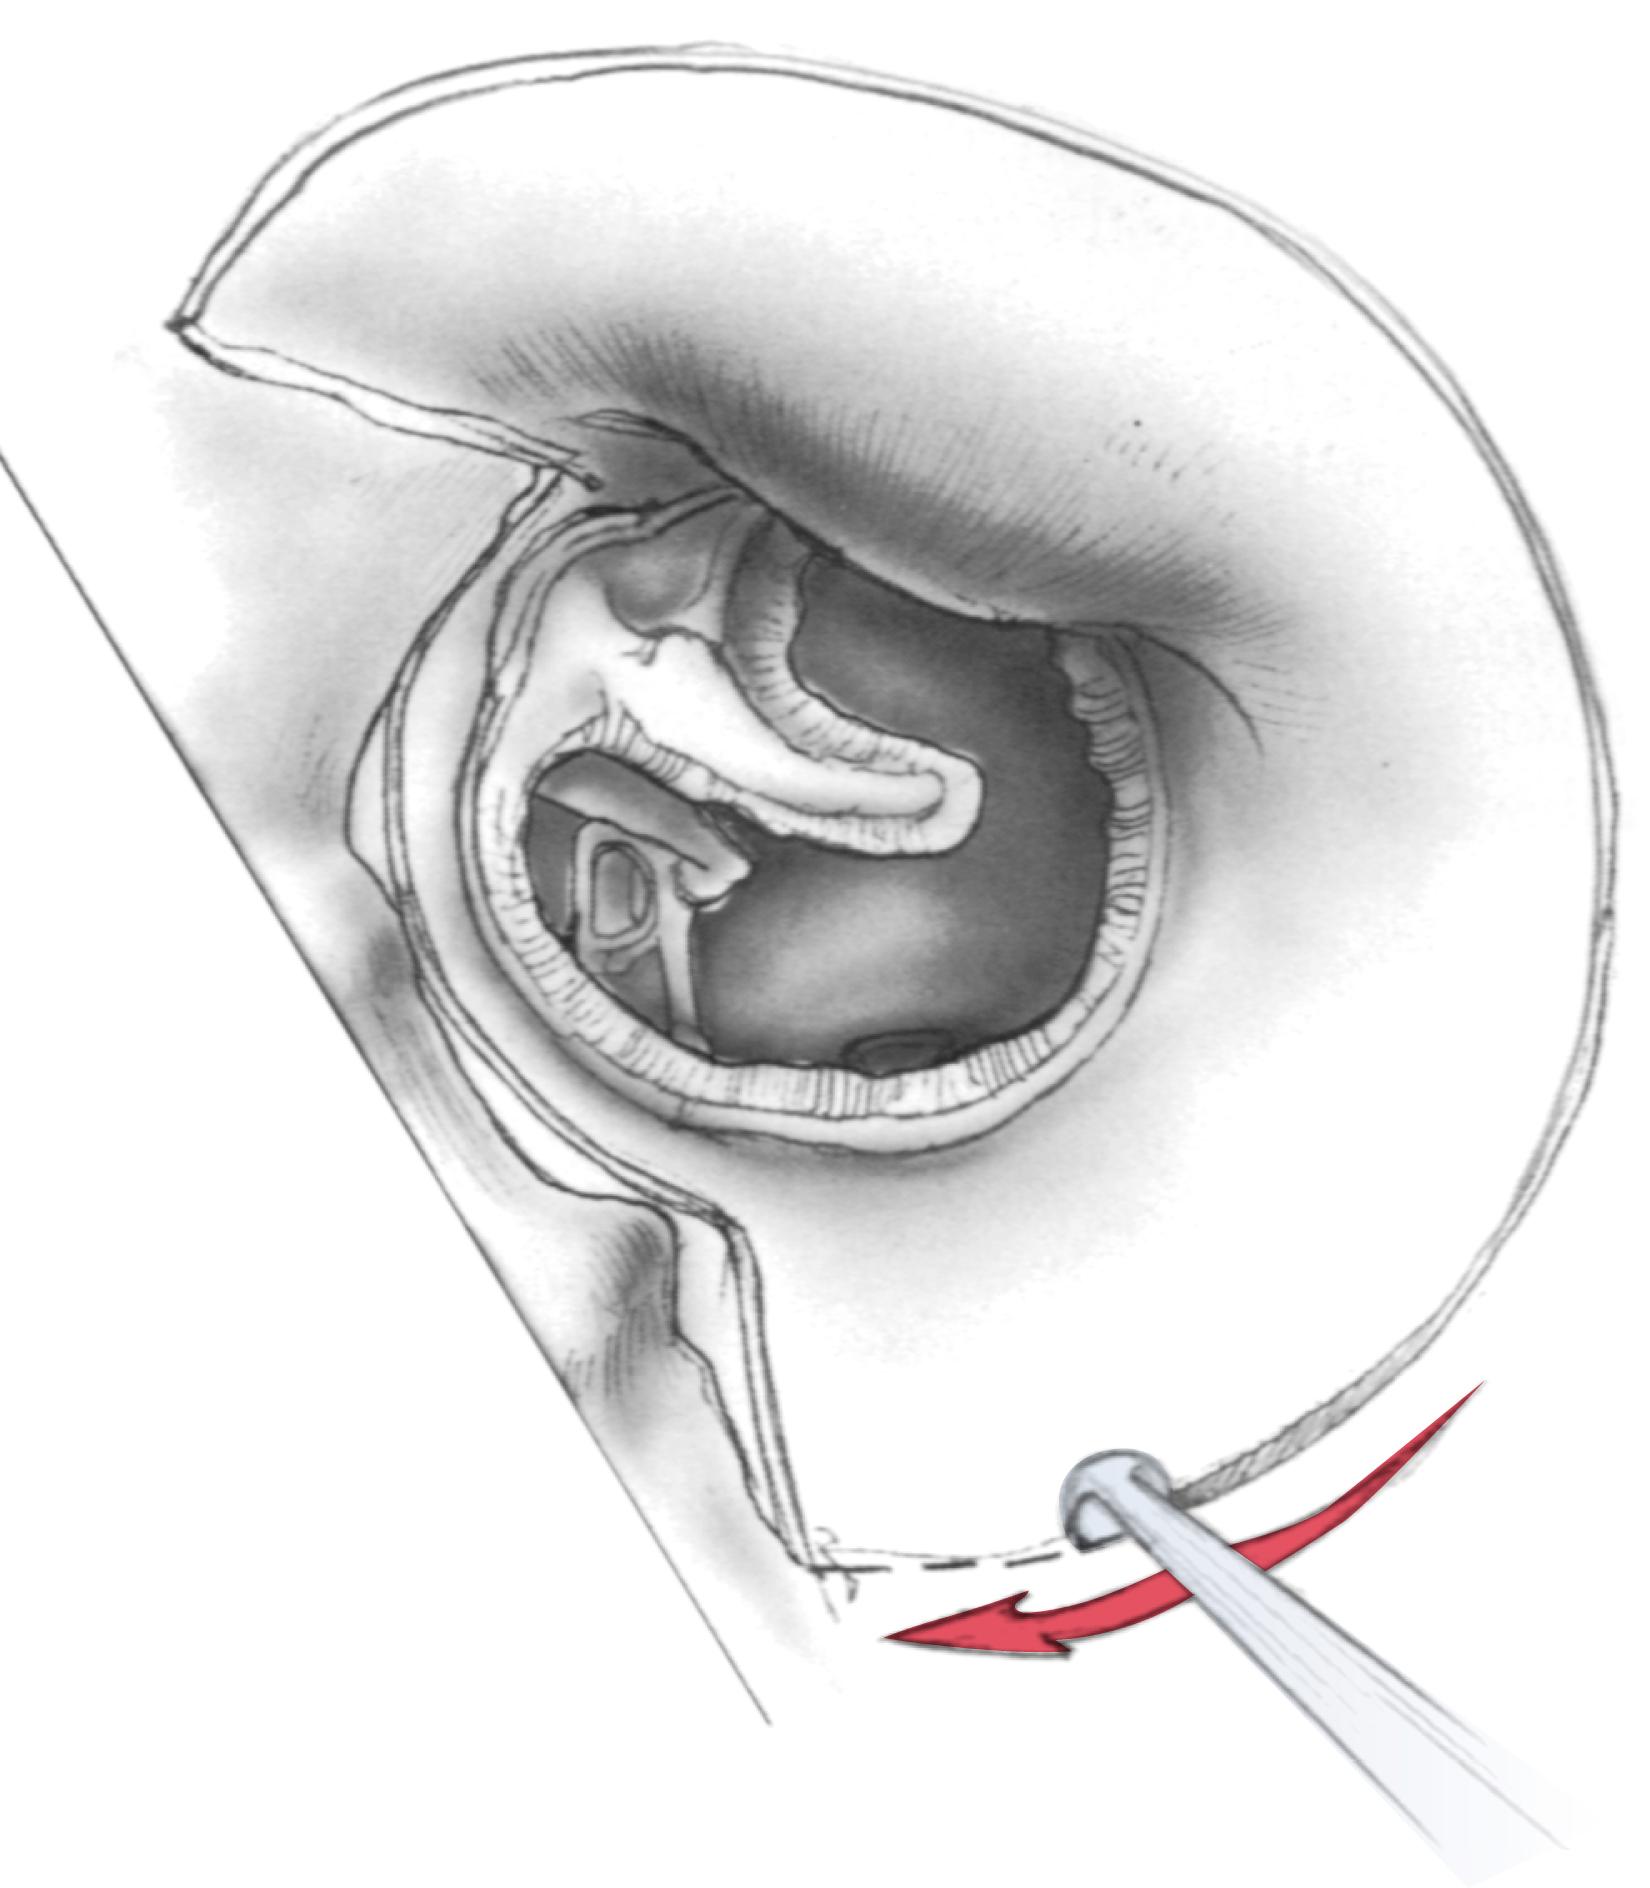
The skin incision must provide adequate exposure for the operative field. It should extend far enough forward superiorly and inferiorly to allow adequate exposure of the bony meatus when the ear is retracted forward. Failure to do this may result in difficulty seeing structures in the posterior part of the middle ear. The superior portion of the incision begins at the most anterior extent of, and 1 cm above, the postauricular fold. It is continued into the postauricular fold at the level of the lower border of the muscle and extends inferiorly under the lobule of the ear.
Exposure of the temporalis fascia is facilitated if ample local anesthetic has been injected to balloon the area. A retractor is inserted to retract the skin margins in this area and to obtain hemostasis. By lifting up on the retractor, one may pull the areolar tissue away from the fascia, facilitating the dissection and ensuring that all the loose areolar tissue is lifted off the fascia before the fascia’s removal.
A local anesthetic is injected under the fascia to elevate it slightly from the underlying muscle. A 2 × 2 cm piece of fascia is removed. The fascia is spread on a polytef (Teflon) block, undersurface upward, and any adherent muscle is removed. The fascia is placed on a fascia press, an absorbable gelatin sponge (Gelfoam) placed on the fascia, and the press closed. The press is opened after 5 minutes and the Gelfoam removed; the fascia, now smooth and partially dehydrated, is left attached to the press. The press, with the attached fascia, is placed under an electric lamp to complete the dehydration process.
An incision is made through the soft tissue above the meatus, from the root of the zygoma, horizontally, along the linea temporalis. This horizontal incision is extended posteriorly to the level of the skin incision. The incision is extended inferiorly, below the linea temporalis, following the postauricular incision, incising the periosteum until the incision curves forward, down to the level of the floor of the ear canal. The periosteum is elevated superiorly (under the temporalis muscle), posteriorly, and anteriorly, using a Lempert elevator, to obtain adequate exposure of the mastoid cortex. A self-retaining retractor is inserted to retract the auricle and vascular strip forward, exposing the ear canal.
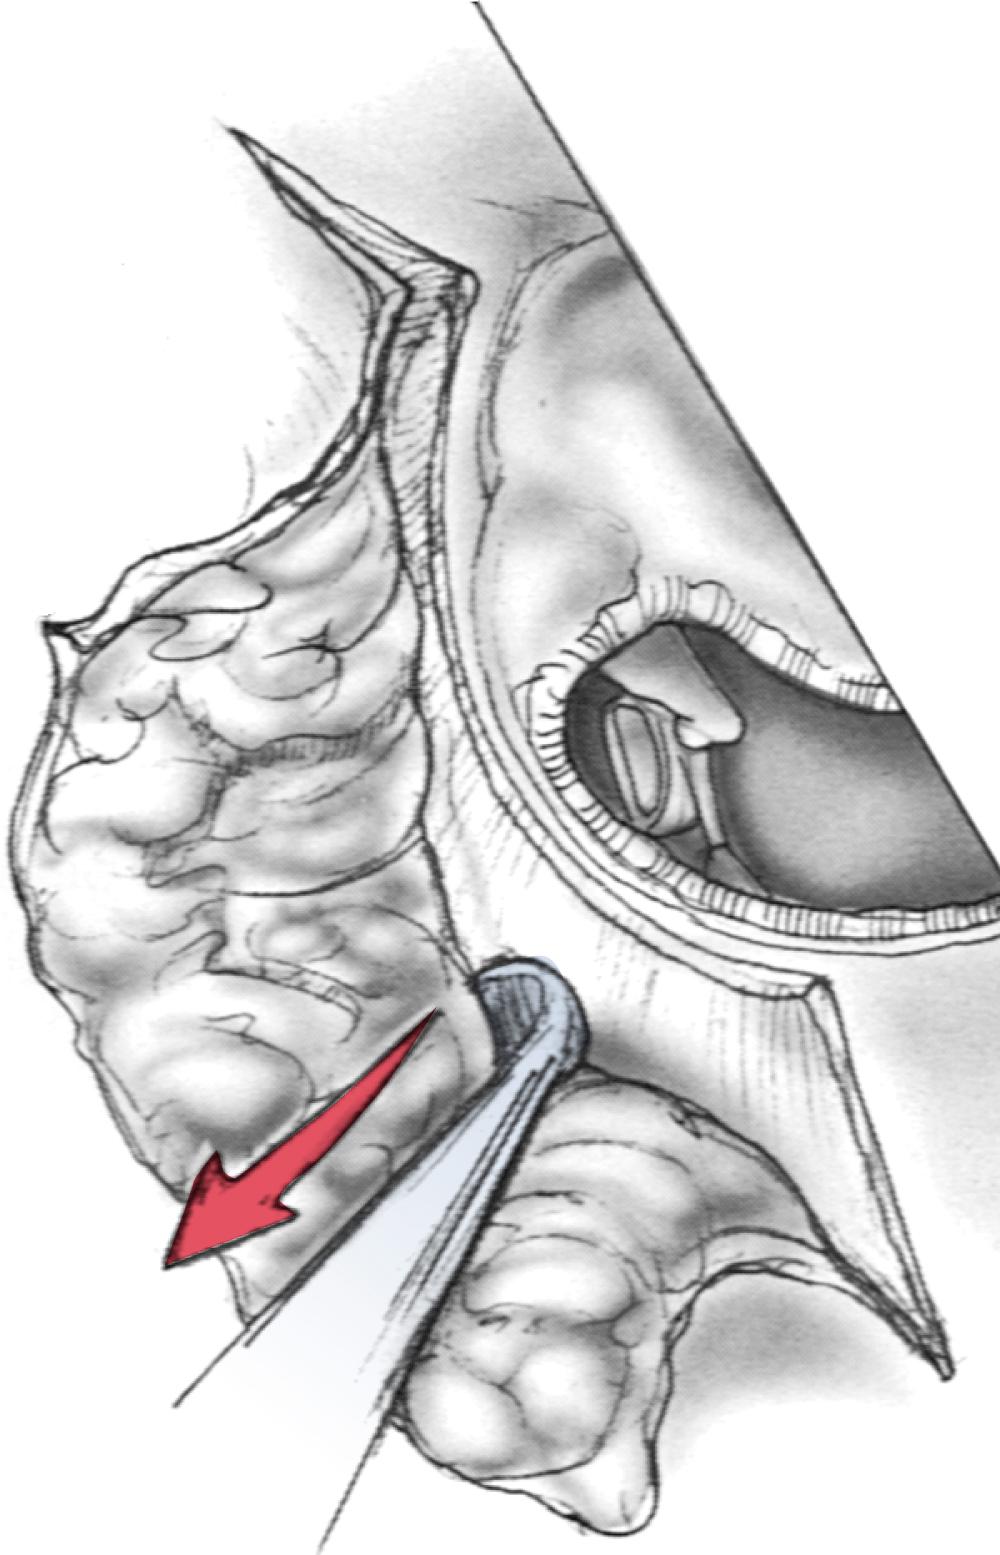
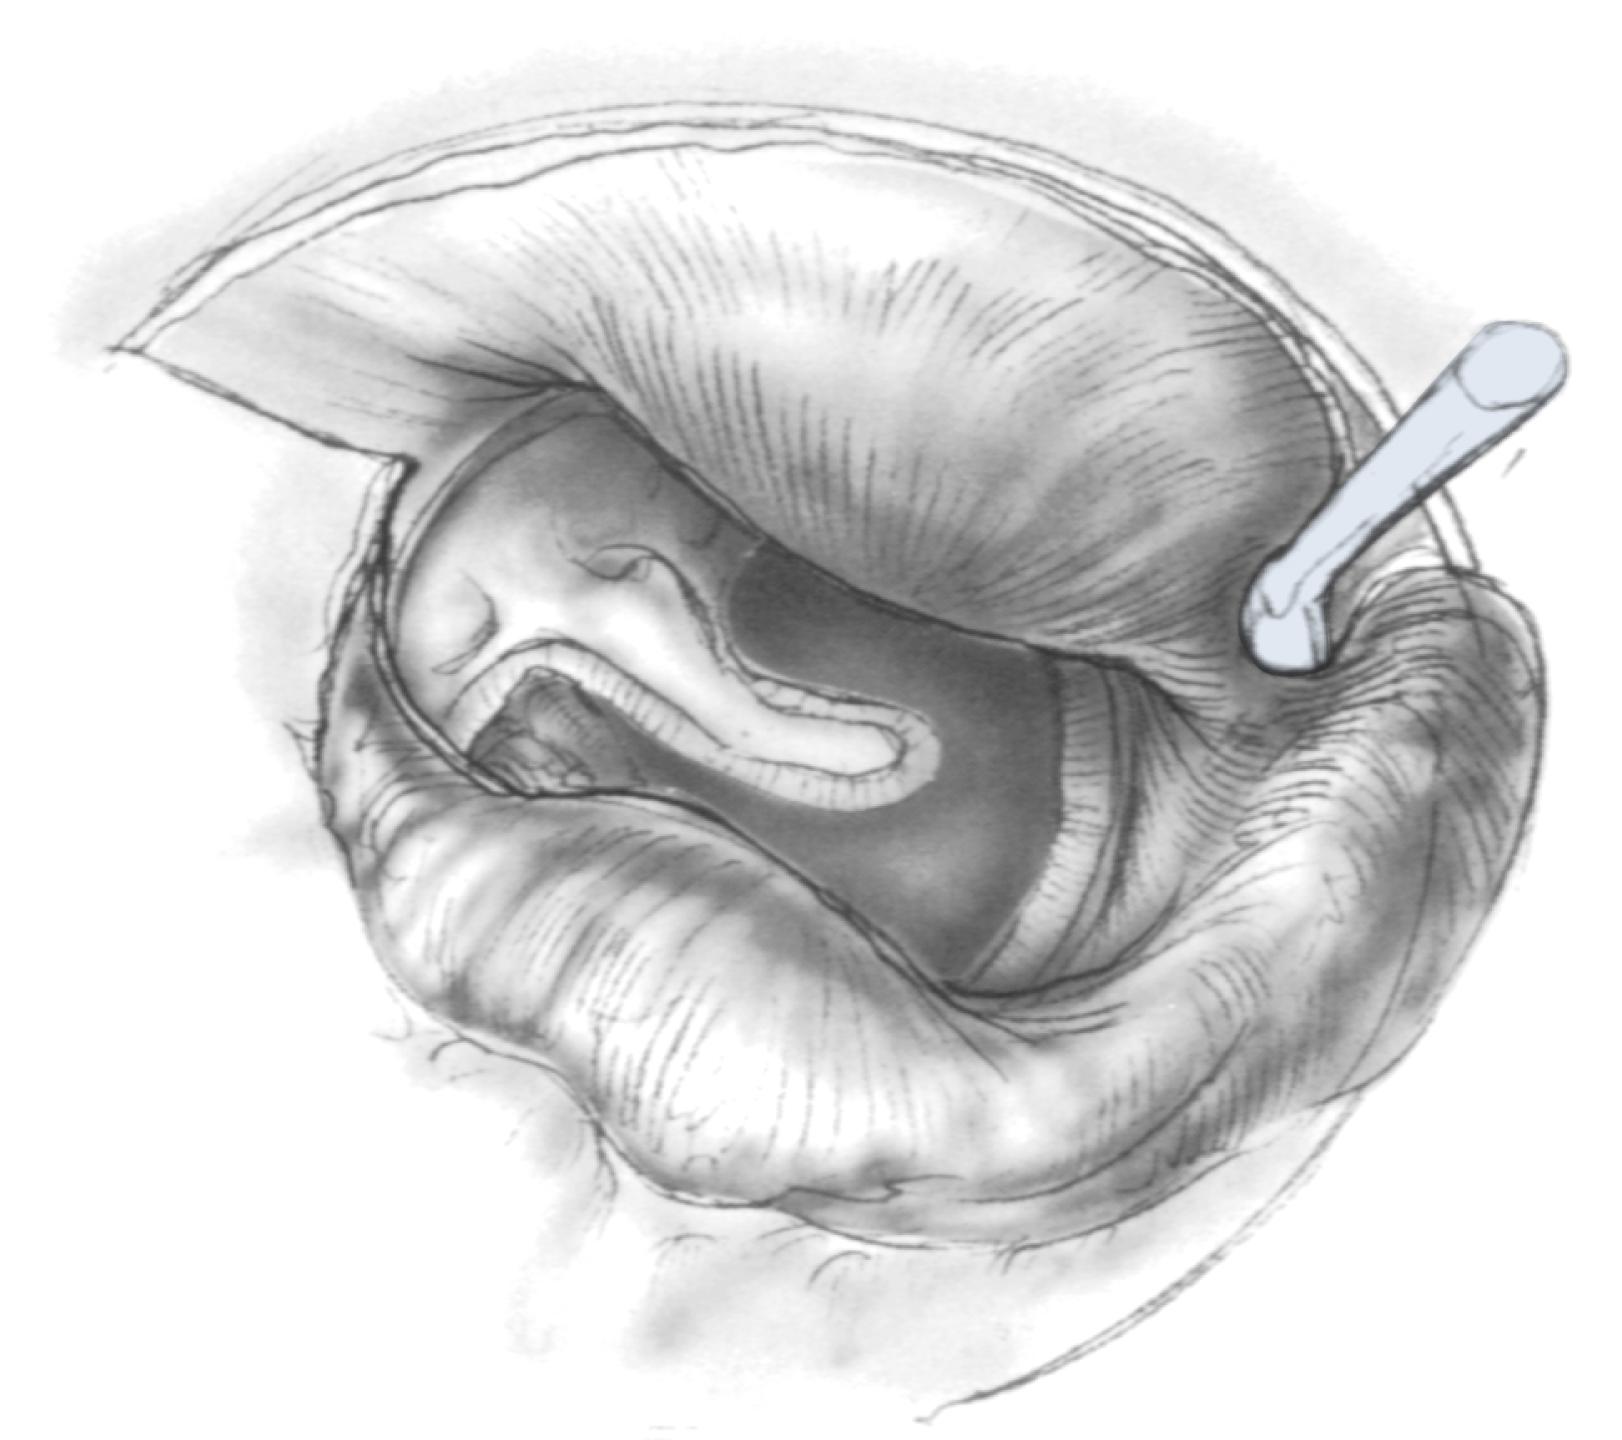
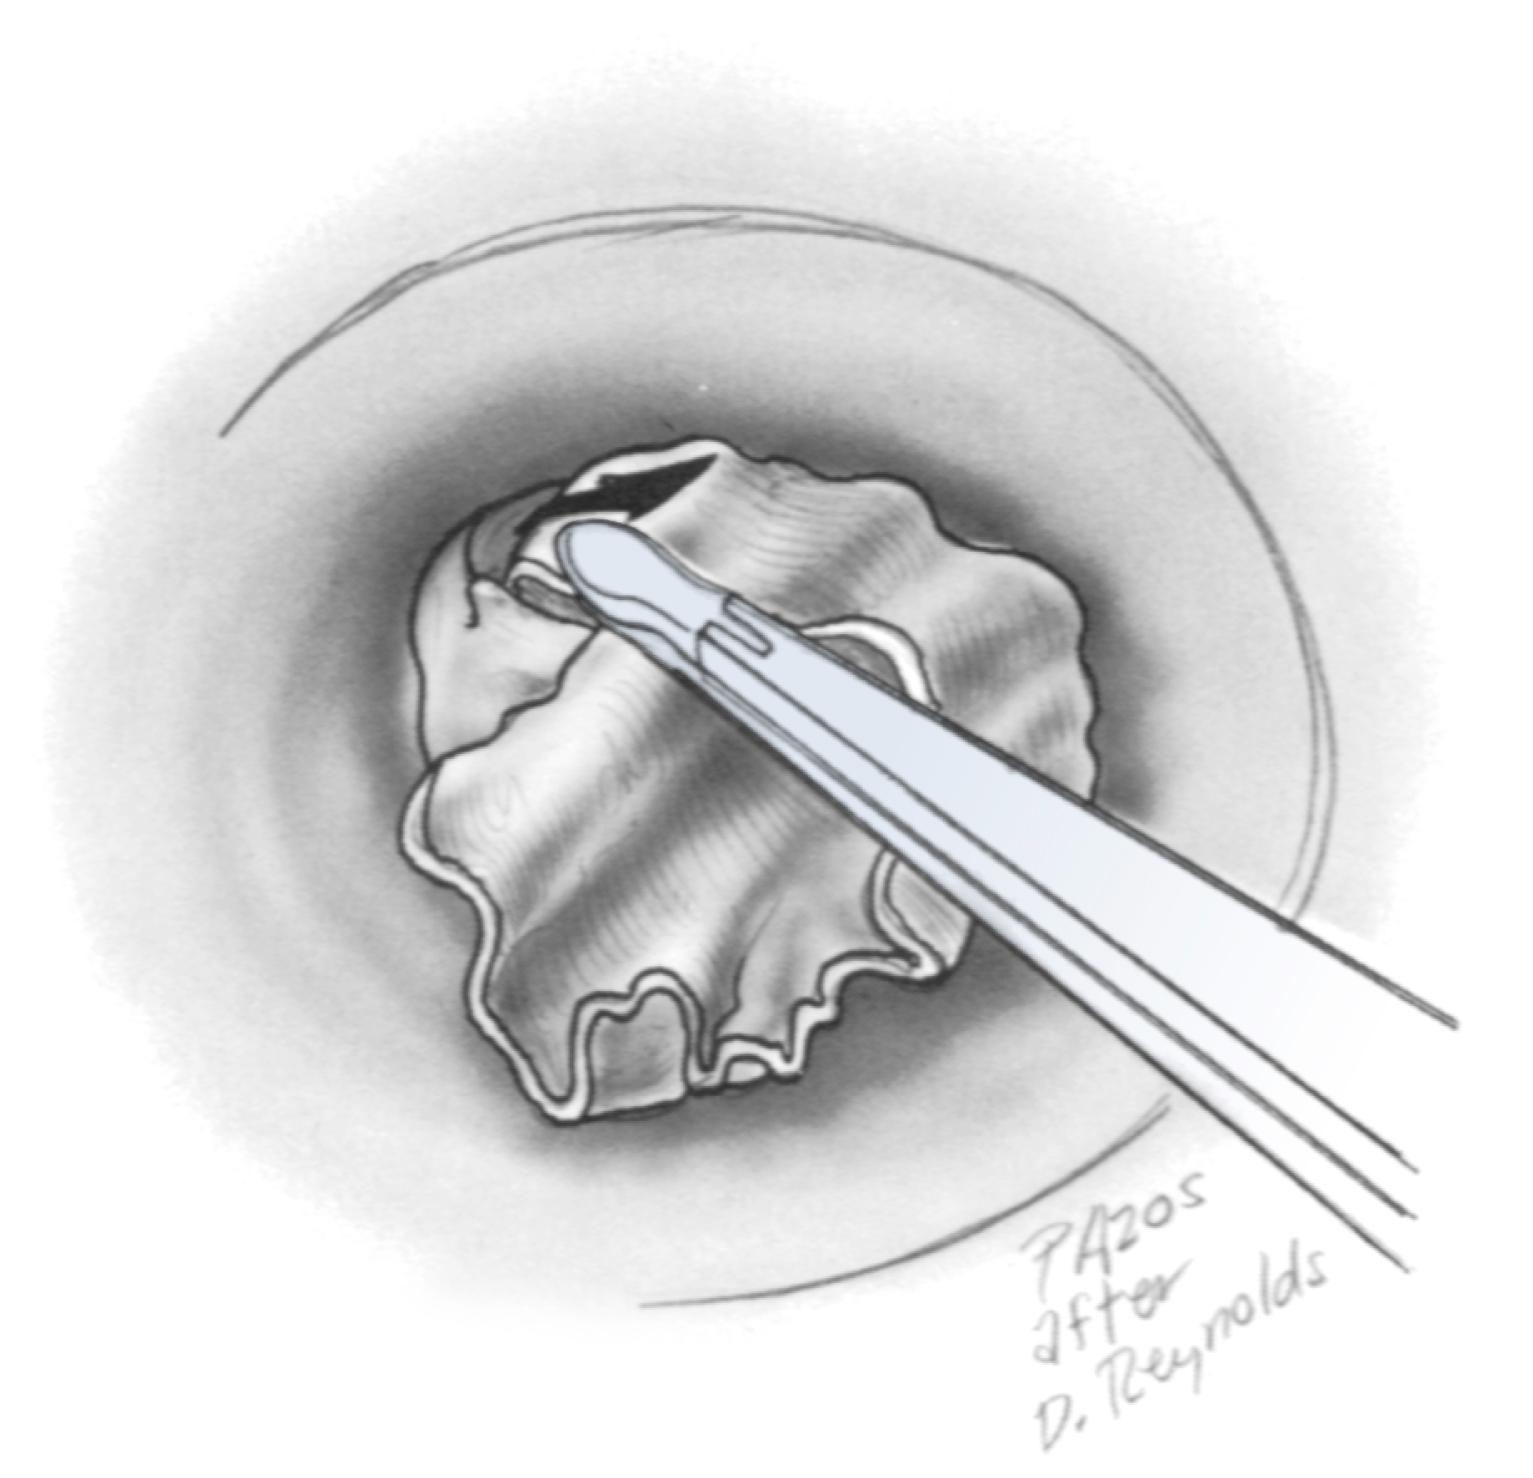
The periosteum and canal skin are elevated from the bone as far as the annular ligament ( Fig. 8.5 ). Care should be taken not to elevate the ligament and the remnant of the middle fibrous layer. The dissection is superficial to the fibrous layer of the remnant such that the remnant is deepithelialized in continuity with the canal skin, if possible. It is often easier to begin the final removal and deepithelialization by starting anterosuperiorly, using a cup forceps ( Fig. 8.6 ). The removal of the canal skin and deepithelialization are continued inferiorly and posteriorly. The periosteum and canal skin are removed from the ear and kept moist in Tis-U-Sol irrigating solution. If starting anterosuperiorly turns out to be difficult, then deepithelialization can start at the other end of the annulus, posteroinferiorly, using a round knife to dissect the skin away from the annulus and continue inferiorly and anteriorly.
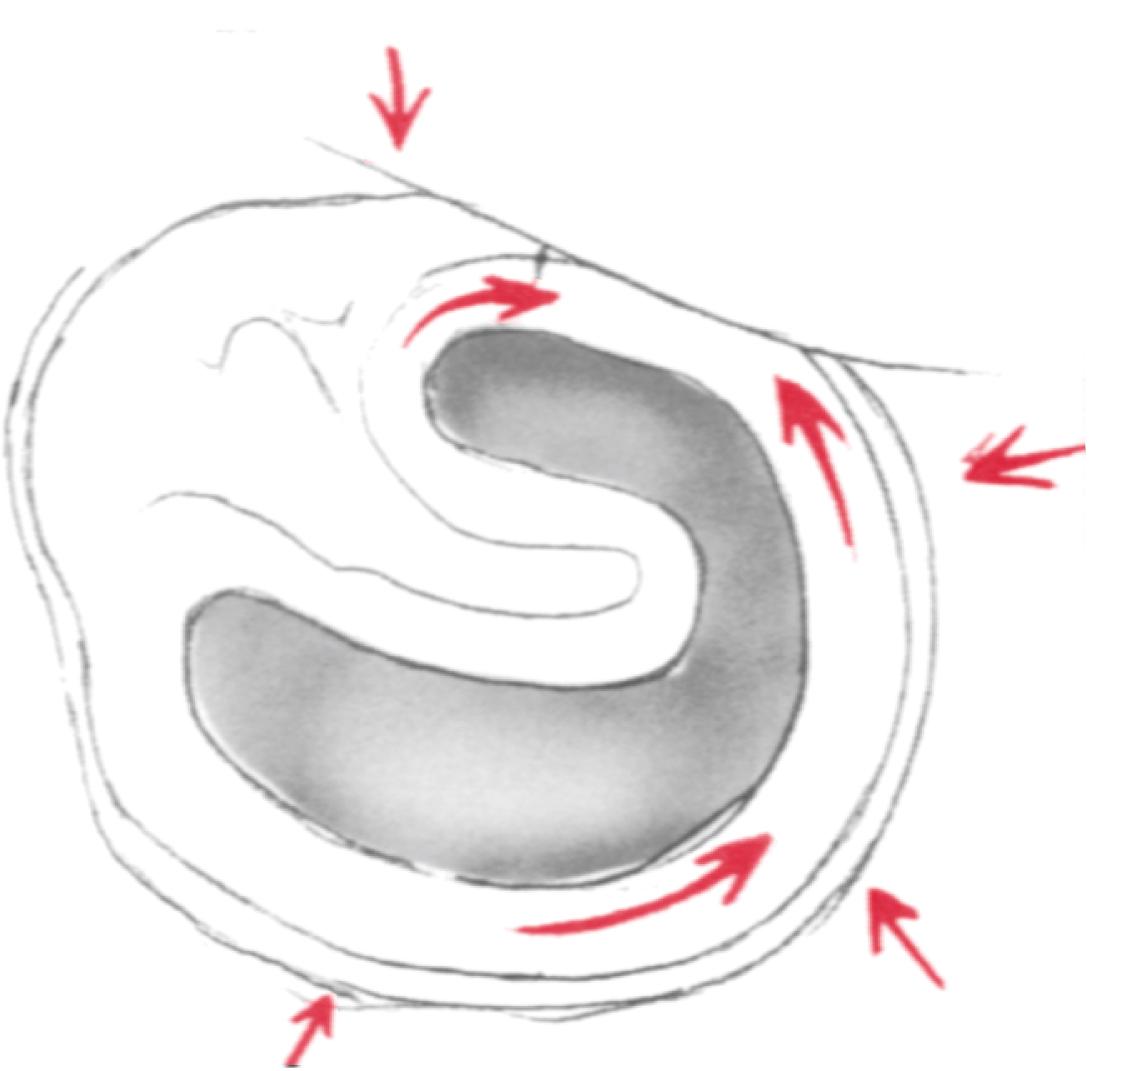
In elevating the periosteum and the canal skin, one works perpendicular to the annular ligament and remnant, keeping the instrument on the bone at all times, until the dissection is completed to the level of the remnant. The dissection is continued parallel to the annular ligament to avoid elevating it and the remnant ( Fig. 8.7 ).
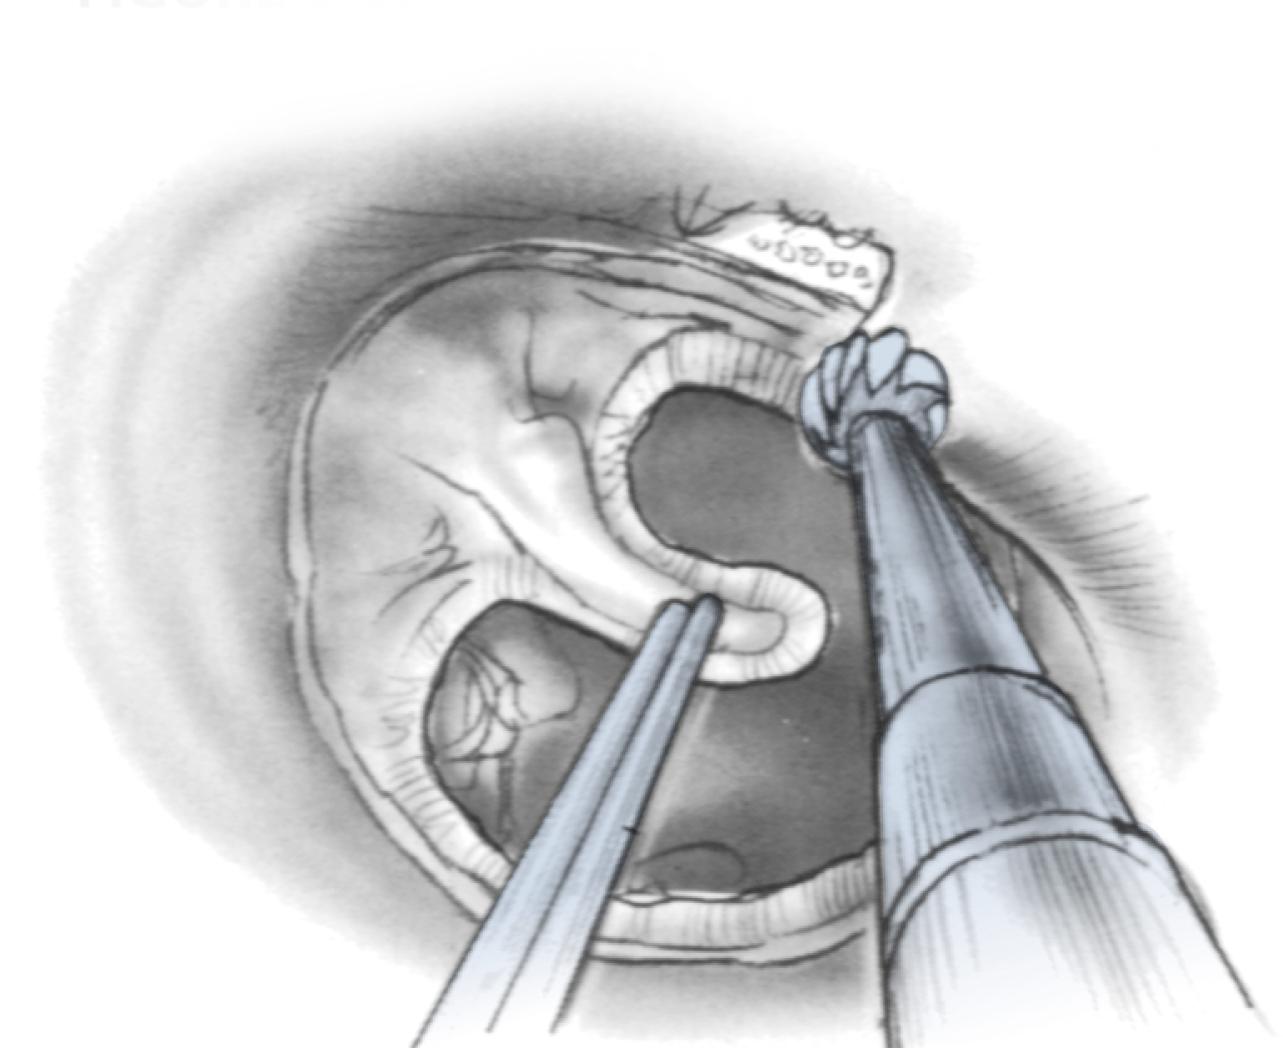
Through the use of a drill and continuous suction-irrigation, the ear canal is enlarged by the removal of the anterior and inferior canal bulges ( Fig. 8.8 ). The importance of this step in the lateral surface grafting technique cannot be overemphasized. The removal of this bone enlarges the field of surgery. The anterior and inferior sulci are thoroughly exposed to allow deepithelialization and satisfactory graft placement. The acute angle that exists anteriorly is opened, helping to prevent postoperative blunting. There is no area hidden from postoperative observation. Enlarging the ear canal is routine in all lateral surface grafting procedures and is the main reason for the removal of canal skin.
The lateral surface grafting technique demands the complete deepithelialization of the remnant. Although the graft may take without all the skin having been removed, postoperative epithelial cysts may develop. Attention is directed first to the ear canal bone immediately adjacent to the bony annulus. Particular attention is paid to the anteroinferior bone 1 mm lateral to the annulus, where a small vessel and nerve perforate the bone, and where there is a particularly tight attachment to the skin. Next, the tympanic membrane remnant is assessed carefully for skin. If there is a question about whether the deepithelialization has been thorough, a portion of the remnant is removed to be certain. The size of the perforation is of no consequence in regard to graft take in the lateral surface technique.
The surgical nurse should have begun preparing the Gelfoam for packing before or shortly after the beginning of the operation. Uncompressed Gelfoam is cut into an ample number of variously-sized pieces and soaked in an antibiotic-cortisone solution. Pieces of Gelfoam are removed from the solution and compressed (on a tongue blade or a paper Gelfoam packet) until most of the solution has been removed. The Gelfoam is put aside and allowed to dry more until needed by the surgeon.
Become a Clinical Tree membership for Full access and enjoy Unlimited articles
If you are a member. Log in here