Setup for cardiac surgery


Incision

Successful cardiac surgeons know that a standardized routine for cardiac operations is essential. An established routine makes every operation more efficient and, in the case of an emergency, allows one to proceed with speed and accuracy.
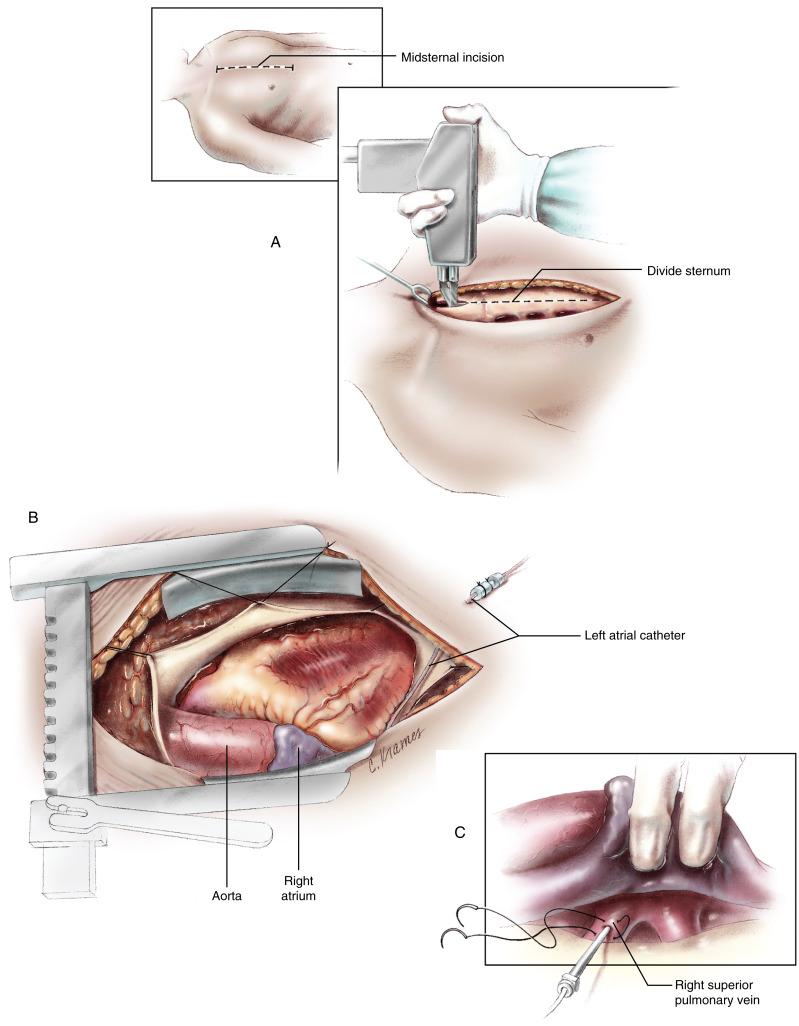
Figure 2-1, A A midsternal incision is made for nearly all cardiac operations. The exceptions are operations on the branch pulmonary arteries or the thoracic aorta, such as palliative procedures in which a thoracotomy is used. The midsternal incision begins below the sternal notch over the sternal manubrium and extends to the xiphoid process. Low, short incisions are preferred for cosmetic reasons and should be used unless they would limit exposure of the heart. The incision is taken through the periosteum of the anterior table of the sternum using electrocautery dissection. A thyroid retractor is inserted to gain exposure of the upper end of the sternum, and a right-angled clamp is used to open the mediastinum behind the sternum. The sternal saw is tested for proper operation before placing it against the upper end of the sternum. The sternal saw is grasped firmly with the thumb at the top and the fourth and fifth fingers at the back and bottom so that the saw blade can be held firmly against the sternum and the saw’s protective “toe” guard is forced against the posterior table of the sternum. Ventilation of the patient is stopped momentarily to allow the lungs to deflate and retract away from the anterior chest wall as the sternum is divided with the saw. It is usually advisable to back up the saw once or twice during division of the sternum to release mediastinal tissue that may be caught up in the instrument; this permits the pleura to be left intact. The sternal edges are separated initially with a thyroid retractor, and hemostasis is obtained using electrocautery with a ball-tipped electrode and a thin layer of bone wax or Gelfoam reconstituted with antibiotic solution. B The sternal retractor is used to separate the sternal edges for optimal exposure of the heart. The pericardium is opened in the midline, and retraction stitches are placed to gain access to the heart. The pericardium is cut back to the full extent of the reflection off the aorta superiorly and onto the diaphragm inferiorly. Extension of the pericardial incisions inferiorly to the right or left toward the pleural spaces may be required to expose the lower aspects of the right atrium or the apex of the heart. Retraction stitches of 2/0 silk are placed from the pericardium to the subcutaneous tissues or the retractor. The aorta, right ventricle, pulmonary artery, and right atrial appendage are clearly in view and freely accessible. The left ventricle, left atrium, and lower aspects of the right atrium must be exposed by retraction or displacement of the heart. C Placement of a small vinyl catheter for monitoring the left atrial pressure is the initial step of the setup for cardiac surgery. The right atrium is retracted to expose the right superior pulmonary vein. A box stitch is placed in the pulmonary vein using 4/0 polypropylene suture. A needle with a catheter is used to enter the pulmonary vein within the box stitch, and the catheter is advanced precisely for a measured length so that the catheter tip is located just inside the left atrium. The needle is withdrawn, and the catheter is secured by tying the box stitch and making an additional stitch of 5/0 silk through the pericardium around the catheter. The catheter is brought out through the skin to the left of the skin incision.

Control of venae cavae

For most procedures to address congenital cardiac conditions, and for the surgical correction of some acquired conditions in which access to the right intracardiac structures is required, it is necessary to control the superior and inferior venae cavae with tourniquets, that can be drawn tightly around the venous uptake cannulae.
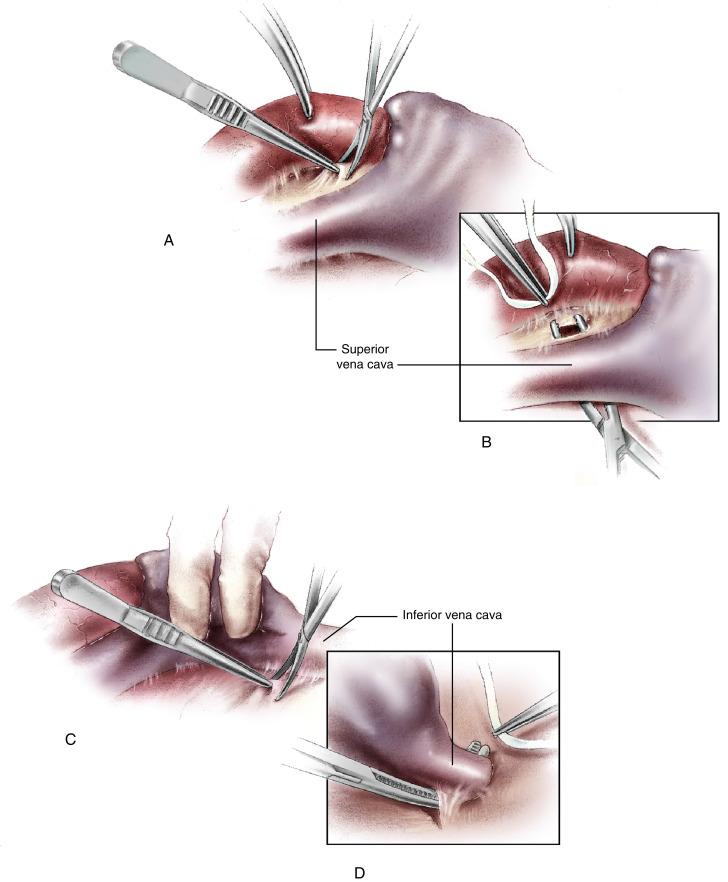
Figure 2-2, A The pericardium over the anterior aspect of the right pulmonary artery just medial to the superior vena cava is opened. B Exposure of this area is enhanced by retraction of the aorta anteriorly and to the left. A right-angled clamp is passed behind the superior vena cava from its lateral aspect. The pericardial reflection lateral to the cava is usually thin and can be easily and safely perforated as it is invaginated toward the incision medially and anterior to the right pulmonary artery. Umbilical tape or heavy No. 3 silk suture is passed around the vena cava and through the polyethylene catheter tourniquet. C Similar steps are used to control the inferior vena cava. The pericardium is incised in the space between the inferior pulmonary vein and the inferior vena cava. The pericardium may be quite thick in this area, so it is safer to use a sharp incision rather than forceful blunt dissection to obtain access to the delicate tissues posterior to the cava. D A right-angled clamp is passed posterior to the inferior vena cava from the lateral aspect. The tip of the clamp can be seen as it emerges from behind the cava on the medial aspect by retracting the diaphragmatic surface of the heart superiorly. This maneuver usually upsets the hemodynamics considerably, so it should be performed efficiently but without compromising accurate exposure of the vena cava. The clamp is used to perforate the thin layer of pericardium medially and make an opening behind the vena cava large enough to draw the tourniquet tape safely around the vena cava.

Cannulation of the ascending aorta

The aorta is used in most operations for the return of oxygenated blood from the extracorporeal circuit.
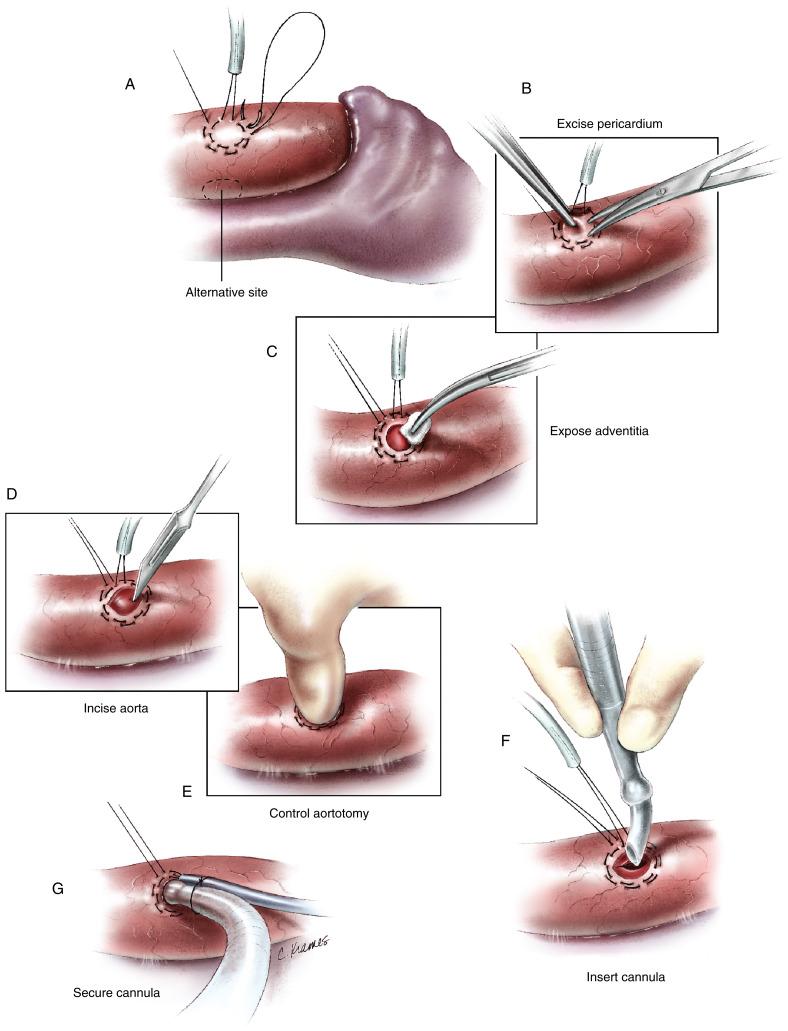
Figure 2-3, A The aorta is prepared for cannulation by placing a purse-string stitch on the anterior aspect near the pericardial reflection. Polypropylene 3/0 suture material and a small needle are used exclusively for purse-string construction because the frequency of aortic perforation is reduced, bleeding around the cannula is less than with braided suture material, and closure of the aorta after removal of the cannula is more secure so that reinforcing pledget material is seldom required. The stitches are placed through the pericardial layer and into the adventitia of the aorta but should not penetrate the lumen of the aorta. Thus, the purse string is located in loose and mobile tissue that is nevertheless strong and will firmly hold the cannula in the aorta and close the aortic incision securely when the purse string is drawn up later. If the needle inadvertently penetrates the aorta, the entire suture should be removed and a new one placed. Stitches that are left in the fixed tissues of the aortic wall are likely to tear through when the purse string is drawn up, leaving an even larger hole in the aorta rather than sealing it. A tourniquet is placed on the purse-string stitch to secure the cannula after it is placed in the aorta. A second stitch is placed immediately outside the first one for added security, but a tourniquet is not necessary. An alternative cannulation site on the right lateral aspect of the aorta may be used if greater access to the anterior wall of the aorta is desired. B The pericardium inside the purse string is removed to expose the aortic wall. This excision removes any loose tissue that could interfere with smooth passage of the aortic cannula into the lumen. C Care must be taken not to mobilize or undermine tissue that is actually supporting the purse string. The area inside the purse string may be cleaned with a Kuettner sponge to remove blood or bits of loose tissue for accurate visualization of the cannulation site. D The size of the cannulation site and the diameter of the surrounding purse string should be 4 to 5 mm larger than the diameter of the cannula to be introduced. A No. 11 blade is used to incise the aorta. The tip of the blade is placed inside the purse string, with the noncutting edge of the blade directed toward the outside. The blade is used to perforate the aorta to a depth sufficient to create an incision equal to the diameter of the cannula to be inserted. Not much blood escapes, provided that the blade is kept absolutely straight and is not allowed to twist. E The thumb of the opposite hand is used to cover the aortic incision to control hemorrhage after the blade is removed from the aorta. Alternatively, the adventitia at the edge of the purse string can be grasped with forceps and pulled toward the aortotomy to control hemorrhage. F The bevel of the aortic cannula is aligned with the aortic incision, the thumb is slid aside or the adventitia is pulled open with the forceps, and the cannula is inserted. Cannulae with removable, tapered point introducers aid the insertion process. Occasionally, the incision in the aorta is not adequate, or loose tissue has been drawn in that interferes with insertion of the cannula. Under these circumstances, the thumb is simply replaced to control hemorrhage while a tonsil clamp is passed beneath the thumb and into the aorta to dilate the opening. This dilation is usually sufficient to allow the cannula to be inserted. If this fails or the hemorrhage cannot be controlled, a partial-occlusion clamp can be placed for better control and assessment of the situation. G The purse-string tourniquet is tightened to achieve hemostasis around the cannula. The cannula is secured to the aorta by simply tying the tourniquet to the cannula. The perfusion tubing is secured to the patient drapes.

You're Reading a Preview

Become a Clinical Tree membership for Full access and enjoy Unlimited articles

Become membership

If you are a member. Log in here