Physical Address
304 North Cardinal St.
Dorchester Center, MA 02124
The anatomy of the tendon makes it susceptible to degenerative rupture due to attrition under the extensor retinaculum. The healthy tendon passes under the medial compartment of the transverse and cruciate crural ligament, and inserts onto the medial cuneiform dorsally and medially, with an extension of the attachment to the more inferomedial aspect of the first tarsometatarsal joint and first metatarsal. The tendon frequently divides into two slips, equal in size, one on the medial cuneiform and the other on the medial base of the first metatarsal, and only occasionally does the tendon attach only onto the medial cuneiform.
Rupture of the anterior tibial tendon (ATT) usually occurs in older individuals due to degeneration and friction underneath the extensor retinaculum. There is always a retraction of the proximal stump of the tendon ranging from 1 cm to 10 cm, and not infrequently there is only a small stump left distally at its attachment. Because the rupture rarely occurs as an acute precipitous episode, most patients do not present for some time, and a delay in diagnosis with further retraction of the tendon is common.
The diagnosis of rupture of the ATT is made clinically by virtue of weakness of dorsiflexion and a foot drop, and rarely are imaging studies necessary. Occasionally if there is focal pain, and one suspects inflammation or early degeneration, then either ultrasound or magnetic resonance imaging (MRI) are useful to delineate the extent of disease. In the presence of complete rupture, MRI of the tendon rupture does not add anything to planning treatment, since it is impossible to determine the quality of the ruptured tendon, although some surgeons may still use MRI to determine the extent of tendon retraction into the leg. Ultrasound may be used as a more dynamic evaluation of the tendon to determine the excursion of the ruptured tendon, which may have some impact on planning treatment. If the tendon has retracted and one is faced with a chronic rupture, then an MRI has a role, but here we do not focus on the ankle, but rather on the leg. This is relevant particularly in chronic ruptures where the tendon repair will require a graft, but this treatment cannot work if the muscle is not healthy. We therefore look for atrophy or fatty infiltration into the muscle prior to surgery to determine if a graft is possible or a tendon transfer is necessary.
We have three methods of repair available: an end-to-end repair, the use of an adjacent tendon such as the extensor hallucis longus (EHL), or a tendon graft. The repair chosen depends on the size of the defect and the quality of the anterior tibial muscle noted on MRI. It does not help with treatment planning to obtain an MRI of the ankle, since this does not demonstrate the quality of the muscle, i.e., with fatty infiltration or muscle atrophy, which would contraindicate the use of a tendon graft. If a graft is not available or if the quality of the muscle is poor, then a tendon transfer with either the EHL or the EHL and the extensor digitorum longus (EDL) combined is used. For a rupture with a small gap less than 1cm with good quality of the tendon stumps on both sides, an end-to-end repair is appropriate and easy to perform.
A patient rarely presents early enough such that an end-to-end repair or reattachment of the tendon can be easily performed. An equinus contracture or fixed claw toe deformities will often present as a result of the rupture of the ATT and the attempt to compensate by using additional muscles to extend the foot. In these cases, a transfer of the EHL and/or the EDL is indicated in combination with an arthrodesis of the interphalangeal (IP) joints of the toes.
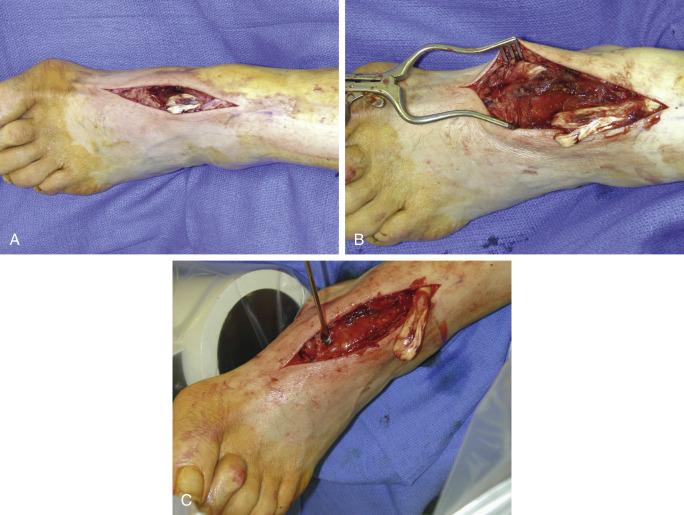
If the ATT is short but has enough length to be attached to the navicular, this can be considered. This repair is very effective in cases in which retraction of the tendon is minimal but not enough length is available to reattach it distally into the cuneiform. It is important to insert or attach the ATT to the navicular in the correct position under fluoroscopy over the dorsomedial navicular using a drill hole, and passing the tendon through the hole and securing it with either an interference screw or a suture anchor ( Fig. 8.1A−C ).

Regardless of the type of repair or reconstruction used, the skin incision must always be more lateral than the underlying repair so that with skin closure, it is not directly over the repair, thus reducing the pressure from the tendon on the actual incision. This is less likely to occur if the tendon repair, transfer, or graft is passed under the retinaculum, but the latter is frequently scarred and this passing under the retinaculum is difficult to do. Always therefore make the incision along the central aspect of the foot at least 1 cm lateral to the position of the ATT. The skin is retracted medially, the extensor retinaculum is incised longitudinally, and the tendon ends are visualized. Before incising the retinaculum, pass a clamp under the retinaculum to see if passage of the tendon will occur to avoid cutting the retinaculum. Frequently, however, the extensor retinaculum has to be incised distally to be able to identify the stump of the tendon. The proximal tendon is sutured with a No. 2 suture, and the tendon is then pulled distally. Maximal tension is applied to the tendon for 10 minutes to determine the mobility of the muscle and then obtain some relaxation with elongation of the tendon at the musculotendinous junction. The biggest challenge with this repair is to obtain the correct tension; unless constant tension is applied at this time, elongation of the muscle develops later on, along with dorsiflexion weakness and a partial foot drop.
The other problem that occurs with all repairs is slight over-supination of the foot—an inevitable consequence of tightening the repair. This should not be of concern initially, although the foot position must be monitored during the recovery and rehabilitation phase. An Achilles tendon lengthening may be necessary to regain adequate dorsiflexion and to correct the position of the foot during the repair. The repair should be performed with minimal tension on the tendon, and the position of the foot must be passively correctable to at least 10 degrees of dorsiflexion without much resistance. Immediately postoperatively, use of a cast, rather than a splint, is preferable to hold the foot in dorsiflexion.
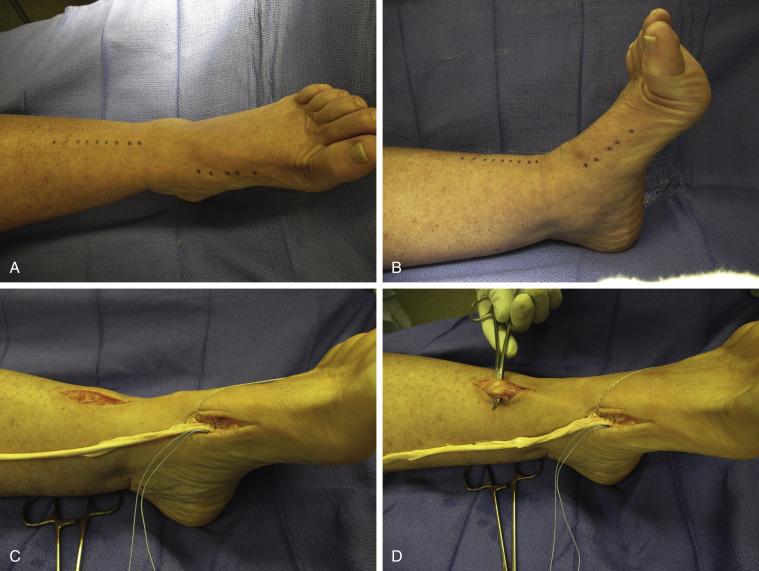
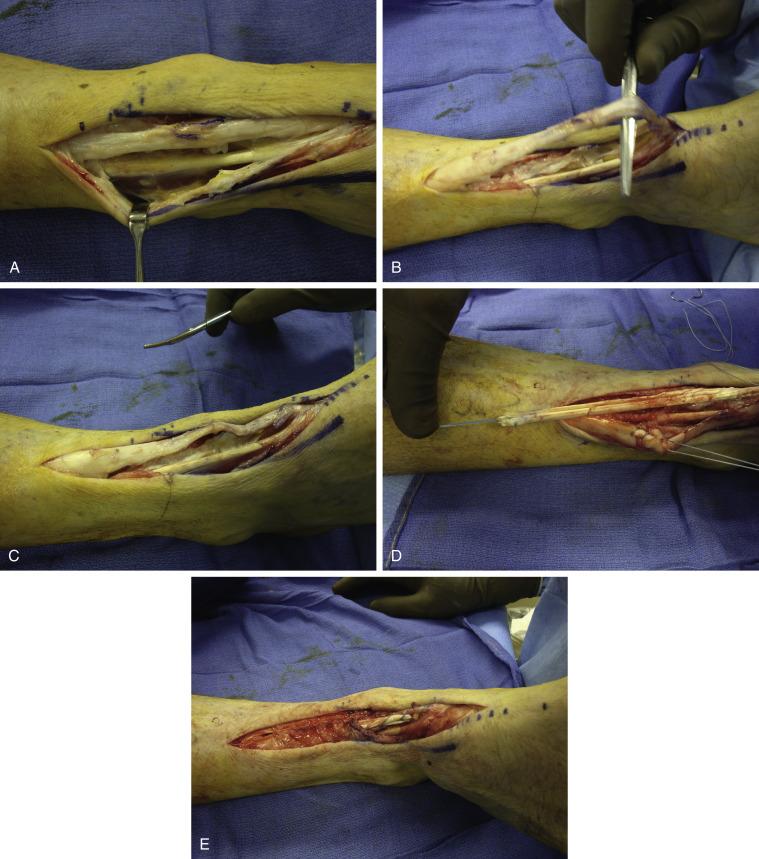
If the tendon is chronically ruptured and retraction of the tendon is greater than 3 cm, a tendon graft is useful and a hamstring allograft or autograft is used ( Fig. 8.2A−G ). A tunnel is created under the retinaculum with a large clamp and exits at the medial cuneiform where a small incision is made. We find that it is easier to attach the graft to the proximal ATT first before the distal attachment, which is far more difficult to gain the correct tension if done the other way around. The tendon graft is attached to the ATT using a weave through and through the ATT, which means that the graft has to be tapered to half its diameter to facilitate passage of the tendon weave. It is then passed under the retinaculum and attached to the cuneiform. The graft is always long enough to be able to secure it to the cuneiform using a double drill hole technique. This will give maximum bone tendon bone healing and more importantly allow one to tension the tendon adequately. This is more difficult when using a suture anchor technique. Here, with the latter technique, we recommend starting with the distal attachment, creating a soft tissue flap, suturing the tendon graft using the anchor and then overlapping the flap over the tendon for further fixation ( Fig. 8.3A−E ).


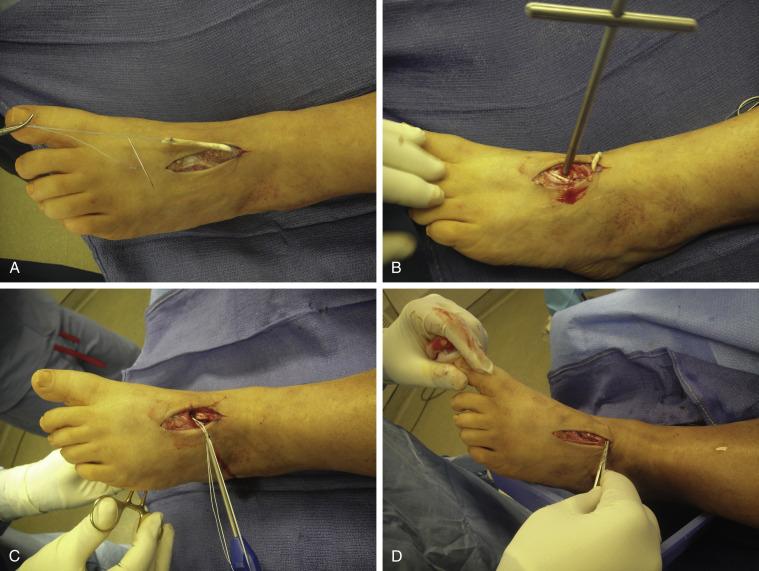
If an EHL tendon transfer is to be performed in conjunction with an IP joint arthrodesis, the arthrodesis is performed first. The EHL tendon is then cut distally and pulled proximally to lie adjacent to the insertion point of the ruptured tendon. The length usually is sufficient for a double strand of the EHL tendon. The tendon is pulled distally and then secured over the distal stump or the medial cuneiform with a suture or suture anchor. Alternatively, one can drill two perpendicular 4.5-mm holes into the dorsal and medial cuneiform and pass the EHL tendon through the tunnel. There will be sufficient tendon length to pass the distal portion of the EHL tendon proximally as a second strand and sutured down onto the proximal ATT under tension ( Fig. 8.4A−D ).

Regardless of the type of suture repair, the foot must be immobilized in dorsiflexion of at least 10 degrees and preferably 20 degrees during recovery. As noted above, a percutaneous Achilles tendon lengthening is the rule rather than not for these cases. We use a cast that is split immediately postoperatively to prevent anurey equinus. Patients can start weight bearing in the cast at approximately 2 weeks once wound healing is apparent. Any plantar flexion beyond neutral must be avoided during the recovery process for the first 8 weeks. Aggressive physical therapy with rehabilitation is important once the cast is removed, for the muscle to regain strength.
The outcomes of both nonoperative and operative treatment of ruptures of the ATT are quite satisfying, provided that the treatment meets the expectations of the patient. Many elderly patients do not object to the use of an ankle foot orthosis (AFO), and this can be supplemented with a dorsiflexion assist on the AFO, if the foot is catching on the ground in the swing phase of gait. The problem with the AFO is that it is not universally accepted, and if it is not worn regularly, the foot will catch as a result of the foot drop as it lags behind in the final swing phase of gait. Surgery will always restore the ability to dorsiflex the foot to at least minus 5 degrees, and although in the worst-case scenario full active dorsiflexion is not achieved, these patients function well. Once the skin has healed, we commence with rehabilitation as noted above. This is very important, particularly in this age group who are prone to develop muscle atrophy that at times cannot be recovered. We have not identified any patients in our experience with a recurrent rupture following treatment, but weakness in active dorsiflexion most definitely does persist in about 15% of patients.
Become a Clinical Tree membership for Full access and enjoy Unlimited articles
If you are a member. Log in here