Physical Address
304 North Cardinal St.
Dorchester Center, MA 02124
A mutilating hand injury is a severe injury with tissue loss that results in loss of prehension.
The goal of management is to obtain a stable wrist, with at least two opposable sensate digits and a wide first web space.
Involvement of a senior surgeon at the time of arrival of the patient to the hospital is an outcome determinant, as it helps in salvage decision−making and the management pathway.
A regional block on arrival provides immediate pain relief, helps to obtain good radiographs, and pain−free assessment.
Early antibiotic administration, radical debridement under tourniquet, skeletal stabilization, and vascular reconstruction if needed must be done on day 1.
The aim is to complete soft−tissue reconstruction as early as possible, definitely before 5 days.
Obligatory secondary procedures like bone and nerve grafting are addressed within 6 months, and discretionary procedures to improve function and appearance are performed once tissue equilibrium is achieved.
The possibility of secondary procedures including free functioning muscle transfers and toe transfers have extended the indications for salvage.
With appropriate management, the functional outcome of salvaged limbs is far better than amputation and prosthesis.
The most important negative determinant of outcome is infection.
![]() Access video content for this chapter online at Elsevier eBooks+
Access video content for this chapter online at Elsevier eBooks+
The word mutilation takes origin from the Latin word mutilus which refers to an injury to a body part and leaves it permanently damaged, detached, or disfigured. A mutilated hand often suffers all the three components. Various definitions exist for a mutilated hand. To the authors the most acceptable definition is that of Campbell Reid, when he said that, “the mutilated hand has suffered a severe injury with loss of substance and has been left lacking in prehension ”. This definition also helps us to set the goals of treatment, whereby we need to reconstruct the lost structures to gain useful prehension.
Mutilated hand injury has also been described based on injury and loss to at least three tissue components − skin and soft tissues, musculotendinous units, nerves, vessels and bone being the components in question. In most mutilated injuries, there is a loss of skin and soft tissue component. A mere laceration at the wrist which divides all tendons, nerves, blood vessels and fractures the bones will not be considered as a mutilated hand injury. Mutilated injuries can be caused by the mechanisms of crush, avulsion or a combination of both. Unless treated effectively, mutilated hand injuries have the potential for leaving the patient with permanent disability. Institution of appropriate treatment rendered in the right sequence with the right timing is the key to success.
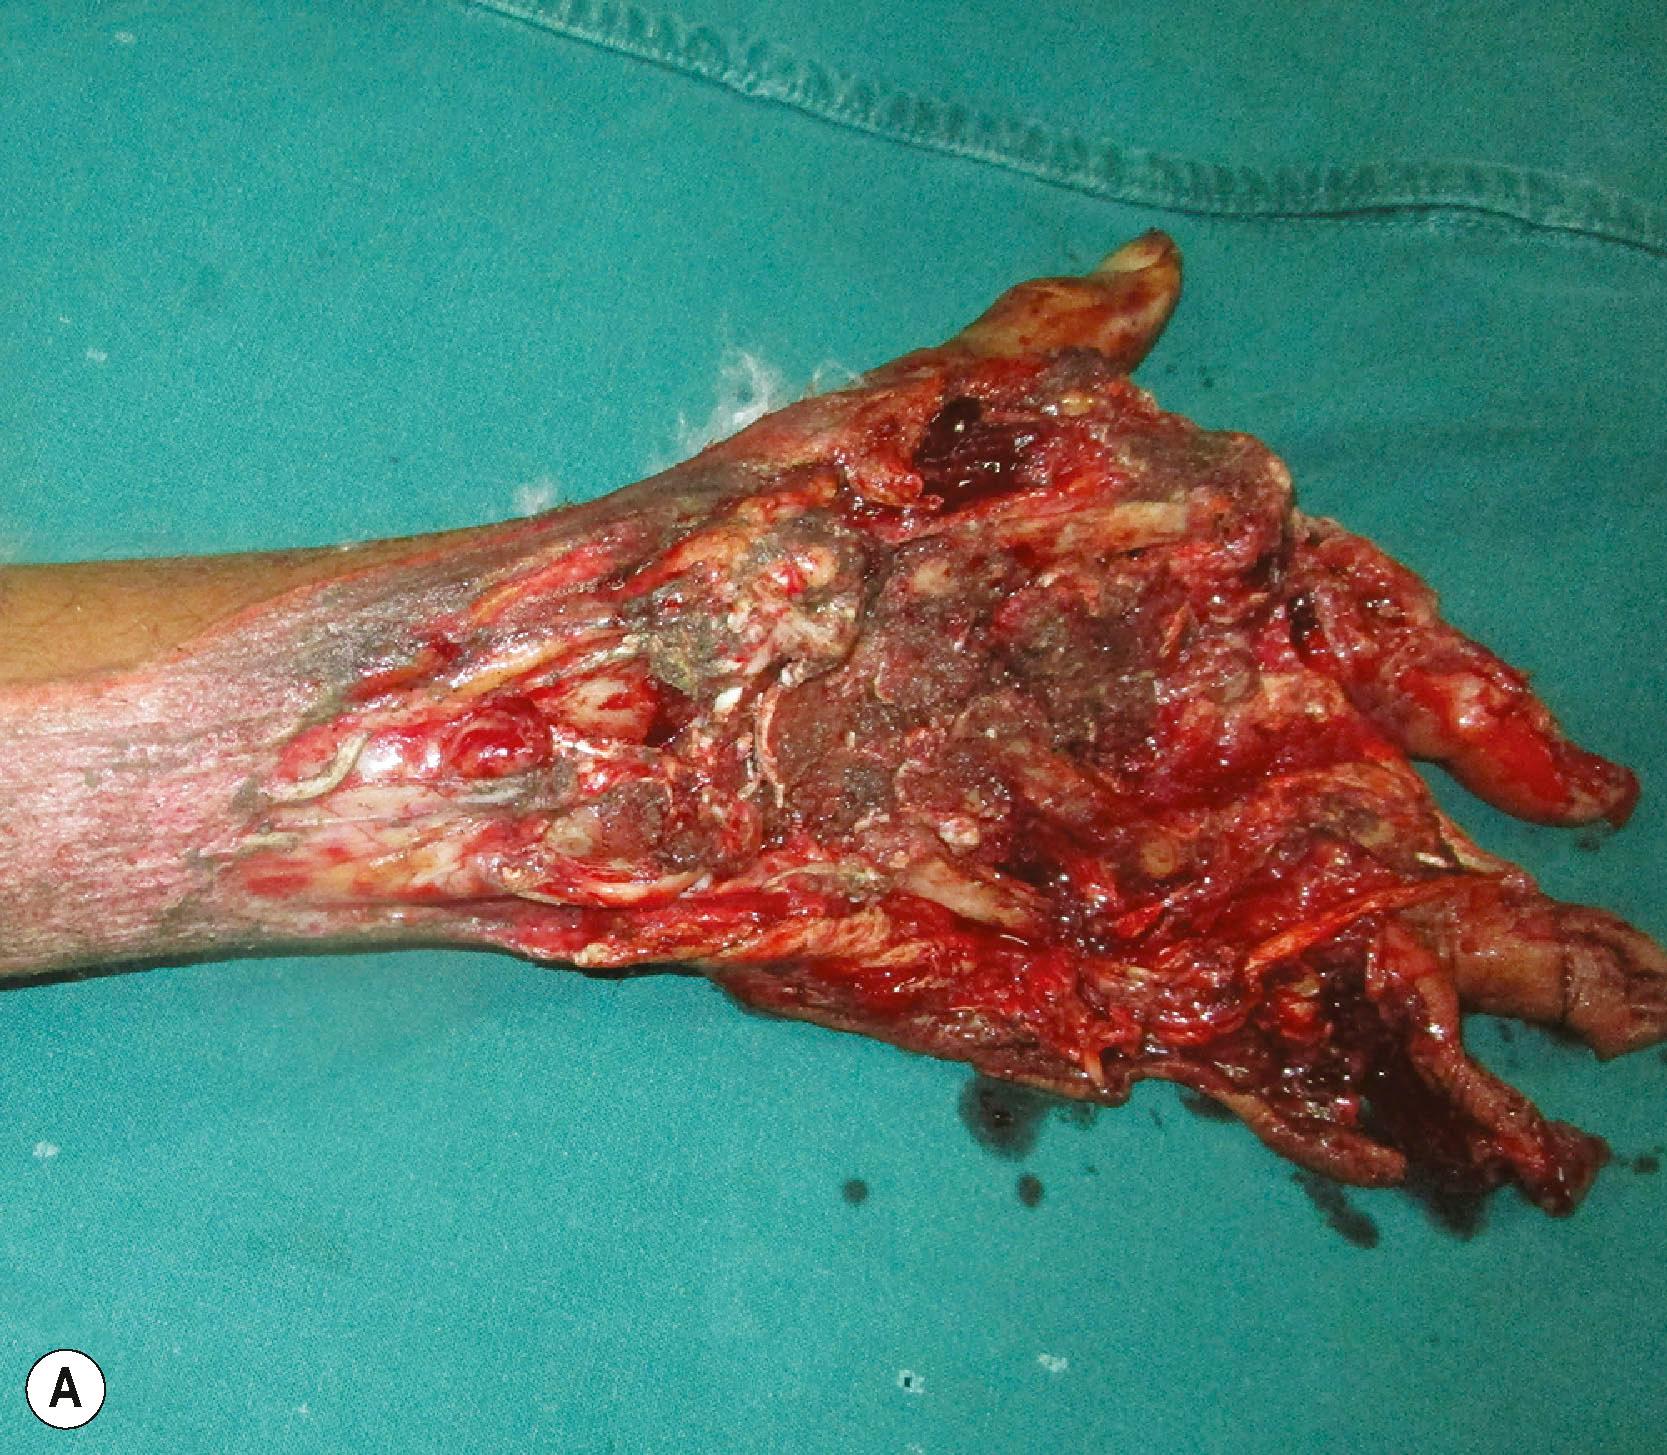
In a mutilated hand, achieving the preinjury state, though a good goal to set, is rarely achievable. Nevertheless, to achieve a hand with preinjury function is a worthy goal to have. According to Piñal, an acceptable hand is one with a thumb and at least three fingers of the correct length, with motion preserved at the proximal interphalangeal joints and sensation. Baltzer and Moran state that the minimal requirements for the hand are a stable wrist and two opposing, sensate and painless digits. For motion, one digit can be stable with the other being sufficiently mobile to meet it. The joints of the mobile finger have to be stable to provide good pinch strength. The web must be wide enough to hold objects and so web creation is important ( Fig. 12.1 ). In proximal injuries, the goal is to obtain painless, stable proximal joints mobile enough to place the hand in a good position of function. To summarize, the goal of management of a mutilated hand injury is to achieve a sensate prehensile hand. This must be achieved in as short a time frame as possible with acceptable cost of care.
Three factors determine the outcome: injury factors, patient factors, and surgeon factors. In any given instance, as caregivers we neither have control of the injury factors nor of the patient factors. The only variable in the equation are the skill levels, the attitude of the treating surgeon, and the infrastructure in which he or she works. The decisions of the surgeon who first sees the patient greatly influence the outcome, and hence it is imperative that all trauma surgeons are well trained in this field.
A mutilated hand draws so much attention that it is easy to miss other associated injuries, and some may even be life−threatening. Unless the wound is actively bleeding, it is a good practice to examine the extremity injury after following the Advanced Trauma Life Support (ATLS) protocol. If there is active bleeding, it is a sound practice to apply direct pressure and to apply a tourniquet to the arm. An unanesthetized limb can tolerate a tourniquet for 20 minutes, which provides adequate time to prepare for the hemostasis efforts. An action to avoid is to blindly plunge in with a hemostat into the bleeding wound. At many sites in the upper limb major vessels and the nerves run close together, and the clamps may destroy a segment of the nerve, precluding primary nerve repair. The only life−threatening emergency in an upper limb injury is a partially injured major vessel. The contracting muscle layer of the vessel wall, which would normally close the vessel when it is totally divided, makes the opening wider in a partially injured vessel. The best practice even in this situation is to apply direct pressure and then a proximal tourniquet, and to assess the wound under good lighting and anesthesia.
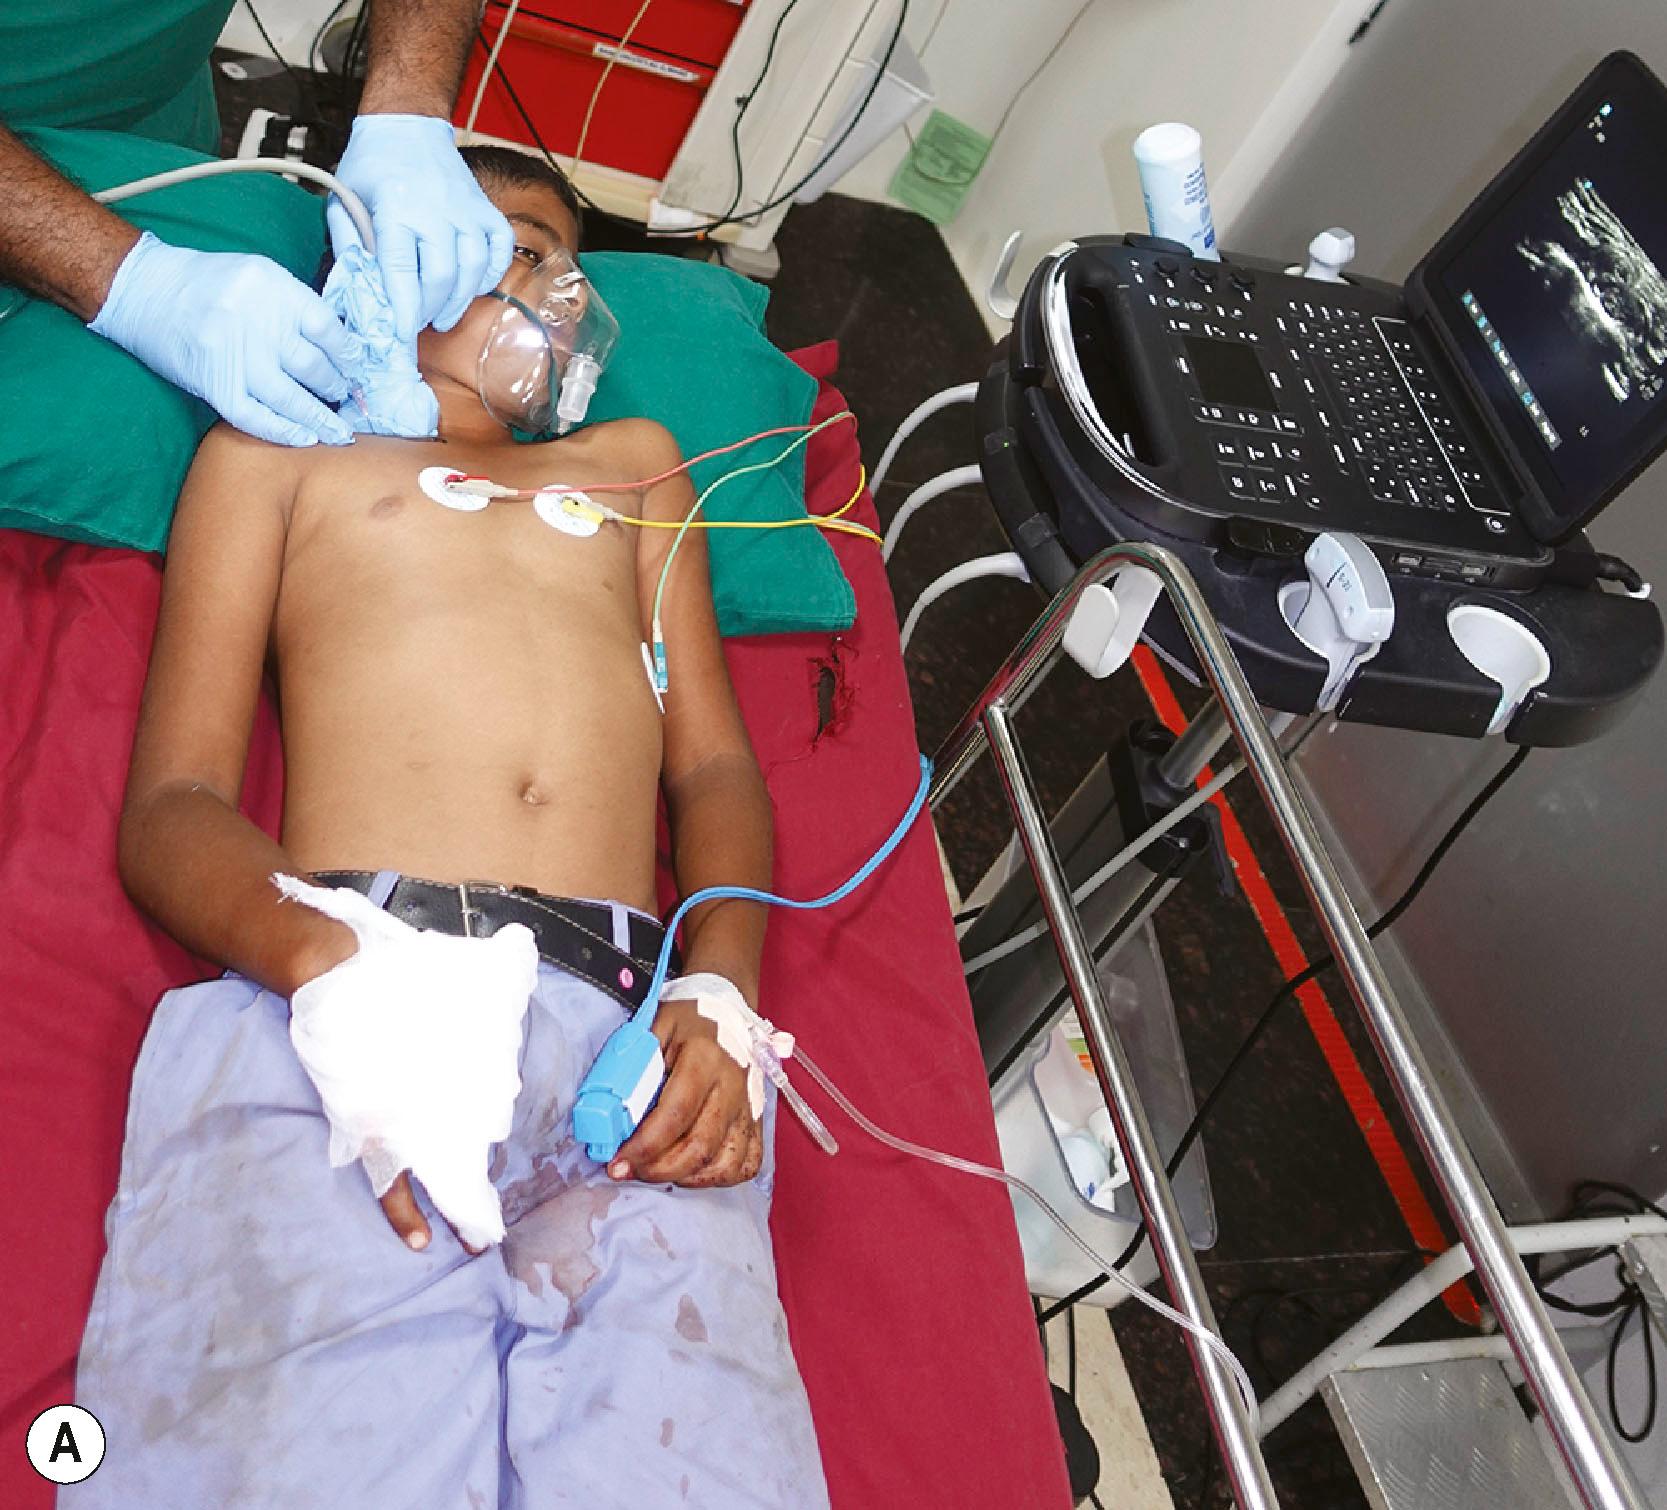
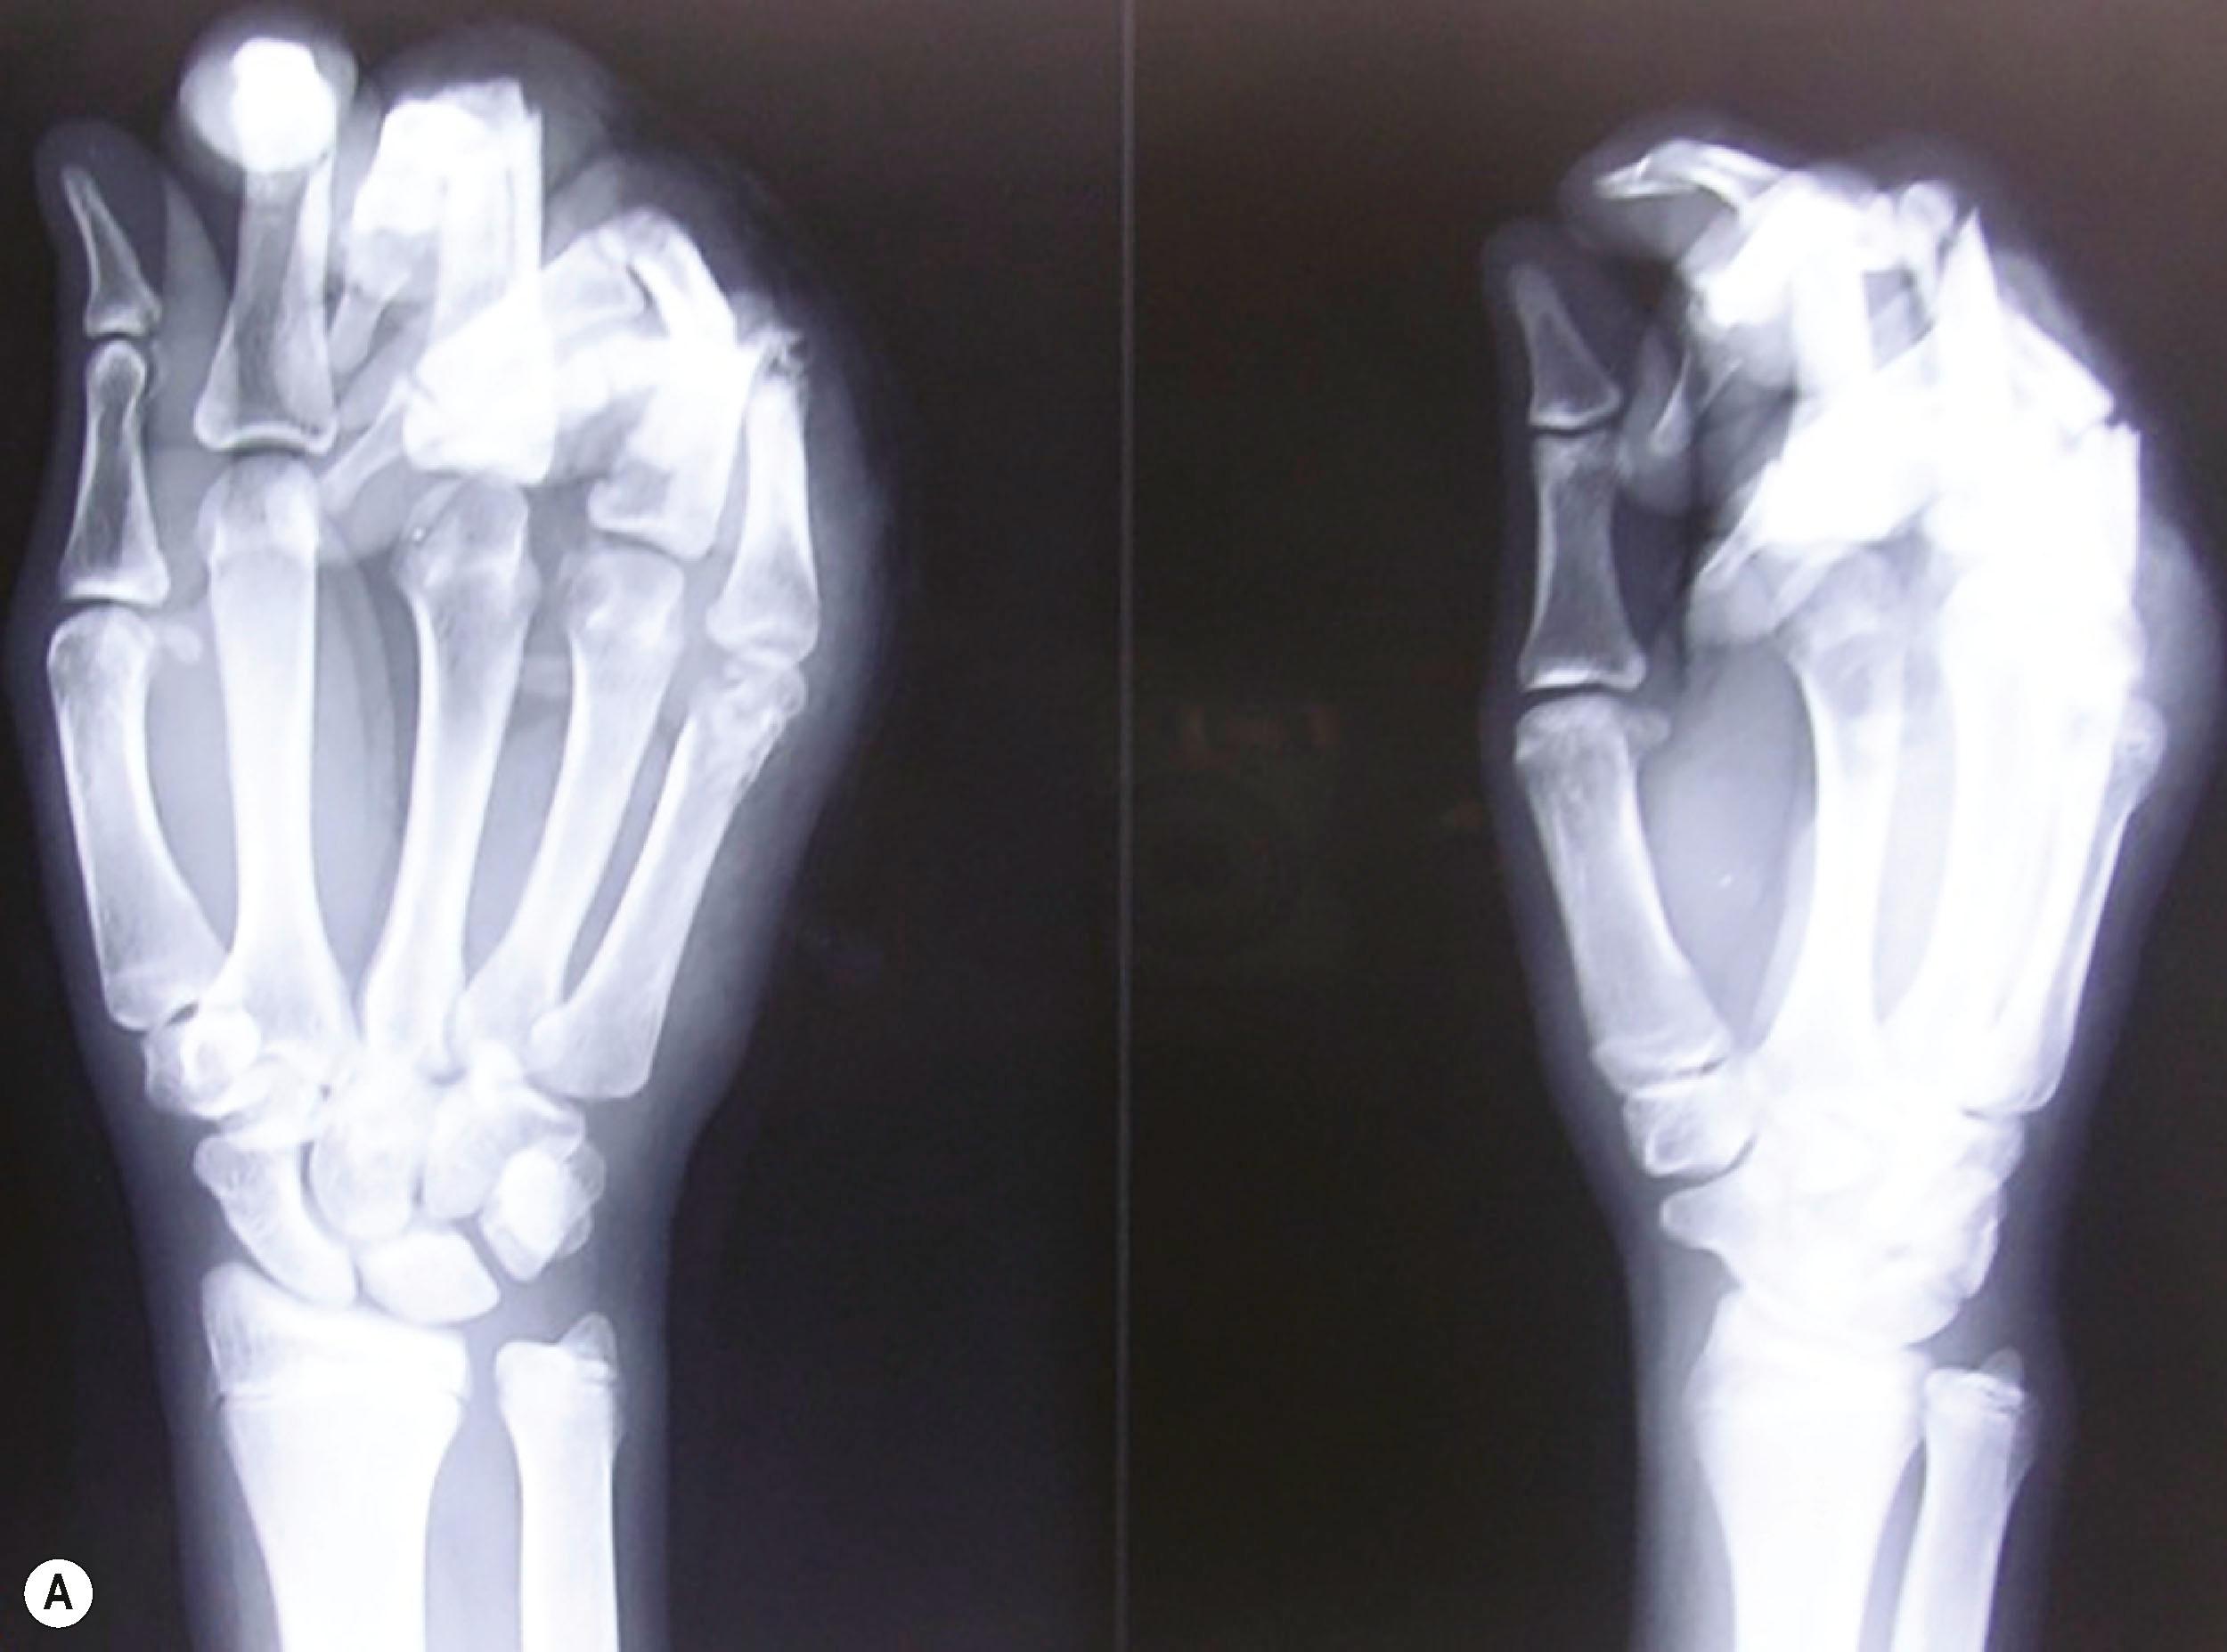
In the assessment protocol of mutilated hand injuries, the authors’ practice at Ganga Hospital has followed a protocol of receiving these patients in the anteroom of the operation theatre, where the patients are received by a senior surgeon and a senior anesthesiologist. After an ATLS survey, a brachial plexus block is provided as the first step of the resuscitation process ( Fig. 12.2 ). The dressings are opened and the wound inspected only after the block. This step, called the “on arrival block”, has many advantages. The patients are relieved of pain soon after arrival to the hospital and this boosts their confidence in the system. Examination of the wound done in a painless environment is better, and in case of bleeding, a tourniquet can be applied to control it. Radiographs are done after the block. Traction radiographs are possible for better delineation of the fracture pattern. Not only are we able to position the hand for various radiological views without pain, but we also get good radiographs without the overlap of fractured bones which often occurs when the radiographs are taken with the bandages on ( Fig. 12.3 ). That we may not be able to ascertain the integrity of the nerves due to the block has never been a problem. The exposure done during debridement allows us to visualize the nerves. The “on arrival block” is also utilized for the definitive surgery. This system can be practiced only when senior surgeons and anesthesiologists, and operating rooms, are available round the clock. This one step results in improved outcomes by greatly reducing the arrival to the operating table time. The only contraindication has been the suspicion of an associated brachial plexus injury, whereby the presence of the anesthetic solution used for the supraclavicular block may seep into the spinal cord through the open dural sleeves causing total spinal anesthesia and respiratory paralysis. The patient then has to be ventilated till the anesthetic effect wears off. One important assessment at this stage is the vascular status of the fingers. If there are signs of vascular compromise, the whole process is sped up, and the patient is taken for surgery as soon as possible.
Appropriate tetanus prophylaxis and administration of intravenous antibiotics is done at this stage. Early administration of antibiotics has been found to be beneficial. It is the practice in the author’s unit to provide intravenous cephalosporin antibiotic to all patients. At the end of debridement, if the contaminants have been severe, aminoglycosides may be added. Any comorbidities in the patient are also noted at this stage.
The next step is to make the crucial decision of whether to salvage or not to salvage the injured limb. In the upper limb, due to the paucity of quality prostheses and the poor long−term compliance of their use, the basic principle is to salvage the mutilated hand whenever possible. While the decision to salvage may be made on arrival, the decision to amputate is made only after debridement of the mutilated hand. The surgeon will then know the extent of injury, the structures available, and the structures that need to be reconstructed. This, coupled with the knowledge that secondary procedures can make the hand functional, will help to make a better decision. Radical debridement and consistent use of microsurgical techniques have helped to extend the indications for salvage, making us believe that technical impossibility is the only absolute indication for amputation.
For decades, surgeons have been involved in attempting to find a scoring system to predict amputation or salvage. While scoring systems have been reasonably useful in the lower limb, for the upper limb we are yet to have a reliable scoring system to predict amputation or salvage. This is because the skill levels and the attitude of the treating team greatly influences the outcome, and this variable cannot be factored into any scoring system. Furthermore, the patients will learn to use the reconstructed hand over an extended period.
Various attempts have been made to classify the mutilated hand. Some are based on the extent of amputation and some on the tissues lost. Campbell and Kay evolved the Hand Injury Severity score for injuries distal to the carpus, wherein the injuries to each ray are assessed, and in a complex manner using specific weighting factor to each ray, a final number is determined. A score of over 50 is a mutilated hand. Our experience has taught us that it is difficult to fit every mutilated hand into these classifications, and that none is helpful to make the salvage decision or to provide treatment guidelines. Though classifications are not especially useful, accurate documentation of the injured and the intact structures is crucial to make the reconstruction plan. As is obvious, it is difficult to do this on inspection of a mutilated hand. Complete information on injured structures is available only at the end of debridement, and so documentation is done after debridement. Detailed notes on the structures injured, level of injury, and the gap length if present, are noted. It is especially important to document the distal end of nerves in segmental loss. During secondary reconstruction, it is possible to know the proximal level of nerve injury by Tinel’s sign, but there is no way to identify the distal end of the nerve. Long exploratory incisions can be avoided by good documentation. Quality intra− and post−operative photographs complete the documentation.
Infection is the single most important negative determinant of outcome in the management of a mutilated hand. Incidence of infection is related to the quality of debridement and provision of early soft tissue cover. This is a vital step in the treatment pathway.
The goal of debridement is to make the crushed, contaminated wound into a clean surgical wound so that wound cover and further reconstruction are possible. Conventionally, debridement is said to be removal of all contamination and nonviable tissue. Instead, the surgeon should aim that at the end of debridement, all tissues left are viable. This attitude subconsciously leads to a better quality of debridement. Debridement is done under good anesthesia and good lighting, and is performed with loupe magnification and tourniquet. The tourniquet helps to provide a bloodless field, helping to visualize the contaminants in the intermuscular planes and to distinguish between dead and living tissues better. Without a tourniquet, as soon as any skin incision is made, the area is covered with blood, making the identification of contaminants impossible. Furthermore, in large wounds debridement without tourniquet leads to severe blood loss, which is not good for an already compromised patient.
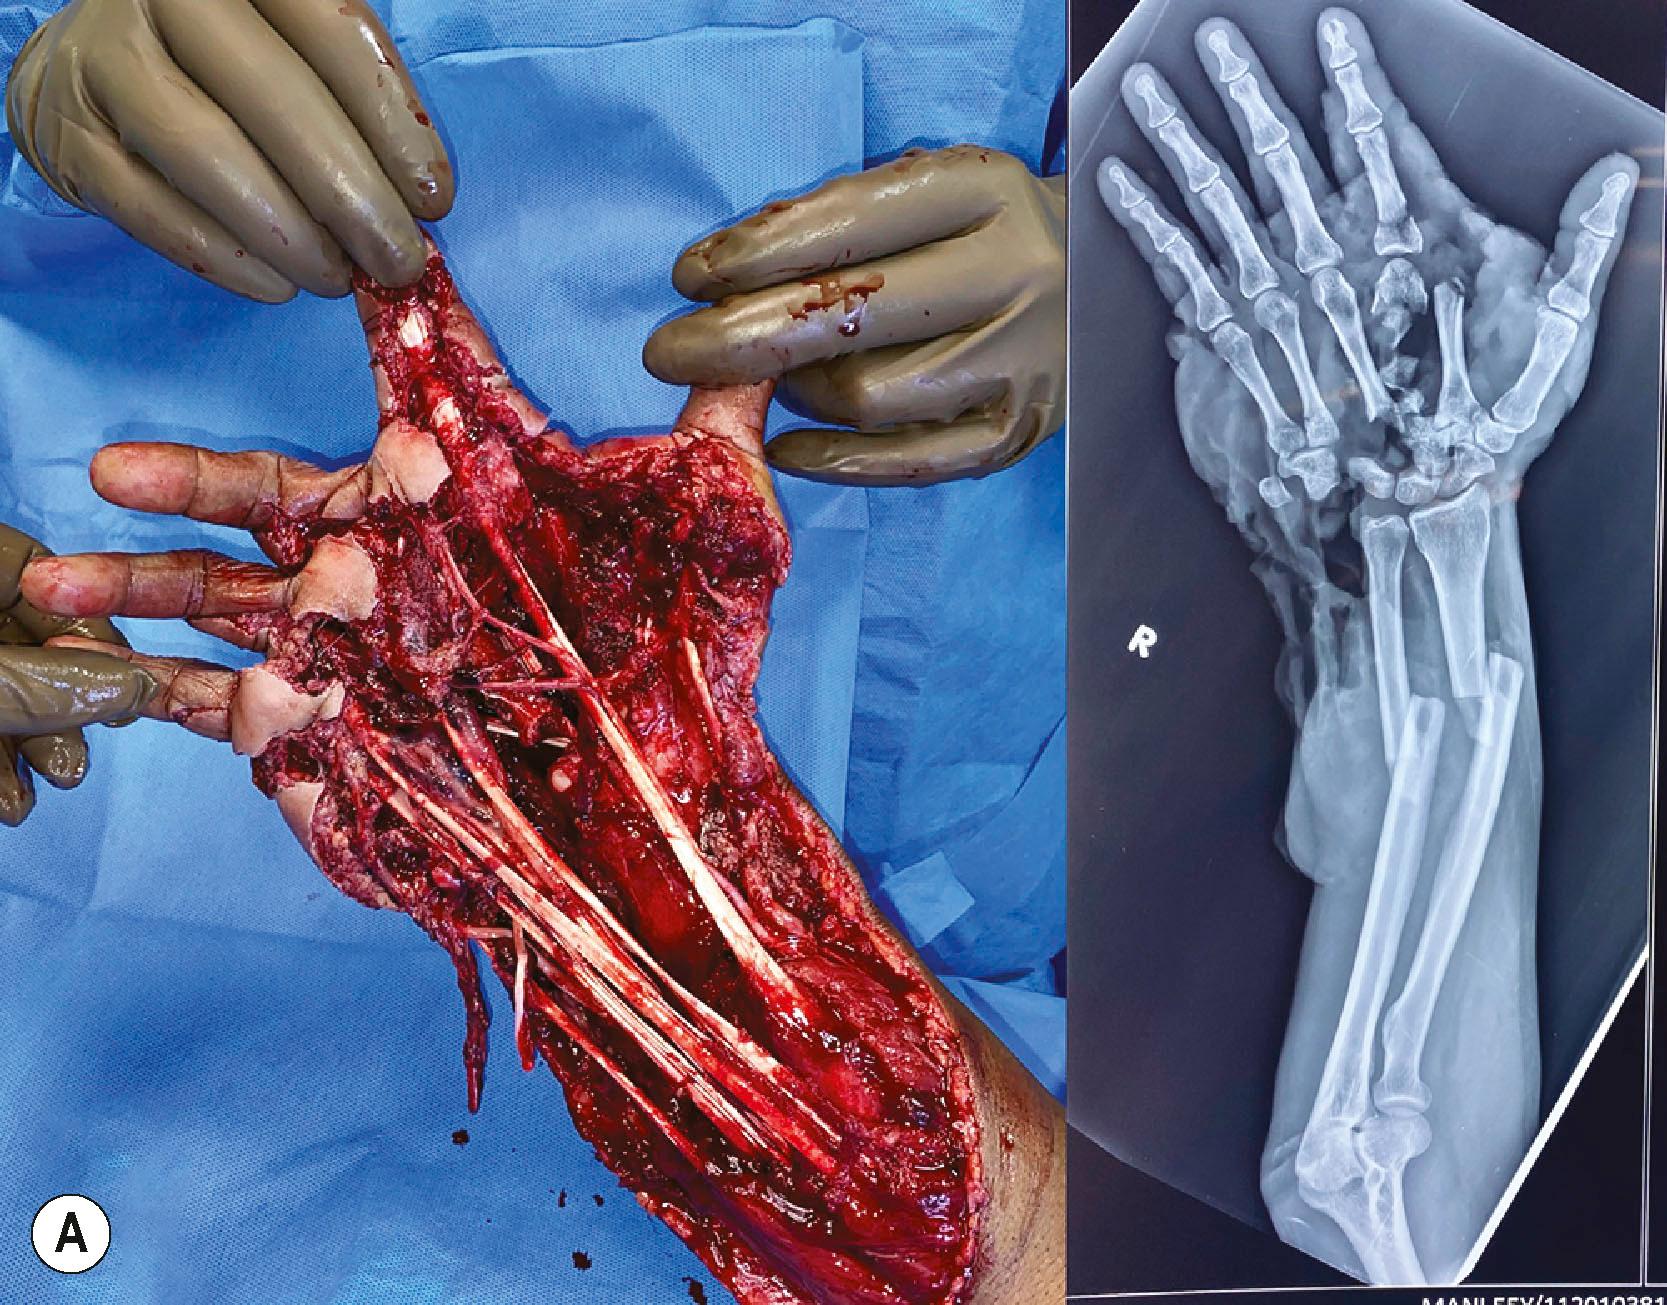
Debridement must be done in a systematic manner. Marko Godina called it wound excision to underline the concept that during debridement we excise all the dead and hypovascular non−critical tissue to leave a clean bed ( Fig. 12.4 ). The wounds almost always need to be longitudinally extended to provide exposure to the injured structures. The ragged skin edges are removed by excising a thin rim of the injured skin, making neat, clean skin margins. If the wounds are very crushed and contaminated, there is a risk of injuring the intact vessels and nerves. The vessels and nerves are first identified proximal and distal to the crushed area and then followed into the wound. Once these structures are safeguarded, debridement proceeds in a systematic manner. Hypovascular and crushed fat in the subcutaneous plane are excised. The debrided skin edges and the subcutaneous tissue are kept retracted and not allowed to fall back on the wound. The deeper structures are systematically examined. Under tourniquet control, healthy and damaged tissues are distinguished by appearance and consistency. Healthy tissue is bright and homogenous in colour. The subcutaneous fat is yellow, the muscles are bright red, and tendons and fascia have a white and shiny appearance. Healthy fat appears bright yellow in colour. Injured tissue needing excision may contain foreign bodies, have irregular tissue consistency, blood stains, and minor clots in the substance of the muscle. Avascular muscle is moldable when pinched. All such devitalized tissues are excised.
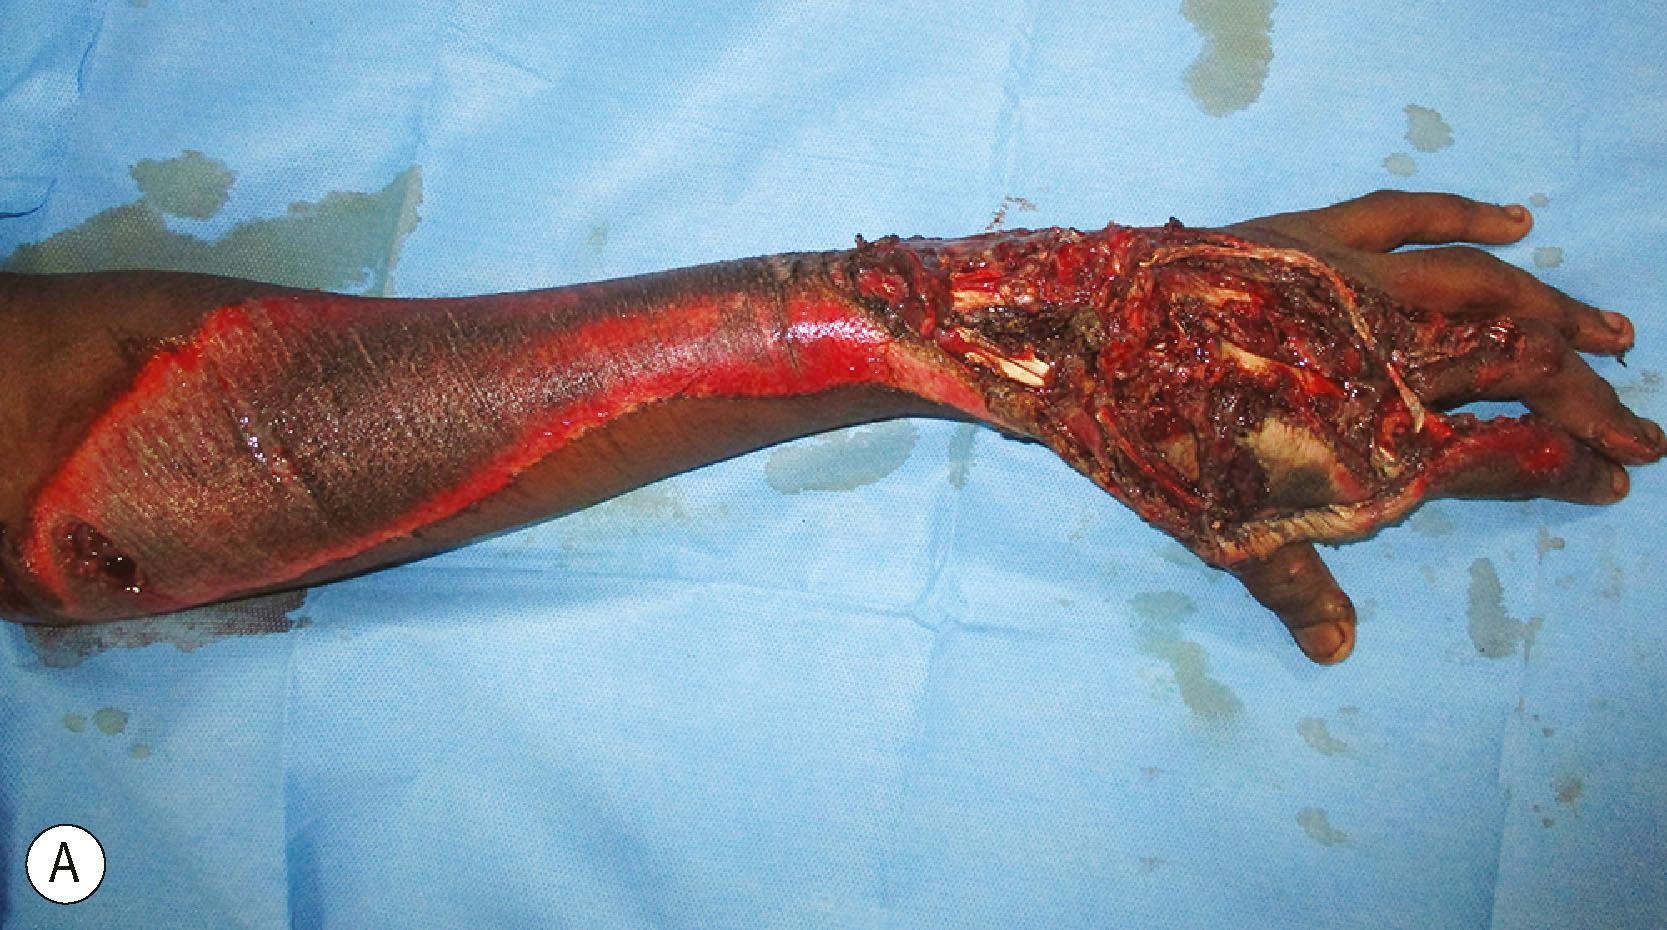
Next attention is turned to the nerves and blood vessels. Neurovasuclar structures have a thin layer of areolar tissue around them. When the neurovascular structures are contaminated, this thin areolar layer must be painstakingly excised with sharp scissors to prevent infection spreading along that plane. Tendons may be avulsed from their origins with sleeves of muscles at the proximal end. These muscles can never be revascularized and so must be excised. Retained muscle in such situations causes infection ( Fig. 12.5 ). Tendons are preserved and tunneled to their original position for use in later tendon transfers. Bone edges are curetted, and in case of ingrained dirt, a burr is used to remove the contaminants. Lastly, we look for open joints, which may contain contaminants. The joint cavities are washed out. At this stage, the tourniquet is let down and the nature of bleeding observed. Bright red subdermal bleeding shows that the skin excision is acceptable. All the muscles must become bright and red. If there is any area that is not vascular, the tourniquet is reinflated, and the area is debrided again. This sequence is repeated until one is confident that all the tissues retained are vascular or can be revascularized. For an avascular hand for which revascularization is planned, debridement is done as advised and tissues that have a chance of being revascularized are retained. After revascularization, the wound is inspected and debridement is done 20 minutes after revascularization. This is important to excise avascular and hypovascular muscles, which are the main cause of infection.
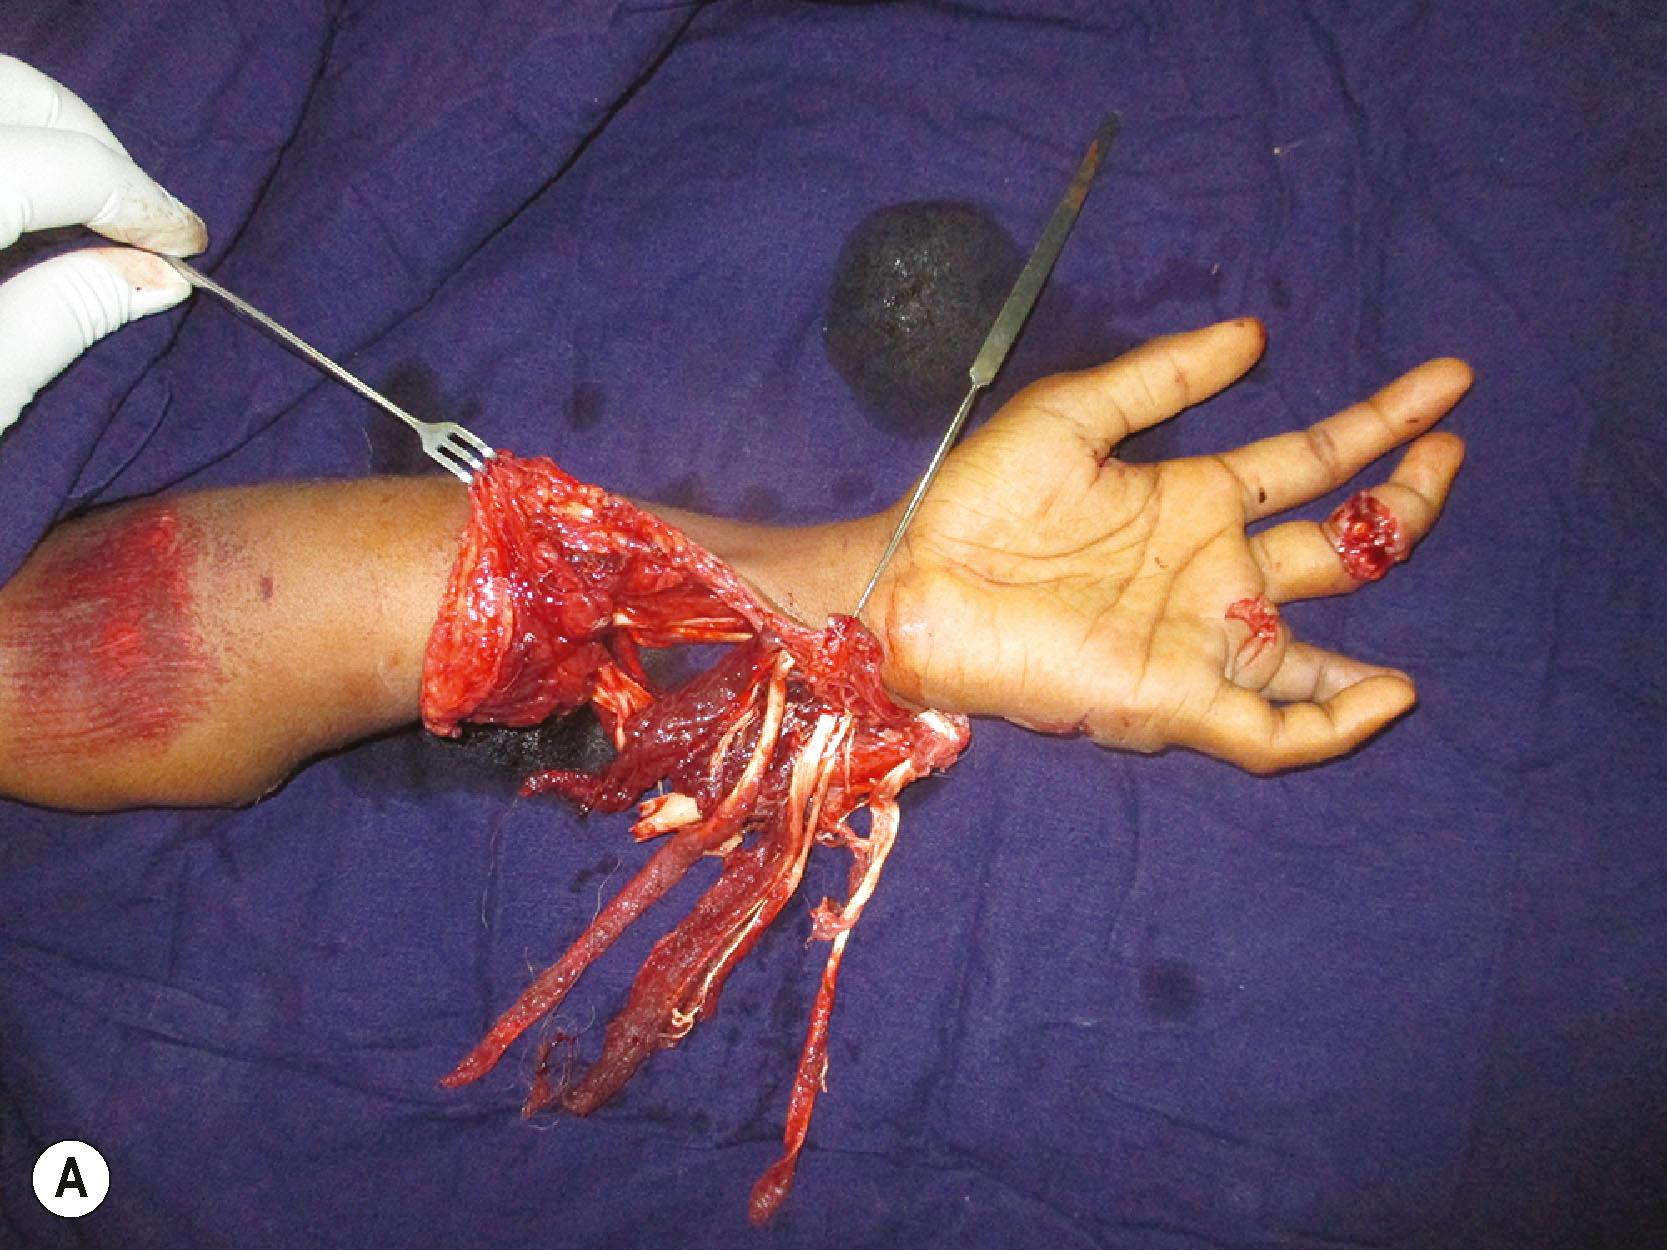
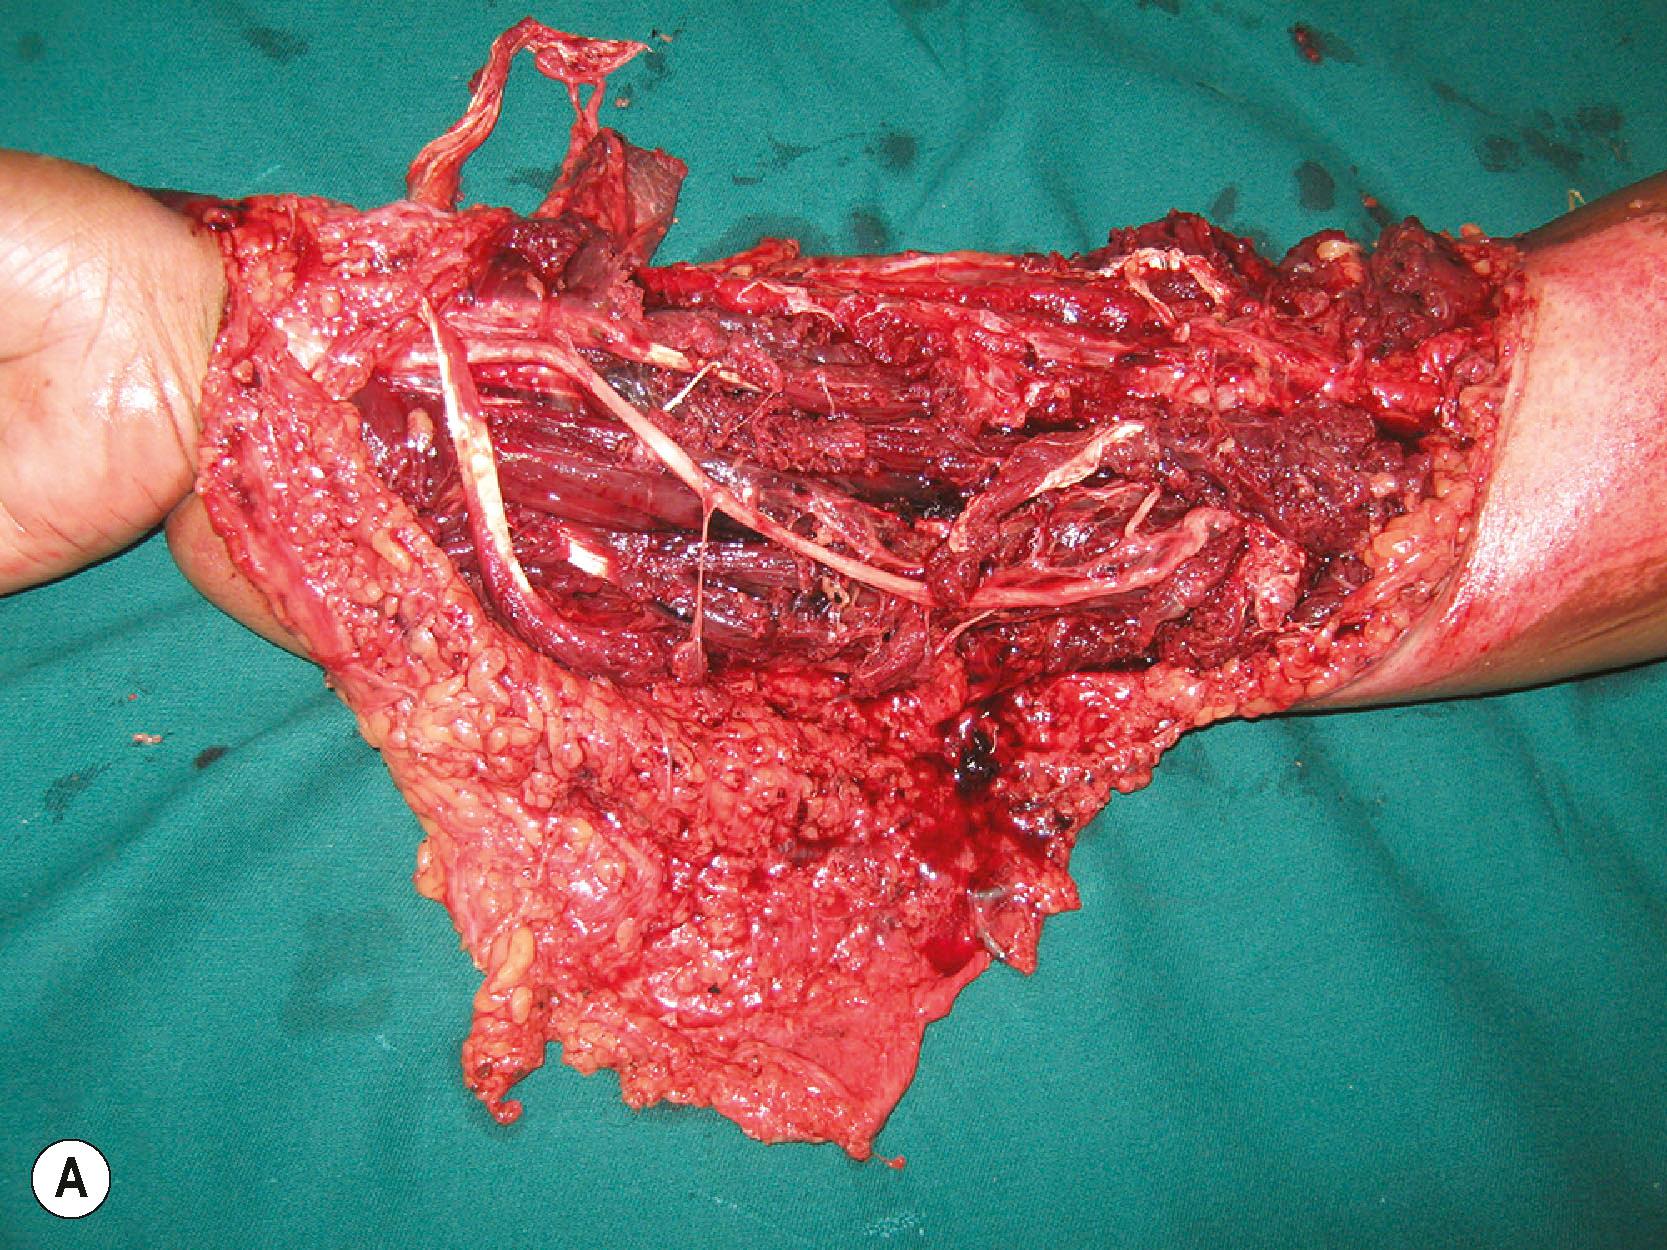
A special type of injury is extensive degloving injuries. Godina advised excising the degloved skin at the base. While this may be reasonably appropriate to the lower limb, in the upper limb we can opt for a conservative approach. The plane of degloving is often superficial to the fascia. The cutaneous vascular network is good in the upper limb skin. In degloving injuries we excise the skin margins and debride the under surface of the degloved flap of all contaminants and loose fat. The tourniquet is released and the circulation is observed. If there is no evidence of subdermal bleeding at the skin margins, the skin edges are excised to the level of subdermal bleeding. In circumferential degloving of the forearm and arm, sometimes there is a bridge of skin connecting the proximal and distal segments. In such instances, we retain this skin bridge, and it often serves as a venous conduit in the initial few days until acclimatization occurs. On a second look operation a few days later, we can excise the skin bridge if it is not viable. We have found this to reduce bleeding from the extensive raw areas in the initial post−debridement time. If the limb is going to be revascularized, final skin excision is done after revascularization. Some perforators even at the distal end can vascularize a good area of skin ( Fig. 12.6 ).
If the injured part is heavily contaminated with soil, road dust, or industrial contaminants, irrigation with flowing water is first performed. Then sharp debridement is done. After this, the wound is irrigated with copious amounts of saline. Jet or power irrigation is not done since it may drive the contaminants deeper into tissues. Low−pressure bulbs or low−pressure flow systems are used. The role of the irrigating fluid has been studied and it has been found that clean autoclaved tap water is as good as any solution containing antibiotics. The duration of contact of the irrigating fluid with the tissue is so short that the benefit of antibiotic−containing irrigating fluids is insignificant.
The injury−to−debridement interval should be kept as short as possible. No study has provided convincing evidence in favor of the “six−hour rule” for debridement. Studies examine infection as the outcome variable. But a shorter arrival−to−debridement period prevents ongoing blood loss, reduces the duration of pain and uncertainty, and adds to patient comfort. This positively adds to the overall experience of the patient. A recent extensive meta−analysis of the existing observational studies, using raw and adjusted estimates, to determine if there was an association between the timing of initial debridement and infection demonstrated an increased risk of infection with progressive delay in debridement. The unavailability of skilled personal would be the only indication for delay in debridement.
At the end of debridement, the surgeon will have a clear idea of the structures injured, structures that can be reconstructed, and the need for vascular augmentation. Presence of adequate distal vascularity is the important assessment that has to be made at this stage. Palpable distal pulses or return of perfusion at the fingertips at 3 seconds of pressure or picking up of signals by a pulse oximeter are definite signs of adequate blood flow. If the flow is sluggish, it is better to augment the blood supply to get pulsatile blood flow into the limb.
Another important decision that has to be taken at the end of debridement is whether any tissues that are to be discarded can be used (spare parts). Prominent among these is the opportunity for heterotopic replantation. When multiple fingers including the thumb are amputated and the thumb is beyond salvage, any of the amputated fingers can be replanted in the position of the thumb. When all fingers are amputated with an intact thumb, and only one is fit for replant, opinions vary as to the best possible position to replant the available finger. Transpositional replantation, as it is termed, posits that positioning it over the little finger will enhance the span of the hand. The authors, however, prefer to replant the single finger over the index finger stump. Apart from providing adequate span, the index position gives better pinch strength, and patients find it very useful ( Fig. 12.7 ).
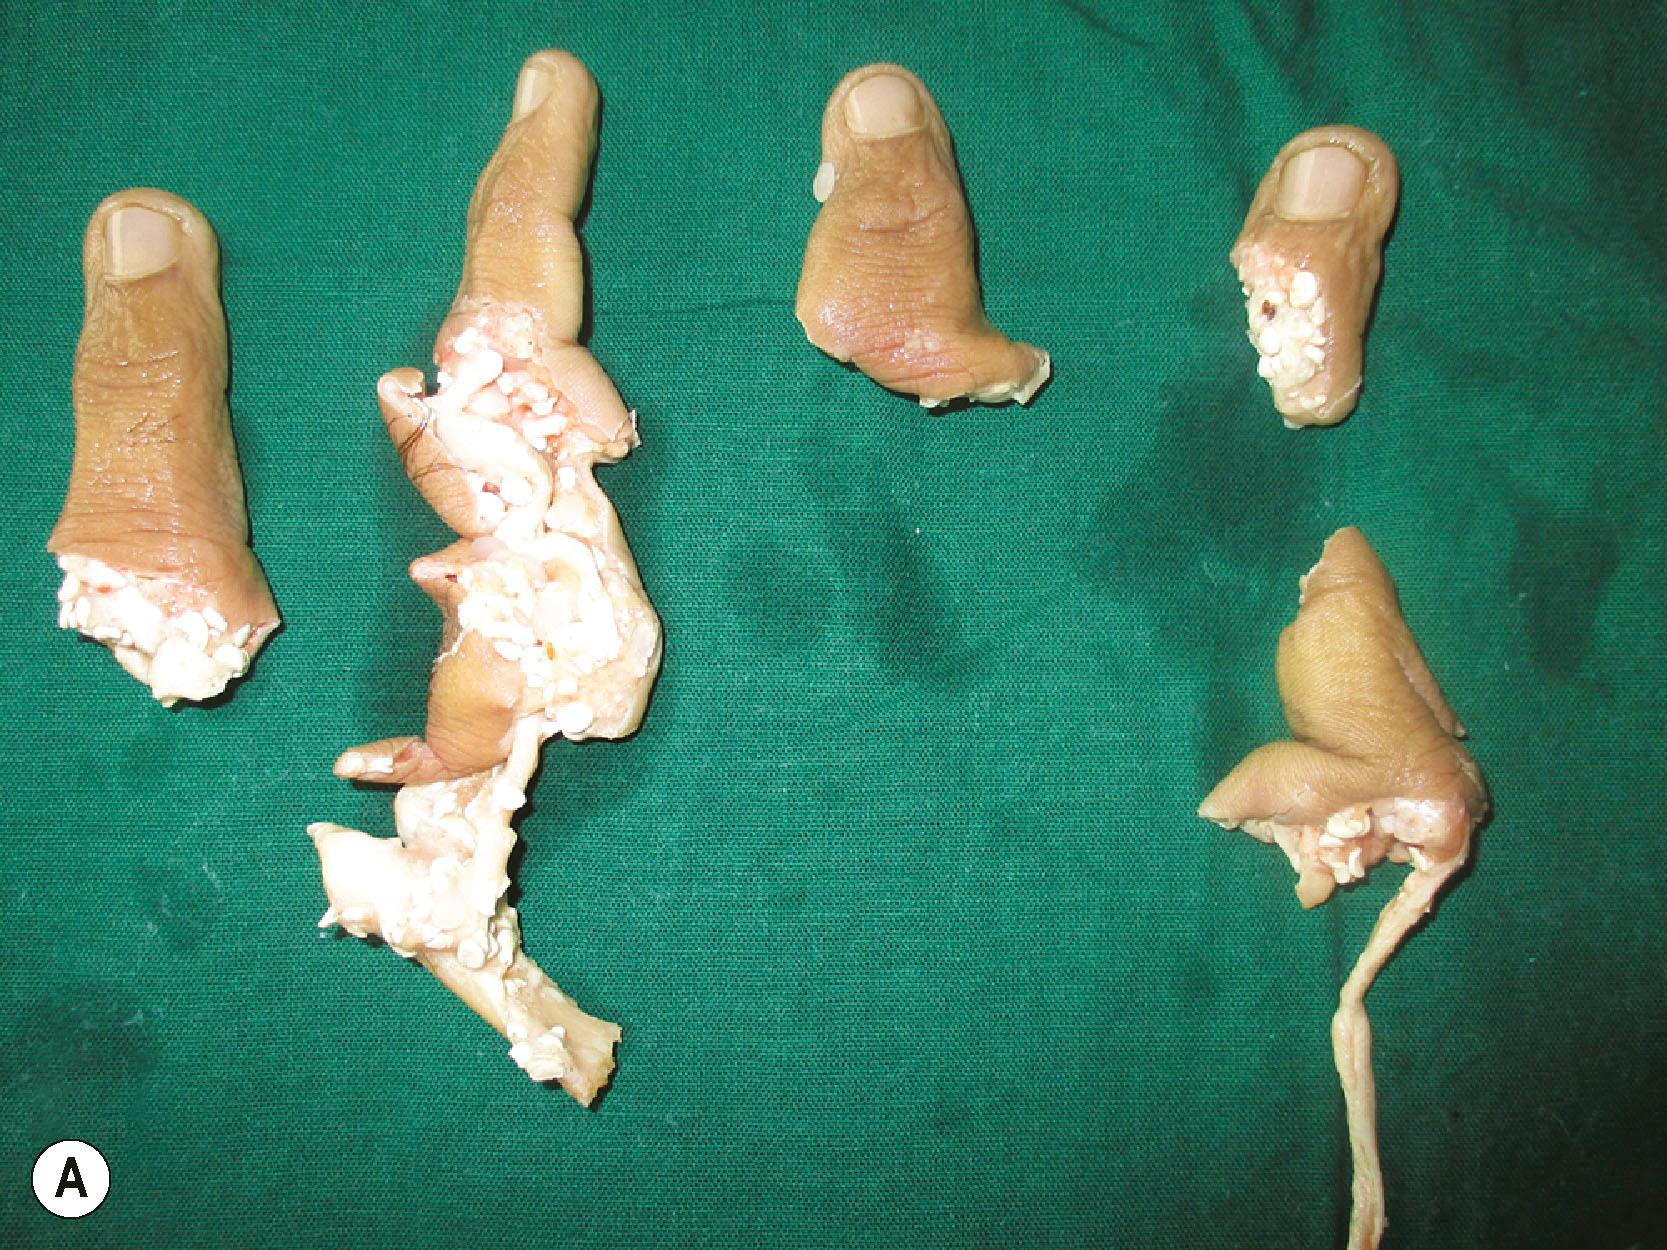
Other tissues which could be used as spare parts include skin grafts from the degloved skin, tendon, nerve, and bone grafts from the amputated fingers. One of Gilles’ principles, “Never throw away anything unless you are sure it is not necessary”, is very true in the management of mutilation injuries.
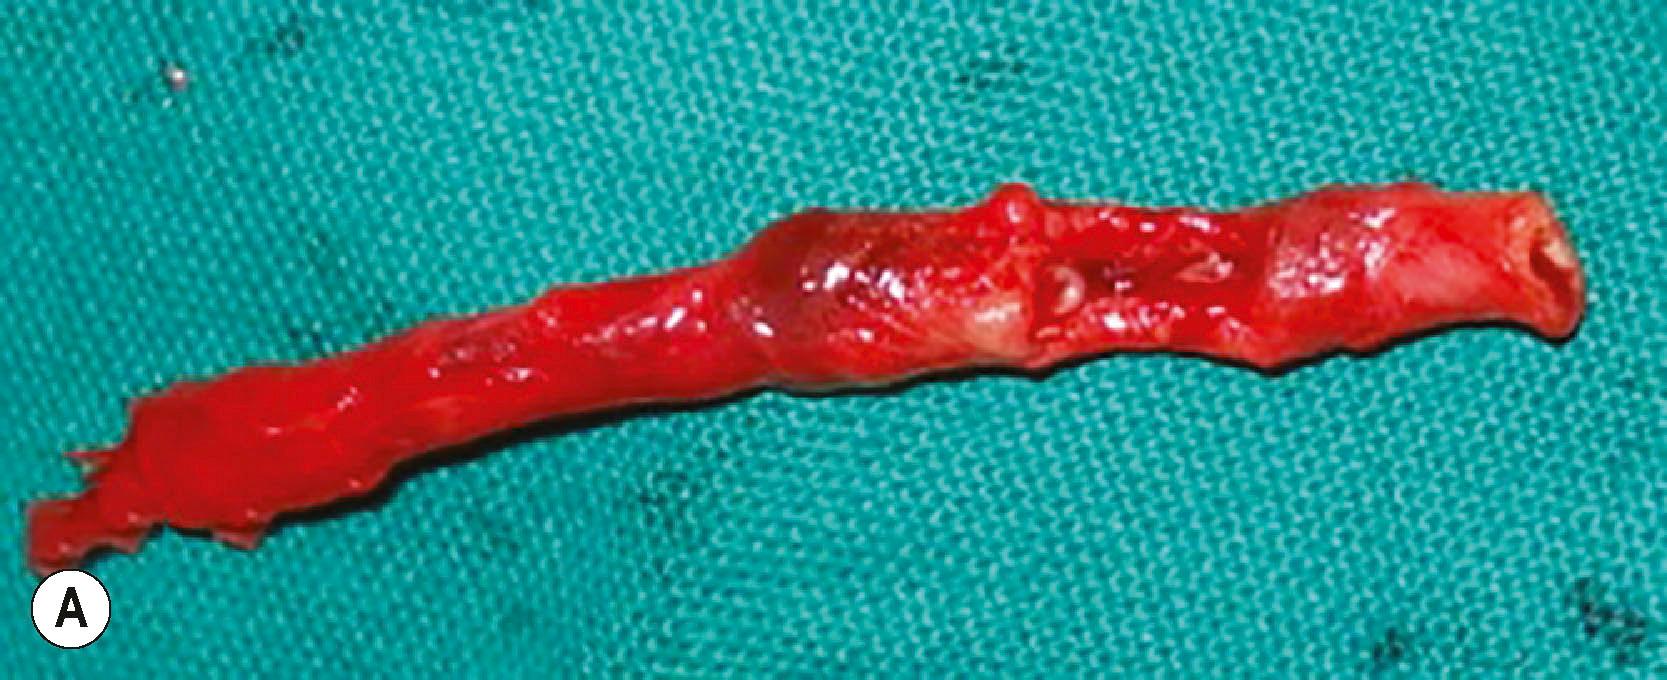
The need for vascular reconstruction in a mutilated upper extremity is a clinical decision. Absence of peripheral pulses in a patient who is not in shock and delayed capillary refill are indications to consider revascularization. In our practice, angiograms are rarely used in the management of mutilated injuries of the upper limb as it might delay revascularization. In closed degloving injuries if there is suspicion of a major vessel injury in the arm or forearm, a handheld Doppler is run along the course of the major vessels. If there is an abrupt drop in signal at any point, it is an indication for exploration. In our experience, a drop in signal is always associated with vessel injury. It is important to reconstruct the vessel since pulsatile blood flow ensures survival of the distal part, increases deep tissue viability, and enhances circulation to facilitate the performance of local flaps. Even in situations of injury in continuity, we always excise the injured area and repair the vessel. If there is a gap, a vein graft is used. In trauma, embolectomy is not advised. The thrombosis occurs due to the damage to the intima and the vessel wall, and there are high chances of recurrence of thrombosis at the site after embolectomy ( Fig. 12.8 ). The injured vessel segment must be excised and reconstructed. The saphenous vein is used to reconstruct the major vessels, and for the digits, the veins from the volar aspect of the forearm are used. There is almost no role for artificial grafts for vascular reconstruction distal to the axillary artery, particularly in contaminated wounds. Arterial grafts from the lateral femoral circumflex artery or from the circumflex scapular artery system were previously used. They are no longer popular since they involve deep dissection in another field, and the outcomes have not been better than the commonly used vein grafts.
Vascular injuries are frequently associated with fractures and soft tissue loss. In the presence of vascular injury, quick and stable fixation of the skeleton is done prior to vascular repair. In vascular injuries proximal to the elbow, if the time to revascularization would exceed 6 hours from injury, a Silastic shunt could be used to temporarily vascularize the distal part. No study exists to provide the information of the time that one could safely gain for definitive revascularization by this initiative. The shunt is allowed to perfuse the distal part for about 5 min, transfusing the blood lost. The long bones are fixed with plates and screws. Hand fractures are fixed with K−wires. Skeletal fixation must be expedited to reduce the ischemia time.
The repaired vessels must lie on a vascular bed and must have viable soft tissue cover. Even though the vein grafts carry blood, they need to be vascularized for survival. Except as a temporizing measure, we never use split skin graft over the site of vessel repair. Not that the graft would not take, but in the event of a partial loss of graft or infection, there is a risk of blow out or rupture of the vessel. This complication can occur a few weeks after the repair and can lead to a torrential hemorrhage. Salvage at that stage would require a fresh vein graft reconstruction and a flap. Secondly, if at a later stage a flap cover is desired in the area of vessel repair to facilitate secondary reconstruction, it is difficult to shave the healed skin graft off the vessel walls and the surface of the nerves. For these reasons we always plan a good soft tissue cover over the vessel repair sites. Another way of solving the problem is to use flow through free flaps. Radial artery flaps and anterolateral thigh flaps (ALT) are the commonly used flow−through flaps in the forearm ( Fig. 12.9 ). Due to donor site morbidity, the ALT flap is more often used. The flap vessels match the size of the radial and ulnar arteries. Designing flow−through flaps requires skill to suit the geometry of both the vessel defect and the soft−tissue defect. A safer and less time−consuming way is to use vein grafts to bridge the vessel defect and to use a skin flap to cover it. That is the more commonly used solution.
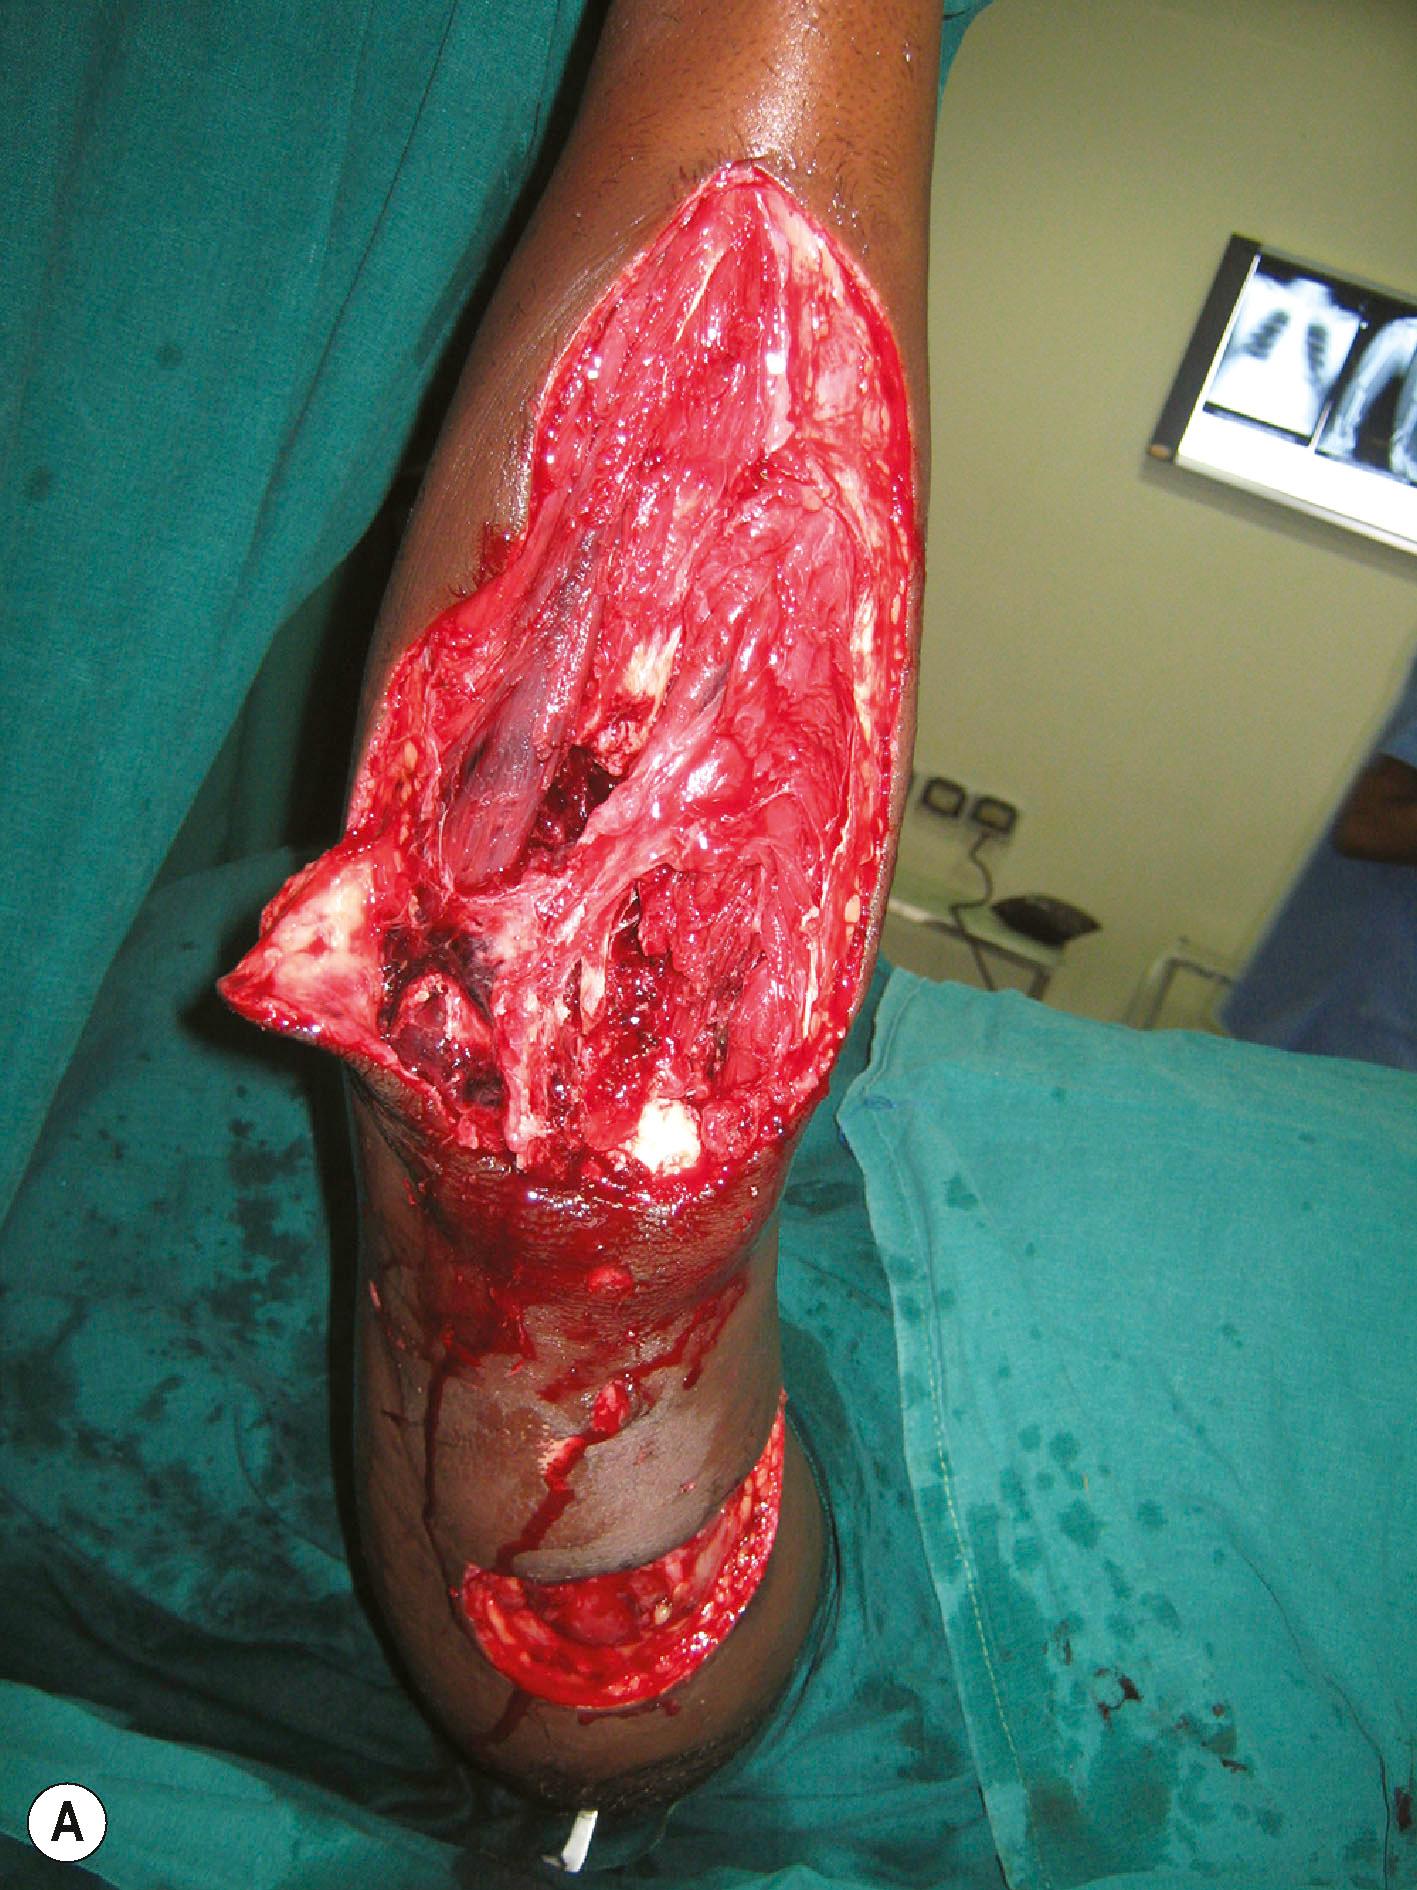
Injury at the level of the palmar arch is a reconstructive challenge. A divided palmar arch reaches out distally at least to some of the common digital vessels. Shortening of the metacarpals which usually accompanies debridement also helps to reach the distal vessel. If multiple fingers have to be individually revascularized, the venous pattern on the dorsum of the foot is carefully examined, and it is possible to choose a segment of the dorsal venous arch that will fit well for the directional flow of the vessels in the hand to revascularize the fingers. The ulnar artery is usually the proximal vessel used. When revascularization is attempted, the extent of soft−tissue connection between the thumb and the fingers is examined. Unless a good amount of soft−tissue connection is present in the web, a separate arterial input to the thumb is needed. A graft from the radial artery at the anatomical snuff box to the ulnar digital artery of the thumb through the first web space is the usual choice. Border digits have vessel dominance, with the ulnar digital vessels of the thumb and the index and the radial side digital vessel of the little finger being larger than the vessels on the other side. In injuries to these fingers, the dominant vessels are preferentially reconstructed.
A special situation is the condition of a “pink pulseless limb”, wherein there is an injury to the major vessel, but the collaterals are good enough to maintain circulation. Some also have near−normal oxygen saturation present in the fingers. Even in such circumstances, the authors prefer to explore the vessels. Vessel reconstruction provides pulsatile flow into the distal part, ensures viability, and makes possible safe performance of local flaps. Routine performance of “non−critical” anastomoses not only helps the patient, but also hones up the skills of the surgeons to be ready for a critical anastomosis.
The goal of fracture fixation in a mutilated hand injury is primary union of the fracture without infection to allow early movement and rehabilitation. Inappropriate fracture fixation leads to non−union and delays rehabilitation of tendon and nerve repairs by many months. Secondary procedures to enhance function have to be deferred until bone union is obtained. A chief requirement for primary bone union is that the bone ends must be alive. Bone ends devoid of periosteum and/or extreme comminution at the fracture site may leave bone ends without blood supply. Free floating cortical bone pieces must be excised as they do not survive as bone grafts.
In the upper limb, internal fixation by plates and screws is the preferred method of fixation of fractures of the long bones. Internal fixation does not increase the incidence of infection provided radical debridement and early soft tissue cover are provided. External fixation is used when large gaps occur in the long bones or across the joints. In the humerus, up to 5 cm of shortening could be performed to reach healthy bone ends. Up to a total of 10 cm of total shortening in the upper limb is functionally and aesthetically acceptable if done to achieve primary bone union. In the forearm, due to the presence of two bones, shortening may be difficult, but still, it is advisable to do so to achieve primary union of the bones. When there is comminution of the forearm bones, with segmental loss in one or both bones it may be preferable to convert it into a one bone forearm. Often, it is proximal ulna to distal radius fixation. When radius to radius or ulna to ulna fixation is done, patients retain the movement of pronation and supination. Making a one−bone forearm is one sure and quick way of bone stabilization. When there are intra−articular fractures, primary articular reconstruction is done as well as possible at the elbow and wrist joints. Articular fragments without soft−tissue attachment can be used for reconstruction provided immediate soft−tissue cover is achieved. The issue of soft−tissue cover must not compromise the technique of skeletal fixation or articular reconstruction ( Fig. 12.10 ). If joint reconstruction is technically impossible, then primary arthrodesis with bone grafts or allografts is acceptable. The favored position for wrist arthrodesis is neutral on the non−dominant side and 15 to 20° extension on the dominant side. We prefer 30 to 40° of flexion in the elbow joints for arthrodesis.
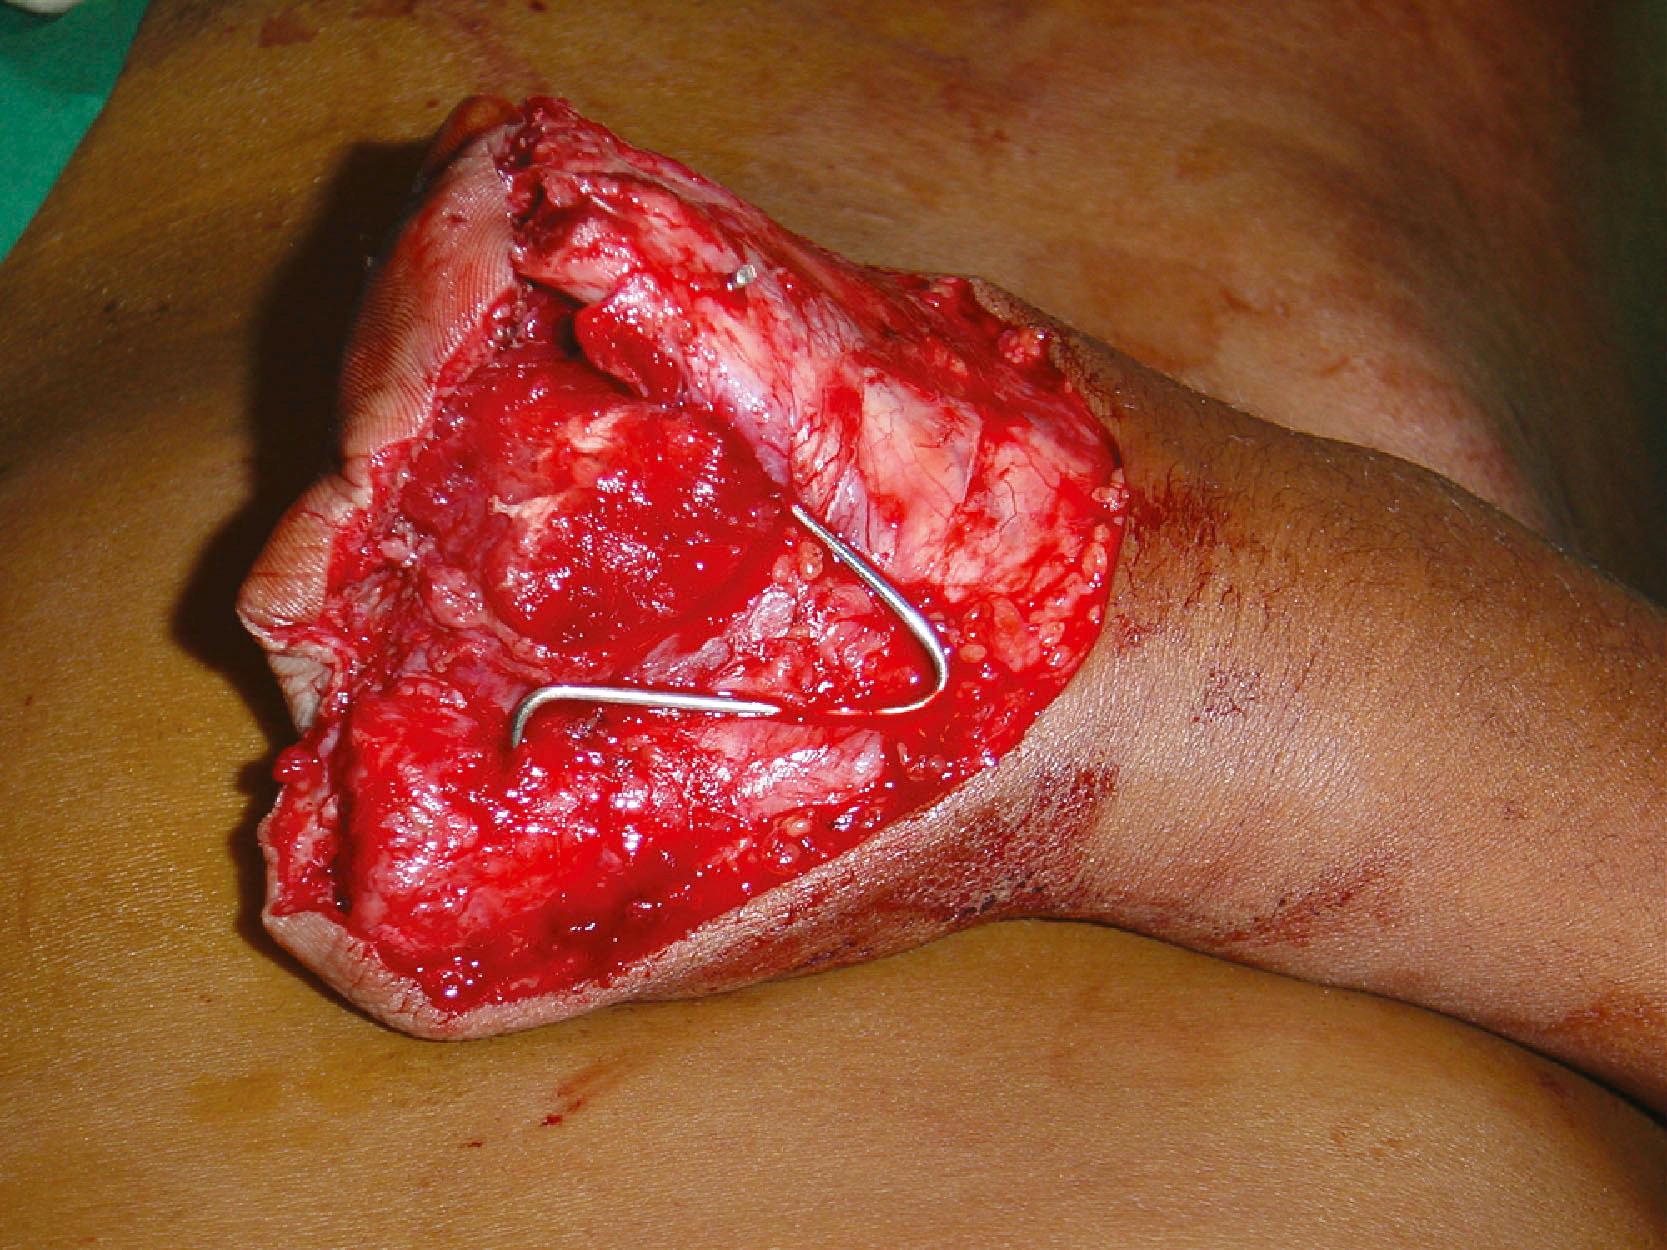
In the hand, most fractures are fixed with K−wires. The gaps in the metacarpals and phalanges are often maintained with axial K−wires. If there is a dorsal composite loss over the thumb, and there is raw area over the first web space, the thumb is stabilized after debridement in the position of palmar abduction with slight pronation so that the pulp of the thumb faces the pulp of the fingers, and the thumb is positioned in the line of the radial border of the index finger. In this position, the flap requirement is greater than if the thumb is positioned in extension. A transverse wire can be passed to keep the first metacarpal in that position till the wound heals. If the mutilation includes loss of thumb and fingers, and toe transfers are later planned, it is imperative that the space between the first and the second metacarpals is maintained until reconstruction is completed. This is achieved by a V−shaped wire wedged between the first and second metacarpals with short transverse limbs passing into the drill holes in the bones ( Fig. 12.11 ). This can be retained till the reconstruction is complete and rehabilitation is started. No splint alone can hold the metacarpals apart.
A key determinant of outcome in the management of a mutilated hand is primary wound healing without infection. This sets the scene for institution of effective rehabilitation of other repaired structures and early performance of secondary procedures to enhance function. In the presence of soft−tissue loss, this involves provision of early soft tissue cover before infection sets in. Timing of soft tissue cover and its relationship to infection has been the subject matter of many studies. The evidence provides a wide range of days to complete the process. It is the authors’ convinced opinion that the earlier the soft−tissue cover is accomplished, the lesser are the chances of infection and higher is the patient’s comfort. Early soft tissue cover reduces the days of hospitalization and cost of care. Until the advent of microsurgery, serial debridement was the standard practice in the management of the mutilated hand. The advent of large microsurgical flaps introduced the possibility of immediate cover of even large wounds. In order to avoid infection after flap cover, the techniques of debridement were refined to make it a “wound excision”. Once the risks of infection were mitigated, early soft tissue cover became the norm. It had the advantage of preventing secondary loss of tendons, nerves, and bone from exposure and desiccation. The current practice is to provide soft tissue cover within 72 hours. If there is any doubt about the quality of the wound, a second−look debridement at 24 or 48 hours is done until the wound is fit for cover. In the intervening time, moist dressings are applied to the wound.
NPWT dressings are known to keep a moist environment, preventing desiccation of critical structures, reducing the bacterial counts in the wounds, encouraging granulation, and making the wound fit for cover earlier. Regular use of NPWT wound dressings has reduced the number of free flaps in some units. The functional outcome of such a practice is debatable, with conflicting opinions about the advisability of the protocol. It is the practice of the authors’ unit that, if at the end of debridement, critical structures are exposed, and the opinion is that the wound needs a flap, we proceed with flap cover. Early flap cover reduces fibrosis and allows gliding tissues to function well. Flaps are better than skin grafts if secondary procedures are needed. NPWT dressings are most useful when the mutilated hand is part of polytrauma and the general condition of the patient or the severity of other injuries do not allow early soft tissue cover procedures to be done.
Of the various options for skin cover, skin grafts are in the lower rungs of the reconstructive ladder and microsurgical free flaps are at the top. Increased knowledge of the anatomical and physiological basis of blood supply of various tissues and refinement of techniques has led to the capacity to raise large flaps with a high degree of microsurgical success. Function, aesthetics, and the ability of the surgeon are the key factors in the choice of the cover, rather than ease of performance of a particular technique. Over the past few decades, certain principles have evolved to guide the surgeon in providing soft tissue cover in mutilated hand injuries.
Skin flaps are better than muscle flaps if there is a possible need for future access. Since most mutilated injuries may need some secondary surgery, skin flaps are preferred. Muscle or skin flaps have no bearing on infection, the rate of infection being dependent upon the quality of debridement and the timing of soft−tissue cover. Similarly, infection rates do not appear to differ between pedicled and free flaps. Primary reconstruction with tendon or bone grafts can also be carried out with pedicled flaps as cover by designing flaps to suit the defect and increasing the inset ( Fig. 12.12 ). Increasing the extent of the attachment of the flap prevents the exposure of the reconstructed structures and makes distant pedicled flaps as safe as a free flap for doing primary reconstruction.
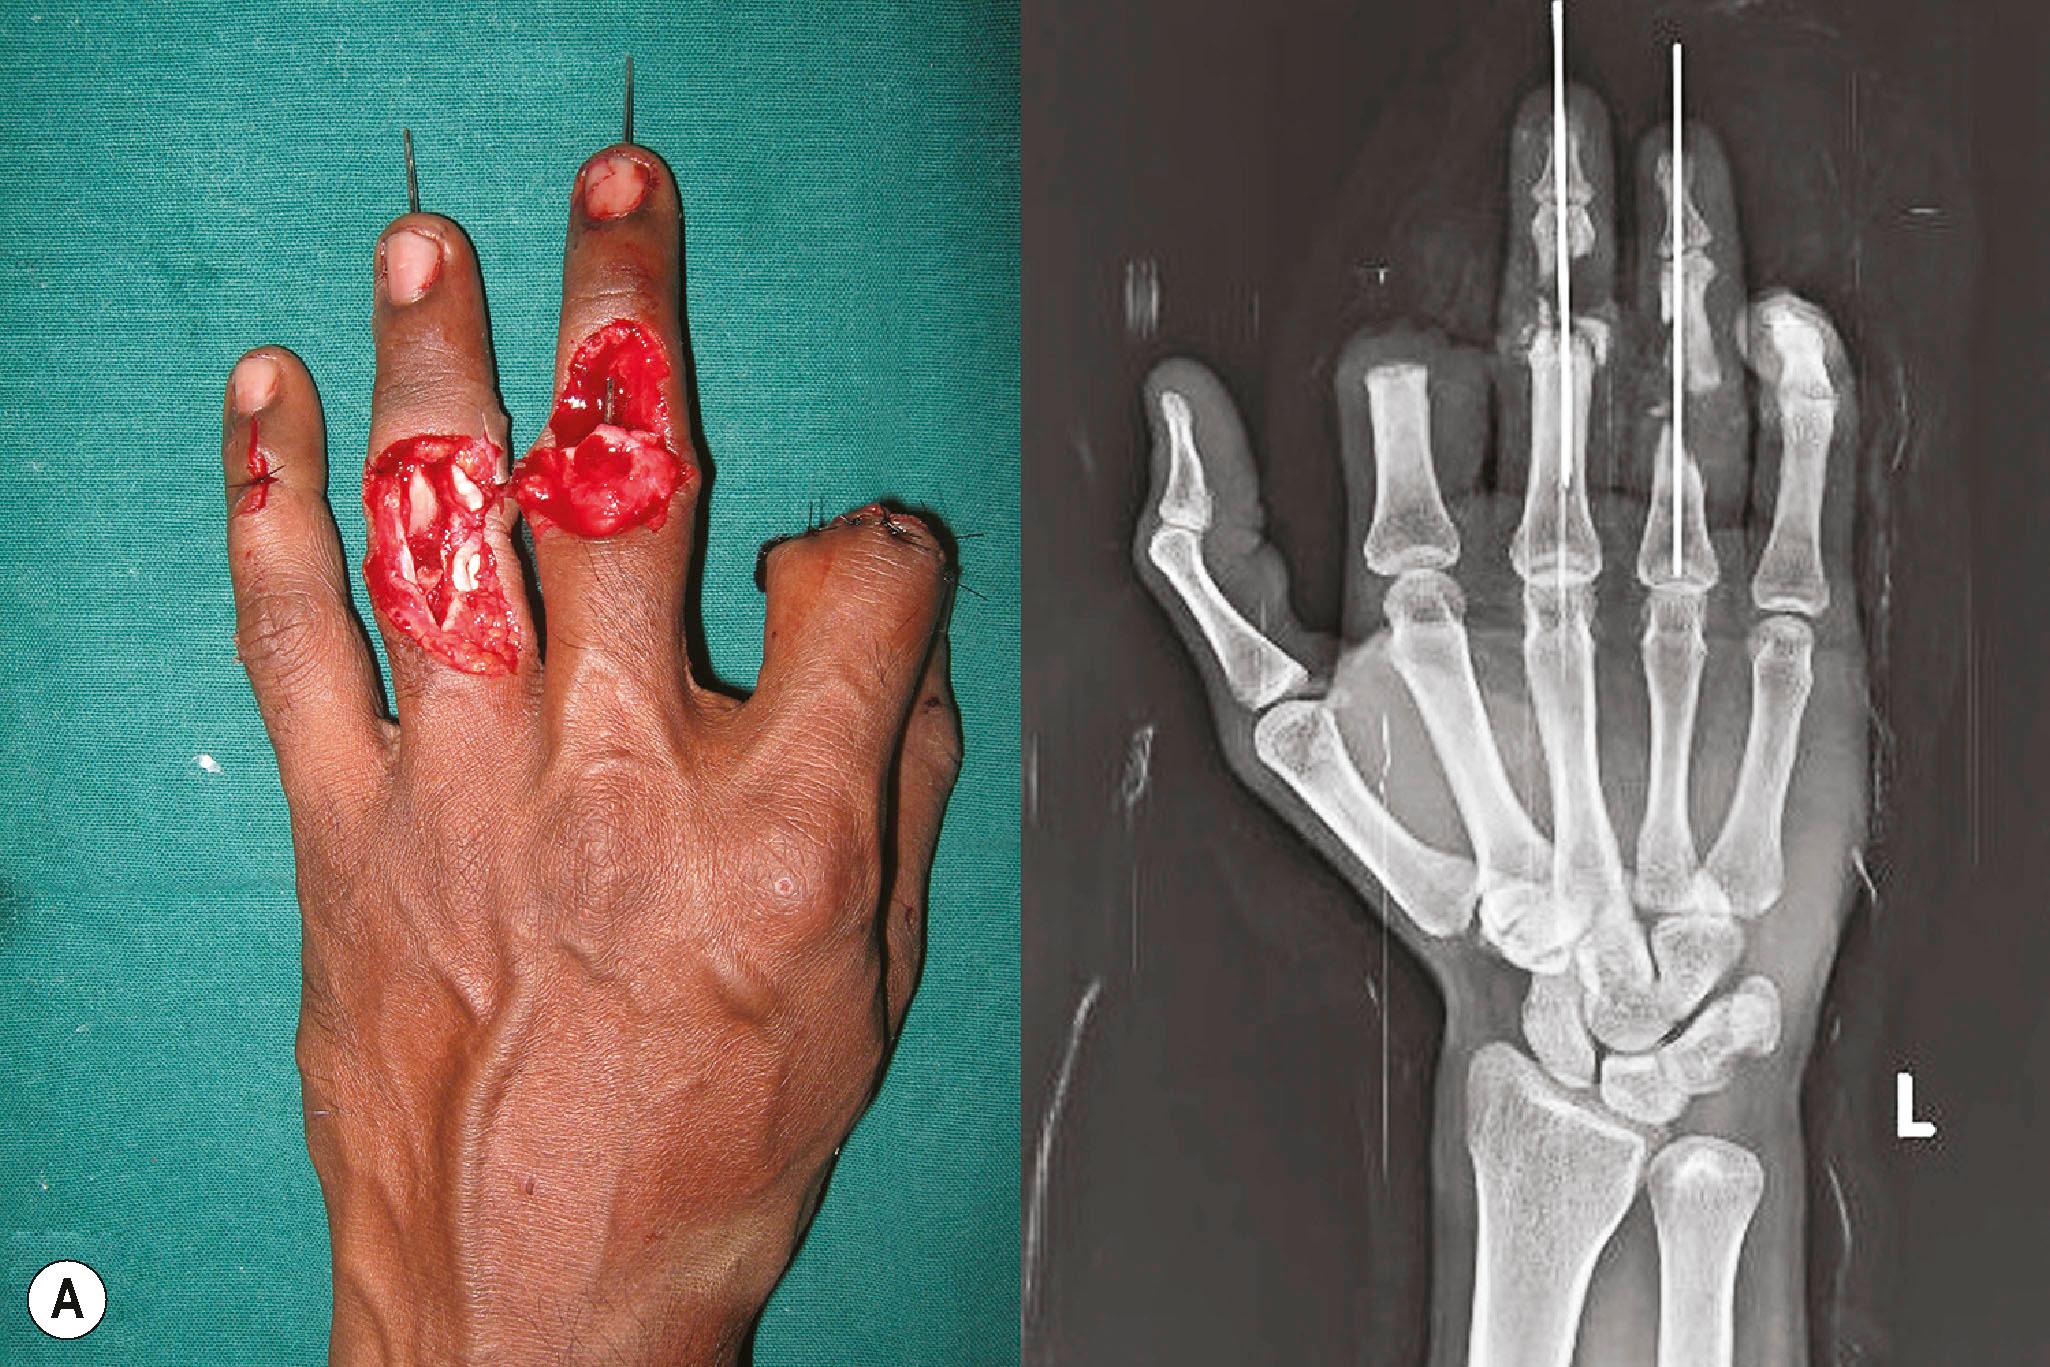
In instances when a future microsurgical procedure is planned, it may be prudent to preserve the vessels for the definitive secondary microvascular procedure. Examples would be the use of pedicled groin flap to cover the stump of the metacarpal hand prior to toe transfers. If the stumps have the base of the proximal phalanges, a groin flap to retain the metacarpophalangeal joints is a better option than shortening and closing the stump with existing flaps. Another example of preference for a pedicled flap is for coverage of the volar surface of the forearm by abdominal flaps in severe Volkmann’s ischemic contracture which would need a free functioning muscle transfer for flexor reconstruction. Similarly, large reverse radial forearm flaps should not be used to cover the hand defects when future flexor reconstruction may be needed. The skin grafted volar forearm will not provide suitable access for the reconstruction, and ideally, a free flap or a pedicled flap must be chosen in that situation. At all stages of mutilated hand management, the adage “do not just plan for the day, think of the complete plan”, must be followed. This principle is also used when planning cover for circumferential defects. It is difficult to find a flap which will cover the entire circumference of the forearm. Most often, one side is covered with a flap and the rest is covered with skin graft. The location and design of the flap depends on the future need for tendon transfers or reconstruction. The future plan is taken into account and the pathway of possible tendon transfers is covered with the flap. When a large raw area needs to be covered, the total plan is conceived and the area divided into “critical” and “non−critical” areas based on the need for reconstruction of deeper structures (see Fig. 12.4 ). Critical areas are preferentially covered with flaps, and the rest is covered with skin graft. Missing this step in the initial period of cover would result in performance of another flap at a later stage to complete the reconstruction.
As mentioned earlier, skin grafts must not be applied over the sites of vascular and nerve repairs and vein grafts. Loss of graft and infection could result in the rupture of the anastomosis and segmental loss of a nerve.
The surgeon usually finds that there are many flaps which could equally well address a particular soft−tissue coverage problem. At that stage, the surgeon is advised to choose the flap that he or she is most comfortable with. Repetition increases success rates, reduces complications, and decreases the operative time. A trauma reconstructive surgeon must be capable of performing the following flaps, which are the workhorse flaps in most reconstructive surgery units.
Pedicled groin flap and flaps from the lower abdomen remain the workhorse flaps for hand and forearm cover in many parts of the world. The flaps do have the inherent disadvantage of the patient having to endure the discomfort associated with attachment of the hand to the trunk for 3 weeks. This and the many of the presumed disadvantages of the pedicled flaps have been addressed by proper planning and execution of the flap.
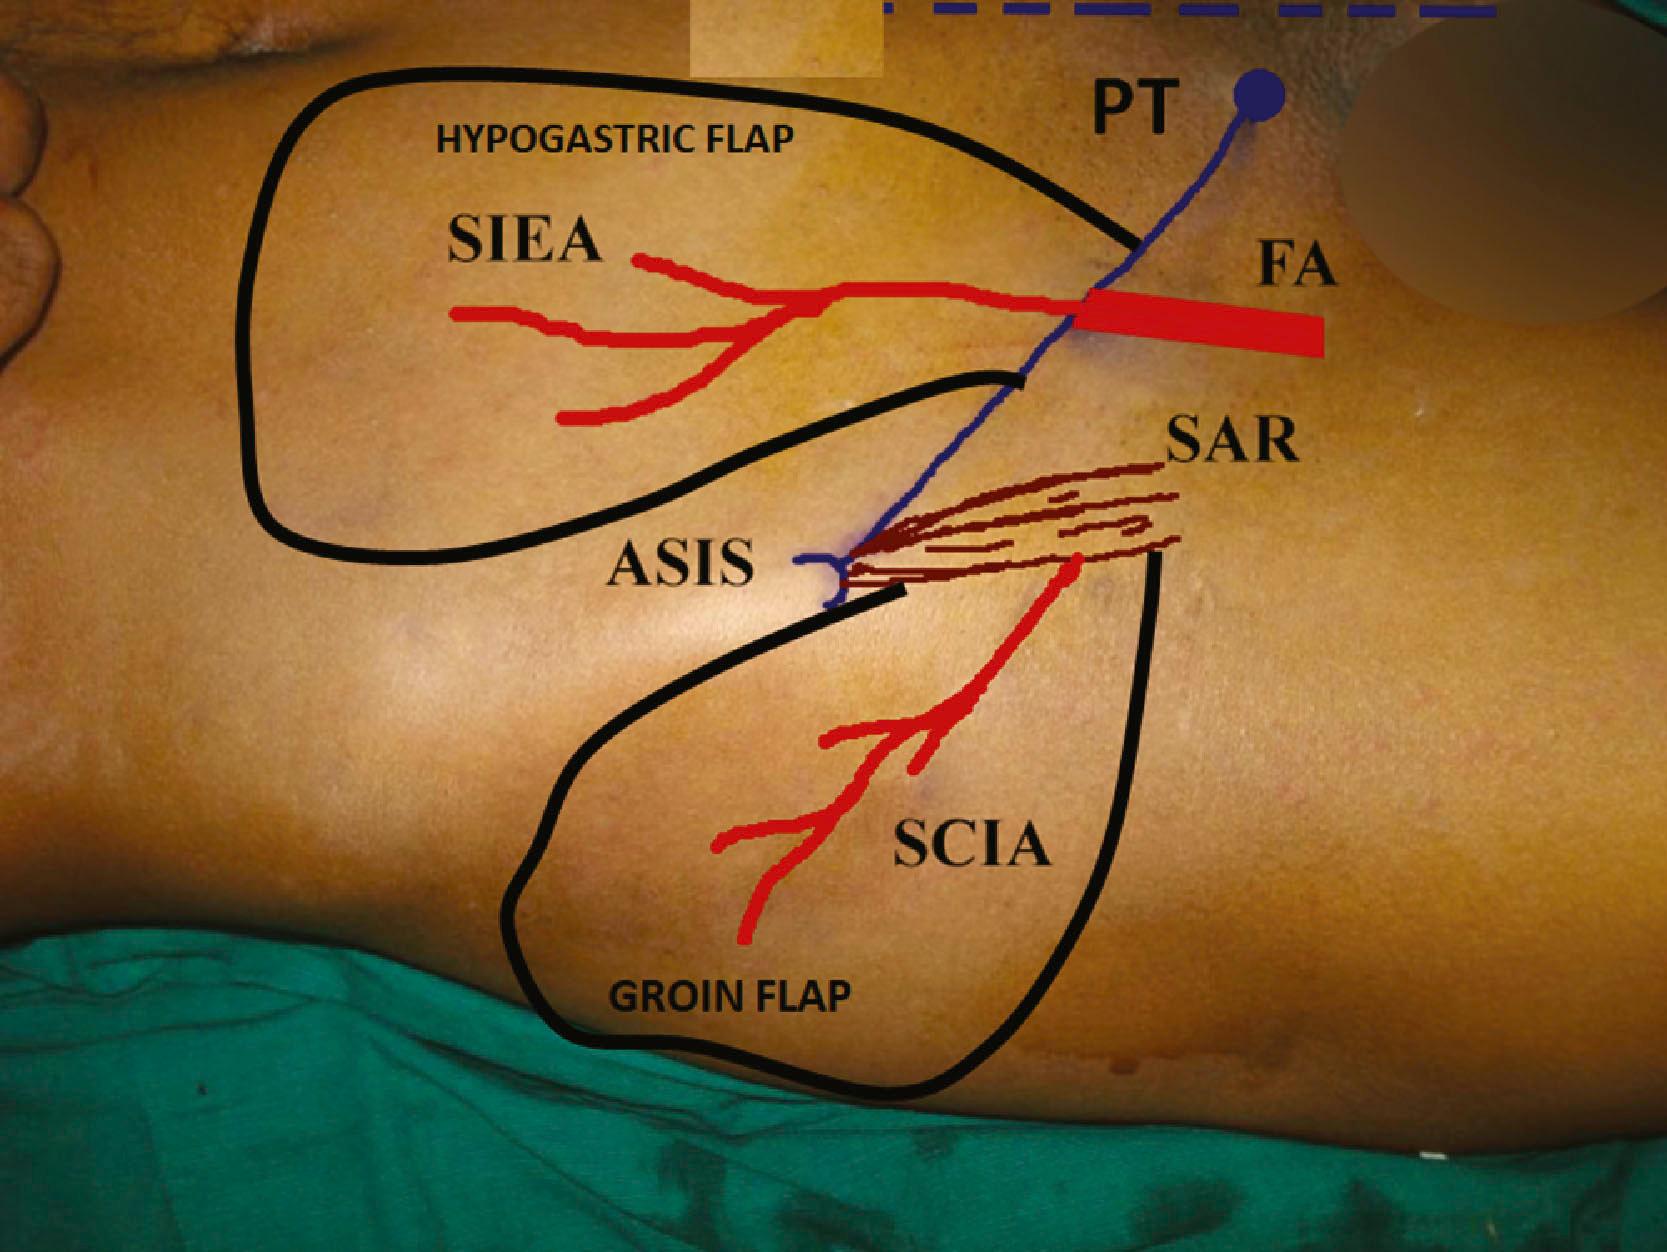
The axial vessel of the groin flap, the superficial circumflex iliac artery (SCIA), arises from the femoral artery about 2 cm inferior to the inguinal ligament as a separate branch or as a common trunk with the superficial inferior epigastric artery. It then travels laterally parallel to the inguinal ligament. A superficial branch is given off immediately which passes towards the anterior superior iliac spine. The deep branch passes beneath the deep fascia and often through the sartorius muscle. At the lateral border of the sartorius, it becomes superficial and supplies the skin, which is elevated as the groin flap. Though the relative sizes of the vessels are variable, the presence and the course of the vessels are reliable. So the flap can be raised with consistent success if flap elevation is done up to the lateral border of the sartorius. When raising the groin flap as a pedicled flap, it is not necessary to look for the vessel if one is keeping about 5 cm of skin caudal to the ASIS as the base and elevating the flap to the level of the lateral border of the sartorius. When raised as a free flap, the fascia needs to be incised and the vessel traced back to the origin from the femoral artery.
The outer limit of the flap is the posterior axillary line. This distal part of the flap is a random flap and can be thinned.
The first step is marking of the anterior superior iliac spine (ASIS). A finger is passed laterally along the inguinal ligament and the first palpable bony point is ASIS ( Fig. 12.13 ). Accurate marking of the ASIS is important. Then mark the pubic tubercle and join the two points to mark the inguinal ligament. Draw the outline of the sartorius muscle from the ASIS. Feel the pulsation of the femoral artery at the mid−inguinal point and mark the femoral artery. At 2 cm below the inguinal ligament, draw the course of the SCIA by a line parallel to the inguinal ligament crossing the sartorius muscle. The area beyond the lateral border of the sartorius will be raised as the groin flap. The hand with the defect to be covered is brought near the groin and is placed in a comfortable position. This means that the surgeon can place the anesthetized hand in that position without much effort. The hand in the supinated position sits well. This point has to be borne in mind when the wrist is to be temporarily stabilized. The flap is planned in reverse. The defect is outlined on a piece of sterile material with an extension representing the pedicle. The hand is positioned back in the groin region in the comfortable position. The material is held, the hand is removed, and the outline of the flap is drawn making sure to include the course of the SCIA. The flap is raised at the level of the muscle up to the lateral border of the sartorius. When raised as a pedicled flap it is not necessary to look for the vessel as long as flap elevation stops at the lateral border of the sartorius. The vessel will be in the base of the flap if about 5 cm of skin caudal to the ASIS is used as the pedicle. Since the vessel position is constant, we can narrow the base. Narrowing the base helps mobility of the flap and allows increased attachment of the flap skin edge into the defect. The flap viability is checked by noting the subdermal bleeding at the flap margins. The donor site can be closed if the width of the flap is 6 cm or less. By adjusting the closure technique the flap can be made to face the appropriate direction to cover the dorsal, volar, ulnar, or radial aspect of the hand. The flap is then attached to the defect. Skin suturing is facilitated by thinning the flap margin by trimming the fat at the margin in a bevelled manner. This makes the attachment easy. Thick flap margins cause tight sutures. Postoperatively, broad tapes are used to restrain the hand to protect the pedicle from kinking or undue pull. After the flap attachment, three lines are drawn on the forearm and extending onto the abdomen (see Fig. 12.14B ). Instructions are given to the patient to keep the lines matched; this is an easy technique to keep the hand in good position during the post−operative phase. Flaps have been done successfully even in children as young as 5 months of age. Children need restraints only for about 5 days and if the flap attachment is good, the children do not pull the flap since it causes pain if they do not keep it in position.
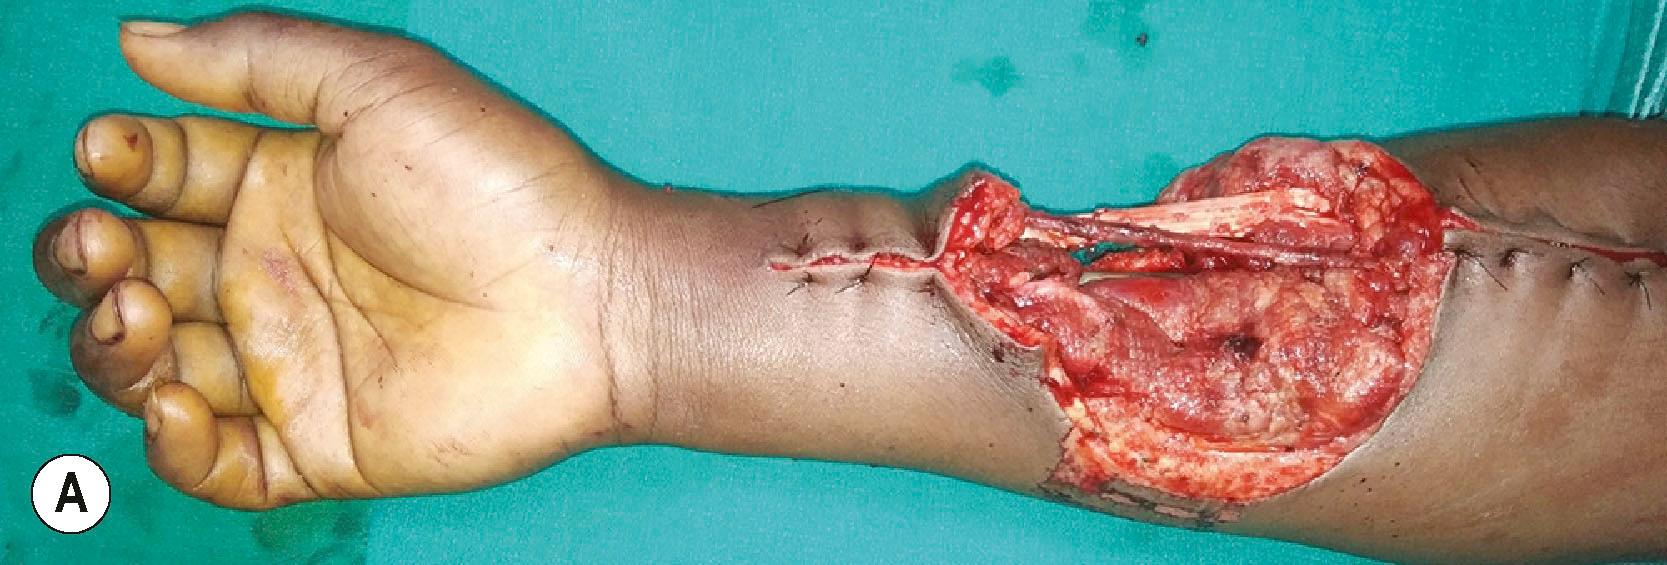
Groin and abdominal pedicled flaps are divided after 3 weeks without a delay procedure if the extent of skin attachment is more than two−thirds of the perimeter. Tubed flaps, like the one for the cover of the thumb or any individual finger, or flaps that have less than two−thirds of inset need delay before division. The delay procedure is done by 3 weeks and the flap divided 7−10 days after the delay procedure.
Flaps from the lower part of the abdomen based on the superficial inferior epigastric artery (SIEA) and superficial external pudendal artery (SEPA) and the paraumbilical perforators can be raised individually or in combination with groin flaps to cover large areas.
The SIEA arises from the femoral artery 2 cm below the inguinal ligament and courses upwards superficial to the inguinal ligament to supply skin up to the umbilicus. The SEPA arises from the femoral artery almost at the same level as SIEA, courses medially beneath the great saphenous vein, reaches the pubic tubercle and ascends up to supply skin up to the umbilicus. The SCIA, SIEA, SEPA all have overlapping territories and all of them could be included in the base of the flap to raise a flap big enough to cover defects from the elbow to the fingers.
The flap is planned in reverse as previously explained under the groin flap section. Flaps are raised at the level of the external oblique to the level of the inguinal ligament. No attempt is made to visualize the pedicle, which may be seen in thin individuals. If raised up to the inguinal ligament, there is no chance of injuring the pedicle. The position of the SIEA is so constant that if we plan a base of 4 cm with 2 cm on either side of the femoral artery, the vessel will surely be included in the pedicle. With a narrow base, flaps could be designed as per the shape of the defect to provide good skin attachment. Comfort to the patient depends more upon good inset than on the length of the pedicle. The vessel progressively becomes superficial as it progresses distally, so the distal half of the flap can be thinned primarily to the level of the Scarpa’s fascia. Therefore, it is possible to obtain thin flaps even in bulky individuals. The tissue deeper to Scarpa’s fasica can be raised as a flap to the base, and it can also be used to cover adjacent defects. When large surfaces are to be covered, all the flap territories can be combined.
When both the dorsal and volar surfaces of the hand are to be covered, bilobed flaps can be raised with the groin flap to cover the dorsum and the hypogastric flap (SIEA) to cover the volar surface of the hand.
When the volar surface of the forearm is to be covered, it is better to use superiorly based flaps based on the paraumbilical perforators of the superior and inferior deep epigastric arteries ( Fig. 12.14 ). The whole of the lower abdomen from the level of the inguinal ligament can be raised to the level of the lateral border of the rectus sheath.
Become a Clinical Tree membership for Full access and enjoy Unlimited articles
If you are a member. Log in here