Physical Address
304 North Cardinal St.
Dorchester Center, MA 02124
The removal of most erupted teeth can be achieved by closed delivery, but occasionally these techniques do not provide adequate surgical access. The open or surgical extraction technique is the method used when greater access is necessary to safely remove a tooth or its remaining roots. In addition, removal of multiple teeth during one surgical session requires more than the routine techniques of tooth removal described in Chapter 8 . In addition, the surgical approach for extractions is commonly required for recontouring and smoothing bone after multiple extractions.
This chapter discusses techniques for surgical tooth extraction. The principles of flap design, development, management, and suturing are explained, as are the principles of open extraction of single-rooted and multirooted teeth. The principles involved in multiple extractions and concomitant alveoloplasty are also discussed.
The word flap, when used to describe a surgical procedure, indicates an area of tissue that will be surgically moved from one site in the body to another or temporarily moved to improve surgical access. Flapped tissue can be comprised of soft tissue only or can include bone and/or other tissues to be relocated. Oral-maxillofacial surgeons often create flaps that contain bone and adjacent soft tissues to reconstruct the jaws (see Chapter 29 ).
Flap , as used in this chapter, indicates a section of soft tissue that (1) is outlined by a surgical incision, (2) carries its own blood supply, (3) allows surgical access to underlying tissues, (4) can be replaced in the original position, and (5) is maintained with sutures. Soft tissue flaps are frequently used in oral surgical, periodontal, and endodontic procedures to gain access to underlying tooth and bone structures. The dental surgeon routinely extracting teeth must have a clear understanding of the principles of design, development, and management of soft tissue flaps.
To provide adequate exposure and promote proper healing, the flap must be correctly designed. The surgeon must remember that several parameters exist when designing a flap that vary based on the clinical situation.
When the flap is outlined, the base of the flap must usually be broader than the free margin to preserve an adequate blood supply. This means that all areas of the flap must have a source of uninterrupted vasculature to prevent ischemic necrosis of the entire flap or portions of it ( Fig. 9.1 ).
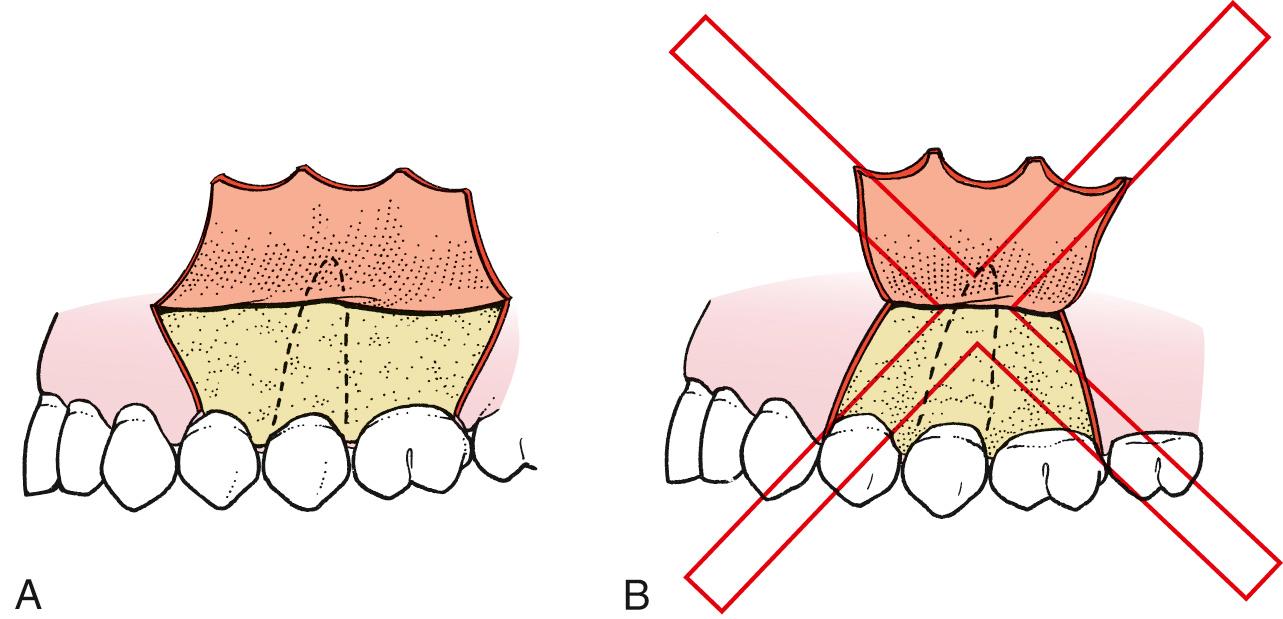
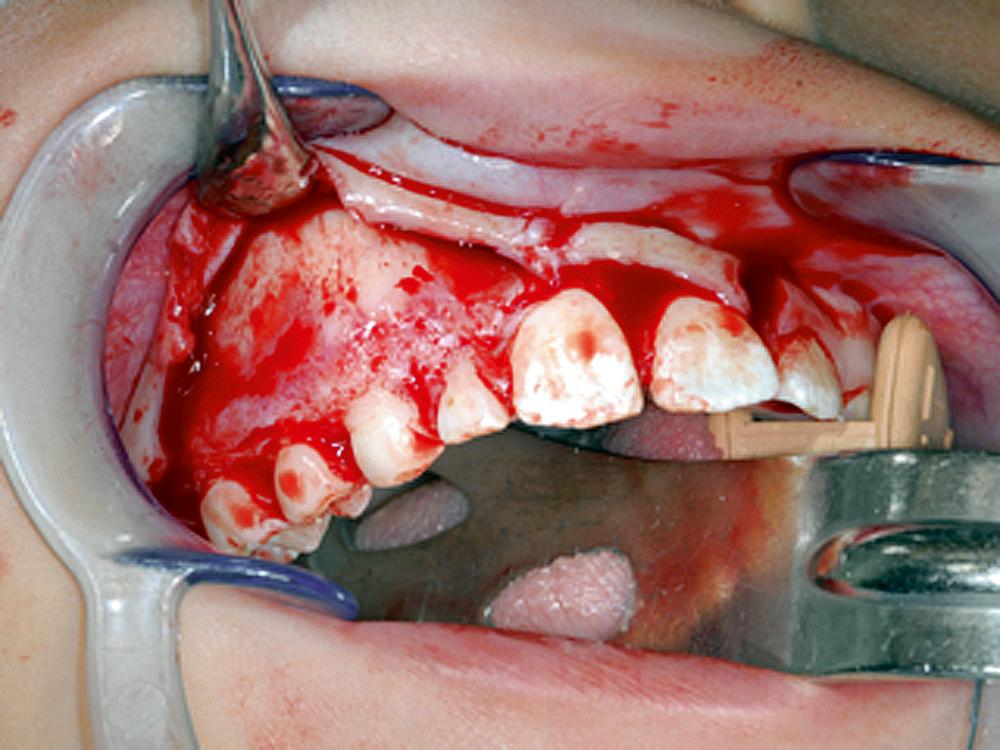
When flaps are used to gain surgical access, they must be of adequate size for several reasons. Sufficient soft tissue reflection is required to provide excellent visualization of the surgical site. Adequate access also must exist for the insertion of instruments required to perform the surgery. In addition, the flap must be held out of the surgeon's line of sight by a retractor that should rest on intact bone. There must be enough flap reflection to permit the retractor to hold the flap without tension. Furthermore, soft tissue heals across the incision, not along the length of the incision, and sharp incisions heal more rapidly than torn tissue. Therefore a long, straight incision with adequate flap reflection heals more rapidly than a short, torn incision, which heals slowly by secondary intention. For an envelope flap to be of adequate size, the length of the flap in the anteroposterior dimension usually extends two teeth anterior and one tooth posterior to the area of surgery ( Fig. 9.2A ). Alternatively, if an anterior releasing incision is planned, the flap only needs to extend one tooth anterior and one tooth posterior to the tooth or teeth planned to be removed ( Fig. 9.2B ).

Flaps for tooth removal should be full-thickness mucoperiosteal flaps. This means that the flap includes the surface mucosa, the submucosa, and the periosteum. Because the goal of the surgery is to remove or reshape bone, all overlying tissue must be reflected from it. In addition, full-thickness flaps are necessary because the periosteum is the primary tissue responsible for bone healing, and replacement of the periosteum in its original position hastens that healing process. Also, torn, split, or macerated tissue heals more slowly compared with a cleanly reflected, full-thickness flap. Furthermore, the tissue plane between bone and periosteum is relatively avascular, so less bleeding is produced when a full-thickness flap is elevated.
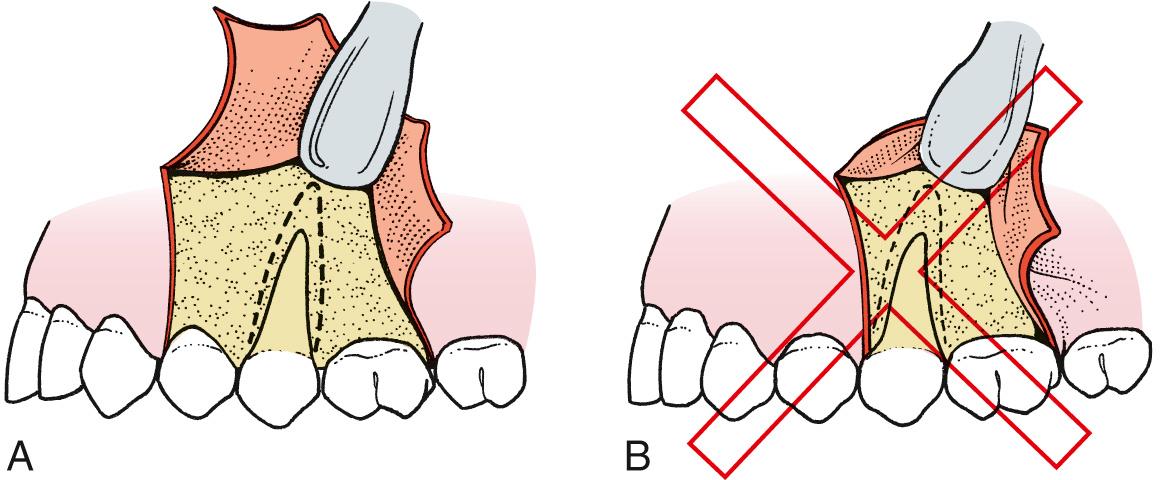
The incisions that outline the flap must be made over bone that will remain intact after the surgical procedure is complete. If the pathologic condition has eroded the buccocortical plate, the incision should be at least 6 to 8 mm away from it in an area of intact bone. In addition, if bone is to be removed over a particular tooth, the incision must be sufficiently distant from it so that after bone is removed, the incision is 6 to 8 mm away from the bony defect created by surgery. If the incision line is unsupported by intact bone, it tends to collapse into the bony defect, which results in wound dehiscence and delayed healing ( Fig. 9.3 ).
The flap should be designed to avoid injury to local vital structures in the area of the surgery. The two most important structures that can be damaged are located in the mandible; these are the lingual nerve and the mental nerve . When making incisions in the posterior mandible, especially in the region of the third molar, incisions should be well away from the lingual aspect of the mandible. In the lower third molar area, the lingual nerve may closely adhere to the lingual aspect of the mandible or even run on the superior aspect of the retromolar area. Incisions in this area may result in damaging or even severing that nerve, with consequent prolonged temporary or permanent anesthesia of part of the tongue. In the same way, surgery in the apical area of mandibular premolar teeth should be carefully planned and executed to avoid injury to the mental nerve. Envelope incisions should be used, if at all possible, and releasing incisions should be well anterior or posterior from where the mental nerve exits the mandible.
Flaps in the maxilla rarely endanger any vital structures. On the facial aspect of the maxillary alveolar process there are no nerves or arteries that are likely to be damaged. When reflecting a palatal flap, the surgeon must remember that the major blood supply to the palatal soft tissue comes through the greater palatine artery, which emerges from the greater palatine foramen at the posterior lateral aspect of the hard palate. This artery courses forward and overlaps, to some degree, with the nasopalatine artery. The nasopalatine nerves and arteries exit the incisive foramen to supply the anterior palatal gingiva. If the anterior palatal tissue must be reflected, the artery and the nerve can be incised at the level of the foramen without serious consequences. In the area of the incisive neurovascular bundle, the likelihood of bothersome bleeding is small, and the nerve typically regenerates. The temporary numbness usually does not bother the patient. However, vertical-releasing incisions in the posterior aspect of the palate should be avoided because they usually sever the greater palatine artery within the tissue, which results in pulsatile bleeding that may be difficult to control.
Releasing incisions are used only when necessary and not routinely. Envelope incisions usually provide the adequate visualization required for tooth extraction in most areas. When vertical-releasing incisions are necessary, only a single vertical incision is usually required, which is usually at the anterior end of the envelope component. The vertical-releasing incision is not a straight vertical incision but an oblique incision, allowing the base of the flap to be broader than the free gingival margin. A vertical-releasing incision is made so that it does not cross bony prominences such as the canine eminence; to do so would increase the likelihood of tension in the suture line, which could result in wound dehiscence.
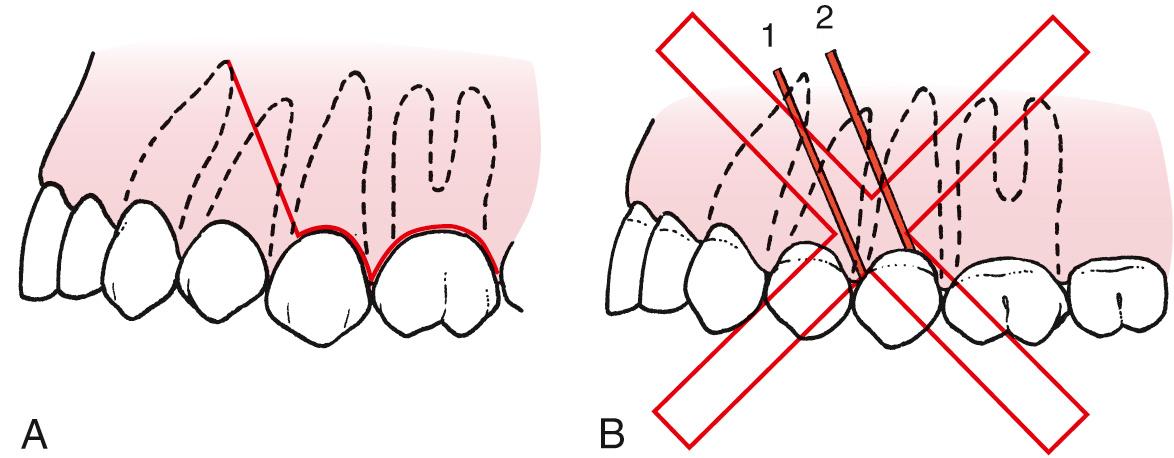
Vertical-releasing incisions should cross the free gingival margin at the line angle of a tooth and should not be directly on the facial aspect of the tooth, nor should it be directly in the papilla ( Fig. 9.4 ). Incisions that cross the free margin of the gingiva directly over the facial aspect of the tooth do not heal properly because of tension; the result is a defect in the attached gingiva. Because facial bone around teeth is frequently thin, such incisions also result in vertical clefting of the bone. Incisions that cross the gingival papilla damage the papilla unnecessarily and increase the chances for localized periodontal problems; such incisions should be avoided.
A variety of intraoral tissue flaps exists. The most common incision is the sulcular incision, which, when not combined with a releasing incision, produces the envelope flap. In the dentulous patient, the incision is made in the gingival sulcus down to crestal bone, through the periosteum, and the full-thickness mucoperiosteal flap is reflected apically (see Fig. 9.2A ). This flap usually provides sufficient access to perform the necessary surgery.
If the patient is edentulous, the envelope incision is usually made along the scar at the crest of the ridge. No vital structures are found in this area, and the envelope incision can be as long as is required to provide adequate access. The only exception occurs in extremely atrophic mandibles where the inferior alveolar nerve may rest on top of the residual alveolar ridge. Once the incision is made, tissue can be reflected buccally or lingually, as necessary, for recontouring of the ridge or the removal of a mandibular torus. Note that flaps created through a crestal scar require extra care during elevation due to the presence of fibrous tissue in the scar that interferes with elevation.
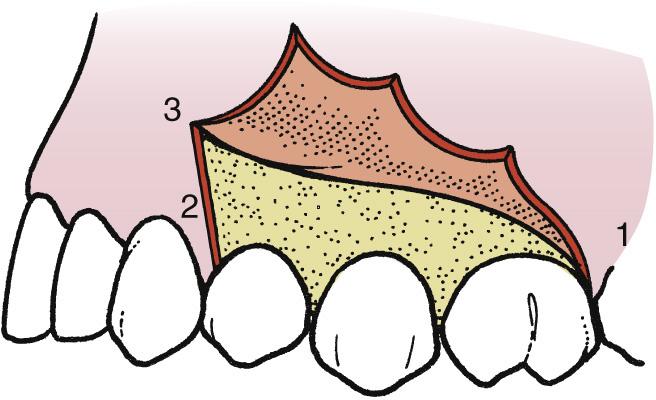
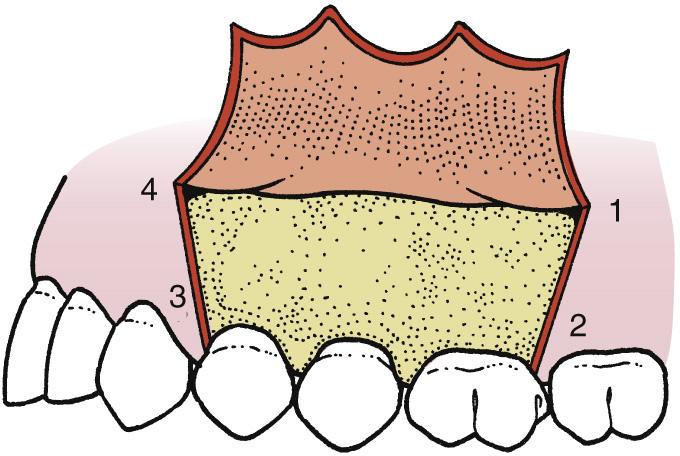
If the sulcular incision has a vertical-releasing incision, it is a three-cornered flap with corners at the posterior end of the envelope incision, at the inferior aspect of the vertical incision, and at the superior aspect of the vertical-releasing incision ( Fig. 9.5 ). This incision provides greater access with a shorter sulcular incision. When greater access is necessary in an apical direction, especially in the posterior aspect of the mouth, this incision is frequently necessary. The vertical component can be more difficult to close and may cause some mildly prolonged healing, but if care is taken when suturing, the healing period is not noticeably lengthened. Placing the first suture at corner number 2 will properly align other parts of the incision, making the placement of the other sutures more straightforward.
The four-cornered flap is an envelope incision with two releasing incisions. Two corners are at the superior aspect of the releasing incision, and two corners are at either end of the envelope component of the incision ( Fig. 9.6 ). Although this flap provides substantial access in areas that have limited anteroposterior dimension, it is rarely indicated. When releasing incisions are necessary, a three-cornered flap usually suffices.
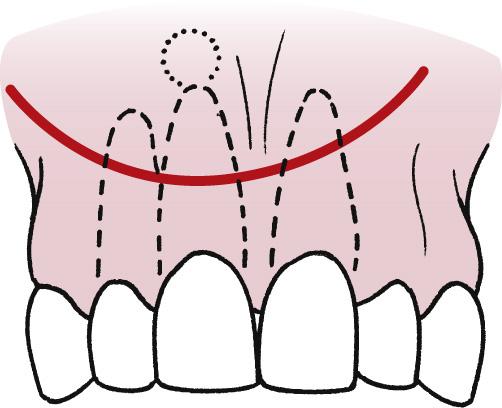
An incision that is used occasionally to approach the root apex is a semilunar incision ( Fig. 9.7 ). This incision avoids trauma to the papillae and gingival margin but provides limited access because the entire root of the tooth is not visible. This incision is most useful for periapical surgery of a limited extent.
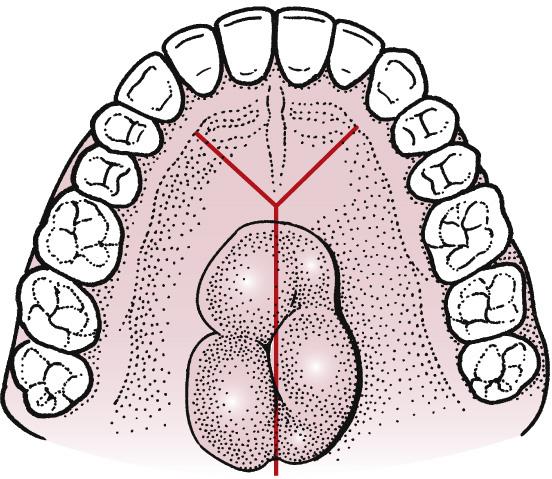
An incision useful on the palate is the Y-incision, which is named for its shape. This incision is useful for surgical access to the bony palate for removal of a palatal torus. The tissue overlying a torus is usually thin and must be carefully reflected. The anterolateral extensions of the midline incision are anterior to the region of the canine teeth. The extensions are anterior enough in this position that they do not sever major branches of the greater palatine artery; therefore bleeding is usually not a problem ( Fig. 9.8 ).
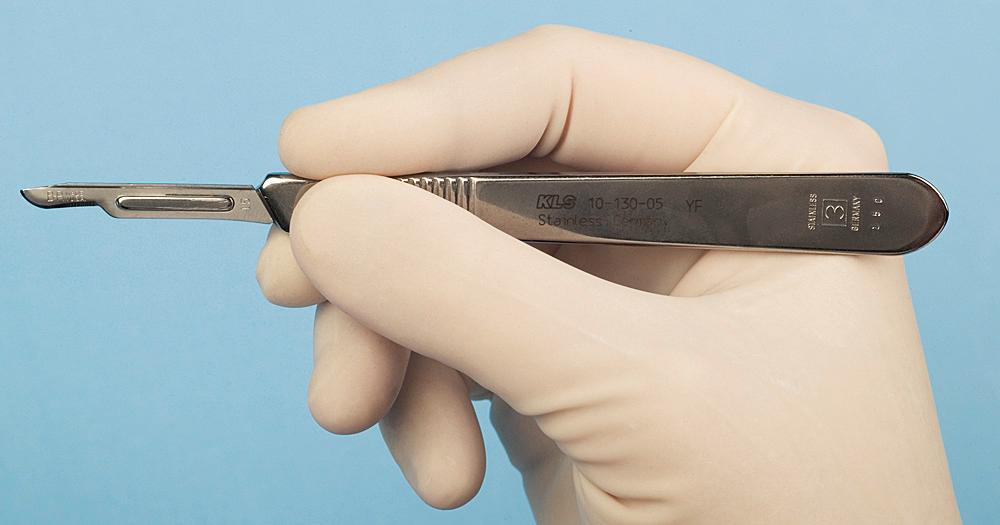
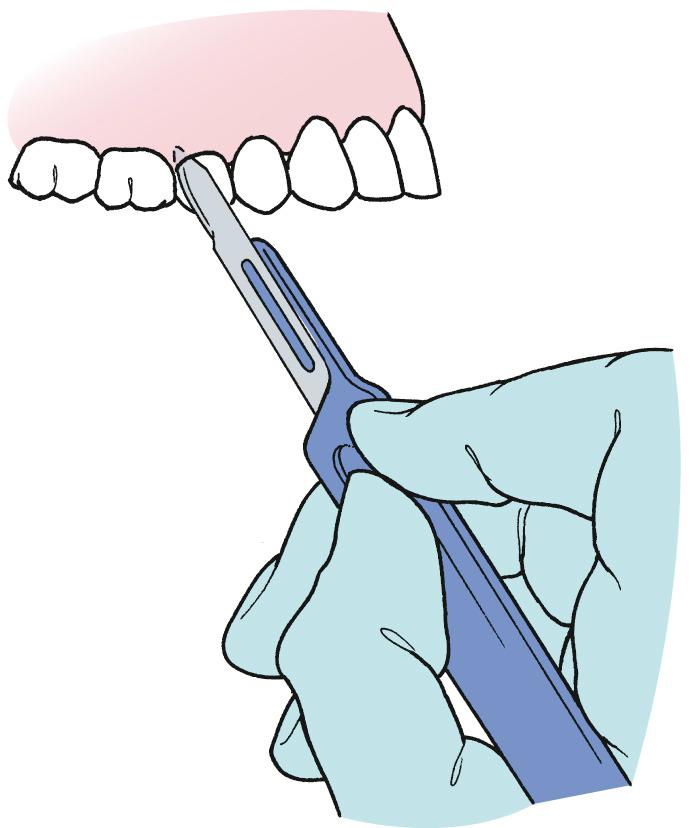
Several specific considerations are involved in developing flaps for surgical extractions. The first step is to incise soft tissue to allow reflection of the flap. The No. 15 blade is used on a No. 3 scalpel handle, and it is held in the pen grasp ( Fig. 9.9 ). The blade is held at a slight angle to the tooth, and the incision is made posteriorly to anteriorly in the gingival sulcus by drawing the knife toward the operator. One smooth continuous stroke is used while keeping the knife blade in contact with bone throughout the entire incision ( Figs. 9.10 and 9.11 ).
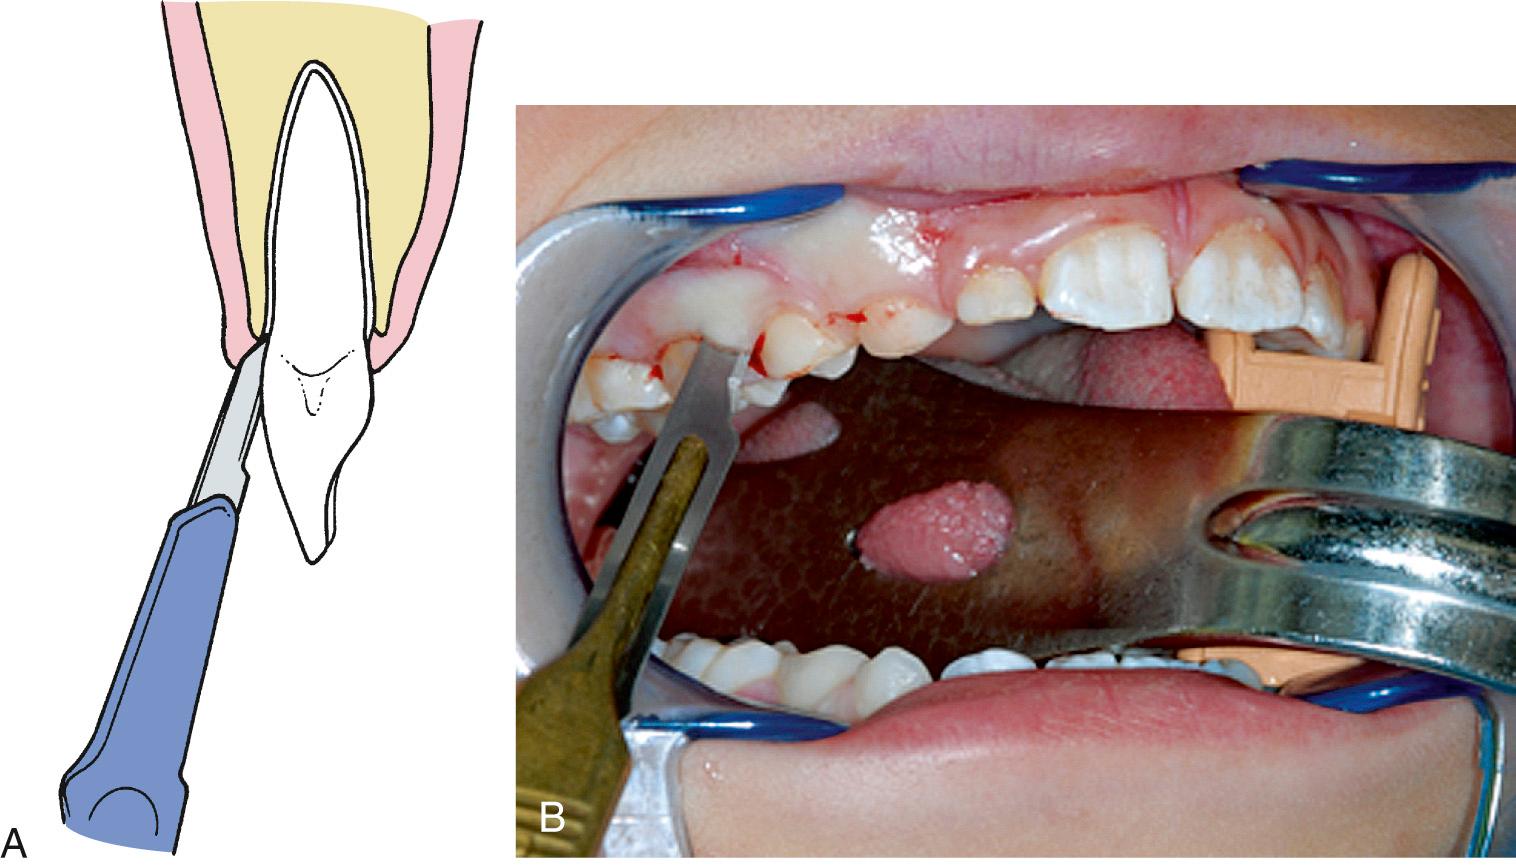
The scalpel blade is an extremely sharp instrument, but it dulls rapidly when it is pressed against bone, such as when making a mucoperiosteal incision. If more than one flap is to be reflected, the surgeon should consider changing blades between incisions.
If a vertical-releasing incision is made, the tissue is apically reflected, with the opposite hand tensing the alveolar mucosa so that the incision can be made cleanly through it. If the alveolar mucosa is not tensed, the knife will not incise cleanly through the mucosa, and a jagged incision will result.
Reflection of the flap begins at a papilla. The sharp end of the No. 9 periosteal elevator begins a reflection ( Fig. 9.12 ). The sharp end is slipped underneath the papilla in the area of the incision and is turned laterally to pry the papilla away from underlying bone. This technique is used along the entire extent of the gingival incision. If it is difficult to elevate the tissue at any one spot, the incision is probably incomplete, and that area should be reincised. Once the entire free edge of the flap has been reflected with the sharp end of the elevator, the broad end is used to reflect the mucoperiosteal flap to the extent desired, taking care to keep the edge of the elevator on bone and under the periosteum.
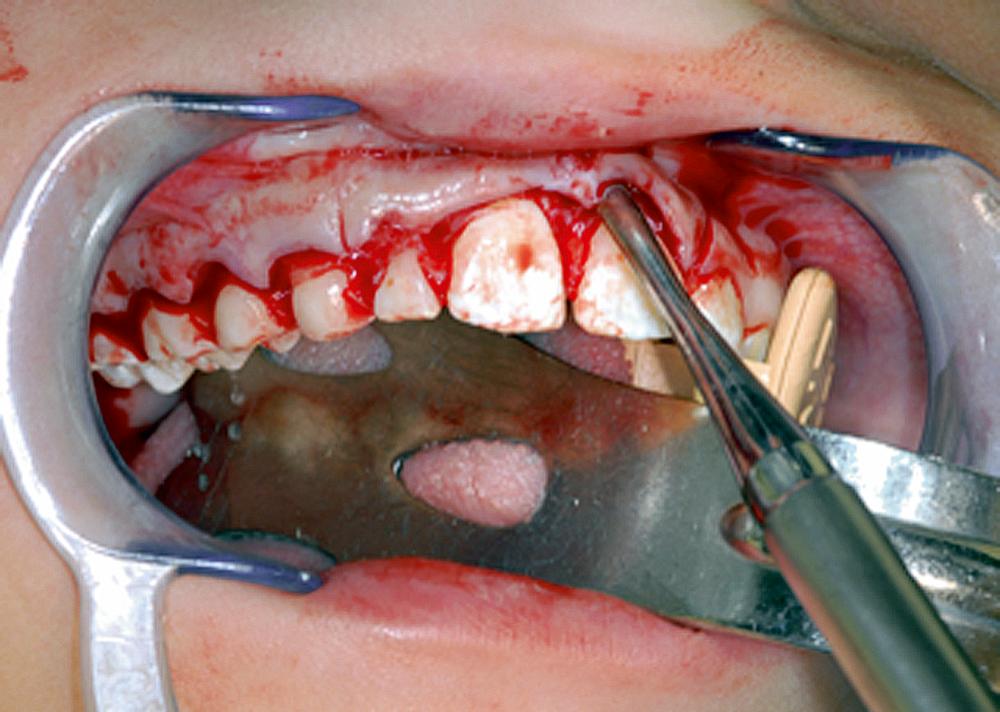
If a three-cornered flap is used, the initial reflection is accomplished with the sharp end of the No. 9 elevator on the first papilla only. Once the flap reflection is started, the broad end of the periosteal elevator is inserted at the middle corner of the flap, and the dissection is carried out with a pushing stroke, posteriorly and apically. This facilitates the rapid and atraumatic reflection of the soft tissue flap ( Fig. 9.13 ).
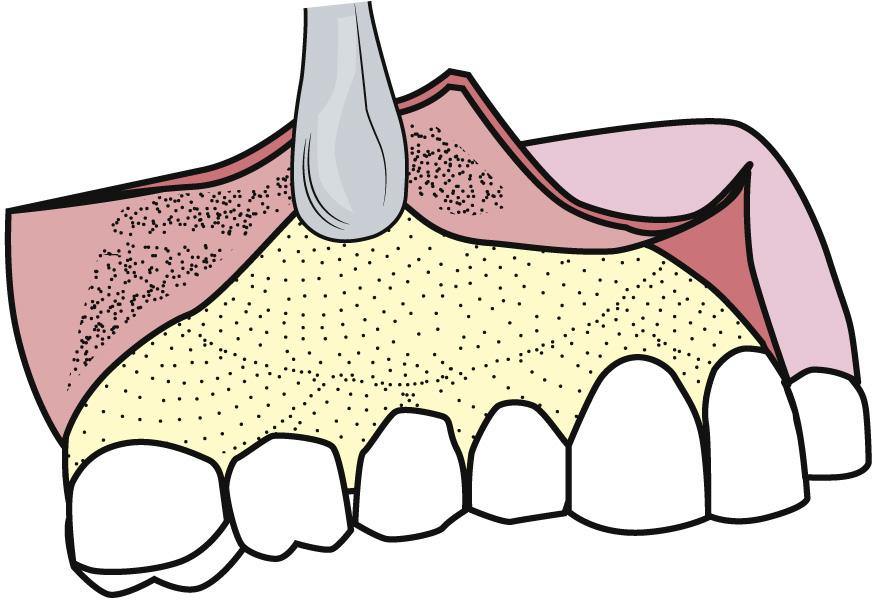
Once the flap has been reflected as desired, the periosteal elevator can be used as a retractor to hold the flap in its proper reflected position. To accomplish this effectively, the elevator is held perpendicular to the bone tissue while resting on sound bone and not trapping soft tissue between the retractor and bone. The periosteal elevator is therefore maintained in its proper position, and the soft tissue flap is held without tension ( Fig. 9.14 ). The Seldin elevator, or the Minnesota or Austin retractors, can be used in a similar manner when broader exposure is necessary. The retractor should not be forced against soft tissue in an attempt to pull tissue out of the field. Instead, the retractor is positioned in the proper place and held firmly against bone. By retracting in this fashion, the surgeon primarily focuses on the surgical field rather than on the retractor; thus the chance of inadvertently tearing the flap is lessened.
Become a Clinical Tree membership for Full access and enjoy Unlimited articles
If you are a member. Log in here