Physical Address
304 North Cardinal St.
Dorchester Center, MA 02124
Three pedicled forearm flaps, including the reverse radial forearm flap, ulnar artery perforator flap (Becker flap), and posterior interosseous artery (PIA) flap, are commonly used for coverage of hand defects ( Table 90.1 ).
| Reverse Radial Artery Flap | Ulnar Artery Perforator Flap | Reverse PIA Flap | |
|---|---|---|---|
| Source vessel | Radial artery | Ulnar artery perforator (dorsal ulnar artery perforator, ascending branch) | PIA |
| Interval | BR and FCR | Between ECU and FCU | EDQ and ECU |
| Axis | Radial artery | Pisiform to medial epicondyle of humerus. | Lateral epicondyle to DRUJ in neutral pronosupination |
| Pivot point | Volar wrist crease | Ulnar border of the FCU, 2–6 cm proximal to the pisiform | 2 cm proximal to the dorsal DRUJ |
| Location of skin paddle | Volar forearm | Distal two-thirds of ulnar forearm | Dorsal proximal third of forearm |
| Size of skin paddle | Large: width is one-half the width of the forearm; proximal margin is just distal to the antecubital crease, distally at the wrist crease | Width: ideally what can close primarily Length: distal two-thirds of forearm, ending at wrist crease |
30–90 cm 2 |
These flaps are reliable and effective, and they can be performed in a single stage without advanced microsurgical techniques.
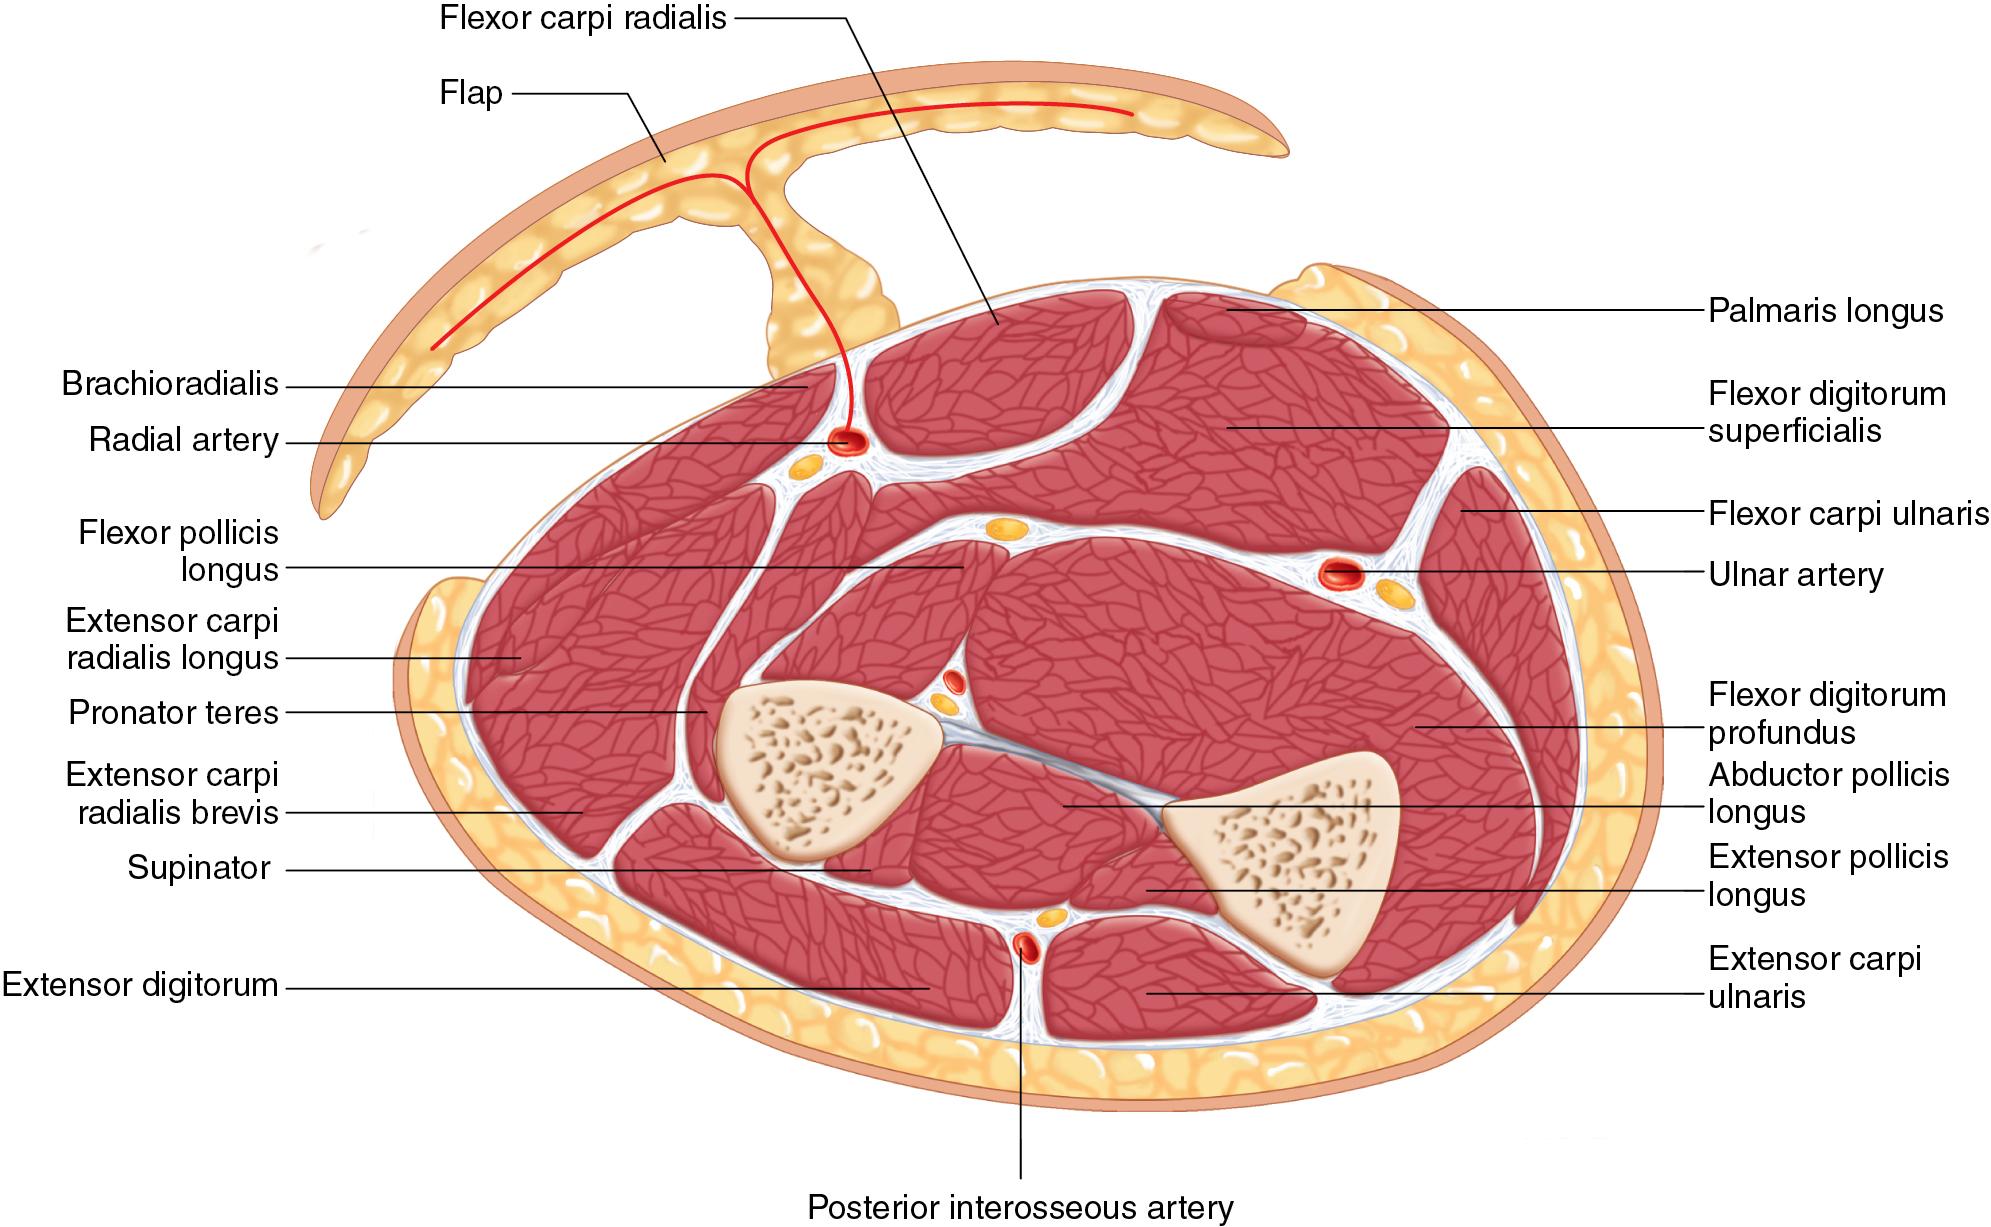
The flaps are similar in that they are based on septocutaneous perforators that consistently travel between specific muscles ( Fig. 90.1 ; see also Table 90.1 ).
Before using any flap, the recipient site must be debrided to ensure that it is free of infection or devitalized tissues. Exposed hardware is ideally removed. Tendon and nerve reconstruction can be performed at the time of coverage but may be delayed until the wound has healed.
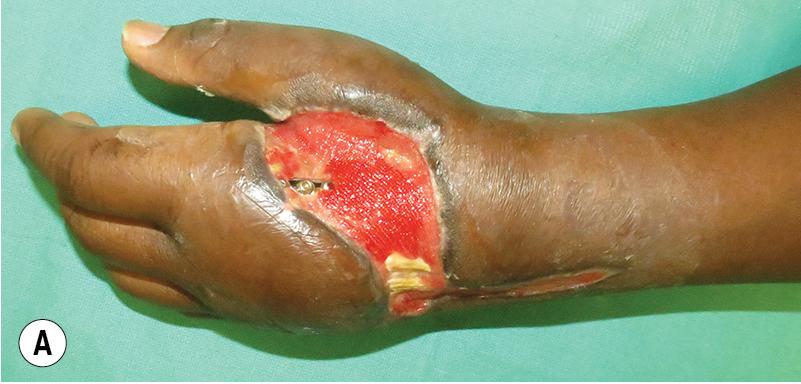
The reverse radial forearm flap is the most reliable and versatile flap for hand coverage because of its constant vascular supply and long pedicle. It can reach any area of the hand or digits ( Fig. 90.2 ).
The flap can be harvested as a fascia-only flap without the skin paddle. The flap sacrifices one of the two major forearm arteries supplying the hand. Before the operation, the patient should understand the risks for development of cold intolerance, pain, edema, and hand ischemia, even though the preoperative investigations are normal.
There are few contraindications:
Acquired absence of the radial artery, either from coronary artery bypass grafting or trauma
Preexisting perfusion abnormalities, including Raynaud phenomenon, Buerger disease (thromboangiitis obliterans), or hypothenar hammer syndrome
The Allen test is mandatory to demonstrate patency of the radial artery, ulnar artery, and palmar arches. Perfusion of the hand by the ulnar artery alone must be established.
The flap should not be performed in the following situation: vascular insufficiency of the hand resulting from loss of continuity of the radial or ulnar artery and incomplete palmar arches.
A Doppler examination is useful to assess the patency of the radial and ulnar artery. The Doppler can also be used to map out the artery’s course preoperatively, although palpation and familiarity with the anatomy are often sufficient.
An arteriogram is required only when the results of the Allen test and Doppler examination are questionable.
The flap is based on the radial artery and its perforators to the skin (see Fig. 90.1 ).
The radial artery originates from the brachial artery at the midpoint of the cubital fossa and then runs distally on the radial side of the forearm ( Fig. 90.3 ). In the proximal forearm, it passes deep to the ulnar margin of the brachioradialis (BR) and superficial to the pronator teres. In the distal forearm, the radial artery courses more superficially in the lateral intermuscular septum between the BR and the flexor carpi radialis (FCR) muscles. At the level of the wrist crease, it can be palpable through the skin. It turns dorsally to the anatomic snuff box under the abductor pollicis longus (APL) and extensor pollicis brevis (EPB) tendons and then passes between the heads of the first dorsal interosseous muscle to the palm and forms the deep palmar arch with the deep branch of the ulnar artery.
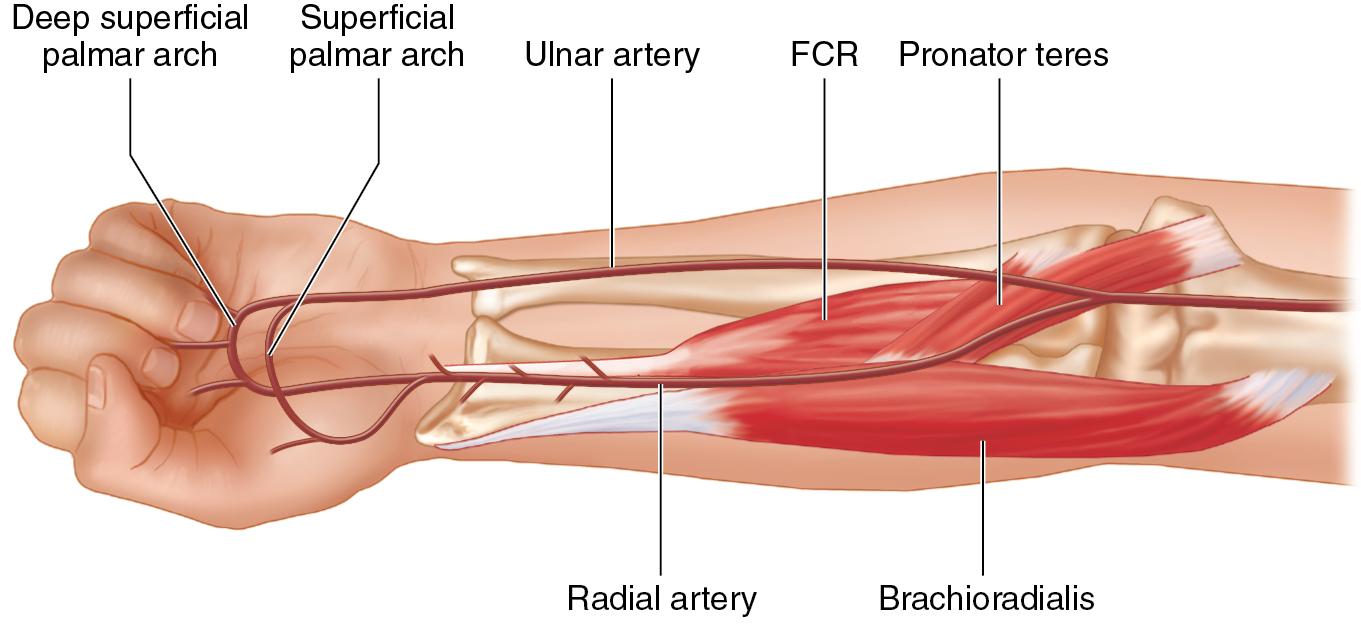
In the proximal forearm, the radial artery gives off about 10 septocutaneous perforators that travel between the FCR and BR to supply the skin of the anterolateral aspect of the forearm via the subdermal fascia. The artery also sends the perforators to the adjacent muscles and radius in its course, so that the flap can be applied as a composite tissue transfer, including a bone segment of the radius or portions of the FCR and BR if required.
The ulnar artery, through the superficial and deep palmar arches, permits the retrograde blood flow to the reverse-flow radial artery flap (see Fig. 90.3 ).
A pair of venae comitantes accompanies the radial artery along its course and provides venous drainage.
The lateral antebrachial cutaneous nerve of the forearm can be harvested with a traditional antegrade radial artery flap; however, it has a reverse design, and the nerve is divided. Therefore it is not a sensate flap.
The superficial branch of the radial nerve travels between the BR and ECRL and is most easily damaged in the distal arm, near the pedicle dissection in the reverse flap design. It should be protected with identification and gentle retraction as necessary.
The patient is positioned supine with the affected extremity on a hand table.
The flap raising is performed under tourniquet control and without exsanguination to make vessel identification easier.
The radial artery is marked using a Doppler probe and serves as the axis of the flap.
The pivot point at the wrist crease is marked.
A template of the defect is created using a bandage or surgical glove packaging.
The required pedicle length for rotation is measured, and the defect template is placed this distance from the pivot point along the axis of the radial artery ( Fig. 90.4 ).
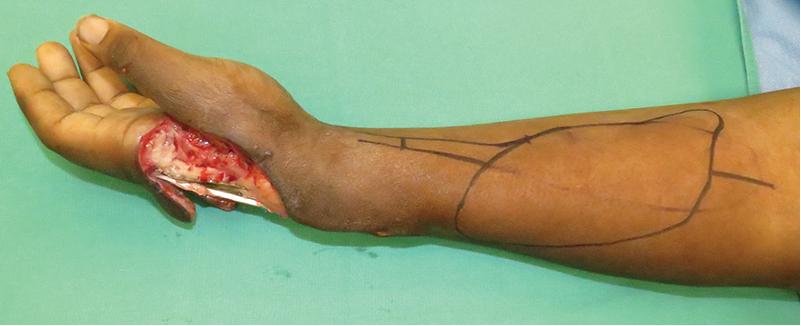
The maximum width of the flap is approximately one-half the circumference of the forearm. The proximal limitation of the flap lies just below the origin of the radial artery, and distal limitation lies at the crease of the wrist.
Overestimate the pedicle length required for rotation to keep the pedicle tension-free. Generally, overestimate by 10% to 15%.
The skin paddle can extend distally to provide a narrow cover of the entire pedicle, creating a “tennis racquet” pattern, where the racket handle is the skin covering the pedicle, and the wider head is the skin paddle for defect coverage. The skin on either side of the handle will close primarily if designed appropriately. The pedicle can then be laid en route to the defect area through an open incision and without tunneling. This prevents pedicle compression and improves venous drainage.
The flap should not be designed over the more distal forearm, if possible, because the underlying tendons exposed during flap elevation will make it difficult to close the donor side with a skin graft.
Dissection is started distally, where the flap interval can be readily identified by viewing the distal muscle tendons.
Skin and deep fascia at the ulnar border of the flap are incised first, and the fascia and all superficial structures are elevated in an ulnar to radial direction toward the radial margin of the FCR.
At the radial margin of the FCR, the septum with cutaneous perforators from the radial artery to the overlying skin bridge can be seen ( Fig. 90.5 ).
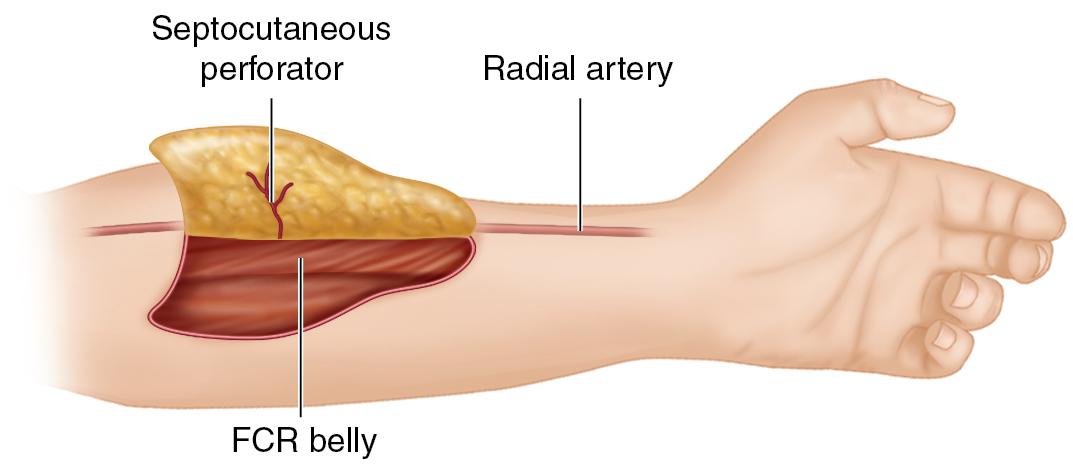
The dissection plane is deep to the deep fascia, superficial to the muscle belly. It is better to stay deeper as the septum is approached.
The fascia is temporarily sutured to the skin to prevent shearing during flap elevation.
Because only septocutaneous perforators are raised with the flap, any muscular perforators of the radial artery can be coagulated in a bipolar fashion or ligated and divided during flap elevation.
If a skin bridge covering the distal radial artery is not used, incise over the radial artery distally and identify the interval between the FCR and BR. This will serve as a reference point for proximal flap dissection.
The paratenon of the FCR tendon is preserved to enable the skin graft to cover the defect.
As the FCR muscle is dissected from the septum, great care should be taken to preserve the integrity of the septum, which contains the perforators communicating the vascular pedicle and the flap.
Now that the intermuscular septum is identified distally, the dissection can proceed proximally along the ulnar border of the flap.
The skin and fascia incision is continued proximally following the flap markings.
Dissection is carried down to the deep fascia and then radially toward the intermuscular septum. Any superficial veins are ligated. Superficial nerves are dissected free or crushed and buried.
Once the septum is encountered, dissection proceeds deep and ulnar to the radial artery. Leave as much loose areolar tissue surrounding the radial artery as possible ( Fig. 90.6 ).
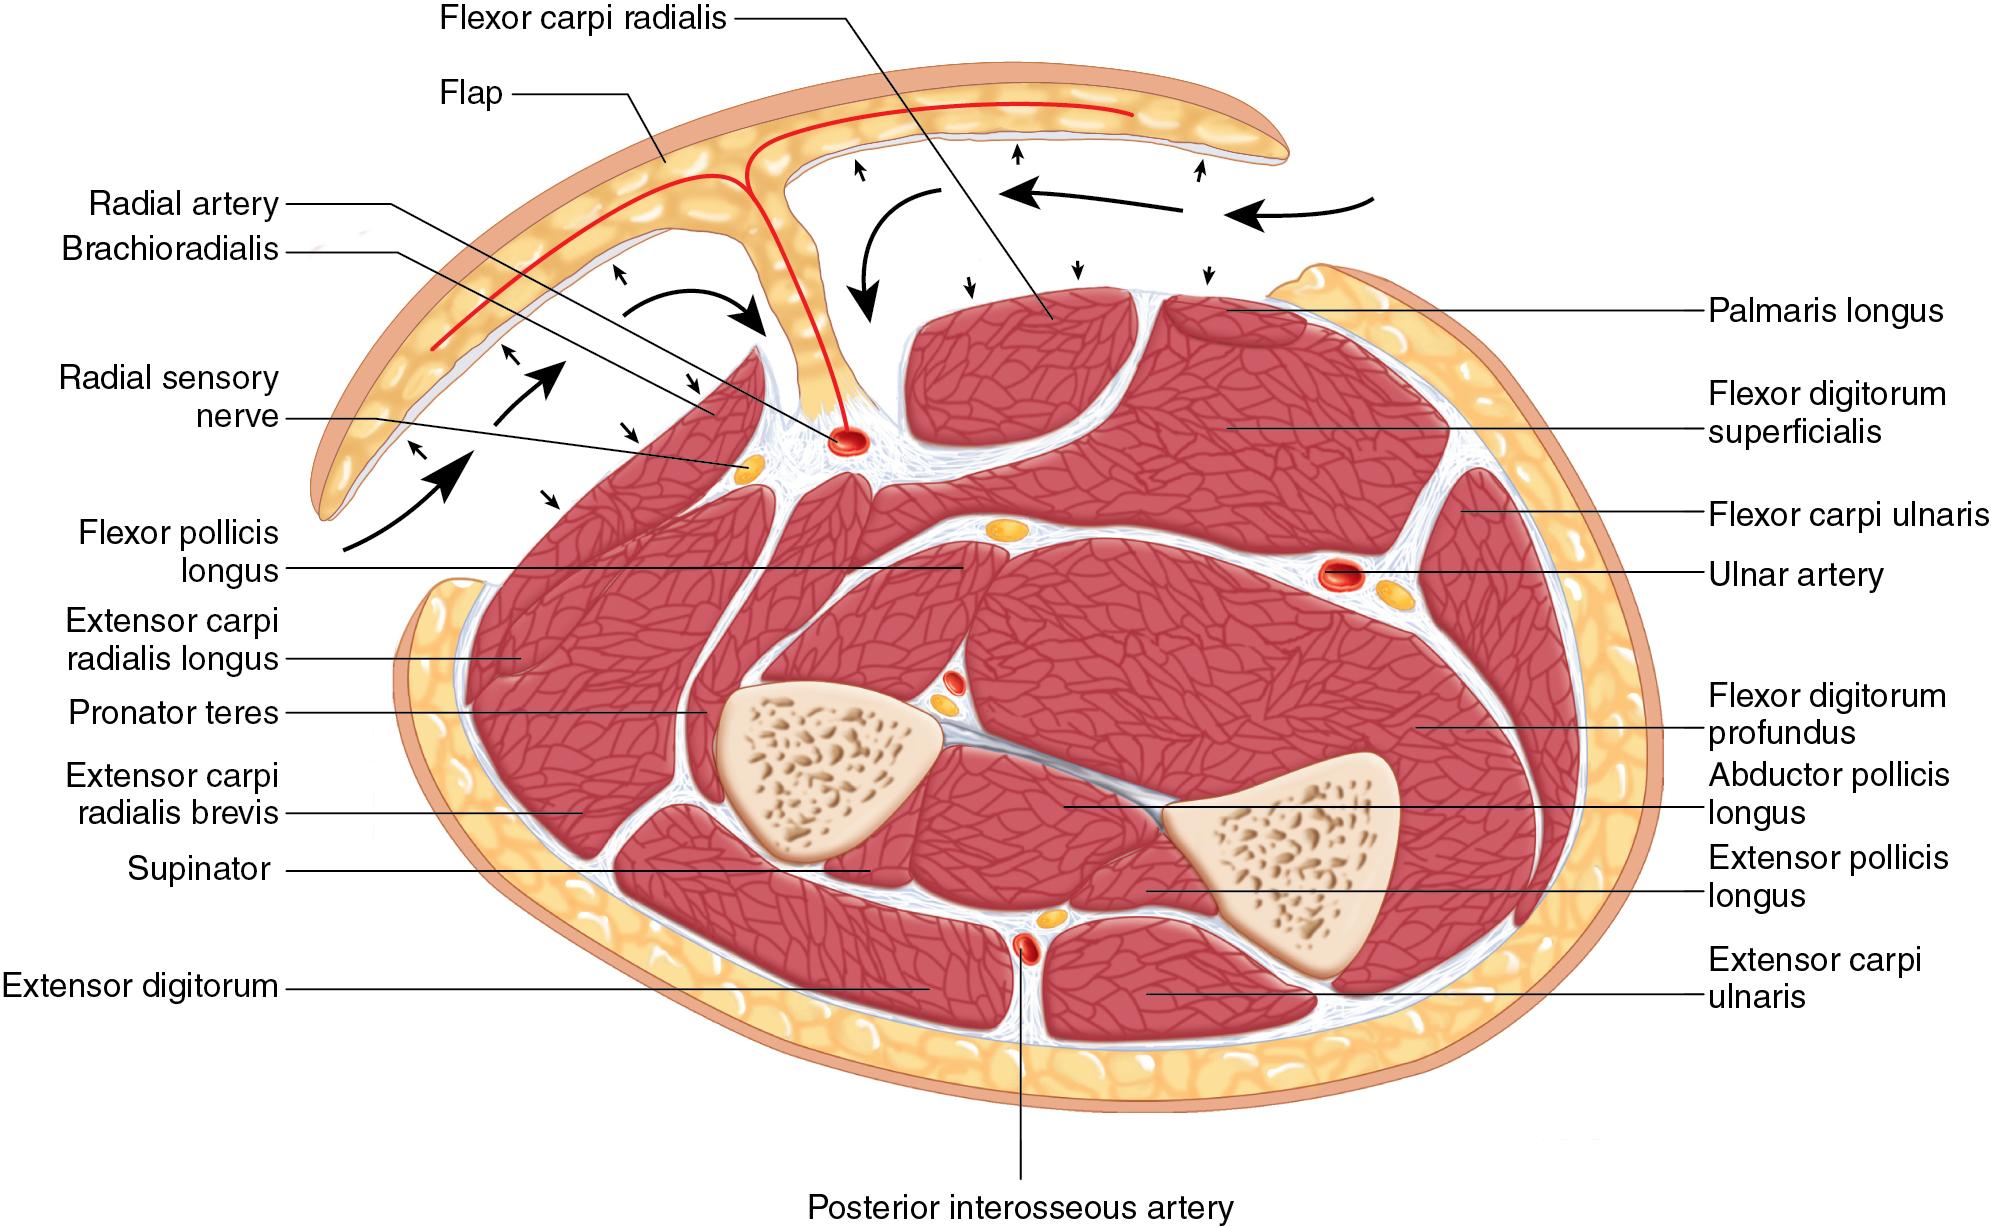
Nerves can also be dissected proximally, divided, and coapted to donor nerves if the distal area requiring flap coverage has suitable donors.
To help in dissection, the FCR muscle is pulled away from the septum, and the septum is sharply removed off of the muscle.
To best protect the intermuscular septum and cutaneous perforators within the septum arising from the radial artery, the FCR will have no fascia covering it after dissection is complete. The tendons will have paratenon only.
Now that the ulnar dissection is complete, the radial border of the flap is incised, distally first. The septum is identified distally, and then dissection proceeds proximally.
Dissection takes place deep to the deep fascia, like for the ulnar flap elevation ( Fig. 90.7 ).
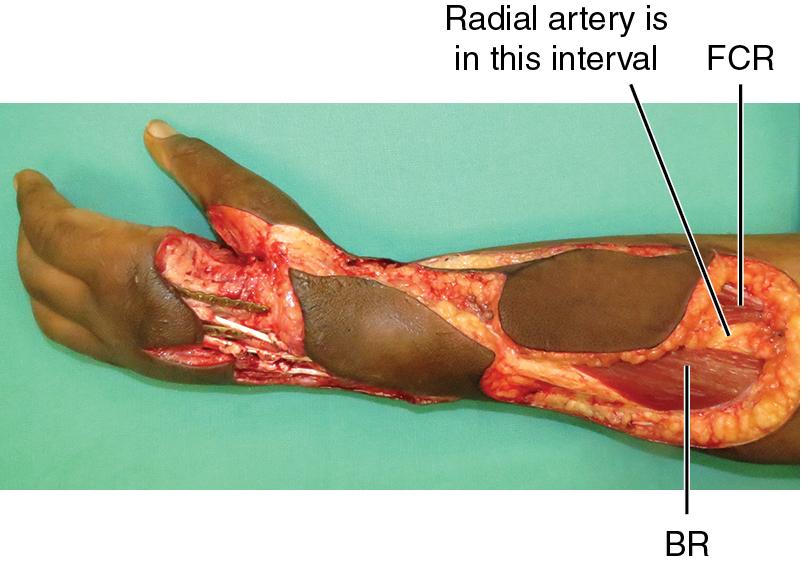
The superficial branch of the radial nerve lateral to the septum must be identified and dissected from the flap.
The lateral antebrachial cutaneous nerve may be sacrificed or harvested for neurotization, as mentioned previously.
Once the proximal aspect of the flap has been incised, dissection continues deep to identify the radial artery, which lies proximal to the flap skin paddle (see Fig. 90.7 ).
The radial artery is ligated proximal to the skin paddle.
The septum deep to the radial artery is dissected from the underlying muscles and radius so that the flap with its vascular pedicle is elevated toward the pivot point, from proximal to distal (see Fig. 90.7 ).
The pedicle dissection plane should be deep enough to ensure that the vascular pedicle and perforators are included.
The tourniquet can be let down at this step to confirm viability of the entire hand, and then brought back up for further dissection. If inadequate perfusion of the hand is detected, it is necessary to reconstruct the radial artery. A reverse saphenous vein or cephalic vein is harvested to bridge the radial artery with an end-to-end anastomosis in the proximal end and an end-to-side anastomosis in the distal end. The flap remains a pedicled flap with this reconstruction ( Fig. 90.8 ).
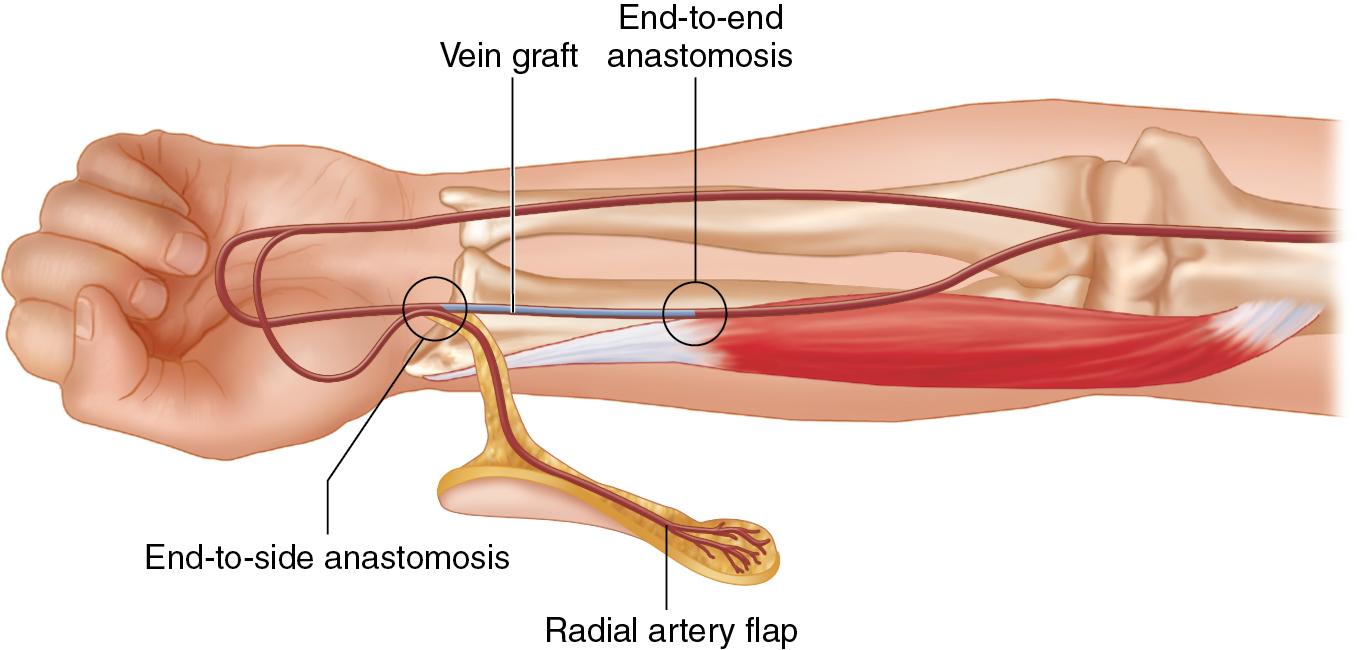
The cephalic vein plays no role in the venous drainage of the flap, so it can be dissected free or ligated at the distal border of the flap rather than be included in the flap.
Become a Clinical Tree membership for Full access and enjoy Unlimited articles
If you are a member. Log in here