Physical Address
304 North Cardinal St.
Dorchester Center, MA 02124
13.1
13.2
13.3
13.4
13.5
Visit Expert Consult ( expertconsult.inkling.com ) for videos on topics discussed throughout the text.
You are likely to see a variety of trauma patients, with injuries ranging from minor soft tissue injuries to severe multisystem trauma. The patient’s medical condition must be stabilized before you determine the full extent of any injuries to the eye, orbit, or head. Try to obtain a history that details the trauma to help you to determine if a facial fracture or deep orbital penetration is likely to have occurred. Next, perform a systematic evaluation of the eye and periocular tissues. The presence of any orbital fat in the wound suggests the possibility of deeper injury to the eye, orbit, or brain. These patients need imaging of the orbit and brain.
Periocular trauma can be divided into soft tissue injury and bone injury. First, we discuss the types of soft tissue injuries that you are likely to see. You should learn the techniques for repair of soft tissue injury, including suturing of simple and complex lacerations. With some practice, you can learn the techniques for the repair of lid margin and canalicular lacerations.
You will see fractures involving the calvarium, face, and mandible. The facial bones break in predictable patterns associated with specific findings that you learn to recognize on examination. Common orbital fractures include blowout fractures, zygomaticomaxillary complex (ZMC) fractures, nasoorbital ethmoid fractures, and Le Fort fractures. The symptoms of diplopia and hypesthesia of the infraorbital nerve should make you suspect an orbital floor fracture. On examination, look for decreased eye movements, enophthalmos, or any deformity of the orbital rims or face. After viewing the computed tomography (CT) scan of the facial bones, you are able to determine the type of fracture and make a plan for repair if necessary.
The surgical approach to the repair of orbital fractures is through a combination of periocular and/or transoral incisions. After anatomic realignment and fixation of the facial skeleton, thin implants are used to reconstruct the orbital floor and medial wall, as needed. In most patients, substantial improvements in the structure and function of the orbit are possible. We discuss the surgical approach for the treatment of a blowout fracture in detail. We won’t cover the details of the repair of all facial fractures, but you should learn the principles of repair.
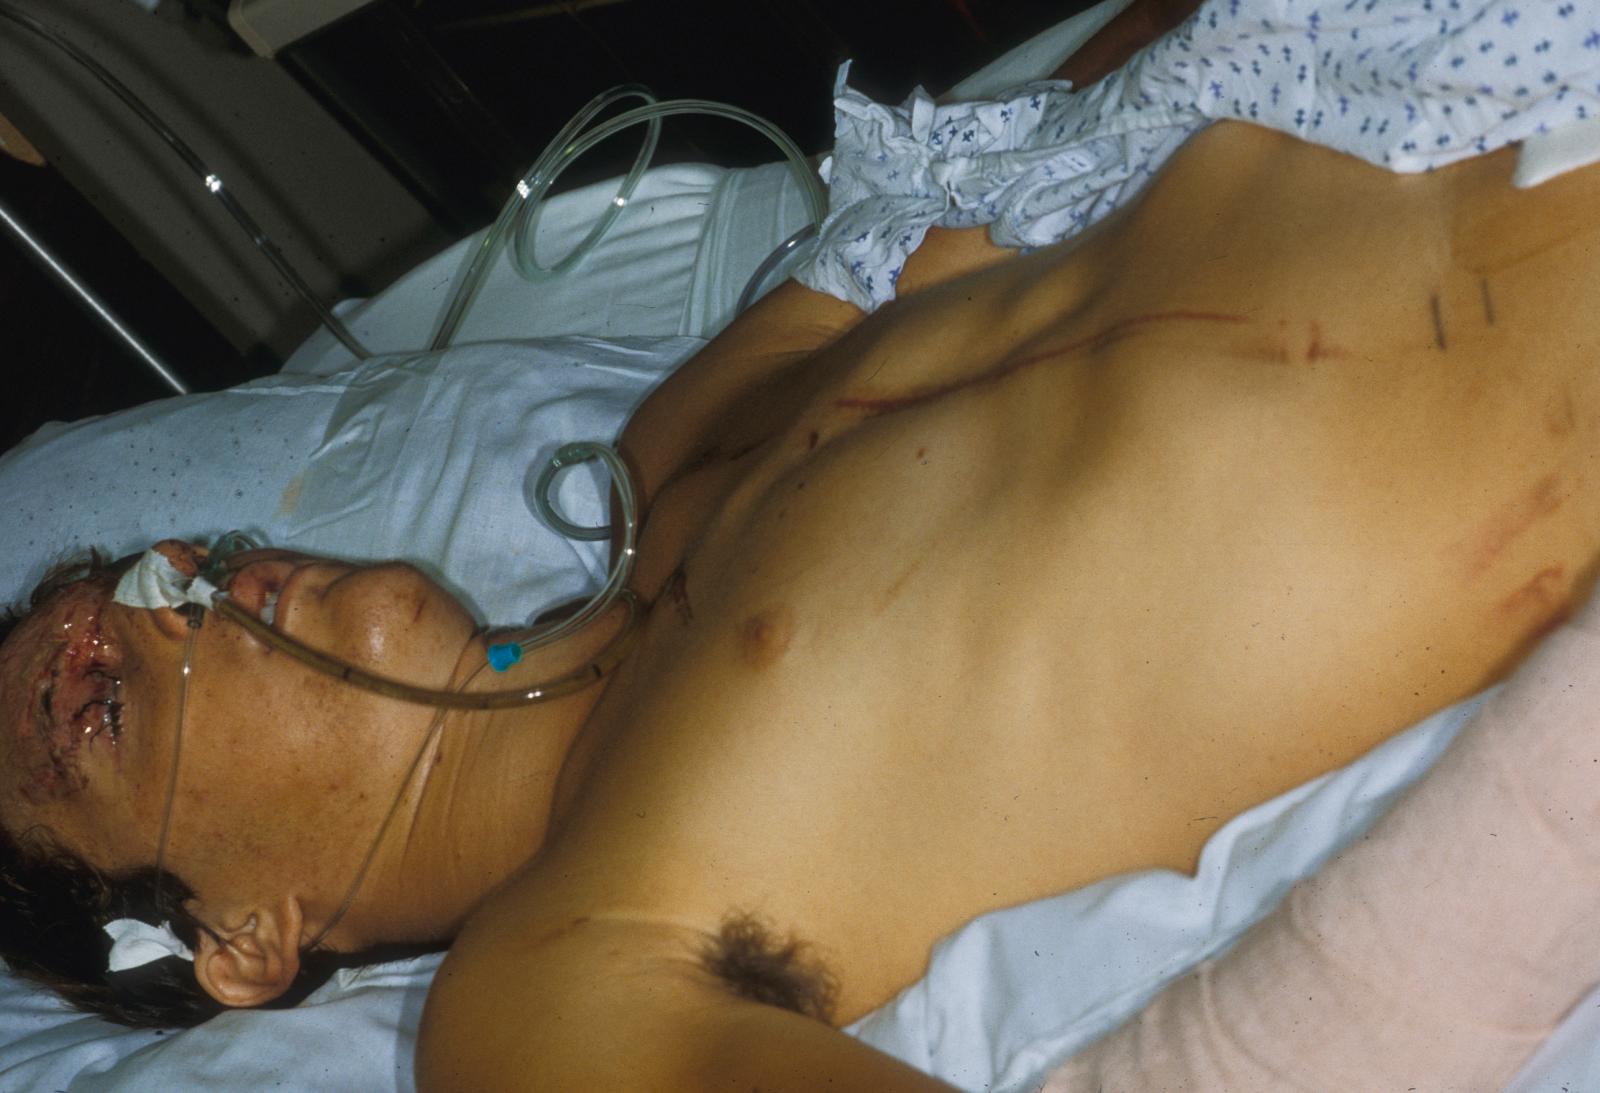
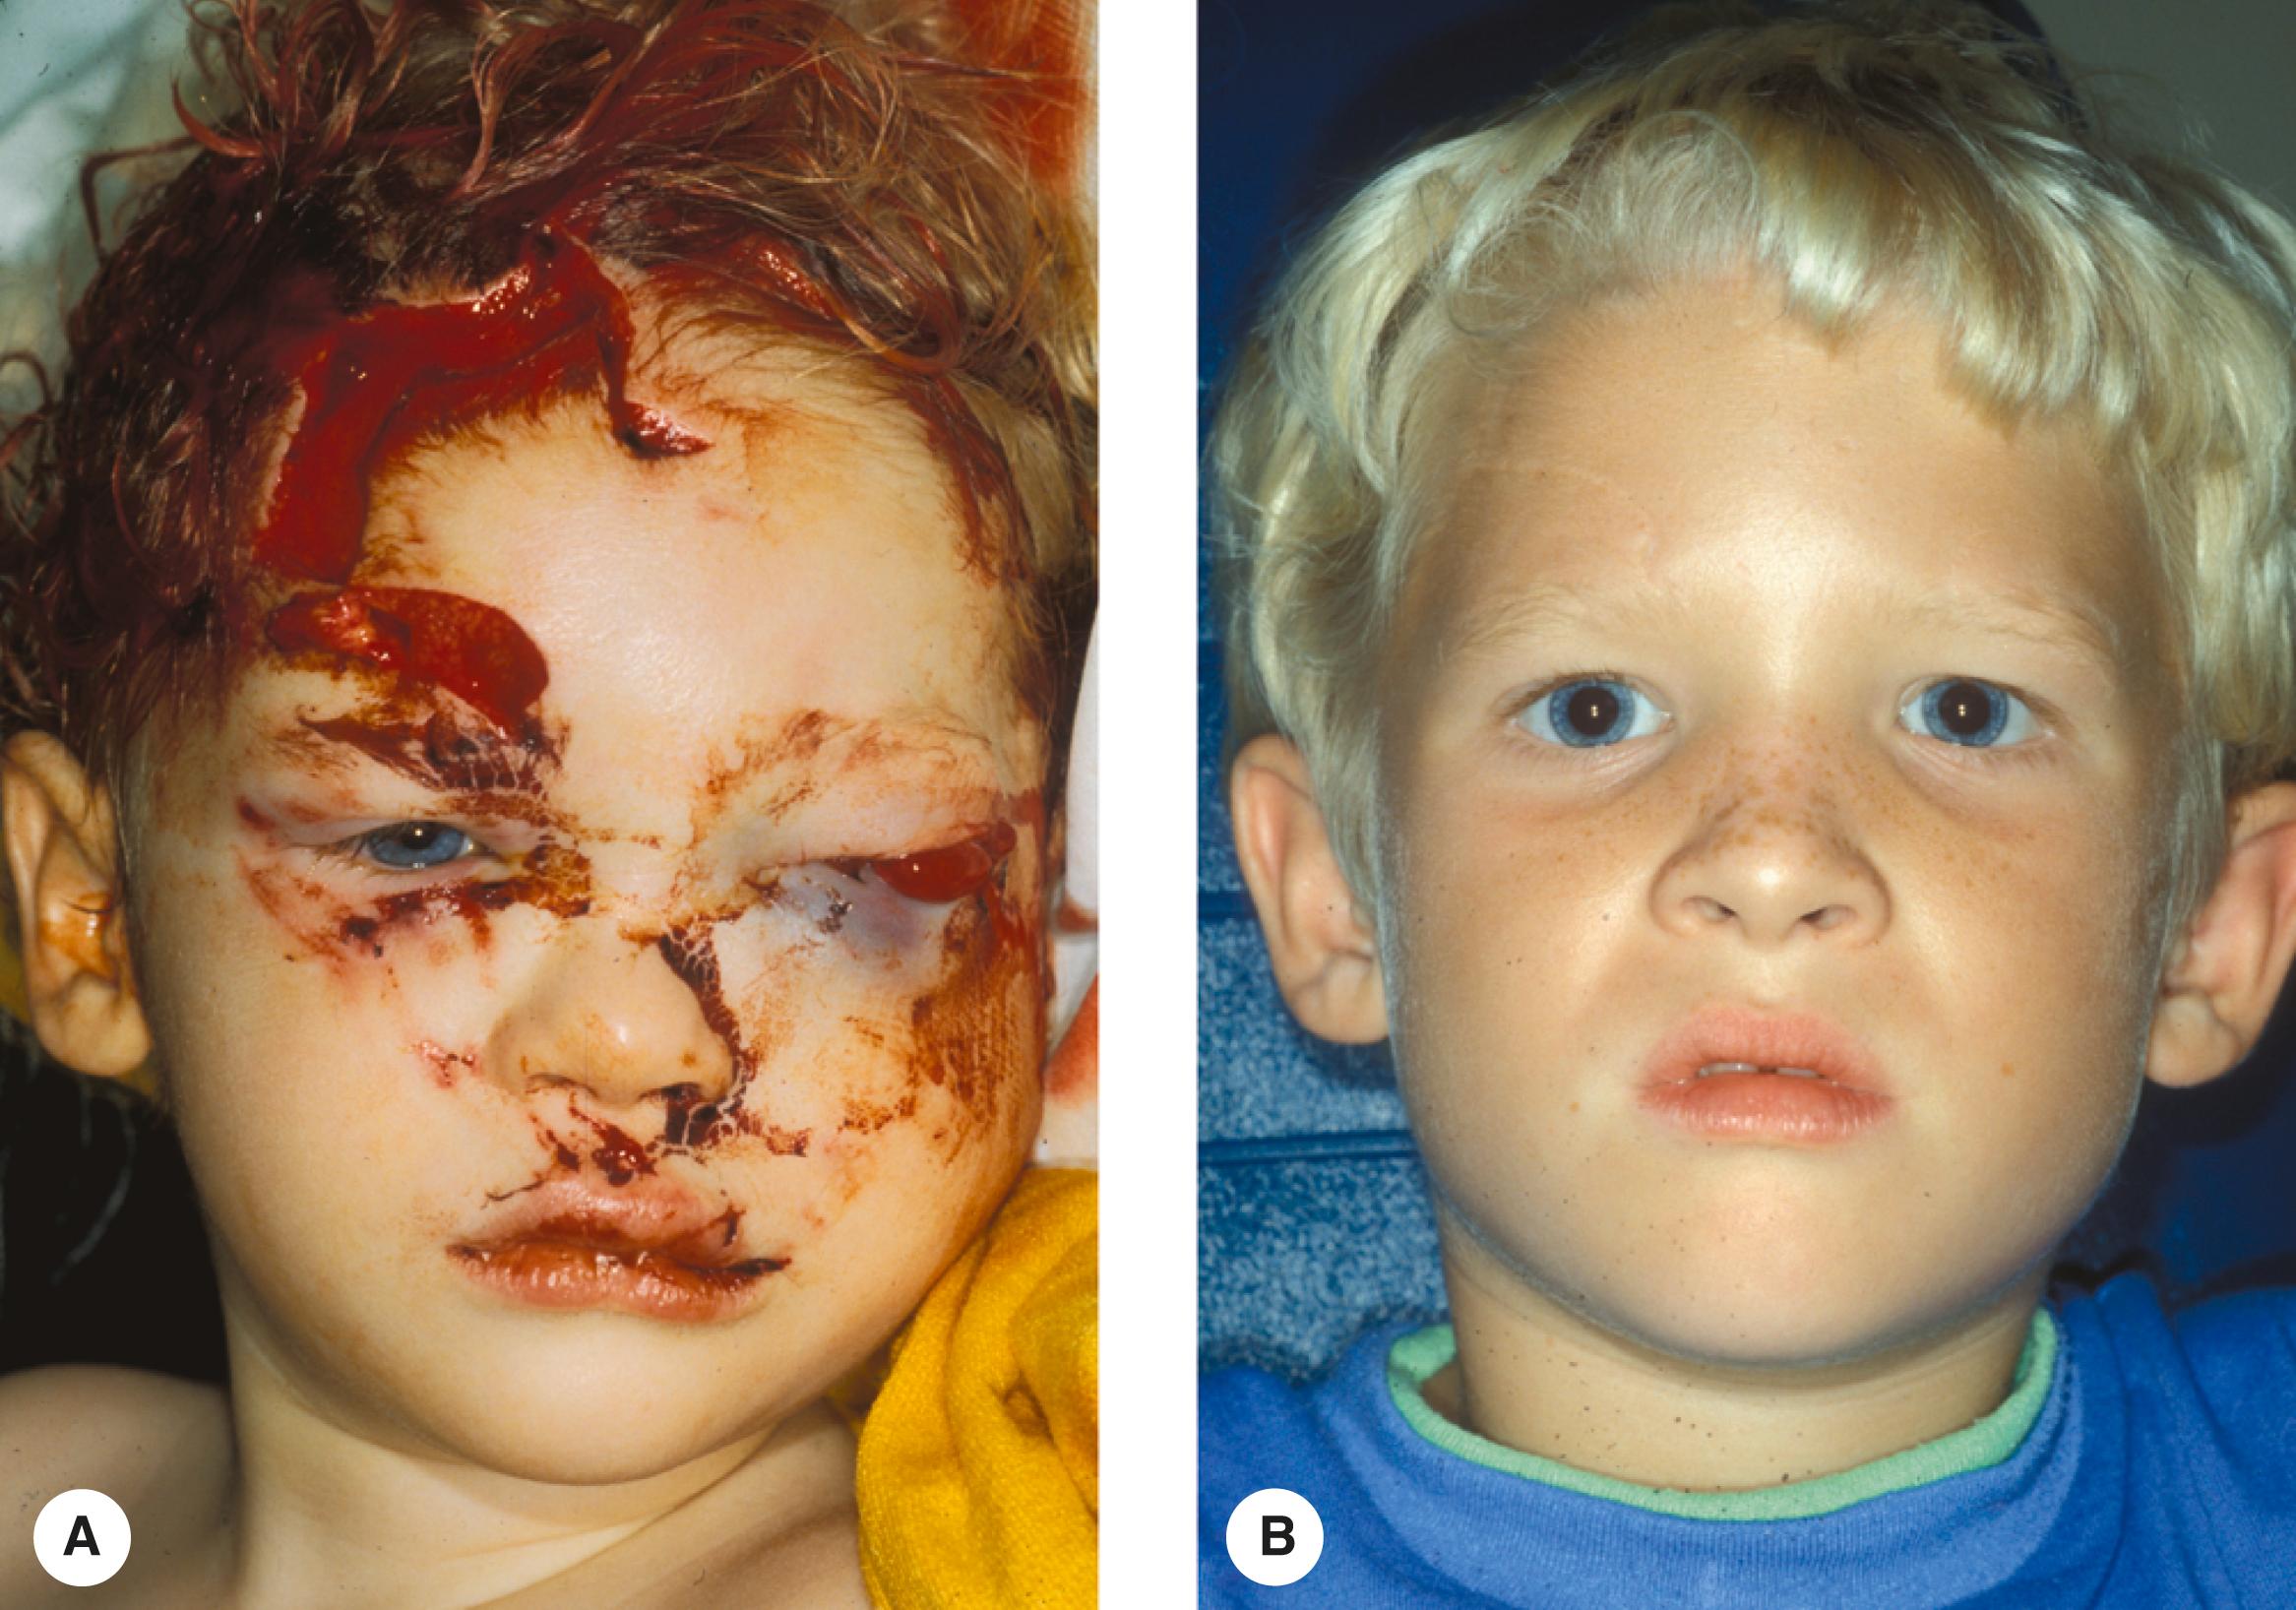
Periocular trauma can occur as an isolated injury or as a small part of multisystem trauma. You must make sure that the patient’s cardiopulmonary and neurologic status is stable before you evaluate and treat any ocular or periocular injury ( Figure 13.1 ). Evaluation of the eye precedes evaluation of the soft tissue and bones. You must prevent further injury to the eye as a result of manipulation of the surrounding tissues.
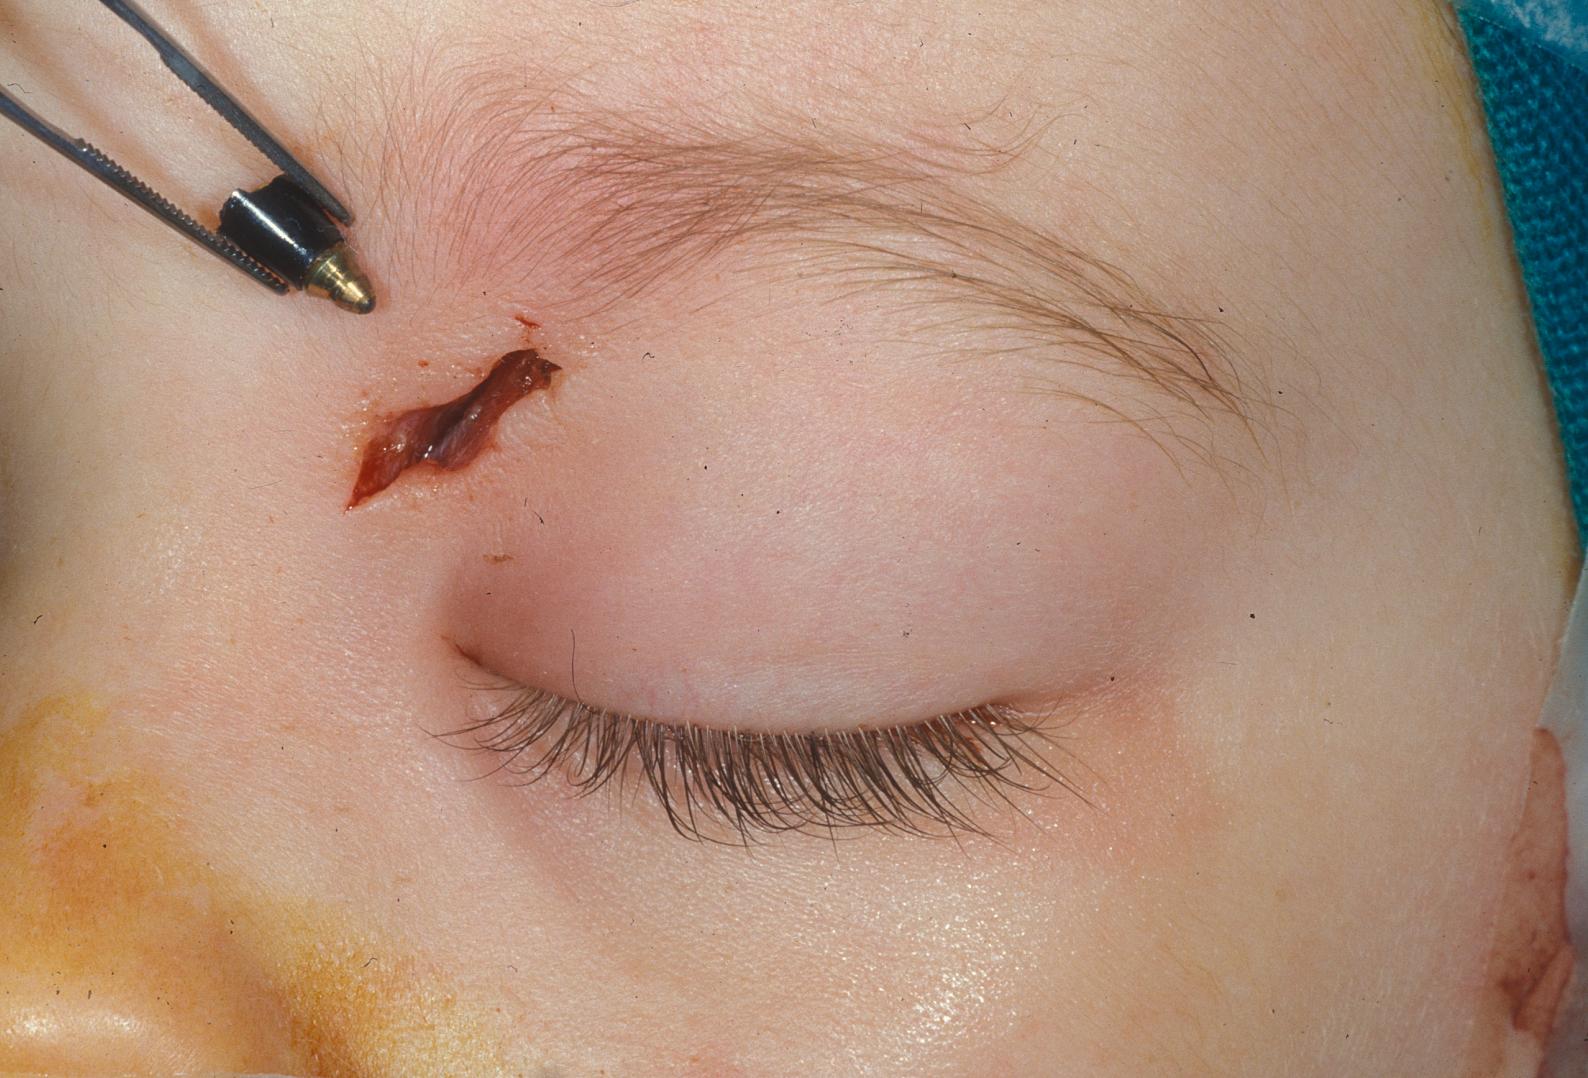
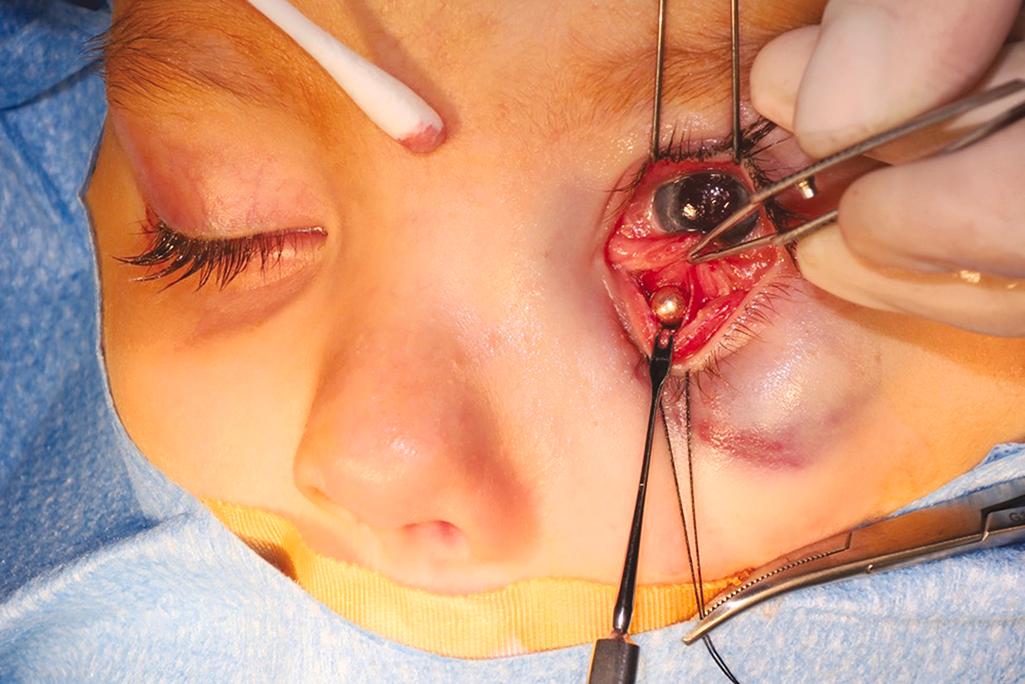
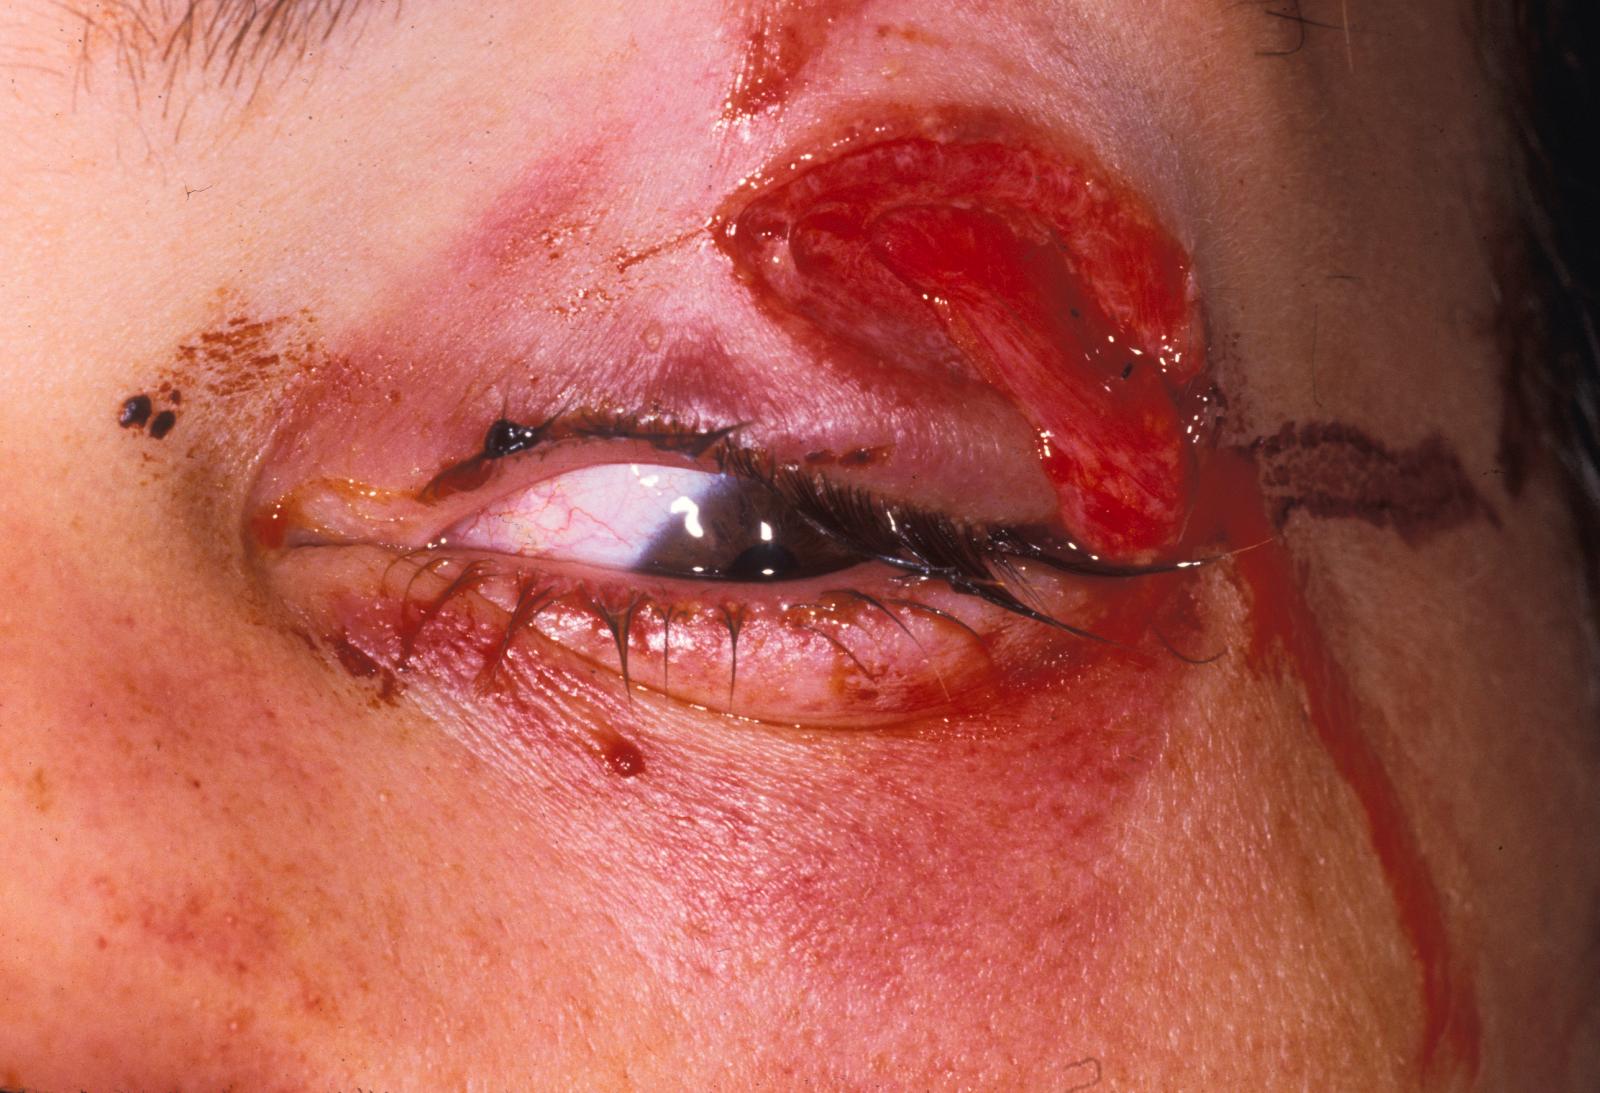
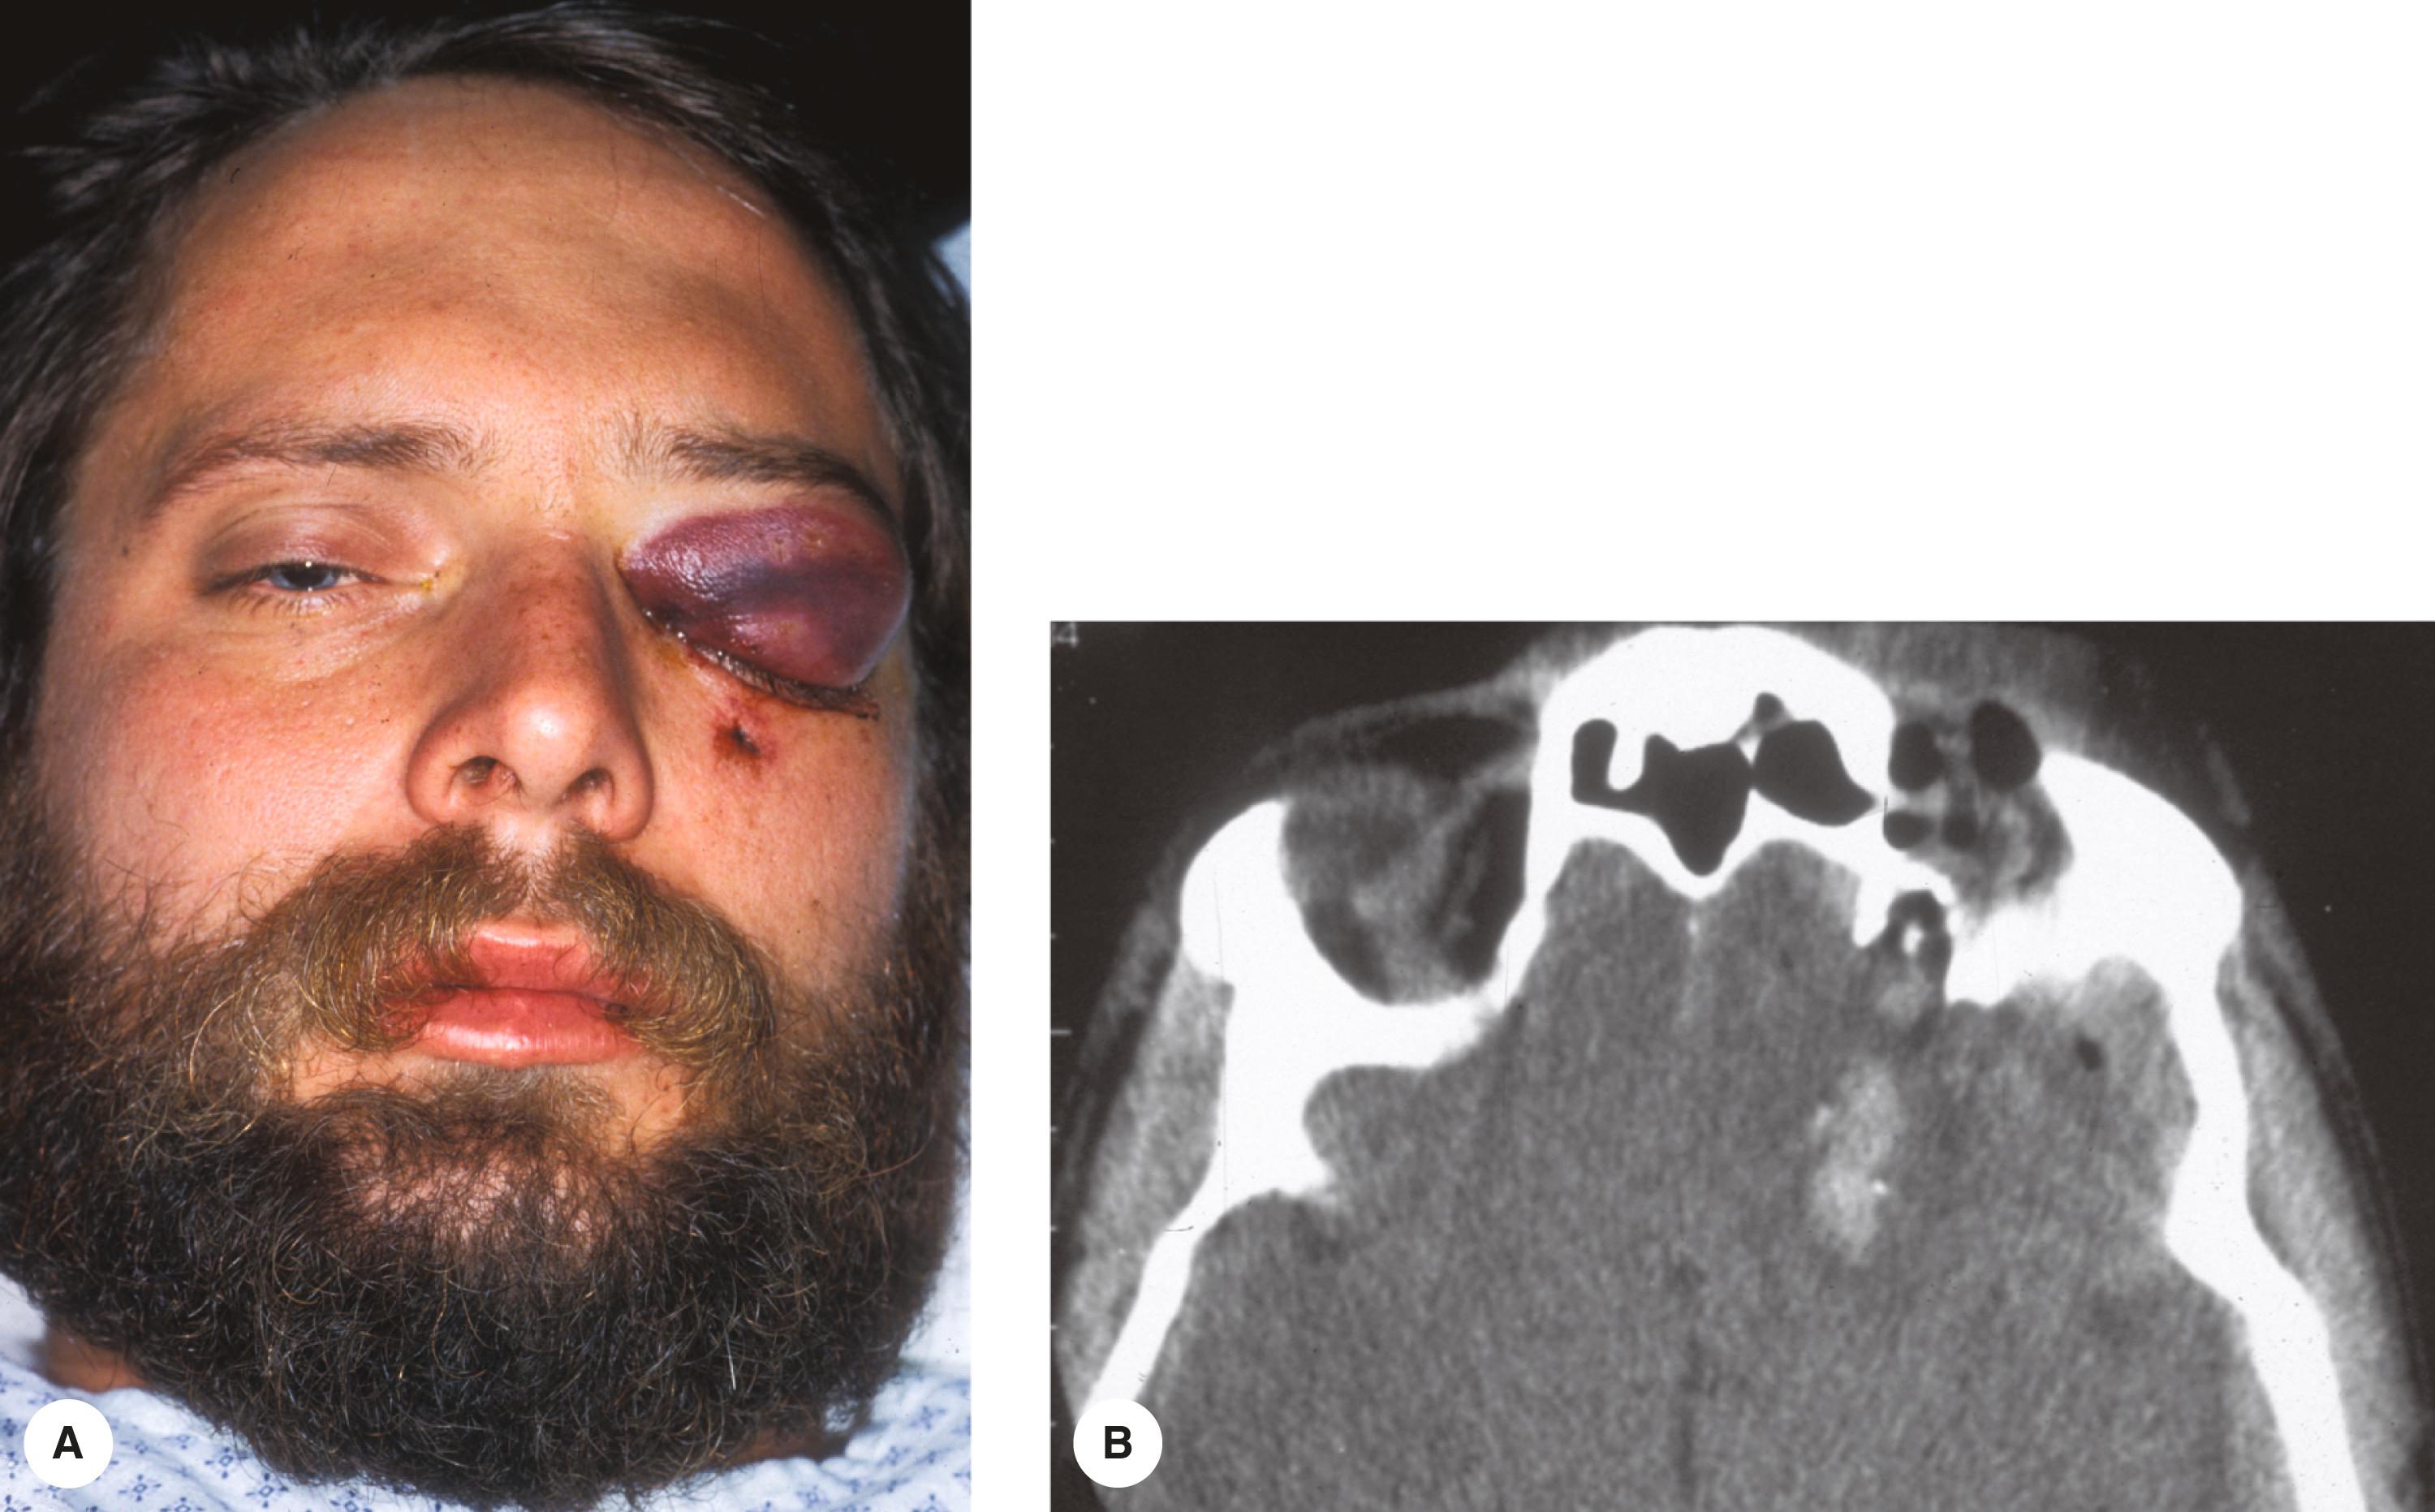
Try to obtain some history about how the injury occurred. A broad area of superficial involvement may initially look worse than a small puncture wound. The puncture wound may extend deeply, causing injuries to the eye, orbital contents, or brain, a much more serious situation than the superficial abrasion. If it appears possible that there was deep penetration into the orbit, try to determine what instrument caused the injury to give you some information about the depth of penetration and the possibility of the presence of a foreign body that may have broken off. Symptoms of diplopia or hypesthesia of the infraorbital nerve should suggest an orbital fracture. Always be skeptical about the history if alcohol was involved or if the patient is a child. Alcohol use has a way of distorting a patient’s perception of the facts. Children may not give an accurate history, fearing they may get in trouble with their parents ( Figures 13.2 to 13.4 ). Your examination helps you decide if the history is plausible and if imaging studies are necessary to rule out injury to deep tissues ( Box 13.1 ).

Ensure stable neurologic and cardiopulmonary status.
Eye examination
Eyelid examination
Lid margin laceration
Canalicular injury
Anterior lamellar injury
Presence of preaponeurotic fat in the wound
Levator muscle or aponeurosis damage
Periocular examination
Describe injury and extent
Check facial nerve function
Trunk injury (complete facial nerve palsy)
Branch injury
Frontal nerve injury
Take a general medical history to make sure that the patient is able to tolerate local or general anesthesia. You need to know when the patient last ate or drank if you are considering general anesthesia. Inquire about recent tetanus injections.
Take photographs of the patient before cleaning the wounds. These photographs should document the severity of the injury for medicolegal documentation. Occasionally, after repair, your patient may be unhappy with your best attempts to reconstruct the facial injuries. These photographs can remind the patient of the severity of the initial injury. In some cases, photographs may provide some legal defense of your efforts.
We won’t go into much detail about examining the eye. Remember that eye injuries commonly occur with facial trauma. As always, measuring the vision is an essential part of the eye examination. You must explain any acuity measurement that is not normal. This can be difficult if the patient is lethargic, intoxicated, or otherwise uncooperative. Remember to check the visual acuity on both sides. In an uncooperative patient, a vision of 20/20 in the right eye and 20/100 in the left eye is much more suggestive of an injury to the visual system than an acuity of 20/100 in both eyes. If you can’t explain the decrease in visual acuity as being caused by an injury to the eye itself, consider the possibility of damage to the optic nerve, or traumatic optic neuropathy. We discuss traumatic optic neuropathy in more detail in the section on facial fractures later in this chapter.
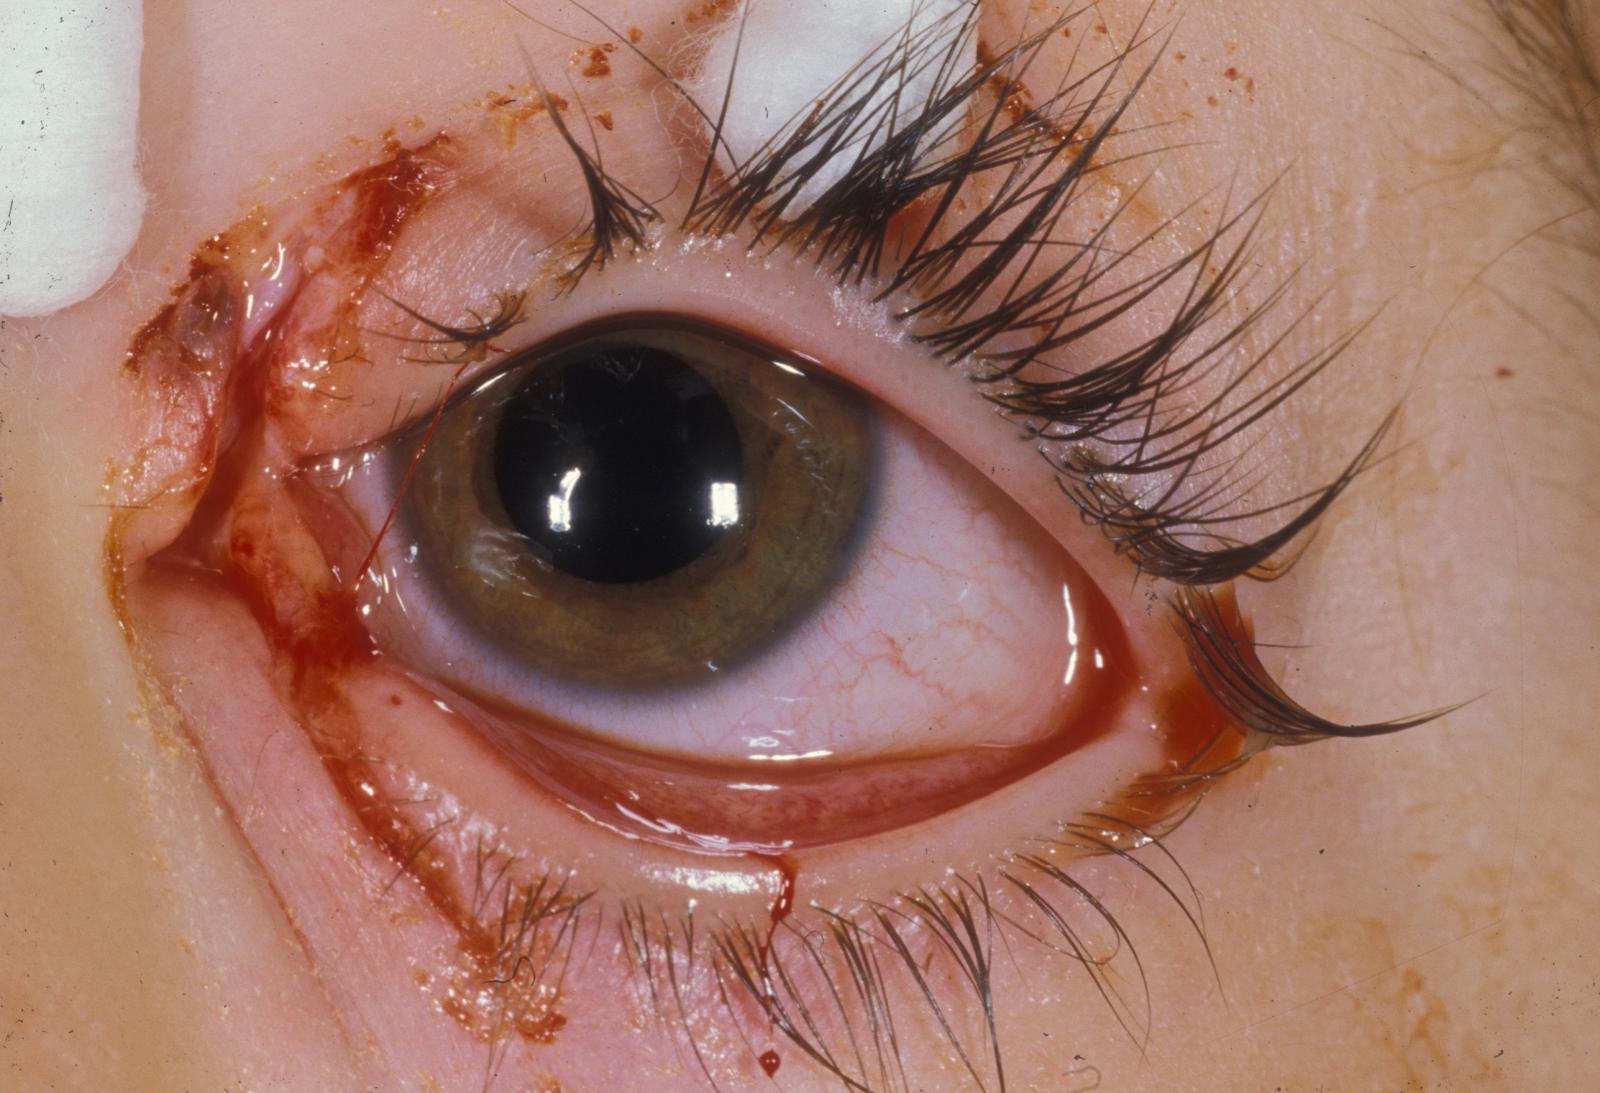
Next inspect the eyelids. Note the location, extent, and severity of injury to the soft tissues. Draw a diagram to describe the soft tissue injury. Develop a routine for examination of the soft tissue. Start with inspection of the continuity of the lid margins. Pay special attention to the lid margins medial to the puncta so you do not miss a canalicular laceration ( Figure 13.5 ). If you suspect a canalicular laceration, pass a 1-0 or smaller Bowman probe through the punctum and inspect the canaliculus. You may be surprised to know that most canalicular lacerations do not occur from direct trauma of the medial lid. Most are the result of an avulsion or tear that occurs when the lid or cheek is pulled laterally. This explains why the patient who has been punched with a fist on the zygoma can be seen with a lower canalicular laceration.
Examine the anterior lamella of the eyelids. The presence of orbital fat in a wound means that the orbital septum has been violated and that there is a possibility of deeper orbital injury. Observe the upper eyelid movement to ensure that the levator muscle has not been damaged.
Next examine the more peripheral periocular areas. If a laceration has occurred near the trunk of the facial nerve, check for normal facial movements. If you suspect that the nerve has been damaged, primary nerve reanastomosis by a surgeon trained in this procedure may be required. If the injury is near the brow, check to make sure that the frontal nerve branch is intact. Clearly document any abnormality.
Soft tissue injuries are classified as:
Contusion
Abrasion
Avulsion
Puncture
Laceration
Simple or complex
Superficial or deep
Contusions and abrasions do not require surgical repair. Cleaning and use of topical antibiotics and ice are appropriate. Avulsions imply a tearing of the tissue, sometimes separating with loss of tissue. Tearing often occurs with injuries on pavement, but loss of tissue is extraordinarily rare. Remember that wounds usually spread open, making them look like tissue may be lost. Punctures are caused by long sharp objects that create small entrance wounds but may extend deeply. Lacerations are caused by sharp objects. Clean cuts or simple lacerations require only single-layer closure and heal with minimal scarring. Lacerations outside the orbital rims extending into the subcutaneous fat usually require a layered closure. Complex lacerations have extensive jagged edges that extend into deeper layers of tissue. These lacerations may require several hours of layered closure, but with good technique, the results can be spectacular ( Figure 13.6 ). When dealing with deep lacerations of the face, evaluate facial nerve function prior to injecting any anesthesia. Canalicular and lid margin lacerations require special techniques that you can master with some instruction and practice.
At this point, you should be able to evaluate the patient with soft tissue facial injuries. You have established that the patient’s neurologic and cardiopulmonary status is stable. You have evaluated the eye. The history gives you an idea about what injuries you might expect. You should be able to describe the injuries.
Recall the steps of a systematic evaluation of the soft tissues. Write down the information in Box 13.2 and memorize it.
Contusion
Abrasion
Avulsion
Puncture
Laceration
Simple or complex
Superficial or deep
Lid margin
Canalicular
What would make you suspect that a canalicular laceration has occurred? What are the possible mechanisms for this injury?
What is the significance of fat in an eyelid wound? What layers of the eyelid have been disrupted? What concerns do you have?
When you evaluate a patient, consider the type and mechanism of soft tissue injury. This information helps you to develop a plan for repair.
Don’t forget to evaluate for deep injuries that may involve the eye or brain.
Small, simple lacerations are usually repaired with local anesthesia in adults and children. Tissue glue (Dermabond, ethicon.com ) is available for repairing small lacerations without anesthesia, which is most helpful in children. More complex lacerations should be repaired with general anesthesia. Facial lacerations should be repaired within 12 to 24 hours. Operations for life- or vision-threatening conditions take priority over laceration repair. Fractures associated with facial lacerations are either repaired at the time of laceration repair or after 3 to 5 days when the facial swelling resolves. The specific timing for blowout fracture repair is discussed later. Although facial lacerations rarely become infected, prophylactic broad-spectrum antibiotics, usually a first-generation cephalosporin, are prescribed for 1 week.
In the operating room, the wounds should be injected with local anesthetic containing epinephrine. All foreign bodies should be removed from the wounds. Vigorous cleaning and irrigation should be performed to minimize the chance of infection and tattooing of the skin with foreign materials.
Before repair of any laceration, explore the depths of the wound to ensure that deeper injury has not occurred. Any visible orbital fat means that the orbital septum has been violated ( Figure 13.7 ). Make sure that you are not dealing with a potentially more serious injury involving damage to the orbital contents or brain ( Figure 13.8 ). If the laceration occurs perpendicular to the orbicularis fibers and the wound is pulled open, placement of deep absorbable sutures in the muscle helps to approximate the wound edges without placing tension on the skin closure.
Lacerations parallel to the orbicularis muscle do not require closure of the muscle layer. Placement of interrupted permanent skin sutures that bisect the wound in successive halves prevent the formation of a dog-ear (redundant tissue on one side of the wound noted at the completion of closure). A running suture can be used for longer straight lacerations, but this does not permit individual removal of sutures if any infection should occur. Suitable sutures for eyelid skin closure include 6-0 and 7-0 nylon or Prolene. Lacerations of the brow in thicker skin can be closed with 4-0 or 5-0 nylon or Prolene sutures. Blue 5-0 Prolene sutures are especially useful in the brow, where black sutures can easily be confused with eyebrow hairs. A layered closure can be used in the dermis or subcutaneous tissues to remove tension from the skin edges. Do not close the orbital septum; lagophthalmos may result.
Complex lacerations have many jagged edges and extend into deeper tissue layers. Repair of a complex laceration is like building a jigsaw puzzle. First, you start with pieces of the puzzle that you can identify, the edges and corners, and put them together. Then you fill in the missing areas in the center of the puzzle, looking for less obvious details to guide you.
The steps of complex laceration repair are:
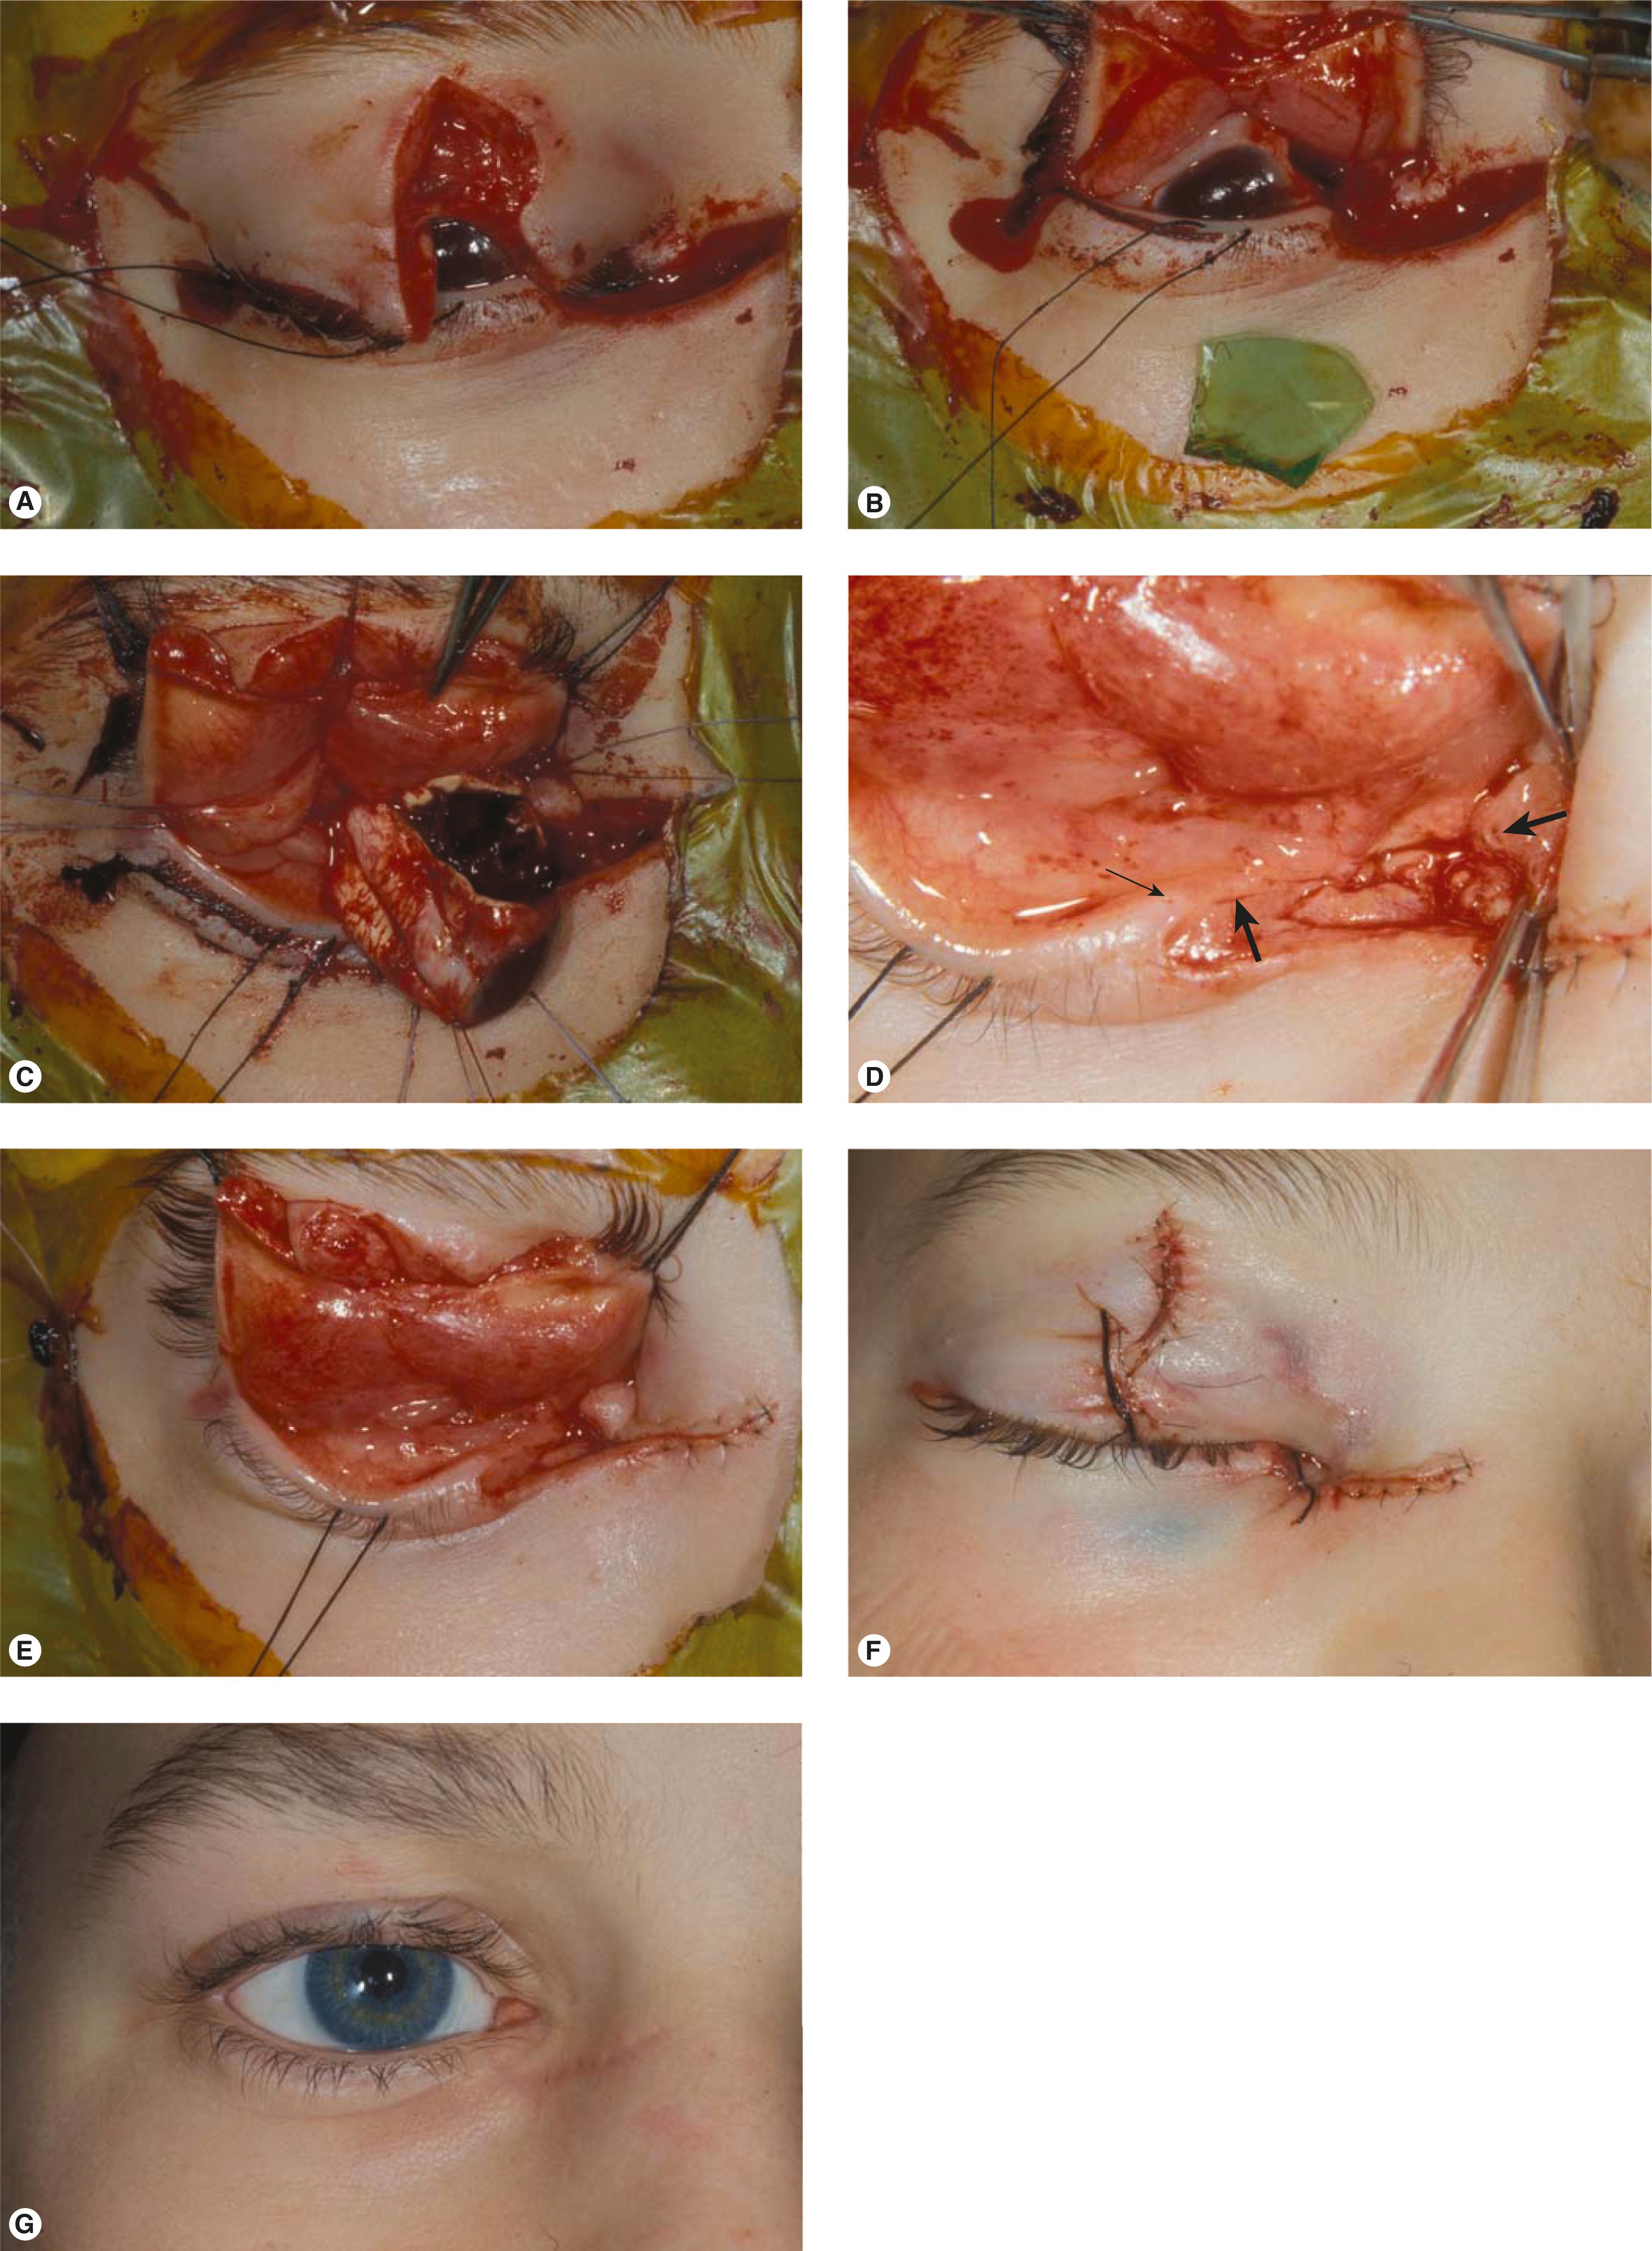
Clean and inspect the wound ( Figure 13.9A to C ).
Rule out deep injury.
Remove any foreign material.
Do not debride any tissue. It is surprising how well this tissue survives.
Repair the deep layer.
To begin the laceration repair, identify anatomic landmarks such as the eyebrow, lid margin, and canthus (see Figure 13.9D ).
Place deep sutures to reposition the anatomic landmarks in proper alignment.
In some cases, temporary tacking sutures of large caliber (3-0 or 4-0) can be placed full thickness through the skin to help with the orientation of tissues and take tension off the wound while deep layers are being closed. These temporary sutures are removed as the wound comes together.
Start with the deepest layers of closure first, including any posterior lamellar repair of the conjunctiva, tarsus, canthal tendons, or levator aponeurosis (see Figure 13.9E ).
Close the subcutaneous layer with buried absorbable long-lasting sutures such as 4-0 and 5-0 Vicryl or PDS sutures. In large lacerations extending onto the scalp, 3-0 PDS sutures are appropriate. Use a reverse-cutting needle for these closures. If you are unhappy with the position of a deep suture, replace it. The final skin closure cannot compensate for poor deep closure alignment.
Complete the deep closure before starting closure of the superficial layer.
Close the superficial layer.
Approximate the edges of the skin with interrupted sutures (see Figure 13.9F ).
Most commonly, 6-0 and 7-0 nylon sutures are used on the eyelids, and 4-0 and 5-0 nylon sutures are used in the thicker periocular skin.
You can use absorbable sutures such as 5-0 or 6-0 chromic sutures for the final skin closure (see Figure 13.9G ). You should always use absorbable sutures in children.
Use a topical antibiotic ointment such as erythromycin, placed over the wound.
Dressings are not necessary.
Suture removal should be done between 5 and 10 days after surgery. If you are removing sutures early, you may want to remove every other suture initially and have the patient return a few days later for removal of the remaining sutures. Superficial wound healing occurs within the first week or two. Scar maturation does not occur until 6 to 12 months after surgery. You need to be supportive during this period. Massage with vitamin E oil or other products (e.g., Mederma) is helpful. Several brands of silicone sheeting (e.g., ScarAway) are available to reduce raised scars on the face. Avoid revisions until all healing is complete and scars are flat and nonerythematous ( Box 13.3 ).
Preparation
Use general anesthesia if the laceration is large.
Clean the wound and remove any foreign material.
Inspect the wound.
Determine the depth of the wound.
Rule out injury to deep tissues.
Do not debride any tissue.
Inject the wound with local anesthetic containing epinephrine (inject before cleaning the wound if using local anesthesia).
Repair deep tissue injuries first.
Levator aponeurosis
Tarsus
Medial or lateral canthal tendon
Align identifiable surface anatomic landmarks.
Eyebrow, eyelid margin, corners of the wound
Deep suture placement, 4-0, 5-0, or 6-0 PDS or Vicryl sutures
Larger temporary full-thickness tacking sutures, 3-0 PDS or 4-0 silk
Complete the deep interrupted closure.
Anatomic alignment of the layers of the subcutaneous tissue or dermis
Close the skin.
Eyelid skin
Interrupted 6-0 or 7-0 nylon or Prolene sutures
Consider 5-0 or 6-0 chromic sutures in children
Periocular skin
Interrupted 5-0 nylon or Prolene sutures
Topical and oral antibiotics
Some lid margin lacerations are isolated minor injuries or are associated with large facial wounds (see Figure 13.9 ; Box 13.4 ). The technique for repair is the same in either situation. Repair begins with identifying the appropriate anatomic landmarks of the eyelid, especially the landmarks of the lid margin. The strength of the closure is in sutures placed in the tarsal plate. Eyelid margin eversion is necessary to prevent lid notching.
Inject local anesthetic with epinephrine.
Align the lid margin.
7-0 Vicryl vertical mattress suture through the meibomian gland orifices
5-0 or 6-0 Vicryl lamellar pass, two or three sutures
An additional 7-0 Vicryl vertical mattress suture placed anteriorly in the lid margin
An additional simple interrupted suture to align the eyelashes as needed
5-0 or 6-0 chromic interrupted sutures
Consider 5-0 Vicryl sutures in muscle, if under tension
Eyelid margin repair includes:
Injecting local anesthetic
Aligning the lid margin
Suturing the tarsal plate
Suturing the lid margin
Closing the skin
The steps of eyelid margin repair are:
Inject local anesthetic.
Repair can be done with local or general anesthesia.
Instill topical anesthetic drops and inject local anesthetic with epinephrine into the wound.
Align the lid margin: Use a 7-0 Vicryl vertical mattress suture passed through the meibomian gland orifices to align the lid margin. Keep this suture long for traction ( Figure 13.10A ).
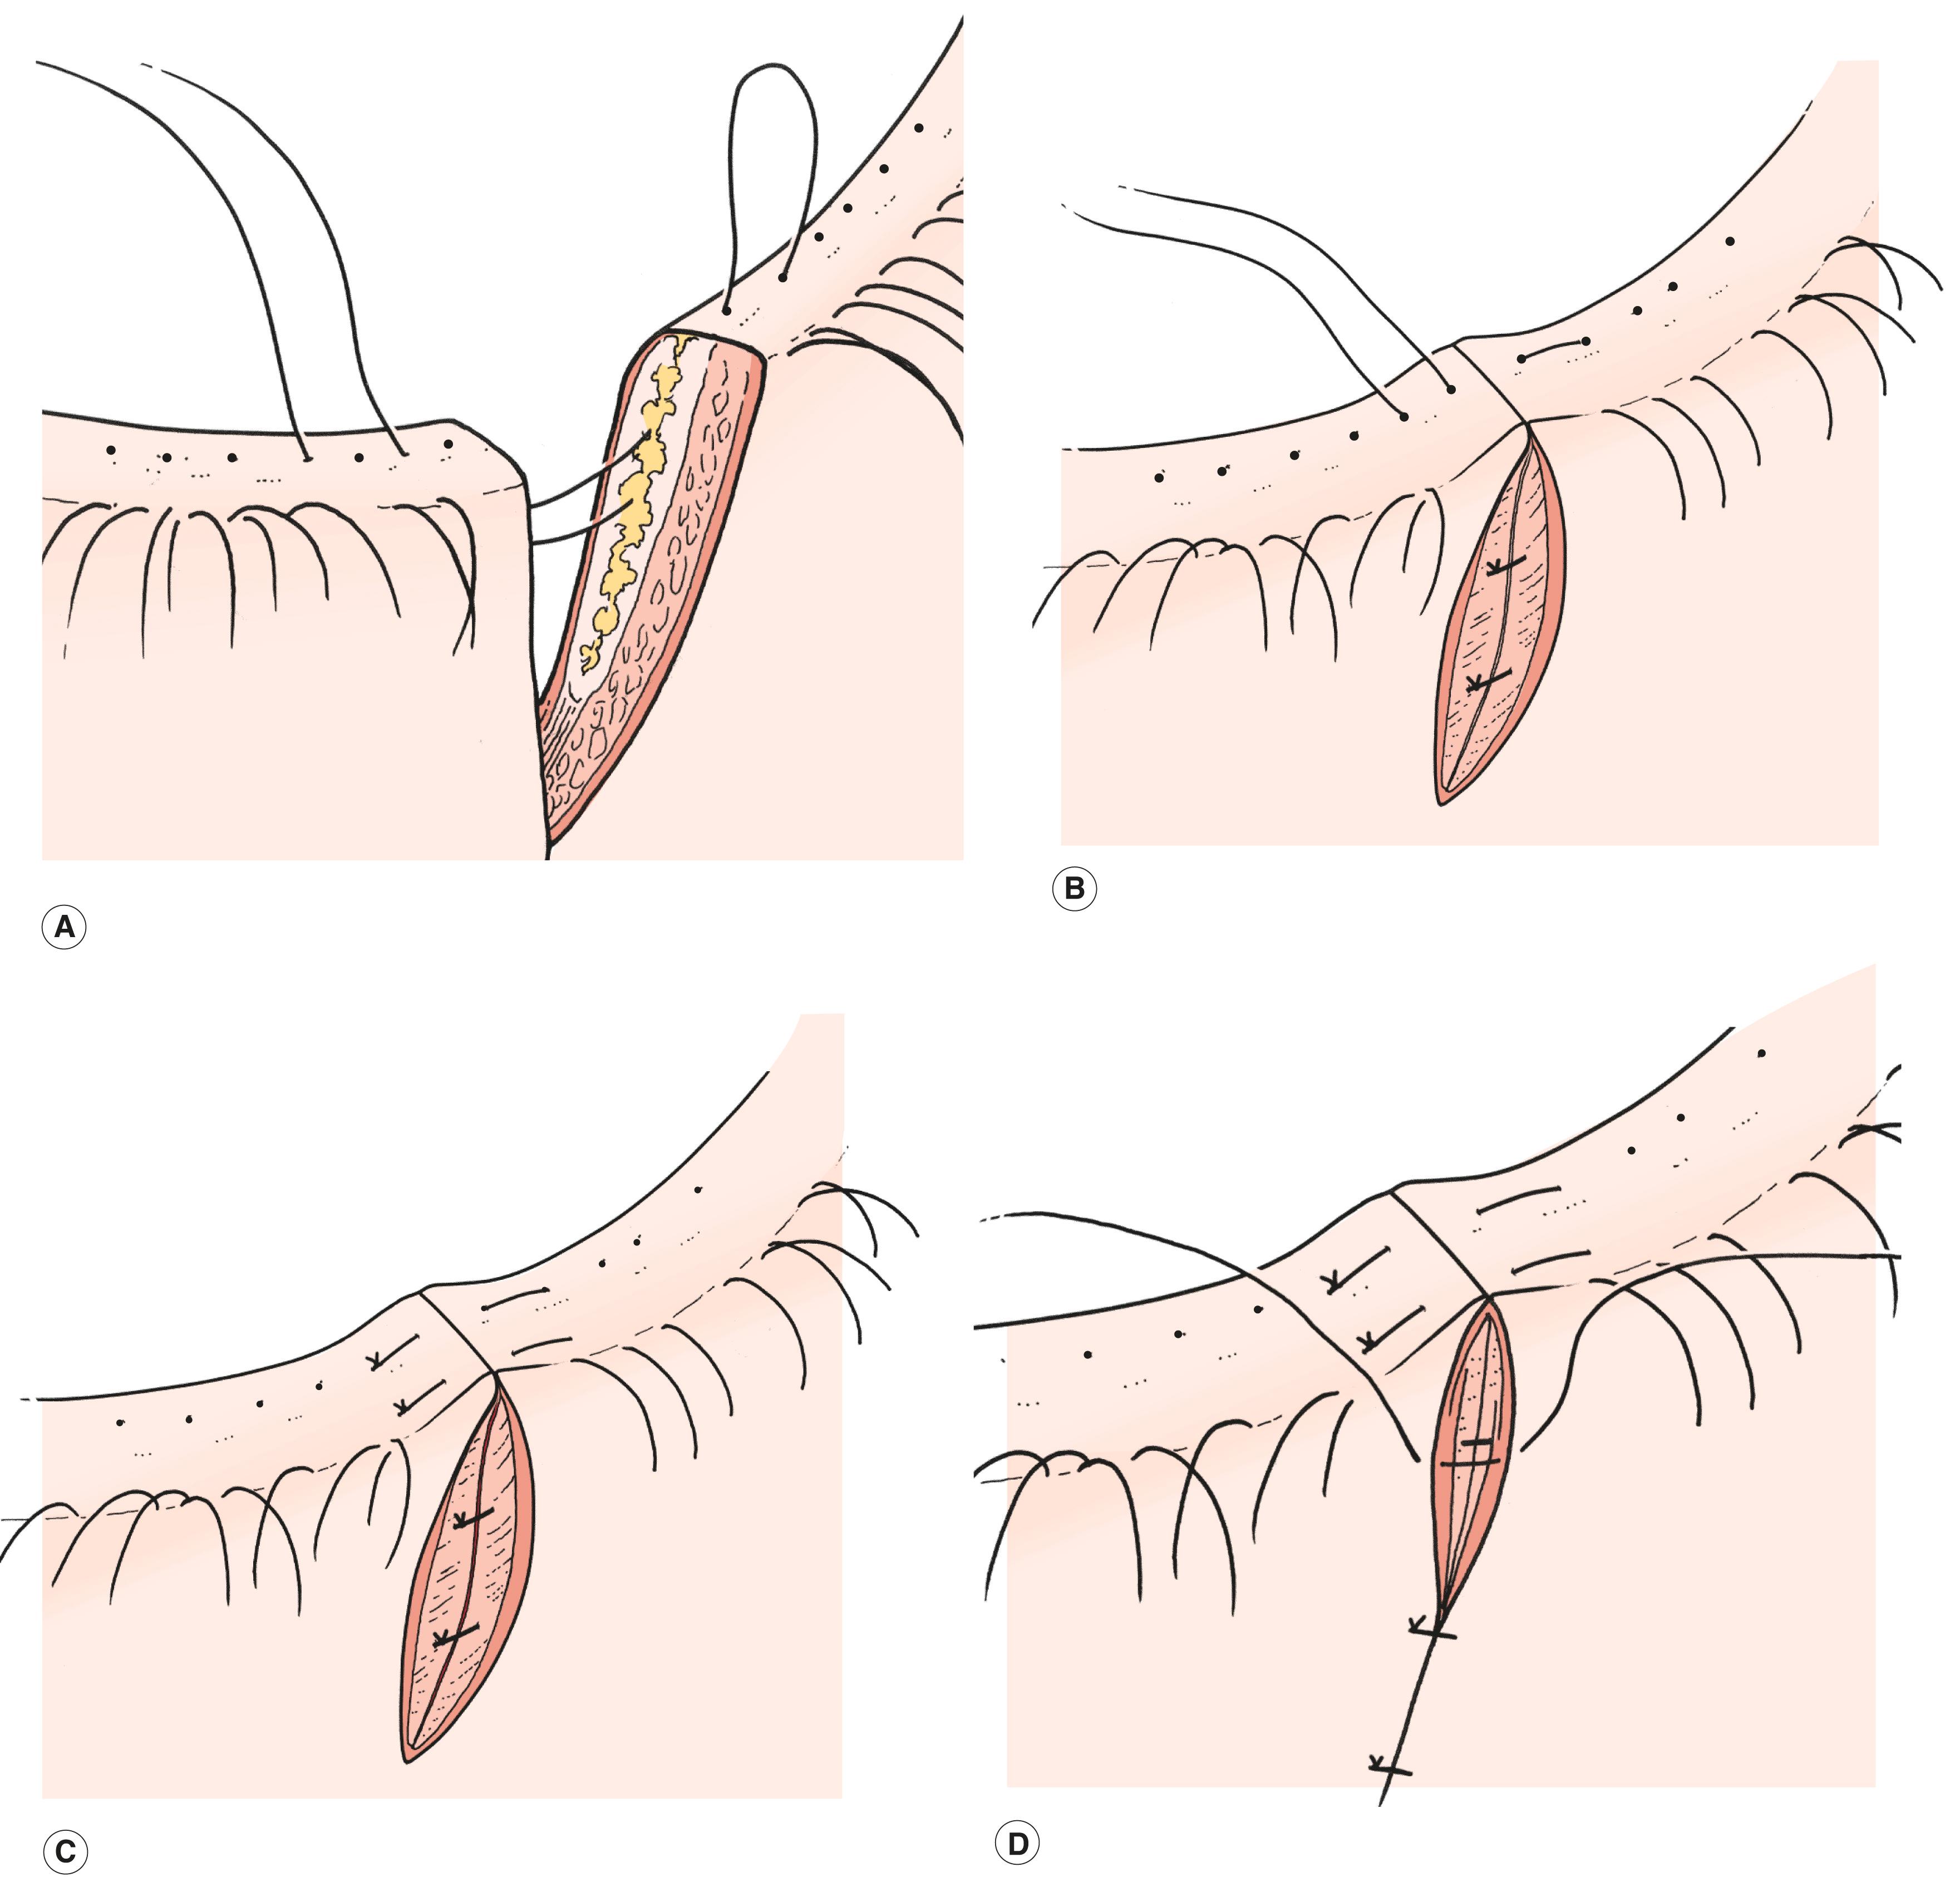
Suture the tarsal plate: Use two or three interrupted 5-0 or 6-0 Vicryl sutures passed in a lamellar fashion to align the tarsal plate. Traction on the initial lid margin suture helps with the positioning of your tarsal sutures (see Figure 13.10B ).
Suture the lid margin.
Go back to the lid margin and place an additional 7-0 Vicryl vertical mattress suture anterior to the gray line. The vertical mattress sutures should provide eversion of the lid margin wound (see Figure 13.10C ).
If you are unhappy with the alignment of the lid margin, replace the sutures.
An additional anterior lamellar suture (just distal to the eyelashes) can be used to help the alignment of the eyelashes (see Figure 13.10D ).
I prefer to use 7-0 Vicryl sutures for the eyelid margin. Traditional teaching suggests the use of 6-0 or 8-0 silk sutures, which should be left long and require removal later. The 7-0 Vicryl sutures can be cut on the knot and allowed to absorb.
Don’t tie the margin sutures very tightly because the tissue may die, resulting in a lid margin notch.
Close the skin.
The skin can be closed with an interrupted simple or vertical suture using permanent or absorbable sutures (see Figure 13.10D ).
If the wound seems to be under tension, you may want to place 5-0 Vicryl sutures through the orbicularis muscle before closing the skin.
Postoperative care is routine. Occasionally, the sutures rub against the cornea and require removal.
Become a Clinical Tree membership for Full access and enjoy Unlimited articles
If you are a member. Log in here