Physical Address
304 North Cardinal St.
Dorchester Center, MA 02124
An emergency situation, whether it is unresponsiveness, an acute medical condition, drug overdose, or trauma, requires a change in the usual sequence of history taking and examination. Life-threatening conditions, such as airway obstruction, cardiac arrest, hypovolemic shock, and respiratory failure, must be identified rapidly and managed. The steps to complete the assessment for life-threatening conditions take seconds, not minutes. The rapid sequential assessment process focuses on patient physiology to identify priority lifesaving interventions.
In an emergency, the patient is assessed, and treatment priorities are established based on the presenting physiologic findings, with a goal of physiologic stability rather than making a diagnosis. National organizations such as the American College of Surgeons Committee on Trauma and the American Heart Association have defined an approach for the emergency assessment of patients with trauma and cardiac arrest. Using this approach, the patient’s vital functions are determined quickly through a rapid primary assessment with resuscitation of vital functions as necessary ( Box 26.1 for the basic life support assessment sequence). During the emergency, the responding examiners need to protect themselves with appropriate personal protective equipment (PPE).
First: Check for responsiveness and for abnormal (gasping) or absent breathing (no chest movement).
Second: Call for emergency responders and get a defibrillator if one is available, or send someone to do this.
Third: Check for the carotid pulse for 10 seconds.
If no pulse, begin cardiopulmonary resuscitation. Perform chest compressions at a rate of 100 per minute, interrupting after 30 compressions to give 2 breaths. Repeat cycles of 30 compressions and 2 breaths.
If a pulse is present, begin rescue breathing at 10–12 breaths per min.
Fourth: If no pulse, use the defibrillator when it arrives to check for a shockable rhythm.
Provide shocks as indicated.
Resume cardiopulmonary resuscitation immediately after each shock.
The primary survey or initial assessment is rapidly completed. With a stable patient it may only take 30 seconds, but it may take several minutes when a mechanism of injury or the patient’s physiologic responses make you suspect a potential critical condition. The patient history, obtained during the primary survey, is often limited to the chief concern (e.g., the mechanism of injury or primary symptom). The primary survey (initial assessment) includes addressing basic life support and integrates rapid assessment for life-threatening injuries.
Perform a rapid inspection for excessive bleeding. Control visible bleeding with manual pressure while continuing the primary survey, and estimate the amount of blood loss from visible blood on dressings or pooled around the patient. A tourniquet around an extremity proximal to the injury may be needed in cases of uncontrolled bleeding.
The patency of the upper airway and responsiveness are assessed by asking the patient a question. If the patient answers, the patient is responsive, and the airway is open at this time ( Box 26.2 ). Keep the patient talking so that you know the airway is being maintained. Have suction equipment readily available to prevent aspiration in case the patient vomits.
Hoarse voice and/or cough, sometimes characterized as a “bark”
Apprehension: tense, deeply worried facial expression
Stridor: severity related to extent of obstruction and the patient’s respiratory effort
Inspiratory: obstruction at the glottis, epiglottis
Expiratory: obstruction below the glottis (wheezing)
Retraction
Suprasternal notch: obstruction at or above trachea
Intercostal and subcostal, below suprasternal notch: obstruction in bronchial tree or below
Altered mental status
Drooling (difficulty swallowing): obstruction at glottis or above
Bleeding from mouth or nose
Subcutaneous emphysema, particularly with trauma
Facial or mandible fracture, often palpable
Respiratory distress: dyspnea, tachypnea
Difficulty swallowing
Pain, such as a sore throat
Cough and associated strain or change in voice
Behavior change: restlessness or lethargy
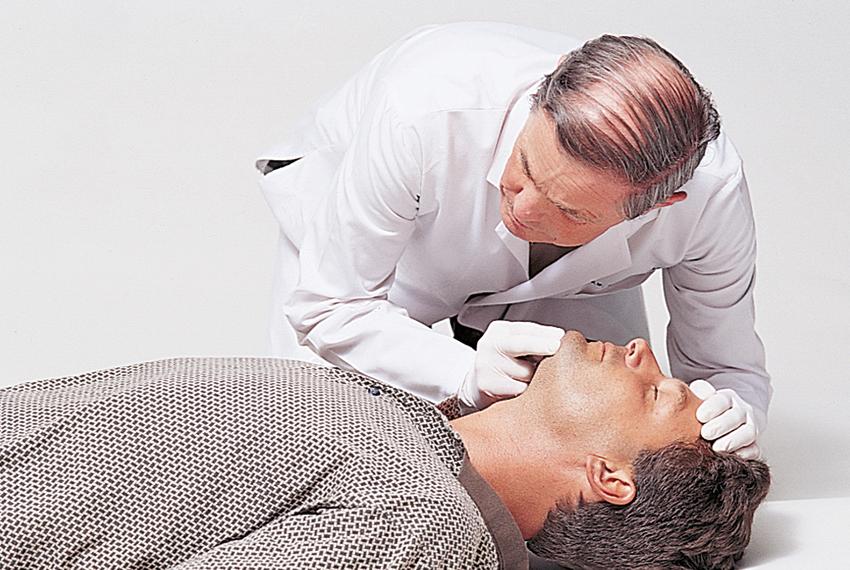
If the patient does not respond, place your ear close to the patient’s nose and mouth to detect any air movement ( Fig. 26.1 ), while simultaneously looking for chest movement. Look for any blood, vomitus, teeth, or any foreign bodies that may be obstructing the airway. Determine whether any fractures of the mandible, face, or larynx could be obstructing the airway.
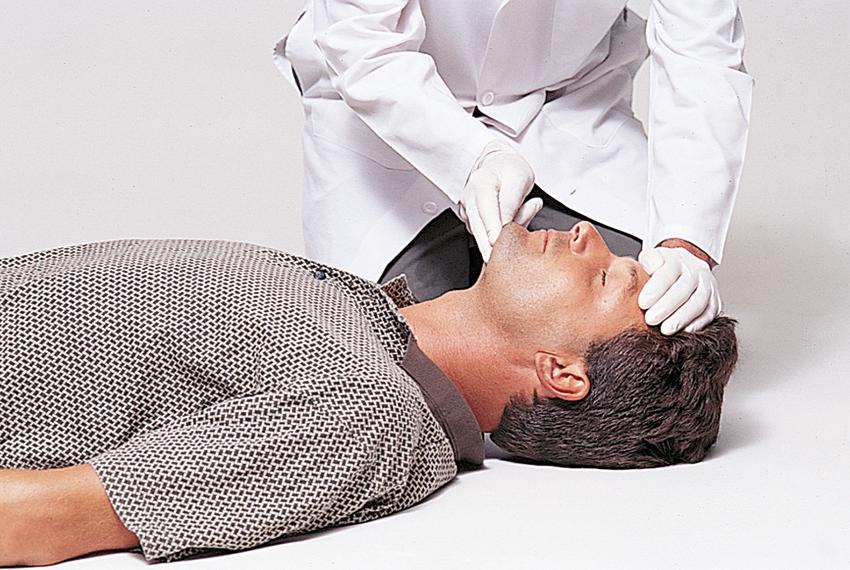
If the airway is obstructed and the patient is supine, use a chin lift or jaw thrust (if any potential injury to the cervical spine has occurred) to raise the tongue (the most common cause of airway obstruction) out of the oropharynx ( Fig. 26.2 ). Do not hyperextend, hyperflex, or rotate the patient’s head and neck to establish or maintain the airway. Remove blood, vomitus, or foreign bodies from the airway by suction. Endotracheal intubation is frequently performed to control and protect the airway, especially when the patient is unresponsive.
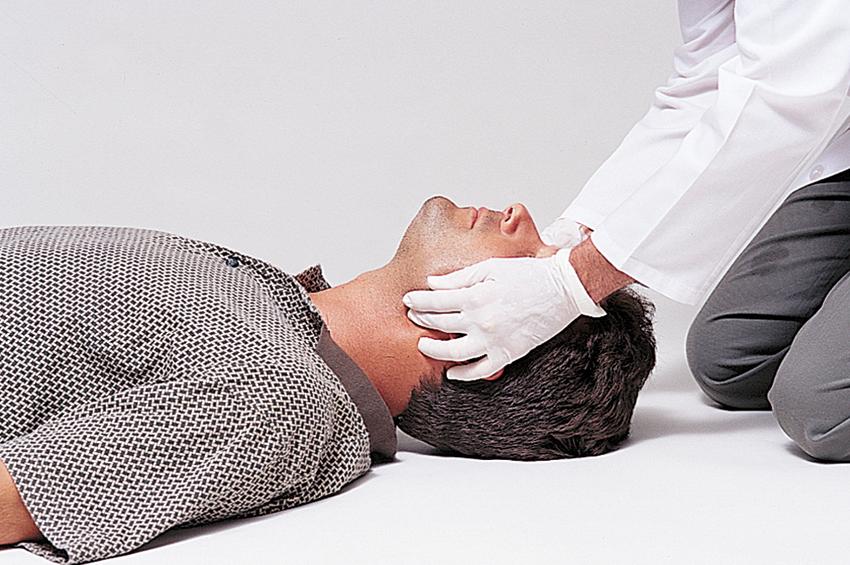
The cervical spine must be stabilized when performing any airway maneuvers or moving the patient in cases of multisystem injury or trauma above the clavicles. Excessive movement of the cervical spine can convert a fracture or dislocation without neurologic damage to one with neurologic injury. Stabilize the cervical spine by manually maintaining the neck in a neutral position, in alignment with the body ( Fig. 26.3 ) until a cervical collar can be applied. Once the patient’s vital functions are more stable, radiologic imaging of all seven cervical vertebrae is often obtained to diagnose the presence or absence of cervical spine injury.
Expose the patient’s chest to assess breathing effort and to observe bilateral chest movement synchronized with breathing. Identify paradoxical chest movement (entire chest does not rise and fall in synchrony), open chest wounds, and bruising. Note the rate and depth of respirations. Use the stethoscope to auscultate for the presence of bilateral breath sounds. Note any signs of respiratory distress such as retractions, tachypnea, and cyanosis. Apply a pulse oximeter if available.
Palpate the upper chest and neck for crepitation, a sign of air leakage into soft tissue. Bruising should alert you to the possibility of a pulmonary contusion (bruising of the lung tissue caused by the energy of an external impact transmitted through the chest wall). This injury may result in a pneumothorax (air leakage into the pleural space causing lung collapse).
Provide high concentration oxygen and ventilatory assistance with a bag-valve-mask, when needed, as the primary survey assessment continues. Cover open chest wounds immediately with a hand to minimize the entry of atmospheric air into the chest until definitive treatment is available, then apply an occlusive dressing taped on three sides. Paradoxical chest movement may be associated with fractured ribs or a flail chest (multiple rib fractures separated from the rib cage). A flail chest also indicates an underlying lung injury (pulmonary contusion).
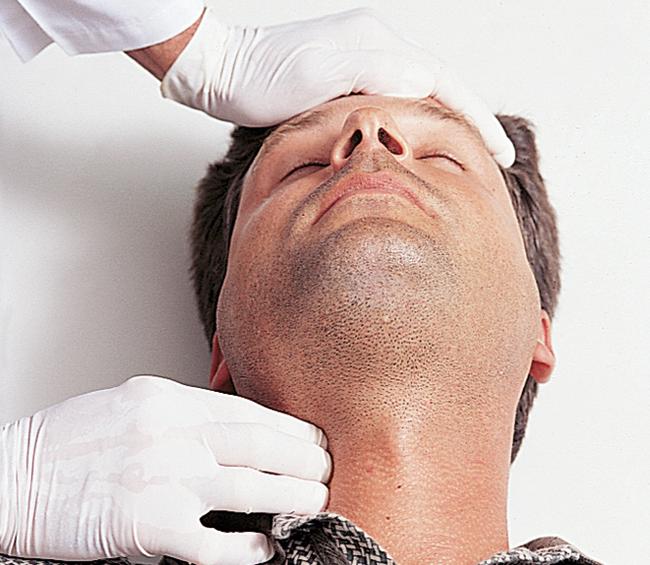
Adequate circulation is needed to oxygenate the brain and other organs. Circulation can be impaired because of cardiac conditions, hemorrhage, dehydration, and other medical conditions. To assess circulation, note level of responsiveness, skin color, and the presence, quality, and rate of the carotid or femoral pulses ( Fig. 26.4 ). Use the capillary refill time to assess the adequacy of tissue perfusion. Press firmly over a nail bed or bony prominence (e.g., chin, forehead, or sternum) until the skin blanches. Remove the pressure and count the seconds it takes for color to return. A capillary refill time in excess of 2 seconds in a central location (e.g., sternum or chin) indicates poor perfusion.
Perform a quick total body appraisal for additional bleeding sites, being especially careful to look and feel for dampness in dark clothing that may hide hemorrhage. Consider the possibility of internal hemorrhage with some mechanisms of injury. Hypovolemic shock can occur with significant blood loss from external bleeding or from internal bleeding into the thoracic and abdominal cavities (see Shock State in Abnormalities). Replacement of intravascular volume is initiated with warmed intravenous fluids and then blood products for hemorrhage.
A brief neurologic evaluation is performed to identify significant disability. Assess the patient’s responsiveness with AVPU or level of consciousness with the Glasgow Coma Scale ( Table 26.1 ). (See Clinical Pearl, “Mnemonic AVPU.” ) This tool allows numeric scoring of the patient’s verbal, motor, and eye-opening responses to specific stimuli to assess the cerebral cortex and brainstem function. Different versions are available for the adult and young child. The Glasgow Coma Scale score should be repeated at intervals to detect changes. A decreased or decreasing the level of consciousness may indicate severe brain injury, as well as hypoxemia or hypovolemic shock, necessitating a reevaluation of the patient’s airway, breathing, and circulation. See Table 7.1 in Chapter 7 for common causes of unresponsiveness. Additional neurologic assessments to be performed include the pupillary size and reactivity, lateralizing signs, or spinal cord injury level.
A quick way to initially assess a patient’s level of responsiveness is with the mnemonic AVPU:
A Alert: no stimuli needed
V Verbal stimuli: responsive to
P Painful stimuli: responsive to
U Unresponsive to verbal and pain stimuli
| Assessed behavior | Adult Criteria | Infant And Young Child Criteria | Score |
|---|---|---|---|
| Eye opening | Spontaneous opening | Spontaneous opening | 4 |
| To verbal stimuli | To loud noise or voice | 3 | |
| To pain | To pain | 2 | |
| No response | No response | 1 | |
| Verbal response | Oriented to appropriate stimulation | Smiles, coos, cries | 5 |
| Confused | Irritable, cries | 4 | |
| Inappropriate words | Inappropriate crying | 3 | |
| Incoherent | Grunts, moans | 2 | |
| None | No response | 1 | |
| Motor response | Obeys commands | Spontaneous movement | 6 |
| Localizes pain | Withdraws to touch | 5 | |
| Withdraws from pain | Withdraws to pain | 4 | |
| Flexion to pain (decorticate) | Abnormal flexion (decorticate) | 3 | |
| Extension to pain (decerebrate) | Abnormal extension (decerebrate) | 2 | |
| None | No response | 1 | |
| The patient’s best response in each category is matched to the criteria for scoring. Appropriate verbal stimuli are questions eliciting the patient’s level of orientation to person, place, and time. Painful stimuli are used when necessary to obtain eye opening and motor responses. Begin with less painful stimuli (e.g., pinching the skin) and progress to squeezing muscle mass or tendons if there is no response. Three scores are summed for the total Glasgow Coma Scale score. A maximum score of 15 indicates the optimal level of consciousness, and the minimal score of 3 indicates deepest coma. | |||
In cases of trauma, undress the patient as completely as possible to facilitate a brief body search for major injuries that may have been missed during the prior steps of the primary survey. Hypothermia is a concern, so use warm blankets, warmed intravenous fluids, and a warm environment to maintain the patient’s body temperature. See Clinical Pearl, “Delay Secondary Assessment to Resuscitate.”
Life-saving measures—hemorrhage control, chest compressions, airway management, defibrillation, oxygen, assisted ventilation, intravenous fluids, and medications—are initiated first, rather than after completion of the assessment. Once the life-threatening problem is stabilized, the initial assessment is continued or repeated. Only when all vital functions have been assessed and treated is an effort made to identify the cause or diagnose the emergency condition through a more detailed head-to-toe assessment and history.
Assess the vital signs (heart and respiratory rates, blood pressure, oxygen saturation) before beginning the head-to-toe survey of the body to identify additional injuries. Compare the patient’s vital sign values to expected values for age and condition. Recognize that vital sign values above or below those expected for the person’s age may indicate physiologic derangement or preexisting health conditions. Remember, the blood pressure is not a good predictor of tissue perfusion because the patient may compensate for hypovolemia until up to 30% of blood volume has been lost ( American College of Surgeons Committee on Trauma, 2018 ).
Usually someone other than the examiner obtains an abbreviated history from the patient, family, emergency medical technicians, or scene bystanders. Pertinent information is then shared with the examiner during the assessment process. See Clinical Pearl, “Mnemonic AMPLE.”
This history focuses on information relevant to the emergency condition. Use the mnemonic AMPLE to remember the key categories of this history.
A Allergies
M Medications or drugs of any type currently being used by the patient
P Past illnesses (e.g., diabetes, epilepsy, hypertension); Pregnancy
L Last meal
E Events preceding the precipitating event; Environment related to the injury
Identify the mechanism of injury that describes the nature and force of the energy transmitted to the body. Because the mechanism of injury is associated with patterns of injury, it provides important clues about physiologic responses and interventions needed (see Blunt Trauma and Penetrating Trauma sections). It is also important to identify potential exposure to hazardous materials (e.g., chemicals or toxins).
Inspect and palpate the face, head, and scalp, looking for any depressions, bone instability, crepitus, lacerations, contusions, penetrating injuries, or drainage from the ears or nose. Clear or amber-colored drainage from the nose or ears may indicate a basilar skull fracture with a cerebrospinal fluid leak. Use an otoscope to inspect the tympanic membranes for blood in the middle ear. Note any bruising around the eyes (raccoon eyes) or behind the ears (Battle sign), indicating a basilar skull fracture ( Fig. 26.5 ). Assess facial structures for any fractures.
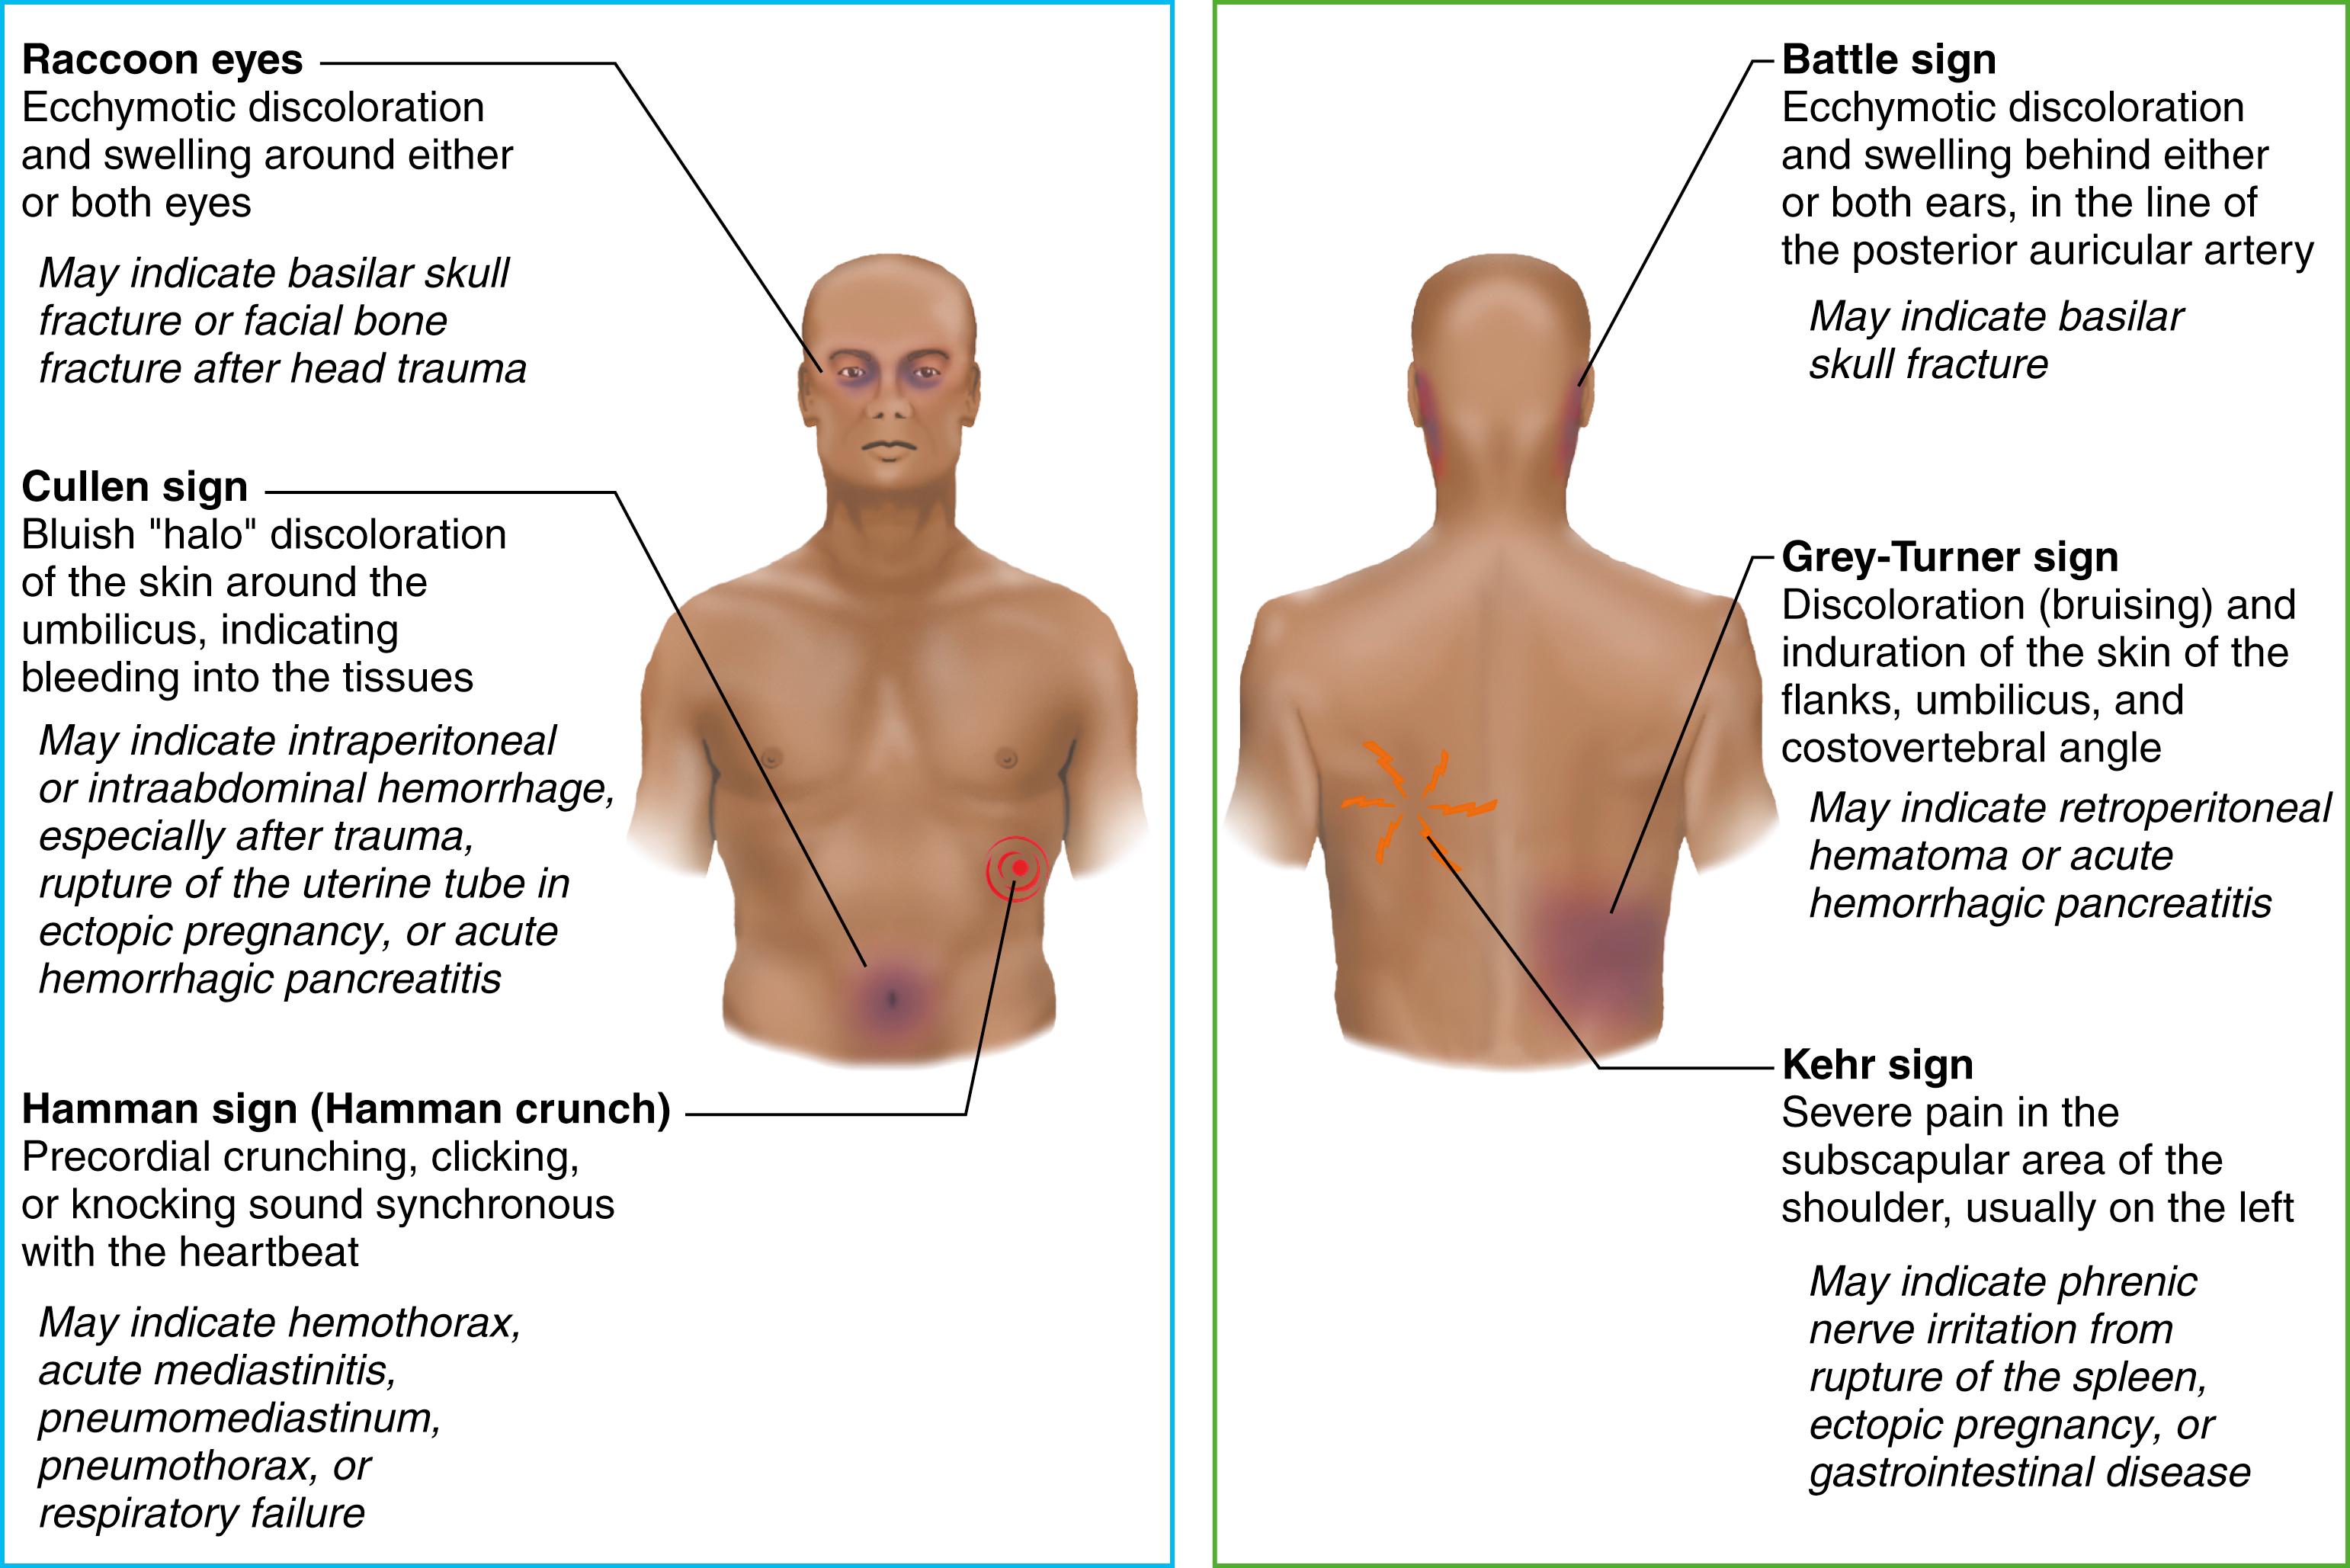
Examine the eyes for pupillary size and responsiveness to light. Examine the retinas and conjunctivae for hemorrhage, and the lens for dislocation. A quick visual examination of both eyes is performed by asking a conscious patient to read the words on the side of any container. Extraocular movements are also examined.
Inspect the neck for unexpected findings such as penetrating injury, bruising (e.g., seatbelt mark), and tracheal deviation from the midline. Palpate for deformity and crepitus. Auscultate the carotid arteries for bruits. Be certain that the neck is manually maintained in neutral position until radiographic studies confirm the absence of cervical injury when cervical injury is suspected. See Clinical Pearl “Identifying Risk for Cervical Spine Injury.”
Factors that place an injured patient at higher risk for cervical spine injury include a history of a fall from a height greater than 3 feet, or 5 stairs, high-speed motor vehicle crash with rollover or ejection, all-terrain vehicle crash, or bicycle collision with a fixed object. Injured patients 65 years or older are at greater risk. Assessment findings indicating higher risk include numbness or tingling of extremities, tenderness when cervical vertebrae are palpated in a patient fully conscious, able to report, not intoxicated, and unable to actively rotate the neck 45 degrees to the right and left (Ali et al. 2018).
Inspect the anterior and posterior chest for bruising and obvious signs of deformity. Palpate the sternum, each rib, and clavicle. Note pain and dyspnea. Blunt sternal pressure will be painful if any attached ribs are fractured. Patterns of bruising may indicate the mechanism of injury, such as a steering wheel or tire track, and may signal a possible pulmonary contusion.
Auscultate breath sounds at the apex, base, and midaxillary areas. Note any diminished or absent breath sounds, which may indicate a pneumothorax or hemothorax (bleeding into the pleural space). Auscultate the heart for clarity of heart sounds. Distant, muffled heart sounds may indicate cardiac tamponade, a life-threatening condition where blood fills the pericardial space; however, heart sounds may be difficult to hear in a noisy environment. Distended neck veins (increased jugular venous pressure) may indicate cardiac tamponade, pneumothorax, or any problem that causes obstruction of the cardiovascular system. However, hypovolemia may prevent distention of neck veins. A tension pneumothorax may manifest with decreased breath sounds, hyperresonance to percussion, and shock. Chest imaging is used to confirm examination findings when time permits.
Inspect the abdomen for bruising and distention. Gently palpate the abdomen, noting guarding and pain. Solid and hollow organs (e.g., intestines) in the abdomen may be ruptured as a result of blunt trauma and result in occult hemorrhage; pain and distention may indicate an underlying hemorrhage (see Fig. 26.5 ). Diagnostic imaging may be performed.
Inspect and palpate all extremities for signs of fractures or deformities, crepitus, pain, and lack of spontaneous movement. Palpation of the bones with rotational or three-point pressure along the shaft helps identify fractures where alignment has been maintained. Note any wounds over the site of a suspected fracture, the possible indication of an open fracture. Palpate all peripheral pulses. It is particularly important to document skin temperature, capillary refill time, and the presence of distal pulses in extremities with a suspected fracture.
Maintain cervical spine stabilization and alignment of the thoracic and lumbar spine when inspecting the back. Use three people to log-roll the patient.
Suspect pelvic fractures if bruising is seen over the iliac wings, pubis, labia, or scrotum and by pain on palpation. If the patient is unconscious, an experienced examiner should test for mobility of the pelvic ring by placing gentle anterior and posterior pressure against the iliac wings and symphysis pubis with the heels of the hands. The maneuver is not repeated as it can cause additional bleeding. Pelvic fractures are associated with occult hemorrhage, which may become a life-threatening condition.
Become a Clinical Tree membership for Full access and enjoy Unlimited articles
If you are a member. Log in here