Physical Address
304 North Cardinal St.
Dorchester Center, MA 02124
Chronic tenosynovitis (either traumatic, degenerative, or secondary to inflammatory arthritis), loss of continuity of the tendon (either complete or incomplete), and loss of the normal anatomic relationships of the tendon to its insertion or insertions (the accessory navicular) may render the posterior tibial tendon insufficient to perform its tasks of plantar-flexion, inversion, and stabilization of the medial longitudinal arch. For this reason, the term insufficiency of the posterior tibial tendon is descriptive. Further classification according to the just-mentioned etiologic factors is necessary for communicating the pathologic findings of this essential tendon of the foot. Other than the Achilles tendon, no other muscle-tendon unit distal to the knee can cause as many symptoms and functional deficits as loss of the posterior tibial tendon.
The etiology of progressive adult-acquired flatfoot deformity is multifactorial, and any pathologic condition that reduces the excursion of this tendon can produce the typical deformity of asymmetric flatfoot. It is important to note the difference between posterior tibial tendon insufficiency and flexible flatfoot deformity. With adult-acquired flatfoot deformity, the foot posture is acquired secondary to the insufficiency of the posterior tibial tendon, which leads to an asymmetric loss of arch. On the other hand, flexible pes planovalgus deformity (flexible flatfoot) is typically symmetric with a functioning posterior tibial tendon. This symmetric deformity is associated more with the patient’s underlying anatomic morphology than with acquired tendon dysfunction. Nevertheless, patients with an underlying valgus foot posture can still develop tendon dysfunction and worsening deformity. Increased valgus orientation of the posterior facet in the coronal plane and obesity have been associated with adult flatfoot deformity. In adult-acquired flatfoot deformity, the components of the deformity are hindfoot valgus, midfoot abduction at the midtarsal joint, and forefoot pronation, primarily at the midtarsal joint. This description applies best to the weight-bearing posture of the foot, and each component may vary in severity depending on the magnitude of posterior tibial dysfunction, the degree and location of the bony collapse of the medial longitudinal arch, the chronicity of the insufficiency, the rigidity of the deformity, and the configuration of the arch before the onset of posterior tibial tendon dysfunction.
The loss of the medial longitudinal arch can occur at the talonavicular, navicular-cuneiform, or cuneiform-metatarsal articulation or at more than one of these points. The weight-bearing lateral radiograph may show no collapse and may appear the same as the radiograph of the opposite, asymptomatic foot even with obvious clinical evidence of an asymmetric pes planus. To further complicate any discussion of posterior tibial tendon insufficiency, the nomenclature describing the components of the deformity is confusing. For example, it is obvious in the weight-bearing position that the heel is in valgus, the midfoot is in abduction, and the forefoot is in pronation. However, in reality, with the subtalar and midtarsal joints reduced anatomically (if the deformity is supple enough to allow it), the forefoot is not pronated but supinated, and in severe deformity this supination may be 60 to 70 degrees in the non–weight-bearing position. Restated in a different way, when examining the foot end-on with the hindfoot corrected to a neutral position, there is relative elevation of the first ray out of the neutral plane 60 to 70 degrees. Moreover, the terms forefoot varus and supination can be used interchangeably.
Recognition of secondary changes that occur in the hindfoot and forefoot with long-standing posterior tibial tendon insufficiency is important. As the hindfoot moves into valgus with midfoot pronation, changes occur in the ligamentous supporting structures of the medial arch, especially the spring ligament (calcaneonavicular ligament) in which significant stretching and elongation occur as it gradually loses support of the talar head. With increasing pressure and strain over the medial arch, the ligaments supporting the naviculocuneiform and cuneiform first metatarsal joints also may be elongated. In more severe cases, the deltoid ligament, especially the anterior or tibionavicular portion of the superficial deltoid ligament, may elongate, becoming a significant component of medial ankle instability. Deland et al. found that the most commonly involved ligament abnormality in this disease was the spring ligament but also demonstrated abnormalities in the anterior band of the superficial deltoid ligament, the plantar metatarsal ligaments, and the naviculocuneiform ligament.
Classification systems in general are useful only to the extent that they assist in planning treatment or in predicting the outcome of the condition. The classification system originally developed by Johnson and Strom in 1989 is useful in the management of posterior tibial tendon insufficiency. Stage I disease is characterized by swelling, pain, inflammation, and often effusion within the posterior tibial tendon sheath. Irritability is noted with passive eversion of the foot along the course of the posterior tibial tendon. Mild weakness to manual testing may be present; however, no deformity of the foot is demonstrated when compared with the opposite foot. The patient is able to invert the foot actively on a double-leg toe raise test and is able to perform a single-leg toe raise as described in the next section. Stage II disease is characterized by the loss of function of the posterior tibial tendon and inability to perform a single-leg toe raise. There is attempted compensation by use of the anterior tibial muscle and tendon unit as an accessory inverter of the hindfoot. In stage II disease the hindfoot remains flexible. With the hindfoot in neutral the forefoot can be brought into neutral. Generally, mild lateral or sinus tarsi impingement pain is present. Bluman et al. added two subcategories to Johnson and Strom’s original classification: in stage IIA, less than 30% of the talar head is uncovered on standing anteroposterior radiographs and abduction deformity is minimal; in stage IIB, more than 30% of the talar head is uncovered and the abduction deformity is severe. In stage III disease, function of the posterior tibial tendon is lost, and a semirigid or rigid hindfoot deformity with valgus abduction occurs and degenerative changes may be apparent on radiographs. Significant lateral sinus tarsi pain is present. Stage IV disease was described by Myerson et al. and involves valgus positioning and incongruence of the ankle joint in addition to stage III findings.
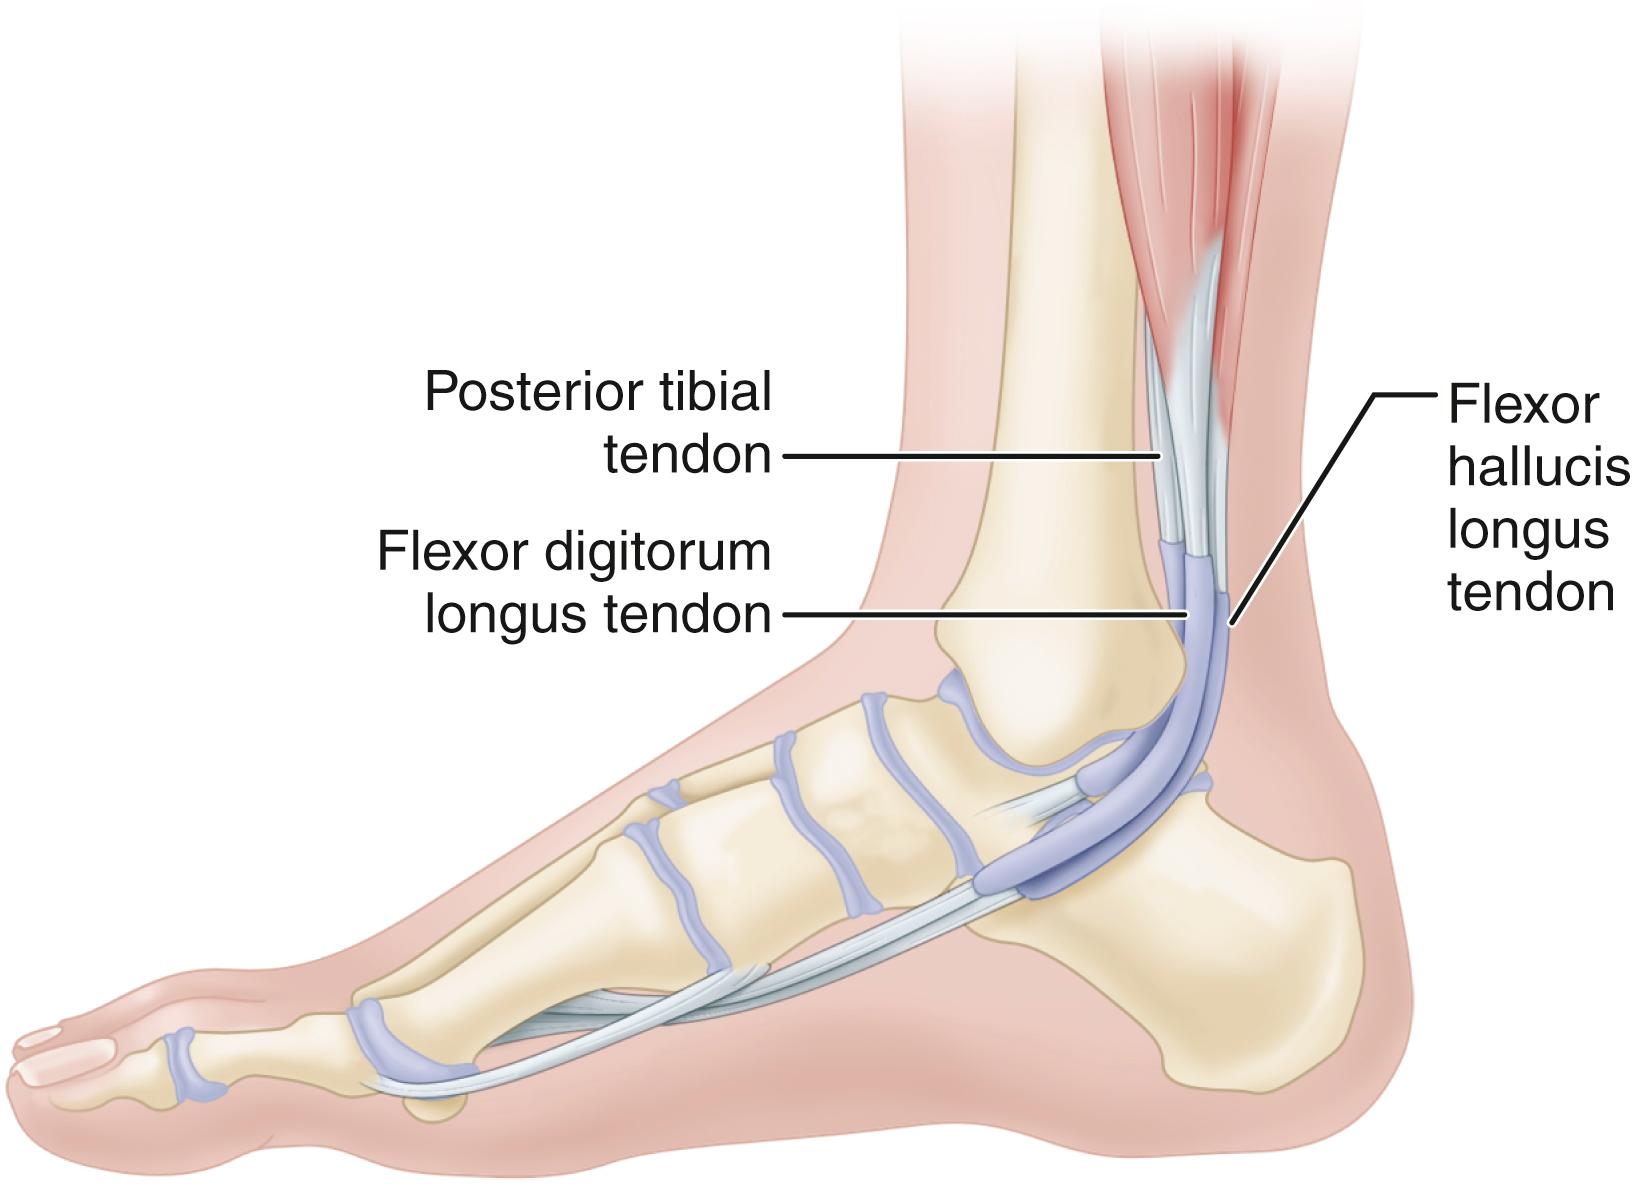
The pertinent physical findings accompanying posterior tibial tendon insufficiency are illustrated in Figs 83.1 to 83.3 .
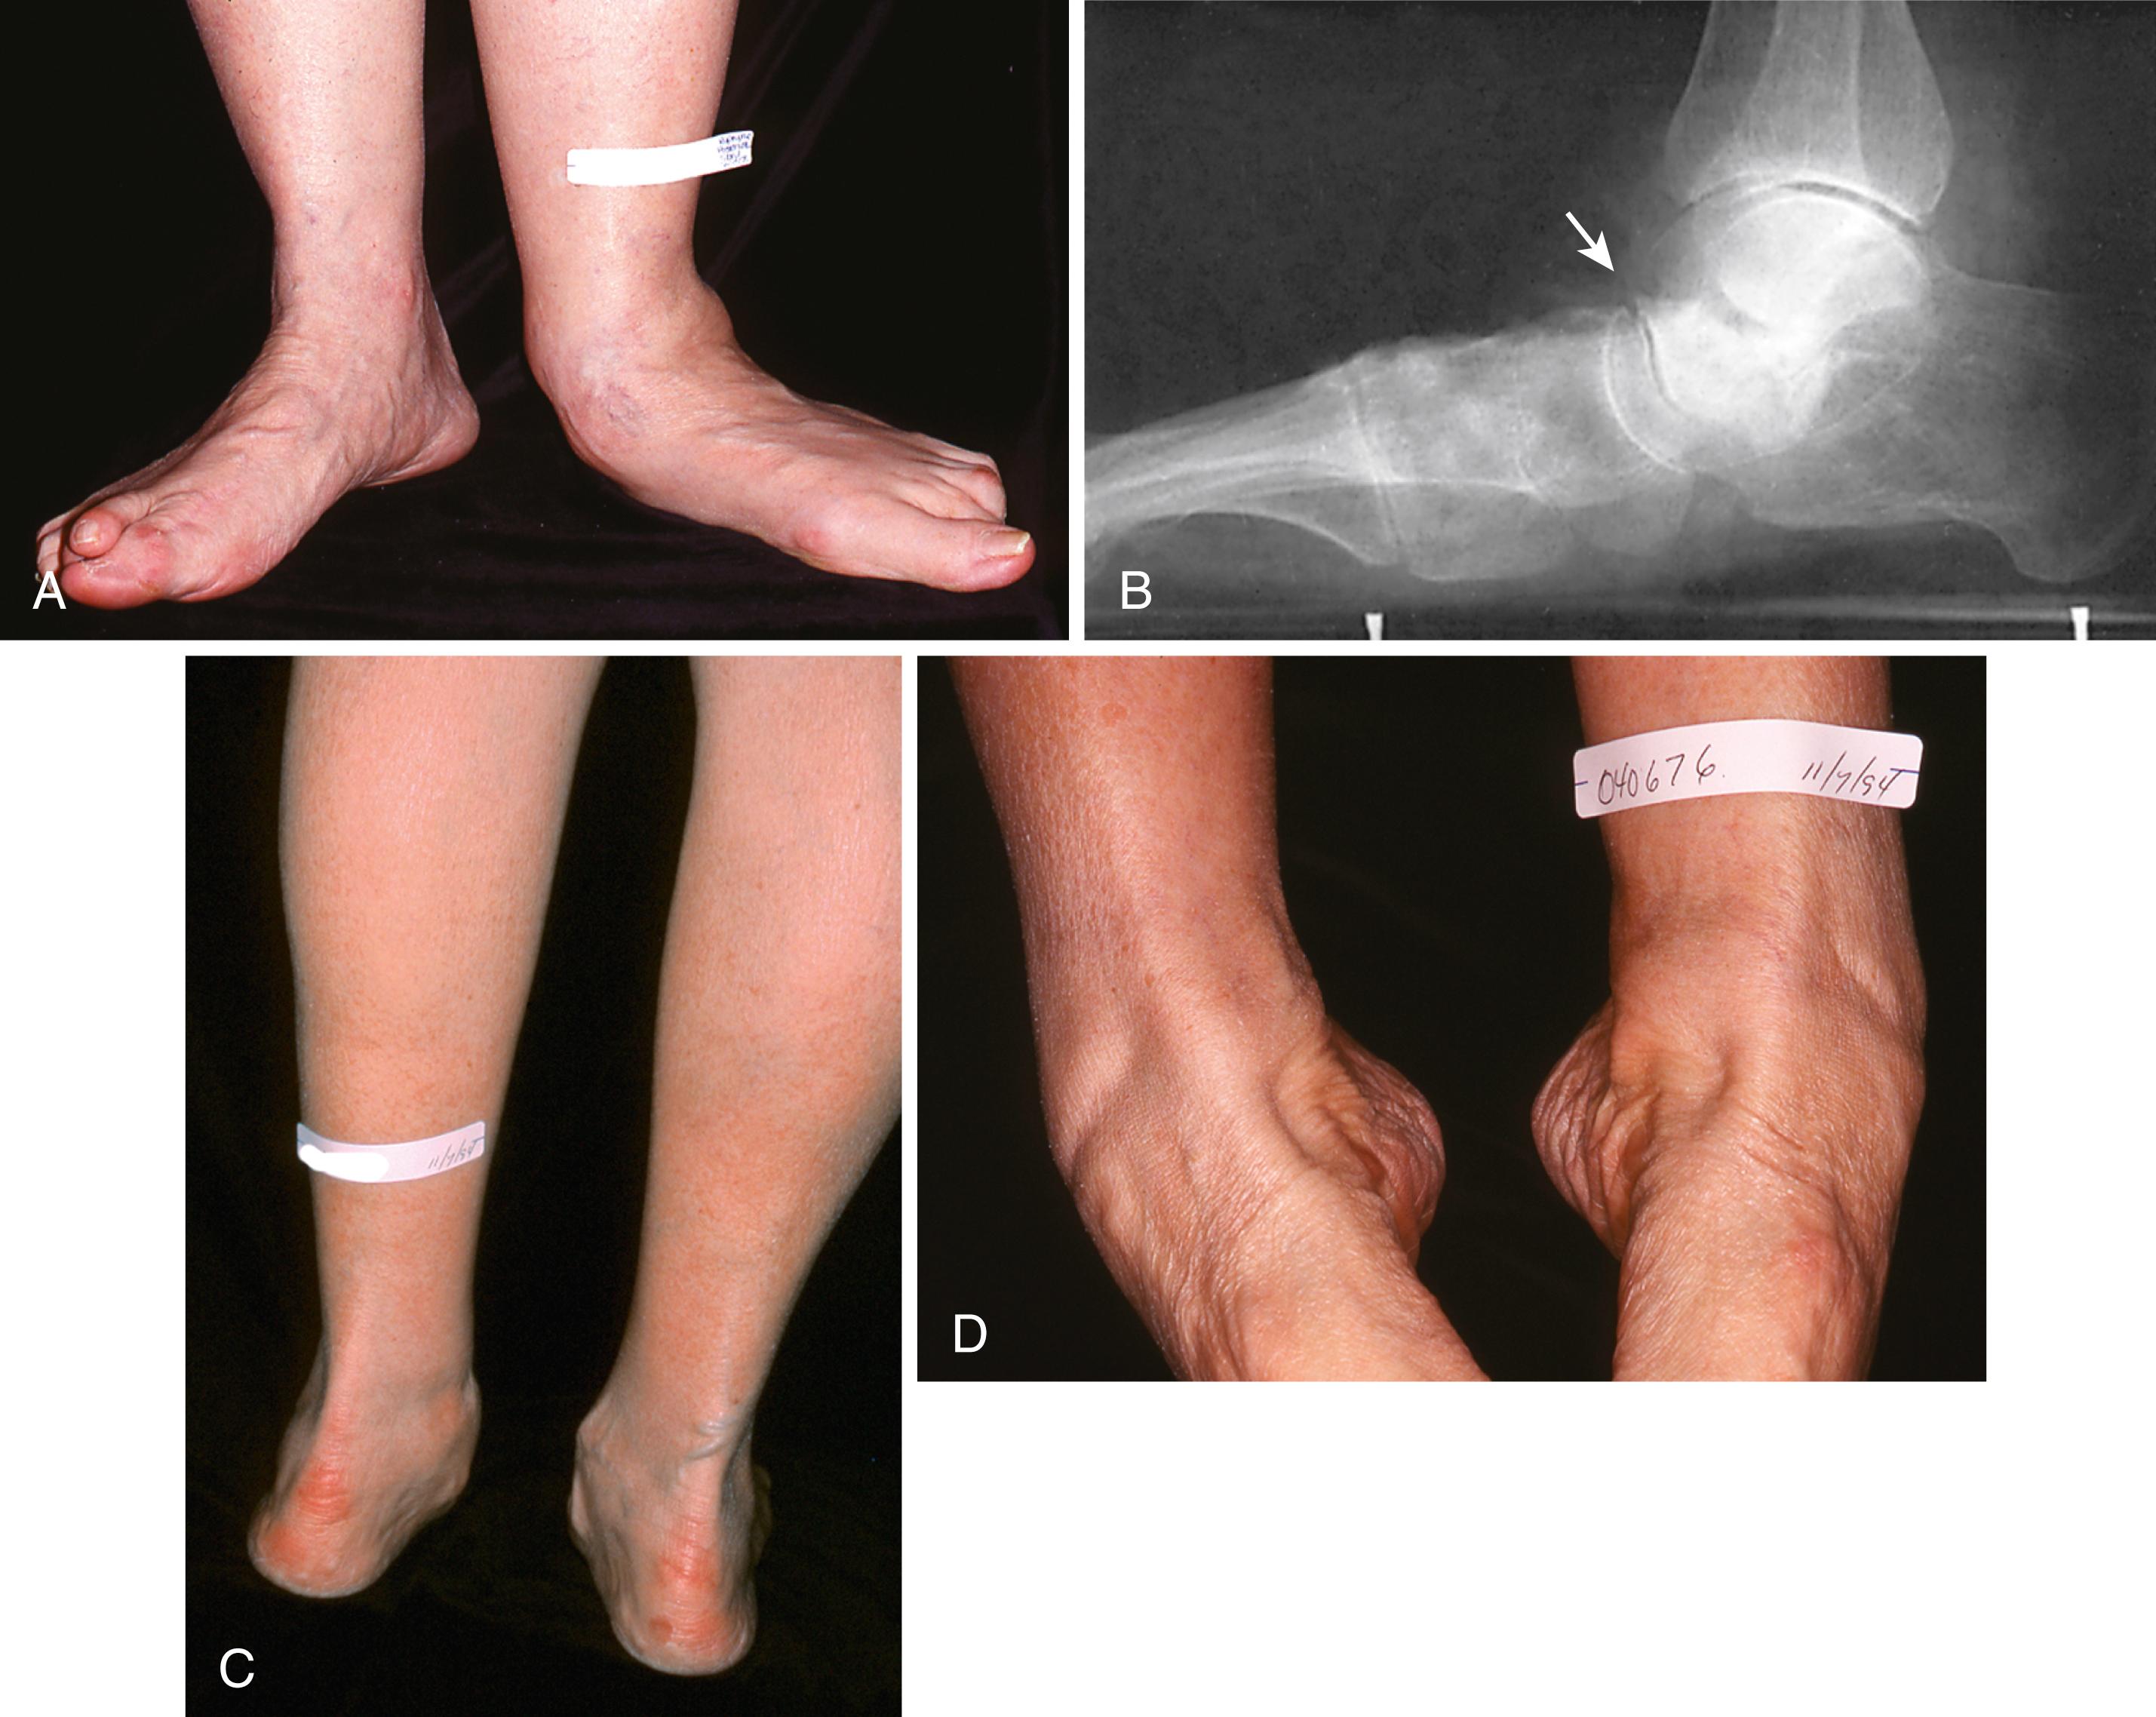
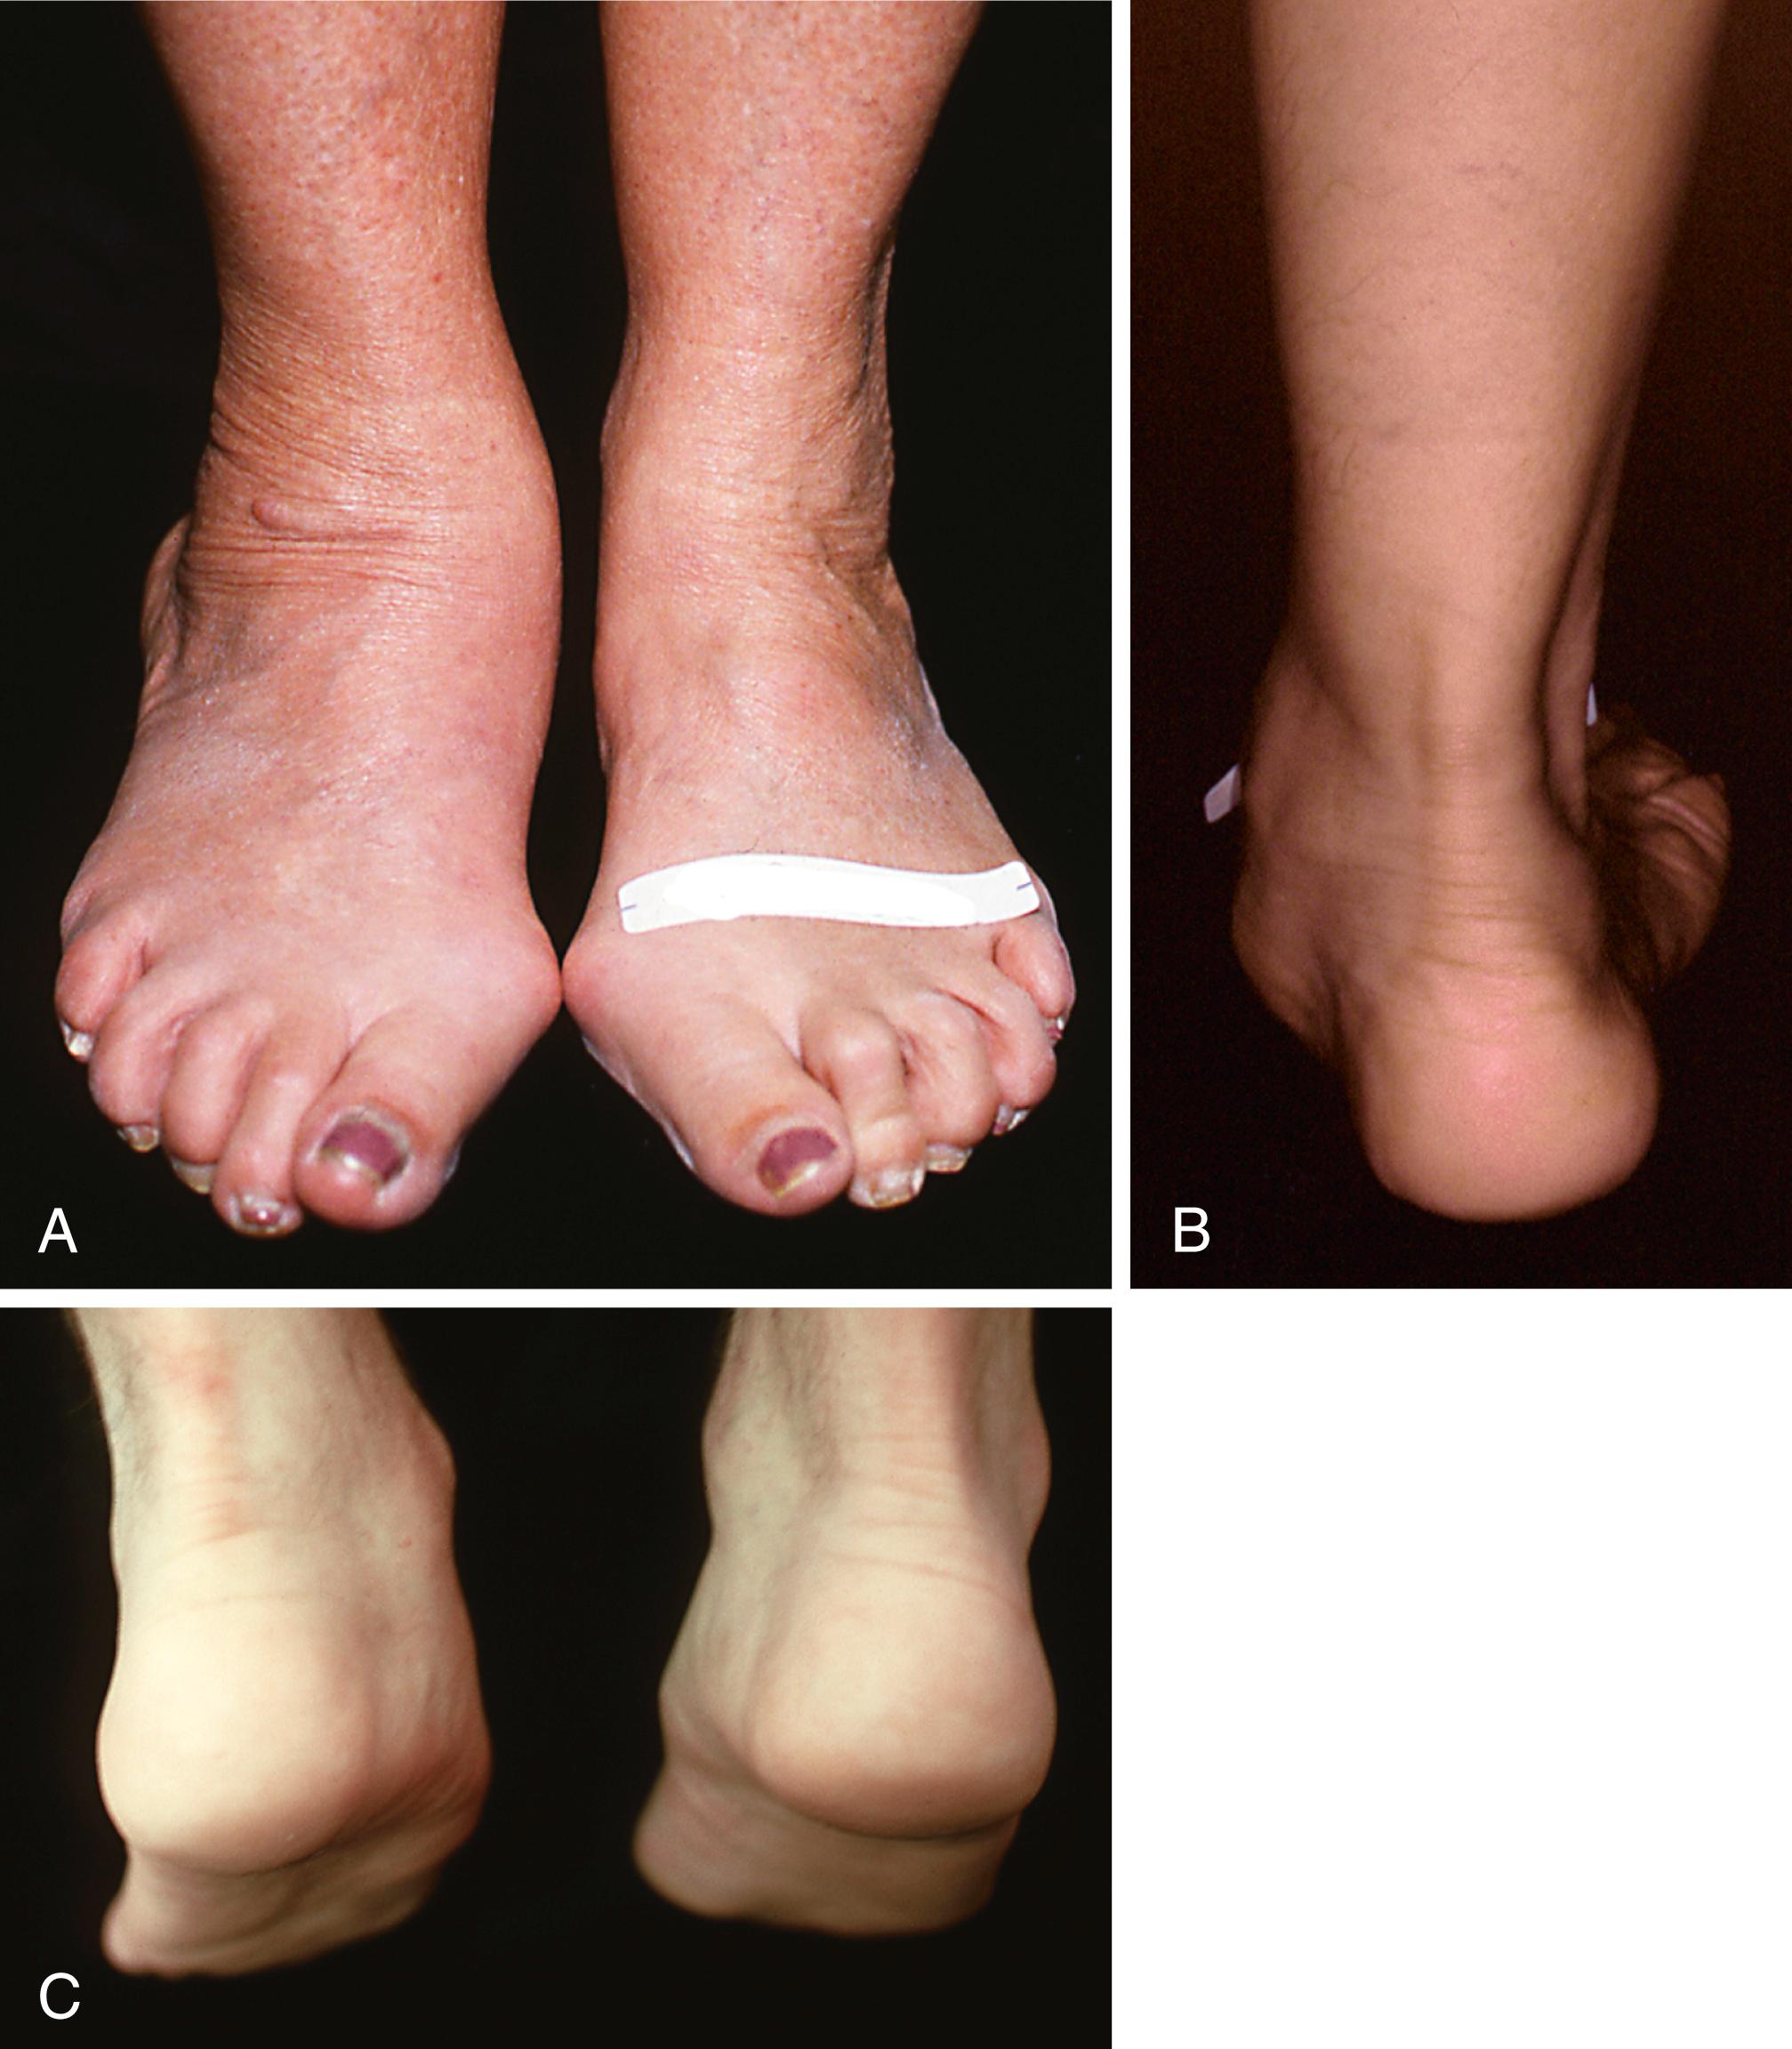
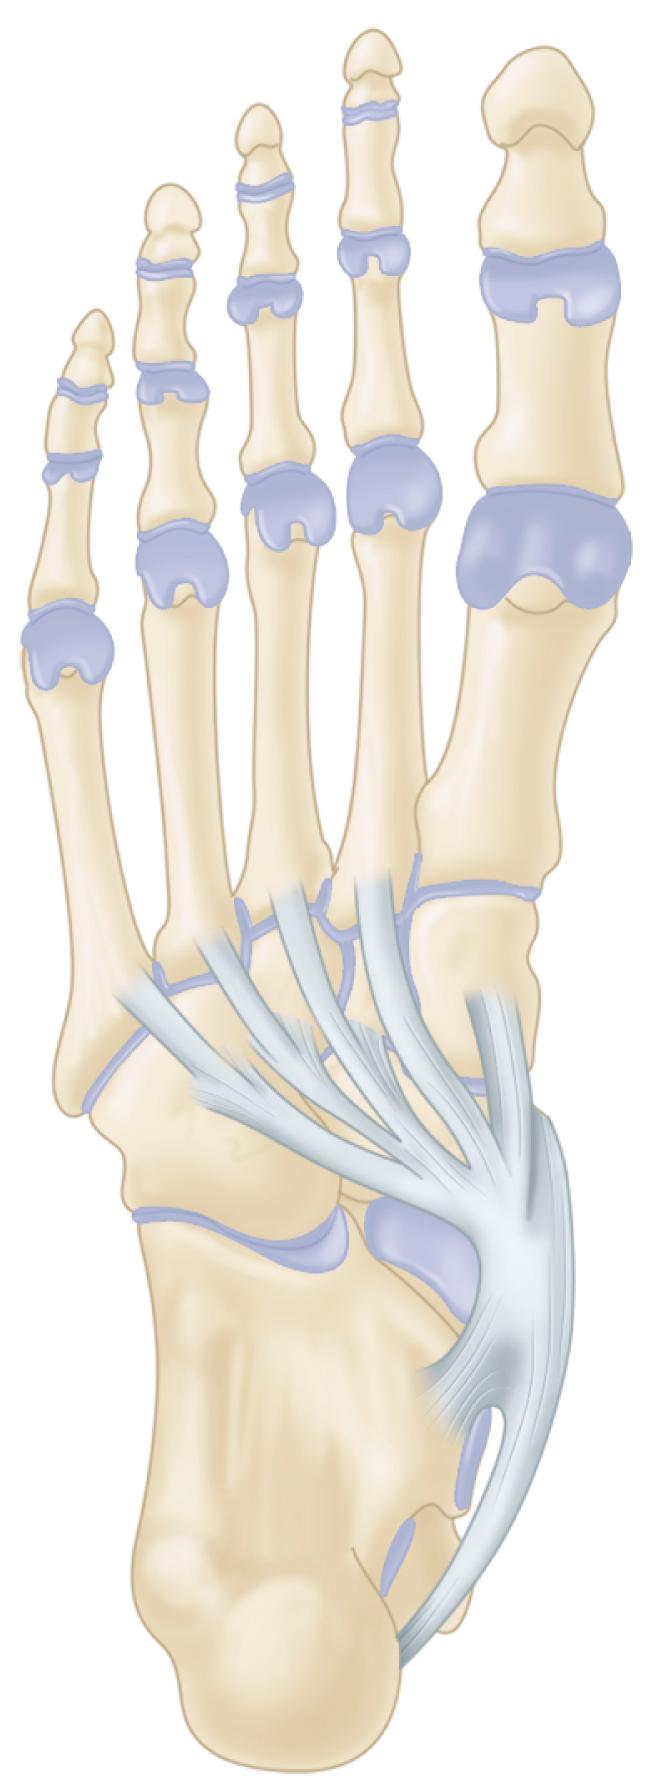
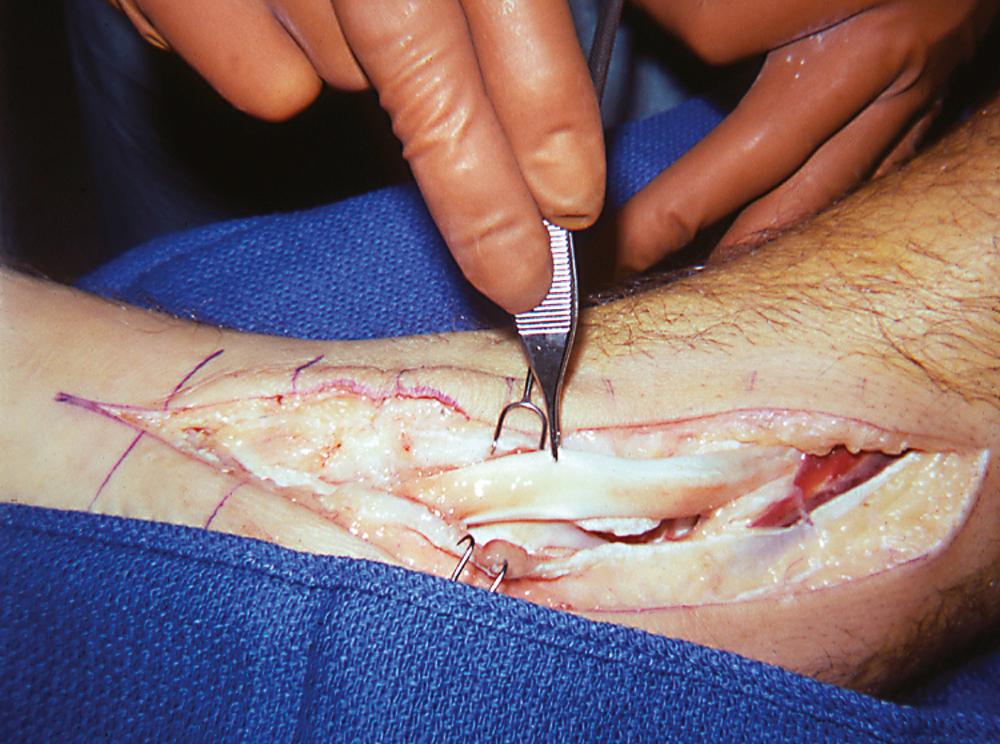
A patient may have a variety of symptoms depending on the cause and chronicity of the insufficiency. If recurrent bouts of tenosynovitis are the cause, medial ankle and hindfoot pain may predominate. If the tenosynovitis goes unchecked, loss of excursion of the tendon may result either from mechanical blockage beneath the laciniate ligament that prevents the inflamed, edematous tendon and sheath from moving within the pulley system or from loss of voluntary contraction of the muscle-tendon unit because of pain. In other words, the patient “decommissions” the muscle-tendon unit because contraction is painful. With time, this becomes involuntary. The tendon can be palpated by the examiner at the medial malleolus by placing the foot in equinovarus and asking the patient to hold it there. Usually the deformity is not severe in tenosynovitis as long as continuity of the tendon is not lost ( Fig. 83.4 ).
Patients may report foot and ankle fatigue after only limited activity, lack of support during ambulation, and limitation of footwear as a result of the foot “rolling out.” However, pain is the most common primary complaint. This pain is medial at first, but with long-standing pronation it localizes laterally where the anterior surface of the lateral process of the talus impinges on the floor of the sinus tarsi (see Fig. 83.1B ). The deformity can become fixed, in which case lateral pain may become the presenting complaint. There may be a history of an acute injury with rapid collapse of the arch, but usually no traumatic event is noted by the patient, and gradual collapse of the arch is recalled.
Many authors have added to our understanding of the physical examination of the posterior tibial tendon–insufficient foot, but Mann, Specht, and Johnson emphasized that moving the heel into varus when raising the heel off the ground is difficult at best and virtually impossible if standing only on the affected foot. Therefore, in addition to examining the characteristic posture of the foot on weight bearing, the examiner should have the patient toe-stand while holding on to the examiner or the examining table for balance only and not support (single-limb heel rise). Some patients with supple deformities are able on toe-stand to “throw” the hindfoot-midfoot into a locked position, thereby inverting the heel even in the presence of complete loss of continuity of the tendon, but careful observation reveals the foot “jumping” into that position while gaining momentary support from the examiner or the examining table and using the gastrocsoleus muscle as the motor unit. Gradually rising on only the affected foot to the tip-toe position and inverting the heel at the end stage without concomitant external support is not possible for a patient with complete loss of continuity of the tendon.
DeOrio et al. described the “posterior tibial edema sign” in which the presence of subcutaneous pitting edema along the course of the posterior tibial tendon correlated with MRI findings of disease in 88% of patients. It is also important to evaluate the gait of patients with a suggested posterior tibial tendon pathologic process. In a normal, unaffected hindfoot the stance phase of gait begins with the hindfoot in a neutral to slightly inverted position. Through midstance a valgus hindfoot position is obtained, and at terminal stance or toe-off position the hindfoot inverts, locking the midtarsal joint to produce a rigid lever for push-off. For the patient with posterior tibial tendon insufficiency, failure to invert the foot at the terminal stance position occurs. The inability to lock the hindfoot and produce a rigid lever during the point of gait at which most stress is placed through the arch of the foot creates a high strain level and ultimately pain through the arch.
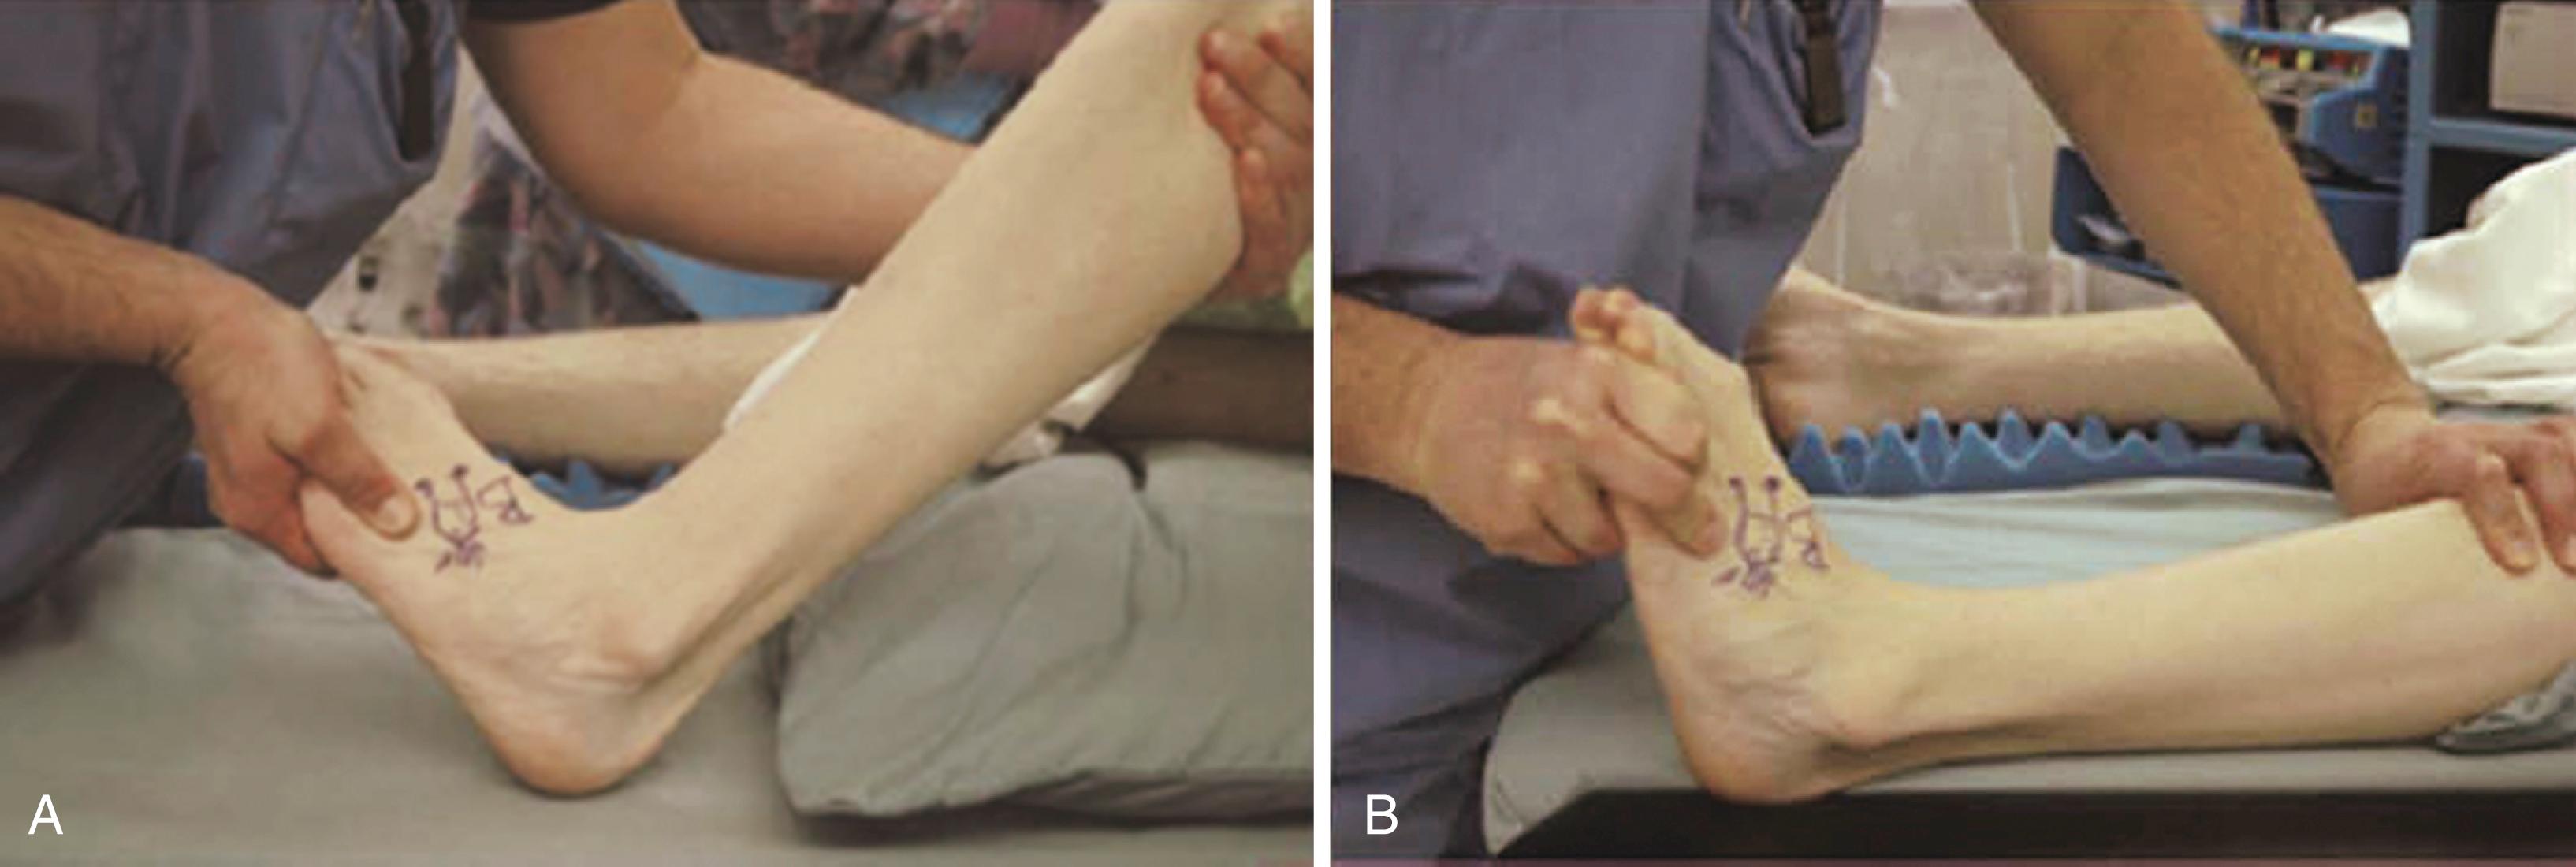
Contracture of the gastrocnemius or gastrocsoleus complex frequently accompanies this condition early in the course of the disease. The hindfoot valgus position shortens the moment arm for the heel cord, leading to the contracture. By preventing dorsiflexion and inversion, the contracture further worsens the hindfoot valgus. The Silfverskiöld test is used to determine selective gastrocnemius muscle and gastrocsoleus (Achilles) contracture ( Fig. 83.5 ). Treating the contracture conservatively or surgically is vital for successful treatment of posterior tibial tendon insufficiency.
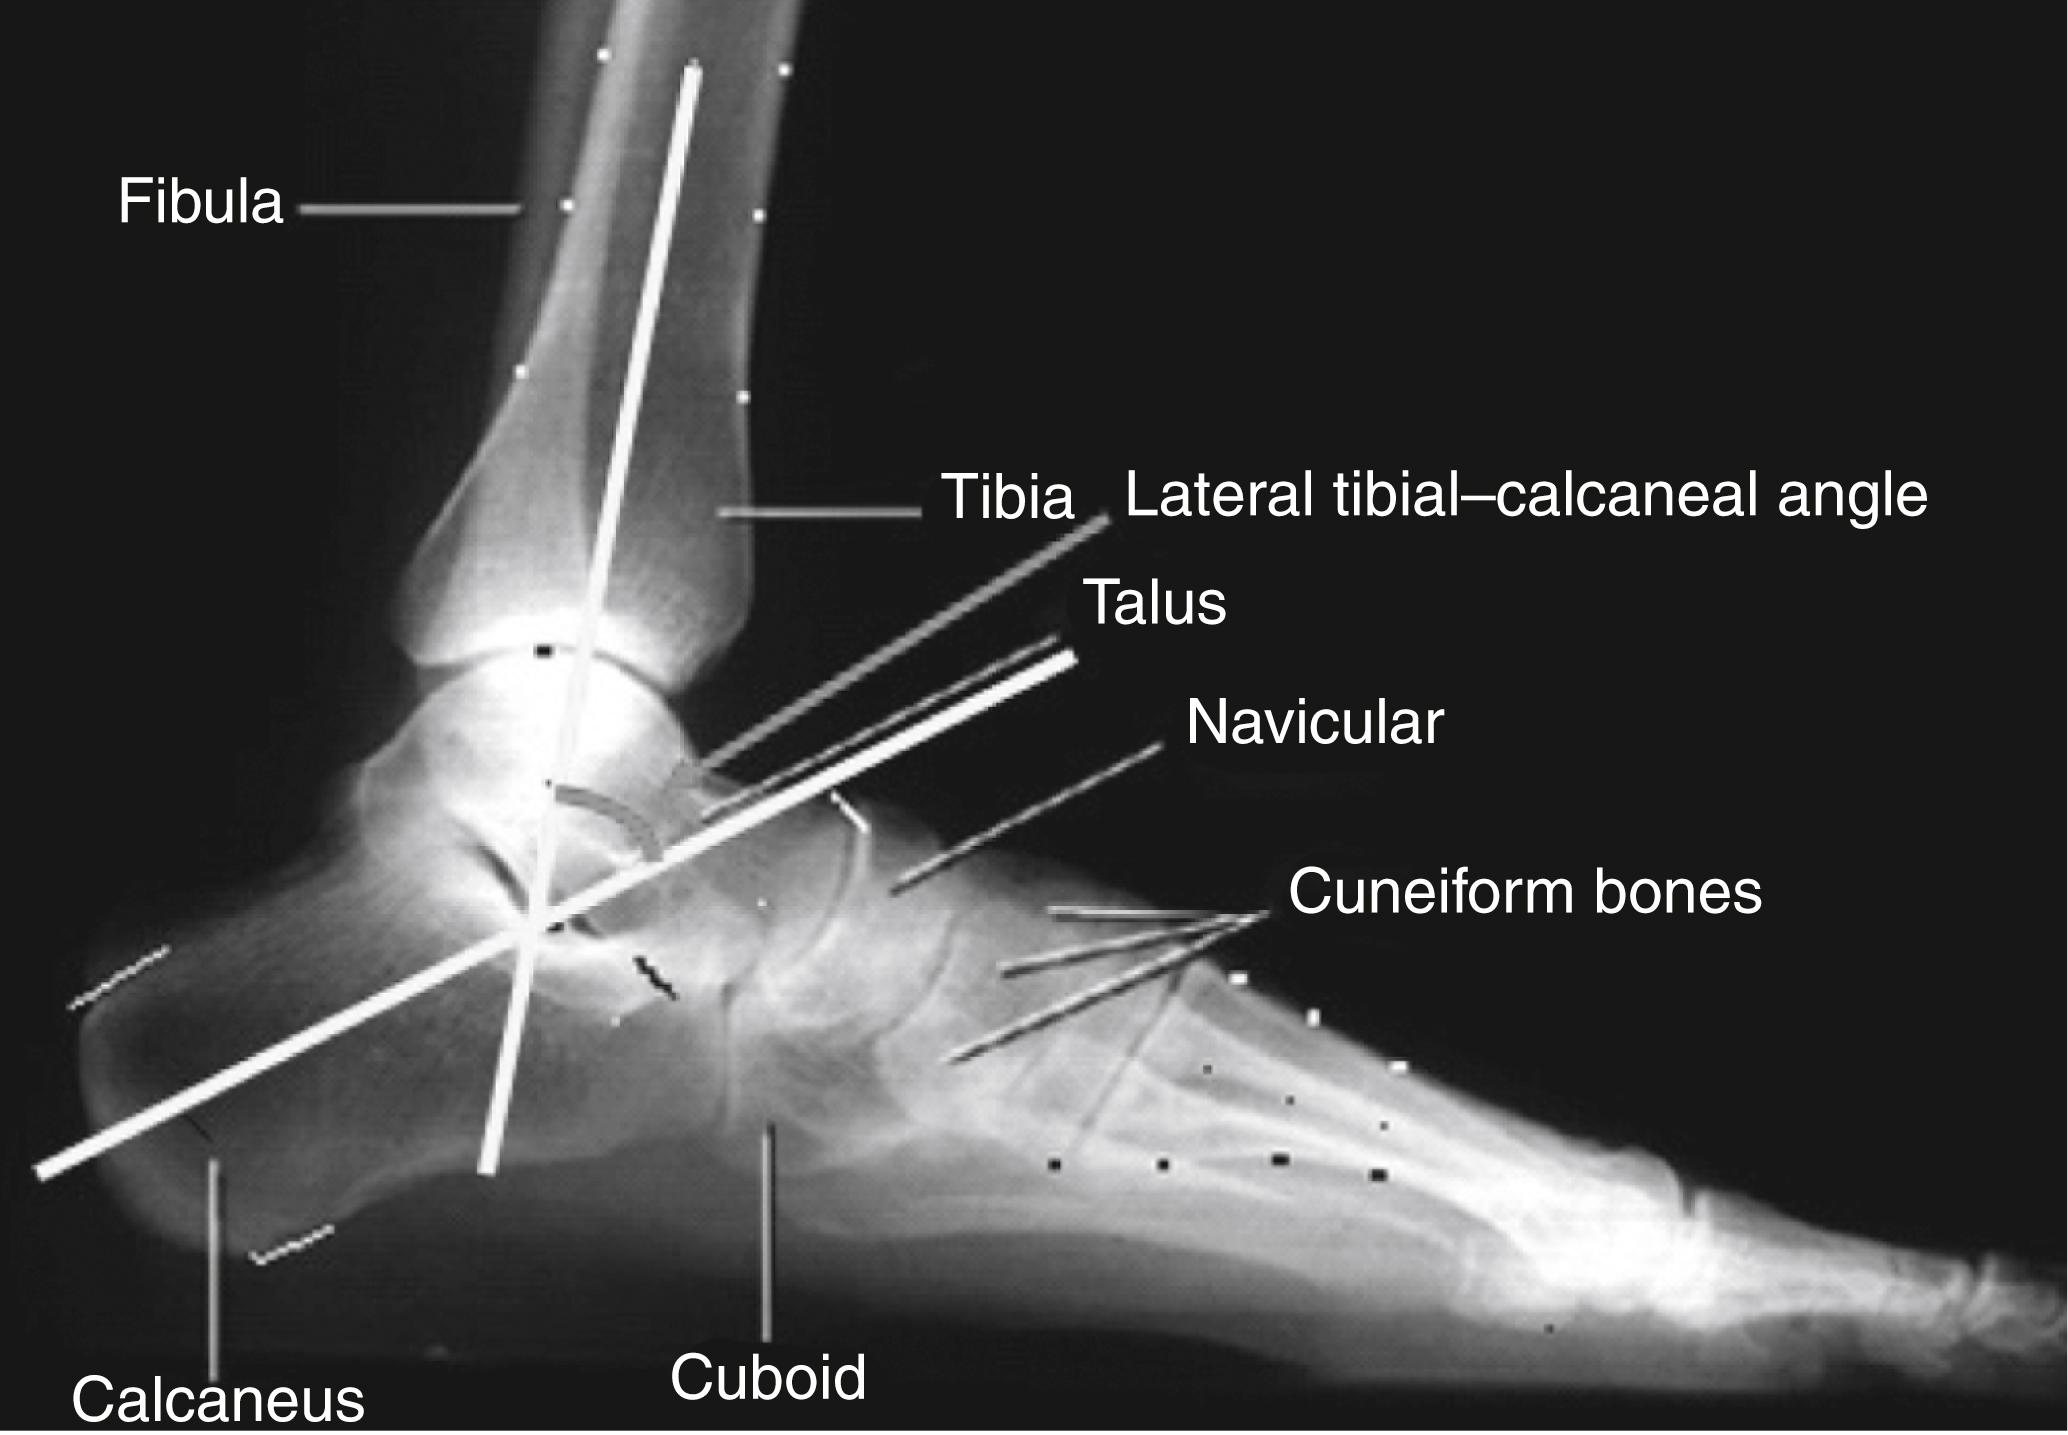
Radiographic evaluation with standing anteroposterior and lateral views may or may not be helpful even with obvious clinical evidence of asymmetric pes planus. If the tendon is intact and the diagnosis is recurrent tenosynovitis, radiographs usually are normal even with some degree of flattening of the medial longitudinal arch clinically. More commonly, radiographs demonstrate changes as deformity occurs from tendon insufficiency. Radiographic parameters commonly used in the evaluation of posterior tibial tendon dysfunction include the lateral talus–first metatarsal angle, hindfoot alignment angle, hindfoot moment arm, calcaneal pitch, and talonavicular coverage angle.
In a normal foot, the talus–first metatarsal angle is 0 to 10 degrees on a standing lateral view. An increased angle indicates loss of the medial longitudinal arch. Overlapping metatarsals or loss of height of the medial cuneiform also indicates depression of the medial longitudinal arch. Loss of the calcaneal pitch angle may indicate both loss of the longitudinal arch and contracture of the gastrocsoleus complex. The standing lateral tibial-calcaneal angle ( Fig. 83.6 ) has been found to be significantly increased in adults with flatfeet and Achilles tendon contracture, suggesting that this angle is a sensitive, reproducible, cost-effective method of identifying and quantifying Achilles tendon contracture in patients with adult-acquired flatfoot.
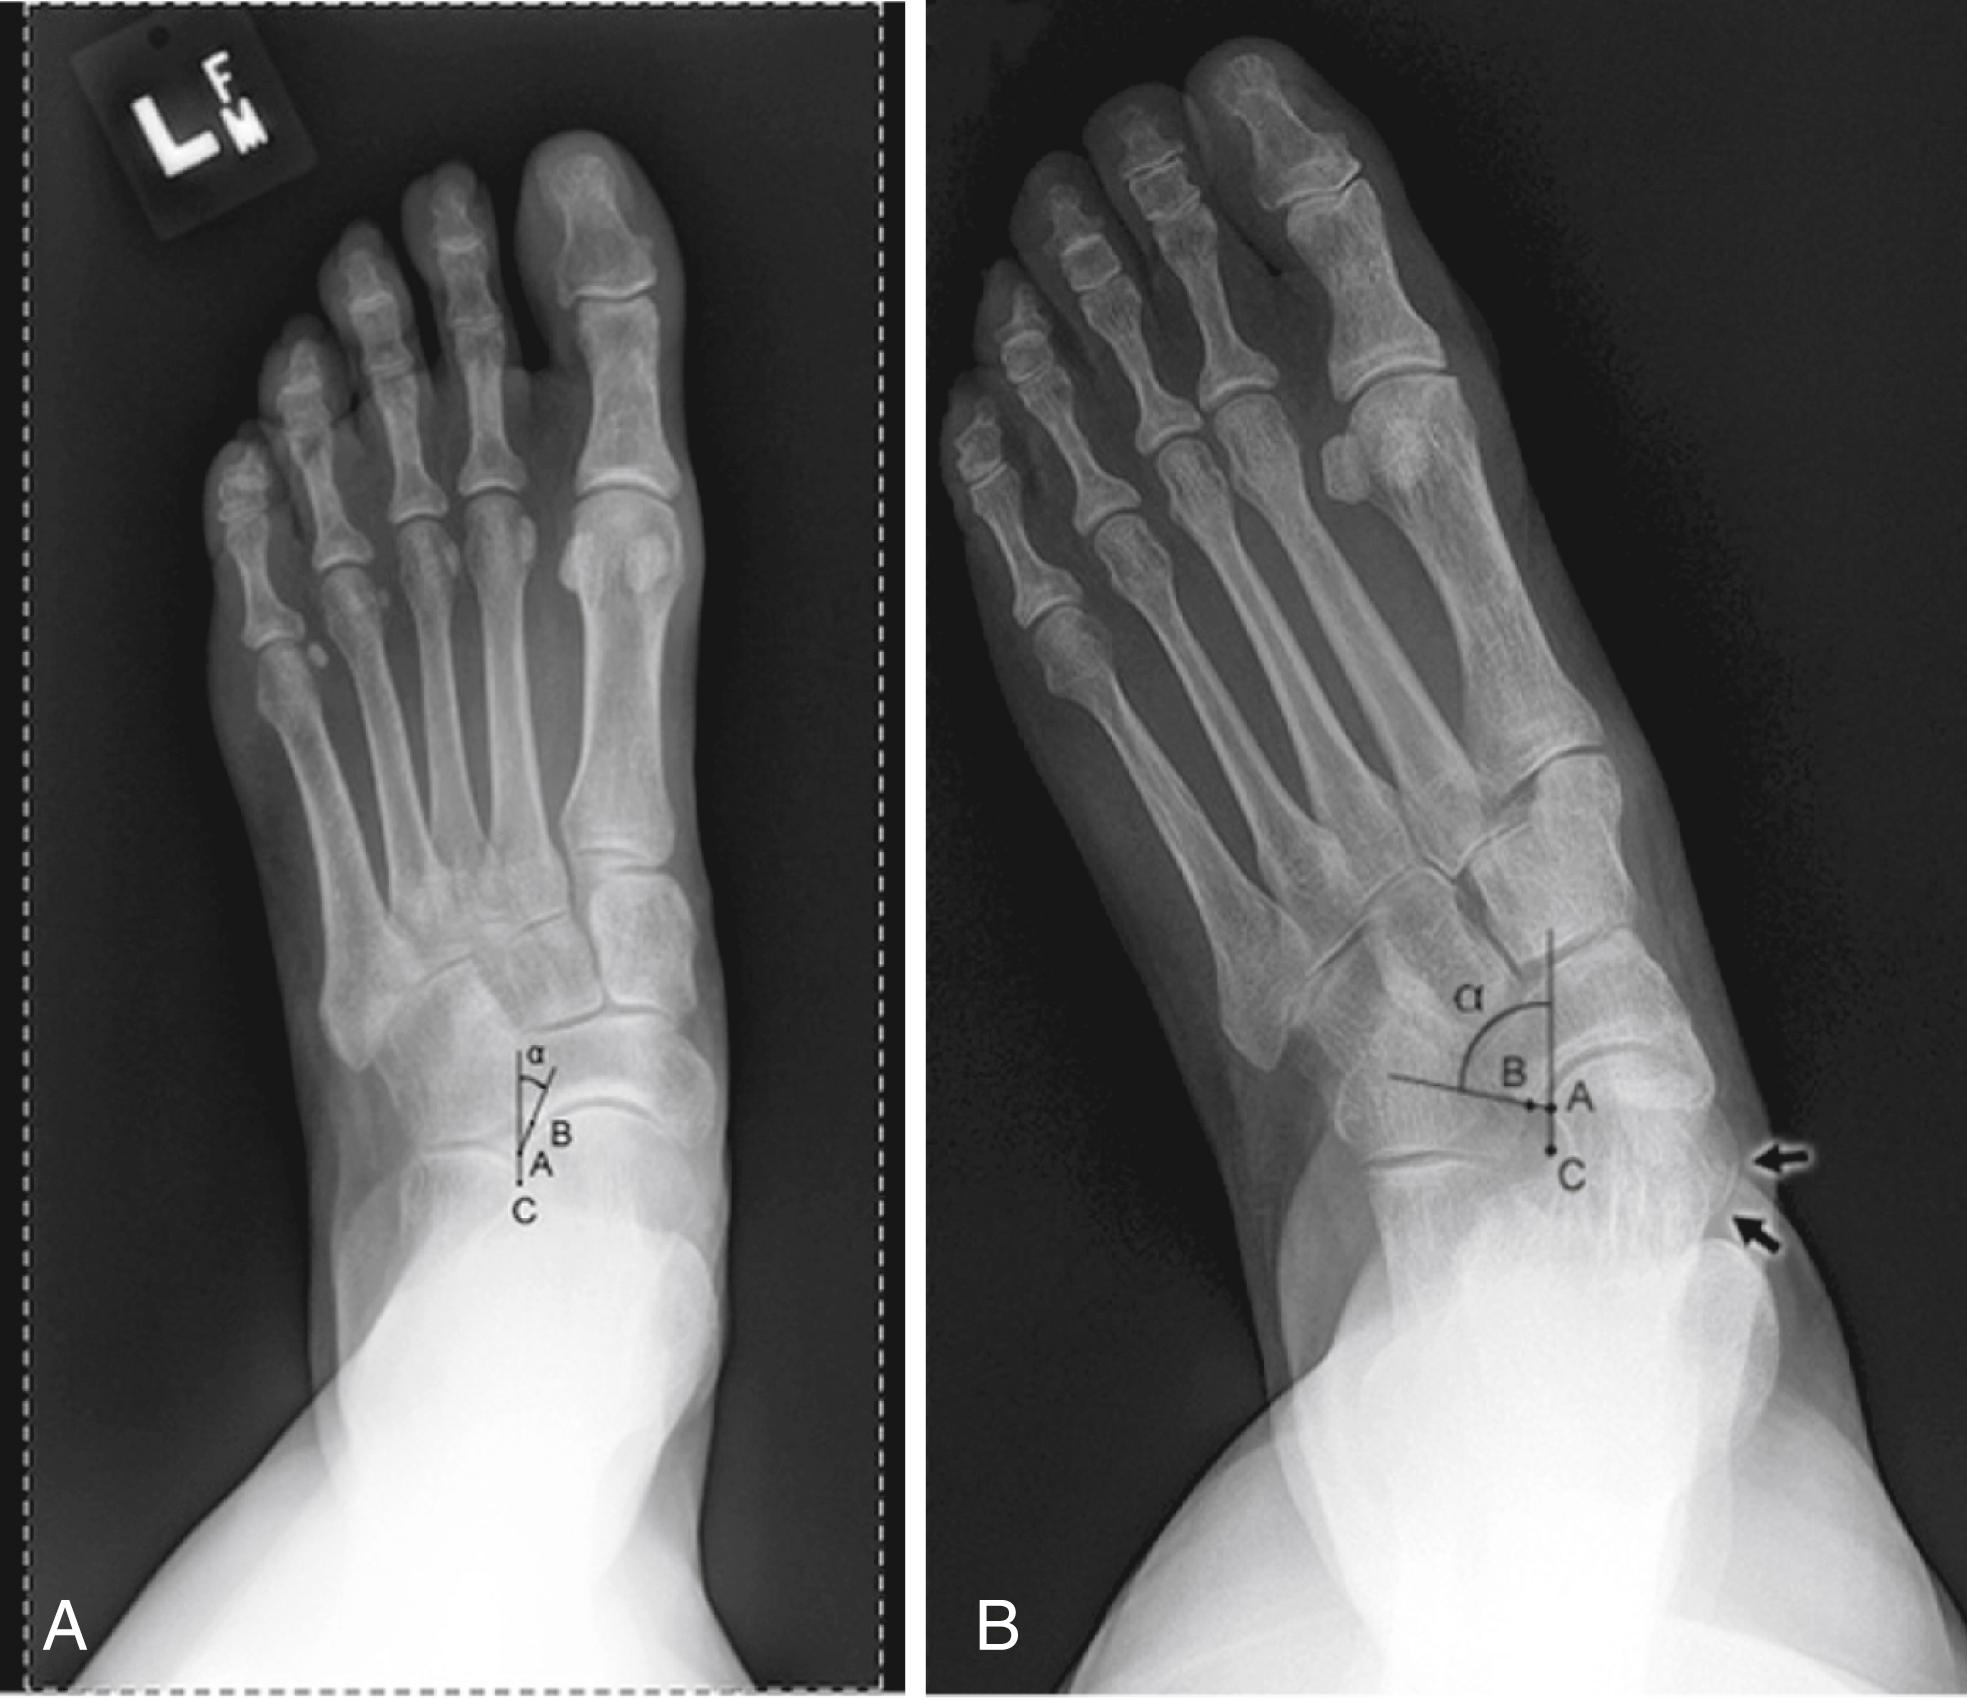
On the standing anteroposterior view, abduction of the forefoot through the midfoot may be characterized by an increase of the talus–first metatarsal angle, which normally should be 0. Additionally, a line drawn through the shaft of the second metatarsal should bisect the hindfoot angle that is formed by the intersection of lines along the longitudinal axis of the talus and calcaneus. Ellis et al. described two measurements for differentiating between mild (type IIa) and severe (type IIb) posterior tibial tendon insufficiency based on the degree of talonavicular abduction: lateral talonavicular incongruency angle and incongruency distance. The lateral talonavicular incongruency angle was significantly increased in those with type IIb insufficiency ( Fig. 83.7 ), whereas the incongruency distance did not vary significantly between the two groups.
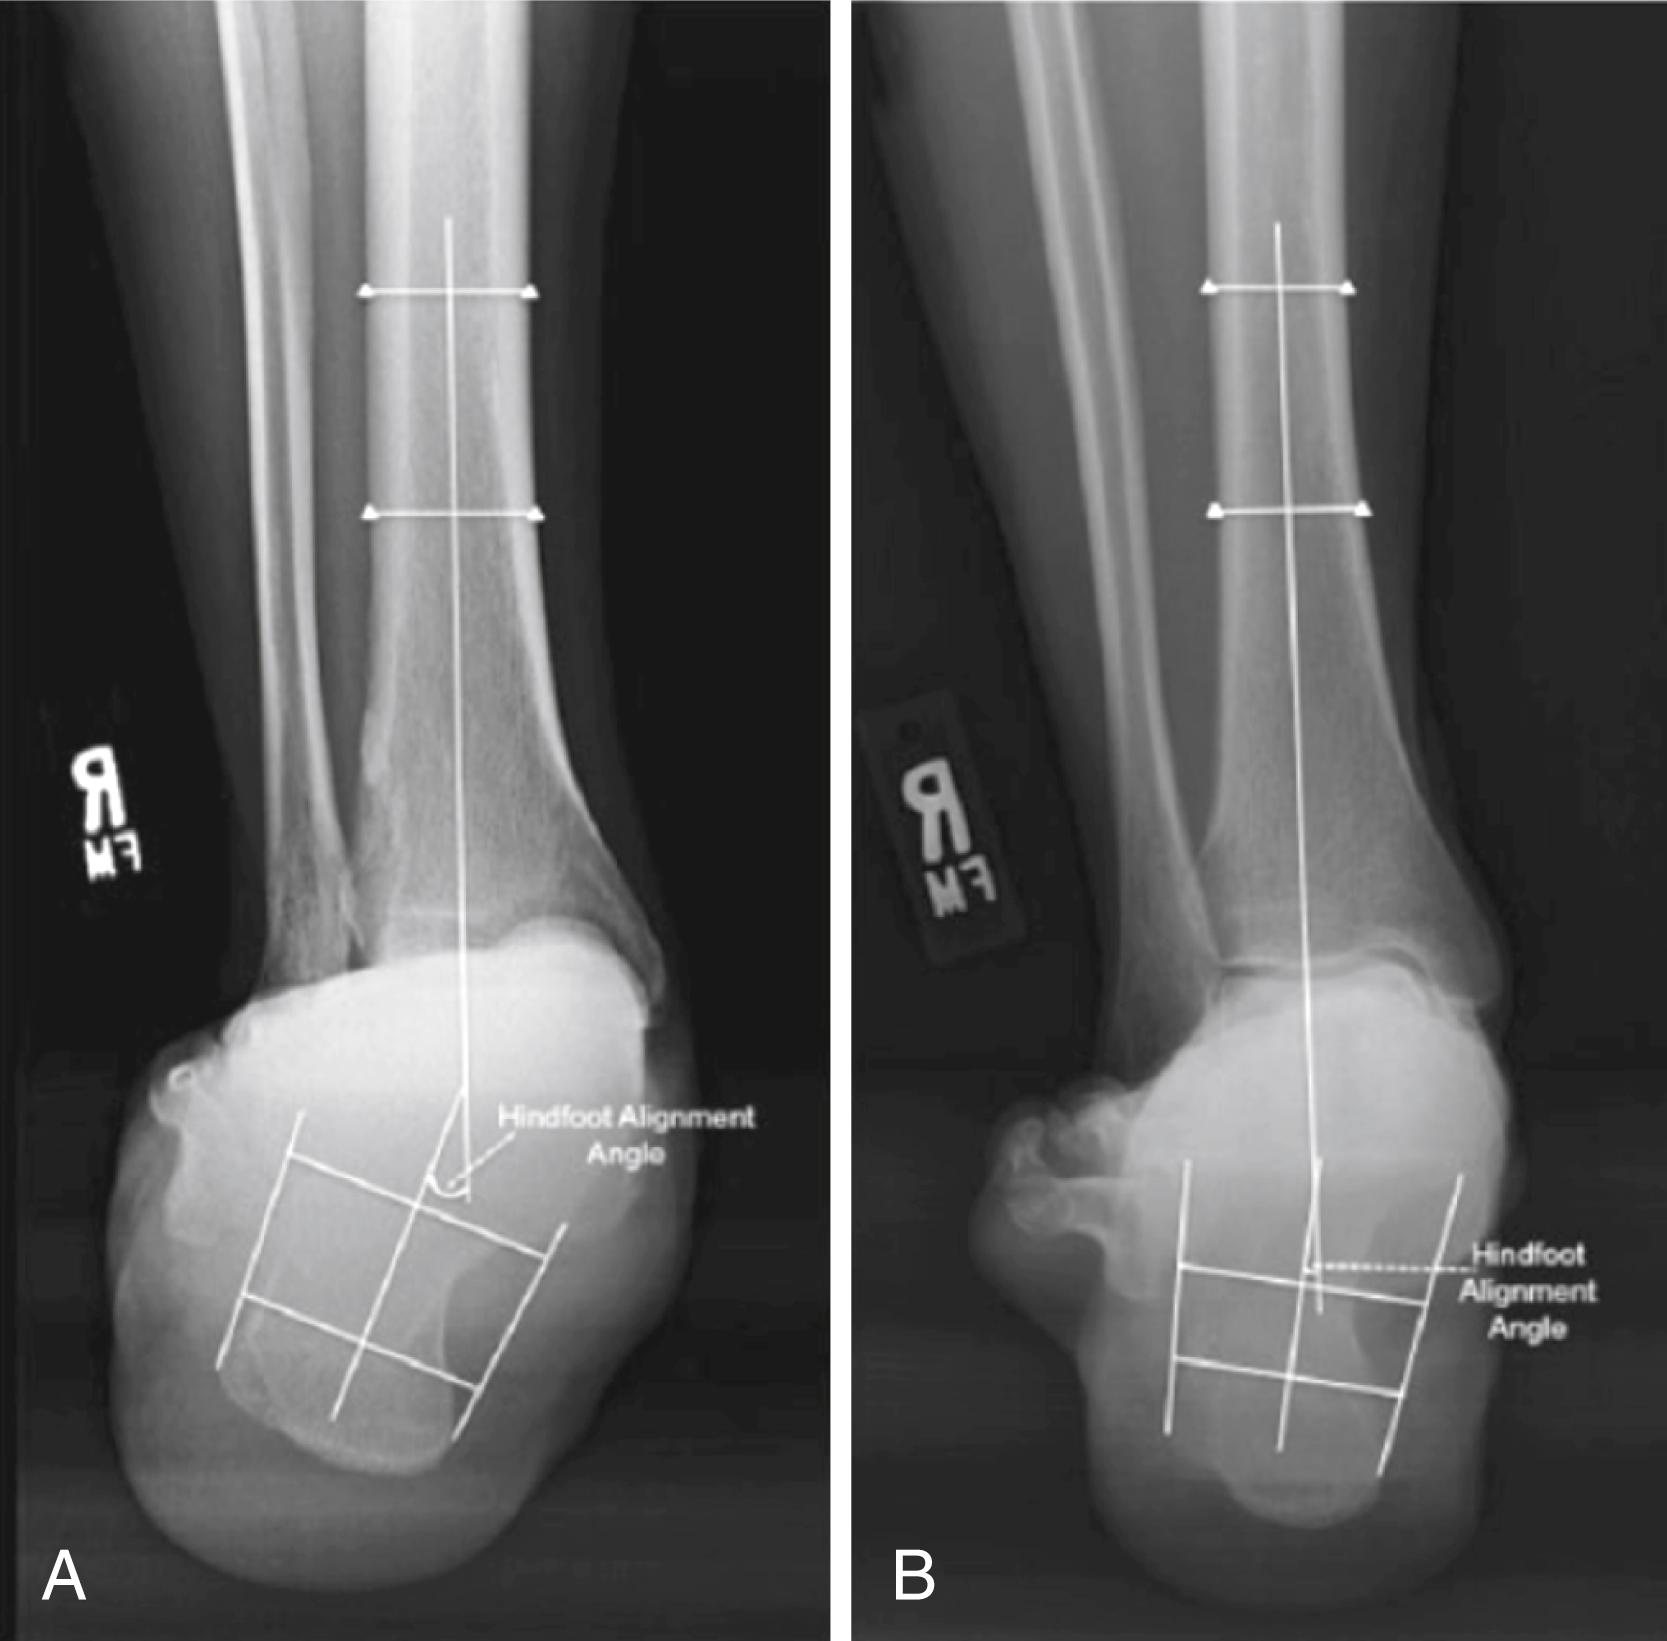
Saltzman et al. modified Cobey’s method for radiographically imaging the coronal plane alignment of the hindfoot to quantify hindfoot valgus with the hindfoot moment arm measurement. More recently, Williamson et al. described the hindfoot alignment angle ( Fig. 83.8 ), which correlated significantly with the hindfoot moment arm and was found to be a reliable measure of hindfoot valgus. Furthermore, hindfoot alignment radiographs demonstrate more pronounced valgus than clinical evaluation. In addition to standing foot radiographs, standing ankle radiographs are also useful in the diagnosis of tibiotalar joint valgus present in stage IV disease.
MRI has become a useful tool in evaluation of posterior tibial tendon insufficiency. Often it is helpful to know if a patient with a swollen, painful tendon and tendon sheath has degenerative changes within the tendon, tearing of the tendon, or simply peritendinitis with synovial effusion without tendon degeneration. MRI can aid in making the diagnosis. T2-weighted and fat-suppressed images are helpful in showing peritendinous effusions, as well as cystic degeneration within the tendon ( Fig. 83.9 ). T1-weighted images are helpful in showing the anatomic contours of the tendon and whether a disruption of the tendon has occurred. MRI also can aid in the diagnosis of spring ligament and tibionavicular ligament injury, two important medial arch stabilizers.
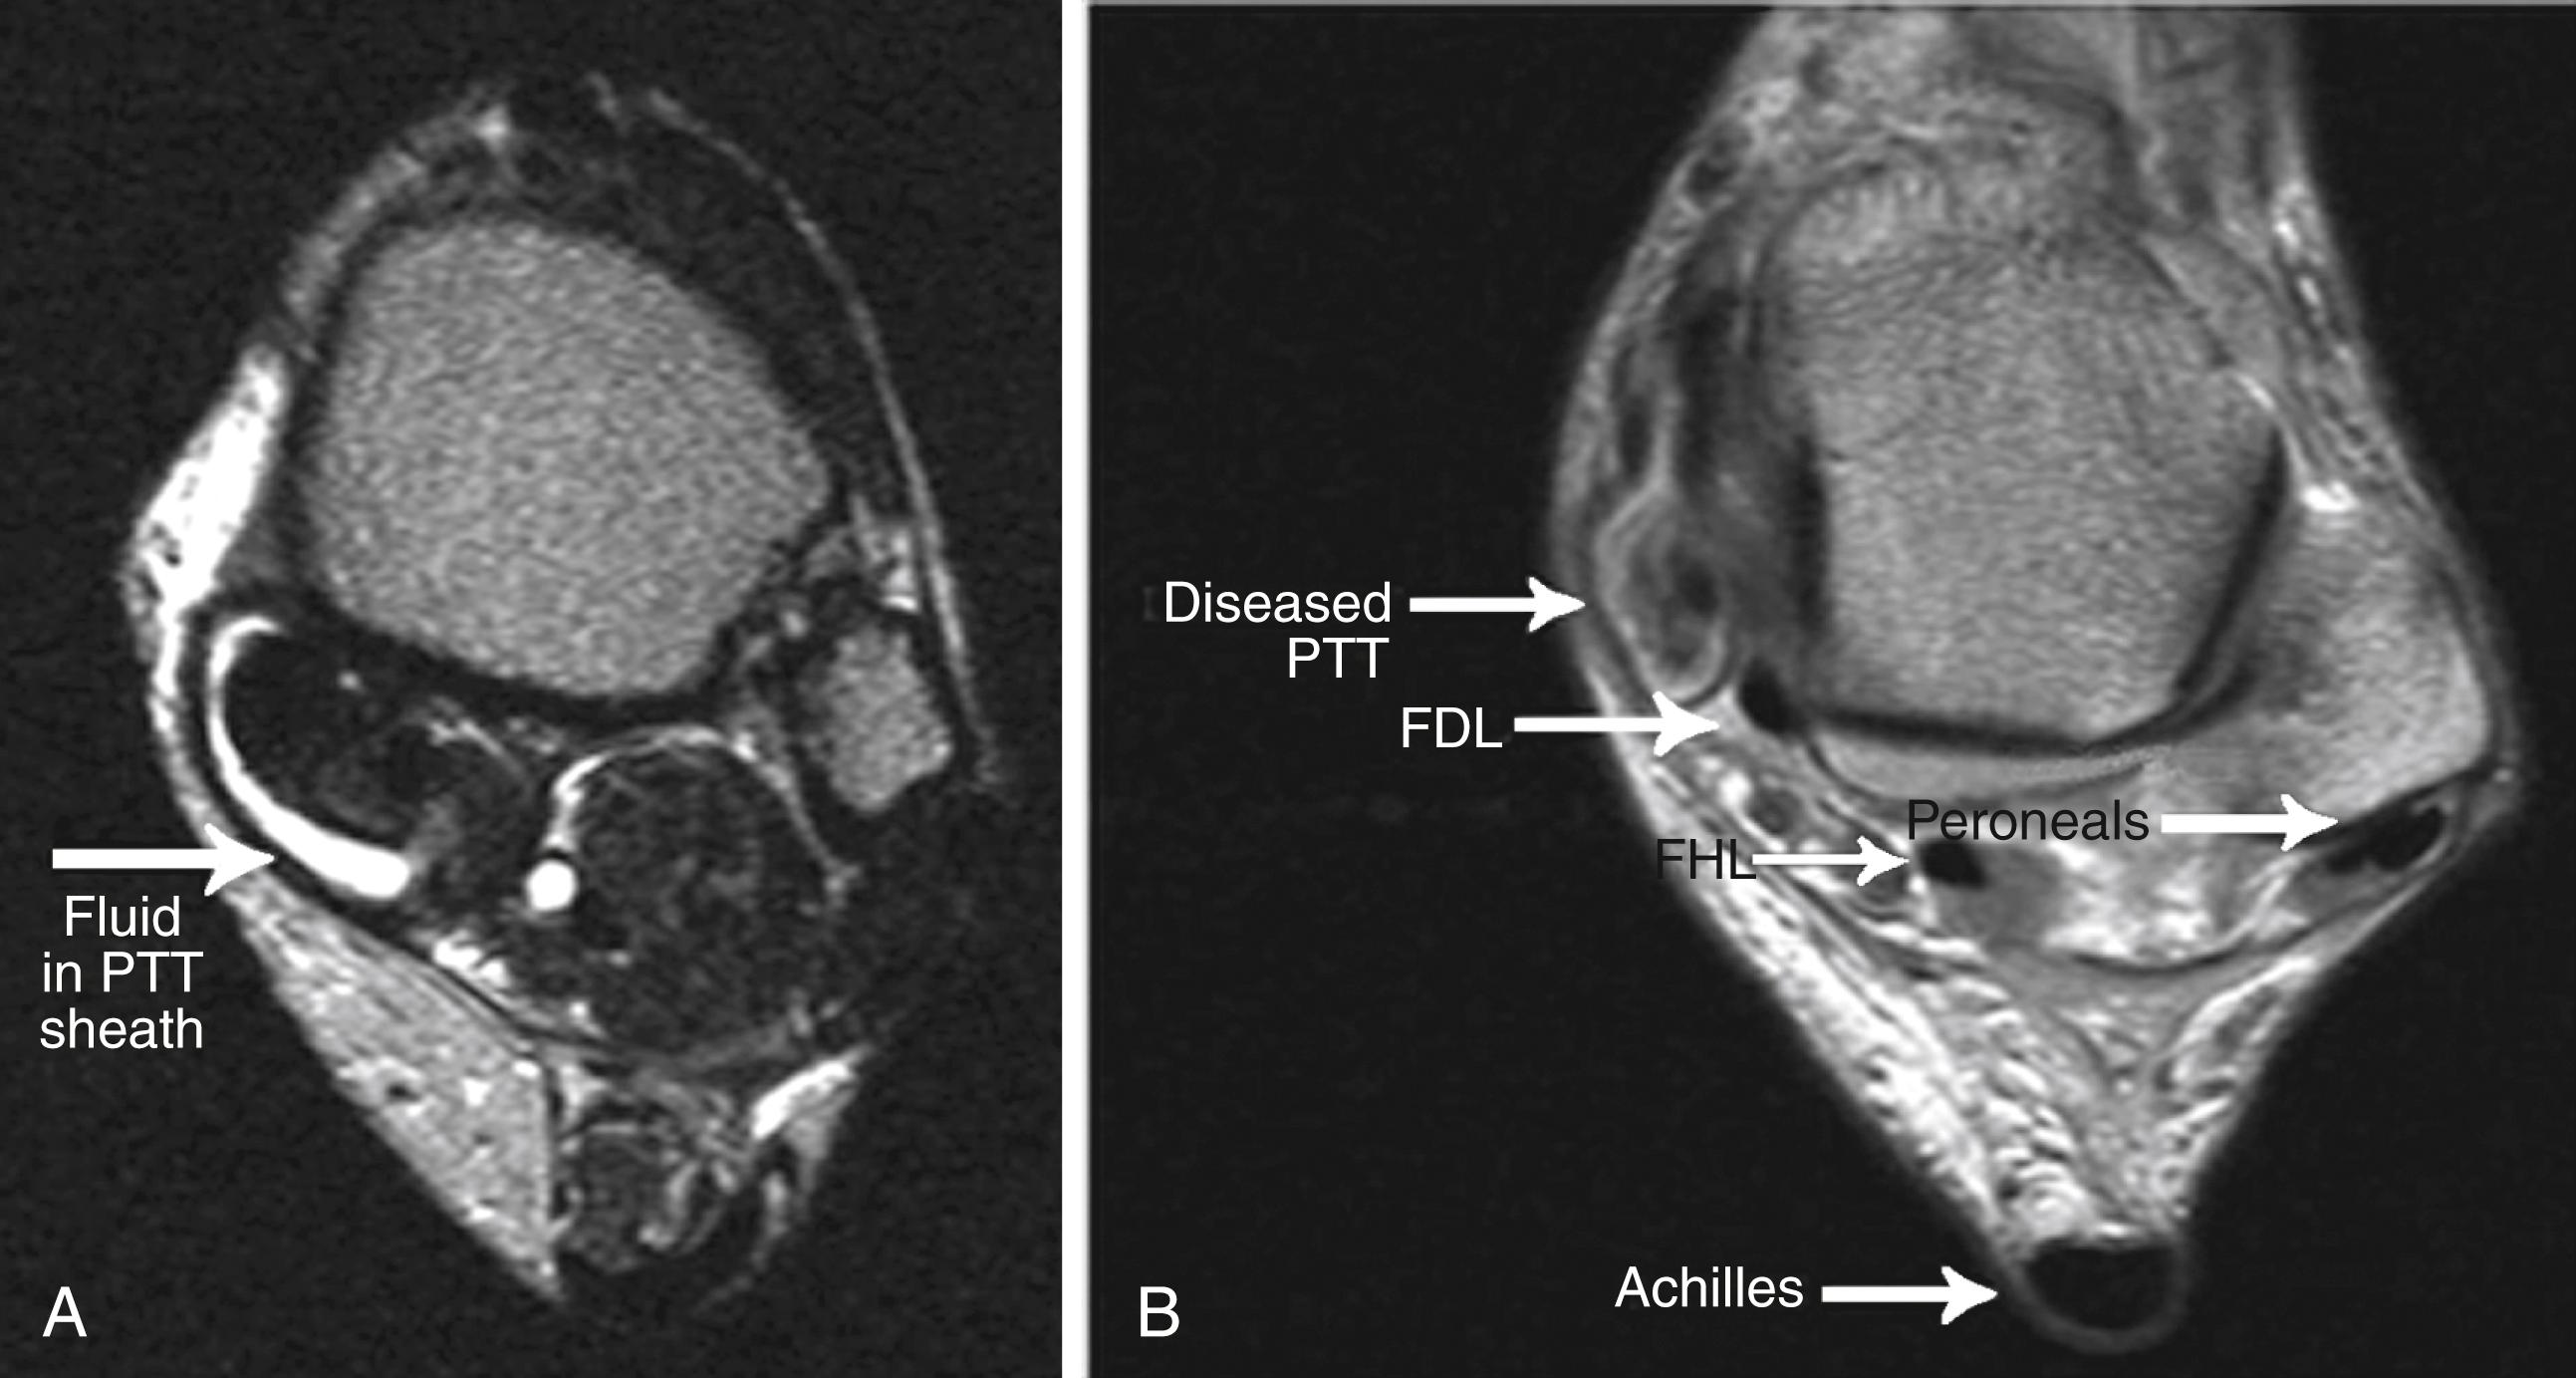
The advancement of weight-bearing CT scans with multiplanar images adds further insight for surgical planning. Because the deformity often is very dynamic, non–weight-bearing images may underestimate the amount of needed correction. On the other hand, weight-bearing CT scans provide multiplanar and three-dimensional reconstruction images that improve understanding of anatomic pathology.
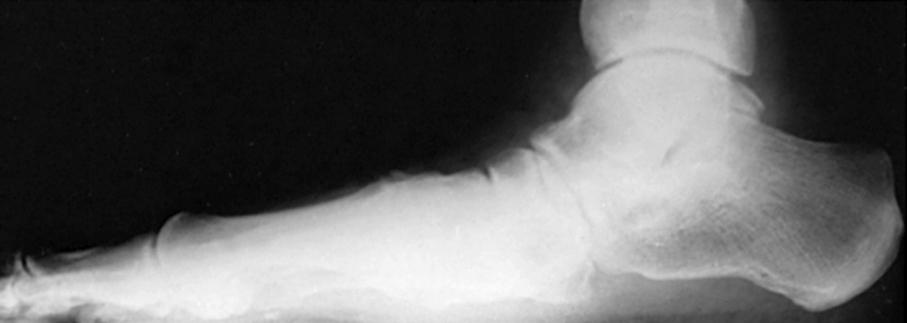
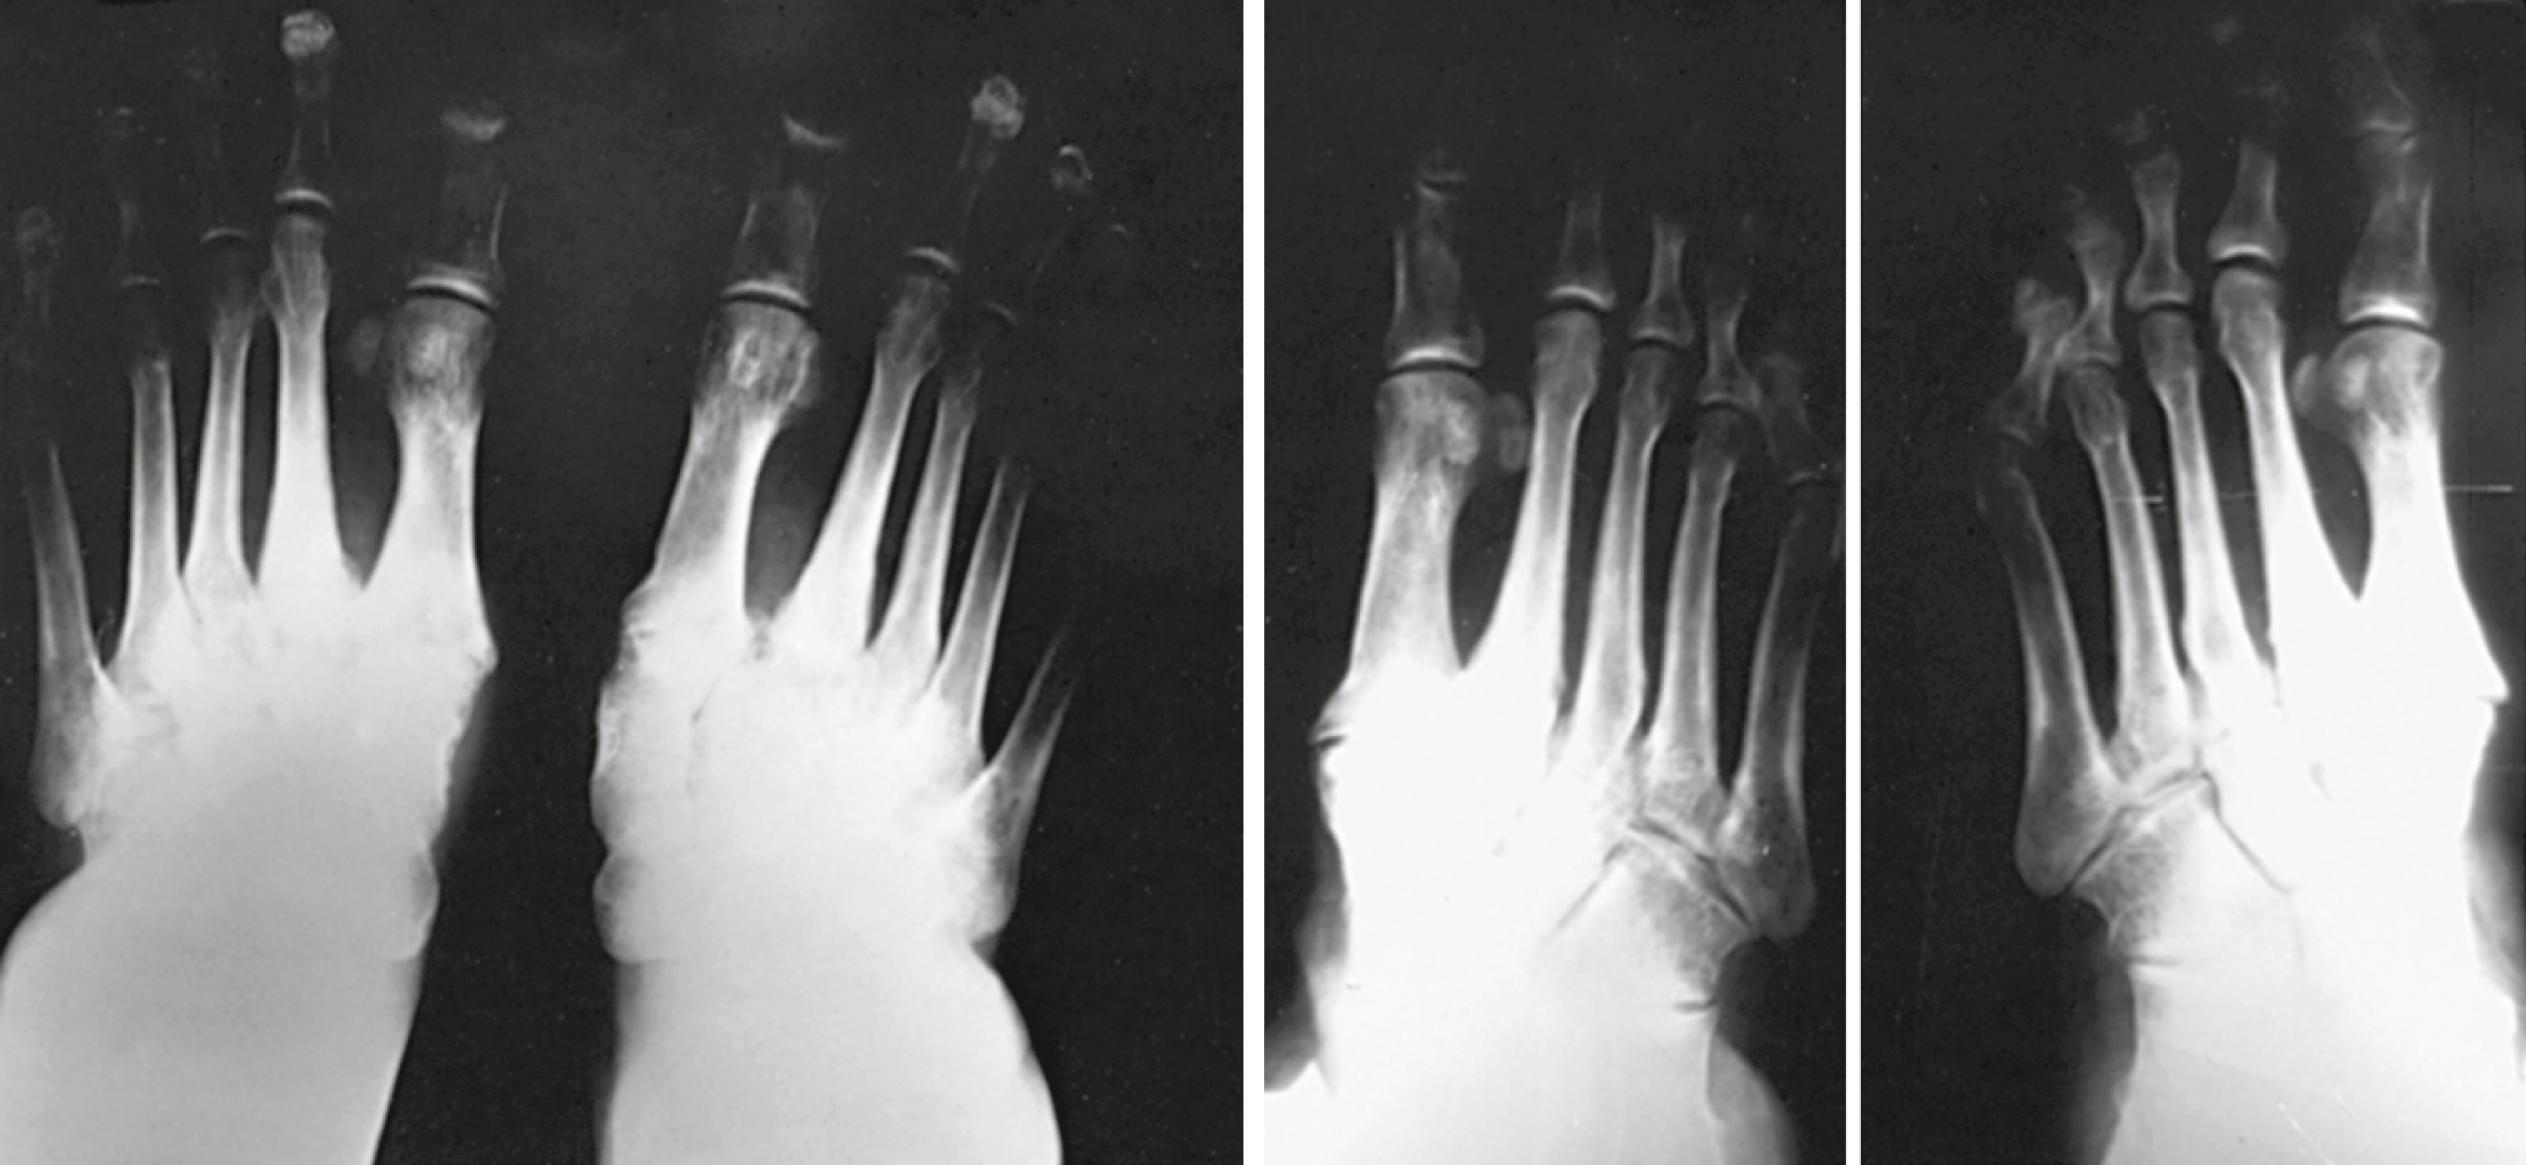
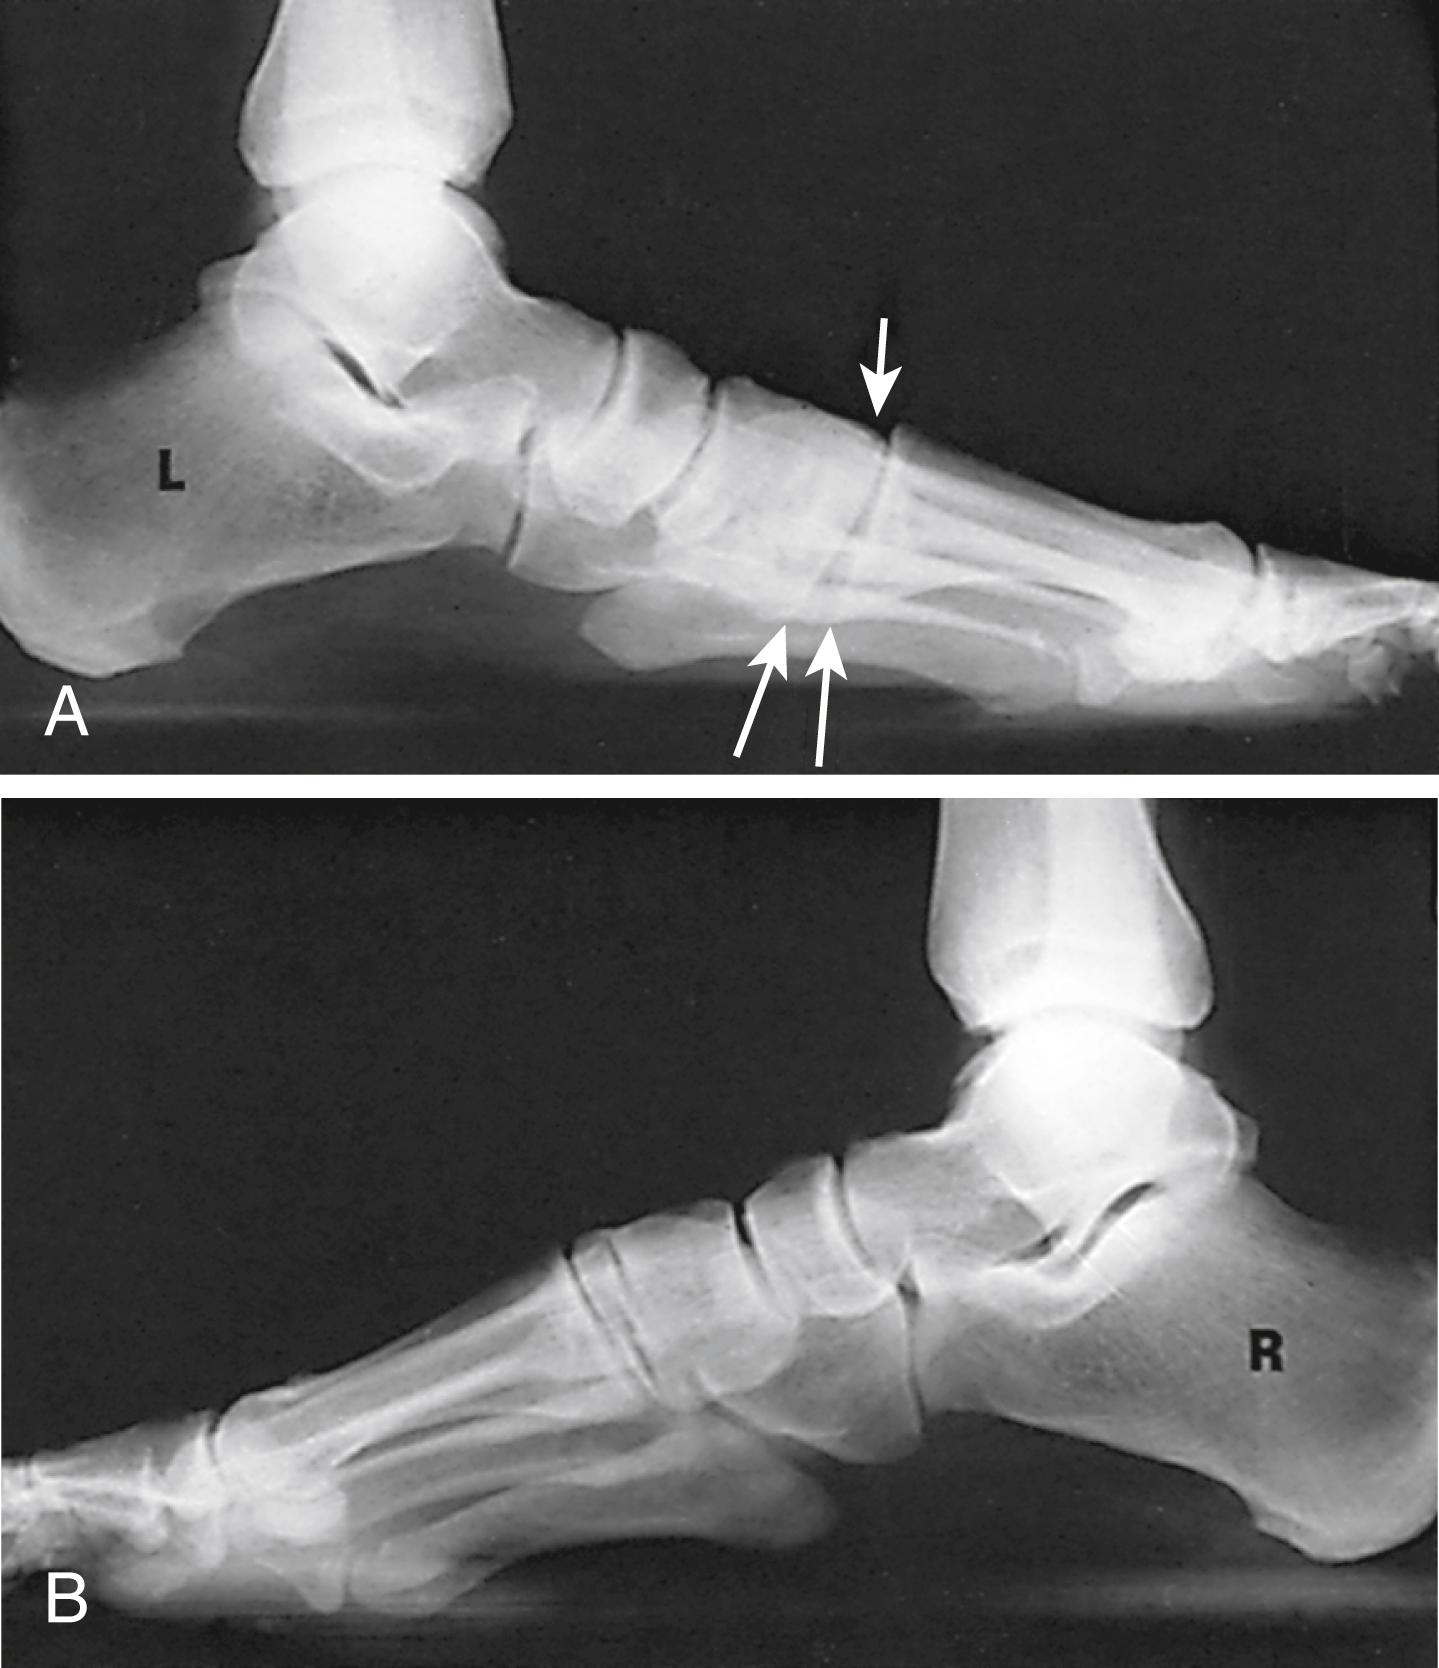
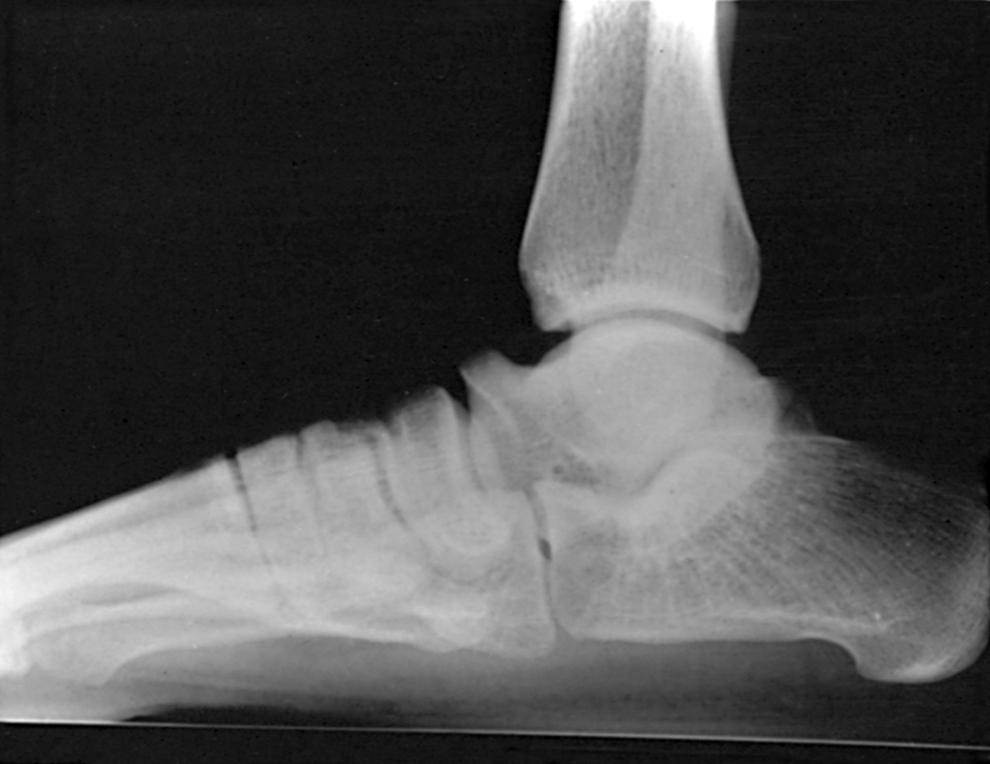
If the weight-bearing films corroborate the clinical findings and locate the articular area of instability, preoperative counseling and surgical planning are facilitated if, indeed, surgical treatment is warranted ( Figs. 83.10 and 83.11 ). However, the physician must be certain of the pathologic condition even if an expensive radiographic evaluation with MRI is necessary because other entities can mimic the posture of a foot with posterior tibial tendon insufficiency ( Fig. 83.12 ). For example, degenerative arthritic deformities ( Figs. 83.13 and 83.14 ), traumatic collapse distal to the midtarsal joint ( Fig. 83.15 ), and tarsal coalitions, especially unilateral with a normal arch on the unaffected foot ( Fig. 83.16 ), can cause such a deformity. Another entity that may confuse the examiner is the foot that has collapsed from neuropathic arthropathy ( Fig. 83.17 ). Although the clinical examination may be strikingly similar, the radiographic examination should clarify the diagnosis ( Fig. 83.18 ). Finally, idiopathic flexible pes planus must be excluded ( Fig. 83.19 ). The association of the accessory navicular with posterior tibial tendon insufficiency is discussed in the following section on treatment.
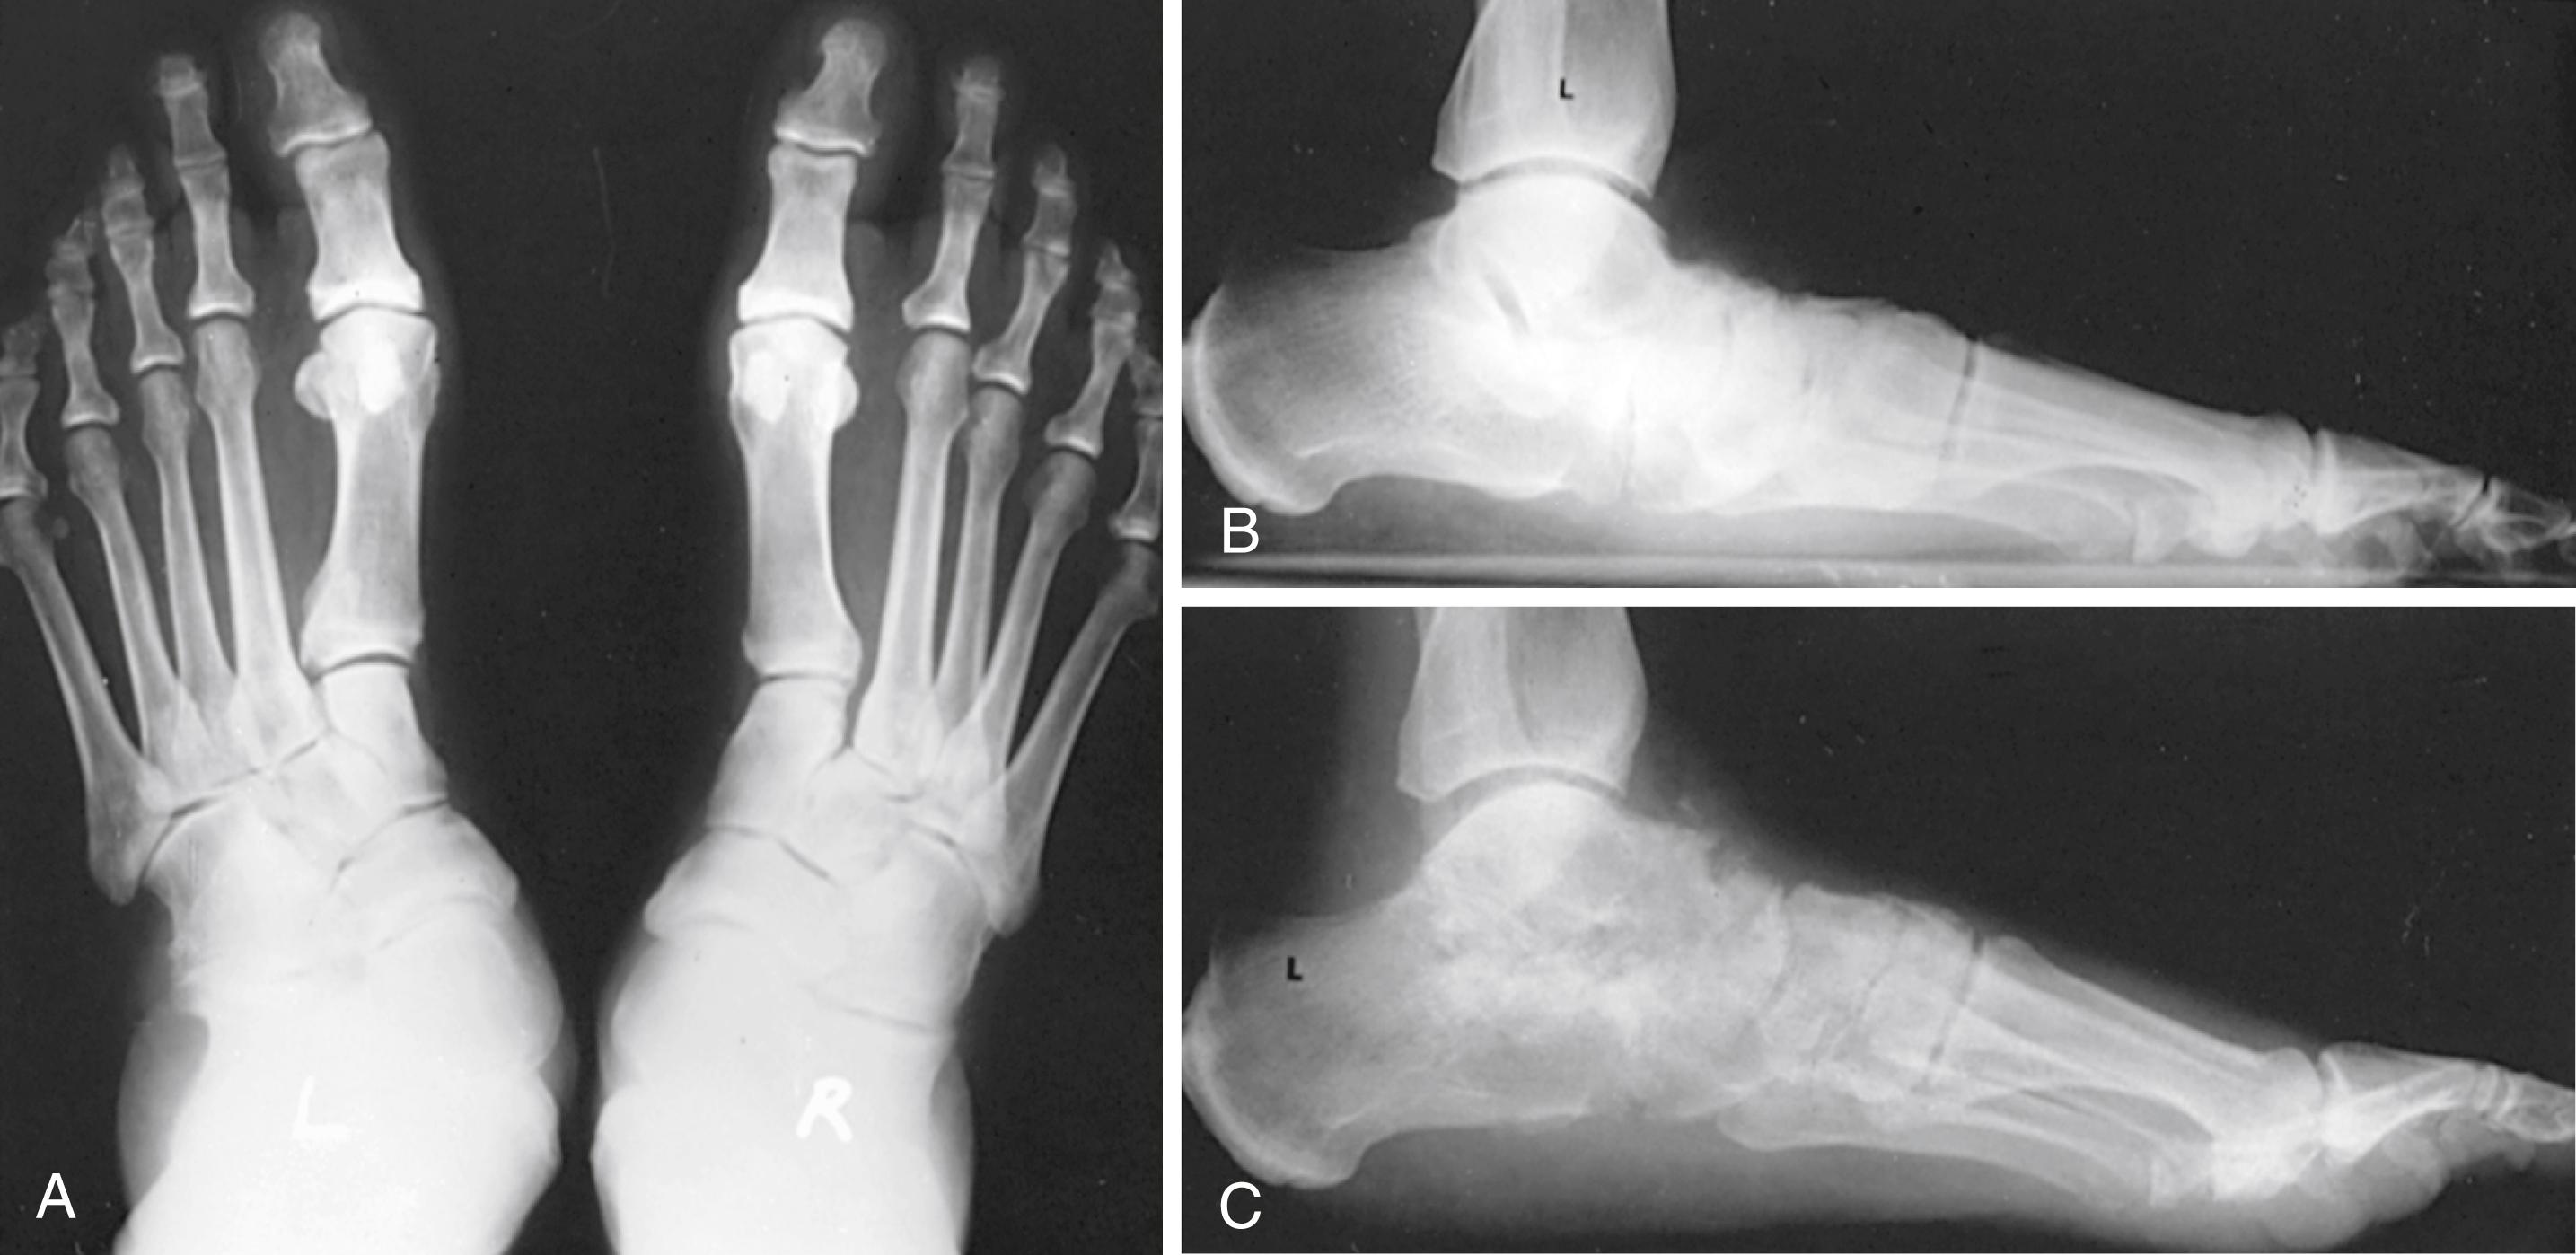
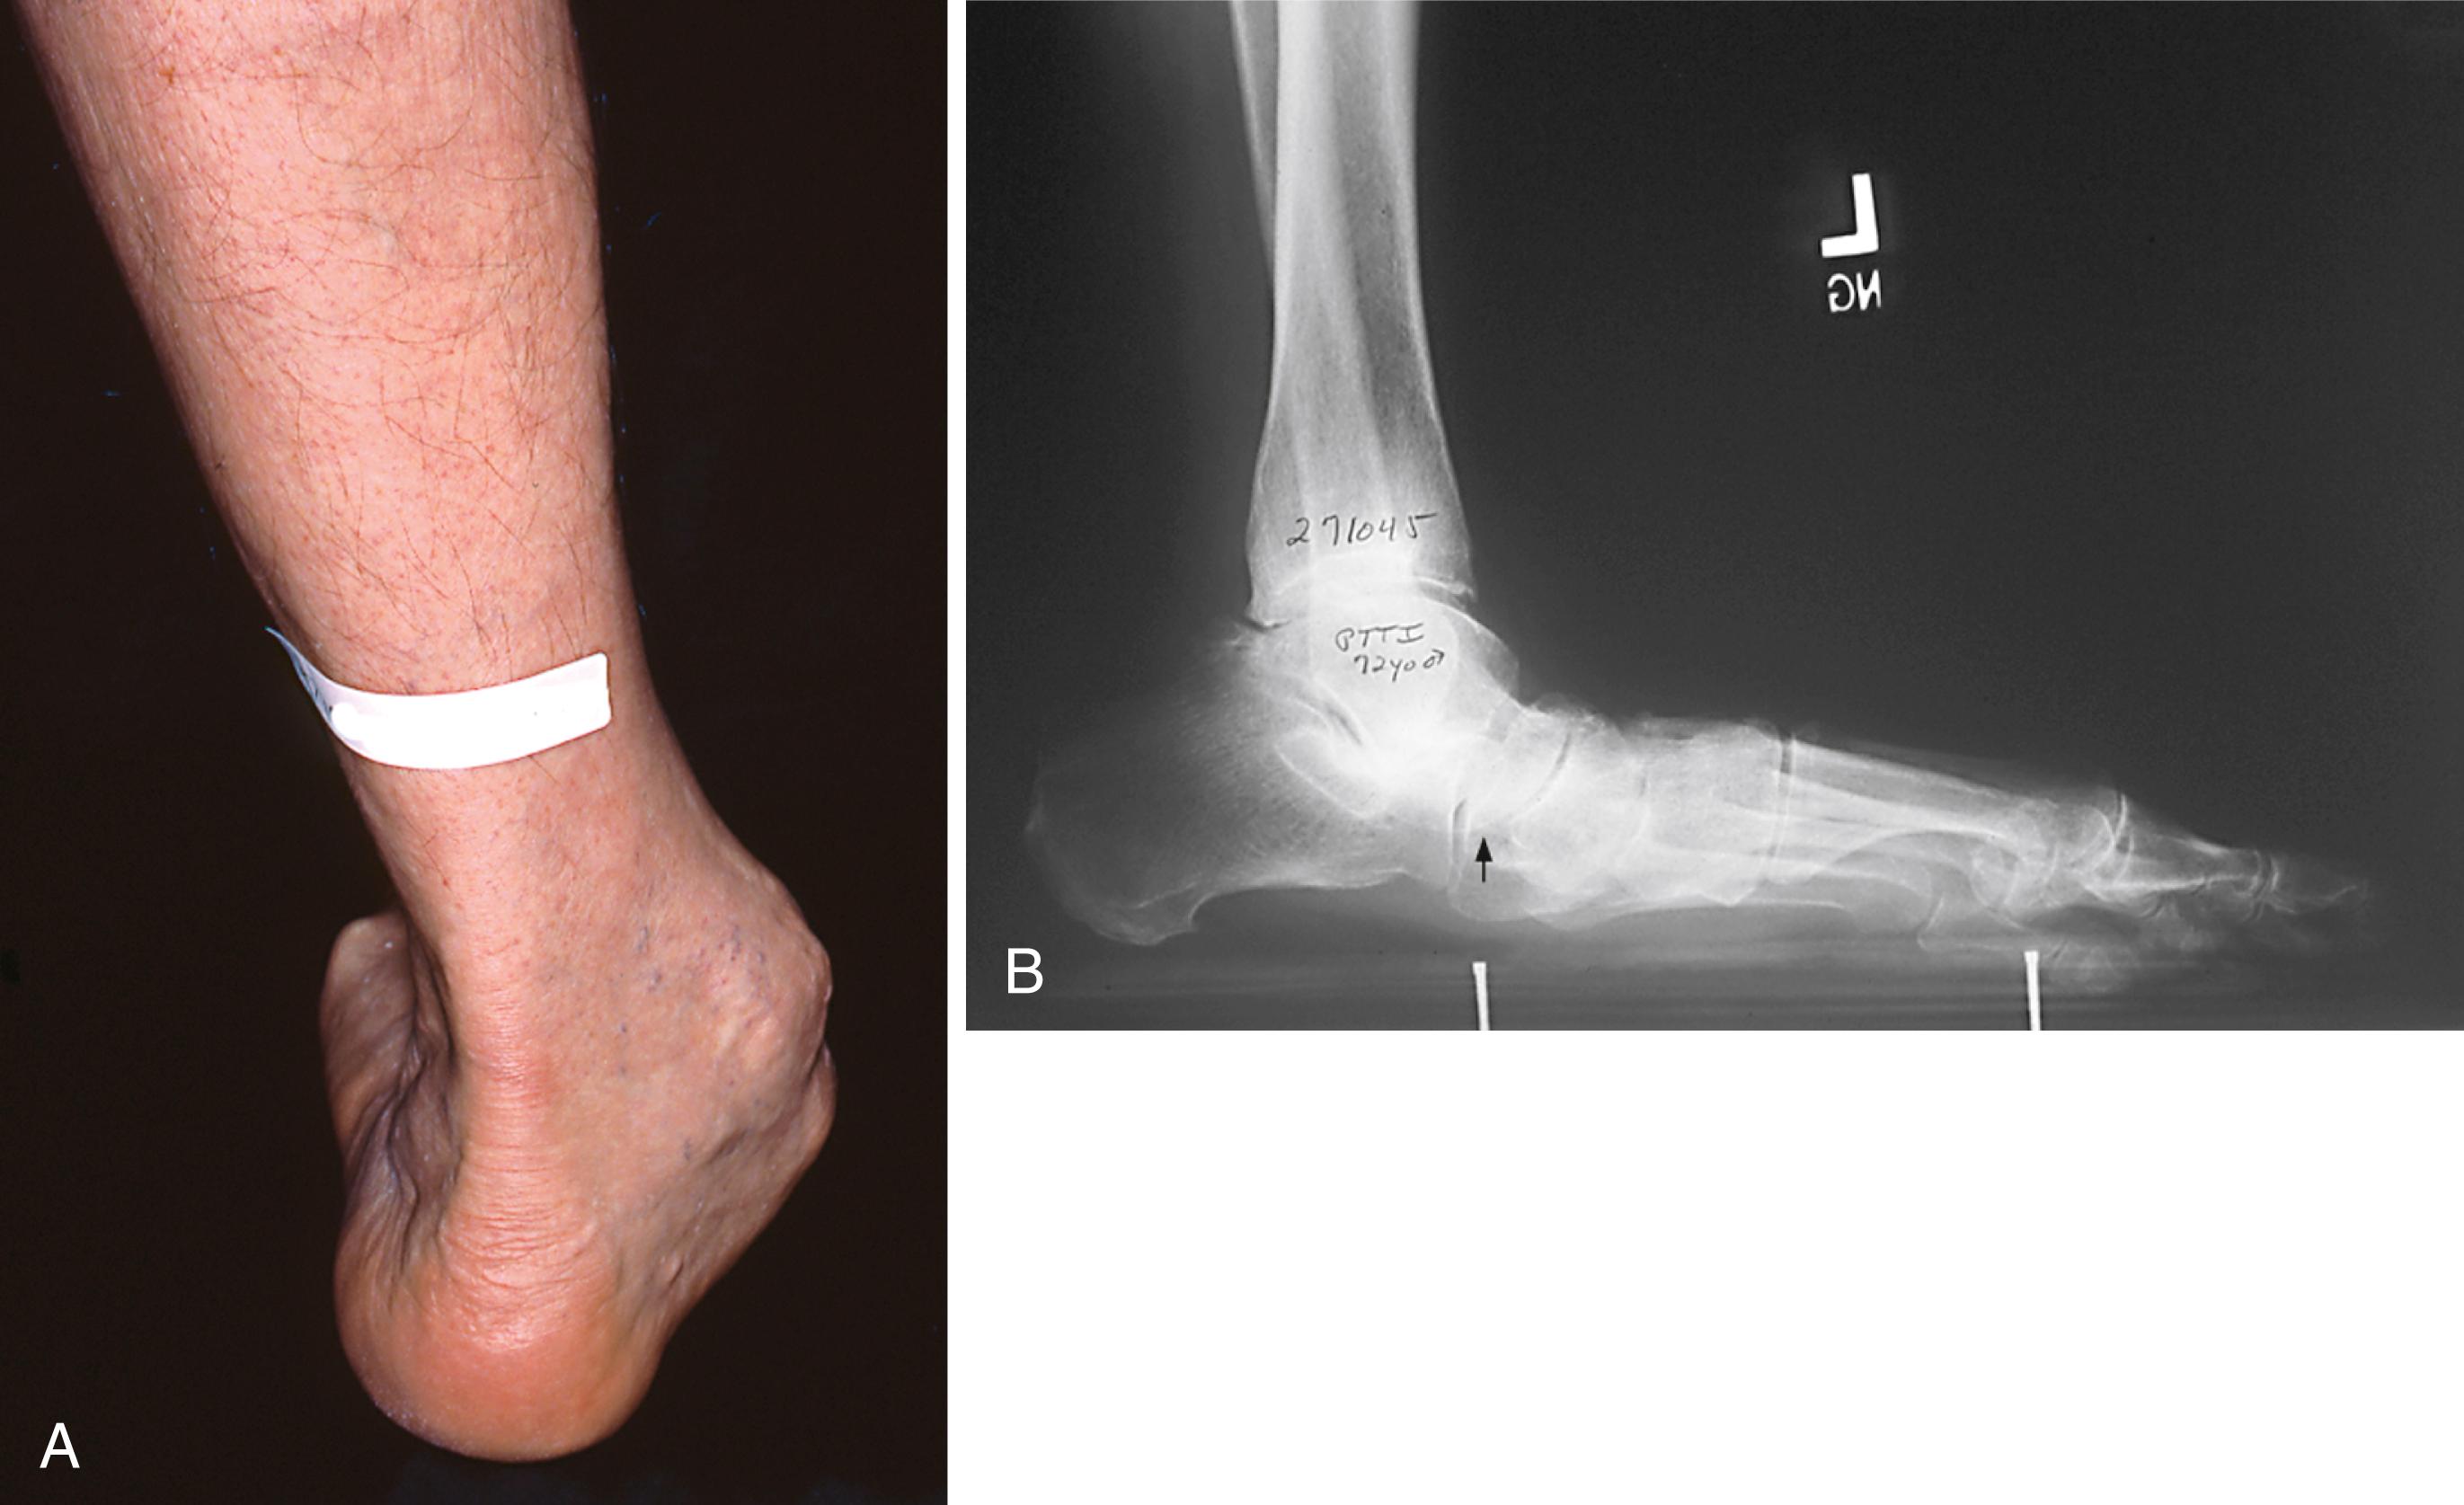
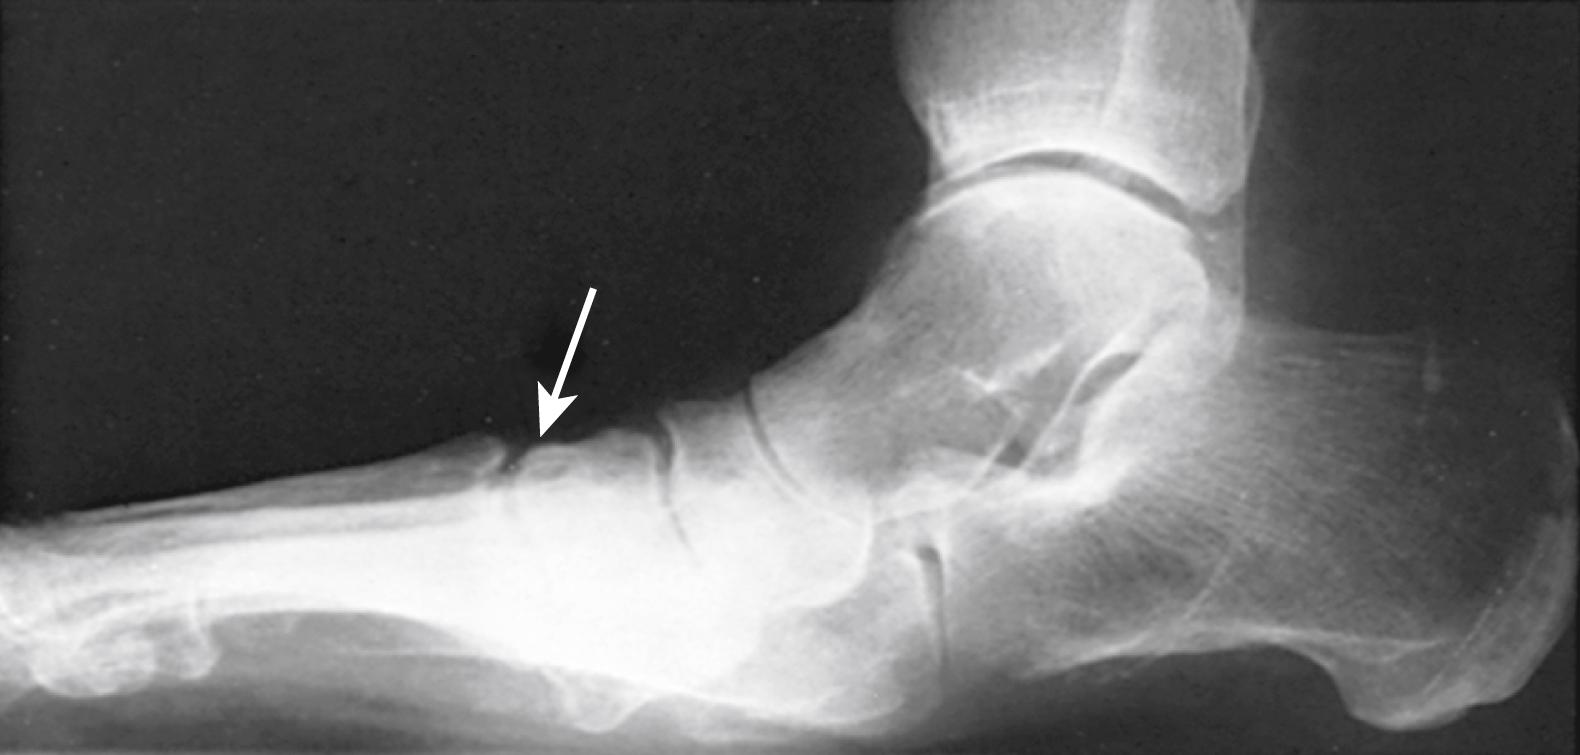
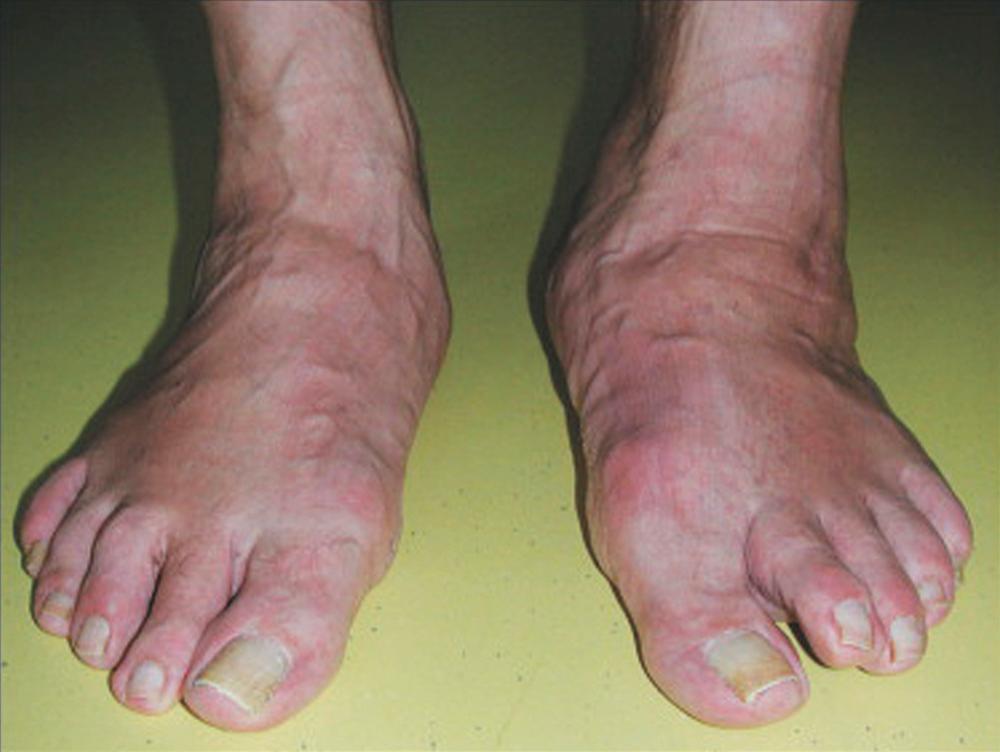
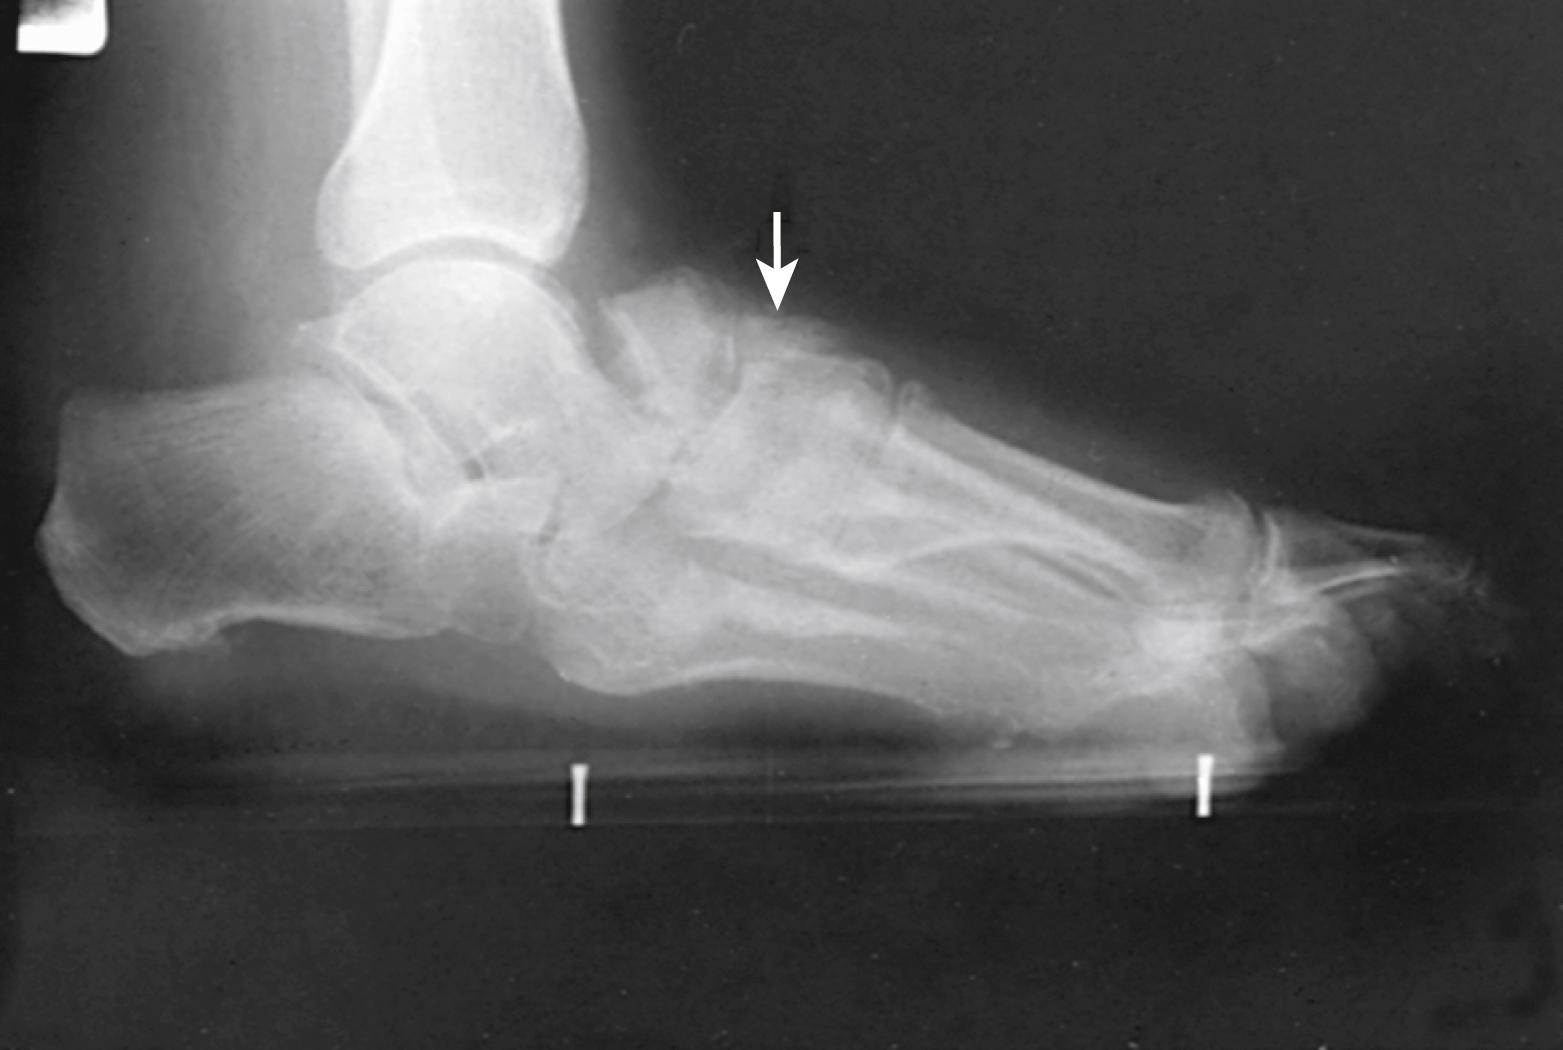
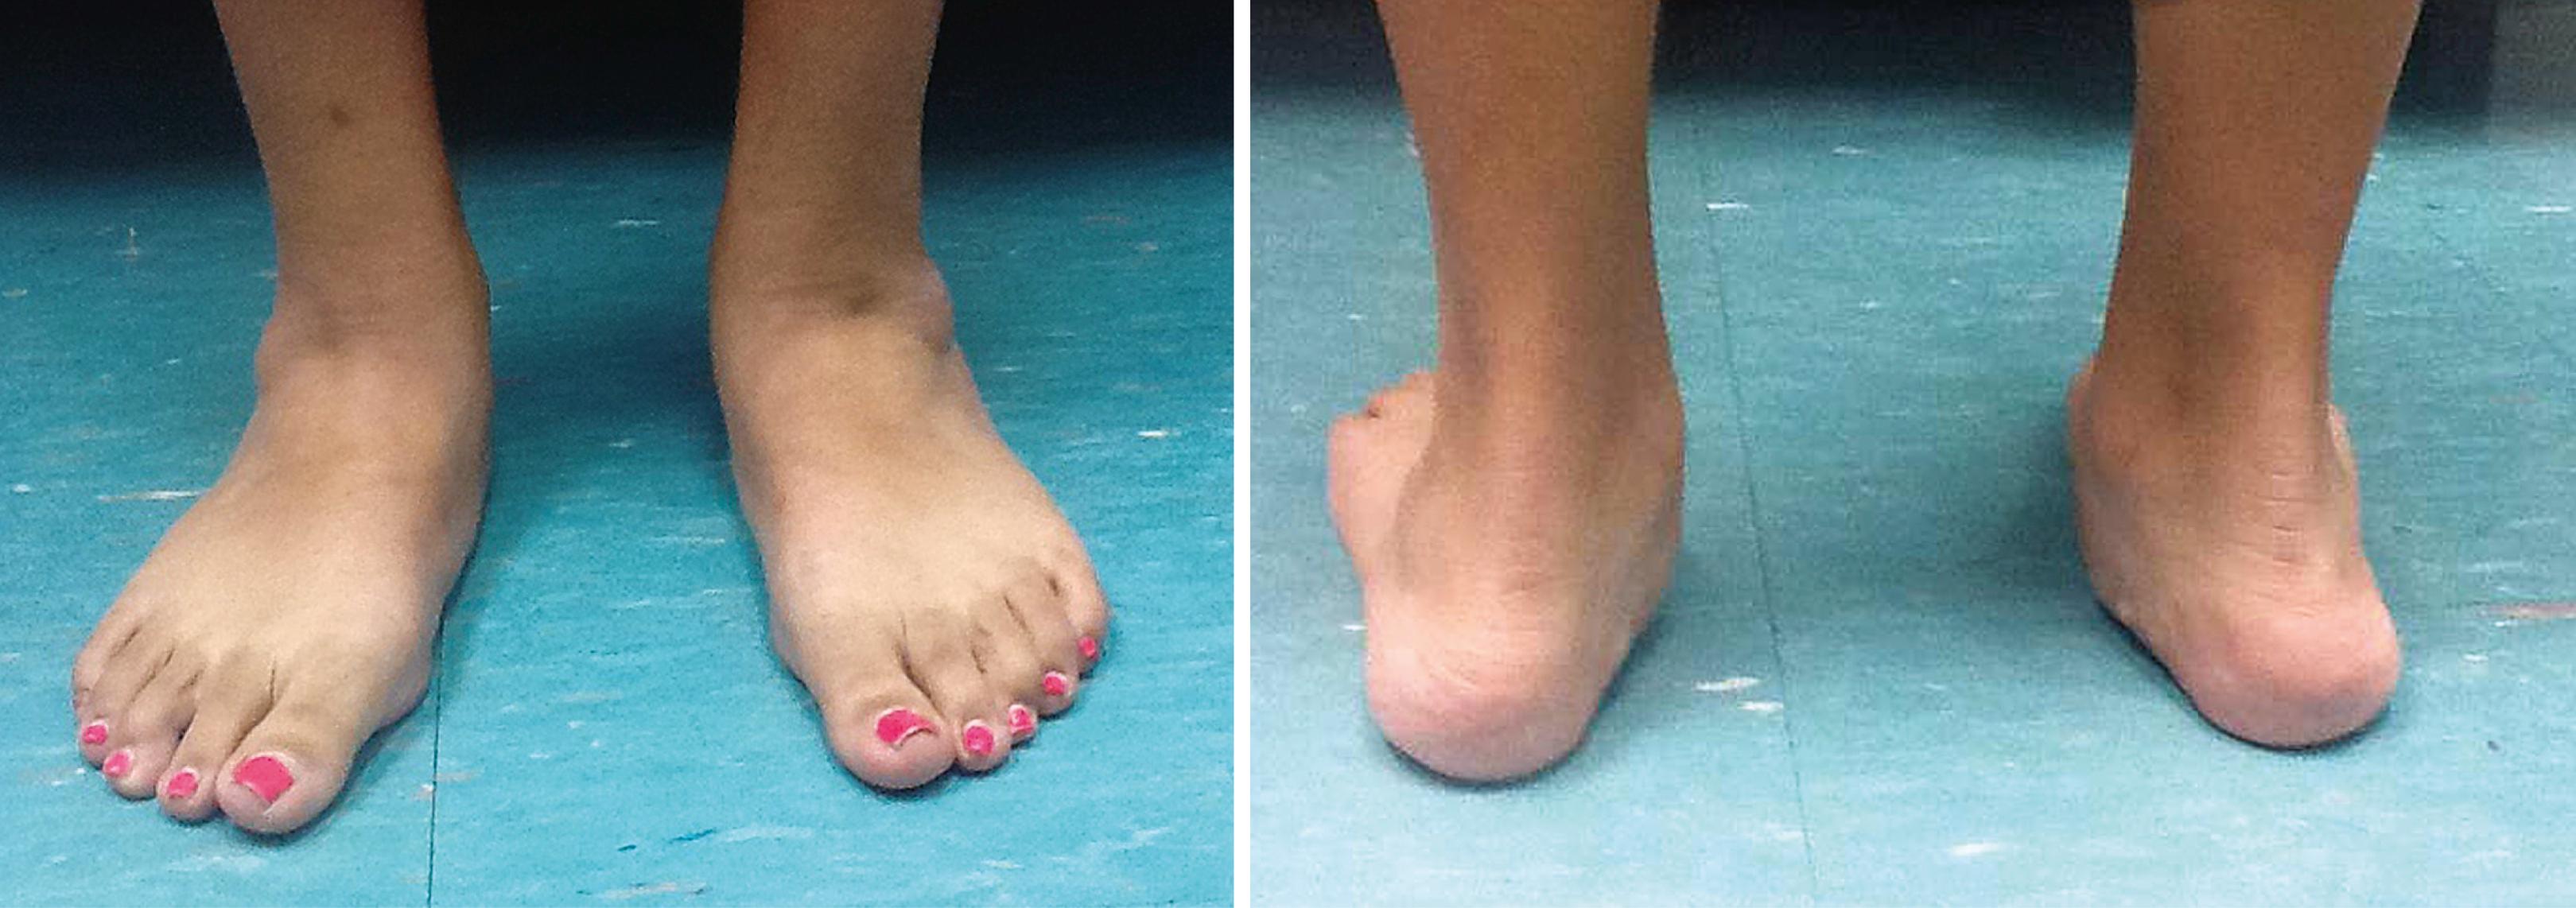
Although surgical management is highlighted in each section, conservative treatment often is successful in managing associated pain. Expectations of the patient regarding return to previous level of function should be ascertained before any treatment decisions are made.
Tenosynovitis is treated with rest, nonsteroidal antiinflammatory agents, and supportive modalities. Modalities may include walking boot with added medial longitudinal arch support, ankle corset, or short leg walking cast. After the acute inflammation of the tenosynovium subsides, rehabilitation of the calf and leg with physical therapy often is helpful. Success has been demonstrated with a comprehensive calf and leg rehabilitation program that emphasizes graduated isometric strengthening exercises and gastrocsoleus complex stretching. Preventing recurrence of stage I disease can be assisted with the use of an orthotic device that incorporates a medial heel wedge and medial forefoot post to place the hindfoot in neutral, decreasing force requirements for the posterior tibial muscle and tendon unit. If conservative treatment fails, tenosynovectomy is indicated ( Figs. 83.20 and 83.21 ). Open synovectomy remains our surgical treatment of choice for stage 1 disease, but tendoscopy has been reported to produce good results. Depending on the patient’s underlying osseous morphology, adding adjuvant procedures to the synovectomy may be beneficial. Adding an osseous procedure such as a medializing calcaneal osteotomy or Cotton osteotomy to create a higher arch may also be warranted in patients with symmetrical pes planovalgus. These adjuvant procedures are further discussed in later sections of this chapter.
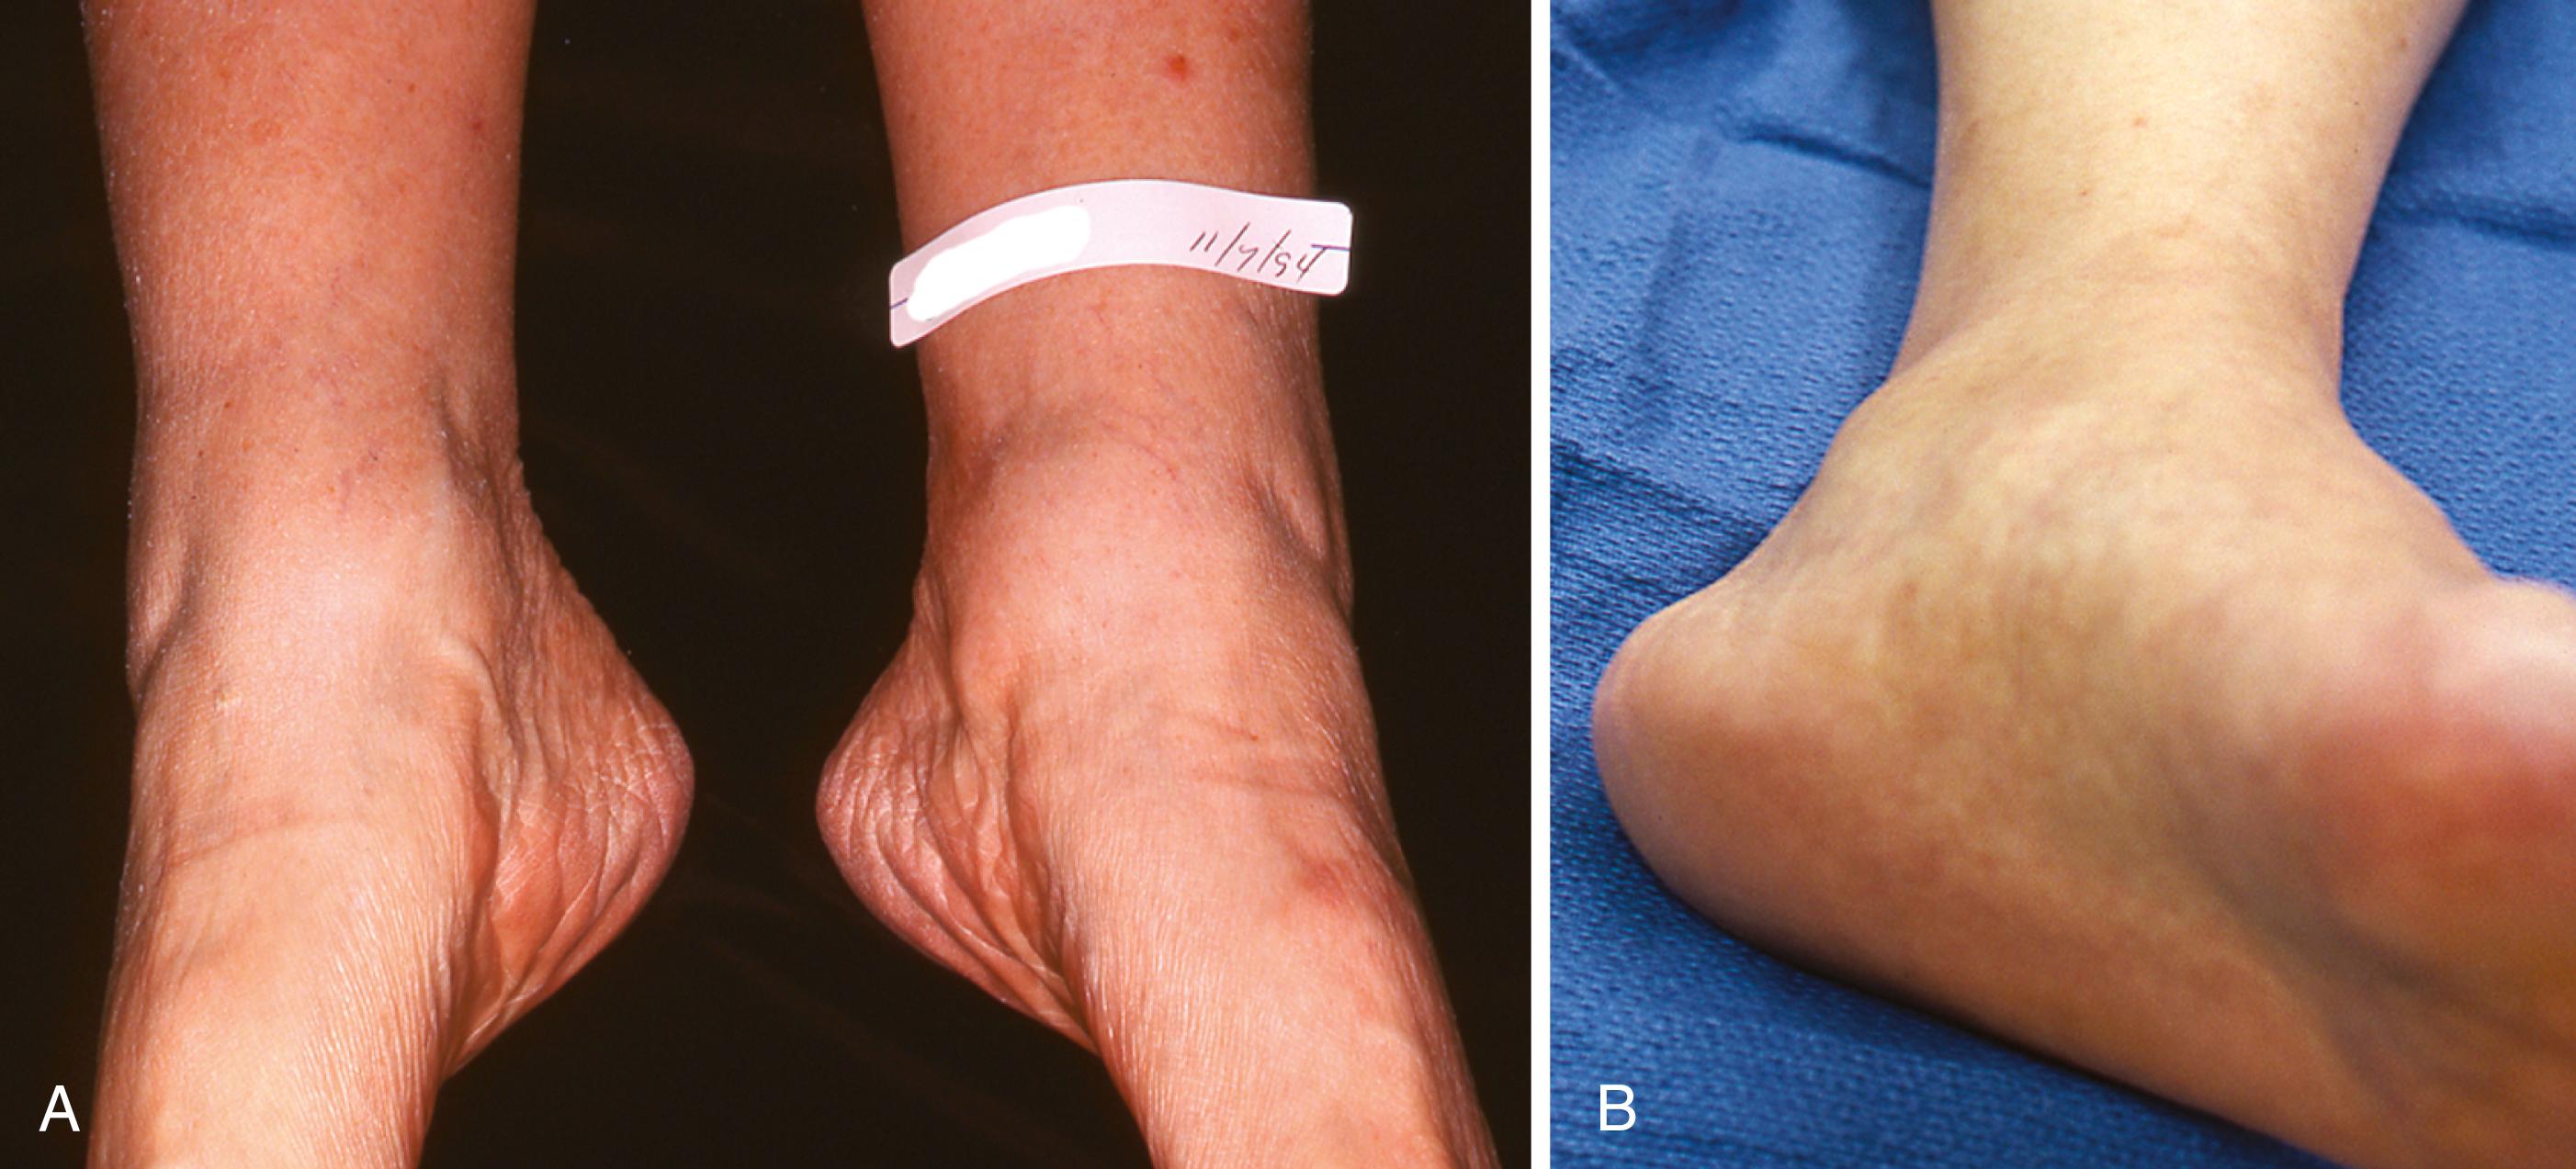
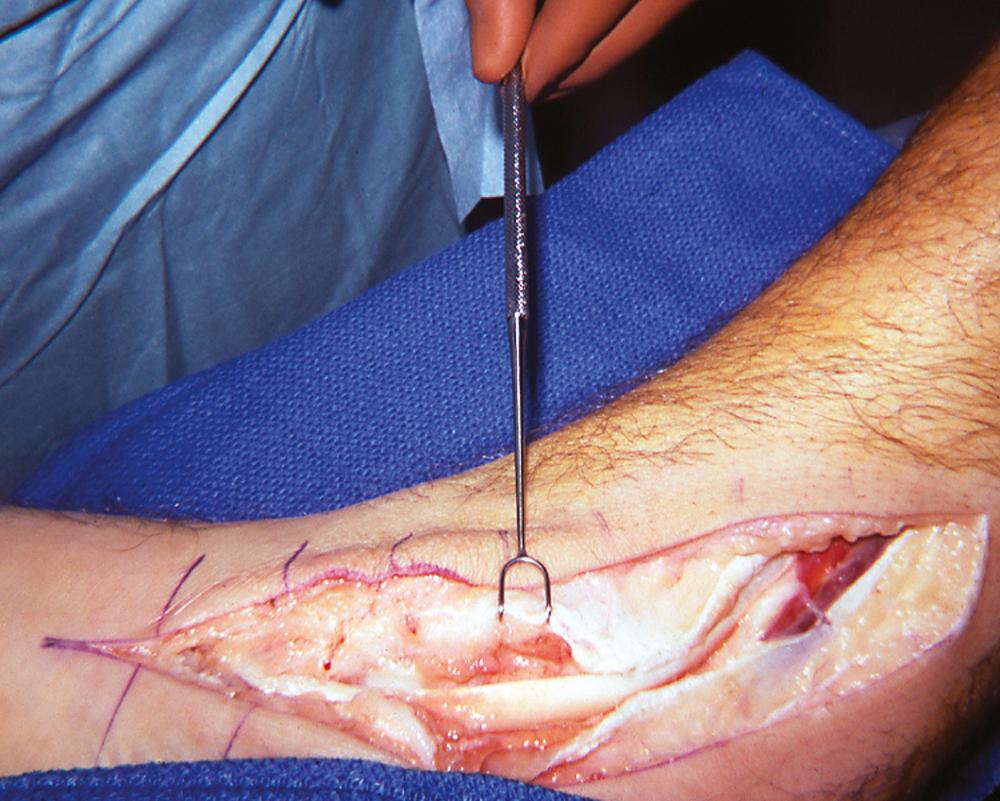
Allow the foot to rest in gravity equinus.
Starting at the inferior edge of the navicular tuberosity, carry a straight incision proximally 1 cm posterior to the prominence of the medial malleolus and continue it 3 to 4 cm proximal to the flexor retinaculum.
Identify the tendon at the inferior margin of the wound and trace it proximally until the muscle is seen.
Release the pulley behind the medial malleolus and the deep investing fascia of the distal leg (see Fig. 83.21 ).
By sharp dissection remove all abnormal-appearing synovium.
Inspect the tendon for longitudinal tears and intratendinous fibrosis.
Trace the plantar slip of the tendon 1 cm distal to the tuberosity to be certain it is intact.
If the tendon insertion into the navicular and the slip plantar to it appear intact, imbricate the tendon across the abnormal-appearing area. This imbrication is over a length of 1.0 to 1.5 cm.
Leave the flexor retinaculum open and close the wound.
The length of cast immobilization and protected weight-bearing varies depending on the appearance of the tendon at surgery, that is, the evaluation of its structural integrity and the extent of dissection necessary to rid the tendon of inflamed synovium. In most cases, weight bearing is delayed for 4 to 6 weeks and the leg is immobilized in a splint until the wound is healed (2 weeks). Mobilization of the tendon in the sheath is encouraged with minimal resistance exercises in a removable splint or boot to prevent intrasheath adhesions. In some markedly overweight patients with an abnormal-appearing tendon, after this extended period of support a double upright brace with a medial T-strap should be worn for 3 months.
Stage II disease, in which the hindfoot remains flexible and passively correctable, encompasses a wide spectrum of symptoms and varying physical and radiographic findings. Bluman et al. refined the classification system to reflect this spectrum in subtypes IIA and IIB. The principal difference between the subtypes is the amount of abduction of the midfoot through the talonavicular joint, with IIb being more severe (see Fig. 83.7 ). Conservative management of stage II disease often is successful, and most patients obtain pain relief with application of an orthotic device that has a medial post and an ankle-foot orthosis. A double-upright ankle-foot orthosis with a medial T-strap works well. The brace is configured to allow 20 to 30 degrees of plantarflexion and 10 degrees of ankle extension; however, despite its effectiveness, this large brace may not be acceptable to patients. In these circumstances, a hinged polypropylene short leg ankle-foot orthosis (Richie brace) may be more acceptable. Although it is not as comfortable, it is lighter, can be used in a variety of shoes, and is more cosmetically acceptable. Patients who obtain significant relief with brace wear often find that after 9 to 12 months of routine brace use, they are able to wear regular shoes with insoles for longer periods of time without pain. At our institution, Lin et al. found that 70% of patients treated with double-upright ankle-foot orthoses (average duration of bracing, 15 months) were brace free and had not required surgery at 7-year follow-up; 61% of patients were “satisfied” with their outcomes, and 33% were “satisfied with minor reservations.”
A patient who completes a structured physical therapy program also may avoid surgery. Alvarez et al. reported that after a median of 10 physical therapy visits over 4 months, 83% of patients had successful subjective and functional outcomes; 89% were satisfied with their outcomes. The rehabilitation protocol included the use of a short, articulated ankle-foot orthosis or foot orthosis, high-repetition exercises, aggressive plantarflexion activities, and an aggressive high-repetition home exercise program that included gastrocsoleus tendon stretching.
Surgical reconstruction is indicated for patients in whom conservative management is not acceptable or fails. Initial enthusiasm for isolated transfer of the flexor digitorum longus tendon to the navicular, with or without side-to-side augmentation using a remnant of the posterior tibial tendon, has waned because of a high incidence of failure. Therefore, in addition to reconstruction of the tendinous portion of the pathologic process, correction of the flatfoot deformity is indicated. Satisfactory results have been obtained with lengthening of the lateral column of the calcaneus (LCL), medial displacement of the tuberosity of the calcaneus (MDCO), a Z-shaped calcaneal osteotomy, or a combination of LCL and MDCO. Lateral column lengthening is achieved through an osteotomy of the body of the calcaneus between the anterior and middle facets of the subtalar joint, osteotomy between the posterior and middle facets, or a distraction arthrodesis at the calcaneocuboid joint. Malerba and De Marchi described a Z-shaped osteotomy that allows for rotation (lengthening) and translation. MDCO improves hindfoot alignment, but multiple authors have reported limitations of these osteotomies in stage IIB deformities. Iossi el al. proposed an algorithm to aid with surgical decision-making in which stage IIB deformities require the addition of a lateral column lengthening procedure; however, this algorithm is based on radiographic parameters and has not been validated with patient outcomes. Despite the power of LCL procedures to correct abduction deformities, they are associated with a higher rate of complications than MDCO and should be used judiciously; MDCO is a safe option for correction of mild abduction deformities. LCL through calcaneal cuboid arthrodesis is effective for correction, but it also has high complication rates. No one bony procedure is best, and surgeons should be familiar with both MDCO and LCL procedures.
Tendon transfer for reconstruction of the musculotendinous portion of the deformity is described first, followed by descriptions of each of the calcaneal osteotomies. Attention to the medial structures is important as well, with repair of the spring ligament, arthrodesis of one or more midfoot joints, or cuneiform opening osteotomy (Cotton procedure) as adjunctive procedures to improve the integrity of the medial column. demonstrates posterior tibial tendon reconstruction with calcaneal osteotomy and flexor digitorum longus transfer.
Although the flexor hallucis longus (FHL) has superior strength characteristics compared with the flexor digitorum longus, Wapner et al. demonstrated that the flexor digitorum longus may be more appropriate for reconstruction for posterior tibial tendon insufficiency because of its position. MRI has demonstrated adaptiveness of the flexor digitorum longus with muscle hypertrophy after transfer of the flexor digitorum longus tendon, and functional scores were significantly improved after this procedure.
We believe that it is important to evaluate the posterior tibial muscle belly when performing this transfer. With long-standing disease, the posterior tibial muscle becomes inelastic and fails to contract when touched with electrocautery and loses its normal color. In this case, it is inadvisable to supplement the flexor digitorum longus tendon with the remnant of the posterior tibial tendon. However, if the muscle appears normal, resection of the entire diseased segment of the posterior tibial muscle and side-to-side transfer using a Pulvertaft weave of the flexor digitorum longus and posterior tibial tendon are recommended.
Expose the posterior tibial tendon through an incision beginning 3 to 4 cm proximal to the tip of the medial malleolus. Curve it posterior to the malleolus and extend it to 3 to 4 cm distal to the navicular tuberosity ( Fig. 83.22 ). This extensive incision is necessary to allow adequate evaluation of the condition of the posterior tibial muscle-tendon unit proximal to the flexor retinaculum. The incision should be distal enough not to compromise dissection around the medial plantar neurovascular bundle while reaching the Henry knot and exposing the crossover of the flexor digitorum longus and flexor hallucis longus.
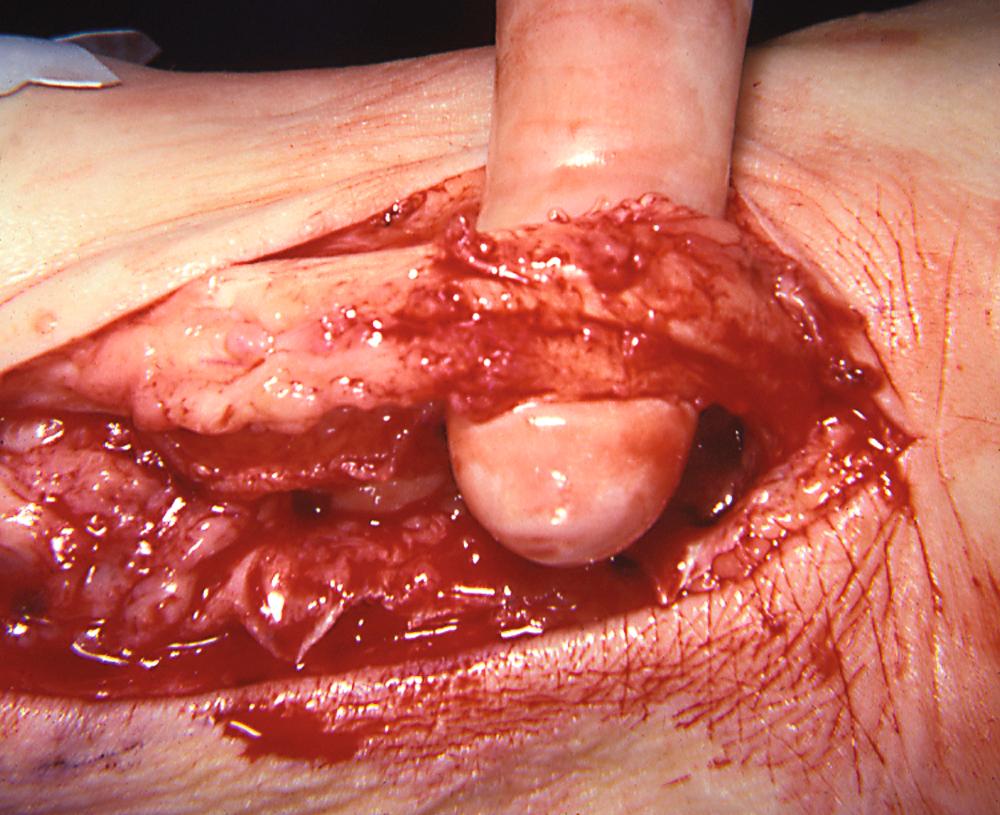
The posterior tibial tendon may be completely disrupted, with rounding of the proximal stump. The proximal stump may appear to end in hypertrophic synovial tissue ( Fig. 83.23 ), but once the synovium is removed there may be a flimsy scar in continuity or a strong, dense, solid band of scar in continuity.
If the tendon, once freed from its bed and with sustained slow tension, regains sufficient length, suture it with nonabsorbable suture to the undersurface of the navicular after the transfer is performed. Rarely can the tendon be advanced in this manner. Usually it is debrided and removed from its pulley proximal to the laciniate ligament and sutured to the adjacent tendon transfer under moderate tension.
If the posterior tibial muscle-tendon unit has no excursion, which is uncommon even in long-standing deformity if dissected far enough proximally, then cut it short and discard it.
Expose the flexor digitorum longus and FHL at the Henry knot lateral to the tuberosity of the navicular by dissecting along the superior border of the abductor hallucis muscle and retracting it plantarward. Branches of the medial plantar neurovascular bundle are along the path of dissection and about 2 cm lateral to the distal edge of the navicular. This dissection is tedious, and the distance to the tendons is surprisingly great.
Using a right-angle smooth retractor to pull the intrinsic muscles plantarward, expose the tendons with blunt dissection. The FHL crosses dorsal to the flexor digitorum longus. Sever the tendon to be used at this point while flexing the toes. The strong tendinous cross ties will allow some active flexion by using the remaining intact muscle-tendon unit. Rerouting the transferred tendon through the pulley of the posterior tibial tendon is unnecessary.
Using successively larger drill bits (⅛ inch to inch), drill a hole perpendicular to the navicular in its midportion dorsal to plantar. Dissecting dorsally and plantarward to the midportion of the bone requires patience, but to stop short of this point may leave insufficient bony support medially to prevent the drill from cracking through the bone medially.
Weave a 0 or 2-0 nonabsorbable suture through the distal 1.0 to 1.5 cm of the tendon and pass a straight hemostat or tendon passer with loop from dorsal to plantar.
Holding to the suture ends, work the tendon up through the hole from plantar to dorsal until all slack is taken up. Then place the foot in equinovarus and further tighten the tendon.
Using a small, free-cutting needle, suture the tendon to the adjacent periosteum. The foot should remain in this position when relaxed.
Finally, if possible, advance the posterior tibial tendon and suture it to the adjacent periosteum and deep fascia. Wukich et al. described the use of a biotenodesis or interference screw to anchor the tendon in the tunnel.
Holding the foot in equinovarus, apply a bulky dressing and a short leg splint.
The splint is changed at 14 days after surgery, but the foot is maintained in equinovarus for 4 to 6 weeks. At 6 weeks a short leg walking cast or boot is applied and worn for an additional 3 to 4 weeks. Physical therapy is used to wean the patient from the boot and regain strength, balance, and range of motion. A molded arch support is encouraged after the cast is discontinued.
Elongation and incompetence of the spring ligament from the loss of protective support of the posterior tibial tendon also contribute to the deformity. Many authors have suggested that the spring ligament should be routinely repaired as part of the medial soft-tissue procedure. Augmentation of the repair with nonabsorbable suture tape has become popular, but limited clinical evidence demonstrates its superiority over standard repair techniques.
After exposure and debridement of the posterior tibial tendon, locate the superomedial portion of the calcaneonavicular ligament just inferior to the head of the talus where it attaches to the plantar aspect and plantarmedial aspect of the tarsal navicular.
Adduct the foot and forefoot into a neutral and slightly adducted position and excise a wedge of this ligament and plantar talonavicular capsule ( Fig. 83.24A ). The wedge should be 8 to 10 mm, depending on the magnitude of the deformity.
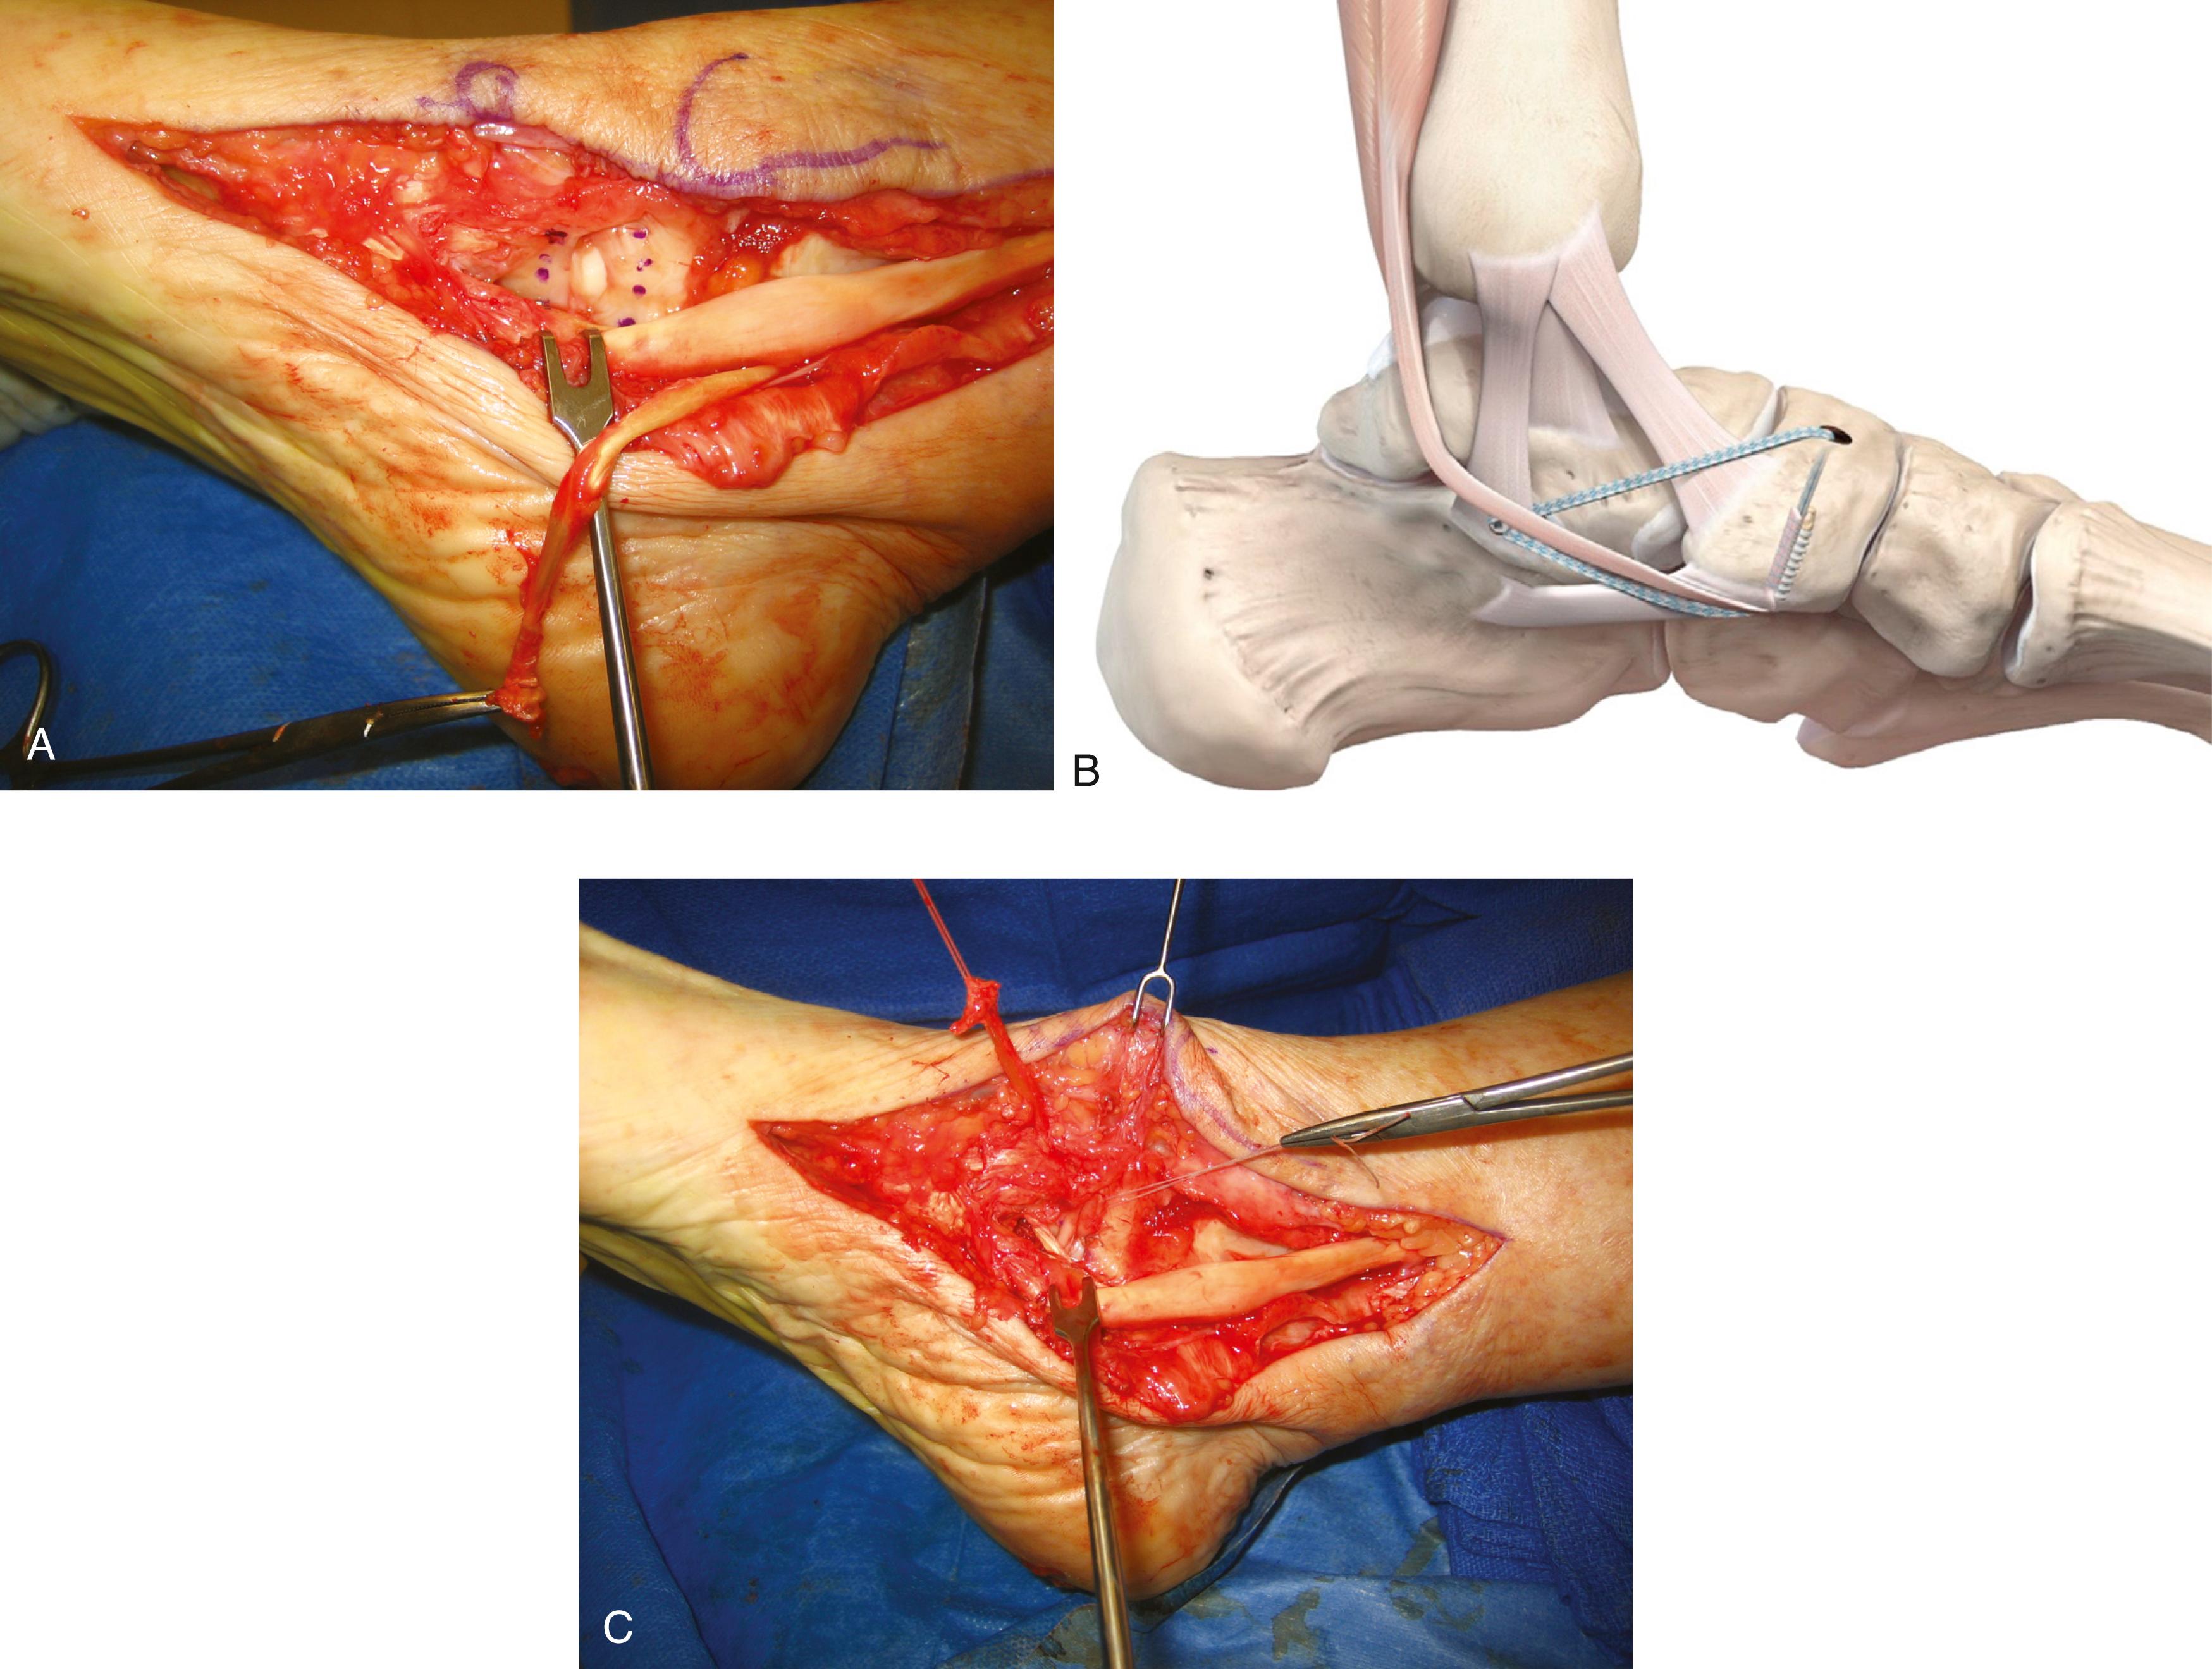
Repair the spring ligament with multiple interrupted 2-0 braided, nonabsorbable sutures ( Fig. 83.24B , C ).
If the spring ligament is so attenuated that it cannot be repaired, reconstruction of the ligament can be considered. Reconstruction may use an allograft or autograft tendon. Ryssman and Jeng described a reconstruction technique in which the posterior tibial tendon is used as an autograft. While leaving the posterior tibial tendon’s native insertion on the navicular, the autograft tendon is secured proximally at the sustentaculum tali. Williams et al. described an autograft reconstruction technique using a peroneus longus transfer. Regardless of the spring ligament repair technique, a calcaneal osteotomy is almost always performed to support the soft-tissue repair.
(WILLIAMS ET AL.)
Make a longitudinal incision over the fibula beginning 6 to 8 cm proximal to the tip of the lateral malleolus.
Identify the peroneus longus and section it just proximal to the peroneal retinaculum. Tenodese the proximal end of the peroneus longus to the peroneus brevis.
Make a 3-cm longitudinal incision along the plantarlateral aspect of the foot from the base of the fifth metatarsal proximally toward the cuboid tunnel.
Release the attachments of the peroneus longus at the cuboid tunnel. Through the medial incision, use a right-angle clamp to hook around the peroneus longus tendon near its insertion site and deliver it gently through the medial incision. Leave the tendon attached to the base of the first metatarsal.
Choose the location of the proximal tunnel according to the type of talonavicular deformity present. If significant plantar sag is present at the talonavicular joint, create a calcaneal tunnel ( Fig. 83.25A ); if only abduction is present through the talonavicular joint, create a tibial tunnel ( Fig. 83.25B ).
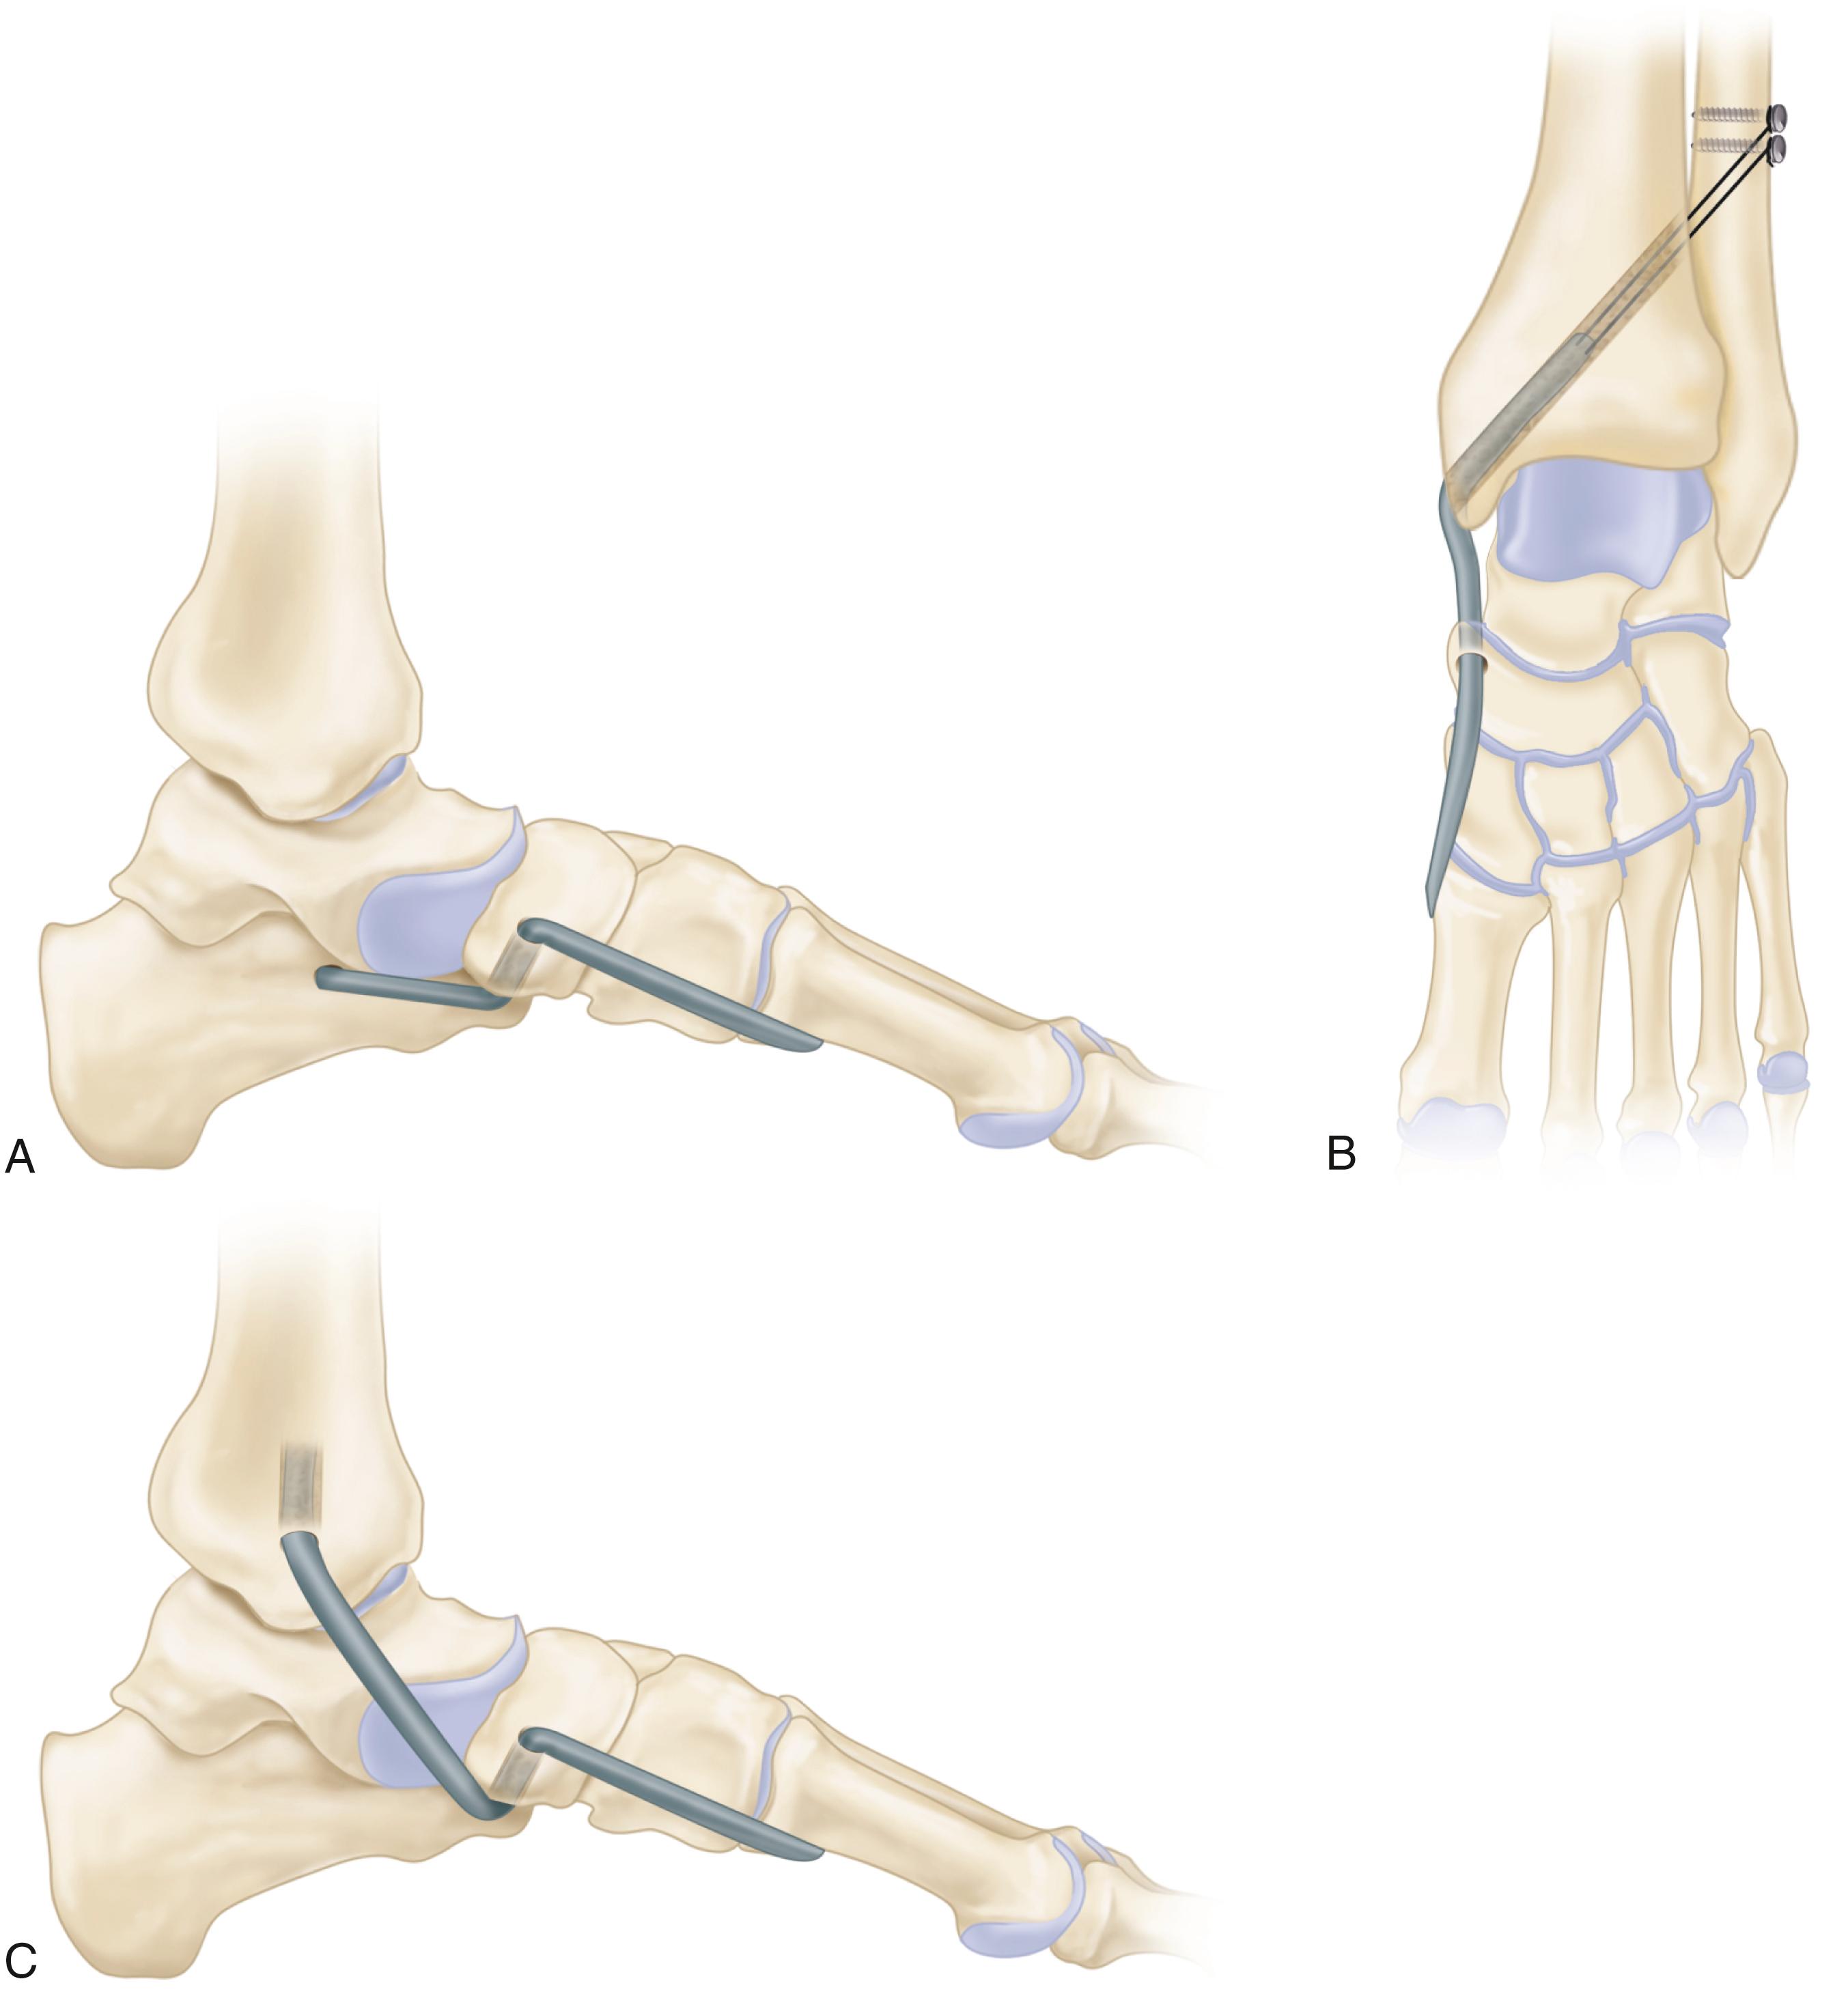
For a calcaneal tunnel, place a Kirschner wire in the calcaneus immediately inferior to the sustentaculum tali, taking care not to damage the FHL tunnel. Advance the wire posteriorly and laterally across the calcaneus, exiting above the medializing calcaneal osteotomy incision on the lateral side of the foot without violating the subtalar joint.
For a tibial tunnel, identify a point between the anterior and posterior colliculi of the medial malleolus. Use a small Bennett retractor through the fibular incision to gain access to the lateral tibia just anterior to the fibula. Under fluoroscopic guidance, place a Kirschner wire from the medial malleolus directed proximally and laterally, taking care to avoid the ankle joint.
For either tunnel placement, check the position with fluoroscopy, replace the Kirschner wire with a guidewire, and use a cannulated drill to create a tunnel 8 to 9 mm in diameter.
Pass the graft from dorsal to plantar through the navicular tunnel and then through the calcaneal ( Fig. 83.25A ) or tibial ( Fig. 83.25B , C ) tunnel. Tension the graft after fixation of the osteotomies.
Place the foot in slight inversion and plantarflexion and in 5 to 10 degrees of adduction through the talonavicular joint as seen on a simulated weight-bearing view. Pretension the graft to remove creep before fixation.
Place screws in the fibula or lateral calcaneus as posts to tie down the graft sutures. For a graft passed through a calcaneal tunnel, place a 3.5-mm screw anterior to the lateral exit of the tunnel. For a graft passed through a tibial tunnel, place the screw laterally on the fibula several centimeters proximal to the exit of the tibial tunnel.
Use two sets of sutures to secure the graft while an assistant applies tension.
Place bone graft from the medializing heel slide osteotomy in the tunnels.
Non–weight bearing in a cast is continued for 12 weeks (cast changes at 6 and 10 weeks). If healing is evident on CT at 12 weeks, a removable boot is fitted, progressive weight bearing is allowed, and gentle stretching and strengthening are begun.
Anterior calcaneal osteotomy has been studied extensively in the laboratory and has been shown to significantly improve the forefoot deformity, as well as the height of the arch. Although clinical studies could be characterized as intermediate at best, we have had significant success with this procedure. Variations of the calcaneal lengthening osteotomy exist. The traditional Evans lateral column lengthening calcaneal osteotomy (E-LLCOT) is created between the middle facet and anterior facets, and the Hintermann lateral column lengthening calcaneal osteotomy (H-LLCOT) is completed between the middle and posterior facets. Both have good clinical results. When compared directly, the H-LLCOT demonstrated less radiographic calcaneocuboid joint degenerative change, but this difference was not clinically relevant. In cadaver models, the H-LLCOT was associated with less injury to subtalar joint surfaces, but this finding may not be clinically relevant. Bolt et al. found that lateral column lengthening achieved greater realignment initially and maintained correction better over time while having a lower reoperation rate despite more frequent nonunion and radiographic progression of adjacent joint arthritis. In our experience, this procedure has been most helpful in patients who have a significant abduction deformity of the forefoot on standing anteroposterior radiographs. Complications such as graft collapse, nonunion, lateral column pain, development of arthritis at the calcaneocuboid joint, sural neuritis, and painful implants are relatively frequent and should be discussed with the patient. The use of tricortical allograft ( Fig. 83.26 ) instead of autograft has been demonstrated by multiple authors to have equivalent healing and complication rates. Gross et al. reported good union rates (96%) and pain relief in patients treated with lateral column lengthening using a porous titanium wedge.
After preparation of the medial soft tissues and before final tensioning of the flexor digitorum longus tendon into the navicular, make a longitudinal incision over the lateral anterior process of the calcaneus. Take care to avoid injury to the sural nerve.
Perform an osteotomy 1.0 to 1.5 cm proximal to the articular surface at the calcaneocuboid joint with a sagittal saw, taking care to aim the saw between the anterior facet and middle facet of the calcaneus. Avoid injuring the soft tissues just on the medial side of the calcaneus and the medial plantar nerve and artery.
Distract the area using a combination of manual adduction of the forefoot and placement of 3/32-inch Steinmann pins into the anterior process and the anterior body of the calcaneus. A hinged cervical lamina spreader, either smooth or with very small teeth, can be used to help distract the osteotomy.
Harvest an appropriately sized graft from the iliac crest. Depending on the size of the patient, it should be 8 to 10 cm in width. Alternatively, a structural allograft can be used.
Assess the foot for clinical and radiographic alignment before inserting the graft. Be certain that there is no overcorrection of the deformity.
Fix the graft with a screw or plate. The subcutaneous nature of implants in this area often necessitates removal at a later date.
Sangeorzan et al. and others demonstrated success with lateral column lengthening through the calcaneocuboid joint. If this procedure is used, carry the incision more distally. Remove the opposing cartilaginous surface of the calcaneus and cuboid to cancellous bone and use a larger graft. In general, a 1.5-cm graft is routinely used in this situation. In our experience, it is more difficult to obtain union with this osteotomy.
Tension the soft tissues, close the wound, and apply a short leg non–weight-bearing splint.
Sutures are removed 2 weeks after surgery. Continued use of a non–weight–bearing cast is recommended for 8 to 10 weeks until evidence of bony union is present on anteroposterior and lateral radiographs. The patient then progresses to weight bearing.
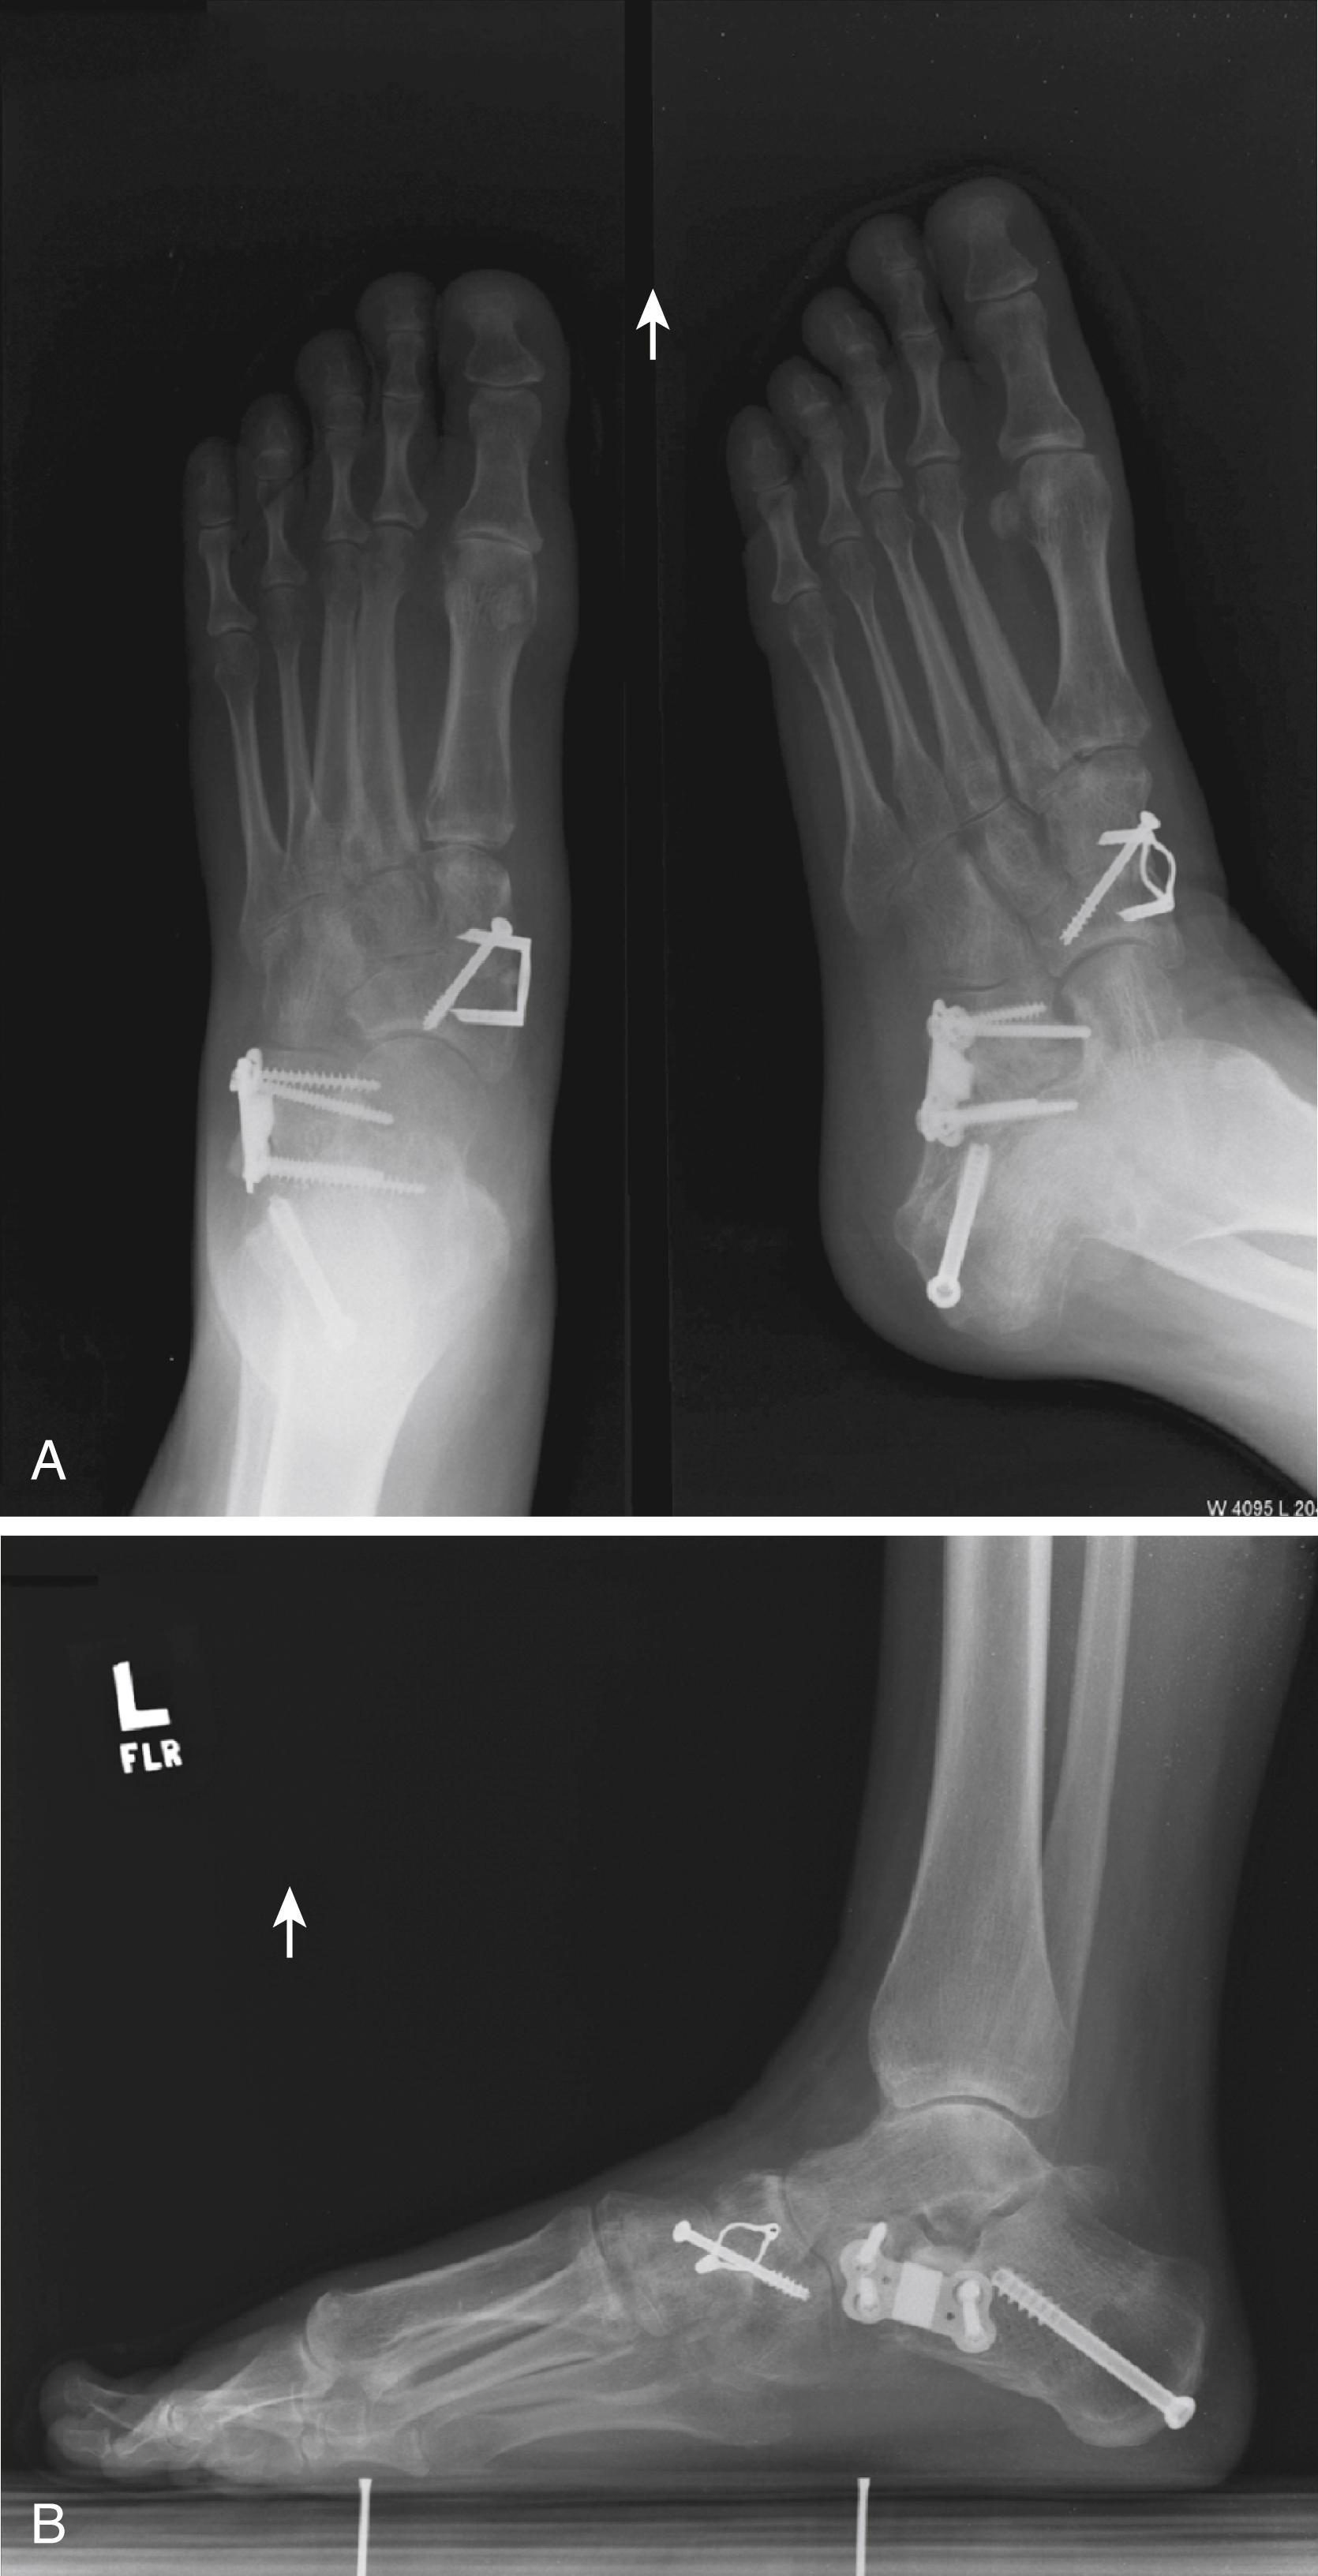
Despite meticulous technique, the risks associated with lateral column lengthening have compelled surgeons to explore other techniques. Vander Griend described a lateral column lengthening technique through a “Z” cut osteotomy, and Scott and Berlet described a similar step-cut lengthening calcaneal osteotomy (SLCO). These techniques differ only slightly so they are described interchangeably. Similar to the more traditional lateral column lengthening, the SLCO allows for varus rotation through the calcaneus, but the horizontal limb improves osseous apposition, aiding with union rates. In 37 patients who underwent a SLCO for stage IIB posterior tibial tendon deficiency, Demetracopoulos et al. demonstrated excellent healing, good deformity correction, and improved clinical outcomes. When compared directly with traditional E-LLCOT, the SLCO had significantly increased healing times, fewer nonunions, less implant irritation, and small graft sizes while resulting in similar deformity correction and outcome scores.
(SCOTT AND BERLET)
Make a 5-cm linear incision over the peroneal tubercle.
Carry dissection through the subcutaneous tissue with care to locate sural nerve branches.
Incise the peroneal tendon sheath and mobilize the peroneal tendons.
Mark the dorsal, vertical limb of the osteotomy site roughly 1.5 cm proximal to the calcaneocuboid joint.
Moving proximally, mark the 2-cm horizontal limb and the proximal, plantar vertical limb. With the peroneus brevis reflected superiorly and the peroneus longus plantarly, make the horizontal osteotomy first.
With the peroneals retracted plantarly, make the dorsal limb cut.
With the peroneals retracted dorsally, create the plantar limb.
Use a long arm distractor to rotate the osteotomy, and obtain an anteroposterior radiograph to determine the amount of talonavicular coverage needed.
Use autograft, allograft, or porous titanium wedges to secure the osteotomy sites and maintain the correction ( Fig. 83.27 ).

Medial calcaneal displacement osteotomy was popularized by Myerson as an alternative to lengthening of the lateral column. Myerson and Corrigan reviewed 32 patients treated with medial calcaneal displacement osteotomy and a medial soft-tissue procedure for stage II posterior tibial tendon dysfunction. At an average of 20 months after surgery, 30 of 32 patients were satisfied with the outcome of surgery, had improved function, and exhibited radiographic correction of the foot deformity. Ninety-four percent of the patients had pain relief and improvement in the arch of the foot and were able to wear regular shoes without orthotic support. Using three-dimensional gait analysis, Brodsky et al. determined that posterior tibial tendon reconstruction consisting of transfer of the flexor digitorum longus tendon to the navicular, reconstruction of the calcaneonavicular ligament, and medial displacement calcaneal osteotomy produced objective improvements in walking velocity, hindfoot motion, and power. The placement of the tuberosity of the calcaneus and the gastrocsoleus complex more medial to the axis of the subtalar joint improves the function of the gastrocsoleus complex as an inverter of the hindfoot, thereby assisting with the force necessary to invert the foot with less reliance on the transferred flexor digitorum longus tendon. We have found this procedure most useful in patients in whom standing anteroposterior radiographs do not demonstrate severe abduction deformity through the midfoot ( Fig. 83.28 ). Advantages of this osteotomy include predictable healing of the osteotomy without the complication of increased calcaneocuboid joint pressure, which has been noted to occur with a lateral column lengthening.
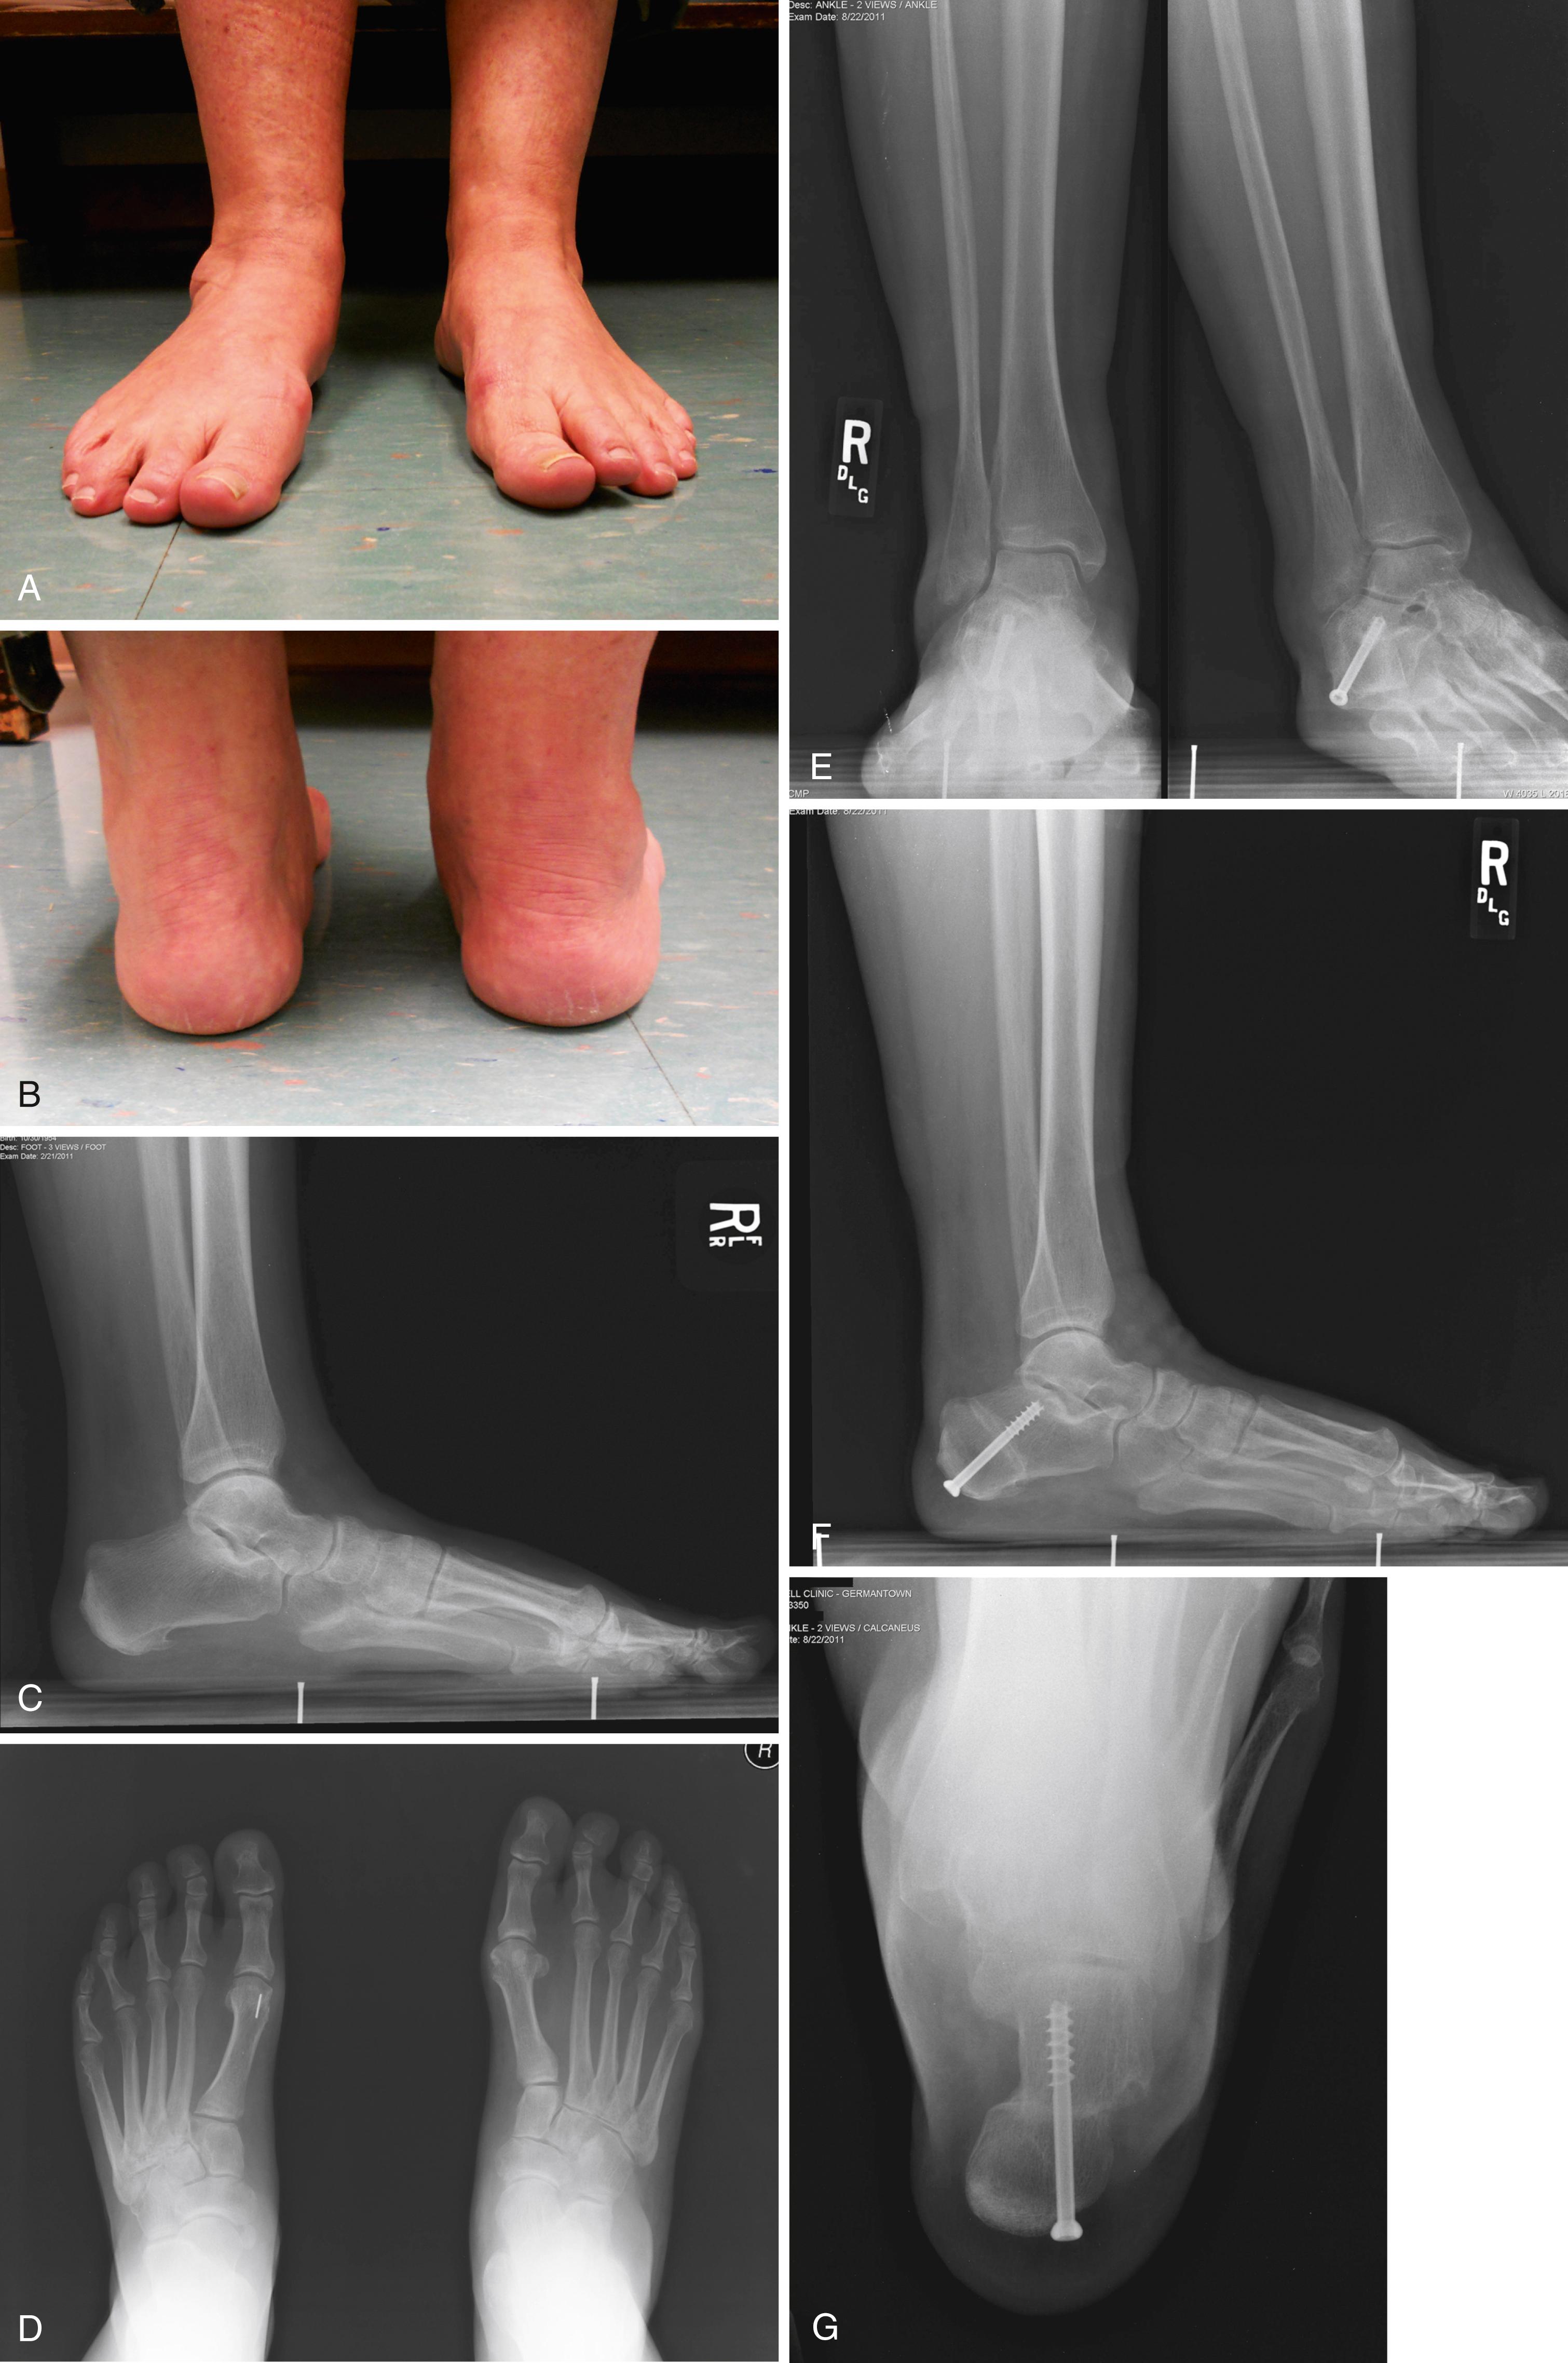
With the increased popularity of minimally invasive surgery, a medializing displacement calcaneal osteotomy also has been described. In a comparative study, the minimally invasive osteotomy was found to be similarly effective with fewer wound and nerve complications than the more traditional open approach.
Position the patient supine with a large ipsilateral hip bump or a bean bag.
Make an incision inferior and parallel to the peroneal tendons and posterior and inferior to the path of the sural nerve. Extend the excision from the upper border of the calcaneus anterior to the retrocalcaneal space to the inferior border of the calcaneus deep to the plantar fascia.
Carry the dissection down to the periosteum and reflect the periosteum at the proposed osteotomy site.
Make a transverse osteotomy in line with the skin incision using an oscillating saw blade ( Fig. 83.29A ). Make the cut at a right angle to the lateral border of the calcaneus and angle it posteriorly approximately 45 degrees to the plane of the foot.
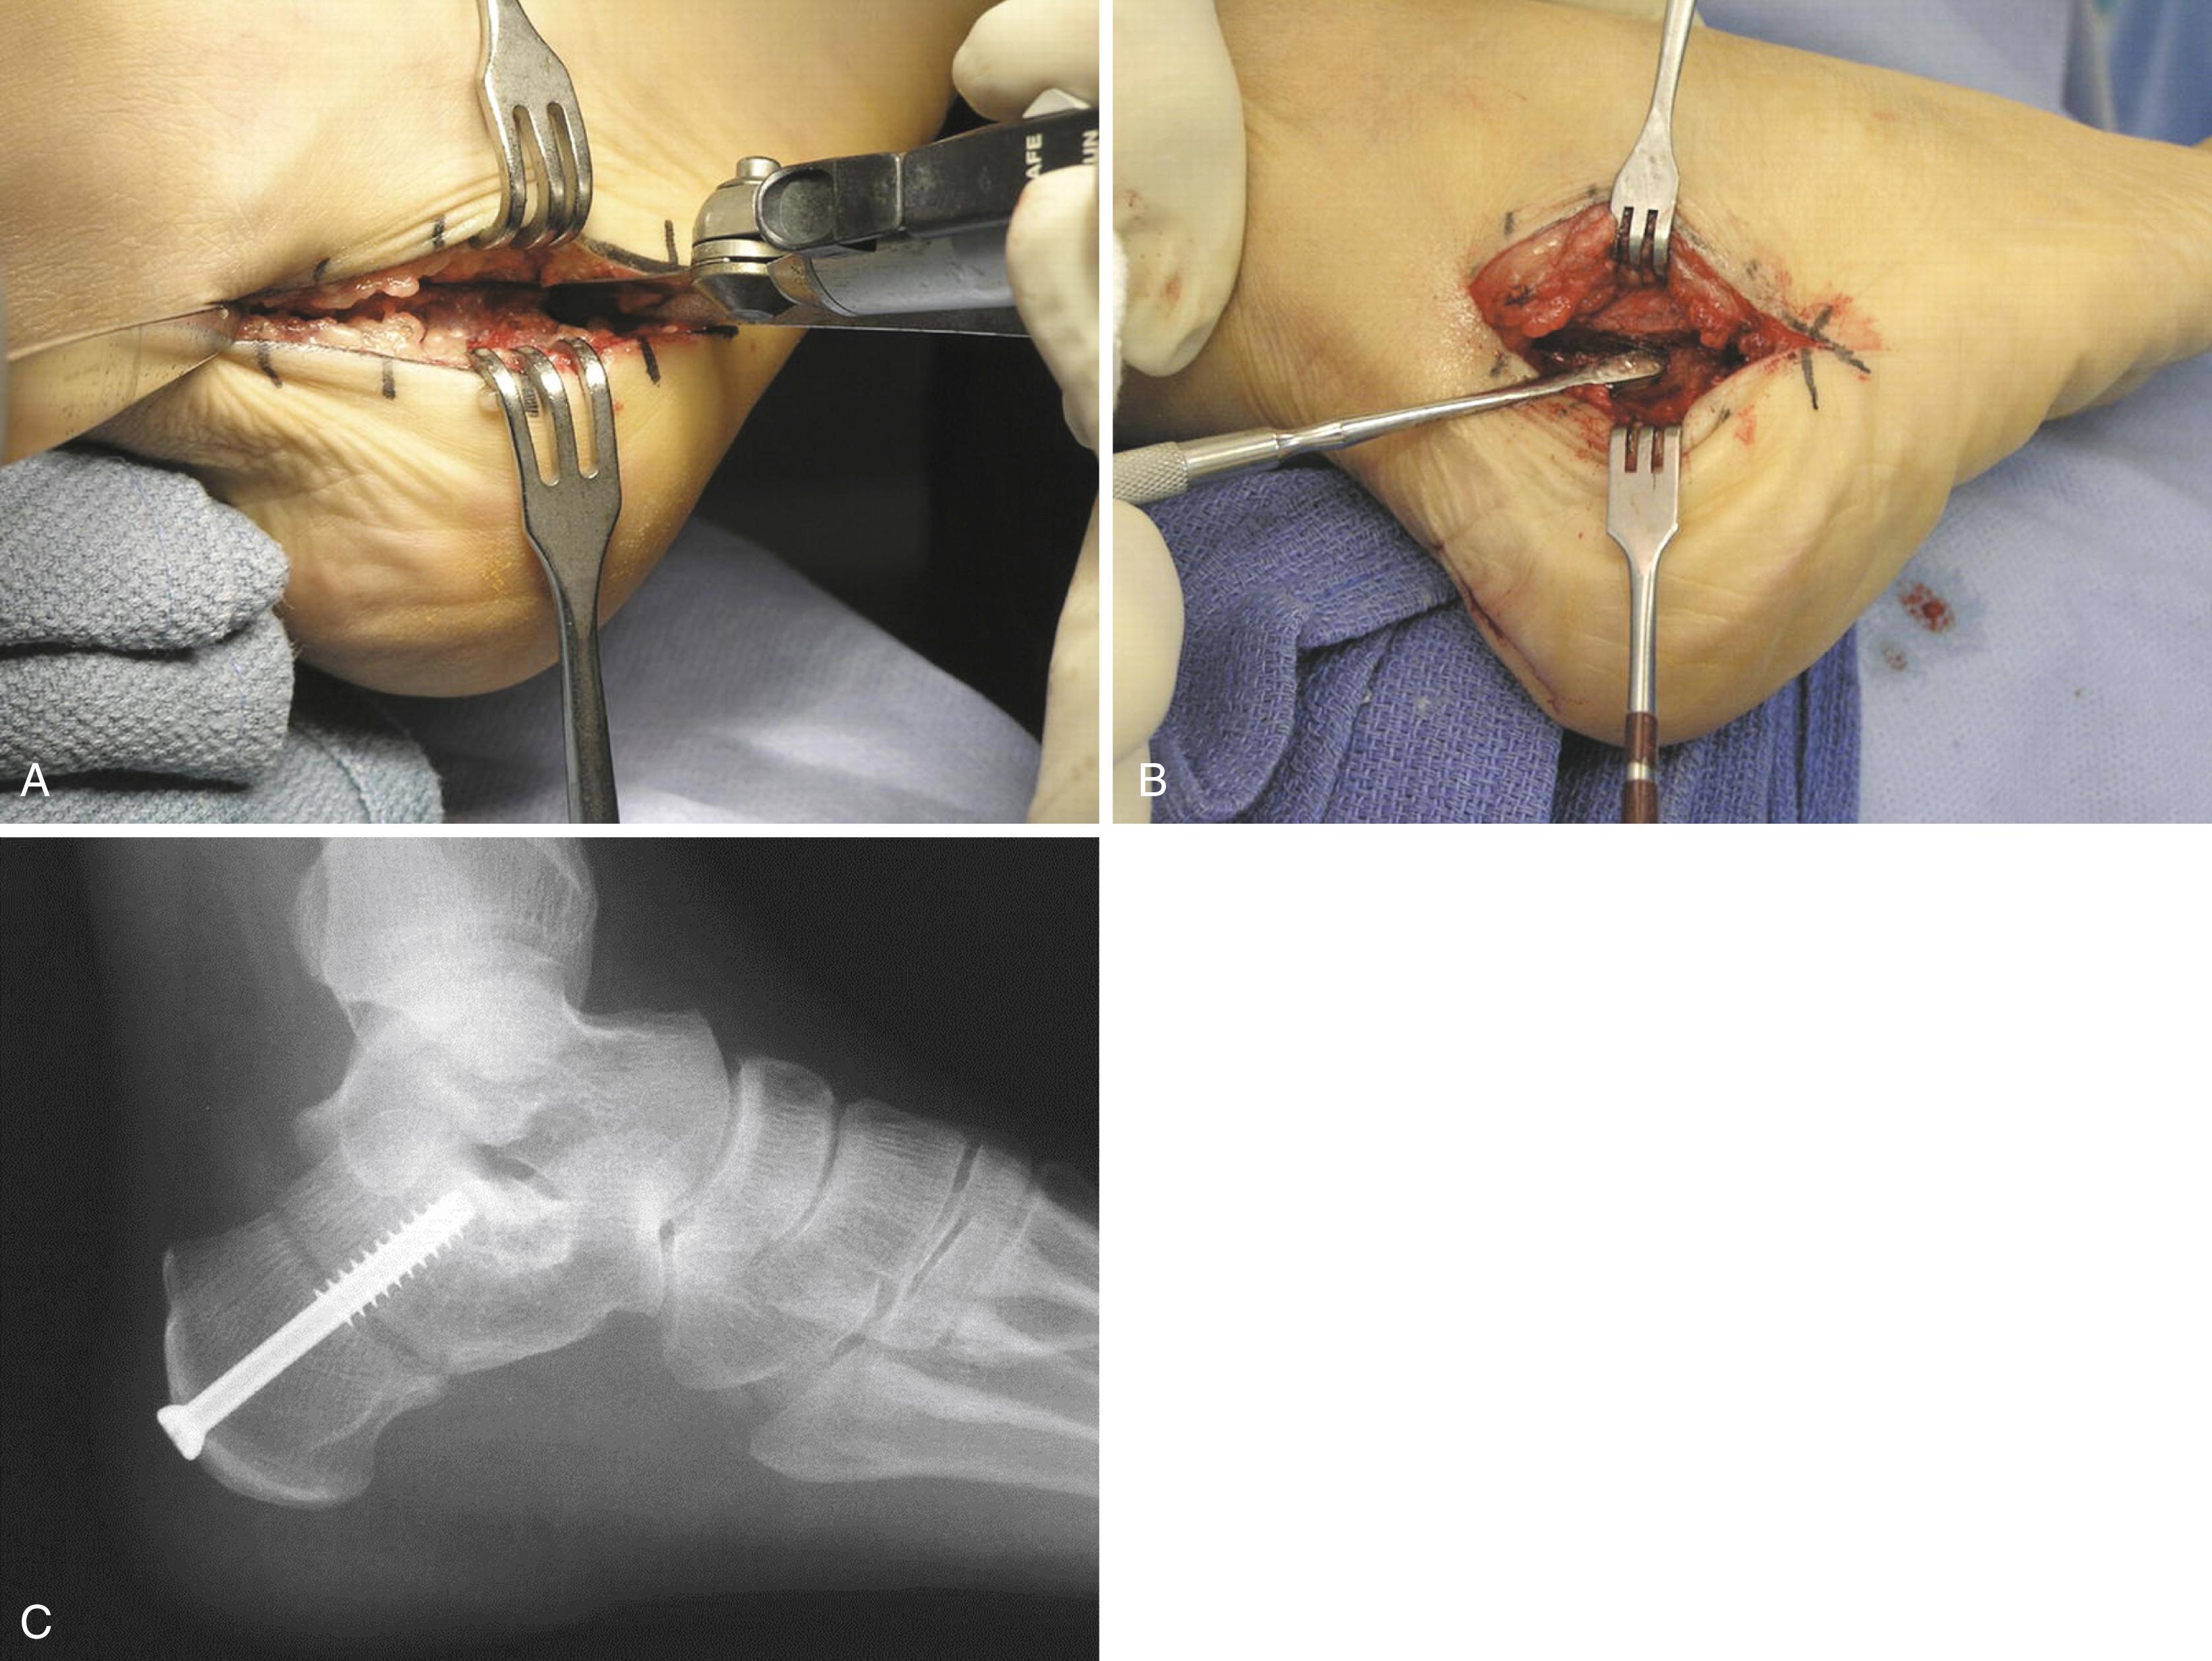
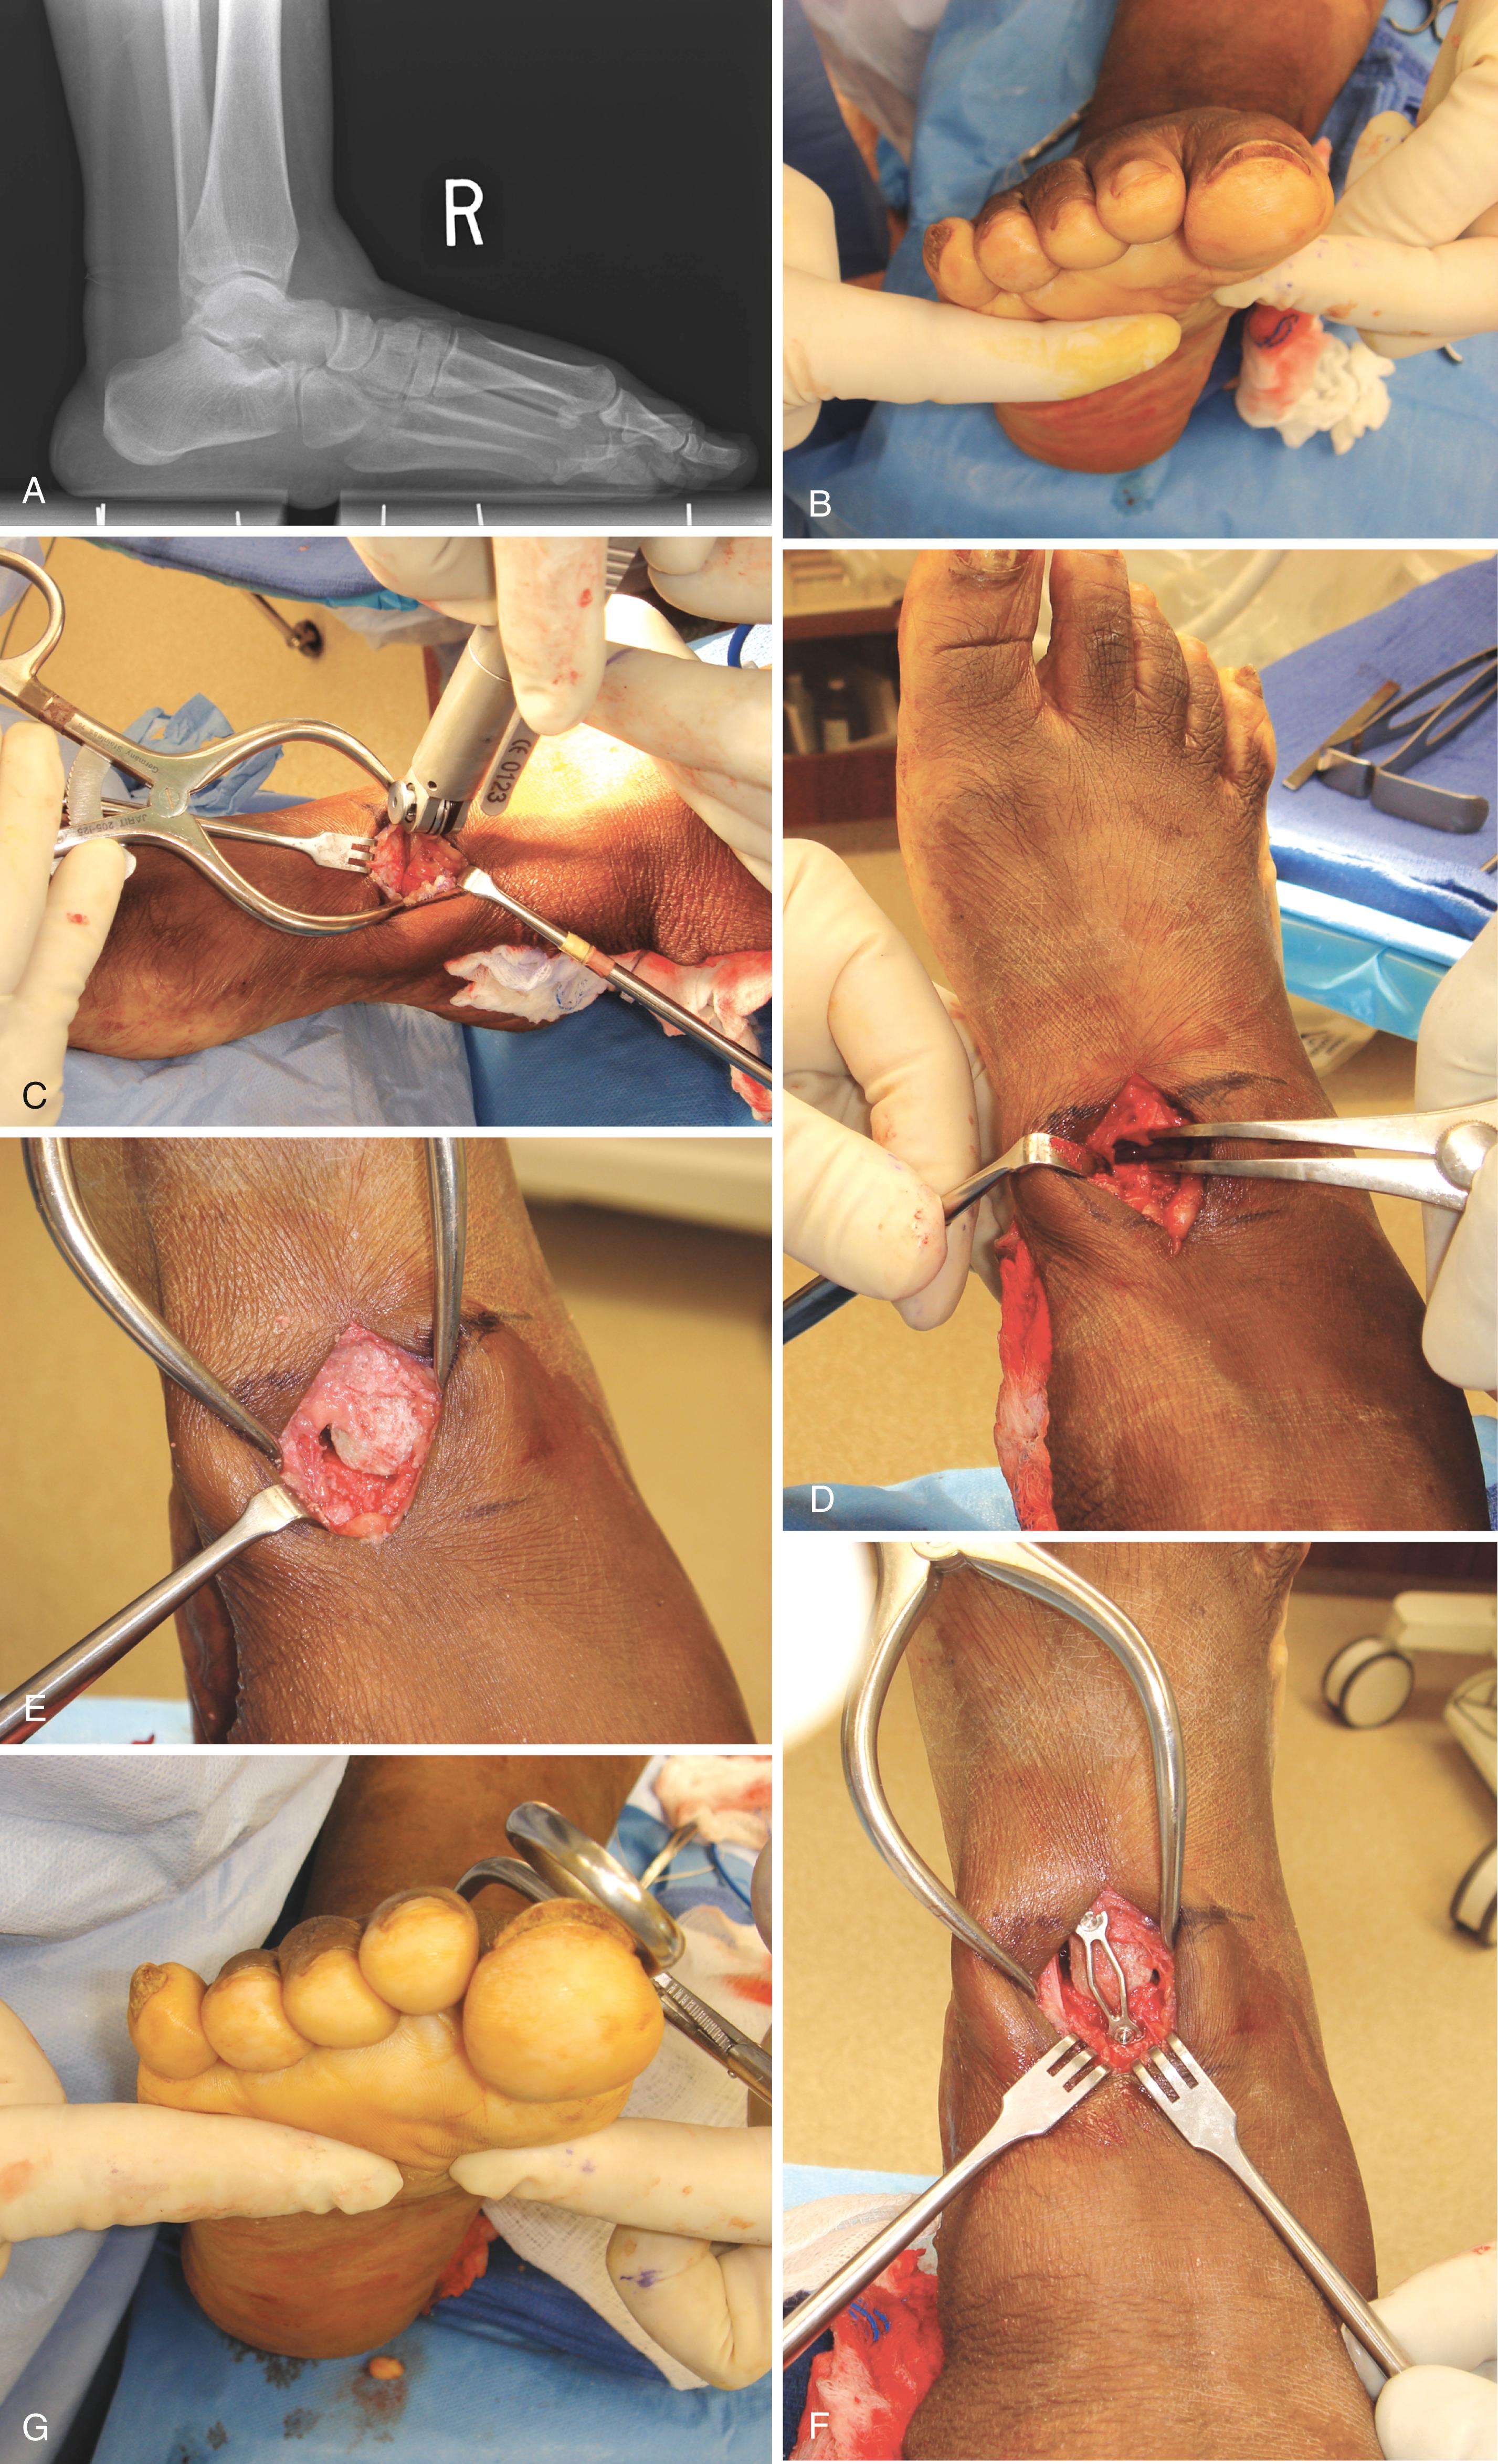
Place a toothless lamina spreader into the osteotomy site and spread it to mobilize the calcaneal soft-tissue attachments.
Withdraw the lamina spreader, translate the posterior calcaneal tuberosity 10 mm medially ( Fig. 83.29B ), and secure it with an adequately sized cannulated screw ( Fig. 83.29C ). Take care to keep the posterior tuberosity from sliding proximally. Insert the screw from posteromedial and inferior to anterolateral and superior, that is, direct it toward the sinus tarsi.
Close the lateral incision, and reposition the patient supine for the medial tendon transfer.
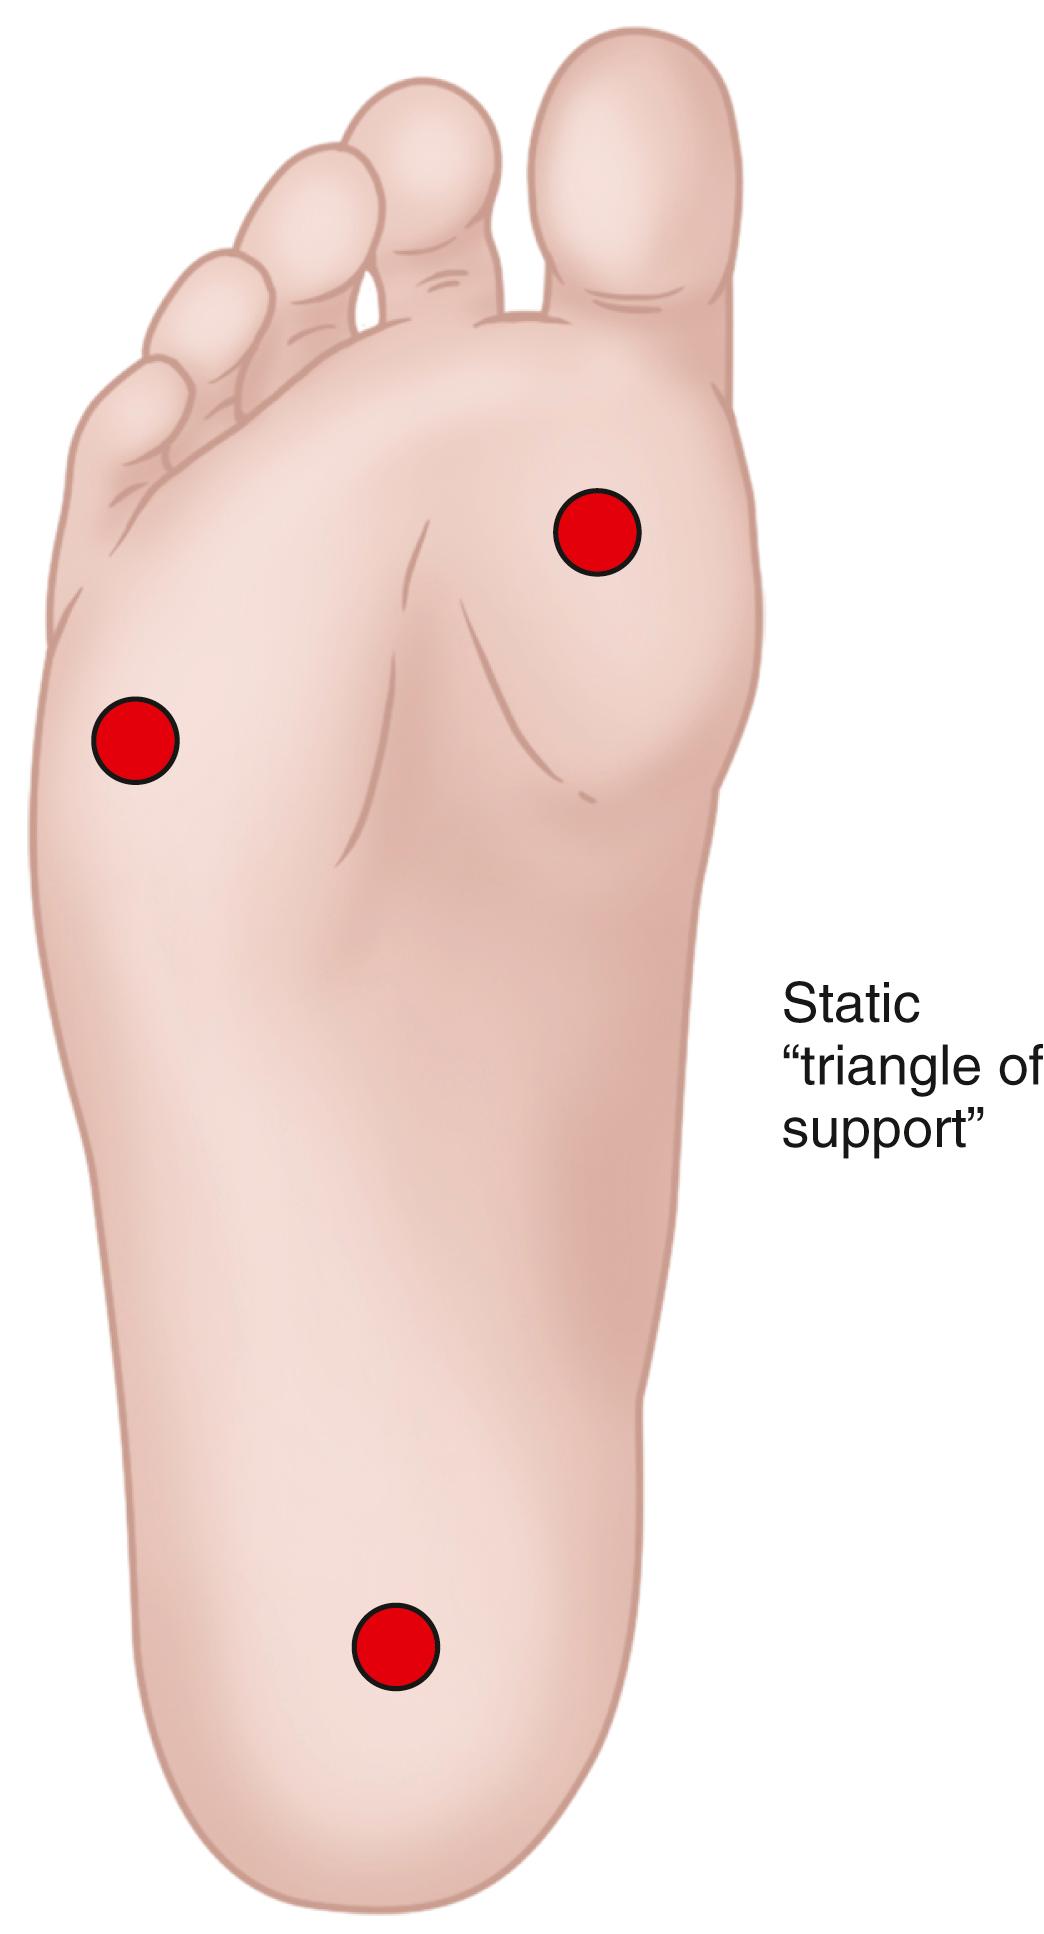
With long-standing hindfoot valgus, the forefoot accommodates this deformity with increasing supination. This supination is accentuated after the hindfoot is corrected, creating an unbalanced foot. Thus, to balance the triangular support of the foot, the supination must be addressed through plantarflexing the medial column. An opening wedge medial cuneiform osteotomy (Cotton) plantarflexes the first metatarsal head, improving forefoot supination. Hirose and Johnson reported excellent results with no major complications in 16 patients treated with opening wedge osteotomy of the medial cuneiform as an adjunctive procedure in flatfoot correction ( Fig. 83.30 ). However, Conti et al. warned that excessive plantarflexion of the medial cuneiform (cuneiform articular angle ≤ -2 degrees) correlates with worse outcomes than those with mild plantarflexion (cuneiform articular angle ≥ -2 degrees), so surgeons should avoid excessive plantarflexion. Suggested advantages of the Cotton osteotomy over first tarsometatarsal arthrodesis include predictable union, preservation of first ray mobility, and ability to vary the amount of correction.
(HIROSE AND JOHNSON)
Position the patient supine on the operating table with a pad under the ipsilateral buttock to internally rotate the affected leg.
Prepare and drape the ipsilateral iliac crest donor site and the affected leg.
Under tourniquet control, make a dorsal longitudinal incision over the medial cuneiform and the base of the first metatarsal and dissect through the skin and subcutaneous tissue.
Retract the extensor hallucis longus medially to expose the dorsal portion of the medial cuneiform; identify the midportion of the bone with fluoroscopy.
Use a microsagittal saw to make a transverse osteotomy from dorsal to plantar through the midportion of the medial cuneiform at the level of the second tarsometatarsal joint ( Fig. 83.31A ).
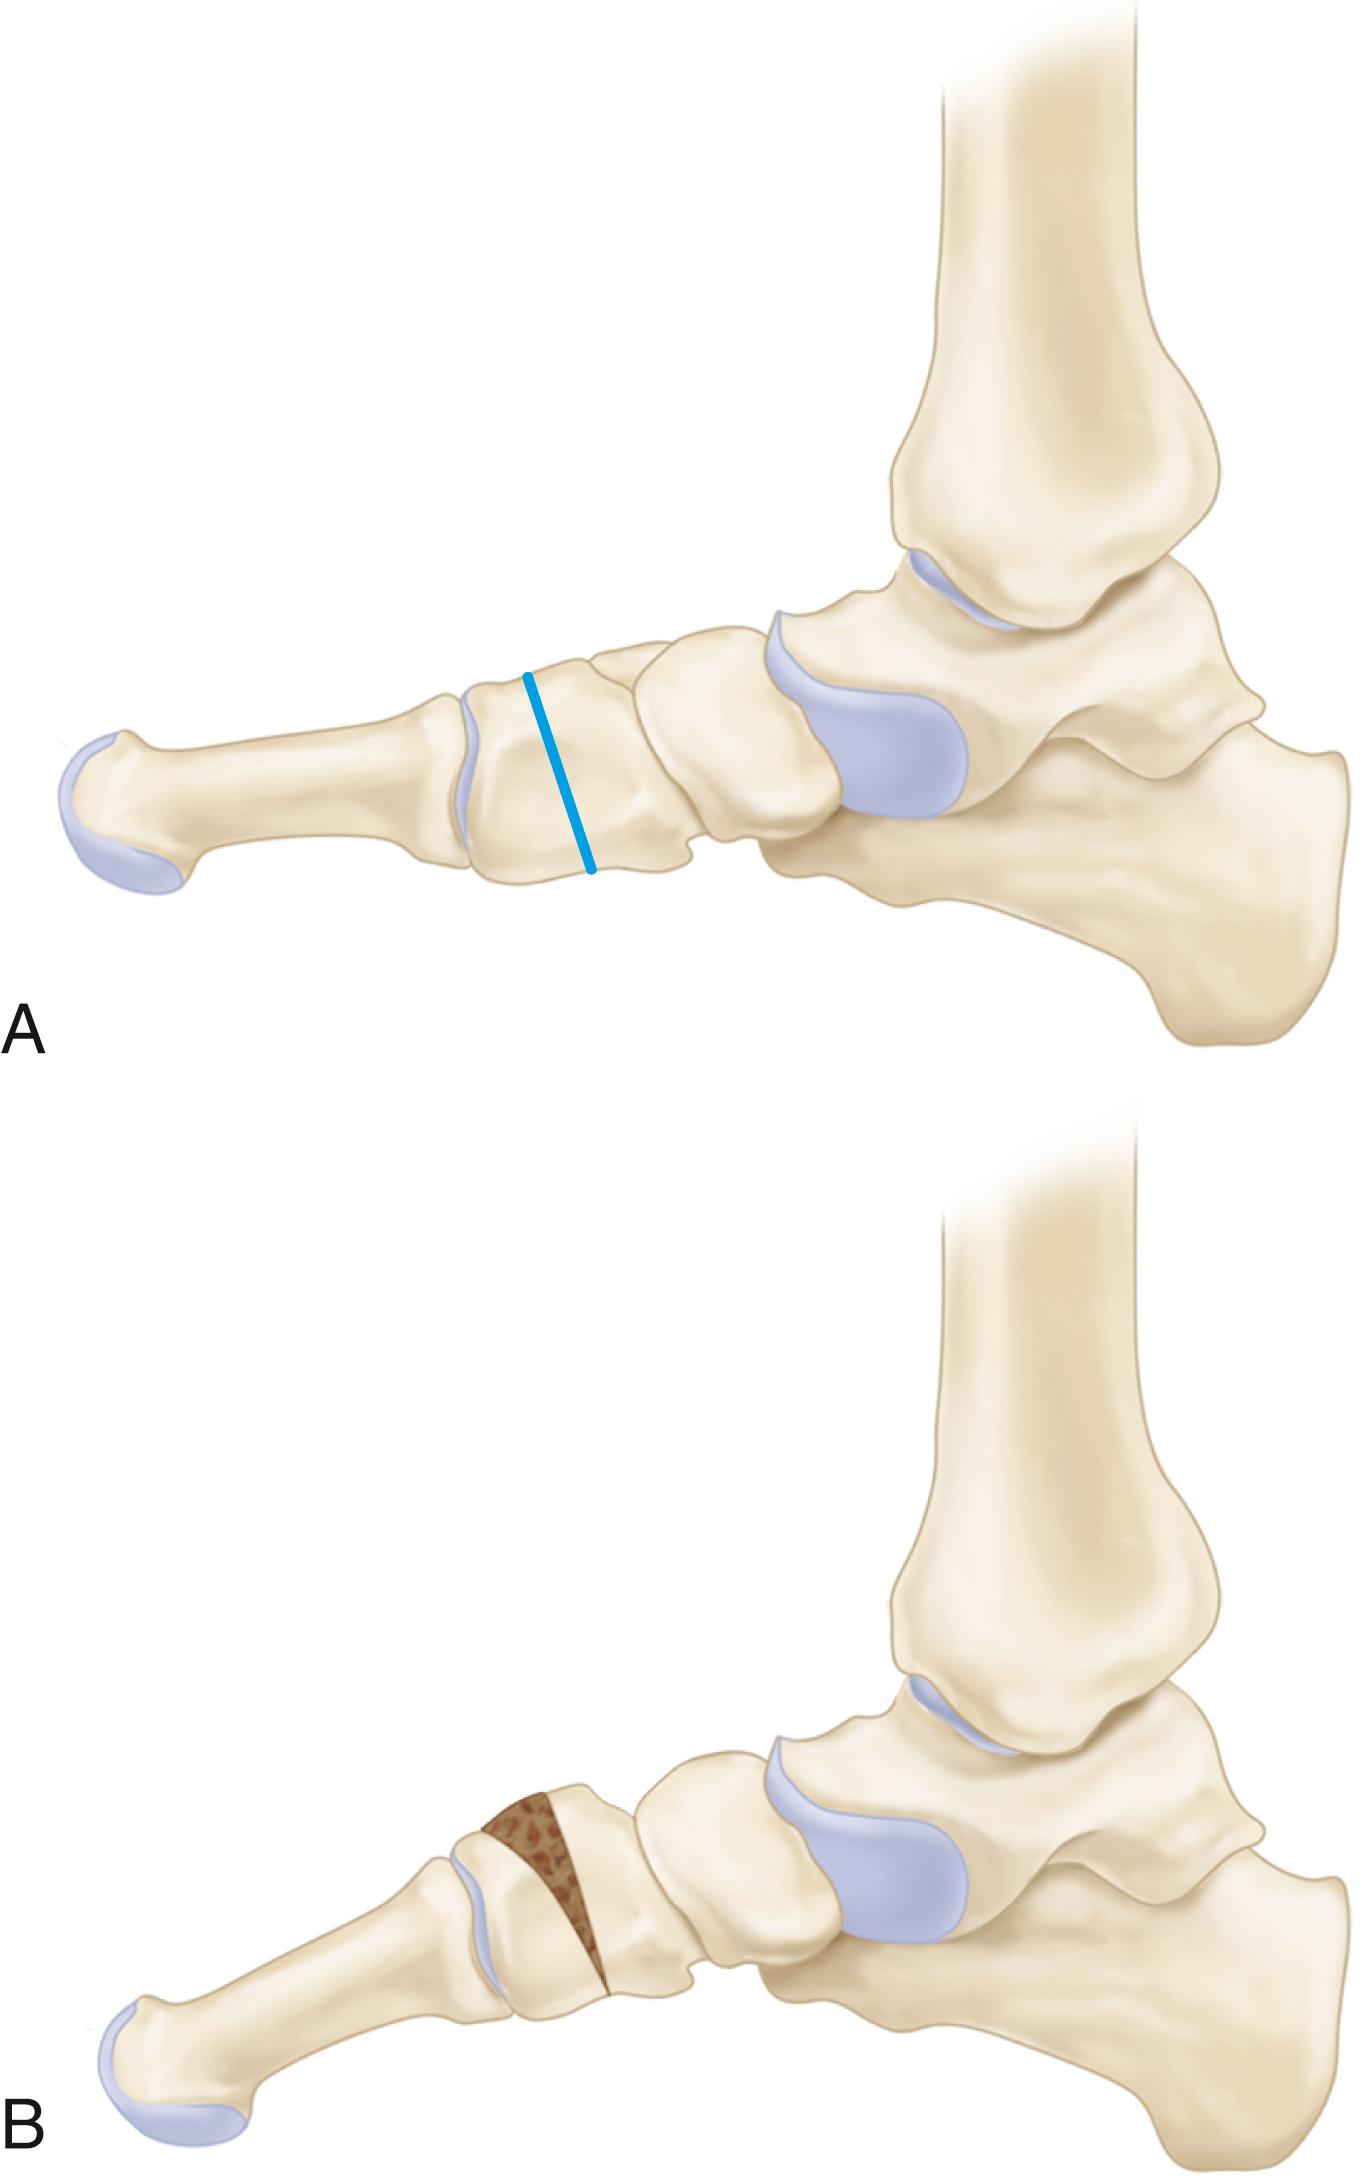
Place an osteotome in the osteotomy and pull it distally to lever open the medial cuneiform osteotomy and plantarflex the first ray. Measure the amount of opening of the osteotomy to obtain the desired plantarflexion of the first ray; usually a 5- to 6-mm wedge of autograft bone is needed. The goal is plantarflexion of the first ray to the level of the fifth metatarsal to restore the normal “tripod” configuration ( Fig. 83.32 ).
Remove a tricortical iliac crest wedge of the measured width and denude it of soft tissue; trim the wedge with a microsagittal saw until it fits into the space created by opening the osteotomy ( Fig. 83.31B ).
Place a small amount of cancellous bone graft into the most inferior aspects of the osteotomy.
Use a bone tamp to impact the tricortical iliac crest graft from dorsal to plantar into the medial cuneiform osteotomy while the osteotomy is levered open with a narrow osteotome and a plantarflexion force is placed on the first metatarsal.
Drive a guide pin for a 4.0- or 3.5-mm cannulated screw from the dorsal aspect of the distal portion of the cuneiform across the osteotomy and into the plantar aspect of the proximal fragment of the cuneiform. Insert a screw of the appropriate length and countersink it.
Use the microsagittal saw to contour any portion of the iliac crest graft that protrudes outside the contours of the cuneiform.
To avoid impingement against the second cuneiform, take care that the graft is not placed too far laterally.
Close the incisions in routine fashion and apply a compressive dressing with plaster.
At 7 to 14 days, the compressive dressing is changed for a non–weight-bearing cast. At 6 weeks, if fusion is evident on radiographs, weight bearing as tolerated is allowed.
The concept of arthroereisis probably dates to Grice’s description of an extraarticular arthrodesis with insertion of bone graft into the sinus tarsi. To maintain the arch correction, the concept was to limit the ability of the calcaneus to externally rotate underneath the talus. Currently, this has evolved to the use of various sinus tarsi implants to block external rotation of the calcaneus relative to the talus or to prevent the anterior process of the calcaneus from abutting the lateral process of the talus as the foot pronates.
As described by Maxwell and Cerniglia, there are three biomechanical types of sinus tarsi implants. The first is a self-locking wedge, which is inserted in a screw fashion within the sinus tarsi between the lateral process of the talus and the anterior process of the calcaneus and prevents external rotation of the calcaneus on the talus ( Fig. 83.33A ). The second is described as an axis-altering device ( Fig. 83. 33 B ). This device is inserted intraarticularly under the lateral process of the talus, elevating the lateral aspect of the talus. The third type is an impact-blocking device, which is inserted extraarticularly in the floor of the sinus tarsi and acts to block external rotation of the calcaneus under the talus ( Fig. 83. 33 C ). Various plastic, metallic, and bioabsorbable materials are used for these implants. No studies compare the efficacies or safety of the differing available implants.

Multiple publications have demonstrated clinical and radiographic improvement with the use of subtalar arthroereisis in managing pes planus deformity in adults and children, but proper patient selection is crucial. Furthermore, this procedure is best utilized with other procedures (i.e., soft-tissue and osseous procedures) to maintain the correction and should be limited to flexible pes planovalgus or early stage posterior tibial tendon deficiency (stage IIA) deformities. With a mean follow-up of 1 year, Chong et al. prospectively compared lateral column lengthening and arthroereisis in pediatric flexible flatfoot deformity. Both groups demonstrated clinical and radiographic improvement with minimal complications, and the authors recommended arthroereisis as a less-invasive alternative to lateral column lengthening. In a critical review of the literature, Metcalfe et al. found patient satisfaction rates of 79% to 100% in pediatric patients; however, arthroereisis was associated with a number of complications, including sinus tarsi pain, device extrusion, talar fracture, and undercorrection. Complication rates ranged from 5% to 18%. Similar positive results in adult populations have been reported in flexible posterior tibial tendon deficiency, but the need for implant removal remains high, ranging from 7% to 46%. Fortunately, no loss of correction has been reported once the implant is removed.
In patients with stage III disease—rigid fixed deformity of the hindfoot and degenerative changes of the triple joint complex—arthrodesis is indicated if conservative measures have failed. Conservative measures include accommodative bracing such as a double upright ankle-foot orthosis. Multiple arthrodeses have been described for treatment of this deformity, including isolated talonavicular, isolated subtalar arthrodesis, talonavicular and calcaneocuboid arthrodesis, talonavicular and subtalar arthrodesis, and triple arthrodesis. Historically, triple arthrodesis is the procedure of choice for this condition. However, Harper found that in elderly, low-demand patients, isolated talonavicular arthrodesis produced significant correction of the deformity with satisfactory pain relief. He reviewed the results in 29 patients treated with an isolated talonavicular arthrodesis with an average follow-up of 26 months; 25 of 29 patients (86%) were satisfied with no or minor reservations and achieved good or excellent results. Sammarco et al., in an effort to preserve the flexibility of the lateral column, corrected the deformity with subtalar and talonavicular arthrodesis without calcaneocuboid arthrodesis. They reported improvements in pain, function, cosmesis, and shoe wear, with only one nonunion in 16 feet, and recommended the procedure for patients whose calcaneocuboid joints are not involved in the primary disease. Denuding and compressing the talonavicular joint while preserving the calcaneocuboid joint was suggested to provide a relative lateral column lengthening, facilitating correction of forefoot abduction in flatfeet. Other authors have warned that the modified double arthrodesis has increased nonunion rates and worse outcomes than the standard triple arthrodesis. For mild stage III deformity, the “diple” (talonavicular and subtalar arthrodesis) is our procedure of choice, but including the calcaneocuboid joint is helpful for large corrections in severe deformity. The procedure for arthrodesis of the hindfoot is described in Chapter 85 ( Fig. 83.34 ).
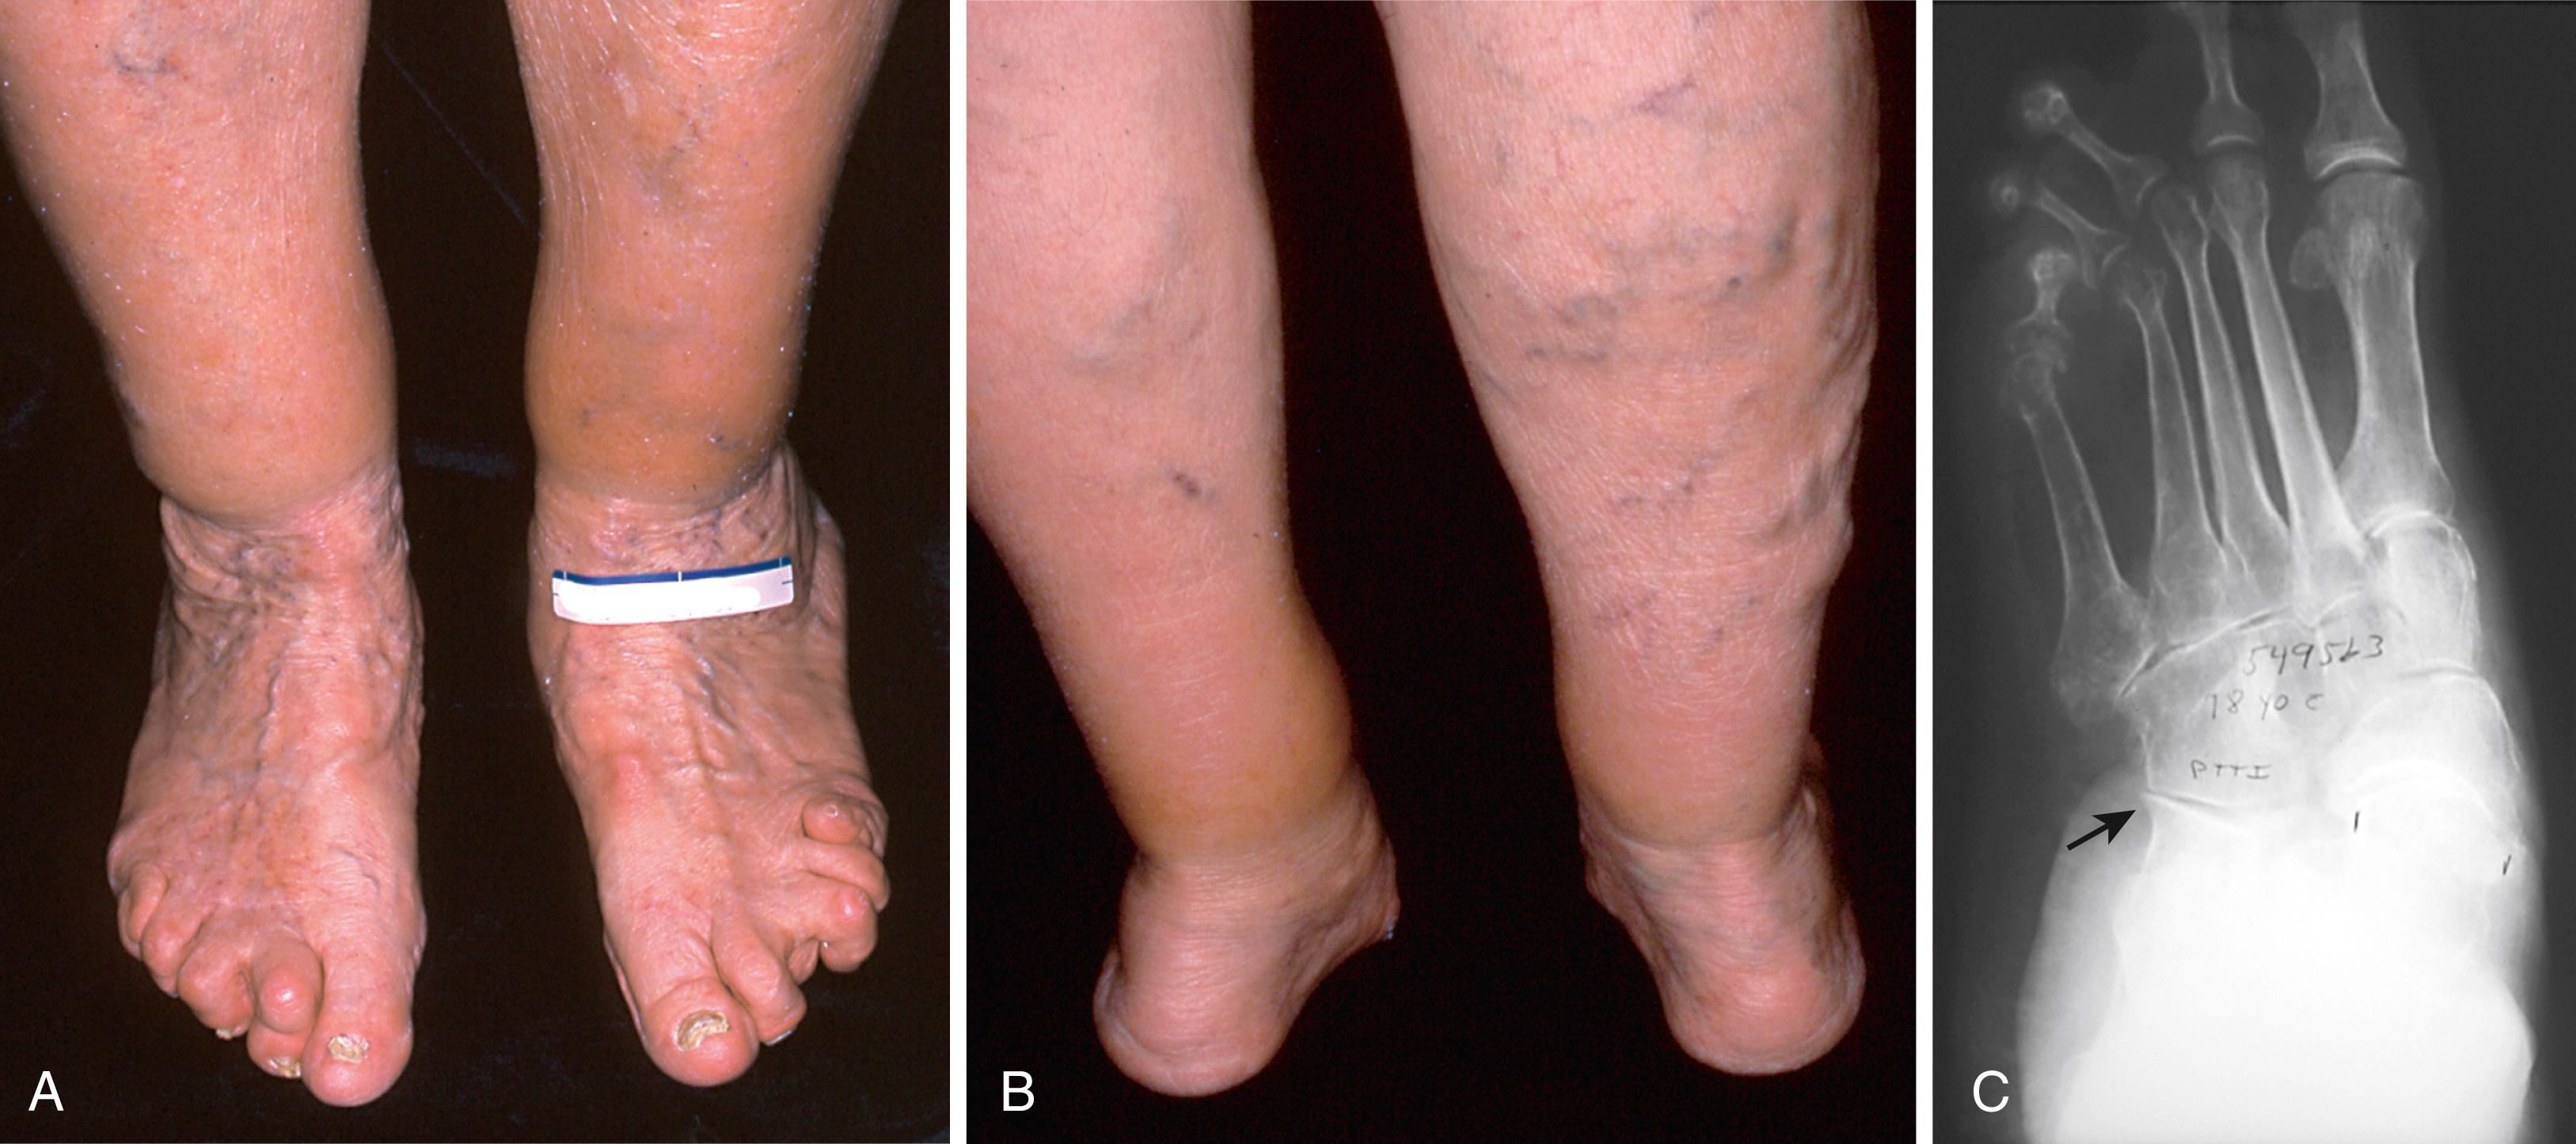
As previously discussed, the deformity is not always the result of talonavicular joint subluxation, but instead the deformity may result from medial column instability (navicular-cuneiform or cuneiform-metatarsal instability). In reality, medial column instability often accompanies the hindfoot deformity, necessitating treatment of medial column stability in addition to hindfoot procedures. Steiner et al. described correcting medial arch collapse at the level of the naviculocuneiform joint. In 34 feet treated with a subtalar and naviculocuneiform fusion, improved radiographic parameters and an excellent union rate (94%) were achieved. Stabilization of the medial column in flatfoot deformity, if not possible by soft-tissue procedures, may be achieved by either arthrodesis or osteotomy. Greisberg et al. described an isolated medial column arthrodesis to improve hindfoot alignment and reported improvement in all radiographic parameters in 19 patients.
(GREISBERG ET AL.)
After induction of spinal or general anesthesia and application of a thigh tourniquet, assess the calf musculature to determine if a gastrocnemius slide (Strayer) procedure is needed for contracture.
Inflate the tourniquet and make a medial utility incision.
If instability is present at the naviculocuneiform joint, use osteotomes to denude the medial and middle naviculocuneiform joints of cartilage and prepare them for fusion by perforating the subchondral bone with a small drill. The lateral naviculocuneiform joint usually is not included in the fusion. Reduce and stabilize the joints with multiple 3.5-mm lag screws passed from the navicular into the cuneiform.
Treat any posterior tibial tendon degeneration as needed with tendon debridement or augmentation with the flexor digitorum longus.
If the first tarsometatarsal joint is subluxed, approach it through a separate dorsal longitudinal incision to avoid injury to the anterior tibial tendon. Open the joint between the extensor hallucis longus and brevis tendons and prepare it for fusion with osteotomes and a small drill to perforate subchondral bone. Reduce and hold the joint with multiple 3.5-mm lag screws ( Fig. 83.35 ). Typically, one screw is passed antegrade and the second retrograde. A third screw is then used to hold the first metatarsal reduced to the second, especially when the area between the bases of the metatarsals is included in the fusion.
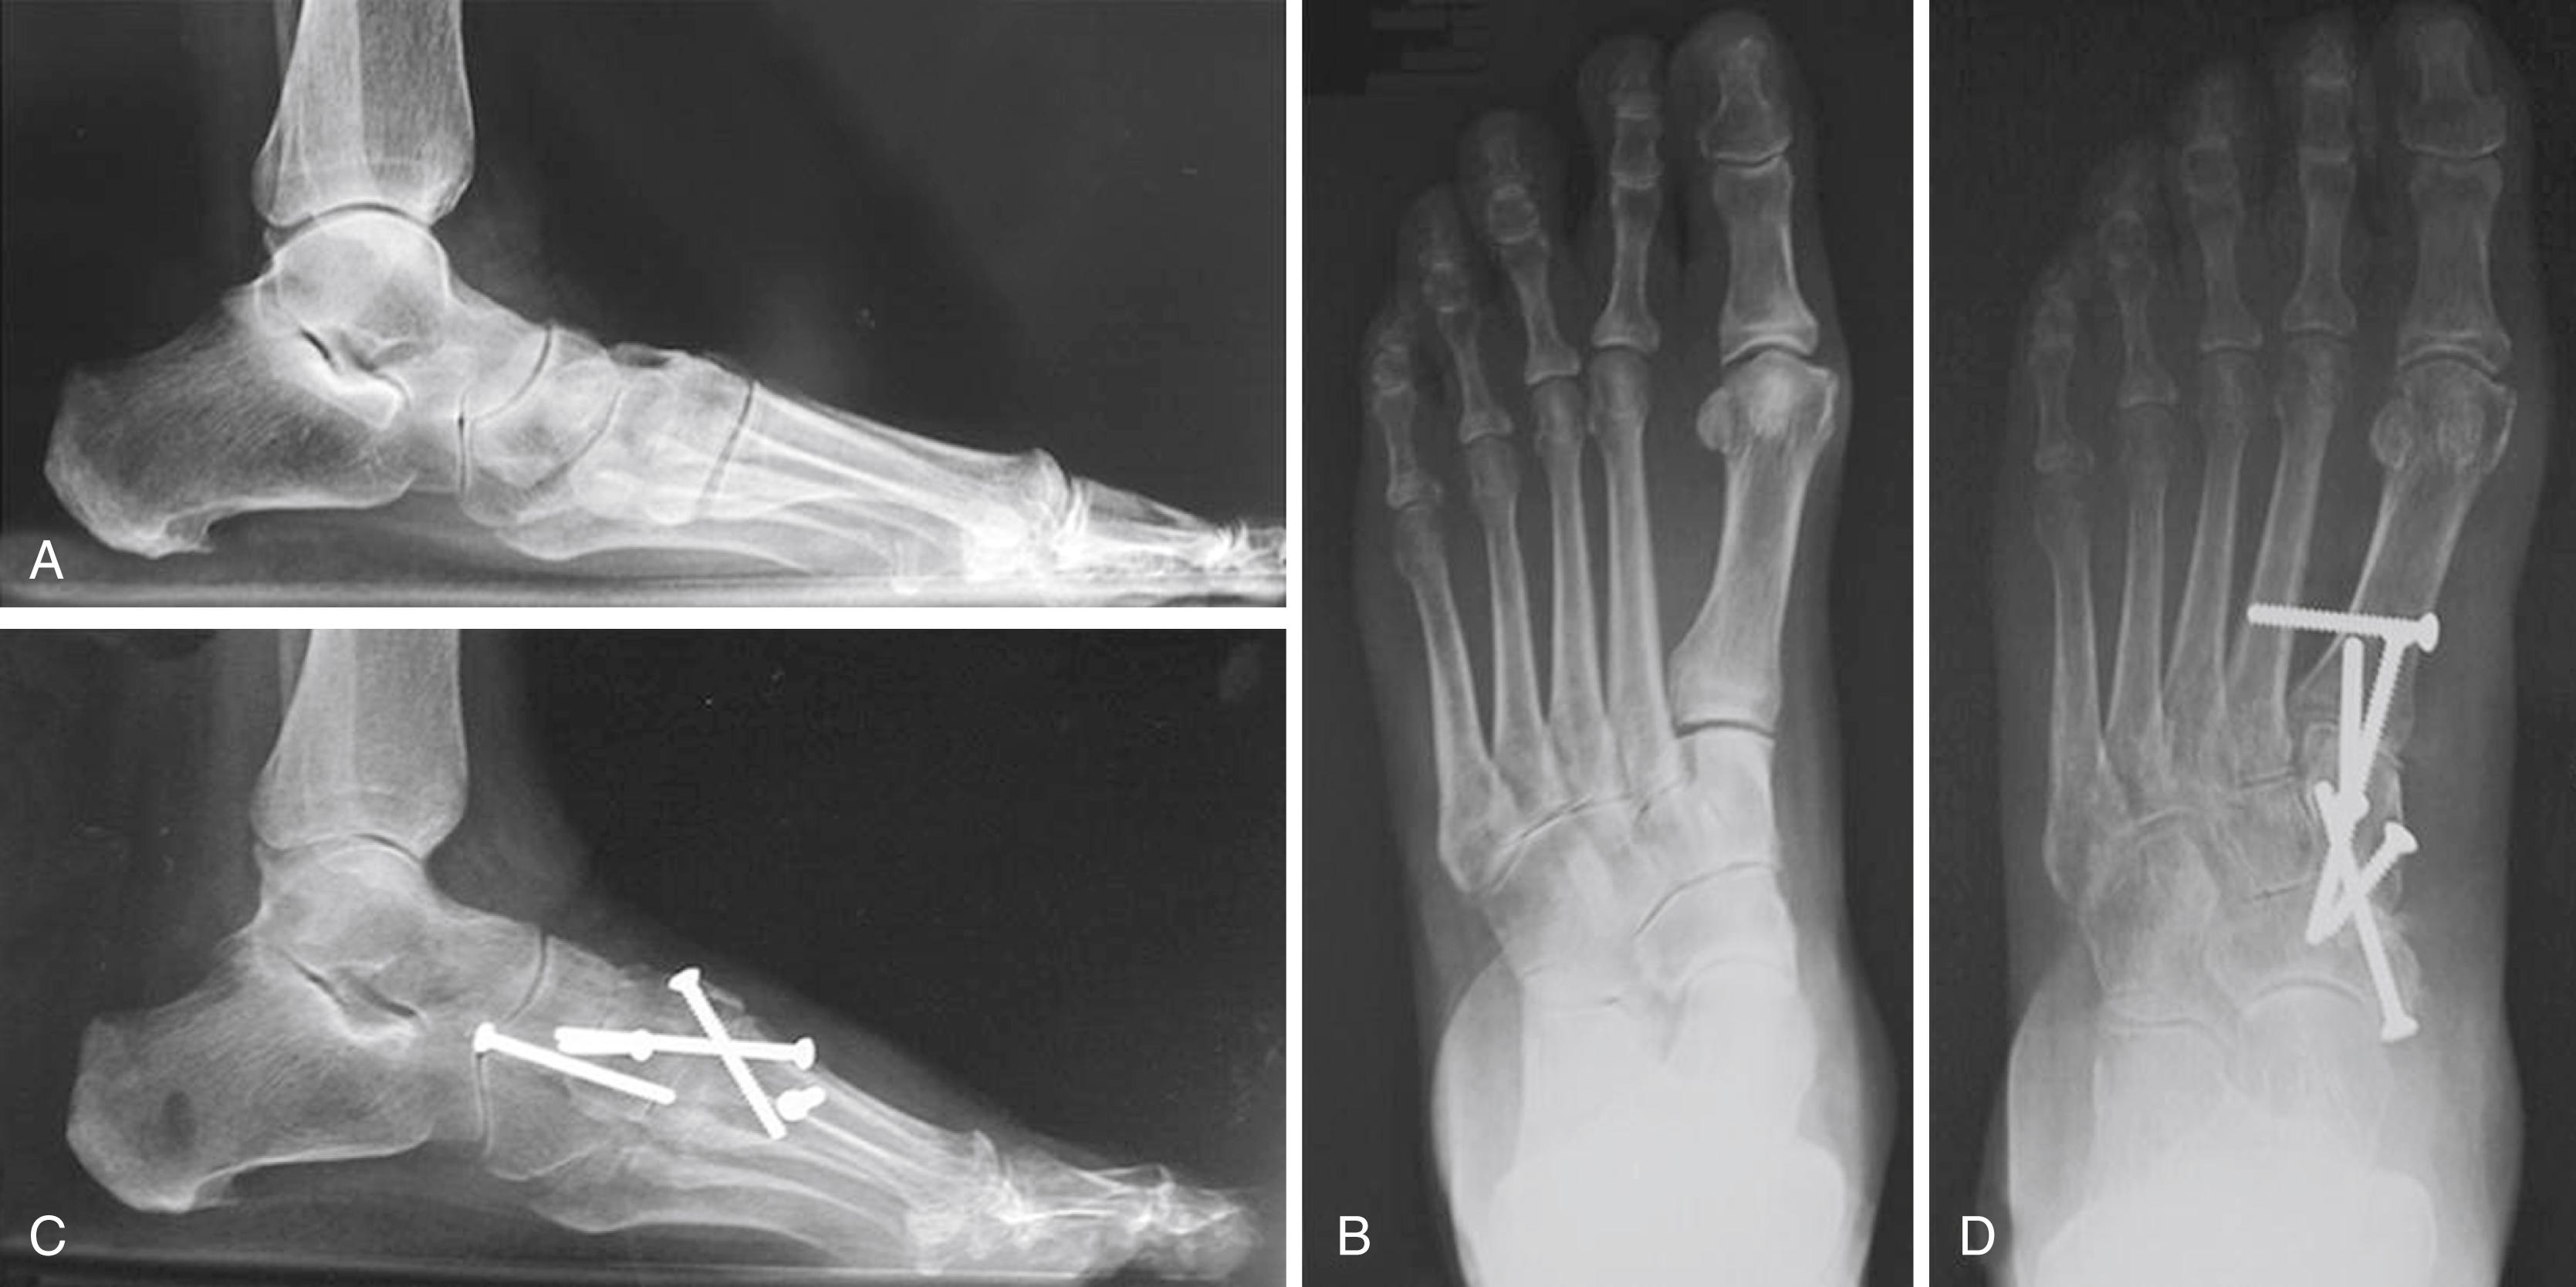
Use a small burr to create small gaps for placement of cancellous bone graft, usually harvested from the proximal tibia.
Deflate the tourniquet, close the wounds in routine fashion, and apply a cast.
The patient is kept non–weight bearing in the cast for 6 weeks. If radiographs at that time show early consolidation of the fusions, weight bearing is advanced as tolerated. Patients usually can fully bear weight in regular shoes by 10 to 12 weeks after surgery.
Chronic posterior tibial tendon deformity in which ankle joint incongruency in valgus is present is a most difficult problem. Although bracing is the mainstay of treatment, a subset of these patients will not have substantial pain relief and will require surgical repair and stabilization. For rigid deformities, the procedure of choice usually is arthrodesis of the ankle or tibiotalocalcaneal arthrodesis (see Chapter 11 ) or, if the hindfoot deformity can be corrected, total ankle arthroplasty (see Chapter 10 ). In a select group of patients with flexible, reducible deformity, less than 10 degrees of tibiotalar tilt, and minimal lateral ankle joint arthrosis, consideration can be given to reconstruction of the deltoid ligament. Jeng et al. described a “minimally invasive” allograft technique for deltoid ligament reconstruction for stage IV flatfoot deformity done in conjunction with triple arthrodesis.
(JENG ET AL.)
Before creation of the bone tunnels, prepare the allograft hamstring tendon.
From a fully thawed allograft tendon, use about 20 cm for the reconstruction.
Split the graft longitudinally, leaving approximately 6 cm intact. Place Krackow stitches of a no. 00 Orthocord (Ethicon, Somerville, NJ) nonabsorbable suture in all three limbs of the tendon graft and apply a preload to stretch the tendon and minimize creep after insertion.
Create a tibial tunnel by inserting a guidewire parallel to the joint surface at the level of the distal tibial physeal scar and centered in the sagittal plane within the tibia ( Fig. 83.36 ).
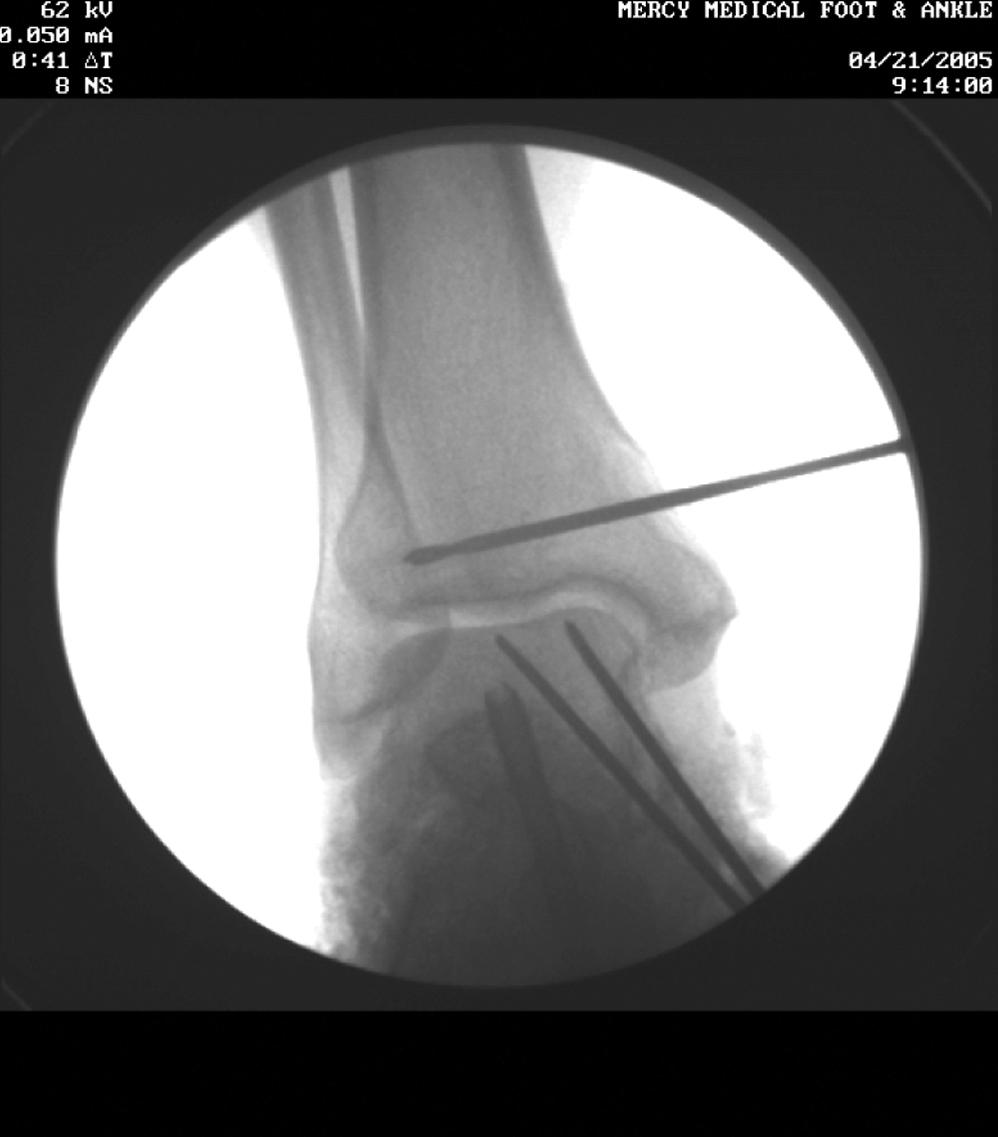
Confirm guidewire position with fluoroscopy, then drill a 6.5-mm tunnel 25 mm deep over the wire.
Insert the nonsplit end of the tendon graft into this blind tunnel and fix it in place with a biotenodesis screw. Bioabsorbable polylactic acid interference screws of 6.25- to 8.0-mm diameter are used for tendon fixation depending on bone quality.
With blunt dissection, create a subcutaneous tunnel from the insertion site inferiorly to the tip of the medial malleolus and pass the distal tendon limbs through this tunnel with a hemostat clamp.
Make a longitudinal incision extending from the distal end of the medial malleolus to approximately 1 cm inferior to the sustentaculum tali.
Excise the posterior tibial tendon and the remaining soft tissues (e.g., tendon sheaths and attenuated superficial deltoid fibers) as needed to gain access to the medial talar dome and sustentaculum. Take care not to damage the flexor digitorum longus or FHL tendons. The posteromedial neurovascular bundle of the ankle should remain posterior to all tunnels at the level of the ankle and posteroinferior to them at the level of the sustentaculum.
Create a talar tunnel beginning at the medial center of tibiotalar rotation; approximate this position through the footprint of the previously transected deep deltoid fibers.
Locate the junction of the lateral talar neck and body by palpation and make the lateral exit of the tunnel here ( Fig. 83.37A ).
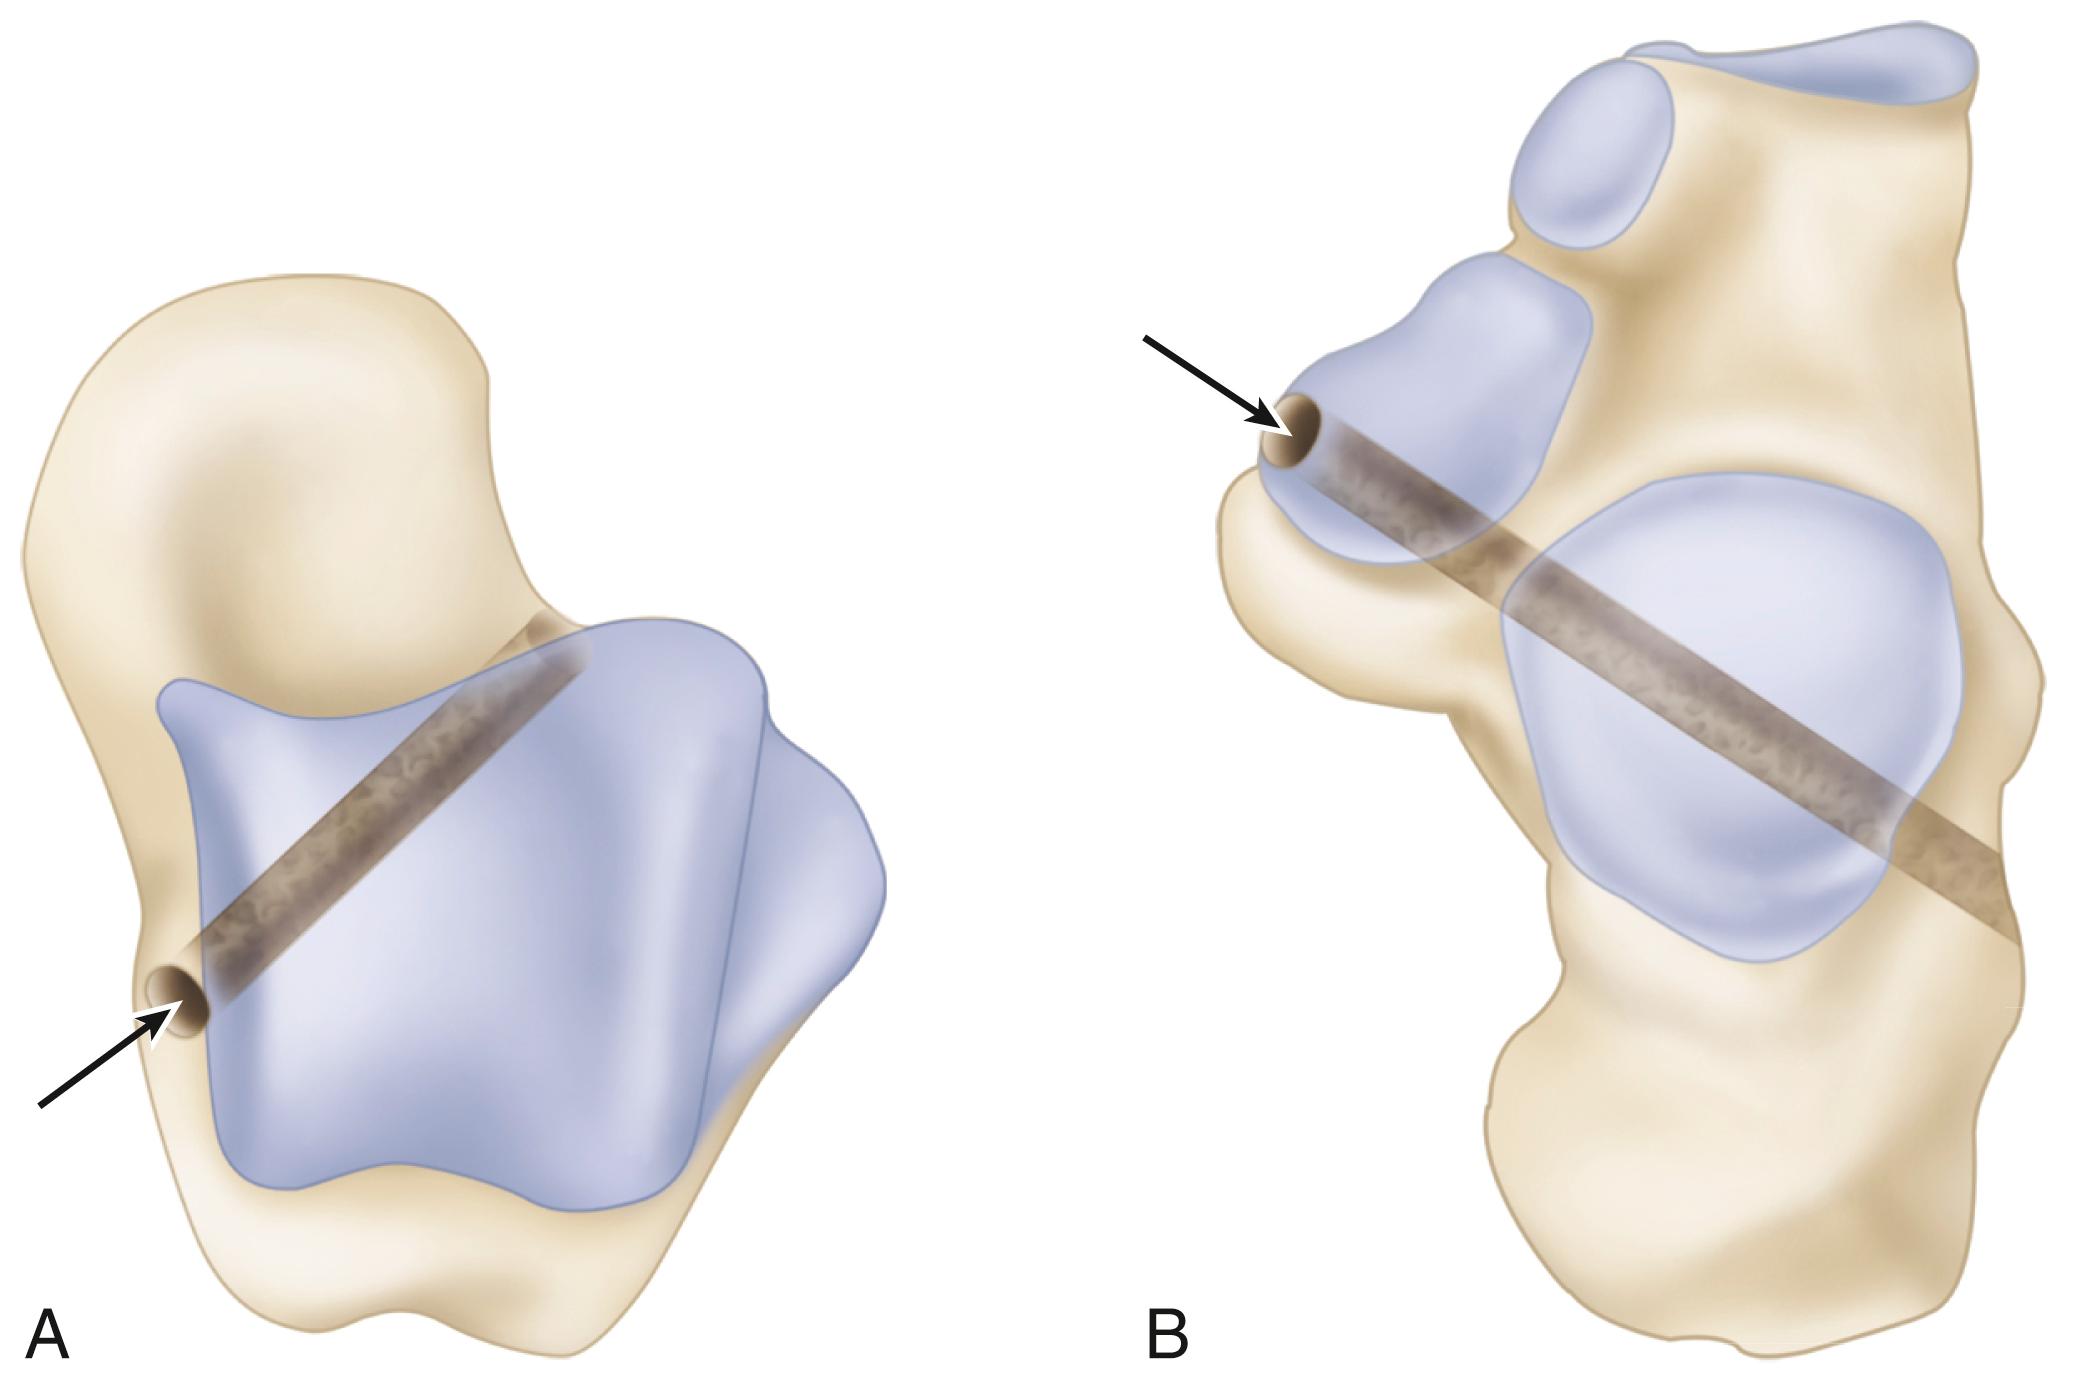
Taking care not to damage branches of the superficial peroneal nerve, use a small hemostat to bluntly dissect down to the most proximal portion of the lateral talar neck.
Advance a guidewire along this axis and confirm its position with anteroposterior and lateral fluoroscopy.
With a cannulated drill, drill a 5-mm tunnel over the guidewire in an anterograde direction.
With a suture passer, pass the talar limb of the sutured tendon through the tunnel from medial to lateral.
Hand-tension this limb of the tendon graft while holding the ankle and hindfoot in maximal inversion and place a 5.5-mm interference screw in the medial aspect of the tunnel to secure the graft.
With digital palpation, locate the medial border of the sustentaculum tali. Advance a guidewire for a biotenodesis screw along an axis from the sustentaculum tali to a point approximately 1 cm superior to the peroneal tubercle on the lateral side of the calcaneus ( Fig. 83. 37 B ).
Confirm position of the guidewire with fluoroscopy and create a 5-mm tunnel over the guidewire.
Pass the free end of the remaining limb of the tendon graft through this calcaneal tunnel.
Manually tension the graft to obtain congruent tibiotalar joint position on fluoroscopy and insert a 5.5-mm interference screw from medial to lateral into the calcaneal tunnel ( Fig. 83.38 ).
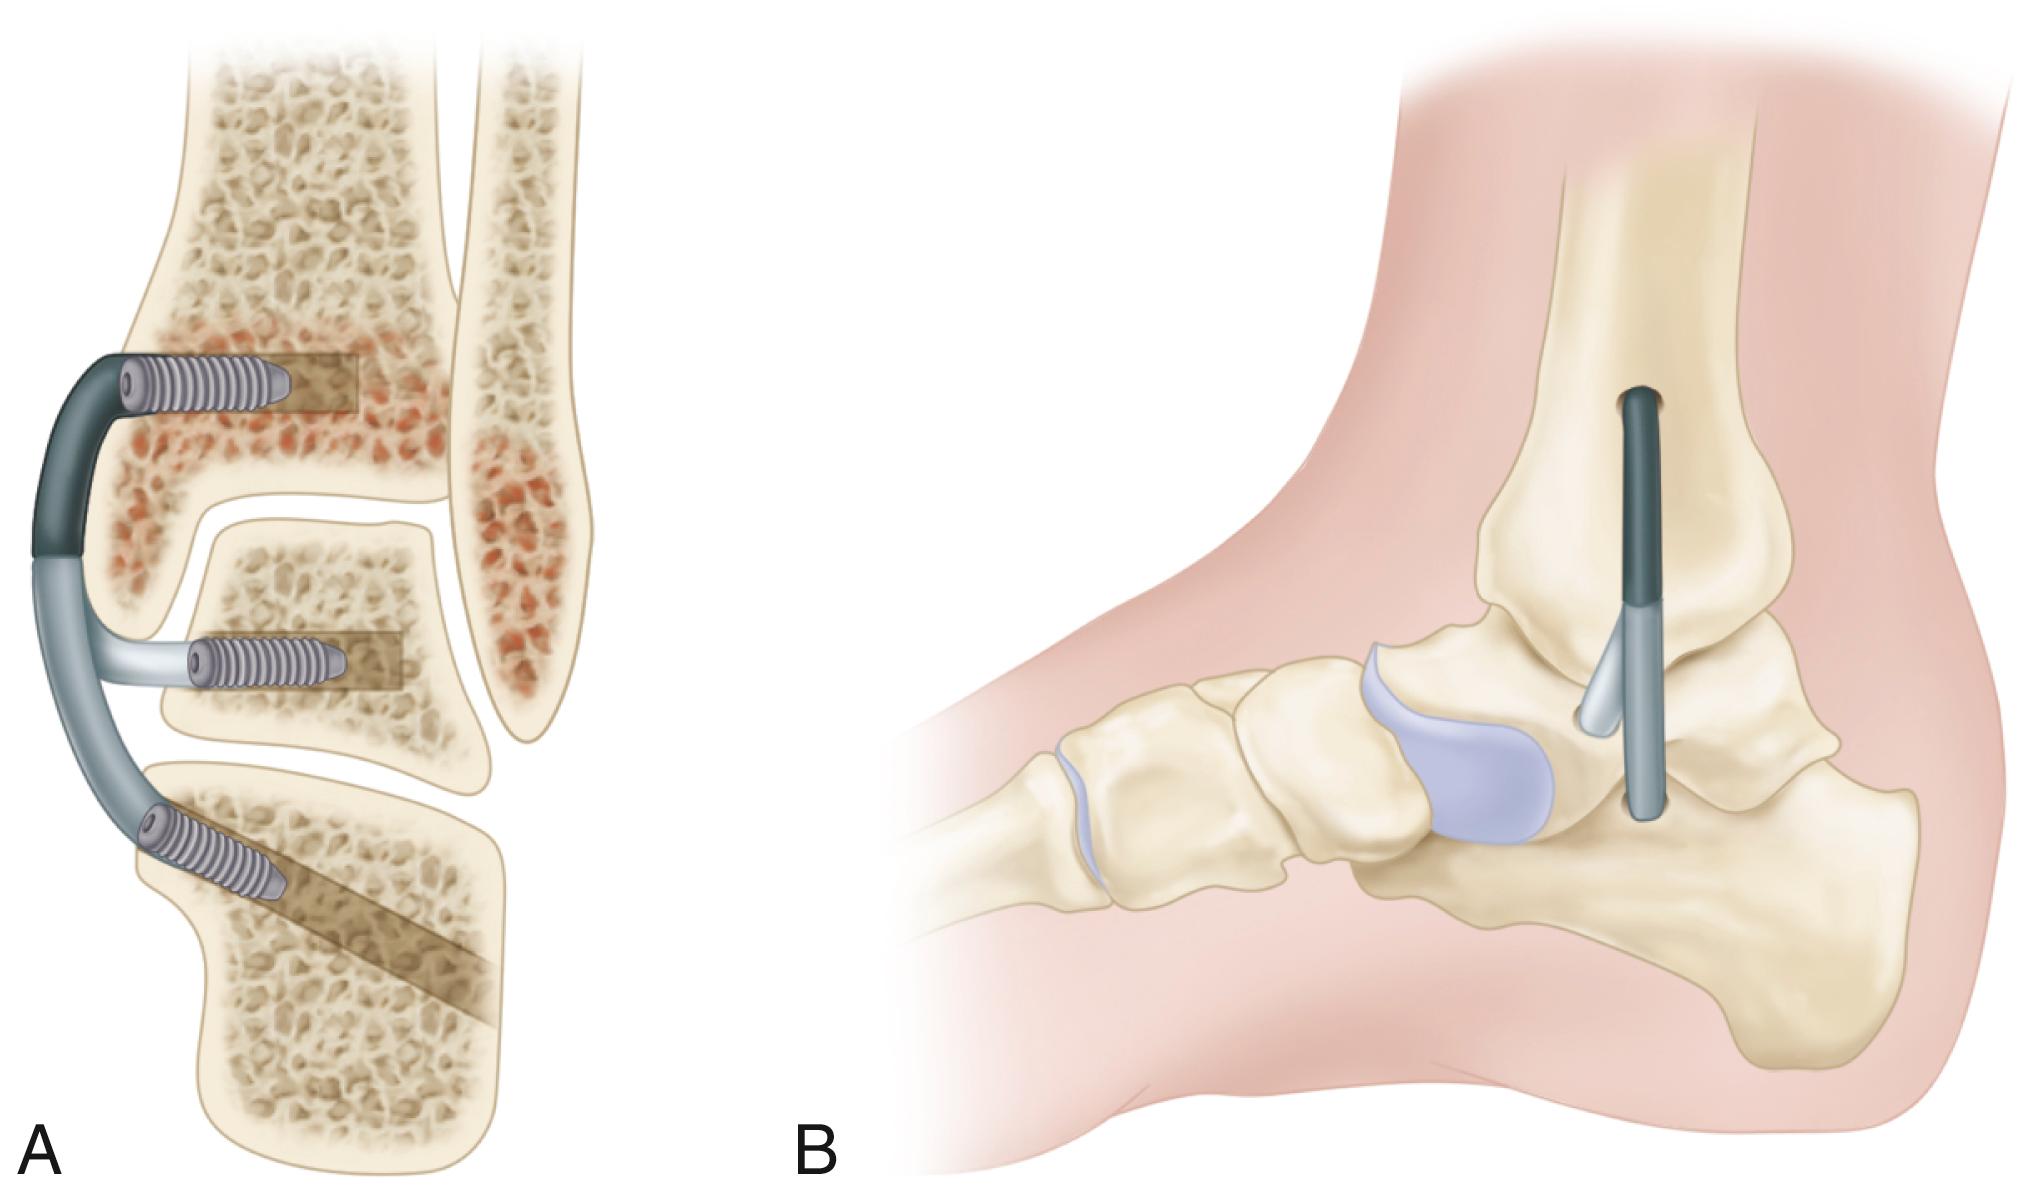
Close the incisions in routine fashion and apply a plaster splint.
At 2 weeks after surgery, splint immobilization is removed and a cast boot is fitted. Weight bearing is begun 6 weeks after surgery, and immobilization is discontinued at 12 weeks.
Insufficiency of the posterior tibial tendon secondary to an accessory navicular presents unique problems. It would seem reasonable that if unilateral pes planus develops, excising the accessory navicular and advancing the posterior tibial tendon should suffice (provided the deformity is not severe and the opposite foot has an accessory navicular but no pes planus) ( Fig. 83.39A,B ); however, this most often is not the case. Whether excision of the accessory navicular and advancement of the posterior tibial tendon alters the medial longitudinal arch is doubtful.
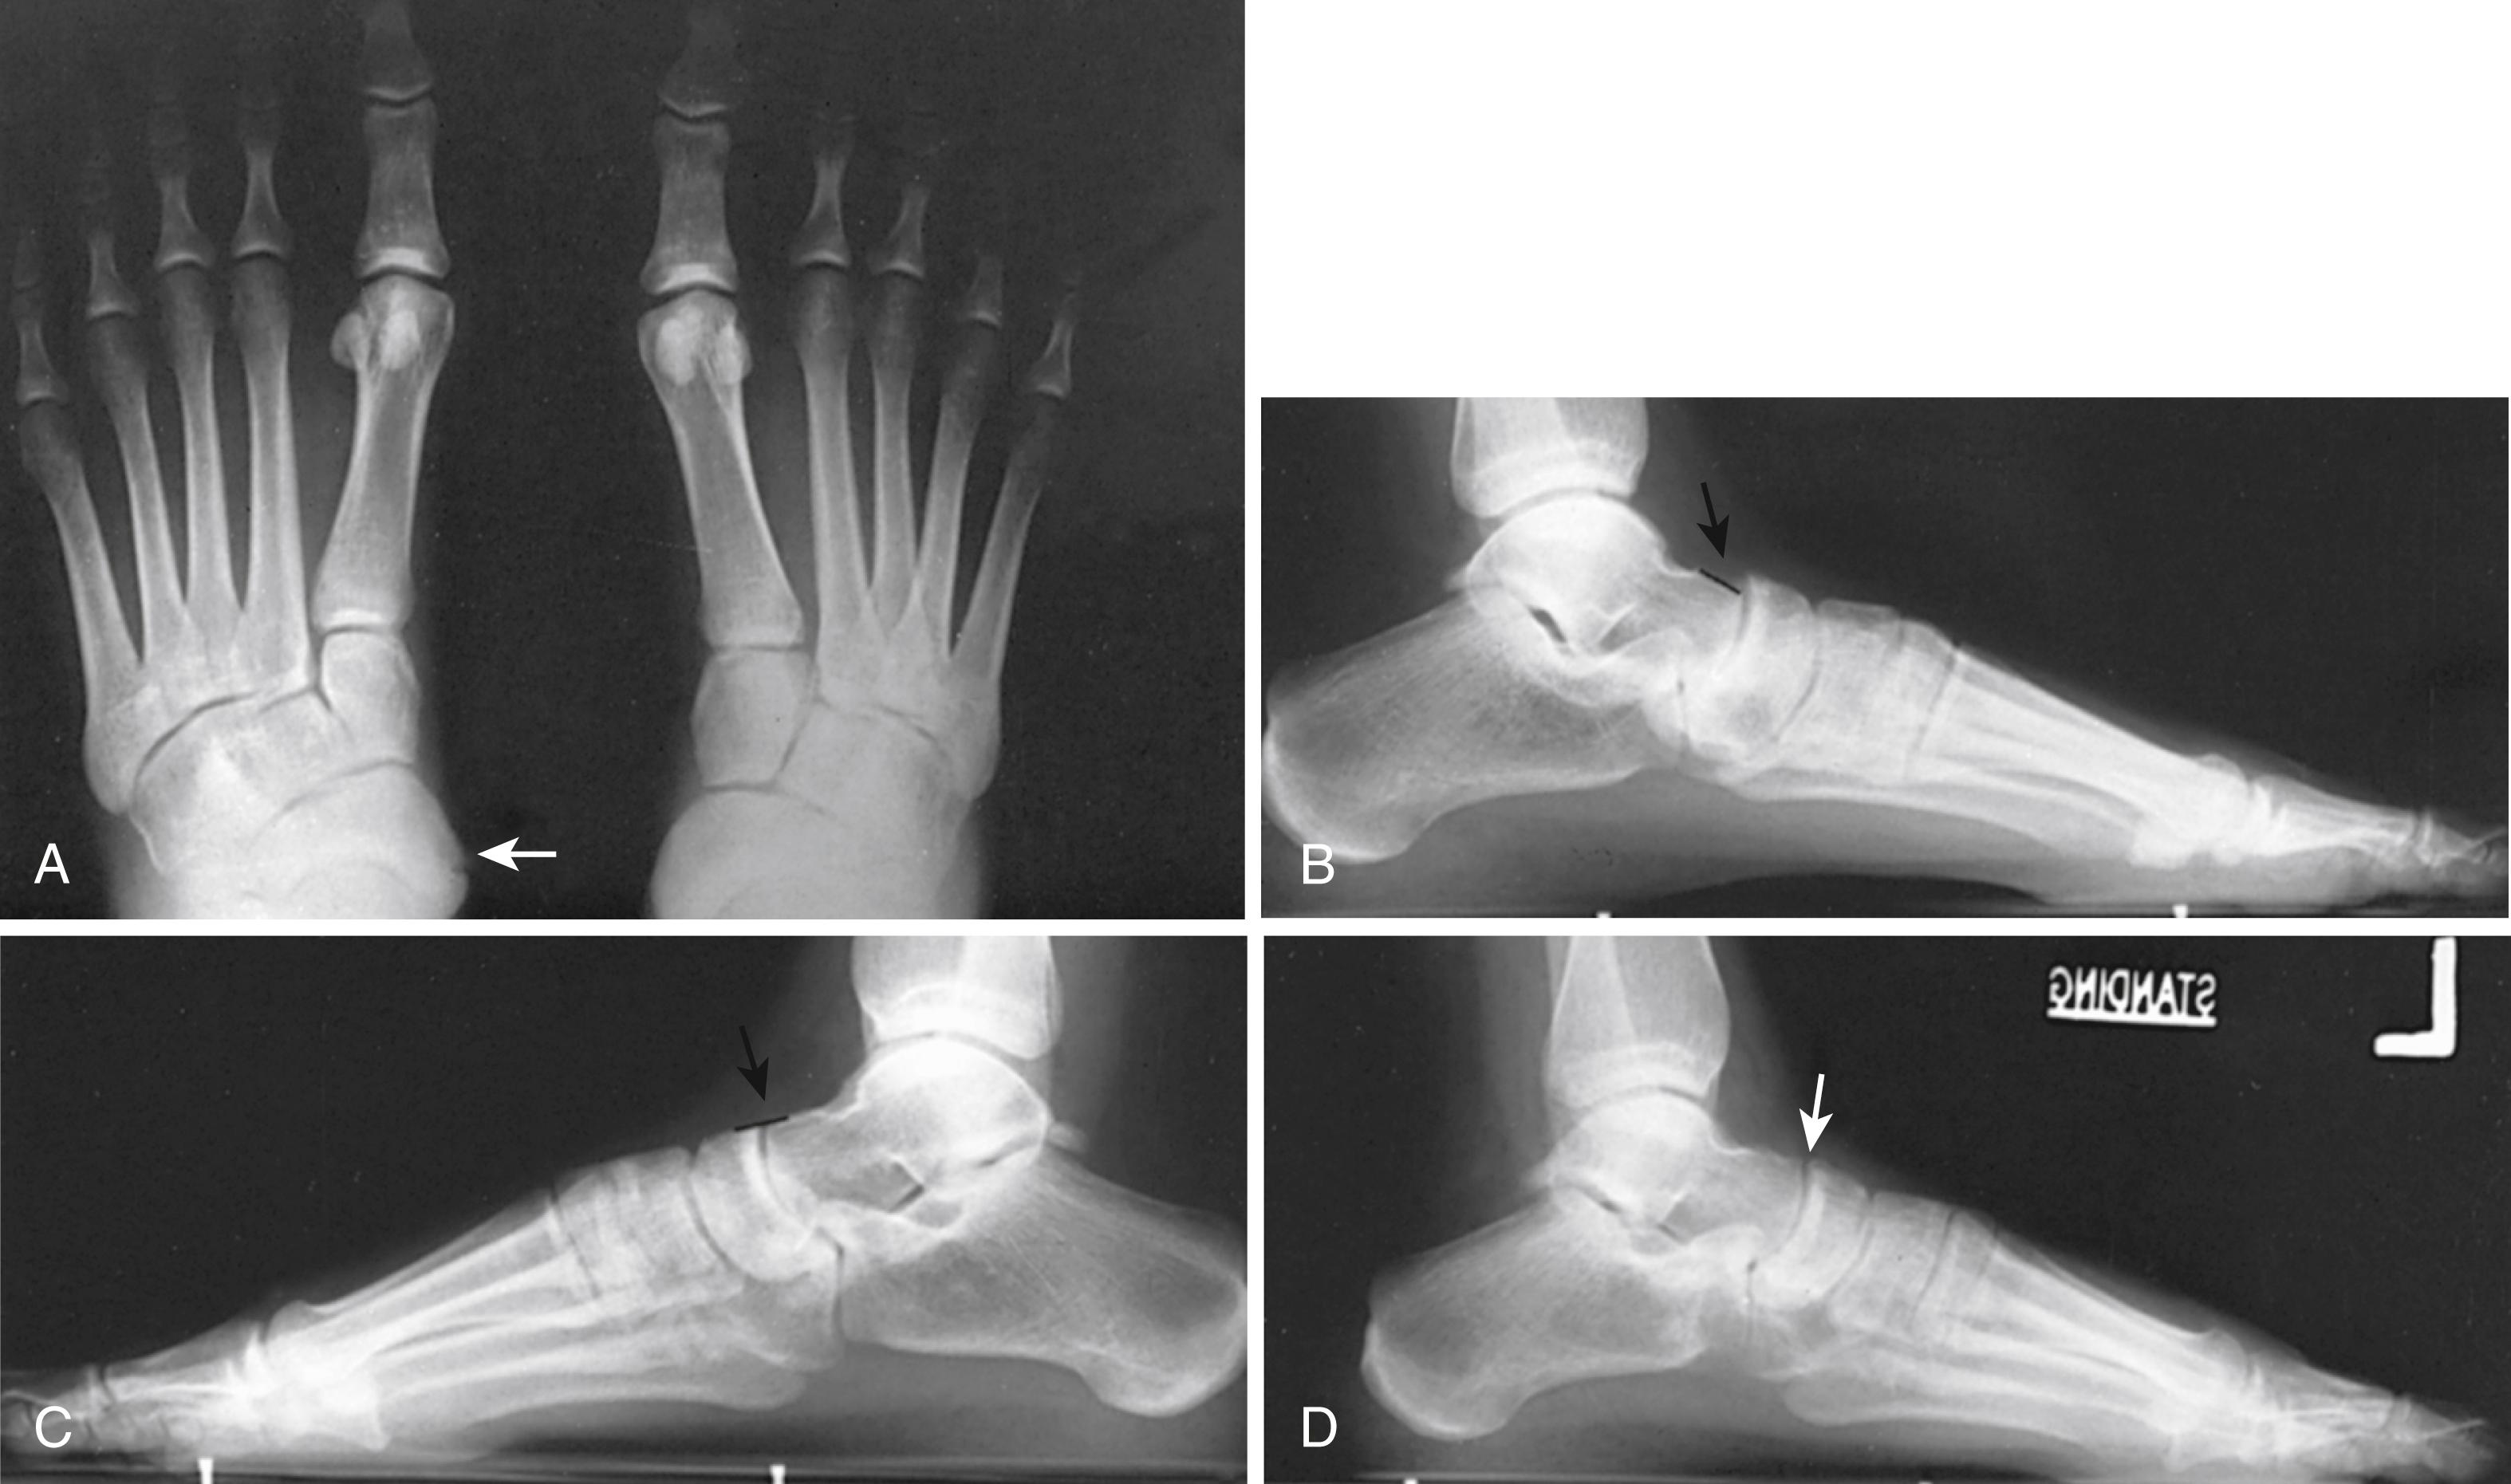
Kidner believed that the support to the medial longitudinal arch offered by the posterior tibial tendon was compromised by its abnormal insertion into the accessory navicular, and he devised a procedure intended to correct this loss of suspension by the posterior tibial tendon. However, a cause-and-effect relationship between the accessory navicular and pes planus is uncertain. In a retrospective comparative radiographic series, the presence of an accessory navicular was associated with flatfoot radiographic parameters when compared to a control group, but many individuals with an accessory navicular had a normal medial longitudinal arch. Furthermore, the presence of an accessory navicular did not correspond with the severity or symptoms of the flat foot. Hence, any improvement in the medial longitudinal arch after a Kidner procedure likely occurs only because of continued growth in the immature foot.
The accessory navicular bone has been classified by various authors into three primary types. Type I occurs primarily as a round sesamoid within the substance of the distal posterior tibial tendon. It rarely is associated with symptoms. Type II is associated with a synchondrosis within the body of the navicular at risk for disruption from traction injury or shear forces in the region. Type III, also known as a navicular beak or a cornuate navicular ( Fig. 83.40 ), occurs with fusion of the accessory navicular bone to the body of the navicular. The presence of an accessory navicular bone likely is an autosomal dominant trait with incomplete penetrance. Recognition of the loss of structural integrity of the longitudinal arch is important because this component of the deformity would not be corrected by excising the accessory navicular and reinserting or even advancing the posterior tibial tendon. In a skeletally mature foot, unilateral pes planus (see Fig. 83.39C,D ) with a posterior tibial tendon insufficiency associated with an accessory navicular may require a combination of excision of the accessory navicular, advancement of the tendon, and lengthening of the lateral column (Evans procedure) ( Fig. 83.41 ).
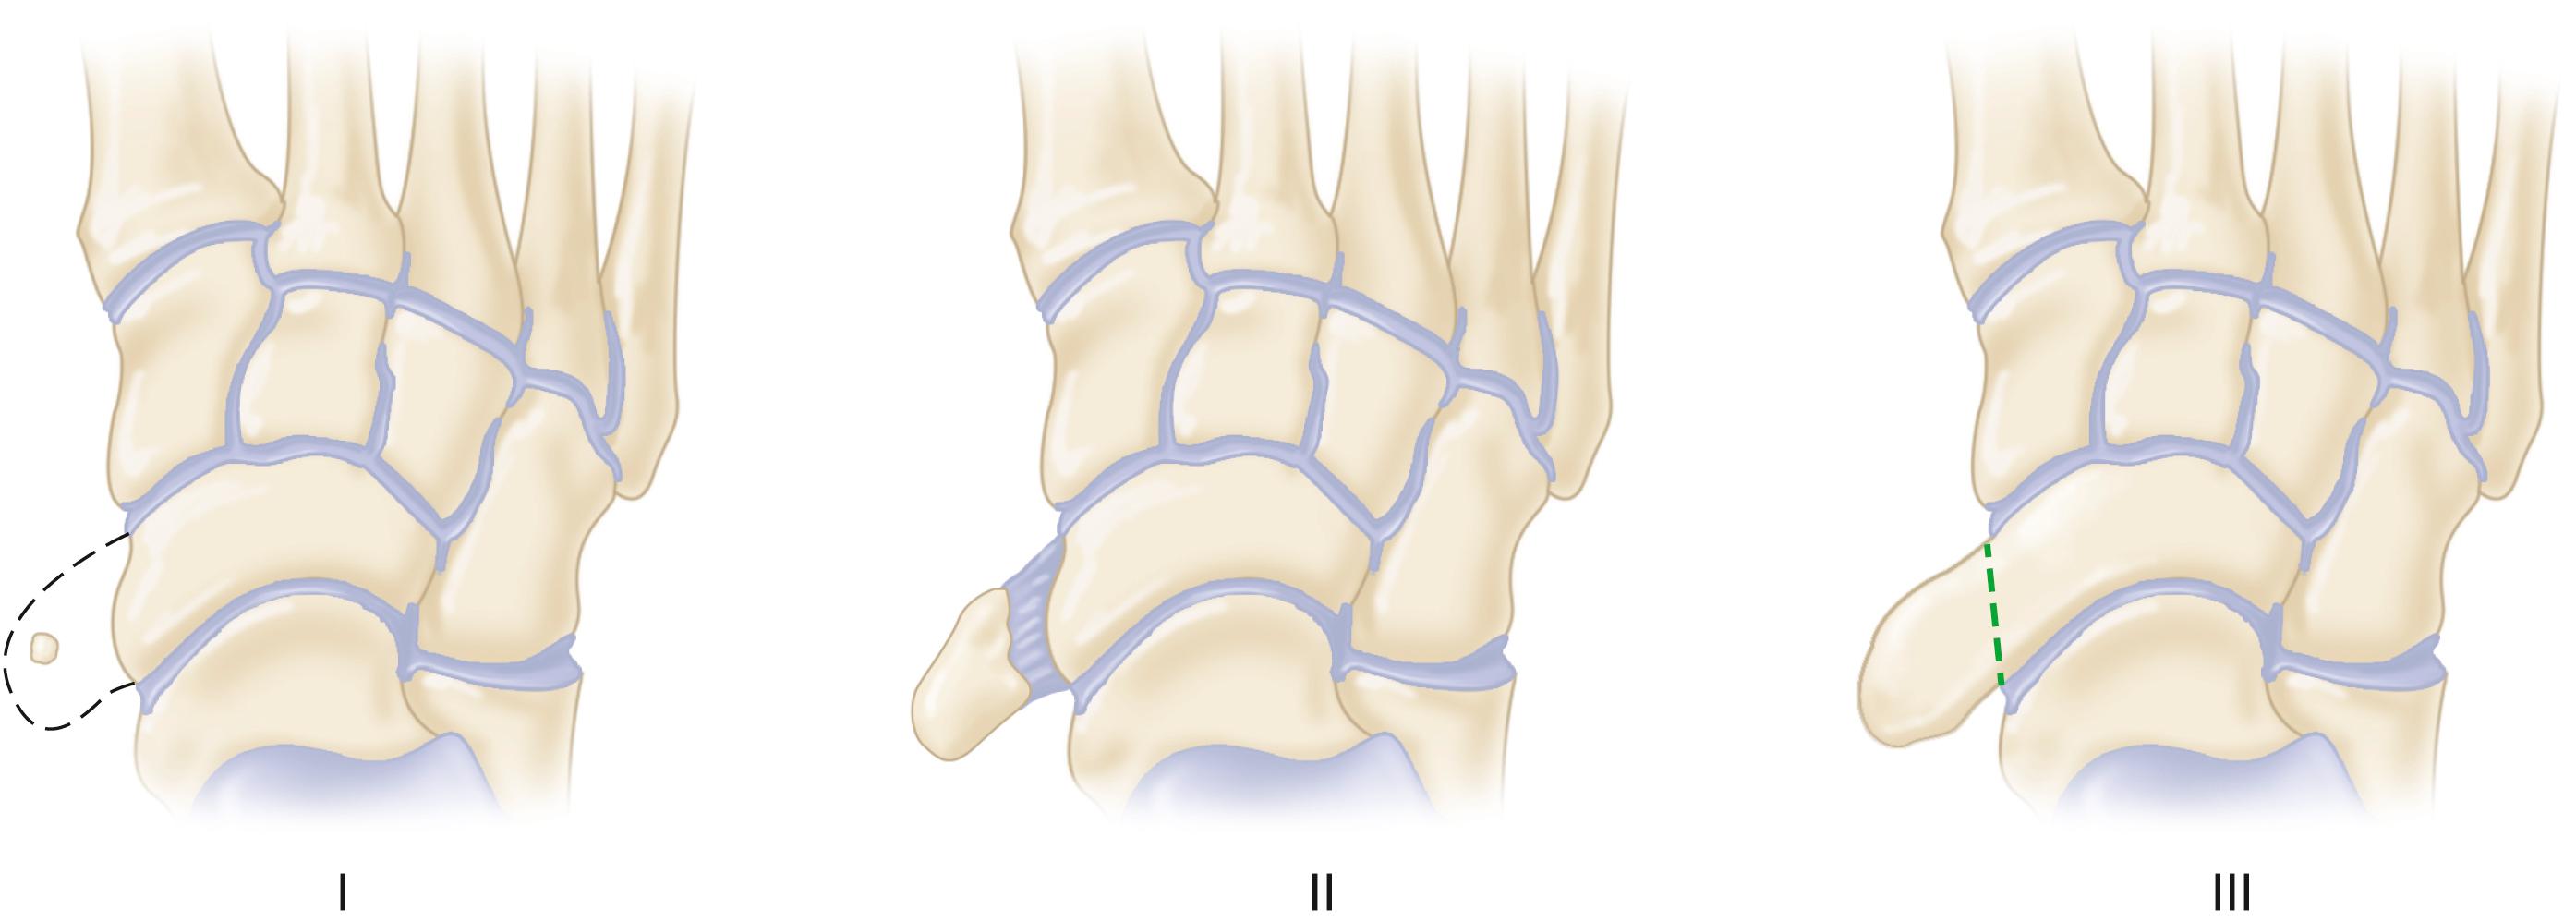
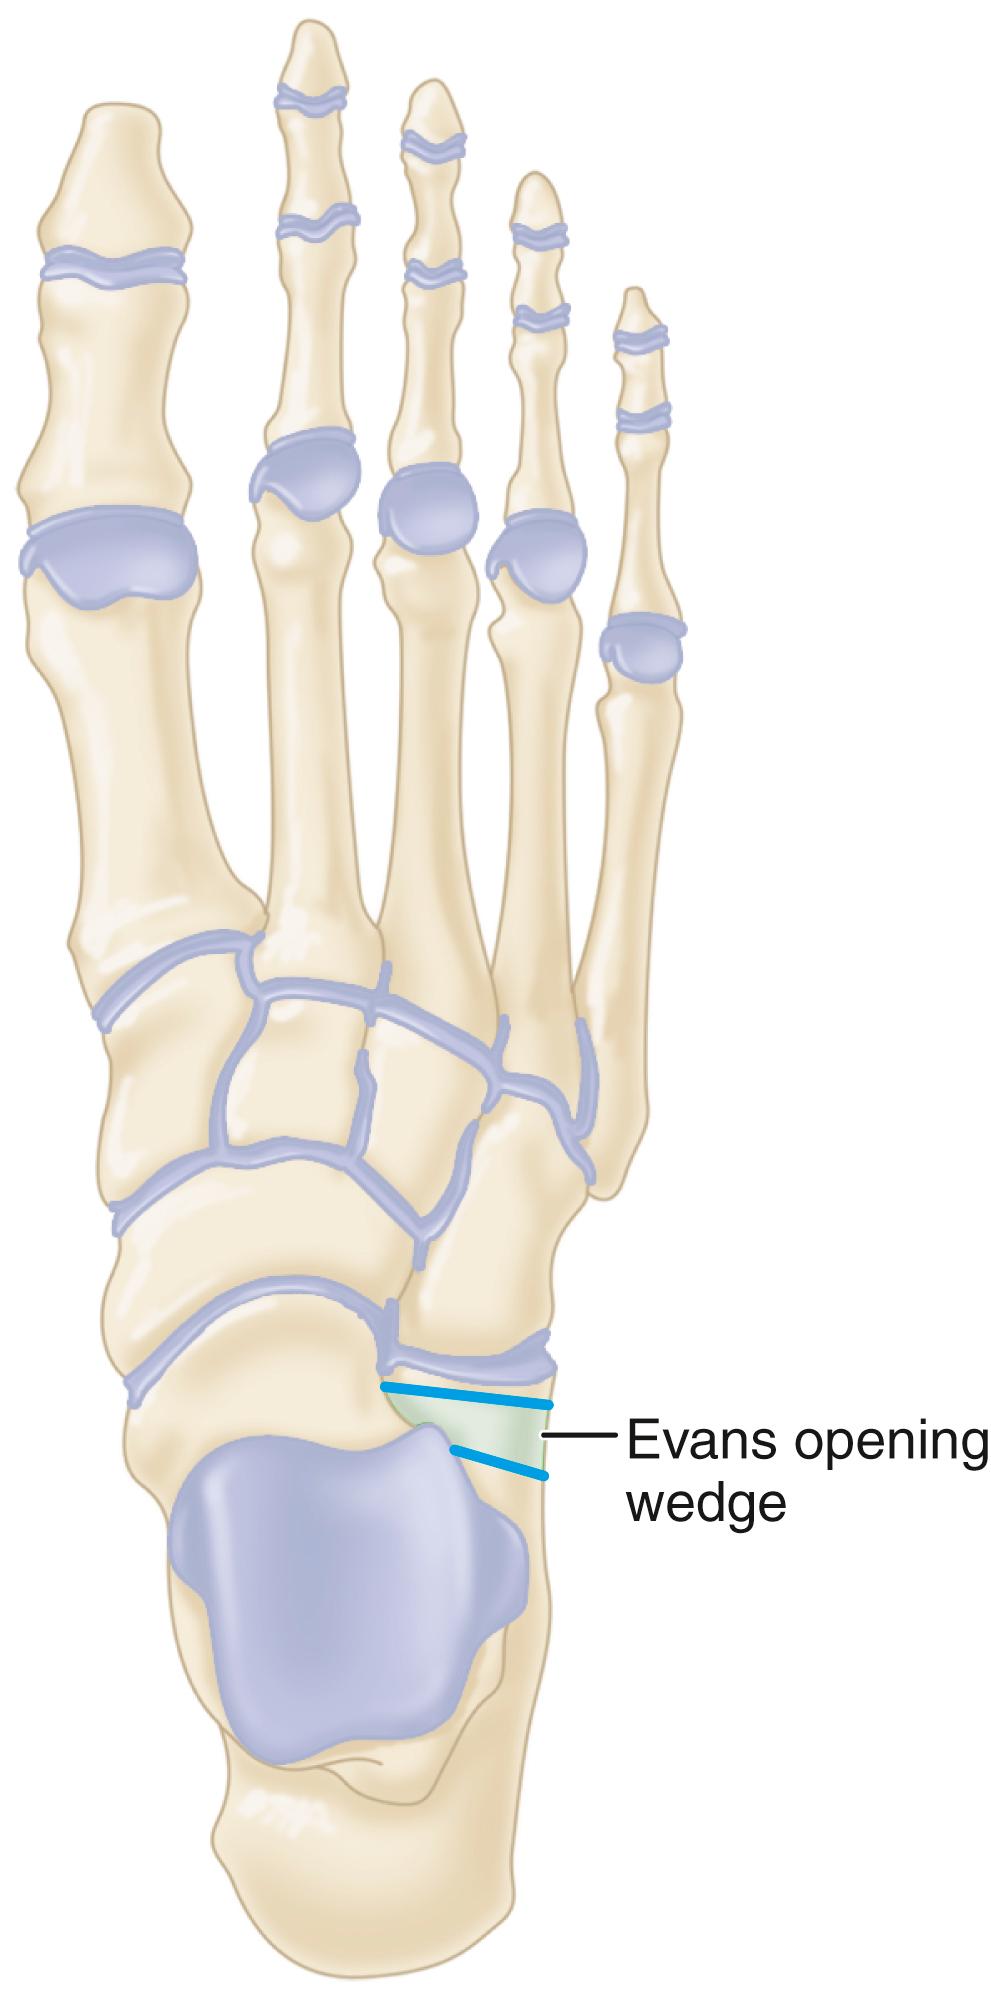
Generally speaking, the presence of an accessory navicular does not necessitate treatment unless symptomatic. Through a thorough history and examination, any foot pain must be correlated to the accessory ossicle because 10% to 14% of normal feet have an accessory navicular. With or without pes planus, an asymptomatic accessory navicular bone may become symptomatic after mild trauma, causing instability of the synchondrosis. Athletes may be less responsive to conservative treatment, suggesting that early operative treatment could be considered.
For painful synchondrosis with symmetric foot posture, excision and osseous union procedures have been successful. Cha et al., in a prospective study, compared two groups of patients (50 feet) with type 2 accessory navicular. Group 1 had simple excision of the accessory navicular, and group 2 had accessory navicular excision with advancement of the tendon. At a minimum of 3 years’ follow-up, both groups showed pain improvement and no significant differences were present between the two groups.
Nakayama et al. described another technique in which percutaneous drilling to induce union of the synchondrosis produced excellent or good results in 30 of 31 feet.
Malicky et al. described accessory navicular fusion to the native navicular body as an alternative to excision. This technique leaves the posterior tibial tendon attachment intact, removes the synchondrosis, and relies on bony union of the accessory navicular. Chung and Chu reported excellent or good results in 27 of 34 feet with fusion of the accessory navicular, but 6 feet developed a nonunion, resulting in a poor result.
The Kidner procedure consists of excising the accessory navicular and rerouting the posterior tibial tendon into a more plantar position. The parents should be informed before surgery, however, that permanent correction of the arch sag cannot be certain. Relief of symptoms around the prominent tuberosity and reduction or elimination of fatigue from arch strain are predictable. Indications for the Kidner procedure include symptomatic accessory navicular bone with point tenderness in the region. In most patients with an acute injury to the synchondrosis, 6 to 8 weeks of cast or boot immobilization is recommended as a trial before surgical intervention.
Incision and Removal of Accessory Navicular
Beginning 1.0 to 1.5 cm inferior and distal to the tip of the medial malleolus, arch the skin incision slightly dorsalward, peaking at the medial prominence of the accessorynavicular, and sloping distally to the base of the first metatarsal ( Fig. 83.42A ).
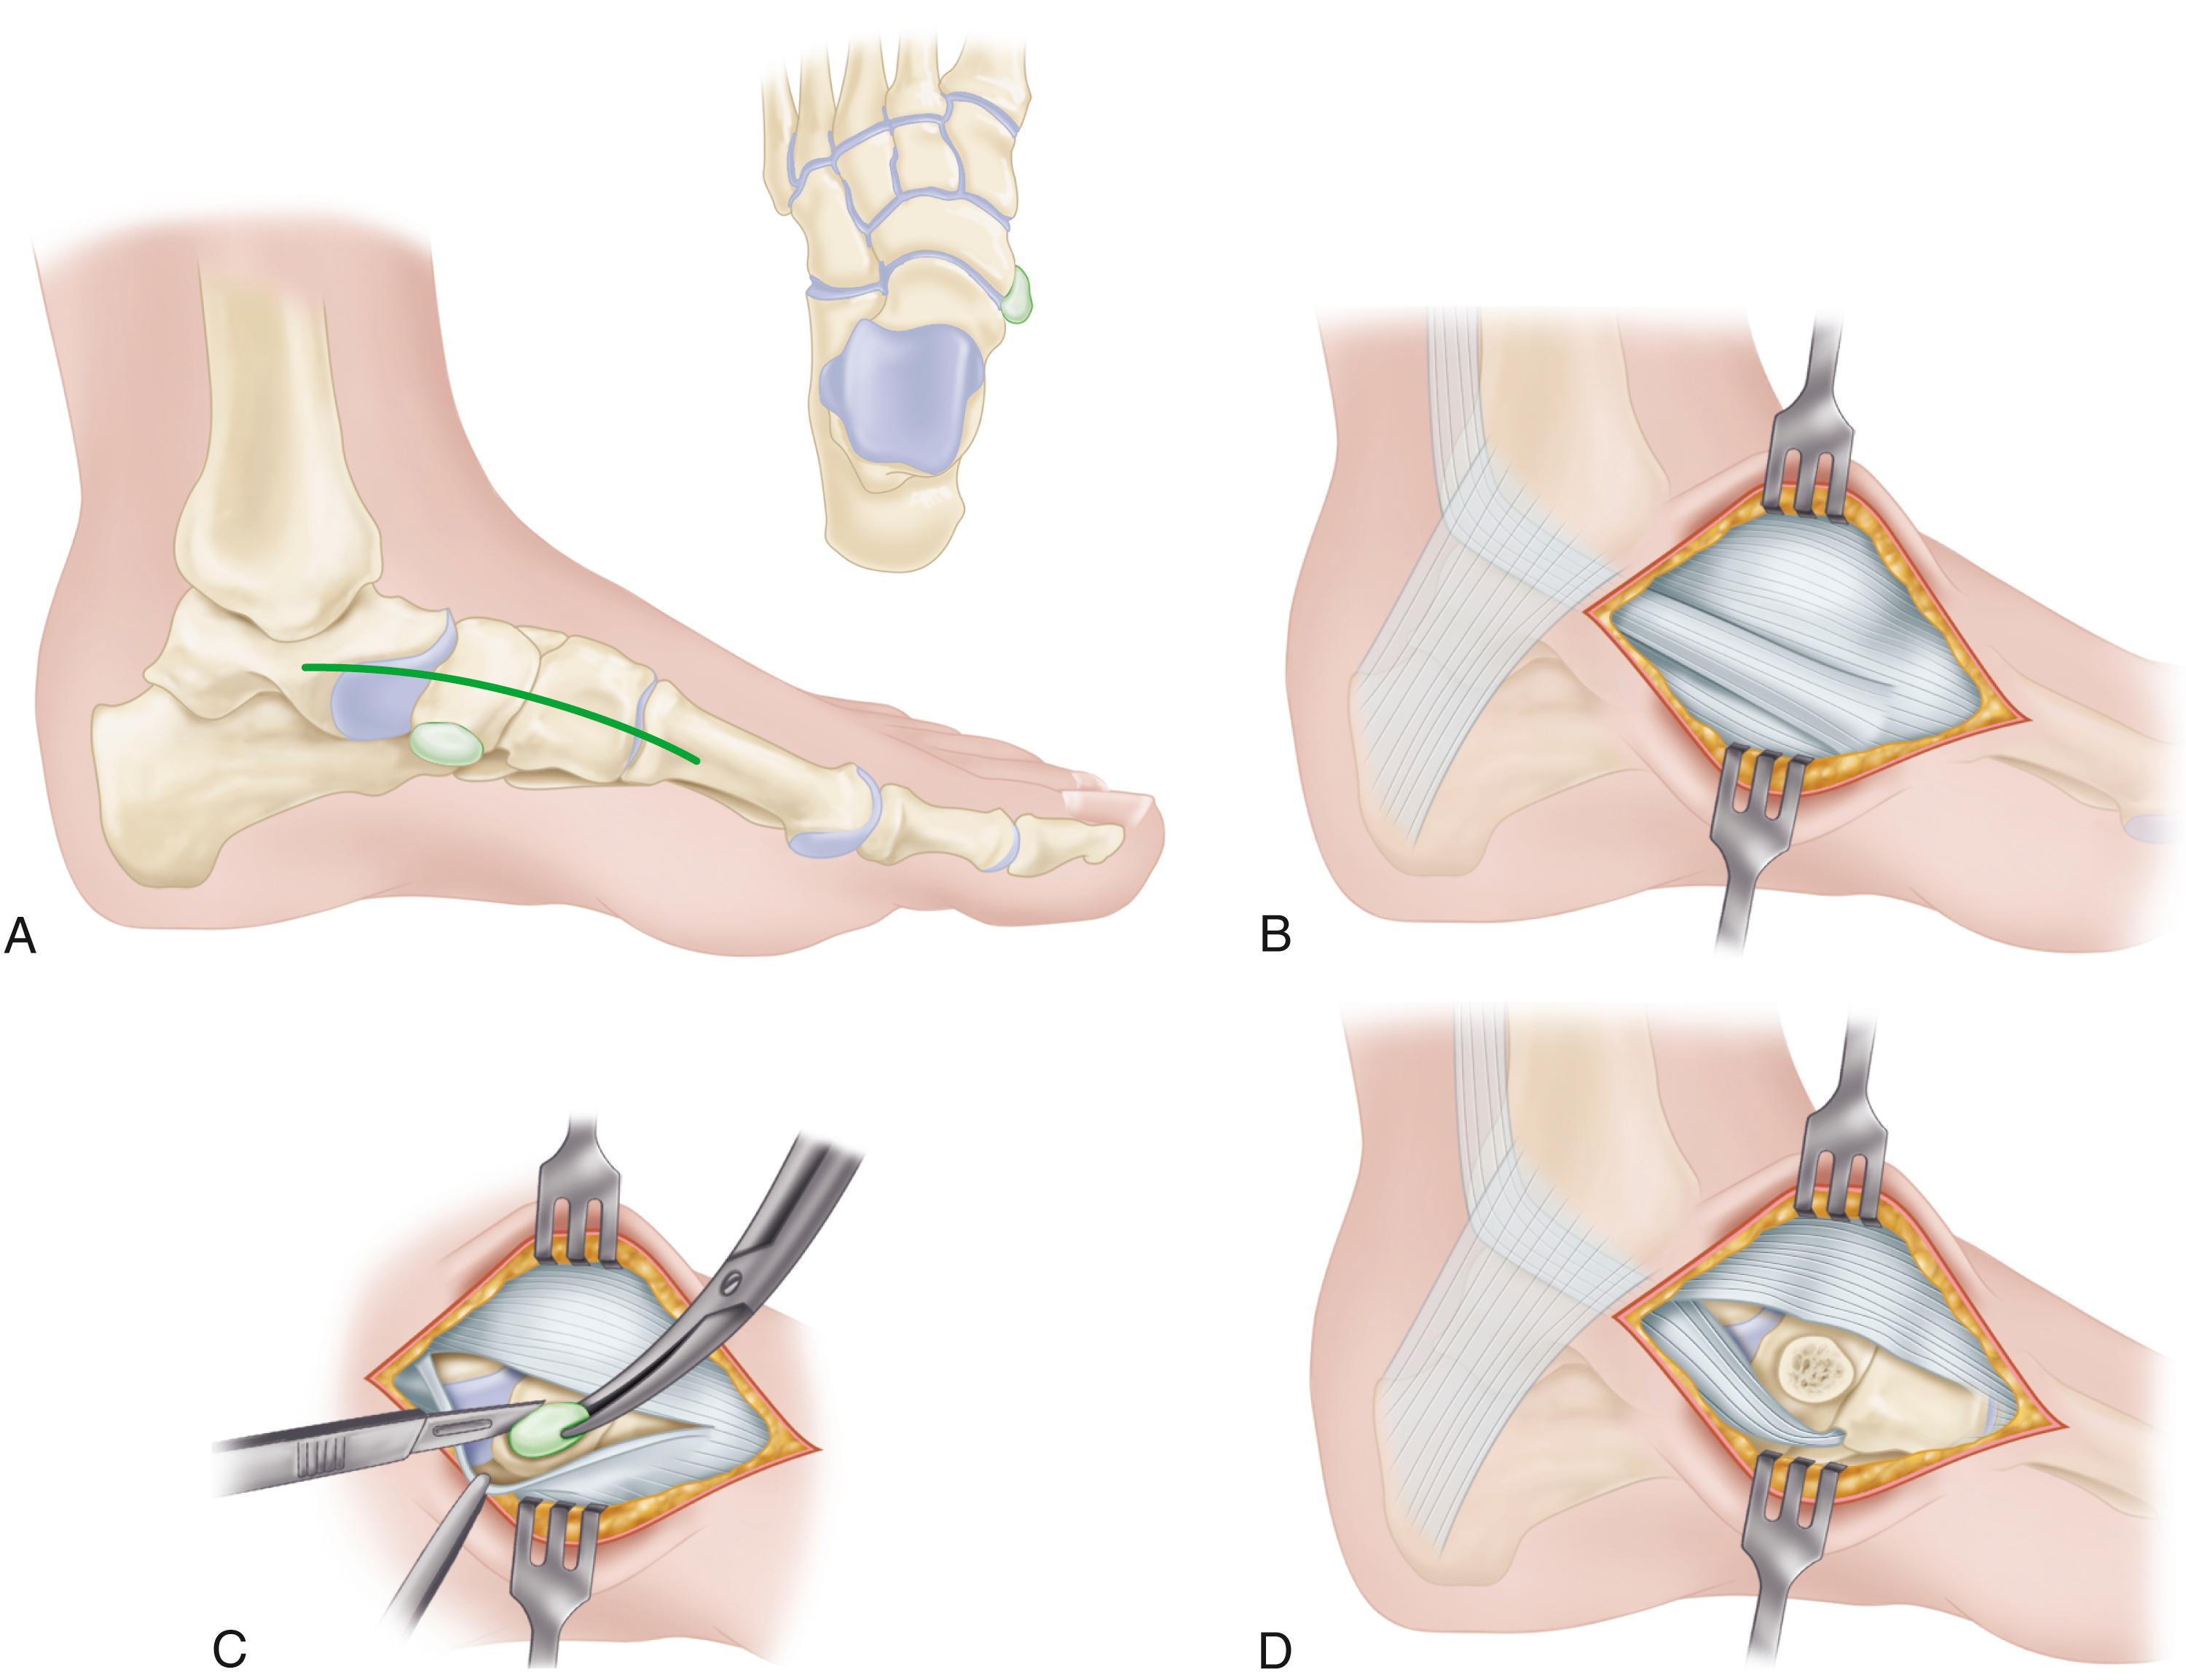
After ligating the plantar communicating branches of the saphenous system, identify the posterior tibial tendon as it approaches the accessory navicular ( Fig. 83.42B ).
Identify the dorsal and plantar margins of the tendon 2 cm proximal to the accessory navicular and expose the tendon distally, ending at the bone. By this means, the entire tendon can be exposed and the part extending plantarward toward its multiple insertions is not disturbed ( Fig. 83.3 ).
Using sharp dissection, shell the accessory navicular from the posterior tibial tendon, attempting to leave a small sliver of bone within the tendon if transposition of the tendon is planned ( Fig. 83.42C ).
Resect the medial prominence of the main navicular flush with the medial border of the first cuneiform using a rongeur and rasp ( Fig. 83.42D ). Remove the portion of cuneiform using sharp dissection and shift it plantarward and laterally as far as possible.
Suture the tendon to the apex of the medial longitudinal arch using periosteum and ligamentous tissue to secure the transposed tendon slip or by passing the sutures through holes drilled in the center of the navicular and tying them dorsally. Try to advance this slip of tendon while the talonavicular joint is reduced and the medial longitudinal arch is reestablished by holding the midfoot and forefoot in a cavovarus position.
This graft usually is 8 to 10 mm wide and is placed 1 cm proximal to the calcaneocuboid articulation. It is internally fixed with a single 3⁄32-inch pin from the fourth intermetatarsal space, distal to proximal, crossing the calcaneocuboid articulation and cut beneath the skin. The pin is removed in 6 to 8 weeks using local anesthesia, and a short leg weight-bearing cast is worn for another 6 to 8 weeks. This should restore the arch ( Fig. 83.39D ).
Close the skin and subcutaneous tissue with absorbable sutures or adhesive skin strips so that the postoperative cast can remain in place for 4 weeks.
Apply a long leg, bent-knee cast in two parts. The cast is well padded and gently molded into the longitudinal arch with the talonavicular joint reduced and the foot inverted. Extend the short leg cast above the knee with this joint flexed 45 degrees.
If the patient is reliable and the parents are informed, a short leg cast with the foot in equinovarus is a reasonable alternative, but it must be a nonwalking cast.
The cast applied in the operating suite is left on for 4 weeks unless neurovascular signs or evidence of infection demand its removal. At 4 weeks, a short leg cast, well molded into the arch with the foot plantigrade, is applied and partial weight bearing is allowed. At 8 weeks, full weight bearing is allowed. At 10 weeks, a firm arch support is fitted in a leather oxford shoe. It has been our experience that many patients require 6 to 12 months to be completely asymptomatic at the site of the tendon repair and advancement.
(MALICKY ET AL.)
Approach the posterior tibial tendon in a manner similar to that described for the Kidner procedure (see Technique 83.11).
Expose the tendon just proximal to its insertion onto the navicular, maintaining the tendon attachment to the accessory navicular bone.
Through the dorsal aspect of the interface between the primary and accessory navicular bones, excise the intervening soft tissue to expose the bony surfaces.
Leave the plantar distal extension of the posterior tibial tendon intact.
Use a small saw or osteotome to remove enough of the prominent part of the primary navicular to create a flat surface at the distal plantar segment.
Advance the accessory bone into the distal plantar aspect of the primary navicular and stabilize it with either a 2.7- or 3.5-mm lag screw. A washer can be used to better distribute the compressive forces.
A short leg non–weight–bearing cast is worn for 6 weeks. Then progressive weight bearing is started in a removable cast boot and advanced to full weight bearing at 10 to 12 weeks.
Although tarsal coalition has long been cited as a cause of congenital rigid pes planus, this is inaccurate. Some patients with a tarsal coalition, especially calcaneonavicular coalition, have little deformity suggestive of pes planus. Slight heel valgus and minimal loss of the longitudinal arch may be present but frequently are not among the patient’s complaints. In addition, any deformity may not be rigid. This is especially true of calcaneonavicular coalition, which might allow enough subtalar motion to delude the examiner before radiographic evaluation. Most patients with tarsal coalition do have a fixed hindfoot valgus of varying severity and some loss of the normal longitudinal arch. In addition to this loss of normal longitudinal arch, many patients do not experience symptoms until their foot is close to skeletal maturity. For this reason, tarsal coalition has been included in the discussion of posterior tibial tendon insufficiency.
Tarsal coalition, rigid pes planus, and peroneal muscle spasm frequently are discussed together as essential components of peroneal spastic pes planus. However, peroneal spasm actually is an acquired or adaptive shortening of the muscle-tendon units of the peroneal muscles. Inversion stress by the examiner, producing an unsustained three-beat or four-beat clonus of the peroneal muscles, is the stretch reflex of a shortened muscle-tendon unit. That peroneal muscle tightness is the frequent result of tarsal coalition and not the cause must be emphasized.
Peroneal muscle tightness is seen in many clinical disorders other than tarsal coalition. Common among these are rheumatoid arthritis, osteochondral fracture, and infection in the subtalar joint, or neoplasm adjacent to the subtalar joint in the talus or calcaneus. The relaxed position of the subtalar joint is valgus, which places the least strain on the talocalcaneal interosseous ligament according to Lapidus. Presumably, through an ill-defined mechanism, the peroneal muscles are reflexively stimulated to evert the hindfoot, “decompressing” the subtalar joint, and with time, this position becomes fixed.
The true incidence of tarsal coalition is greater than the 1% usually quoted. Tarsal coalition appears to be inherited, probably as a unifactorial disorder of autosomal dominant inheritance with nearly full penetrance. The specific type of coalition probably represents a genetic mutation that is responsible for failure of the primitive mesenchyme to segment. Symptomatic tarsal coalitions, other than calcaneonavicular and talocalcaneal coalitions, are exceedingly rare. Talonavicular coalition ( Fig. 83.43A-C ) probably is much more common than calcaneocuboid, naviculocuboid, naviculocuneiform, or massive tarsal coalition, but it, too, is rare.
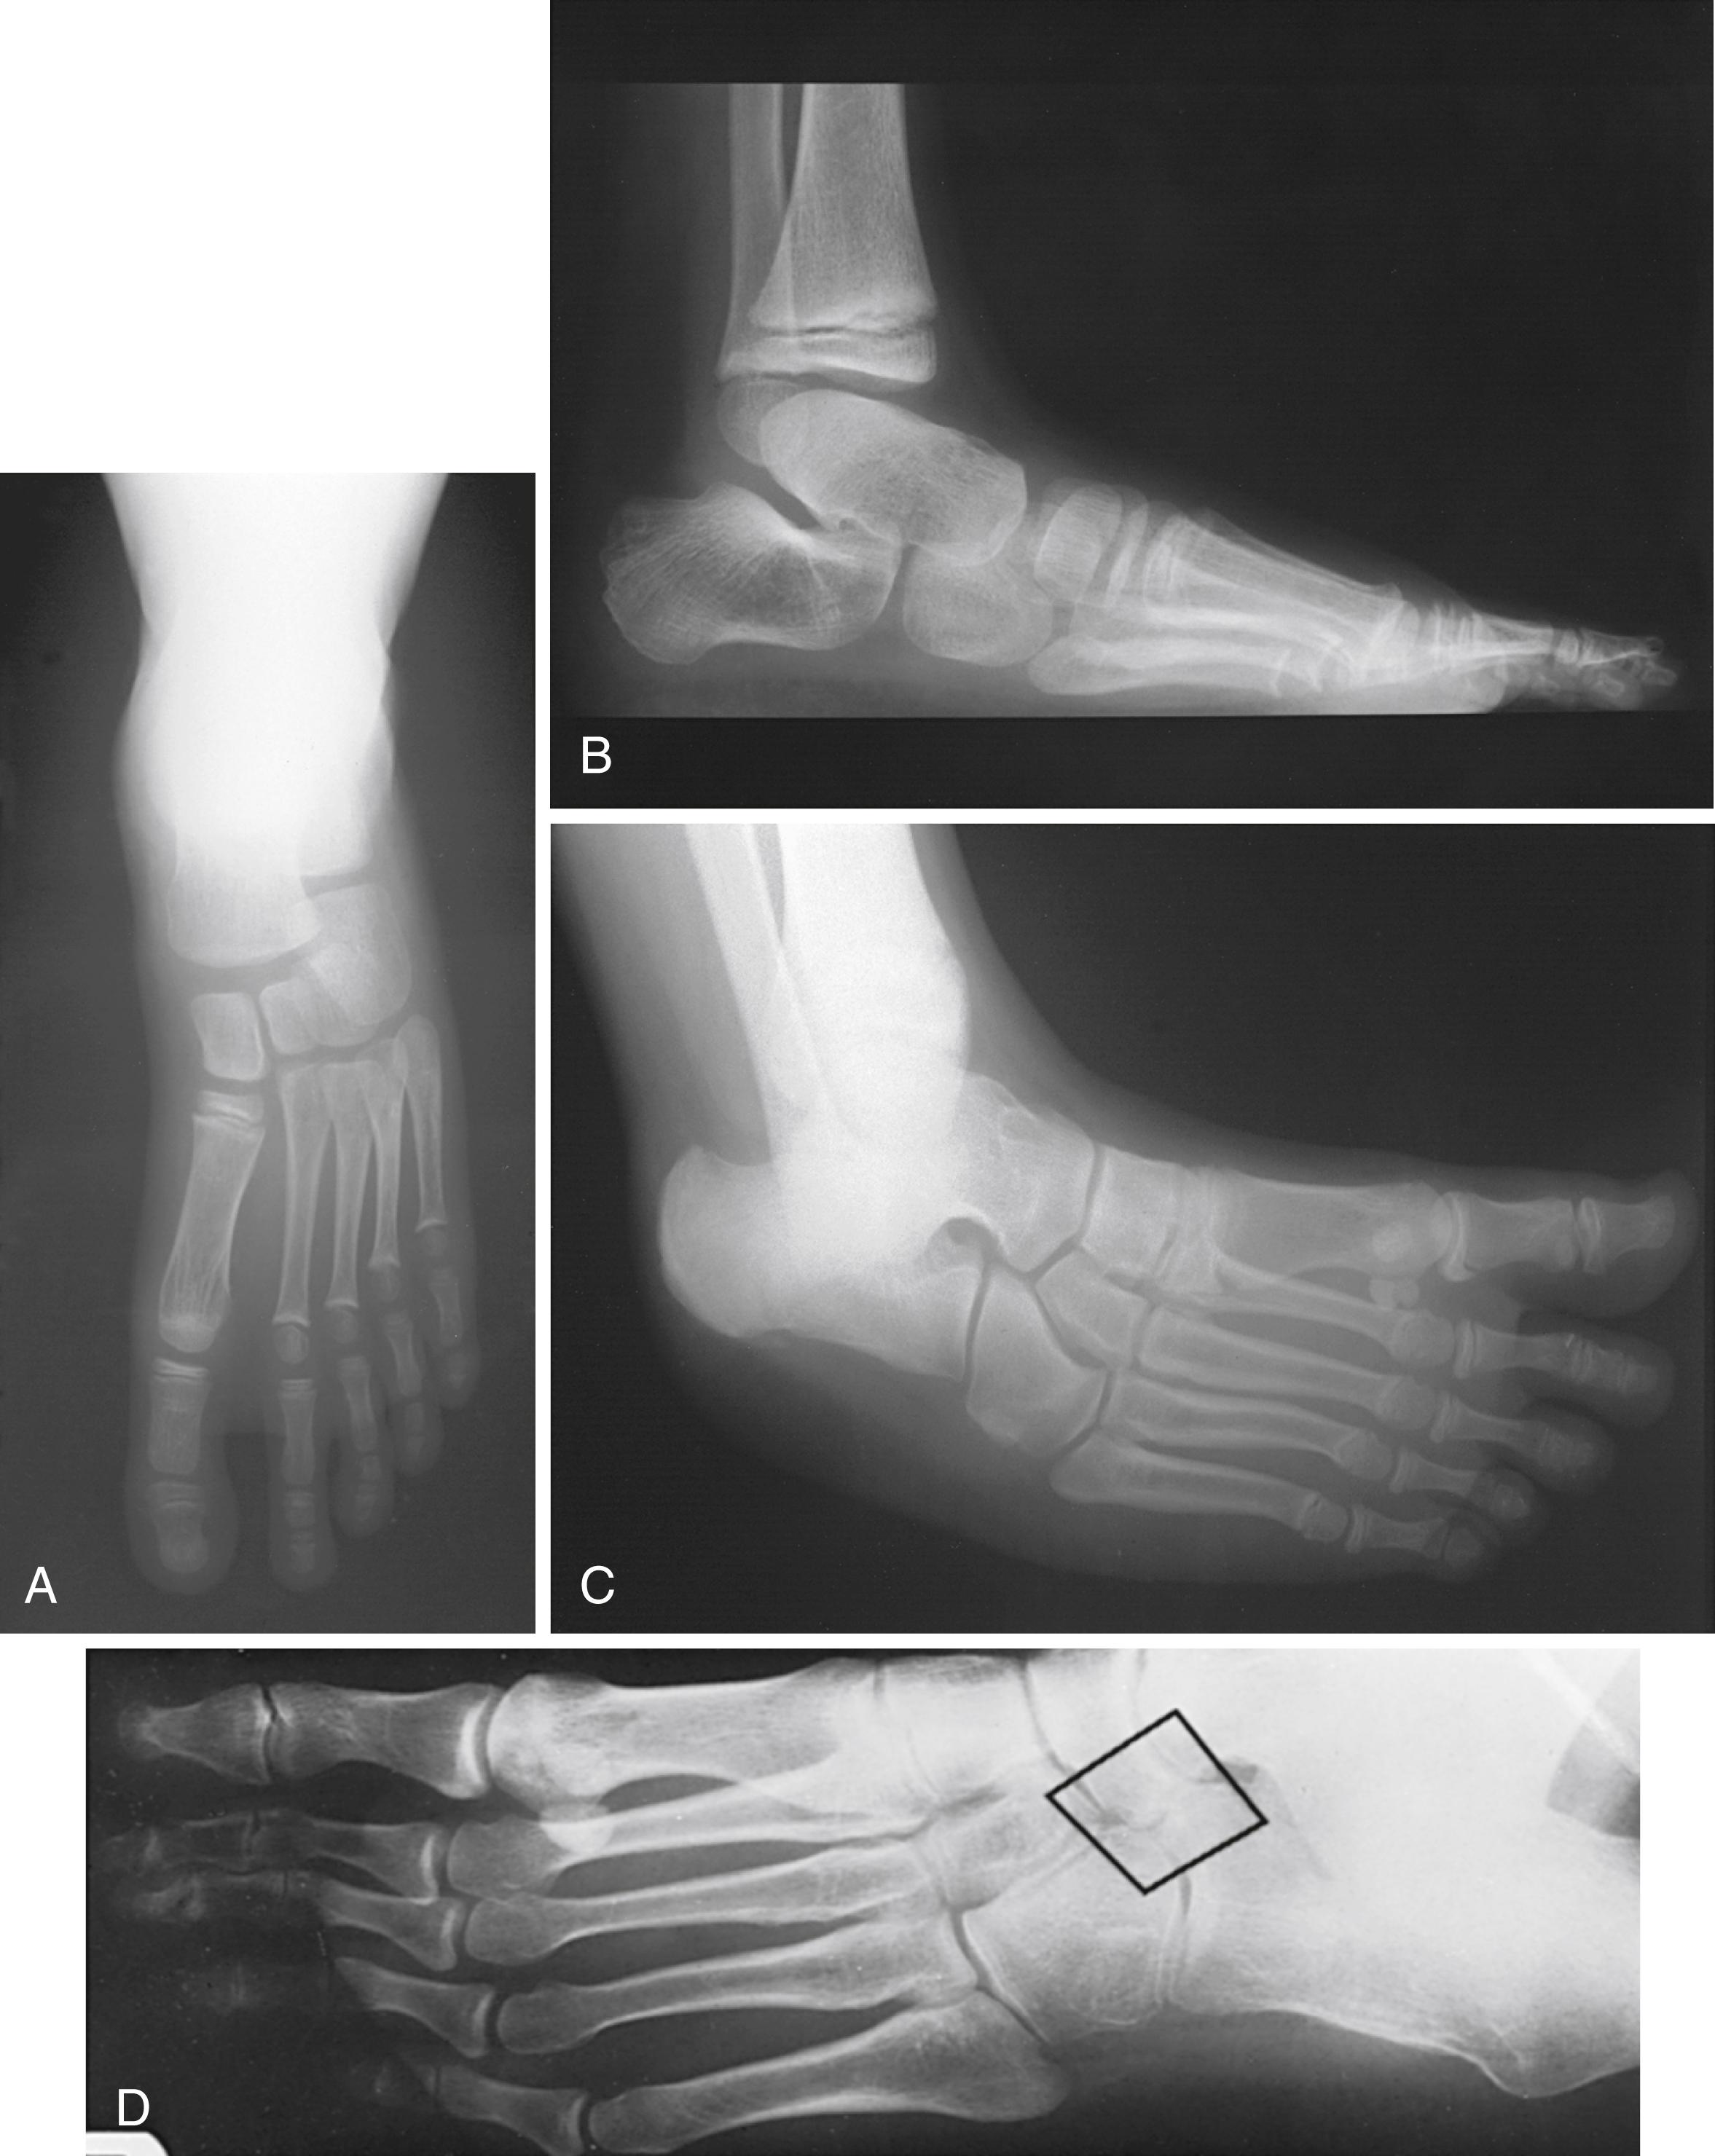
Specific treatment for calcaneonavicular and talocalcaneal coalitions is further discussed, but generally speaking, a trial of conservative treatment with cast or boot immobilization is indicated initially. After failing conservative treatment, surgical treatment includes bar excision (open or endoscopic) or joint arthrodesis (selective or triple). Treating physicians must also address concomitant valgus deformities through additional procedures to create a plantigrade foot.
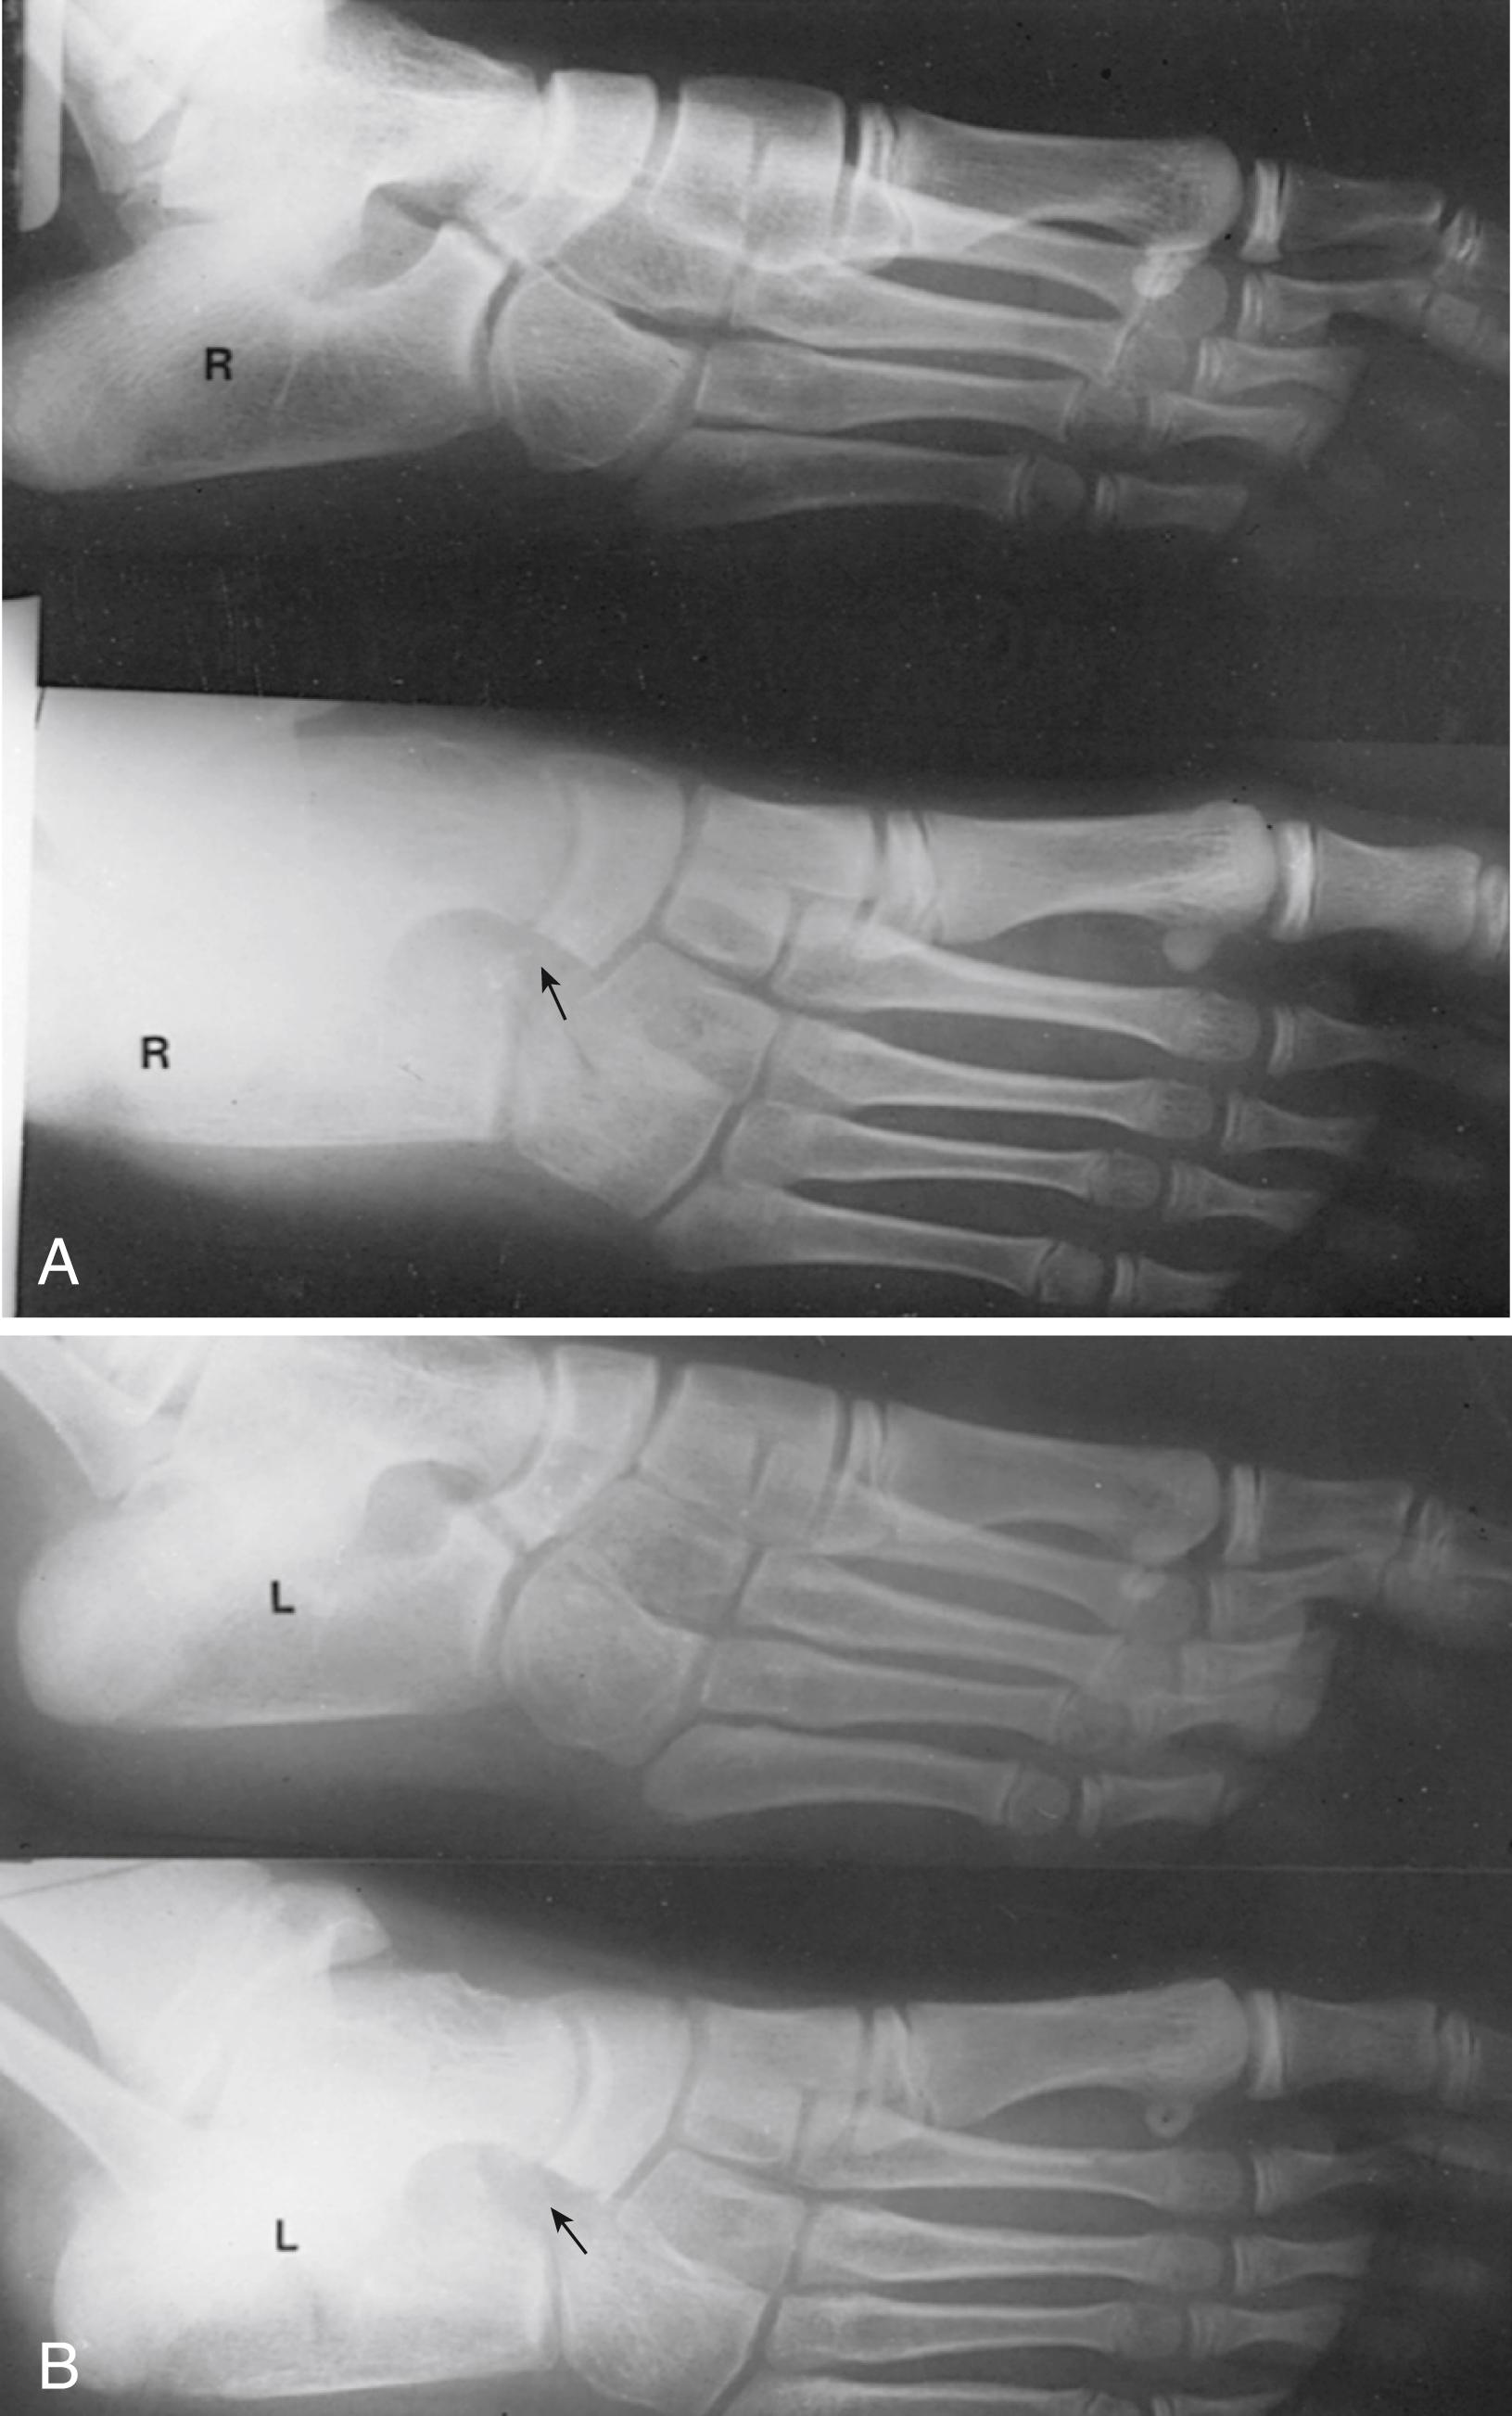
Although probably present since birth, the calcaneonavicular bar does not ossify until a person is 8 to 12 years old. Before this period, presumably because of the malleability of the cartilage surrounding the primary ossification centers of the peritalar complex, significant symptoms are rare. It is believed that, as the cartilage ossifies, hindfoot stiffness results; thus, the patient’s ability to withstand the stress of vigorous childhood activity declines. The coalition might be bony (synostosis), cartilaginous (synchondrosis), or fibrous (syndesmosis). Incomplete coalitions ( Fig. 83.43D ), that is, cartilaginous or fibrous, usually are the more symptomatic. The 45-degree lateral oblique radiographic examination is the most useful in diagnosing calcaneonavicular coalition, whether it is complete (bony) or incomplete (cartilaginous or fibrous).
The abnormal bar runs from the anterior process of the calcaneus just lateral to the anterior facet dorsally and medially to the lateral and dorsolateral extraarticular surface of the navicular. It usually is 1.0 to 2.0 cm long × 1.0 to 1.2 cm wide. In a bar with a cartilaginous or fibrous interface, the adjacent bony margins are irregular and indistinct. The talar head might appear small and underdeveloped. Beaking of the dorsal articular margin of the talus, so common in talocalcaneal coalition, is uncommon in calcaneonavicular coalition.
The symptoms usually are vague dorsolateral foot pain centering around the sinus tarsi, difficulty walking on uneven surfaces, foot fatigue, and occasionally a painful limp. The physical examination may or may not show significant reduction of subtalar motion or flattening of the longitudinal arch, so a high index of suspicion is necessary in this patient profile. In our experience, if the condition is unilateral, careful examination of subtalar motion shows a definite difference in the two feet in most patients. In addition to varying degrees of loss of subtalar motion, tenderness usually is present in the sinus tarsi and along the course of the bar. Hindfoot valgus, some loss of the longitudinal arch, and peroneal spasm are present in most adolescent patients who are symptomatic to varying degrees.
Although a calcaneonavicular coalition may not appear until adulthood, most patients with symptomatic calcaneonavicular coalition are 8 to 12 years old, corresponding to the period in which ossification of the cartilaginous precursor occurs. Parents should be educated regarding its congenital nature, the reason for the delay in symptoms until adolescence, its hereditary pattern, and the fact that some coalitions never become symptomatic. This discussion with the patient and family members is an important part of the treatment.
A trial of reduced activity or cast immobilization or both is recommended. A patient may be rendered asymptomatic for varying periods or even indefinitely after 4 to 6 weeks in a cast. Intermittent casting for short periods, with lengthy intervals of noncasting, might be all that is required. The mere presence of a tarsal coalition does not mean surgery should be recommended; if patients with tarsal coalition reach their 20s with few or no symptoms, they frequently remain asymptomatic or are only mildly symptomatic. If a trial period of casting and the use of a molded arch support do not allow an adolescent to participate in activities he or she enjoys, however, surgical treatment can be recommended with a high expectation of success in reducing or eliminating the symptoms.
For children and young adults, resection of the calcaneonavicular bar with interposition of muscle or fat at the site of resection is recommended. For adults, however, the literature is conflicting as to the efficacy of calcaneonavicular bar excision, with good results reported from 68% to 92% of patients, but with recurrence rates of 67% and osteoarthritic changes in 96% reported by some. Other authors, however, have reported restoration of subtalar motion, relief of symptoms, and improved function after resection and filling of the defect with muscle (extensor digitorum brevis) or fat ( Fig. 83.44 ).
Exposure of Bar
Make an Ollier incision (see Chapter 1 ); preserve the branches of the intermediate dorsal cutaneous branch of the superficial peroneal nerve crossing the incision, and try to preserve the sheaths of the extensor digitorum longus and peroneus tertius tendons anteriorly and the peroneal tendons posteriorly.
Identify the muscle belly of the extensor digitorum brevis. Raise the muscle by sharp dissection from the confines of the sinus tarsi in a proximal-to-distal direction until the entire sinus tarsi and anterior process of the calcaneus are identified.
Become a Clinical Tree membership for Full access and enjoy Unlimited articles
If you are a member. Log in here