Physical Address
304 North Cardinal St.
Dorchester Center, MA 02124
Basic airway procedures are often overlooked in favor of more exciting intubation devices and techniques, but basic procedures are critically important and often lifesaving. Establishment of a patent airway, oxygenation, and bag-mask ventilation (BMV) remain the cornerstones of good emergency airway management ( – ). These techniques can be used quickly and in any setting. They allow practitioners to keep apneic patients alive until a definitive airway can be established.
Extraglottic devices, such as laryngeal mask airways (LMAs) and the King Laryngeal Tube (LT), are also important for the initial resuscitation of apneic patients and for rescue ventilation when intubation fails.
This chapter describes basic airway skills, including opening the airway, oxygen (O 2 ) therapy, BMV, and extraglottic airway (EGA) devices. These are the skills that providers can rely on when other airway techniques are difficult or impossible. Mastery of these skills will help providers manage difficult, anxiety-provoking emergency airways.
Although other specialists are sometimes available, most emergency airways are managed by emergency medicine providers. Airway management in the emergency department (ED) is unique and significantly different from airway management in the controlled setting of an operating room. Additionally, conventional airway management tools may be ineffective in the uncontrolled emergency environment. Major challenges include hypoxia; shock; full stomach, and the presence of emesis, blood, or excessive secretions in the airway. Many patients are uncooperative and combative, making it impossible to properly examine the airway before choosing an intubation technique. Medical history, allergies, and even the current diagnosis are often unknown before emergency airway management begins. Time constraints, lack of patient cooperation, and risk for emesis and aspiration limit the use of some techniques, such as awake intubation. In trauma patients, the risk for cervical spine injury limits optimal head and neck positioning for BMV and laryngoscopy. All these factors increase the risk for complications from emergency airway management, and approximately 0.5% to 1% of all emergency airways require a surgical approach. The increasing use of video laryngoscopy may reduce the incidence of emergency surgical airways.
The first concern in the management of a critically ill patient is patency of the airway. Upper airway obstruction commonly occurs when patients are unconscious or sedated. It can also be due to injury to the mandible or muscles that support the hypopharynx. In these situations, the tongue moves posteriorly into the upper airway when the patient is in a supine position. Upper airway obstruction caused by the tongue can be relieved by positioning maneuvers of the head, neck, and jaw; the use of nasopharyngeal or oropharyngeal airways; or the application of noninvasive positive pressure ventilation (NPPV).
Airway obstruction in unconscious patients is often due to posterior displacement of the tongue ( Fig. 3.1 A ). Research in patients with obstructive sleep apnea using NPPV supports the concept that the airway collapses like a flexible tube. Upper airway obstruction often causes obvious snoring or stridor, but it may be difficult to discern in some patients. All unconscious patients are at high risk for upper airway obstruction.

More than 40 years ago, Guildner compared different techniques for opening obstructed upper airways and found that the head-tilt/chin-lift and jaw-thrust techniques were both effective ( Fig. 3.1 B and C ). The jaw-thrust maneuver (anterior mandibular translation to bring the lower incisors anterior to the upper incisors) is the most important technique for opening the upper airway.
It is widely accepted that the jaw-thrust-only (without head tilt or chin lift) maneuver should be performed in patients with suspected cervical spine injury, but there is no evidence that it is safer than the head-tilt/chin-lift maneuver. The American Heart Association (AHA) concluded that airway maneuvers are safe during manual in-line stabilization of the cervical spine but highlighted evidence that all airway maneuvers cause some spinal movement. Both the chin-lift and the jaw-thrust maneuvers have been shown to cause similar substantial movement of the cervical vertebrae. However, there is no evidence that this movement worsens existing spinal cord injury or causes new spinal cord injury in patients with cervical spine fractures. Most experts believe that airway interventions performed for patients with cervical spine injury are safe. The AHA recommends that “if healthcare providers suspect a cervical spine injury, they should open the airway using a jaw thrust without head extension. Because maintaining a patent airway and providing adequate ventilation are priorities in CPR, use the head tilt–chin lift maneuver if the jaw thrust does not adequately open the airway.”
Importantly, the addition of NPPV may relieve airway obstruction when simple manual positioning maneuvers fail. Meier and colleagues showed that adding NPPV to the chin-lift and jaw-thrust maneuvers decreased stridor and improved the nasal fiberoptic view of the glottic opening in anesthetized children. The use of NPPV for patients with upper airway obstruction should not be considered a definitive solution.
The jaw-thrust maneuver is the most important technique used to open the upper airway. To perform the jaw-thrust maneuver, place the tips of the middle or index fingers behind the angle of the mandible (see Fig. 3.1 C ). Lift the mandible toward the ceiling until the lower incisors are anterior to the upper incisors. This maneuver can be performed in combination with the head-tilt/chin-lift maneuver or with the neck in the neutral position during in-line stabilization.
To perform the head-tilt/chin-lift maneuver, place the tips of the index and middle fingers beneath the patient's chin (see Fig. 3.1 B ). Lift the chin cephalad and toward the ceiling. The upper part of the neck will naturally extend when the head tilts backward during this maneuver. Apply digital pressure on only the bony prominence of the chin and not on the soft tissues of the submandibular region. The final step in this maneuver is to use the thumb to open the patient's mouth while the head is tilted and the neck is extended.
The “triple airway maneuver” is described by some authors as a valuable method for maintaining a patent upper airway. The most common description of this maneuver is head tilt, jaw thrust, and mouth opening. Evidence demonstrates that the upper airway is more patent when the mouth is closed. Although the triple maneuver is commonly mentioned in the anesthesia literature as a valuable technique, no studies exist to support the assertion that this technique is more effective than the head-tilt/chin-lift or jaw-thrust maneuvers.
The best way to position a patient's head and neck for opening the upper airway is to mimic how patients position themselves when they are short of breath, with the neck flexed relative to the torso and with atlanto-occipital extension. This is known as the sniffing position and was described by Magill almost 100 years ago. In normal-sized supine adults this is accomplished by elevating the head approximately 10 cm while tilting the head back, so that the plane of the patient's face tilts slightly toward the provider at the head of the bed (see Chapter 4 , Fig. 4.8 ). Morbidly obese patients require much more head elevation to achieve the proper sniffing position. This can be accomplished by building a ramp of towels and pillows under the upper torso, head, and neck or by using a Troop Elevation Pillow (Mercury Medical, Clearwater, FL) or similar device ( Fig. 3.2 ). Rather than elevating the head by a standard height, the goal of head elevation is to achieve horizontal alignment of the external auditory meatus with the sternum. This is the best position for opening the upper airway in morbidly obese patients.
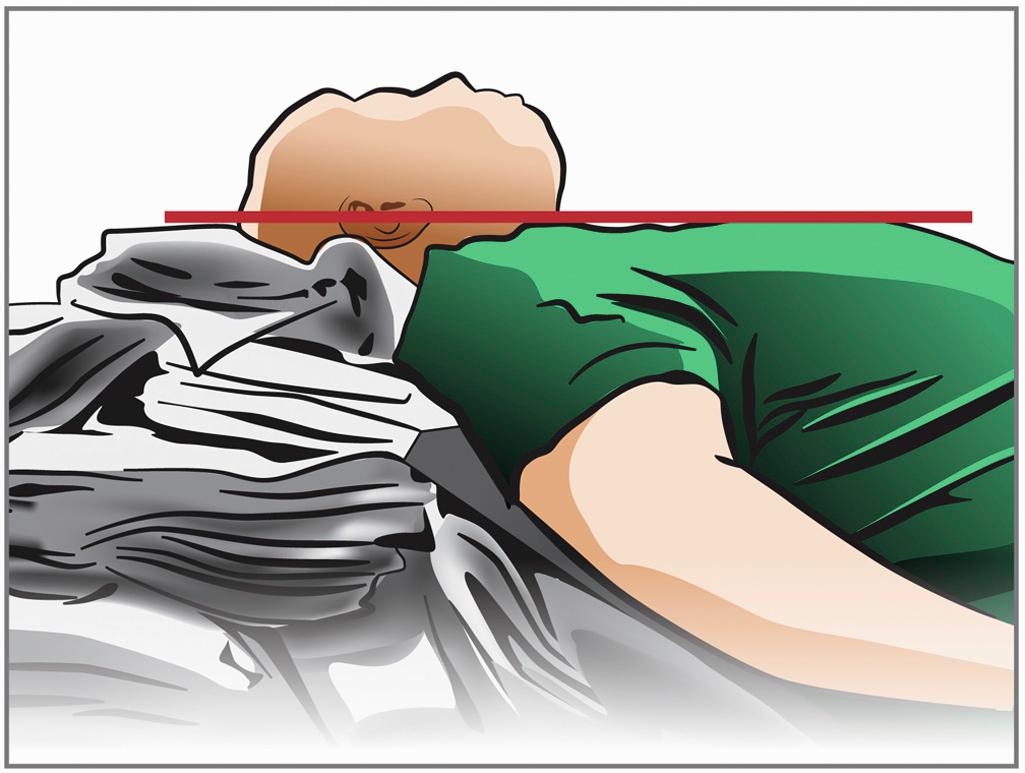
The sniffing position is contraindicated in patients with cervical spine injuries. The best technique for opening the airway in this situation is a simple jaw-thrust maneuver with anterior mandibular translation to bring the lower incisors anterior to the upper incisors (see Fig. 3.1 C ). In obese patients, fat deposition on the upper back results in neck extension when the patient's head is resting on the bed. In these patients, it is acceptable to carefully elevate the head with a towel or pillow to move the head and neck into a more neutral position even in the setting of cervical spine trauma.
In young children, the sniffing position is often achieved without lifting the head because the occiput of a child is relatively large, so the lower cervical spine is normally flexed when the child is lying supine on a flat surface.
Airway management is usually easiest when patients are in the supine position, but the lateral position may be best for patients who are actively vomiting and those with excessive upper airway bleeding or secretions. Some evidence suggests that rotating patients to the lateral position may not prevent aspiration. Patients with suspected cervical spine injury should have their head immobilized with manual in-line stabilization if they need to be rolled to the lateral position. Airway management maneuvers will be more difficult when patients are in the lateral position.
Awake patients with partial airway obstruction can usually clear a foreign body on their own. Intervention is required when the patient is not moving air or has altered mental status. Some patients with upper airway obstruction can be ventilated and oxygenated with aggressive high-pressure BMV, so always try this if standard BMV fails. Massive aspiration of vomitus is often a fatal event because of inability of the patient and clinician to adequately clear the airway.
The International Consensus Conference on Cardiopulmonary Resuscitation and Emergency Cardiopulmonary Care evaluated the evidence for different techniques to clear foreign body airway obstruction. They found good evidence for the use of chest thrusts, abdominal thrusts, and back blows or slaps. Insufficient evidence exists to determine which technique is the best and which should be used first.
The technique of subdiaphragmatic abdominal thrusts to relieve a completely obstructed airway was popularized by Dr. Henry Heimlich and is commonly referred to as the Heimlich maneuver . The technique is most effective when a solid food bolus is obstructing the larynx. In a conscious patient, stand behind the upright patient. Circle the arms around the patient's midsection with the radial side of a clenched fist placed on the abdomen, midway between the umbilicus and xiphoid. Then grasp the fist with the opposite hand and deliver an inward and upward thrust to the abdomen ( Fig. 3.3 A ). A successful maneuver will cause the obstructing agent to be expelled from the patient's airway by the force of air exiting the lungs. Abdominal thrusts are relatively contraindicated in pregnant patients and those with protuberant abdomens. Potential risks associated with abdominal thrusts include stomach rupture, esophageal perforation, and mesenteric laceration, compelling the rescuer to weigh the risks and benefits of this maneuver. Use a sternal hand position for pregnant patients ( Fig. 3.3 B ).
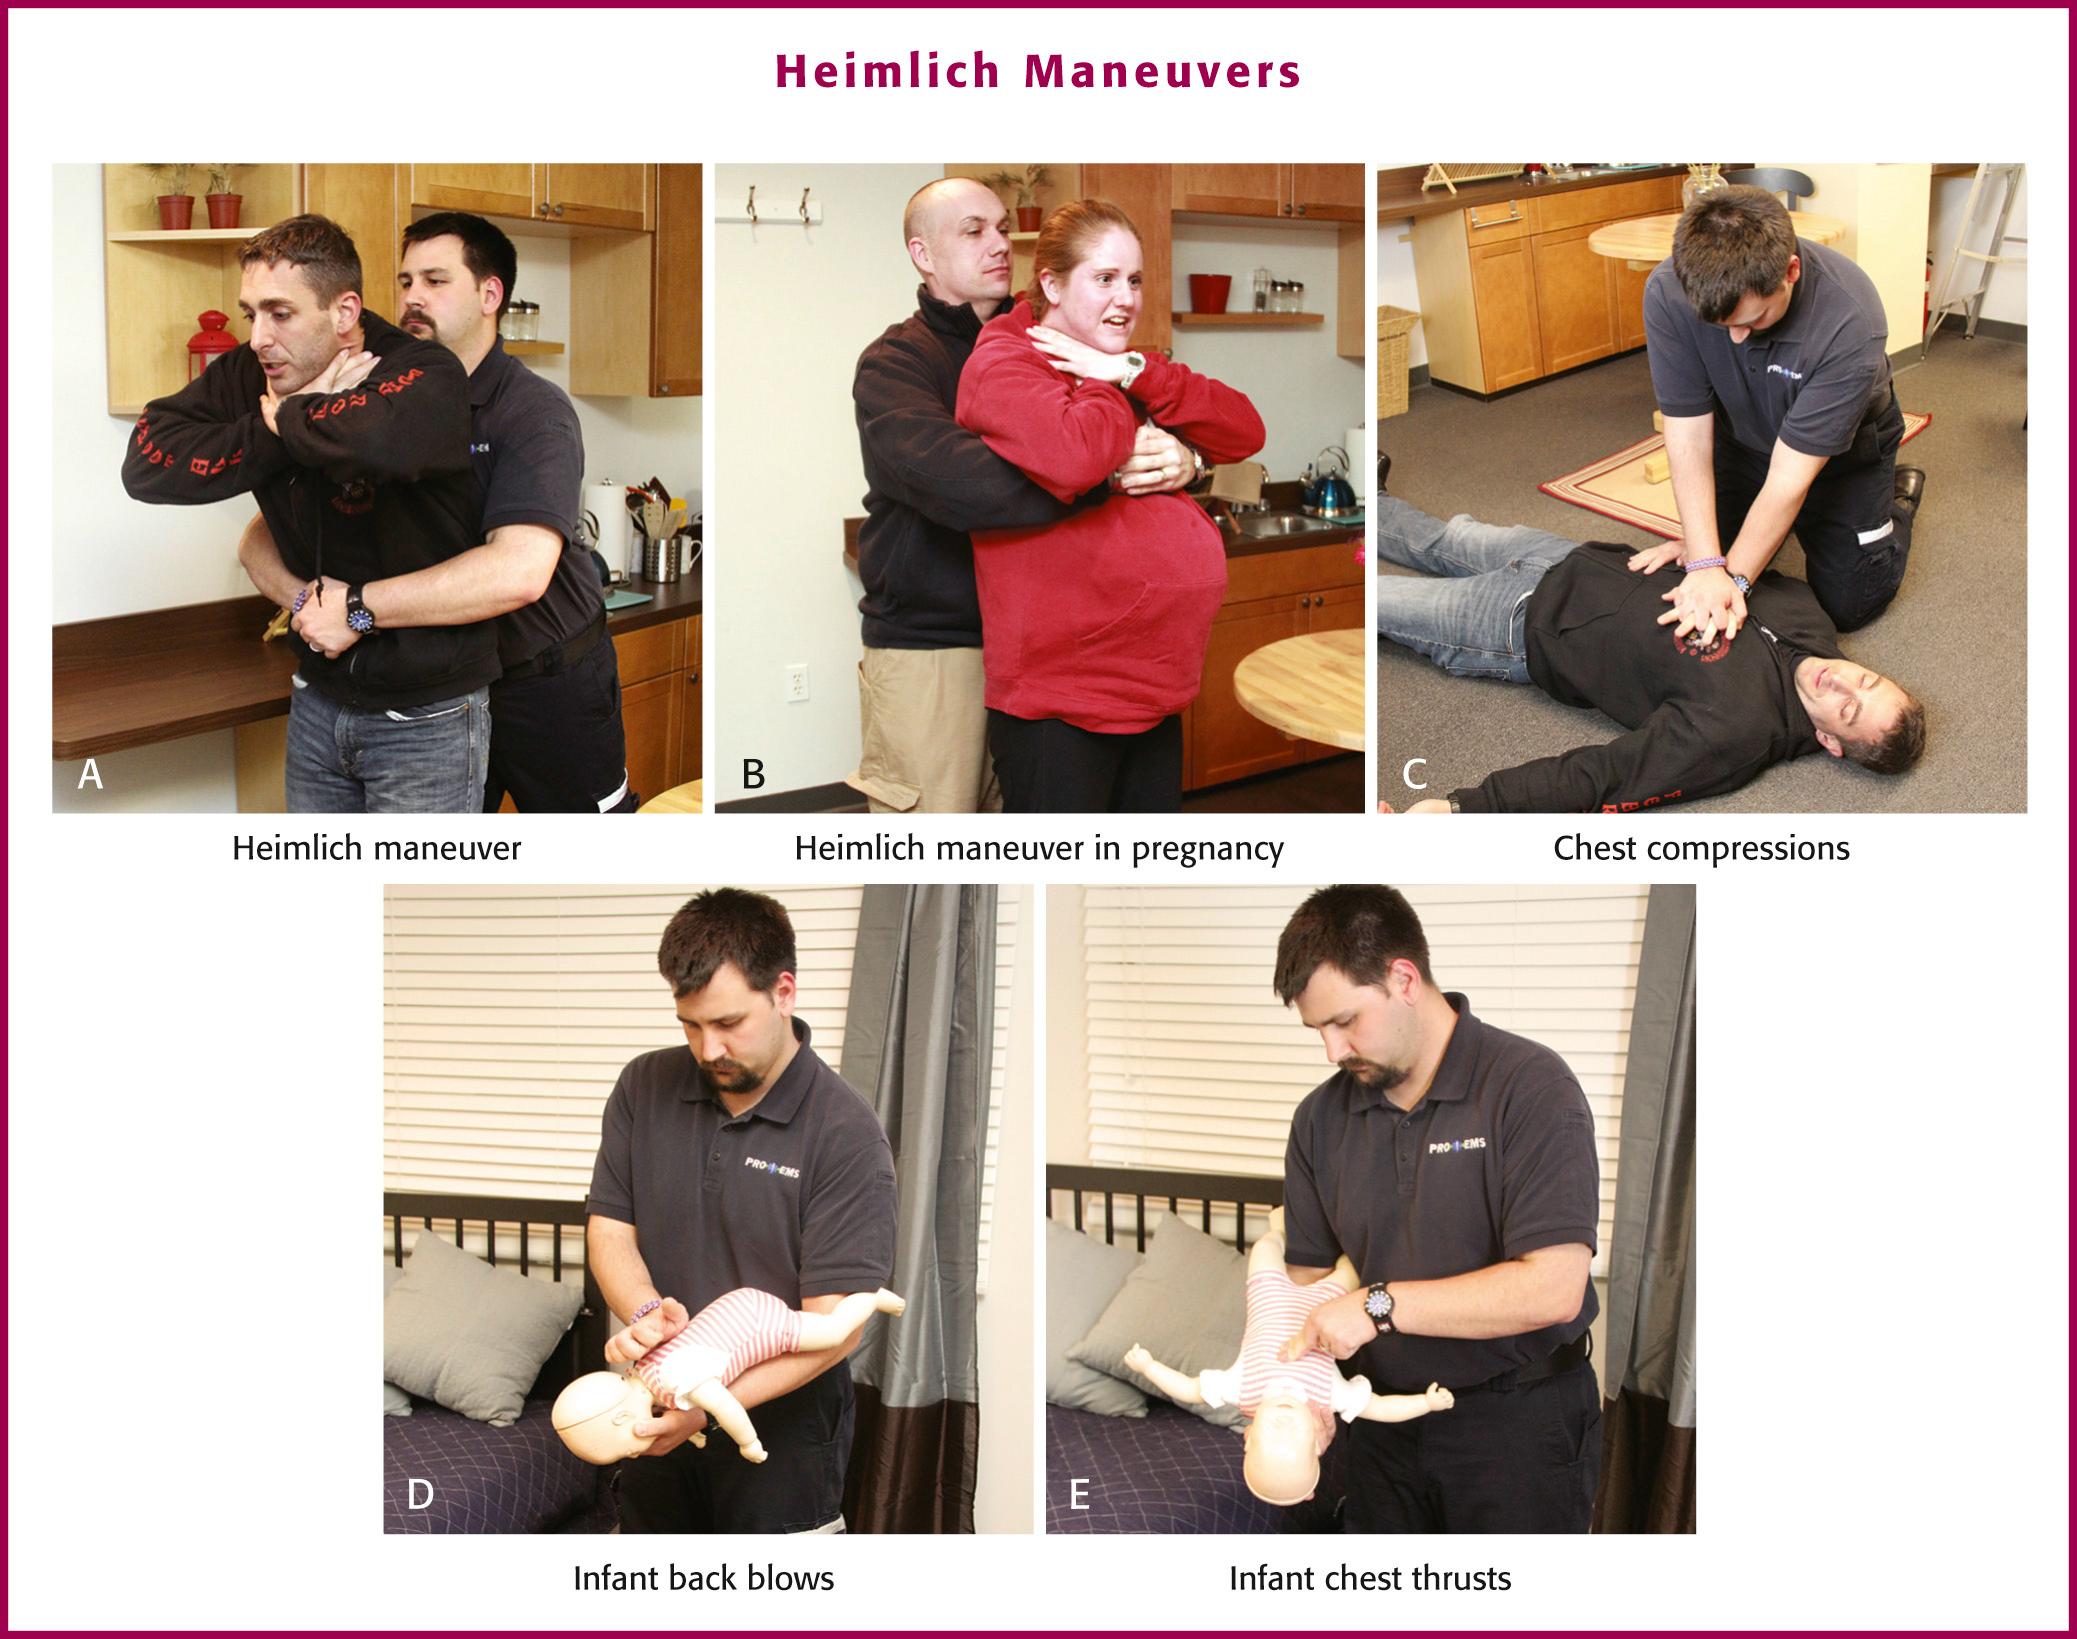
If a choking patient loses consciousness, use chest compressions in an attempt to expel the obstructing agent ( Fig. 3.3 C ). The theory is the same as the Heimlich maneuver, with high intrathoracic pressure created to push the obstruction out of the airway. Some data suggest that chest compressions may generate higher peak airway pressure than the Heimlich maneuver. After 30 seconds of chest compressions, remove the obstructing object if you see it, attempt 2 breaths, and then continue cardiopulmonary resuscitation (CPR; 30 compressions to 2 breaths). Every time you open the airway to give breaths, look for the object and remove it if possible, and then continue CPR if necessary.
Back blows are recommended for infants and small children with a foreign body obstructing the airway. Some authors have argued that back blows may be dangerous and may drive foreign bodies deeper into the airway, but there is no convincing evidence of this phenomenon. Anecdotal evidence suggests that back blows are effective. No convincing data, however, indicate that back blows are more or less effective than abdominal or chest thrusts. Back blows may produce a more pronounced increase in airway pressure, but over a shorter period than with the other techniques. The AHA guidelines suggest back blows in the head-down position ( Fig. 3.3 D ) and head-down chest thrusts in infants and small children with foreign body airway obstruction ( Fig. 3.3 E ). The AHA does not recommend abdominal thrusts in infants because they may be at higher risk for iatrogenic injury. From a practical standpoint, back blows should be delivered with the patient in a head-down position, which is more easily accomplished in infants than in larger children. It is recommended that suction be performed on newborns rather than giving them back blows or abdominal thrusts.
Any patient with a complete airway obstruction may benefit from chest compressions, abdominal thrusts, or back blows. It is important to realize that more than one technique is often required to clear obstruction of the airway by a foreign body, so multiple techniques should be applied in a rapid sequence until the obstruction is relieved. Perform a finger sweep of the patient's mouth only if a solid object is seen in the airway.
Perform CPR on all unconscious patients with airway obstruction. Aggressive high-pressure BMV should be attempted, as this may distend the trachea enough to allow air to bypass the obstruction. In cases in which obstructive foreign bodies cannot be removed under direct visualization and aggressive positive pressure ventilation has failed, practitioners with advanced airway skills and proper equipment can try to push a subglottic foreign body beyond the carina, usually into the right main stem bronchus.
Patient positioning and airway-opening maneuvers are often inadequate to achieve complete airway patency. Ongoing hemorrhage, vomitus, and particulate debris frequently require suctioning. Several types of suctioning tips are available. A large-bore dental-type suction tip is the most effective in clearing vomitus from the upper airway because it is less likely to become obstructed by particulate matter. The tonsil tip (Yankauer) suction device can be used to clear hemorrhage and secretions. Its rounded tip is less traumatic to soft tissues, but the tonsil tip device is not large enough to effectively suction vomitus.
A large-bore dental-type tip device, such as the HI-D Big Stick (SSCOR Inc, Sun Valley, CA) suction tip, should be readily available at the bedside during all emergency airway management ( Fig. 3.4 ). The large-bore tip allows rapid clearing of vomitus, blood, and secretions.
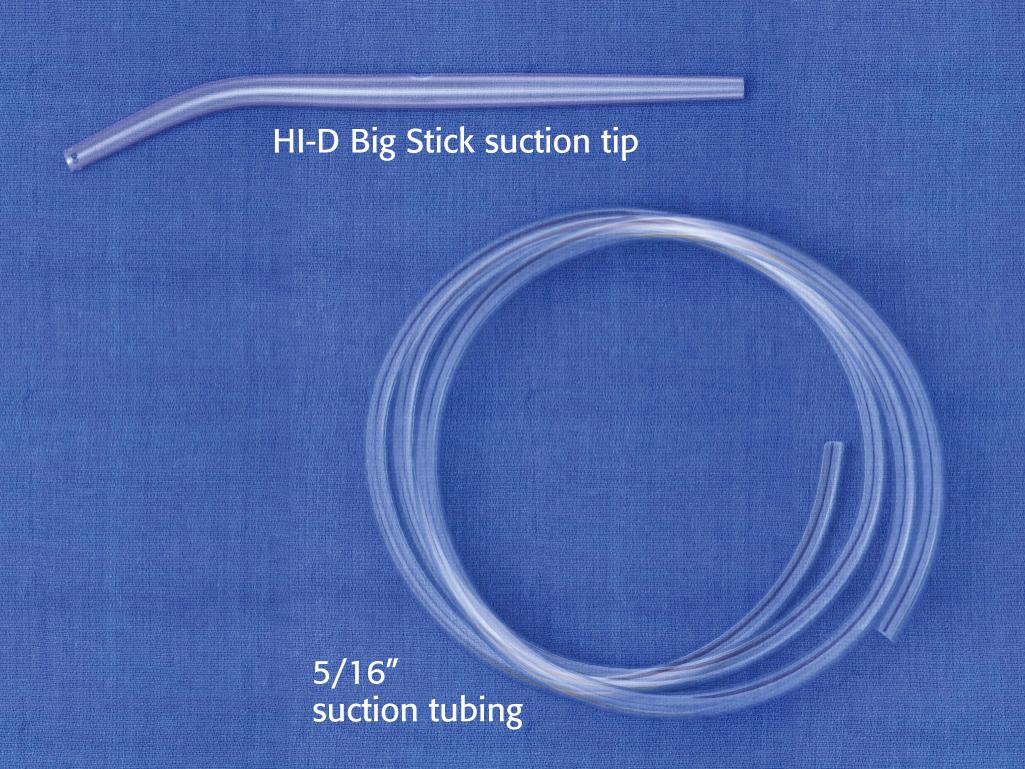
A limiting feature of many suction catheters is the diameter of the tubing. Vomitus may obstruct the standard 1/4-inch-diameter catheter. A 5/8- or 3/4-inch-diameter suction tube (Kuriyama Tubing, 5/16-inch inner diameter, 0.44-inch outer diameter, clear; www.grainger.com ) has been shown to significantly decrease suction time for viscous and particulate material (see Fig. 3.4 ).
Keep suctioning equipment connected and ready to operate. Everyone participating in emergency airway management should know how to use it. Interposition of a suction trap close to the suction device prevents clogging of the tubing with particulate debris.
No specific contraindications to airway suctioning exist. Complications of suctioning may be avoided by anticipating problems and providing appropriate care before and during suctioning maneuvers. Nasal suction is seldom required, except in infants, because most adult airway obstruction occurs in the mouth and oropharynx.
Avoid prolonged suctioning because it may lead to significant hypoxia, especially in children. Do not exceed 15 seconds for suctioning intervals and administer supplemental O 2 before and after suctioning. Naigow and Powasner found that suctioning consistently induced hypoxia in dogs and that it was best avoided by hyperventilation with high-concentration O 2 before and after suctioning. Hypoxia was also prevented in children by preoxygenation prior to endotracheal (ET) suctioning attempts.
When feasible, perform suctioning under direct vision or with the aid of the laryngoscope. Forcing a suction tip blindly into the posterior pharynx can injure tissue or convert a partial obstruction to a complete obstruction.
Once the airway has been opened with manual maneuvers and suctioning, artificial airways, such as nasopharyngeal and oropharyngeal airways can facilitate both spontaneous breathing and BMV. In semiconscious patients who require a head-tilt/chin-lift or jaw-thrust maneuver to open their airways, hypoxia may develop because of recurrent obstruction if these maneuvers are discontinued. Oxygen supplementation and a nasopharyngeal airway may be all the support that is necessary to maintain a functional airway.
Patients who are unresponsive or apneic are usually easier to ventilate with a bag-mask device when an oropharyngeal airway is in place. In the ED, patients who tolerate an oropharyngeal airway should generally be intubated.
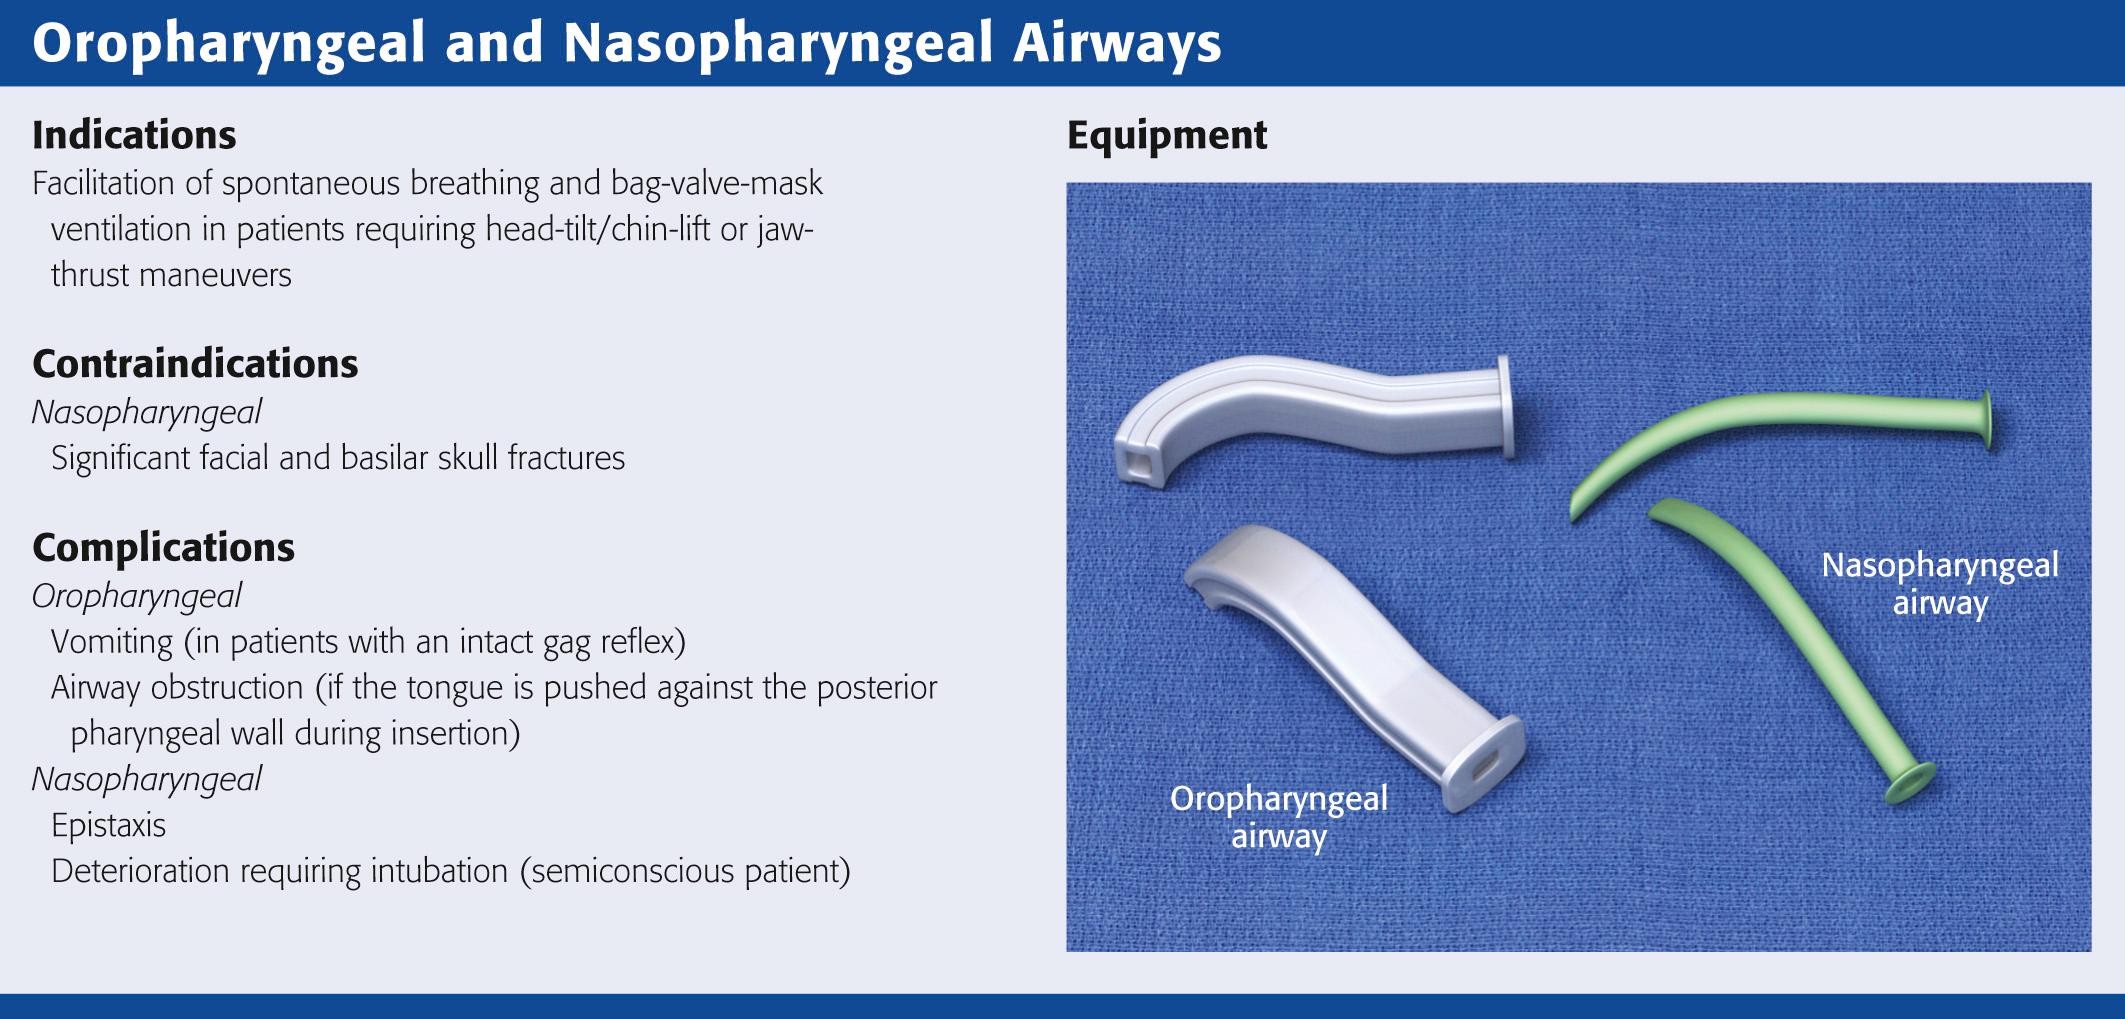
The simplest and most widely available artificial airways are the oropharyngeal and nasopharyngeal airways ( Fig. 3.5 ). Both are intended to prevent the tongue from obstructing the airway by creating a passage for air between the base of the tongue and the posterior pharyngeal wall. The oral airway may also prevent teeth clenching. In cases of severe upper airway edema, such as angioedema, these devices may not function properly or be able to bypass the obstruction. The oropharyngeal airway may be inserted by either of two procedures. One approach is to insert the airway in an inverted position along the patient's hard palate ( Fig. 3.5 , step 2 ). When it is well into the patient's mouth, rotate the airway 180 degrees and advance it to its final position along the patient's tongue, with the distal end of the artificial airway lying in the hypopharynx ( Fig. 3.5 , step 3 ). A second approach is to open the mouth widely, use a tongue blade to displace the tongue, and then simply advance the artificial airway into the oropharynx ( Fig. 3.5 , step 4 ). No rotation is necessary when the airway is placed in this manner. This technique may be less traumatic, but it takes longer.
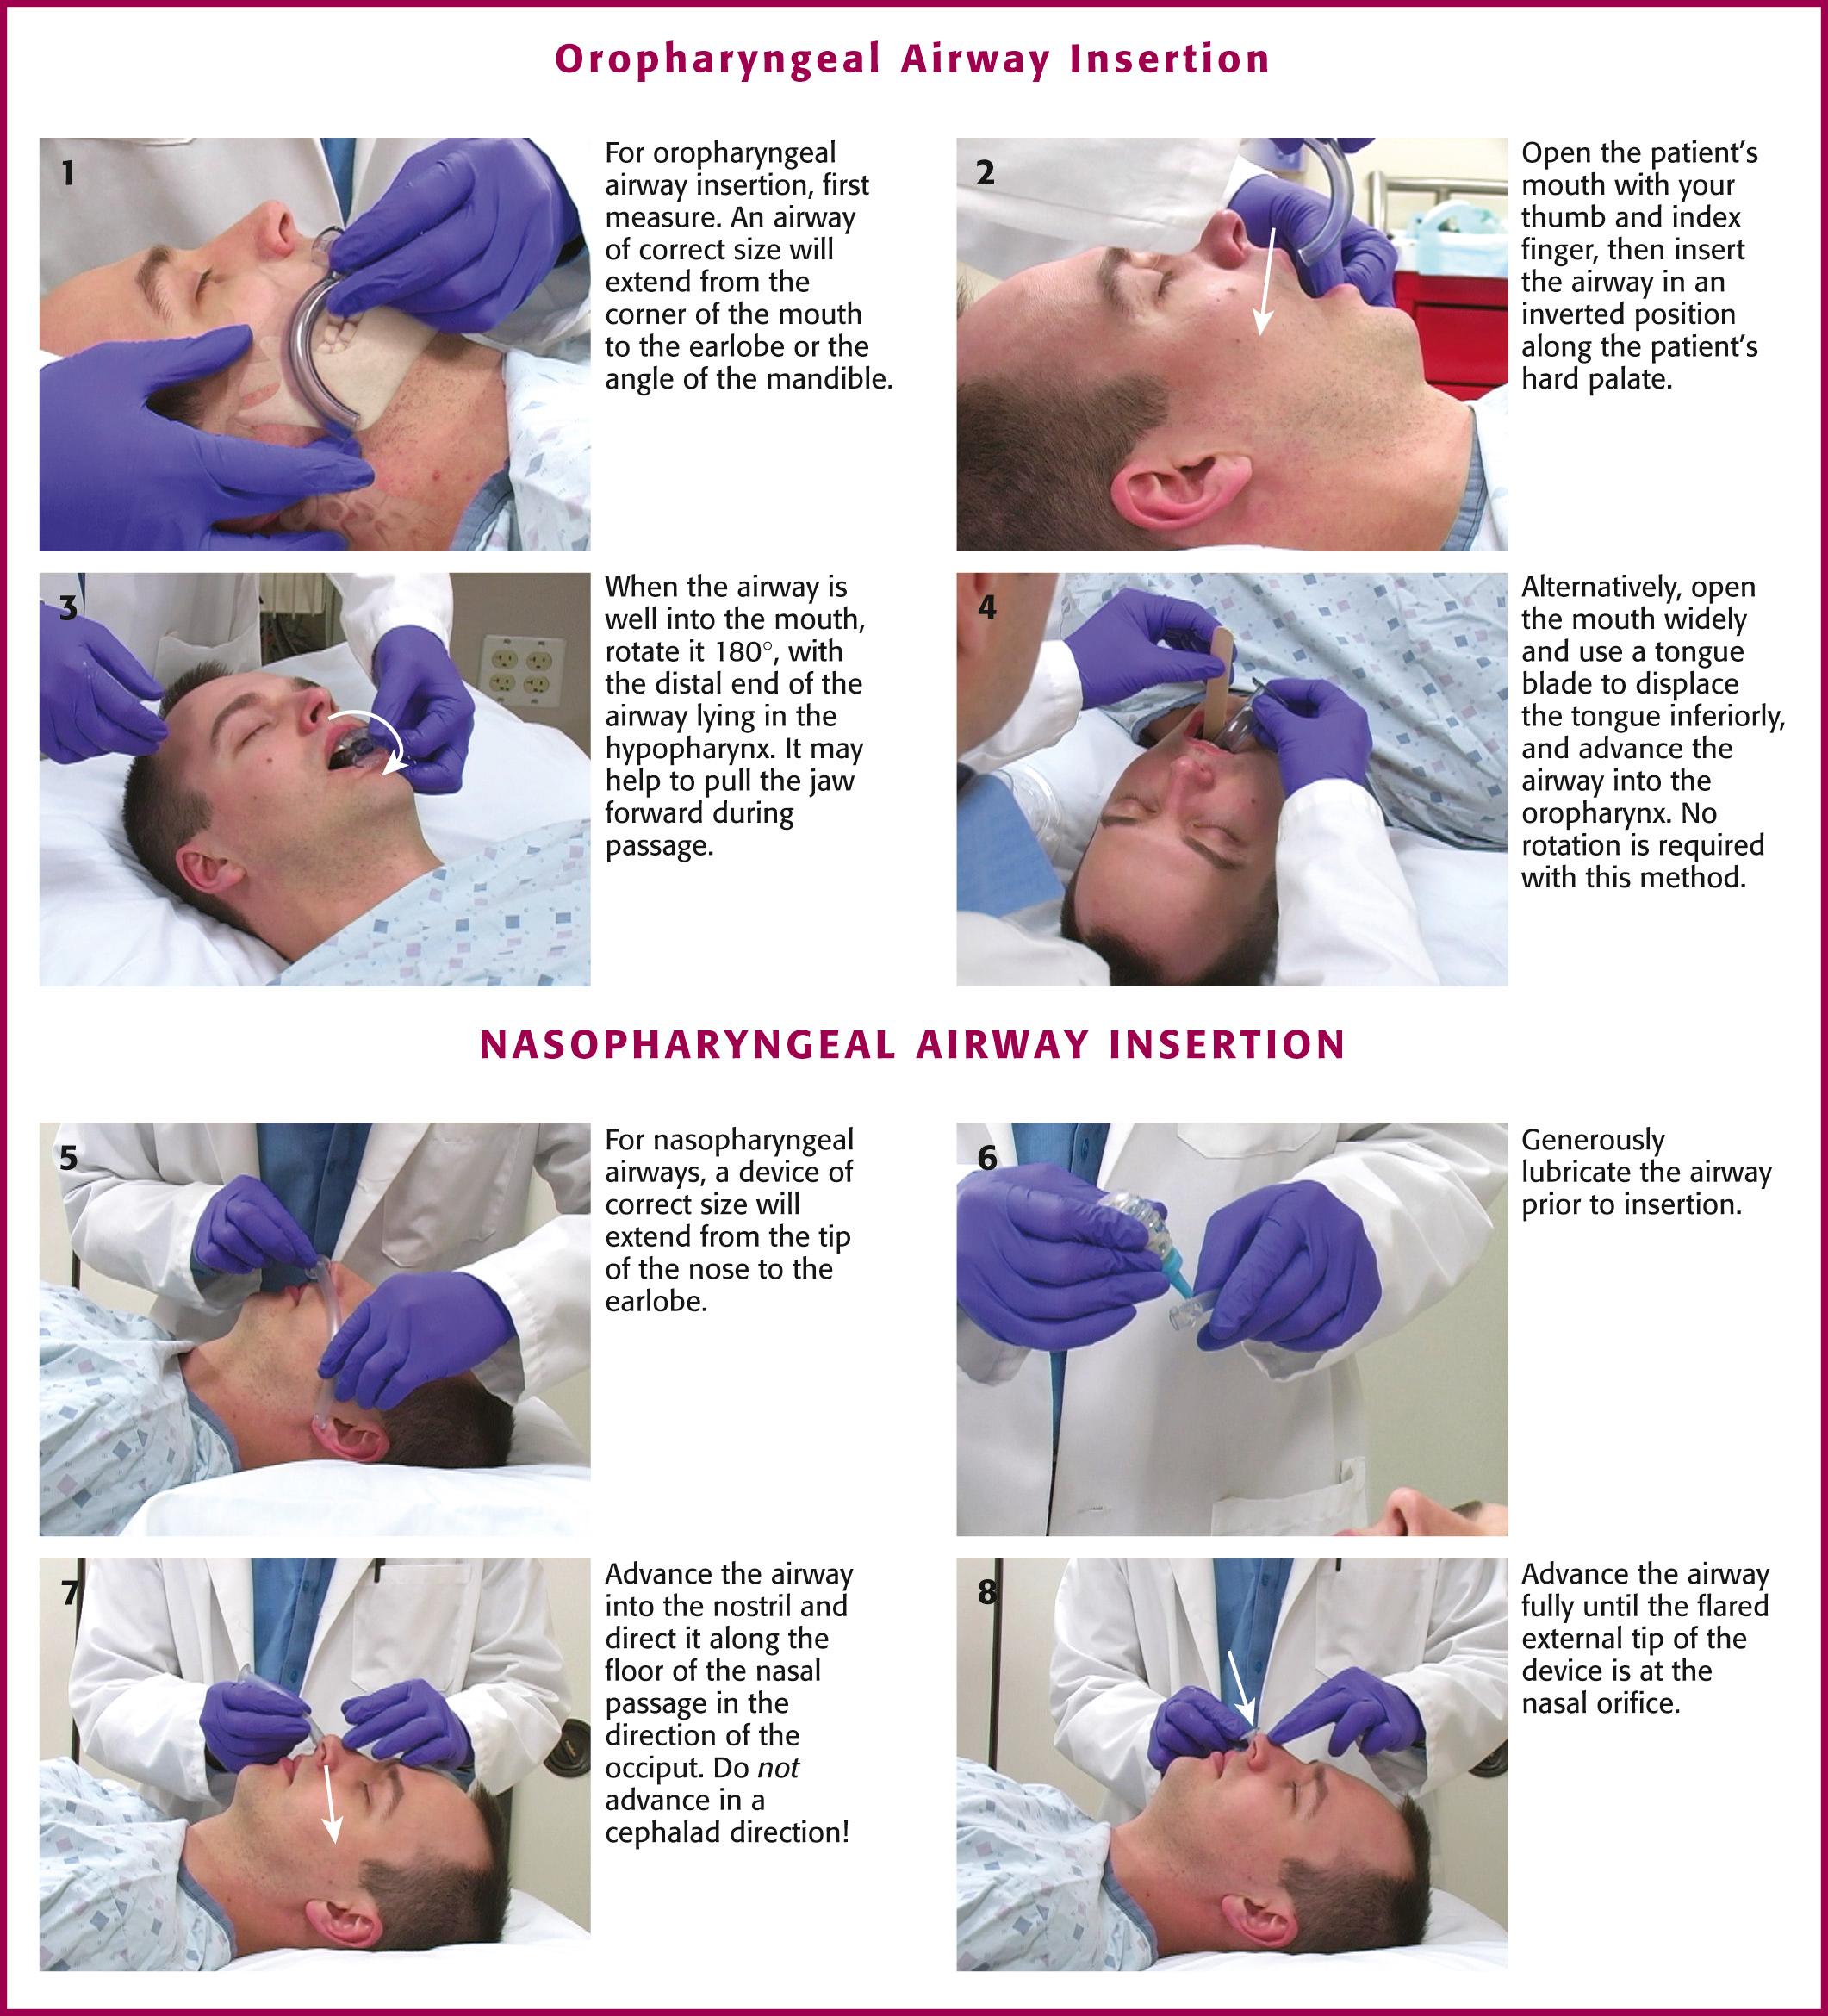
The nasopharyngeal airway is very easy to place. It may be easiest to place it on the patient's right naris so that the bevel is facing the septum on insertion. Be sure to lubricate the device before insertion ( Fig. 3.5 , step 6 ). Some clinicians insert a nasopharyngeal airway to dilate the nasal passages for 20 to 30 minutes before nasotracheal intubation. Simply advance it into the nostril and direct it along the floor of the nasal passage in the direction of the occiput, not cephalad ( Fig. 3.5 , step 7 ). Advance it fully until the flared external tip of the airway is located at the nasal orifice ( Fig. 3.5 , step 8 ).
Both oropharyngeal and nasopharyngeal airways are available in multiple sizes. To find the correct size of either device, estimate its size by measuring along the side of the patient's face before insertion. An oropharyngeal airway of the correct size will extend from the corner of the mouth to the tip of the earlobe (see Fig. 3.5 , step 1 ); a nasopharyngeal airway of the correct size will extend from the tip of the nose to the tip of the earlobe (see Fig. 3.5 , step 5 ).
Both oropharyngeal and nasopharyngeal airways provide airway patency similar to that achieved with the head-tilt/chin-lift maneuver. The nasal airway is better tolerated by semiconscious patients and is less likely to induce emesis in those with an intact gag reflex.
The nasopharyngeal airway may cause epistaxis and may be dangerous in patients with significant facial and basilar skull fractures. Semiconscious patients with nasopharyngeal airways may deteriorate and require intubation, so they should be monitored closely.
The oropharyngeal airway may induce vomiting when placed in patients with an intact gag reflex. It may also cause airway obstruction if the tongue is pushed against the posterior pharyngeal wall during insertion. The oropharyngeal airway should not be used as a definitive airway.
Adequate O 2 delivery depends on the inspired partial pressure of O 2 , alveolar ventilation, pulmonary gas exchange, oxygen-carrying capacity of blood, and cardiac output. The easiest factor to manipulate is the partial pressure of inspired O 2 , which is accomplished by increasing the fraction of inspired oxygen (Fi o 2 ) with supplemental O 2 .
Become a Clinical Tree membership for Full access and enjoy Unlimited articles
If you are a member. Log in here