Physical Address
304 North Cardinal St.
Dorchester Center, MA 02124
Rotator cuff tears are among the most common disorders affecting the upper extremity, particularly in patients over age 50. They may manifest with pain, weakness, or disability and can be extremely debilitating in active individuals. The goals of treatment are to restore strength and function with resolution of pain. Although nonoperative treatment may be beneficial in selected patients, surgery is often indicated in order to restore strength and function. Newer repair techniques, such as those involving double-row configurations, may offer improved biology and anatomic reduction of the tendon to the tuberosity footprint.
Double-row rotator cuff repair requires adequate debridement and preparation of the host footprint on the greater tuberosity. A medial row of anchors provides initial reduction to the tuberosity. The sutures are then passed (with or without knot tying) through a second, lateralized anchor, in order to restore the anatomic rotator cuff/footprint relationship.
Chief complaints (weakness versus pain versus disability) and limitations.
Age and baseline activity level.
Injury history (traumatic, recurrent, prior treatments, surgeries).
Present and past medical history (diabetes, cardiac, comorbidities precluding ability to undergo surgery, etc.).
Smoking status.
Visual inspection (prior incisions, muscle atrophy, biceps deformity, scapular dyskinesis).
Palpation (tenderness over acromioclavicular [AC] joint, sternoclavicular [SC] joint, biceps/groove, tuberosity).
Range of motion testing: must differentiate painful restrictions from “true” restrictions (i.e., stiffness). Test both external rotation (ER) at side and abduction-rotation
Impingement signs (Neer, Hawkin, Jobe).
Rotator cuff strength/lag signs (supraspinatus: empty can or Jobe sign, infraspinatus: ER strength, ER lag sign; teres minor: ER strength in abduction, hornblower’s sign; subscapularis: internal rotation (IR) strength testing, lift-off/belly-press, IR lag, and excessive passive ER).
Biceps/labrum/AC: biceps signs (tenderness in groove/tendon, Speed, Yergason), labrum (O’Brien deep in joint), AC (cross body, O’Brien sign at AC).
True/Grashey anteroposterior (AP) x-ray (degenerative disease, proximal humeral migration, AC joint degenerative joint disease (DJD), cystic changes in tuberosity).
Axillary x-ray (joint alignment, os acromiale).
Outlet/scapular Y-view (acromial morphology, calcific tendinitis).
Magnetic resonance imaging (MRI) scan noncontrast (rotator cuff tendon integrity, muscle atrophy/degeneration, edema in AC joint, integrity of biceps).
Compare tendon integrity on orthogonal views.
Nonoperative: rest, anti-inflammatories, physical therapy, injection.
Operative: several options exist in order to treat underlying symptoms:
Rotator cuff repair
Biceps tenotomy/tenodesis
Subacromial decompression/acromioplasty
Tendon transfer (latissimus dorsi tendon transfer for large posterior tears with intact anterior cuff)
Reverse total shoulder arthroplasty (for failed/chronic massive rotator cuff tear)
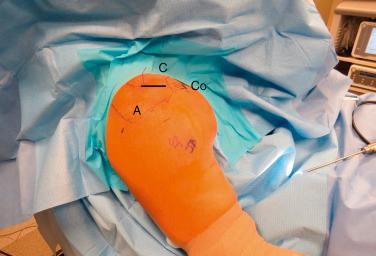
Surface anatomy: acromion, AC joint, clavicle, coracoid, coracoacromial (CA) ligament ( Fig. 20.1 ).
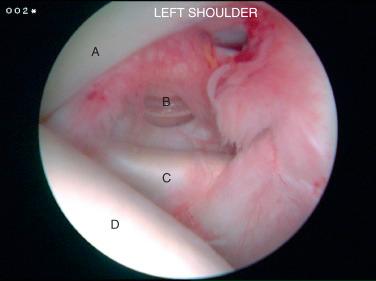
Intraarticular anatomy: rotator interval, biceps tendon, superior labrum, biceps anchor, subscapularis tendon, humeral head, glenoid, axillary pouch, posterior labrum ( Fig. 20.2 ).
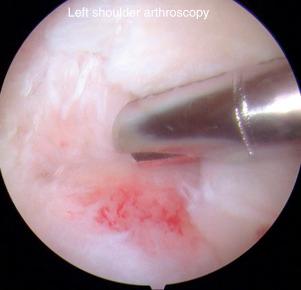
Subacromial space: rotator cuff tendon, acromion ( Fig. 20.3 ).
Full-thickness rotator cuff tear refractory to nonoperative management.
Acute full-thickness tear following trauma (e.g., shoulder dislocation).
Full-thickness tear in young active individuals with significant functional deficit.
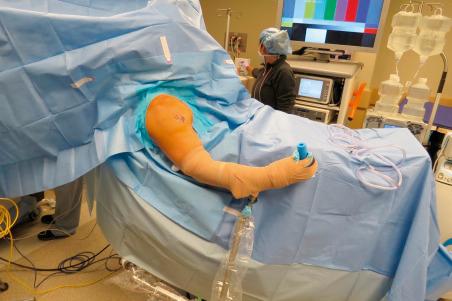
Can be in beach chair or lateral position (authors’ preferred technique is beach chair, Fig. 20.4 ).
Mark relevant bony landmarks: acromion (posterolateral and anterolateral corners), coracoid, AC joint, clavicle.
Stabilize neck in neutral position.
Keep bony prominences well padded (particularly with arm holders).
Make sure to adequately prep the surgical field (prep far medially).
Consider occlusive dressing around axilla/axillary hair.
Do a comprehensive exam in the preoperative area before block is administered. This will enable assessment of the AC joint and biceps.
If planning an AC joint resection, plan your anterior portal slightly superior than you normally would and place it in line with the AC joint. This will allow for easier and more direct access to joint for resection/debridement.
Mark incisions and portal sites before you begin surgery so that swelling does not distort anatomy and reference points.
Place subacromial portals in a slightly distal position to allow for subsequent swelling.
Ensure that head and neck are in acceptable positions and are without any stress; make sure that both are well secured and padded.
Double-check to make sure all equipment is in the room and ready, along with any equipment that may be necessary according to findings from arthroscopic exam (e.g., biceps tenodesis kits, appropriate anchors and suture passers, etc.).
Incomplete physical exam (especially with regards to AC joint and biceps tendon symptomatology).
Mark landmarks and portal locations before you start; otherwise swelling will distort the anatomy.
Incorrect portal placement (this will create additional difficulty throughout the case).
Inadequate patient positioning (i.e., not properly secured in arm holder/traction device).
Inadequate draping of the field (i.e., too laterally draped, therefore precluding proper AC joint debridement).
Not having all necessary equipment in the room prior to commencement of the case (i.e., biceps tenodesis equipment, necessary suture anchors and passers, etc.).
Arm holder/traction device.
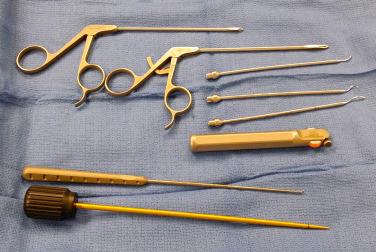
Full array of arthroscopic instruments (suture grasper, tissue grasper, penetrating suture grasper), along with a radiofrequency cautery device, small and large full-radius resectors for soft-tissue debridement, as well as an arthroscopic burr as needed for acromioplasty/tuberosity preparation.
Desired suture anchors for medial- and lateral-row suture anchors.
Biceps tenodesis equipment (suture for whip-stitch, along with fixation equipment, Fig. 20.5 ).
Become a Clinical Tree membership for Full access and enjoy Unlimited articles
If you are a member. Log in here