Physical Address
304 North Cardinal St.
Dorchester Center, MA 02124
The ultrasound machine has become ubiquitous in most hospitals. As ultrasound portability has improved, use of bedside sonographic assessment has expanded. Today, point-of-care ultrasound assessments aid in diagnostics and procedural technique. Ultrasound evaluation offers a rapid, low-cost adjunct to diagnostics and improves procedural safety. The on-call surgical resident should have familiarity with the basic principles behind ultrasound, general technique for use, and understanding of indications for use.
Formal ultrasound education and training are highly valuable and recommended.
Recommended supplementary reading:
Soni, N. J., Arntfield, R., & Kory, P. (2015). Point-of-care ultrasound . Philadelphia: WB Saunders.
Recommended course:
American College of Surgeons Ultrasound Course
Ultrasonography takes advantage of the piezoelectric effect, which refers to the ability of various materials to generate an electric signal when placed under mechanical stress. The reverse effect is also seen—the generation of motion with the application of an electric stimulus. An ultrasound transducer contains piezoelectric material (crystal or synthetic ceramic) that both produces sound waves through generation of minute oscillations and then converts sound waves returning to the transducer into electric signal. The returning sound waves, after being converted into electric signals, are interpreted as images or waveforms.
Clinical application of ultrasound waves allows for real-time visualization of tissues within the body. Ultrasound waves are produced by the transducer, oriented toward the anatomical structure(s) of interest. The different properties of tissues within the body absorb, scatter, transmit, and reflect the produced sound waves. The waves that are reflected are received by the transducer and analyzed. The characteristics of the returning sound waves are typically interpreted onto a grayscale with a resultant image. Air, fat, liquid, bone, hollow organ, and metal allow for different levels of transmission or reflection. Therefore the various tissues can be differentiated in the grayscale image rendered by the ultrasound machine.
Ultrasound machines operate using sound waves in the ultrasonic frequency (2–18 MHz). Recall that the properties of sound waves include both frequency of the waves and wavelength, which are inversely proportional. Wavelength and frequency of the sound waves determine the depth and resolution of an image. High-frequency, short-wavelength waves produce improved image resolution with the tradeoff of shallow tissue penetration. Conversely, longer-wavelength, lower-frequency waves penetrate deeply but produce decreased image resolution. Knowledge of this principle allows the ultrasonographer to choose the right frequency transducer based on the structures requiring imaging.
There are four types of transducer probes for general ultrasonography—linear, curvilinear, phased array, and intracavitary ( Fig. 32.1 ). As an on-call surgical resident knowledge of the first three are essential; the intracavitary probe is unlikely to be needed but is available. Each probe delivers a different range frequencies and proper selection of probe allows optimal visualization.
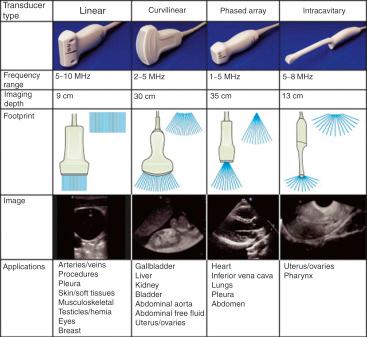
Matching probes for clinical purposes while on call:
Linear probe:
Ultrasound-guided venous access
Evaluation for superficial abscess
Lung-windows of extended version of Focused Assessment with Sonography in Trauma (E-FAST) examination
Curvilinear probe:
FAST examination (evaluation of abdominal free fluid)
Phased Array probe:
Inferior vena cava (IVC; volume status assessment)
FAST examination (cardiac window, assessment for tamponade)
FAST examination (can also be used to evaluate for abdominal free fluid)
Bedside assessment of cardiac function
Intracavitary probe: this probe is uncommonly used by the on-call resident. It should be used by experienced sonographers .
Transvaginal examination (document presence or absence of intrauterine pregnancy)
Transrectal examination (evaluate for deep perirectal abscess)
Modern ultrasound machines come in a variety of set ups. Each dashboard is unique and the mechanism for selecting probes, imaging type, and specialty modes differs between brands and machines. Familiarize yourself with the options and functions available at your institution.
Be sure that the ultrasound machine, including probes and cables, are clean before and after use. An ultrasound machine can be a source of contamination and passage of nosocomial infections. When in doubt, clean it yourself before use.
Image mode: Toggle between two-dimensional (grayscale image), motion (M-mode), and Doppler mode(s). Other specialized modes exist but are not of use to the on-call surgical resident.
Many machines have preset image calibration selections to further optimize image quality based on the tissue being evaluated. Examples of image presets include: vascular, cardiac, and abdomen. Fine-tuning of imaging can be achieved using the following settings.
Each probe has a range of frequencies allowing the user to set the desired depth of image. Typically, a scale on the left or right side of the image shows centimeter tick-marks indicating depth. Either a slider, button, and dial will allow the user to change the depth. Recall that there is a tradeoff between depth and resolution, match the depth to the focal point of interest to optimize the image.
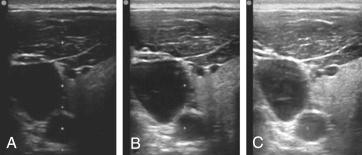
Gain alters the amplitude of sound waves and changes the strength of the signal received by the transducer. Essentially, turning up the gain turns up the brightness of an image but sacrifices image resolution ( Fig. 32.2 ). Overall gain should be adjusted so that fluid appears black and solid structures appear gray. Too much or too little gain will obscure images. Typically, the gain specific to different depths can be adjusted to compensate for changes in how sound waves are attenuated by different tissues. A single set of buttons or a dial typically changes overall gain, whereas a series of sliders or dials are used to change gain at various image depths.
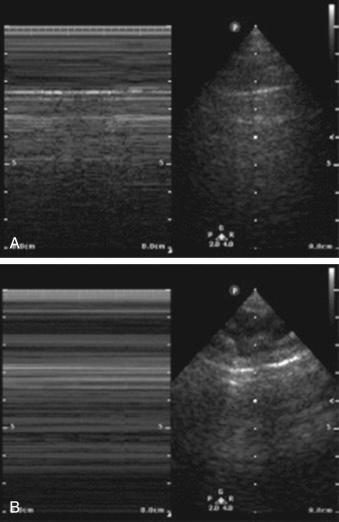
Motion mode depicts the motion of the entire image set on a linear scale across the viewing screen based on the placement of a selector scale ( Fig. 32.3 ). The mode allows more nuanced interpretation of either rapidly moving objects (i.e., heart valves) or finite movements (i.e., lung sliding).
Doppler imaging takes advantage of the Doppler effect, or the change in wave frequency dependent on motion of an object perceived by an observer (think: sound of an ambulance driving past). Ultrasound machines can analyze the Doppler effect and generate interpreted image representations.
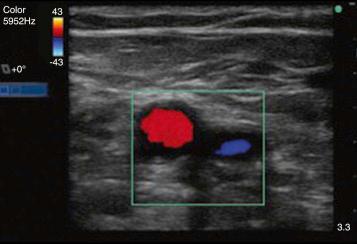
Color (or power) Doppler is the Doppler mode most used by on-call residents at the bedside. It depicts the flow direction of blood within blood vessels as either blue or red ( Fig. 32.4 ). Blood flowing toward the probe is blue and blood flowing away is red. This mode is useful for the on-call resident in determining whether the structure being imaged has “flow.” It is helpful, for example, in distinguishing arterial from venous vessels. This mode is also useful in demonstrating the absence of flow within a structure being evaluated. For example, an abscess should have no flow when viewed with color Doppler.
The safety profile of ultrasonography is highest compared with irradiating modalities such as x-ray and computed tomography (CT) imaging. However, nothing is without risk and the following factors should be considered. Ultrasound wave intensities can theoretically raise tissue temperature. Intensity and time of exposure are two factors that can increase this risk for elevated tissue temperatures. Risk for heat transmission is highest when the ultrasound machine is set to a very focused target (such as pulsed-wave Doppler imaging) and the image viewing time is prolonged. The principle of ALARA (As Low As Reasonably Achievable) has been developed by various professional societies. ALARA states that the sonographer should minimize the duration of exposure to a single point to the shortest period of time possible—this will decrease the risk for temperature rise and increase the amount of time that heat has to dissipate during total scan time.
Obtaining the best image requires proper patient positioning and appropriate handling of the ultrasound probe. The patient should be placed supine for all examinations that an on-call surgical resident will perform. Position yourself at the patient’s right side whenever possible. Place the ultrasound machine in a position that it can be easily seen while manipulating the probe or performing a procedure. Typically, this is next to the ultrasonographer, where machine buttons/dials can be accessed. In situations like central venous catheter placement in the internal jugular vein, it is advantageous to place the machine on the other side of the patient from where you are standing. This technique may require the help of a nurse or other practitioner to change settings on the machine.
Typically, the probe is held in the right hand. The probe is held like a large pen, loosely, allowing easy manipulation of the probe on the body. Find the indicator mark or line on the side of the probe ( Fig. 32.5 ). This line corresponds with the left side of the screen. Press on this side with your finger to orient yourself to where the probe corresponds to the image on the screen. The exception to this rule is echocardiography, where the probe orientation is reversed by convention.
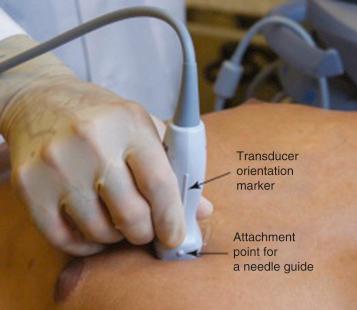
The probe should always face towards the patient’s right or to the head. Being systematic in how you set up each image will improve your skill at image acquisition.
When placing the probe on the body, first apply ultrasound jelly, which enhances the transduction of sound waves into the body. It is best practice to place the base of your palm, near your wrist, on the patient. This acts as an anchor to improve image stability. You can then move your wrist right to left or up and down. Anchoring at the wrist also improves your ability to hold an image in place once you have obtained the optimal image.
There are four general techniques for moving the probe to improve your image ( Fig. 32.6 ).
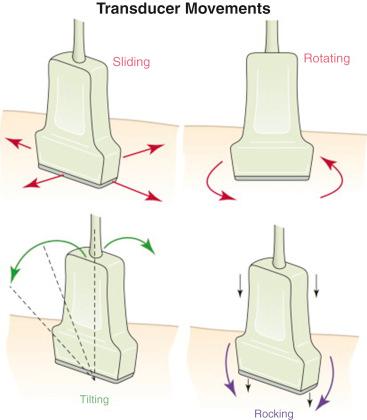
Use small corrections of the probe to find the optimal window for achieving a high-quality image. Image acquisition takes practice! Do as many examinations as possible to improve your skills in rapidly and reliably locating structures of interest.
Obtaining a quality image for interpretation requires a combination of probe selection, ergonomics, optimization of image settings, and use of anatomic “windows.” Image acquisition requires transmission and receipt of ultrasonic waves through tissue. As mentioned, the properties of different body tissues affect the propagation/attenuation of waves. Sound waves are scattered by air, attenuated by bone, and propagated through fluid. Therefore strategic windows can be used to achieve higher-quality images.
Anatomic windows for the on-call surgical resident:
Rib interspaces
Ribs themselves cast shadows and can make ultrasound of the lungs or upper abdomen difficult. Align the probe to fit within rib interspaces to allow transmission of ultrasound waves through muscle.
The liver
As a solid organ, the liver can act as a window to various structures of interest including the heart, IVC, and abdominal aorta.
Intravenous (IV) fluid bag
Superficial abscesses can be difficult to image if they are small or there is considerable surrounding edema. Consider placing a full IV fluid bag over the area of interest and imaging through the fluid. Make sure to use gel as well to further decrease air artifacts.
Attempt to acquire the image without the adjunct of the IV bag first as advancements in modern ultrasound probes nearly eliminate near-field image acquisition issues.
Become a Clinical Tree membership for Full access and enjoy Unlimited articles
If you are a member. Log in here