Physical Address
304 North Cardinal St.
Dorchester Center, MA 02124
Vascular access is the starting point for all diagnostic and interventional arterial and venous procedures. Common principles apply regarding choice of access site and equipment but there are significant differences between puncturing arteries and veins.
Choice of puncture site is dictated by the planned procedure; think what you need to achieve, consider the site of the lesion, and the size of sheath and catheter required.
The basic technique, first described by Seldinger, has three components:
Vessel puncture
Passage of the guidewire
Introduction of the catheter.
In general, arteries are pressurized and have thick walls, veins are at very low pressure and have thin walls, and this affects the puncture techniques, hence they are discussed separately.
Puncture sites are points where the artery has a consistent position, is relatively superficial, immobile and compressible against bone to obtain haemostasis. The most commonly used site is the right common femoral artery (CFA). However, many factors such as the upholstery of the patient, strength of the pulse and the site of the disease will influence the decision. The shortest, straightest route is nearly always best.
It is important to be familiar with the vascular anatomy at the chosen puncture site, as most arteries are accompanied by veins and nerves.
Check the patient is appropriately consented for the procedure. The main complications of arterial puncture can be readily remembered as the three B s: bruising , bleeding and blockage of the vessel; <1% of patients should need either a blood transfusion or an operation to put things right.
Choose the optimal puncture site; take time to find the pulse; clean and drape the area.
Palpate the pulse.
If there is a weak or absent pulse or a thrill:
Use ultrasound to check what is happening.
Perform puncture using ultrasound guidance.
Have a low threshold for using ultrasound guidance when obtaining arterial access, especially in esoteric sites and in the larger patient. However, for day-to-day retrograde CFA access, you will hit the artery much more often than you will miss.
If there is a good pulse:
Feel for the point of maximum pulsation.
Infiltrate from skin to artery with 1% lidocaine. Many operators place a finger to either side of the point of maximum pulsation and infiltrate in between. Disconnect the syringe but leave the needle in situ to mark where to make the skin incision.
Make a skin incision appropriate to catheter/sheath size.
Place gauze swabs to absorb blood.
Insert the needle at 45 degrees to the skin, aiming towards the point of maximum pulsation. Pulsation transmitted to the needle increases as the needle tip approaches the artery wall but falls as the wall is punctured. There is often a change in resistance felt at the arterial wall and on entry to the vessel lumen.
A crunching sensation indicates either heavy calcification in the wall or that you are in bone. In the former case, consider using ultrasound to look for a window in the plaque. In the latter case … pull the needle back and start again.
Free pulsatile backflow indicates that the needle tip is in the lumen.
Poor flow is seen below a high-grade stenosis or occlusion or if the needle is abutting the artery wall.
There will be little flow when using a 21G needle.
The needle position is usually quite stable; it does not need to be held with a vice-like grip.
You will occasionally transfix an artery as the needle is introduced. This occurs most often in young thin patients with compressible arteries. Always pull the needle back slowly after a puncture, you may get a second bite at the cherry.
If by chance either ultrasound is not available or the views are suboptimal, then fluoroscopy may help. However, fluoroscopy is far inferior to ultrasound, not least because of the proximity of your fingers to the beam. The presence of vascular calcification can be an additional aid to localizing the vessel. Very rarely, a roadmap image from another catheter can be used. If you cannot get access at your preferred site, use an alternative approach; remember to include the original access site in the subsequent angiogram to clarify the situation.
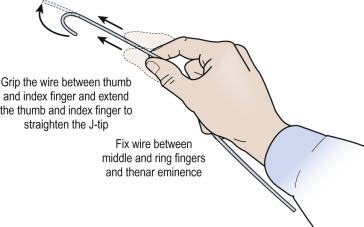
The 3-mm J-wire is the most frequently used initial guidewire. Arterial sheaths often come with a short guidewire with straight and J-tips (at the opposite ends); the straight end is useful in small vessels. Use the introducer to advance the J-wire into the needle. If the introducer is not immediately available, which usually means it has migrated to the floor, it is possible to straighten the J-wire by applying tension to the inner mandrel ( Fig. 28.1 ). The wire should advance smoothly and without resistance when held loosely between finger and thumb. There is a very characteristic feeling when a guidewire is passed through a needle or has a catheter passed over it – you will learn to recognize it but it is still best to use fluoroscopic guidance to ensure that the wire follows the expected path without buckling or deforming ( Fig. 28.2 ). It is better to put plenty of wire in the vessel rather than too little!
Never use force on a guidewire; something is wrong; STOP and CHECK . Use fluoroscopy to check wire passage. Force is never necessary and always harmful.
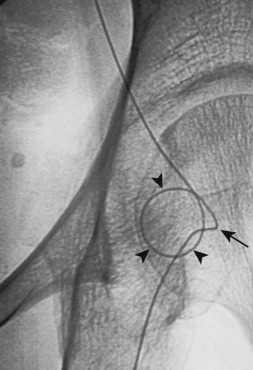
It is not intraluminal – usually the needle has been advanced too far and is in the far wall of the vessel. Remove the wire and verify pulsatile backflow; reposition as necessary.
The needle tip is abutting plaque – alter the angle of the needle; flattening towards the skin is often helpful ( Fig. 28.3 ). Try straightening the wire tip and re-directing.
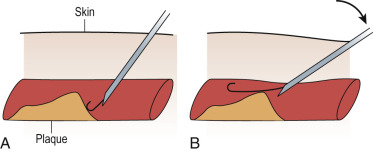
If there is good backflow, gently inject some contrast under fluoroscopic guidance to confirm intraluminal position. This may be all that is required to resolve the problem but if more detail is required then consider an angiographic run. If the needle position is relatively stable use a connecting tube, but check you can still aspirate freely after connecting and before injecting. A roadmap may help you to navigate the wire. Use tight collimation; keep your fingers out of the main beam.
Never omit the gentle test injection under fluoroscopy; this can avoid an unsightly splurge or even dissection of the artery.
Many sheath wires have both a ‘J’ and a straight tip. The straight end will often pass when the ‘J’-tip will not advance. The Bentson wire often finds its way past plaque ( Fig. 28.4 ) that the J-wire will not negotiate.
Never use a Terumo wire through the cutting bevel of the needle because the hydrophilic coating may shear off.
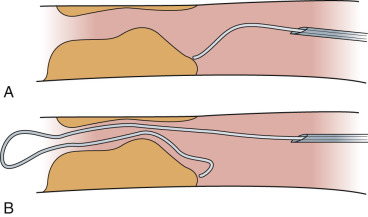
If there is still no success, obtain haemostasis and try again or consider another approach.
Fluoroscope to confirm that the wire is taking the expected route and is not in a branch vessel. Re-direct as necessary.
Make sure blood can still be aspirated from the needle.
Insert a 4Fr dilator (see below) to secure vascular access.
Make sure blood can be aspirated from the dilator.
Using fluoroscopy, gently inject contrast to confirm intraluminal position.
Perform a hand-injected angiogram to identify the problem; this is usually a tortuous vessel, unexpected stenosis or occlusion.
Use a roadmap and steerable hydrophilic wire to negotiate diseased and tortuous vessels.
If all fails, try again using a shaped catheter (e.g. Cobra II).
Make sure that you have plenty of wire in the artery before exchanging the dilator for a catheter. If necessary, replace the hydrophilic wire with a standard wire for stability.
The choice of what to insert depends on the procedure but the simple rule is that the catheter follows the wire and not vice versa. If the guidewire is held straight under slight tension, the catheter should slide smoothly along it. In a scarred groin, it often pays to use a dilator and consider changing for a stiffer guidewire. Use the following basic rules:
Always insert plenty of guidewire, as this increases safety in case you inadvertently pull it back or kink it; in addition, there is a greater weight of wire in the patient so more support when you advance the catheter.
The guidewire should be held out straight and under slight tension.
The catheter should be held initially close to its tip, always within 1–2 cm of skin/sheath.
Do not try to advance the catheter from the hub, it does not work and may result in pulling the wire out! The only exception to this is when you are assisting and the first operator is fixing the wire close to the skin.
Push the catheter to advance it.
Feel the catheter slide freely along the wire. If you encounter resistance try rotating it from side to side.
If the catheter seems to stick and pulls on the wire as it is advanced then the wire has kinked. STOP. Use fluoroscopy to show the problem ( Fig. 28.5 ).
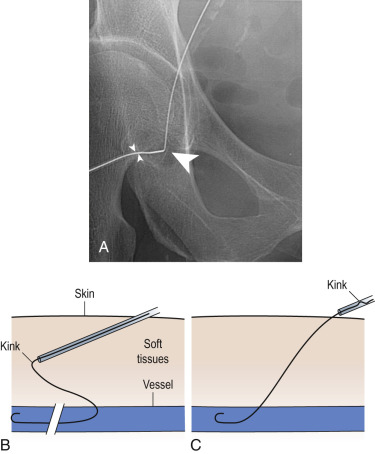
This was why you put in lots of wire! Pull back the catheter and wire until the kink is outside the skin ( Fig. 28.5 ). Try again, using a 4Fr dilator and then change the wire that has been damaged.
The catheter tip is often difficult to see, especially when using 3Fr catheters in obese patients. Pull back the guidewire until it takes the shape of the catheter tip; J-wires can be felt to engage the catheter tip. The position is now readily seen on fluoroscopy. Use a test injection of contrast to confirm intraluminal position before flushing the catheter or performing a run. If the catheter is extraluminal, an extensive dissection will be avoided!
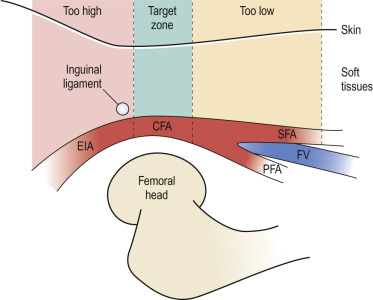
The CFA runs over the medial half of the femoral head ( Fig. 28.6 ). You can readily check your position on fluoroscopy but if in doubt there is no substitute for ultrasound guidance. Always aim to puncture the artery at the level of the midpoint of the femoral head, whether for retrograde or antegrade puncture ( Fig. 28.7 ). This is usually the point where the pulse is most readily palpated.
Puncturing too high, above the inguinal ligament, increases the risk of bleeding into the pelvis. Unlike a groin haematoma, this may remain undetected until the patient collapses.
Puncturing too low, i.e. superficial or profunda femoral artery puncture, increases the risk of false aneurysm and arteriovenous fistula ( Fig. 28.7 ).
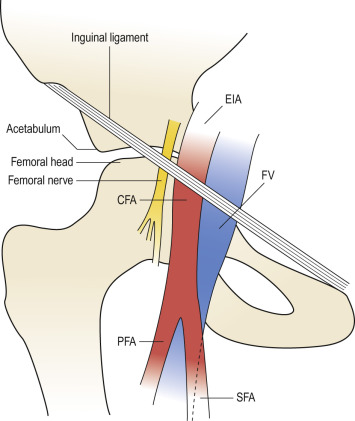
The wire generally does not need any steering to enter the external iliac artery; however, occasionally a plaque may deflect the wire into the deep circumflex iliac artery, which comes off the CFA at approximately 10 o'clock. This is usually easily appreciated on fluoroscopy; take care in this vessel as it is prone to severe spasm, which will retain the wire in a vice-like grip. The spasm usually responds to vasodilation with nitrates and the passage of time.
This ( Fig. 28.8 ) is more difficult and carries increased risk as dissection flaps tend to be elevated by the flow and may occlude the vessel lumen. In practice, antegrade puncture is now almost always undertaken with ultrasound guidance. The point of skin puncture is always higher than you expect, especially in well-covered patients. Remember to aim to hit the artery at the level of the midpoint of the femoral head. In some obese patients, abdominal folds may overhang the groin. Do not struggle alone, ask your assistant to hold back the abdominal folds. The downside of this is that when they release, everything will revert to its normal position and your previously straight trajectory may end up curving back on itself. In extreme cases, the folds will need to be held back during every catheter and wire exchange.
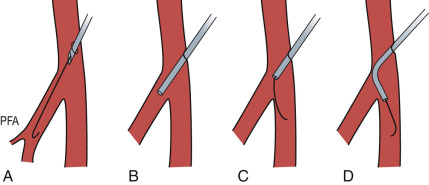
The profunda femoris artery (PFA) arises posterolaterally. This is in line with the needle; hence, the guidewire tends to pass preferentially into it. When this occurs, several manoeuvres will help you catheterize the superficial femoral artery (SFA):
Flatten the needle and point it towards the SFA. If the wire still passes into the PFA, try steering by straightening the wire tip.
If this fails:
Put a 4Fr dilator into the PFA. Withdraw it slowly into the proximal PFA, injecting contrast to show catheter position.
Obtain a roadmap image in the profunda oblique projection (ipsilateral anterior oblique 25 degrees). Inject hard so that contrast refluxes into the CFA and then opacifies the SFA.
Confirm that the puncture site is proximal to the SFA origin. If it is not, start again using ultrasound guidance.
Try using an angled hydrophilic wire or a 15-mm J-wire to select the SFA. Do not exchange over a hydrophilic wire; pass the dilator into the SFA and change to a safer wire.
No luck? Pass a J-guidewire deep into the PFA and exchange for either a 4Fr Cobra or RDC. The catheter is pulled back into the CFA and the wire is directed into the SFA.
Still no luck? Time for an alternative approach.
These divide into those sites which are not used on a daily basis and those which are positively esoteric and only rolled out on special occasions.
Become a Clinical Tree membership for Full access and enjoy Unlimited articles
If you are a member. Log in here