Physical Address
304 North Cardinal St.
Dorchester Center, MA 02124
This section extends the corresponding chapter of prior editions of Braunwald’s Heart Disease , which was authored by Drs. Charles J. Davidson and Robert O. Bonow.
![]() Additional content is available online at Elsevier eBooks for Practicing Clinicians
Additional content is available online at Elsevier eBooks for Practicing Clinicians
The cardiac catheterization laboratory serves multiples roles, which include not only angiography and vascular interventions but also, structural interventions. The latter are directed to percutaneously correct valve diseases, atrial and ventricular septal defects, and septal ablation for hypertrophic cardiomyopathy. Six to seven decades ago the cardiac catheterization laboratory was essential for the hemodynamic assessment and understanding of various disease entities and provided the diagnostic foundation for the application of surgical structural interventions as they arose in those days. At the end of the 1970s the pendulum started to shift with the advancing development of two-dimensional and Doppler echocardiography, which allowed for an alternative assessment of both cardiac anatomy and hemodynamics in patients with structural heart disease. Coupled with the excitement of being able to perform percutaneous coronary interventions (PCIs), the focus of many cardiac catheterization laboratories shifted to coronary artery disease, leading to dwindling interest and expertise in invasive hemodynamic assessment of cardiac diseases. This loss, however, had to be regained with the advent of transcatheter aortic valve replacement (TAVR) in the 21st century, especially as contemporary studies indicate that the correlation between noninvasively (echocardiography) and invasively (cardiac catheterization) measured aortic valve area and gradient is imperfect. This is critically important when decisions on valve procedures are made as well as when gauging the success of these interventions instantly in the catheterization laboratory. With the renaissance of hemodynamic assessment of cardiac diseases, cardiologists of today, especially those engaged in the catheterization laboratory, must have a proper understanding of the principles and nuances of invasive hemodynamic assessment as well as their limitations for proper interpretation and patient management decisions. This chapter will address these concepts and the technical aspects of the cardiac catheterization. As with most diagnostic tools in medicine, hemodynamics cannot be used in a vacuum and must be coupled with the clinical presentation, physical examination, and adjunctive imaging modalities to arrive at accurate results.
The scope of indications for cardiac catheterization are summarized in eTable 22.1 . As outlined, the cardiac catheterization laboratory enables invasive testing for cardiac disease and includes the acquisition of tissue samples (biopsies), imaging of vasculatures and heart chambers (intravascular and intracardiac ultrasound, optical coherence tomography, angiograms, and ventriculograms), and hemodynamic assessments (fractional flow reserve, vascular resistance, cardiac output, pressure gradients, etc.). Clinical history, physical examination, and additional (noninvasive) diagnostic studies guide the invasive hemodynamic evaluation. The ACC/AHA valvular heart disease guidelines, for instance, make it clear (class III recommendation) that the invasive assessment is not the default first-step diagnostic modality in the evaluation of patients with structural heart diseases. Hemodynamics are to be used, however, in case of discrepancies in the results of noninvasive evaluations (in particular the echocardiogram but also additional imaging and stress studies) with the clinical presentation and examination.
| Indications | Procedures |
|---|---|
|
|
|
|
|
|
|
|
|
|
|
|
|
|
|
|
|
|
|
|
|
|
|
|
|
|
|
|
|
|
|
|
|
|
|
|
|
|
Contraindications to cardiac catheterization include fever, anemia, coagulopathy, electrolyte imbalance (especially hypokalemia predisposing to arrhythmias), and other systemic illnesses or conditions needing stabilization ( eTable 22.2 ). The clinical necessity of cardiac catheterization should also be carefully considered when the diagnostic information or therapeutic intervention will not meaningfully impact patient management and outcomes. Furthermore, the procedure is to be done only with full explanation of its benefits and risks and informed consent of the patient. Most catheterization laboratories will also mandate that “do not resuscitate/do not intubate” orders will be suspended during the procedure.
| Major Cerebrovascular accident Death Myocardial infarction Ventricular tachycardia, fibrillation, serious arrhythmia Relative Contraindications Aortic dissection Cardiac perforation, tamponade Congestive heart failure Contrast reaction (anaphylaxis, nephrotoxicity) Heart block, asystole Hemorrhage (local, retroperitoneal, pelvic) Infection Protamine reaction Supraventricular tachyarrhythmia, atrial fibrillation Thrombosis, embolus, air embolus Vascular injury, pseudoaneurysm Vasovagal reaction |
For diagnostic catheterization, an analysis of the complications in more than 200,000 patients indicated the incidences of risks were death, ∼0.2%; myocardial infarction, ∼0.05%; stroke, ∼0.07%; serious ventricular arrhythmia, ∼0.5%; and major vascular complications (thrombosis, bleeding requiring transfusion, or pseudoaneurysm), ∼1% ( eTable 22.3 ). Compared with femoral or radial artery access, vascular complications occurred more often when the brachial artery approach was used and least when the radial approach was used.
| Procedure-Related Complications in Patients Without STEMI | ||
|---|---|---|
| PCI PATIENTS WITHOUT STEMI (N = 787,980) | DIAGNOSTIC CATHETERIZATION ONLY PATIENTS WITHOUT STEMI (N = 1,091,557) | |
| Complications (%) | ||
| Any adverse event | 4.53 | 1.35 |
| Cardiogenic shock | 0.47 | 0.24 |
| Heart failure | 0.59 | 0.38 |
| Pericardial tamponade | 0.07 | 0.03 |
| CVA/stroke | 0.17 | 0.17 |
| Total strokes that were hemorrhagic | 15.6 | 9.16 |
| New requirement for dialysis | 0.19 | 0.14 |
| In-hospital mortality | ||
| Non–risk-adjusted | 0.65 | 0.72 |
| Non–risk-adjusted excluding CABG patients | 0.62 | 0.60 |
| CABG performed during admission | 0.81 | 7.47 |
| CABG status | ||
| Salvage/emergency | 0.01/0.17 | 0.01/0.27 |
| Urgent/elective | 0.47/0.16 | 5.27/1.92 |
| CABG indication | ||
| PCI failure without clinical deterioration | 0.26 | |
| PCI complication | 0.14 | |
| Bleeding Complications (%) | ||
| Any bleeding event within 72 hours of procedure | 1.40 | 0.49 |
| Any other vascular complication requiring treatment | 0.44 | 0.15 |
| RBC/whole-blood transfusion | 2.07 | N/A |
Radial artery access has become the default approach for many labs ( Fig. 22.1 ). Compared with femoral artery access, transradial procedures have a lower risk of bleeding and vascular complications, superior patient comfort, and improved efficiency in postprocedural care. Documentation of adequate dual blood supply to the hand by either the Allen or the Barbeau test is no longer required in most patients.
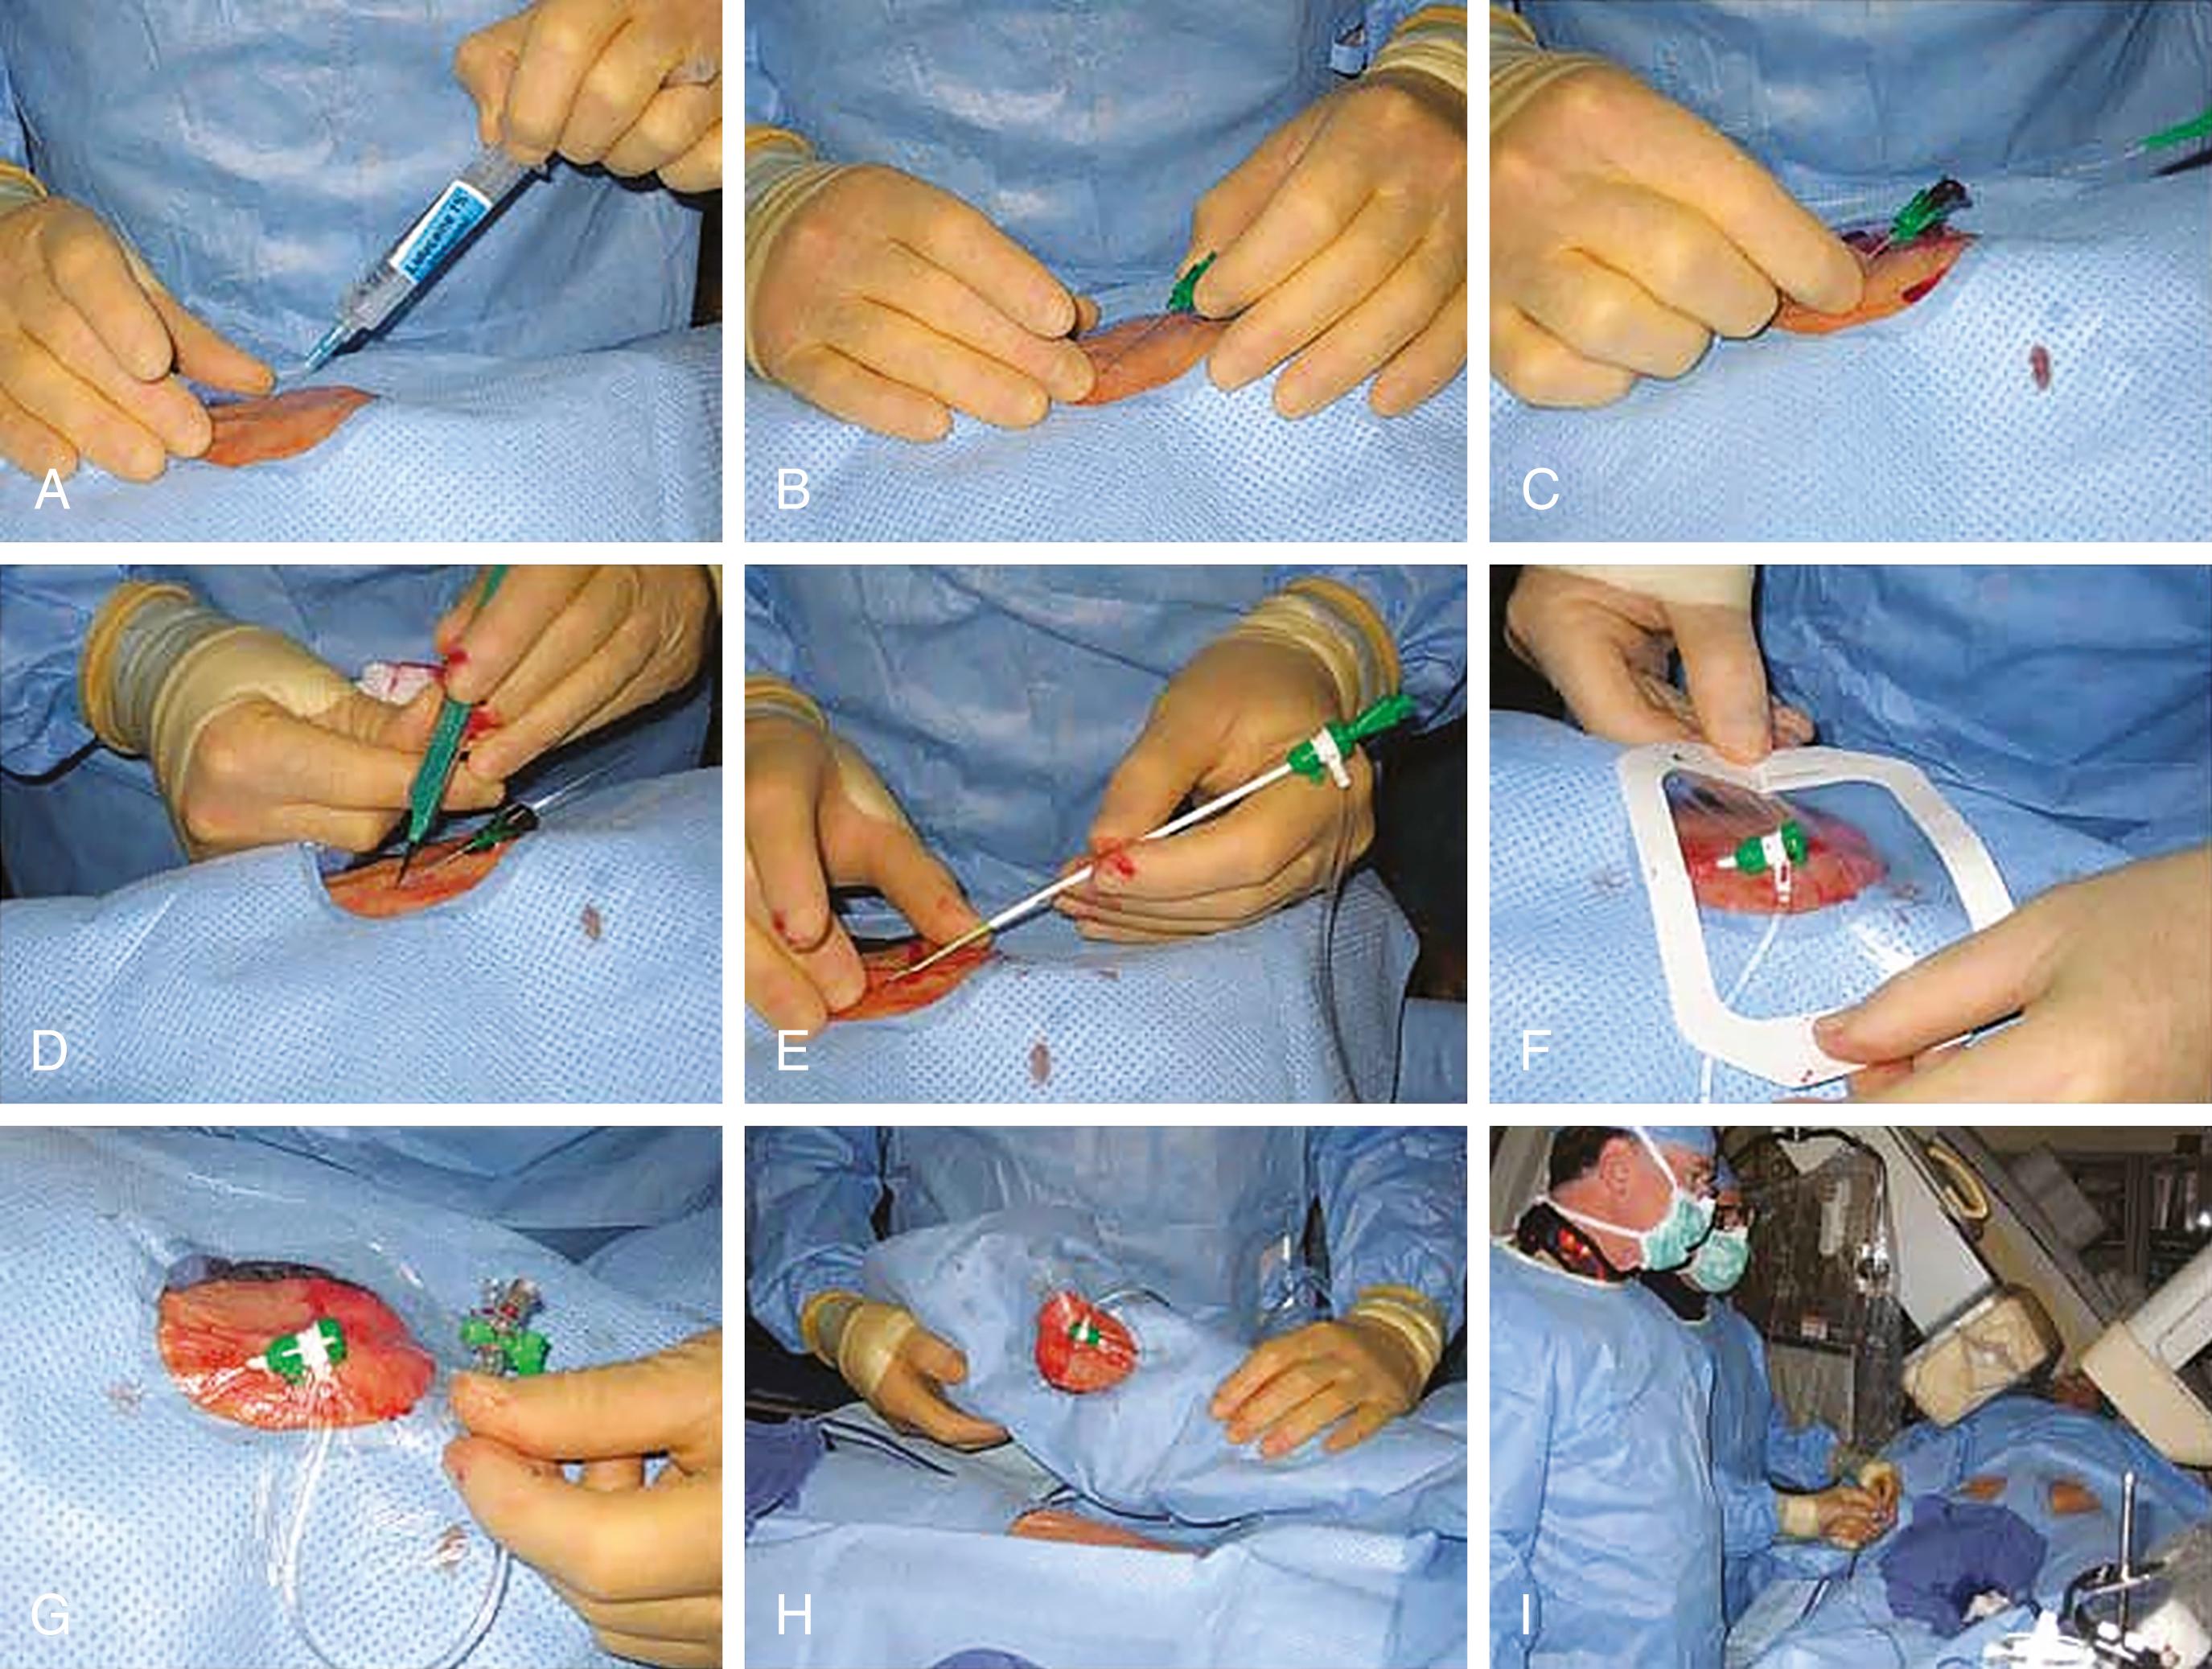
In preparation for radial access, the arm should be placed on an appropriate board, abducted at a 30- to 45-degree angle, and the wrist should be hyperextended over a gauze roll. Unless prompted by anatomy or demand (e.g., left internal mammary artery injection), the right radial artery is used. Its distal course can be mapped by palpation or ultrasound; the latter reduces the difficulty of access and can be used to screen for small radial arteries or anatomical challenges before radial sheath insertion. Only a small amount of 1% lidocaine (up to 1 mL) is injected at the skin entry site, which should be 1 to 2 cm cranial to the bony prominence of the distal radius. The radial artery is accessed by either a micropuncture needle (anterior wall technique) or a 20-gauge angiocatheter needle (posterior wall technique) at a 30- to 45-degree angle. With pulsatile blood return, a 0.018-inch guidewire is advanced into the artery, and there should be little or no resistance to wire advancement. If this were to be noted, access should be reexamined before proceeding. Otherwise, the needle is removed and the sheath is advanced over the wire into the artery. Once the sheath is in place, typically, 5000 units of unfractionated heparin are given as a bolus, or weight-adjusted (50 units per kg), to prevent postprocedural radial artery occlusion. Practices differ but one should consider smaller sizes for women (4 to 5F) yet larger sizes (6F, maximum 7F in men) if coronary intervention is likely. Overstretching of the artery is to be avoided as it leads to higher postprocedural occlusion rates. A longer sheath (up to 16 cm) has been considered to protect more against vasospasm at the level of the forearm. However, other studies suggest that it is the hydrophilic coating rather than the length of the sheath that reduces spasms. Arterial vasospasm is a complicating factor and prevented by adequate sedation, avoidance of limb cooling, and administration of vasodilators. Most commonly, nitroglycerin (100 to 200 mcg) and verapamil (2.5 mg) are given. Other approaches are sublingual nitroglycerin, and/or intra-arterial (local) administration of diltiazem or nicardipine. With these preparations, coronary angiographic catheters are advanced over a 0.035-inch floppy or small J-tipped guidewire into the ascending aorta and then manipulated to engage the coronary artery ostia. Some operators note catheter instability or poor coronary ostial engagement from the radial approach. Larger (>7F) sheath sizes that may be required for complex PCI also present a challenge for radial access.
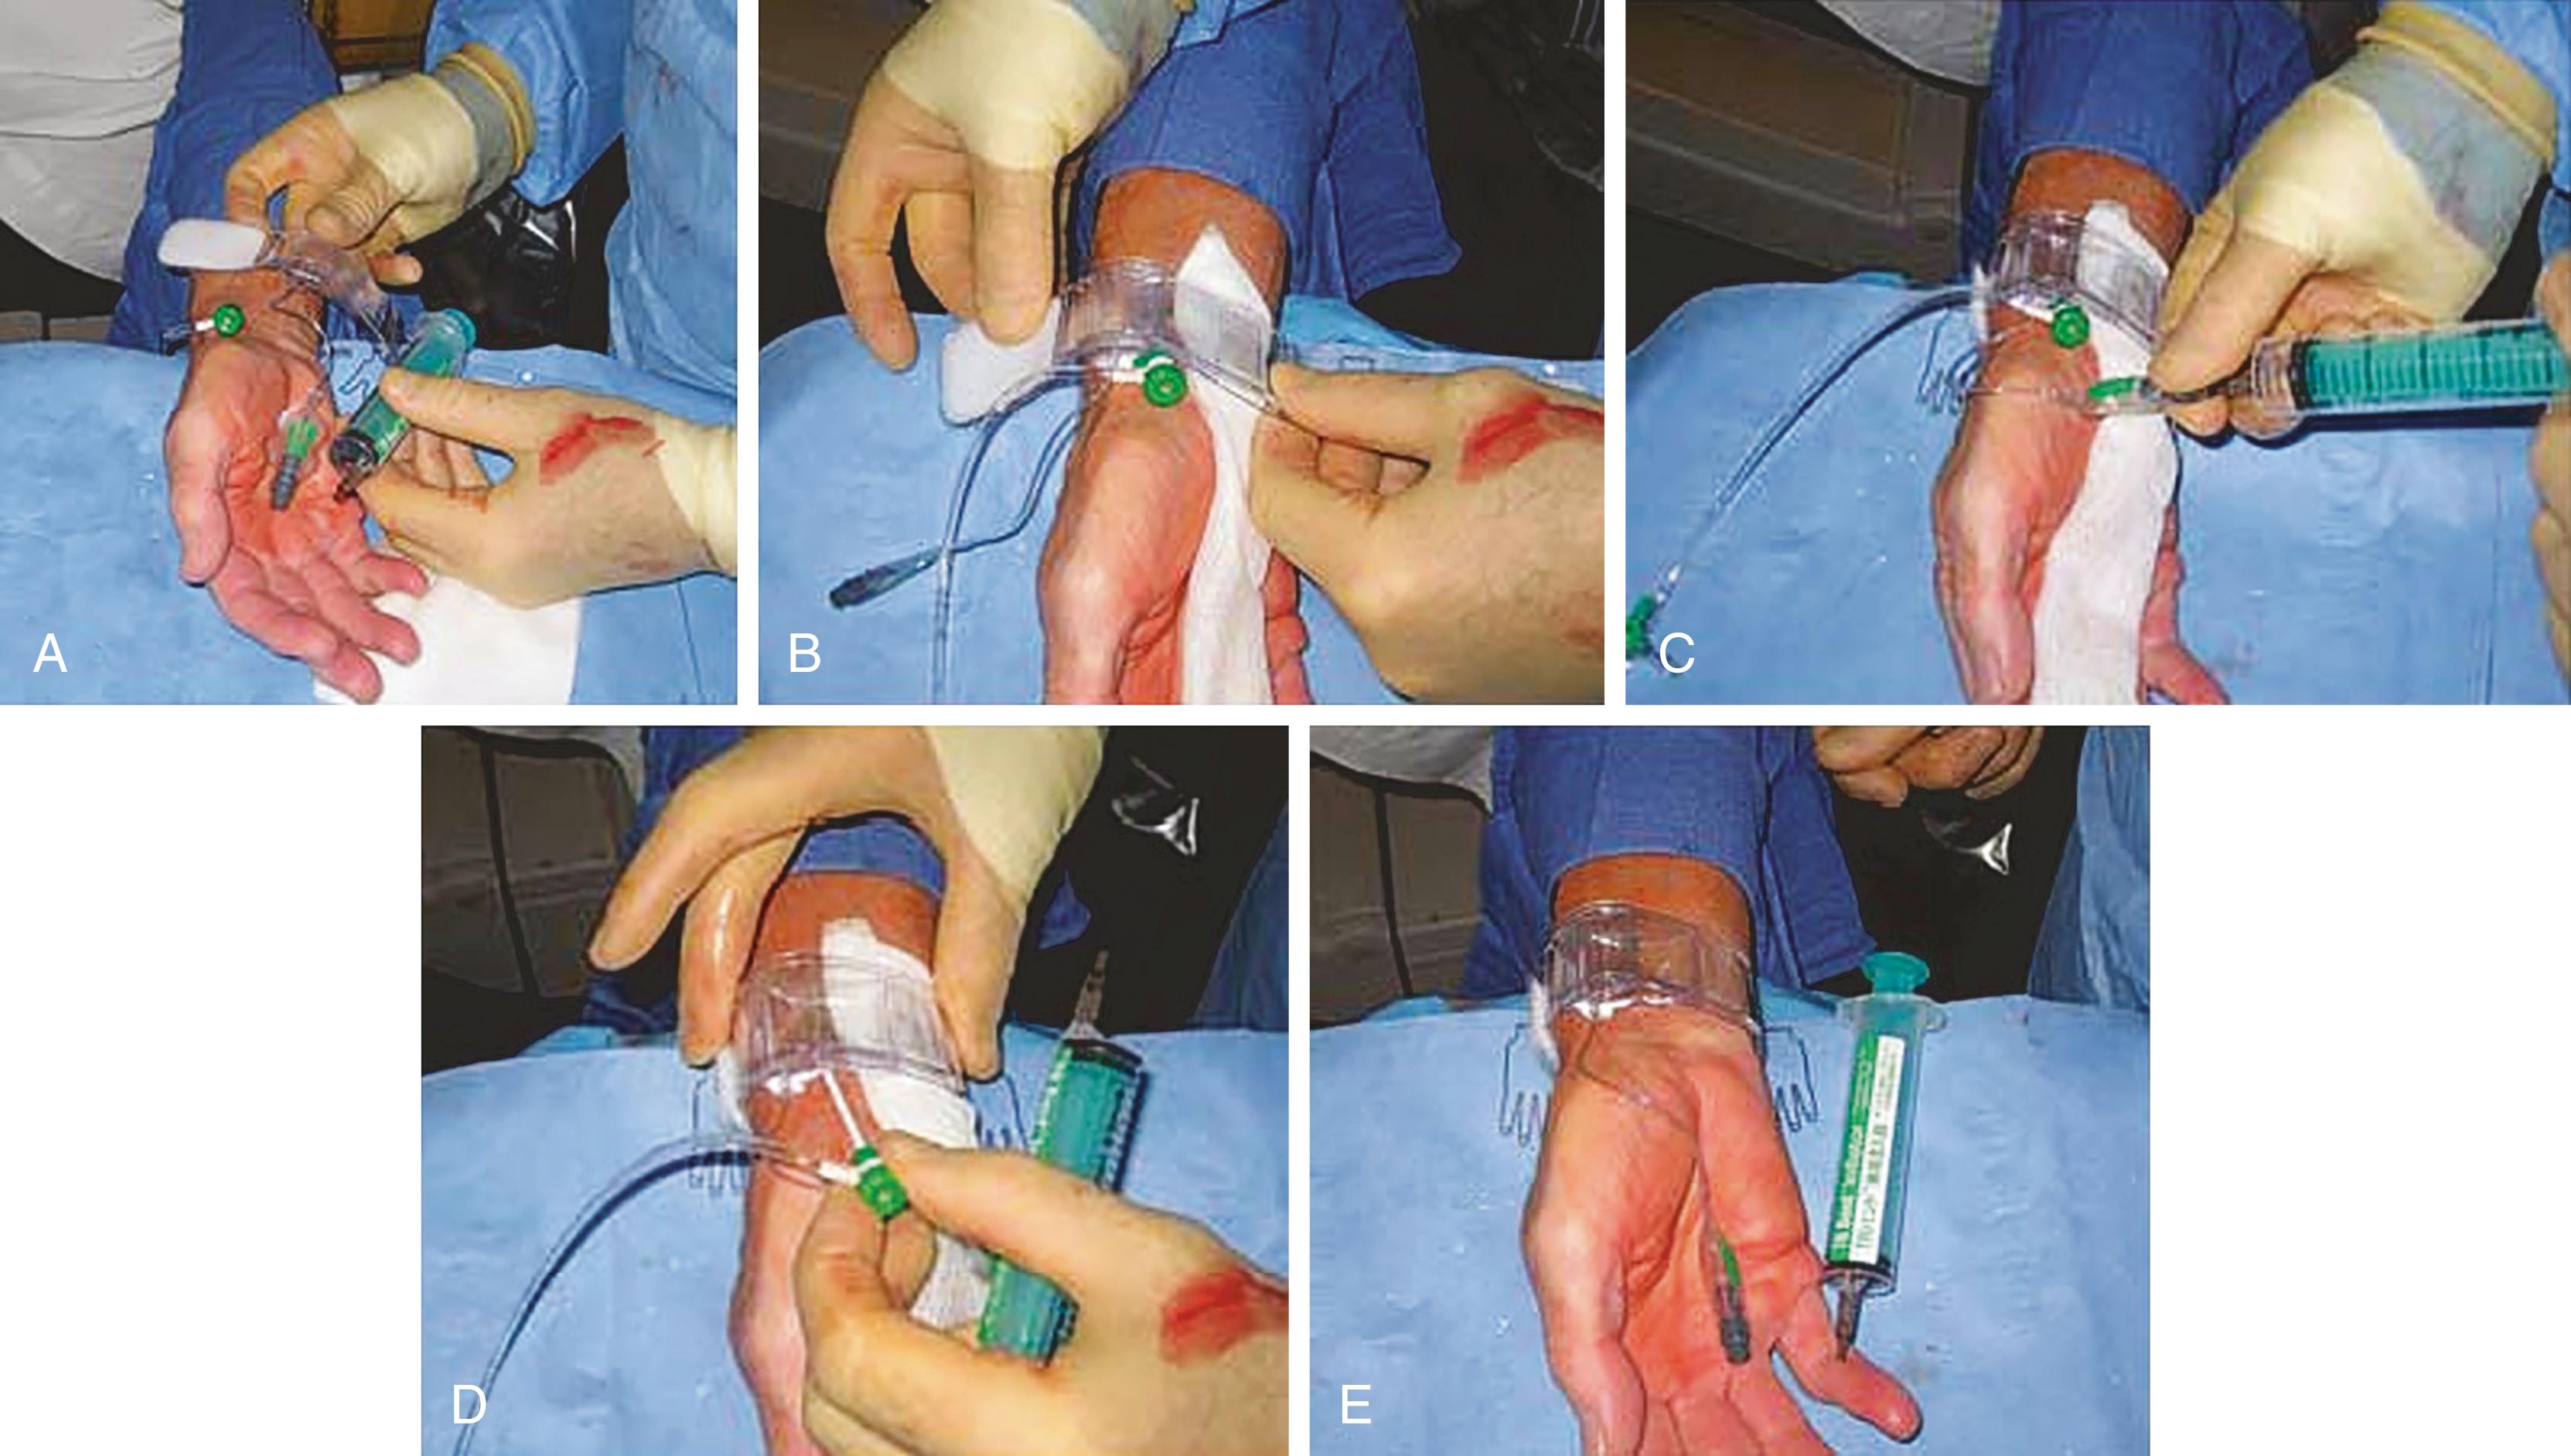
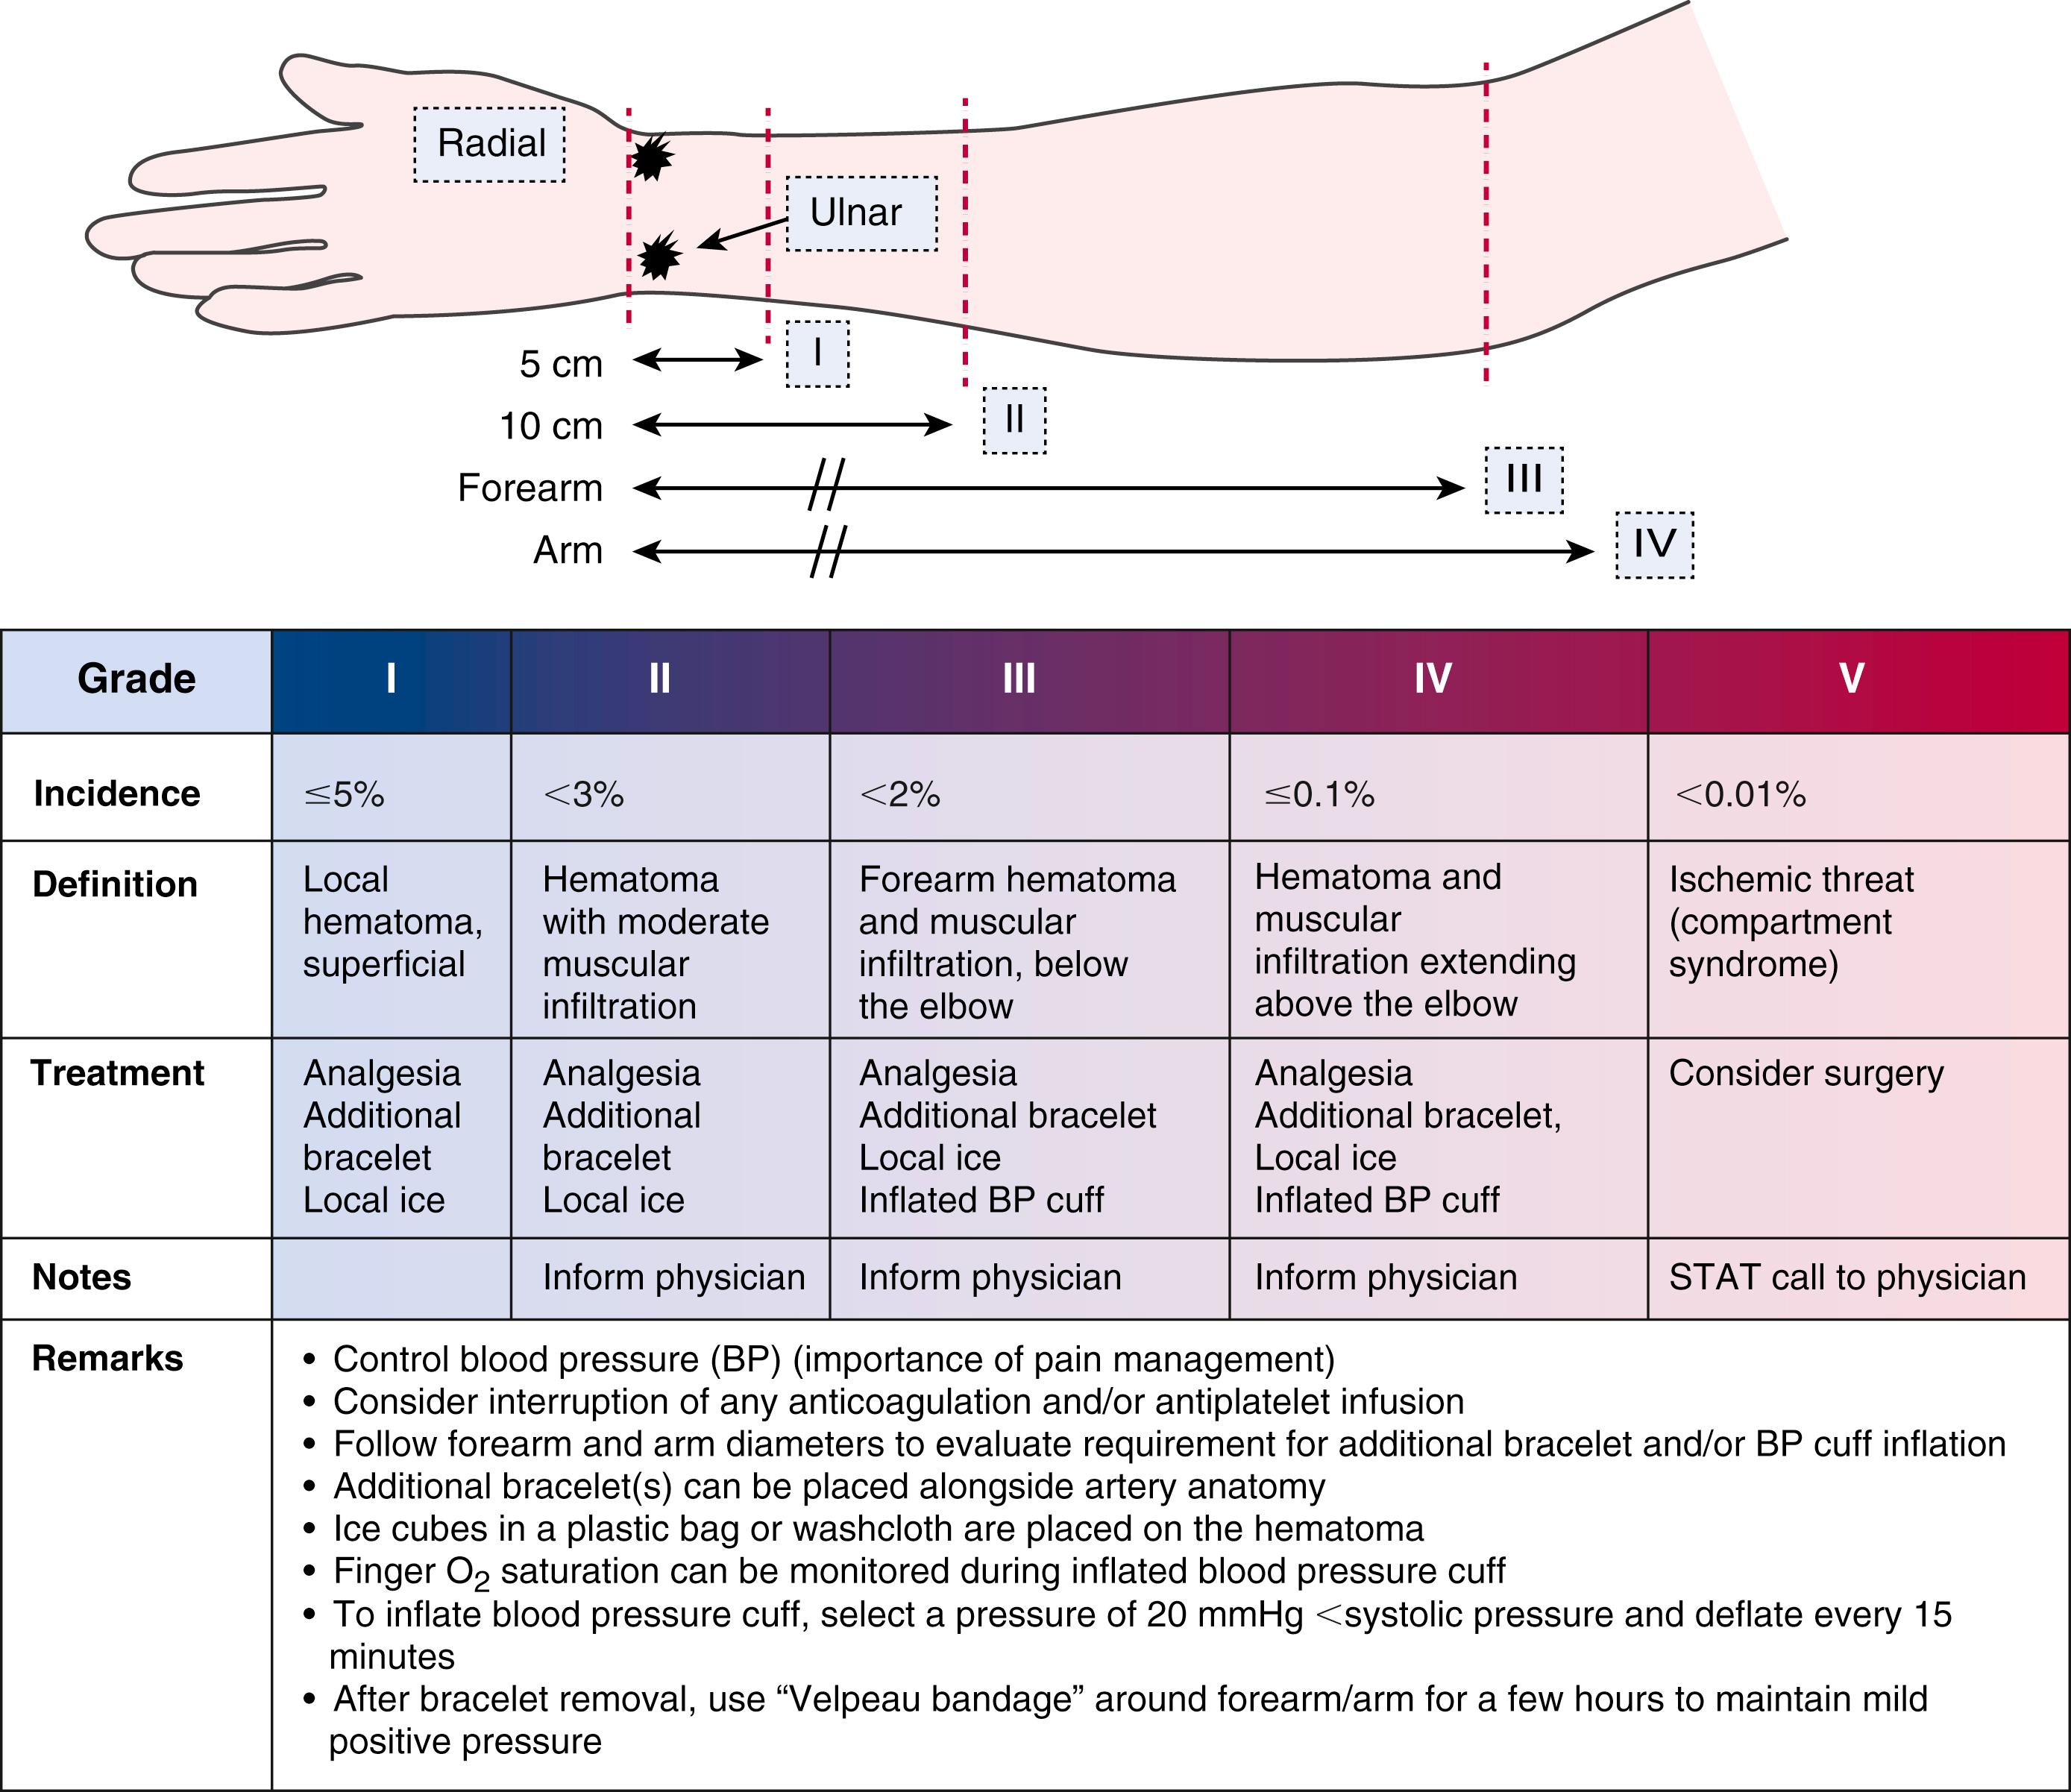
After the procedure is completed, arterial puncture hemostasis is most often obtained with air-bladder compression bands or other similar closure devices ( Fig. 22.2 ). In addition to adequate initial anticoagulation, the use of “patent hemostasis” (occlusion to the point of bleeding control but not complete vessel occlusion) minimizes the risk of radial artery occlusion. Hematomas, while uncommon, can lead to pseudoaneurysms and very rarely compartment syndrome ( eFig. 22.1 ). Other risks include radial artery vasospasm, dissections, transient hand dysfunction, and potentially a higher risk of future coronary artery bypass graft (CABG) radial graft dysfunction.
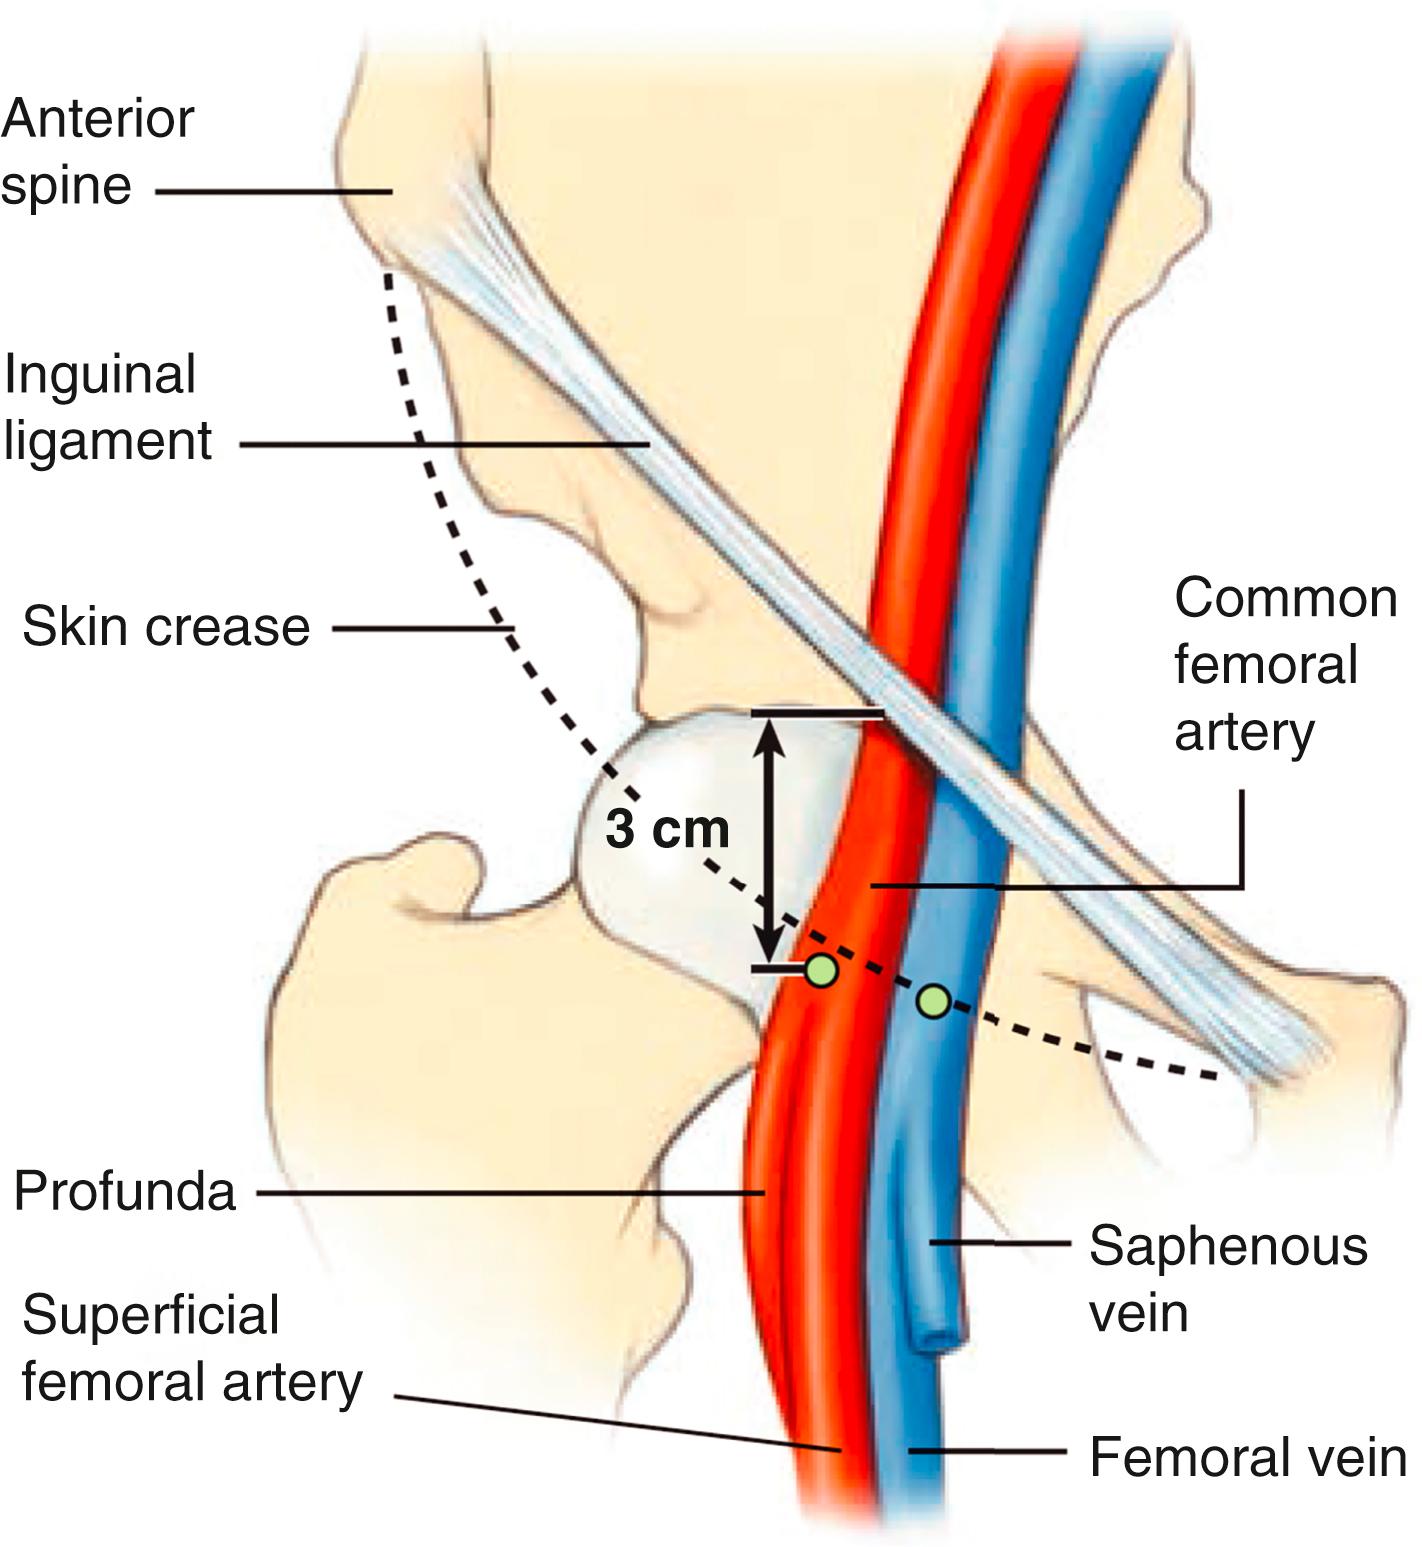
Femoral artery access was the standard access over the last four decades. Femoral artery access uses the Seldinger needle puncture technique with the insertion of a valved sheath (6 to 8F or larger) and use of preshaped “Judkins” catheters. The optimal puncture location is the common femoral artery (CFA). Familiarity with the anatomy will assist in identifying the point of needle entry, usually 1 to 3 cm below the inguinal ligament, in line with the palpable course of the CFA ( Figs. 22.3 and 22.4 ). Superficial anatomic landmarks such as the inguinal crease can be misleading in obese as well as very thin individuals. Identifying the inferior edge of the femoral head by fluoroscopy using a hemostatic clamp is used to begin the puncture. Ultrasound imaging provides the best visualization and definition of the vascular location ( Fig. 22.5 ) and has been shown to improve first-pass success rates and reduce vascular complications in general. Correct placement of the sheath in the CFA will reduce the chance of retroperitoneal hematoma (as occurs with puncture that are above the inferior epigastric artery) or pseudoaneurysm and arteriovenous fistula formation (as occurs with punctures below the profunda and superficial femoral artery bifurcation). Accidental cannulation of the superficial or profunda femoral artery may result in limb ischemia or inability to accommodate vascular closure devices.

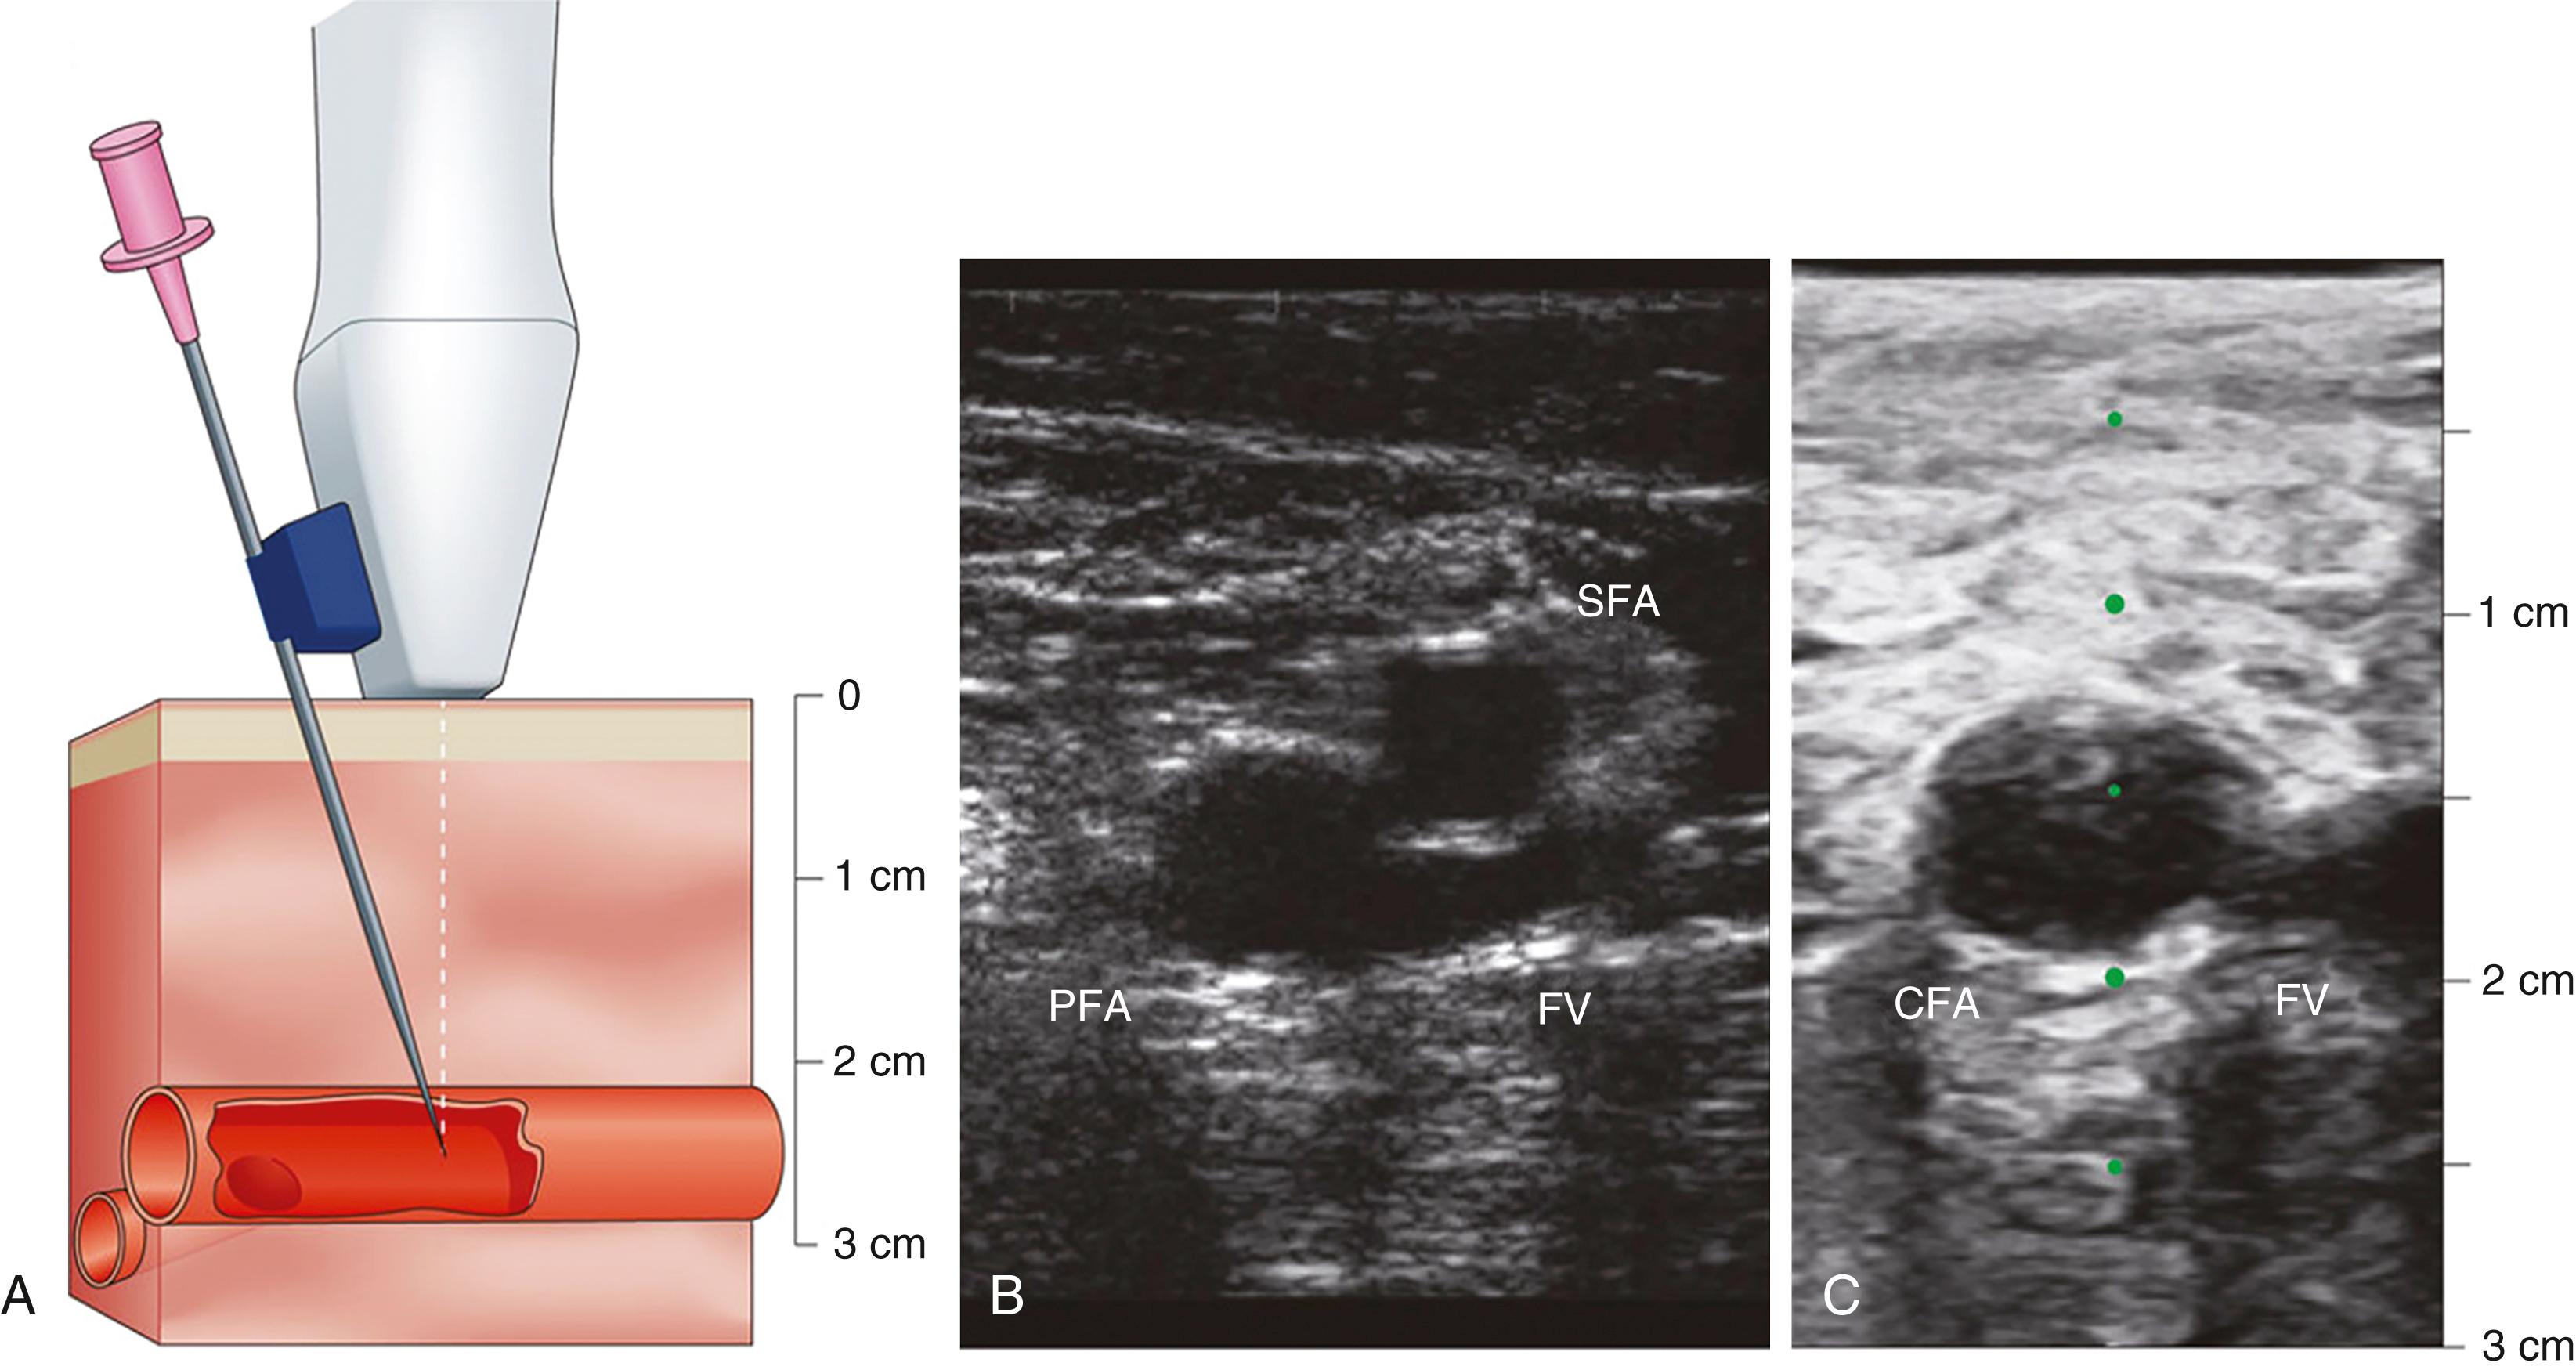
Once localization of the vessel is completed, local anesthesia with 1% lidocaine is given and a small incision is performed followed by insertion of an 18- to 21-gauge needle into the CFA in a modified Seldinger technique ( Fig. 22.6 ). Upon pulsatile blood return, a 0.038-inch guidewire is advanced and should pass freely through the vessel. Symptoms of pain or excessive resistance on wire advancement may indicate vascular trauma, such as dissections or perforations, and should be recognized immediately. The advantages of the Judkins technique are the relative ease, speed, and reliability, and yet vigilance is still required to ensure quality and safety.
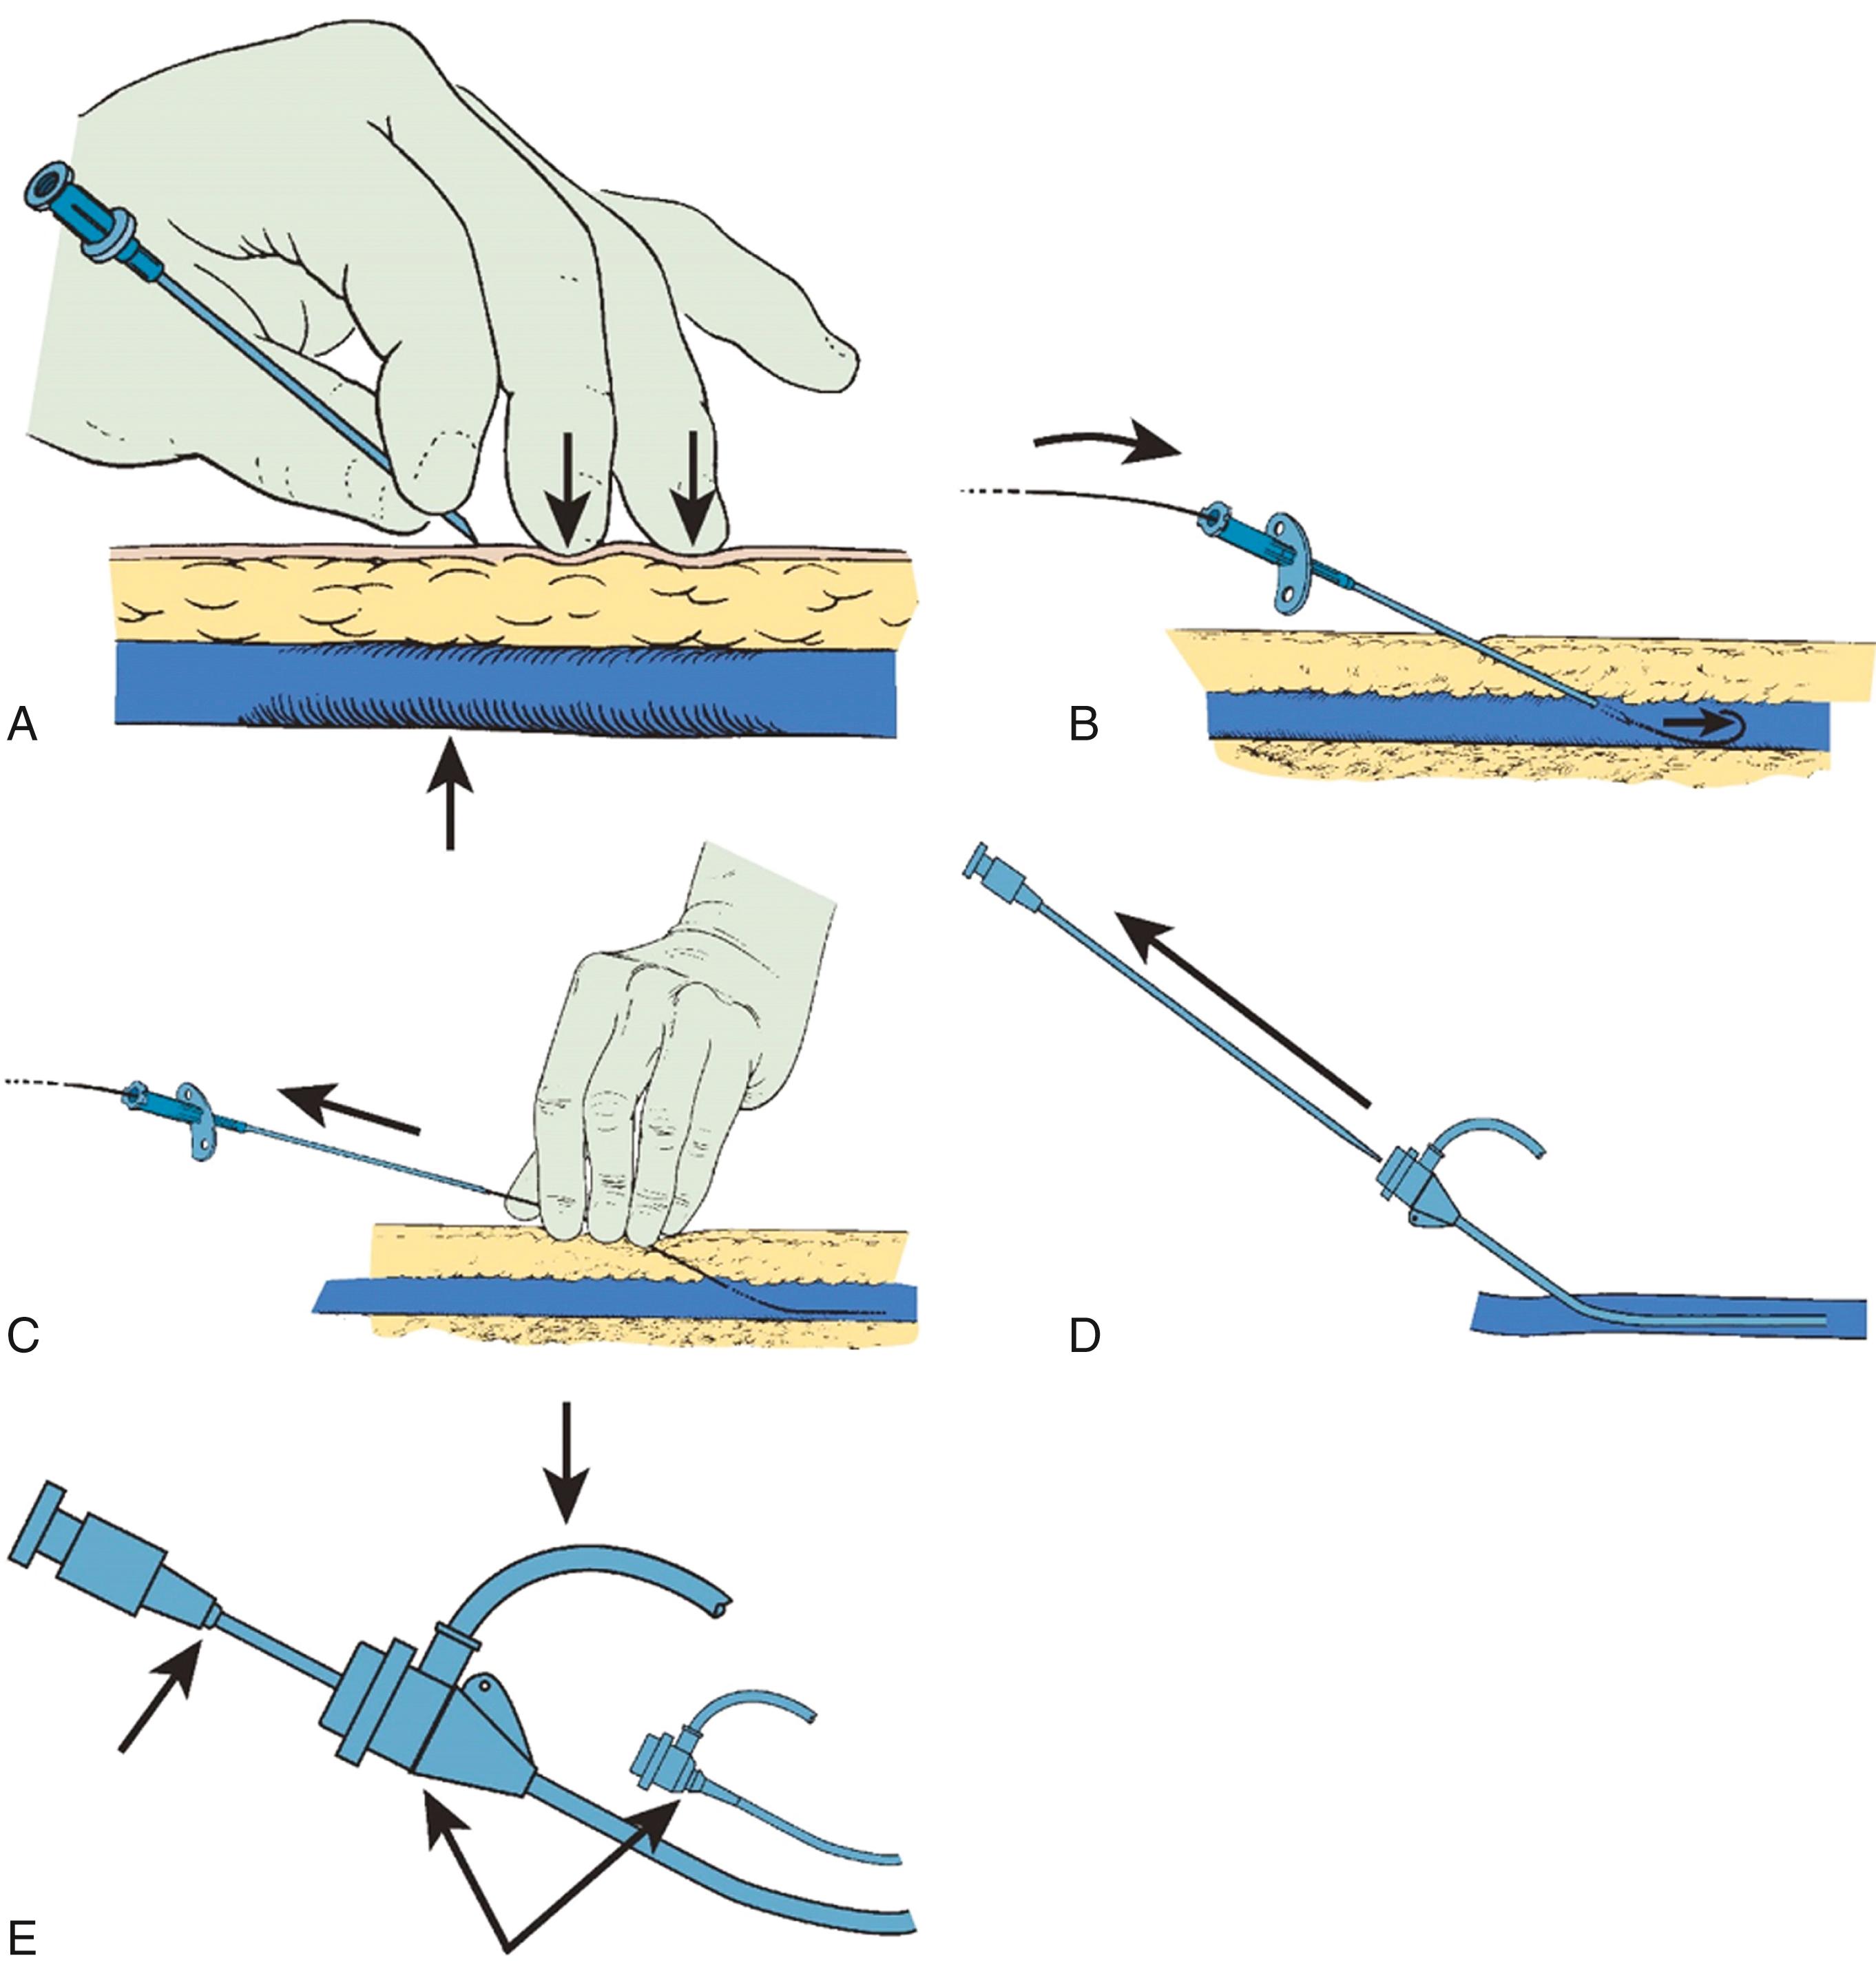
After the procedure, femoral hemostasis can be achieved with a vascular closure device or with manual compression. Despite their perceived benefit, vascular closure devices are not superior to manual compression in general and may in fact be inferior in patients who have had multiple vascular access needle attempts. Vascular closure devices do play an important role in cases of large-bore (>10F) access which are now common in the era of TAVR with sheath sizes of 18F to 24F. Femoral sheaths should not be removed until the activated clotting time (ACT) is less than 160 to 180 seconds unless a vascular closure device is being used.
Patients with a history of peripheral arterial disease (PAD) require particular attention. Before the procedure, one should carefully review what types of interventions were performed in the past (e.g., balloon angioplasty, patch endarterectomy, arterial conduits, and prosthetic grafts). The vascular anatomy should be defined for location and size such that large devices may be accommodated. Prosthetic peripheral vascular grafts are the most problematic vascular challenges, not because they cannot be cannulated but rather because of the lack of adequate closure and potential for thrombotic occlusion. For these reasons, these grafts are usually avoided. Complications arising from femoral access are outlined in eTable 22.3 .
Right-heart hemodynamic assessment is critical to accurately provide a set of differential diagnoses for the causes of dyspnea, the severity and types of pulmonary hypertension, and the determination of cardiac output, among others. Many patients may require simultaneous right- and left-heart pressure measurements. Venous access may use femoral, brachial, or internal jugular approaches.
Using the femoral arterial pulse as a landmark, the femoral vein sits approximately 1 cm medial to the femoral artery. If a combined arterial and venous access is needed, the entry skin area is infiltrated by lidocaine sufficient to cover both puncture sites. The venous puncture site is 0.5 to 1 cm medial and 0.5 to 1 cm caudal to the planned arterial entry site. Because venous pressure is low, a 10- or 20-mL syringe is attached to the Seldinger needle and gently aspirated during needle advancement. The operator inserts the needle through the skin at a 30- to 45-degree angle to the horizontal plane while palpating the femoral arterial pulse with light pressure so as to not occlude the vein. If arterial pulsations are felt at the tip of the needle, the needle is withdrawn and redirected at a slightly more medial angle. Ultrasound imaging guidance can improve successful cannulation and reduce accidental arterial puncture. Upon entry of the vein, venous (nonpulsatile) dark blood should flow easily into the syringe. If the vein has not been entered, the needle is withdrawn, flushed, and reintroduced in a slightly more lateral or medial direction. The remainder of the venous sheath placement is completed in the same fashion as described for the femoral arterial sheath insertion.
A vein that has been entered mistakenly during a femoral artery puncture attempt should be used only if the needle tip did not puncture both walls of the artery and go into the vein behind it. Placing a sheath through the artery into the vein may create an arteriovenous (AV) fistula or cause uncontrolled bleeding from a large hole in the posterior wall of the femoral artery.
After the procedure is completed, venous hemostasis can be achieved with light finger pressure applied over the vein as described for femoral artery sheath removal. Usually only 5 to 10 minutes of compression is needed to obtain adequate hemostasis.
In conjunction with radial artery catheterization, the brachial or antecubital vein may be considered for venous access for right-heart catheterization. Access to the antecubital vein can be obtained using a 20-gauge IV or ultrasound-guided needle puncture. Application of a tourniquet above the elbow will facilitate the identification of a suitable vein. A medial antecubital vein is preferable over a lateral antecubital vein to avoid the acute angulation of the cephalic vein system as it joins with the axillary vein in the shoulder. Before sheath insertion, administration of 1% lidocaine over the puncture site will reduce discomfort. The arm vein sheath size is usually 5F sheath but can be as large as 7F with a suitably sized balloon-tipped pulmonary artery (PA) catheter. Advancing the PA catheter is often straightforward, but if venous tortuosity or valve obstruction is present, the operator can facilitate advancement with an angioplasty guidewire or use an injection of saline to straighten and stiffen the catheter and expand the vein. The balloon should not be expanded until the catheter is in the subclavian system.
The internal jugular (IJ) vein, especially the right IJ, is the preferred venous access given the anatomic ease and for prolonged placement of sheath or PA catheter ( ![]() ). The IJ approach allows for greater patient comfort and lower infectious risk than a femoral approach, and is preferred over the subclavian approach because of reduced risk of pneumothorax. Use of a micropuncture kit with a 21-gauge needle and introducer will minimize inadvertent puncture of the carotid artery or lung. After entering the jugular vein, the micropuncture assembly can be exchanged for any larger sheath (e.g., 7F) for right-heart catheterization or right ventricular biopsy.
). The IJ approach allows for greater patient comfort and lower infectious risk than a femoral approach, and is preferred over the subclavian approach because of reduced risk of pneumothorax. Use of a micropuncture kit with a 21-gauge needle and introducer will minimize inadvertent puncture of the carotid artery or lung. After entering the jugular vein, the micropuncture assembly can be exchanged for any larger sheath (e.g., 7F) for right-heart catheterization or right ventricular biopsy.
The internal jugular vein is located lateral to the carotid artery in the anatomic triangle of the two heads of the sternocleidomastoid muscle and the clavicle. For access, the patient is instructed to lie supine with the head turned 30 degrees to the contralateral side. Patients with low venous pressure may require leg elevation to increase venous filling volume. Routine use of ultrasound imaging facilitates localization of the IJ and can verify its patency. The use of ultrasound is recommended by national guidelines and reduces the overall risk of complications (carotid artery puncture, in particular) by 70%.
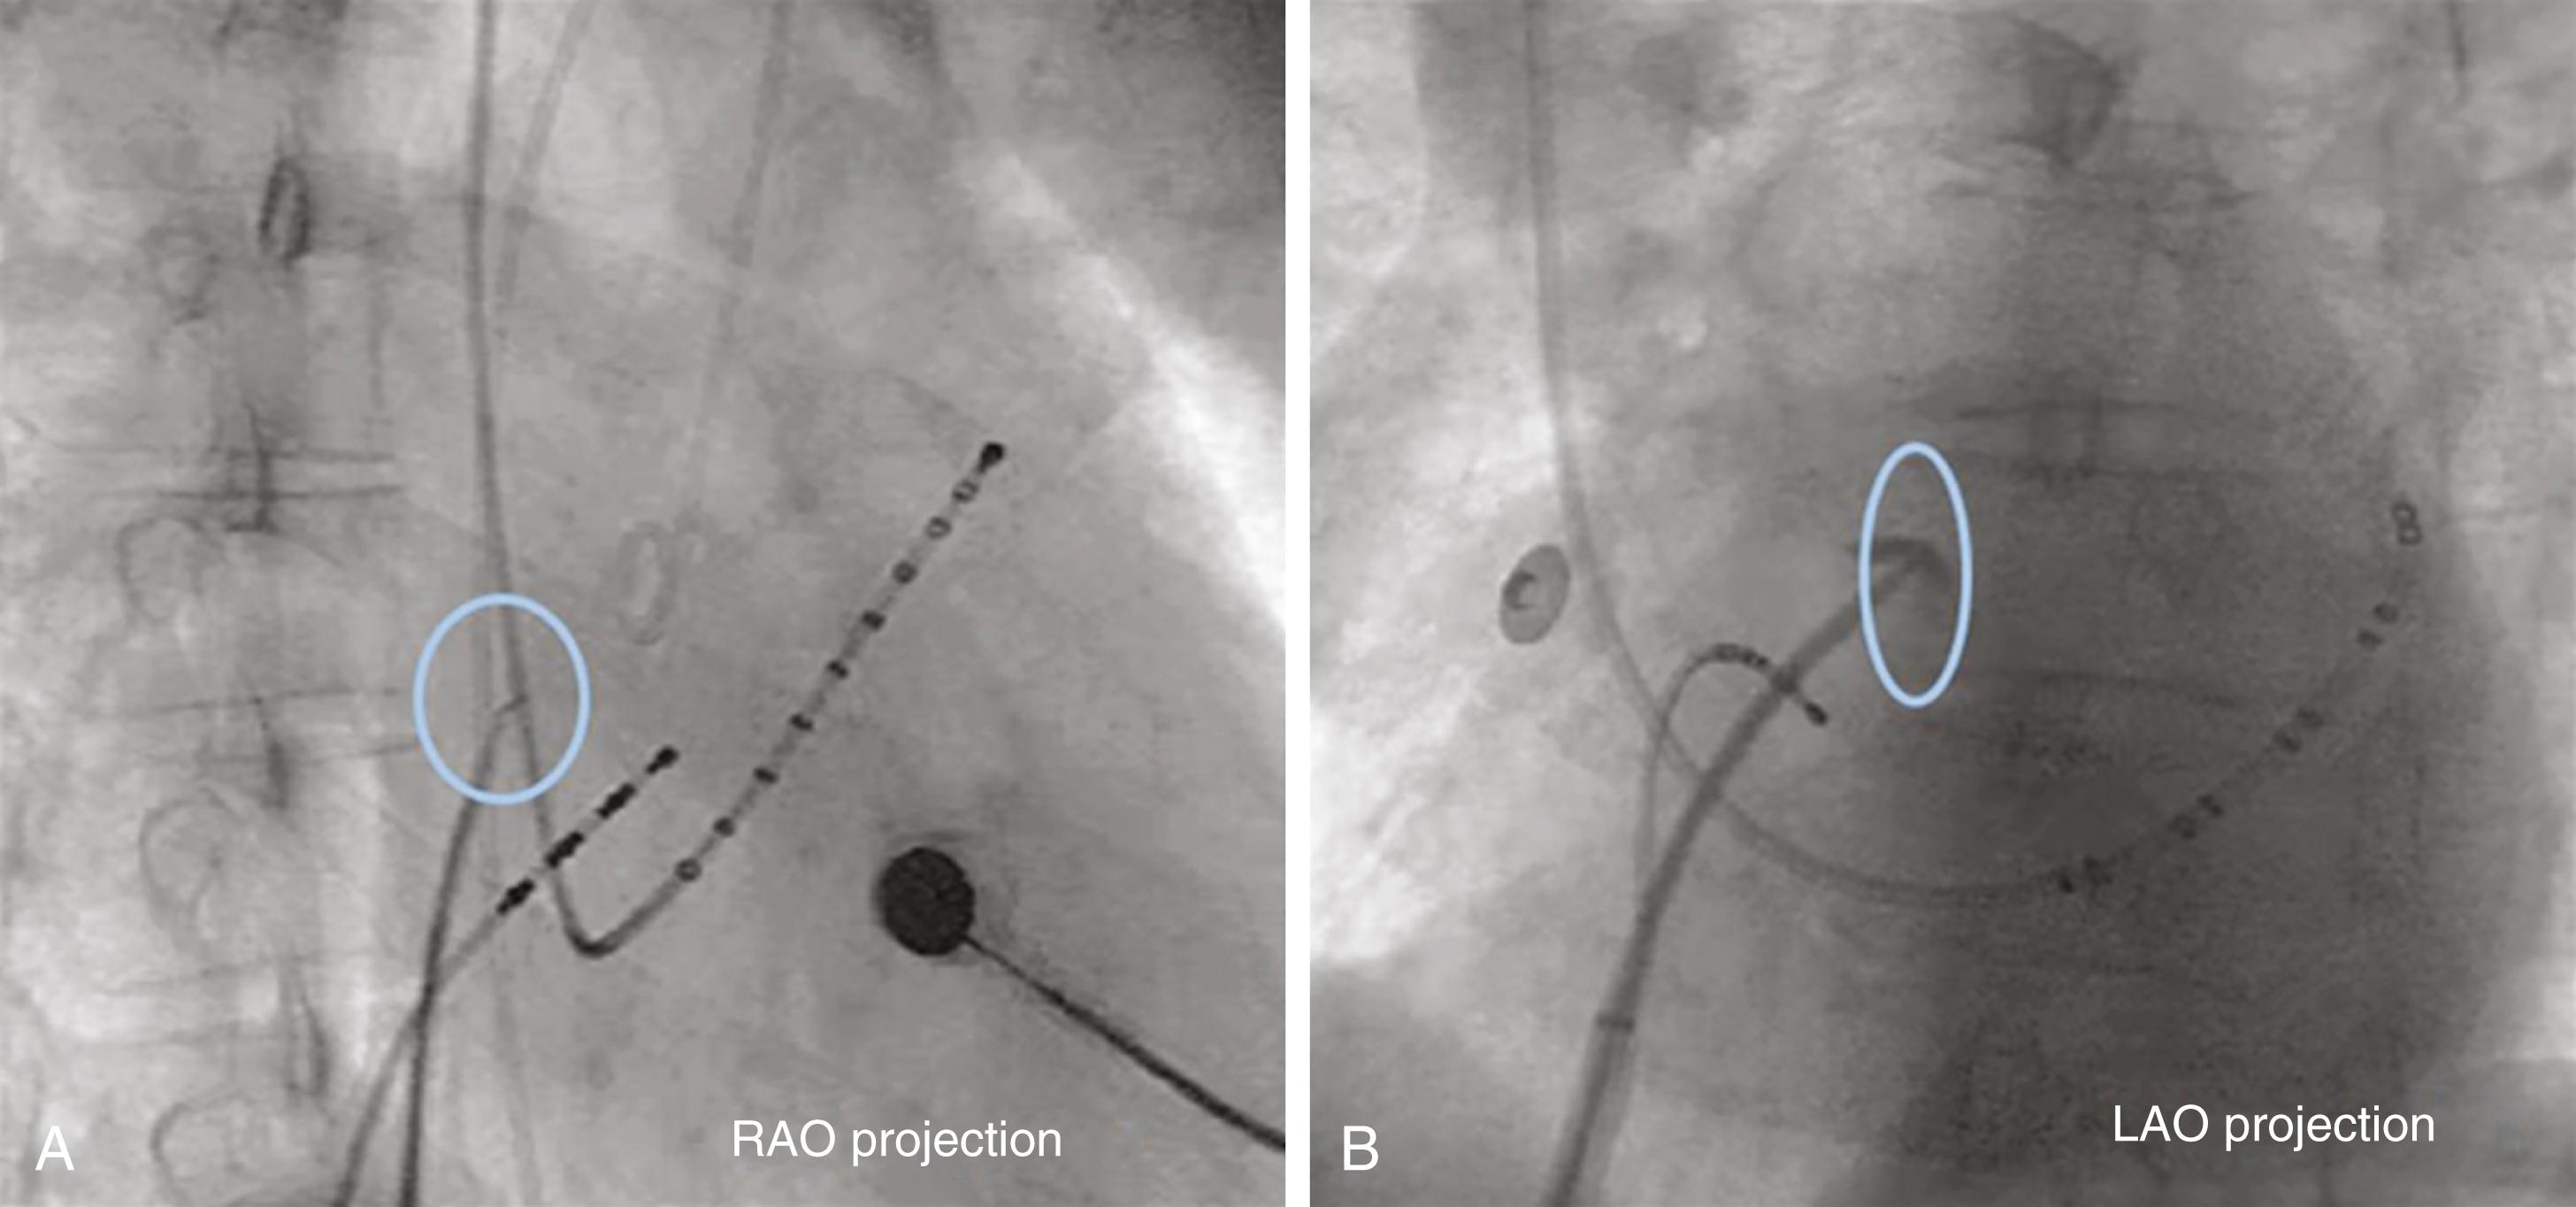
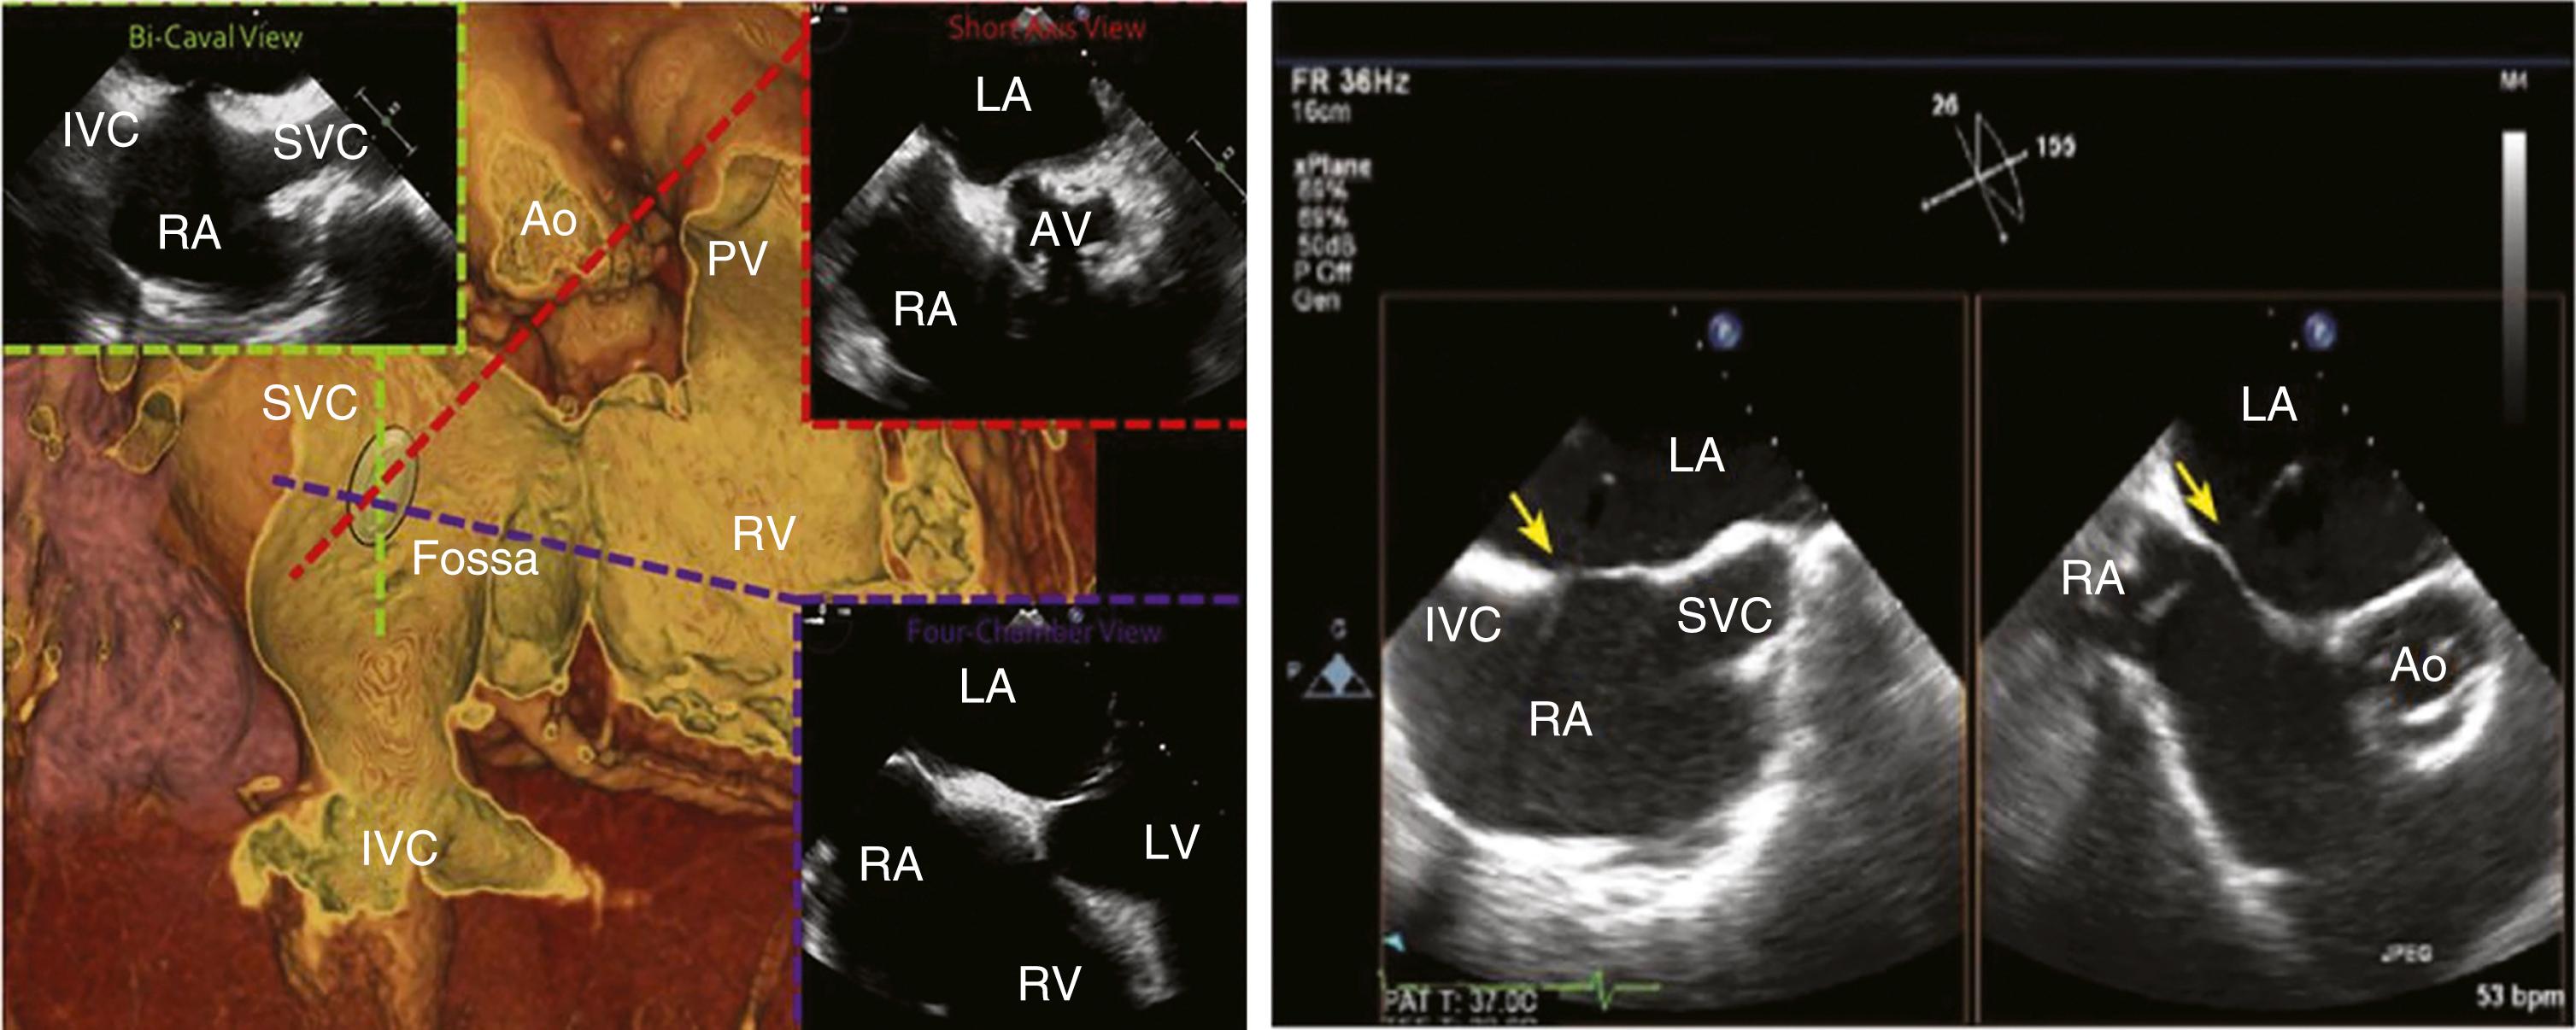
With increasing demands for certain structural heart disease evaluations and interventions (e.g., mitral valve disease) and some arrhythmia mapping procedures, transseptal catheterization has become an essential technique. In brief, the technique uses a right femoral venous access, through which a 0.032-inch guidewire and transseptal needle and catheter assembly is advanced into the right atrium and on into the superior vena cava (SVC). This catheter assembly is then brought back into the fossa ovalis using angiographic landmarks. Transesophageal or intracardiac echocardiography are also typically utilized, especially in difficult cases (e.g., large right atrium, postsurgical condition, anatomic variant) ( Figs. 22.7 and 22.8 ). Once confident in its correct position, the needle and catheter are advanced through the fossa ovalis and into the left atrium. Transseptal catheterization of the left atrium is described in detail elsewhere.
Retrograde access to the left ventricle is commonly performed using a straight or angled pigtail-shaped catheter, initially advanced over a 0.035-inch J-tip guidewire and initially positioned at the level of the AV. ( Fig. 22.9 ). A common approach to crossing the AV is to position the pigtail catheter into the anterior sinus of Valsalva taking a “figure 6” configuration in the right anterior oblique (RAO) projection. The catheter is then pushed against the AV to form a U-shape. With deep inspiration, slight pullback and clockwise rotation, the tip loop usually falls across the valve into the left ventricle. Once inside the left ventricle, the catheter resumes a “figure 6” configuration with the loop directed toward the apex. Alternatively, the catheter can be positioned in front of the mitral valve, but not so deep as to interfere with its function or become entangled in the chordae. Repeated catheter repositioning may be required to eliminate ventricular ectopy.
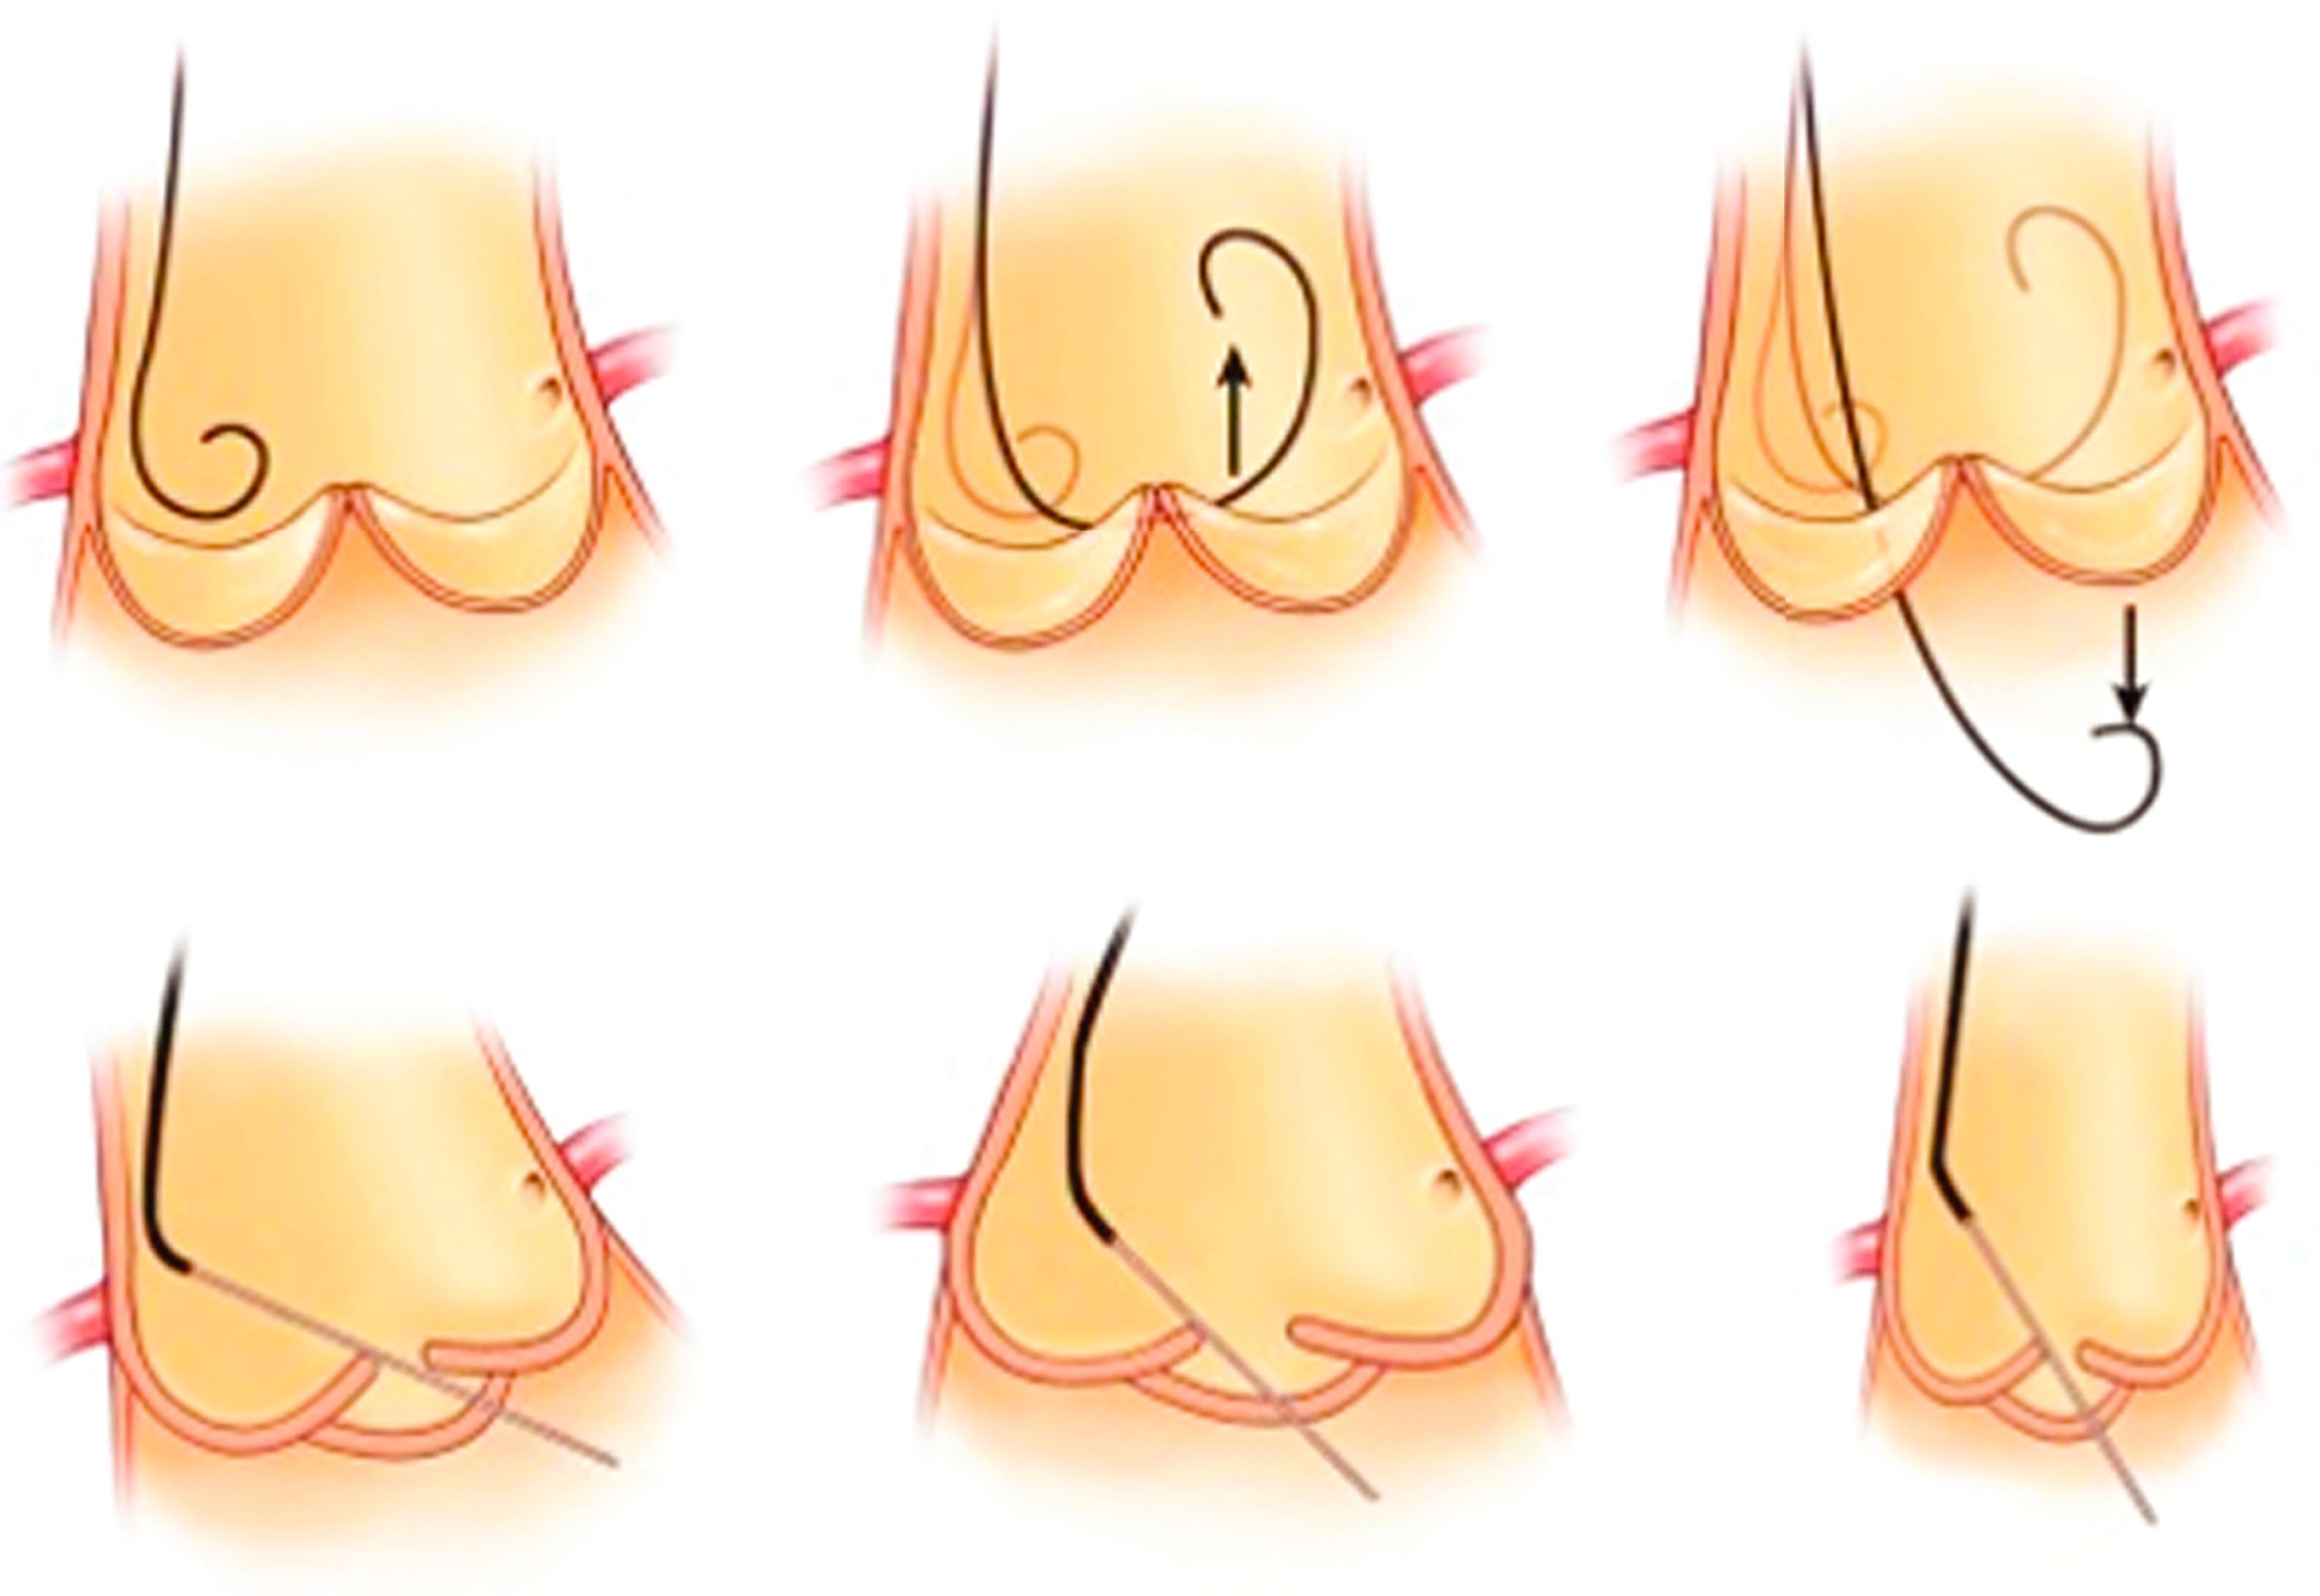
With dilated aortic roots or horizontally oriented hearts, an angled pigtail catheter is preferable, whereas small aortic roots may require a right coronary Judkins for initial wiring and subsequent exchange for a pigtail catheter. In patients with bicuspid valves, a left Amplatz catheter directs the wire tip more superiorly and is also useful for placement of a guidewire into the left ventricle. A left Amplatz is also useful in patients with aortic stenosis, or a multipurpose catheter, depending on the angulation of the AV (more horizontal or more vertical). For sclerotic or stenotic AVs, straight rather than J-tipped guidewires facilitate probing of the AV orifice but also have greater potential for dislodging material from the AV or aorta with the risk of embolic ischemic events (including myocardial infarction and stroke).
For pressure measurements and contrast injections in the left ventricle, a pigtail catheter is preferred because of the high safety profile and inability to entrap the catheter tip in the LV musculature. Catheter tip entrapment leading to erroneous pressure signal readings is a problem for hypertrophic obstructive cardiomyopathy (HOCM) studies when end-hole catheters are used.
Aortic stenosis hemodynamics are best measured with simultaneous aortic and left ventricular (LV) pressures from a dual lumen catheter or use of a multipurpose catheter through which a 0.014-inch high-fidelity pressure sensor guidewire is advanced into the left ventricle while the catheter remains in the aorta. For gradients across the mitral valve, LV and pulmonary capillary wedge (PCW) or left atrial pressures are recorded simultaneously with two transducers. LV measurements include systolic, diastolic, and end-diastolic pressure; dP/dt can also be calculated. Details of obtaining and interpreting pressure measurements are discussed later in this chapter.
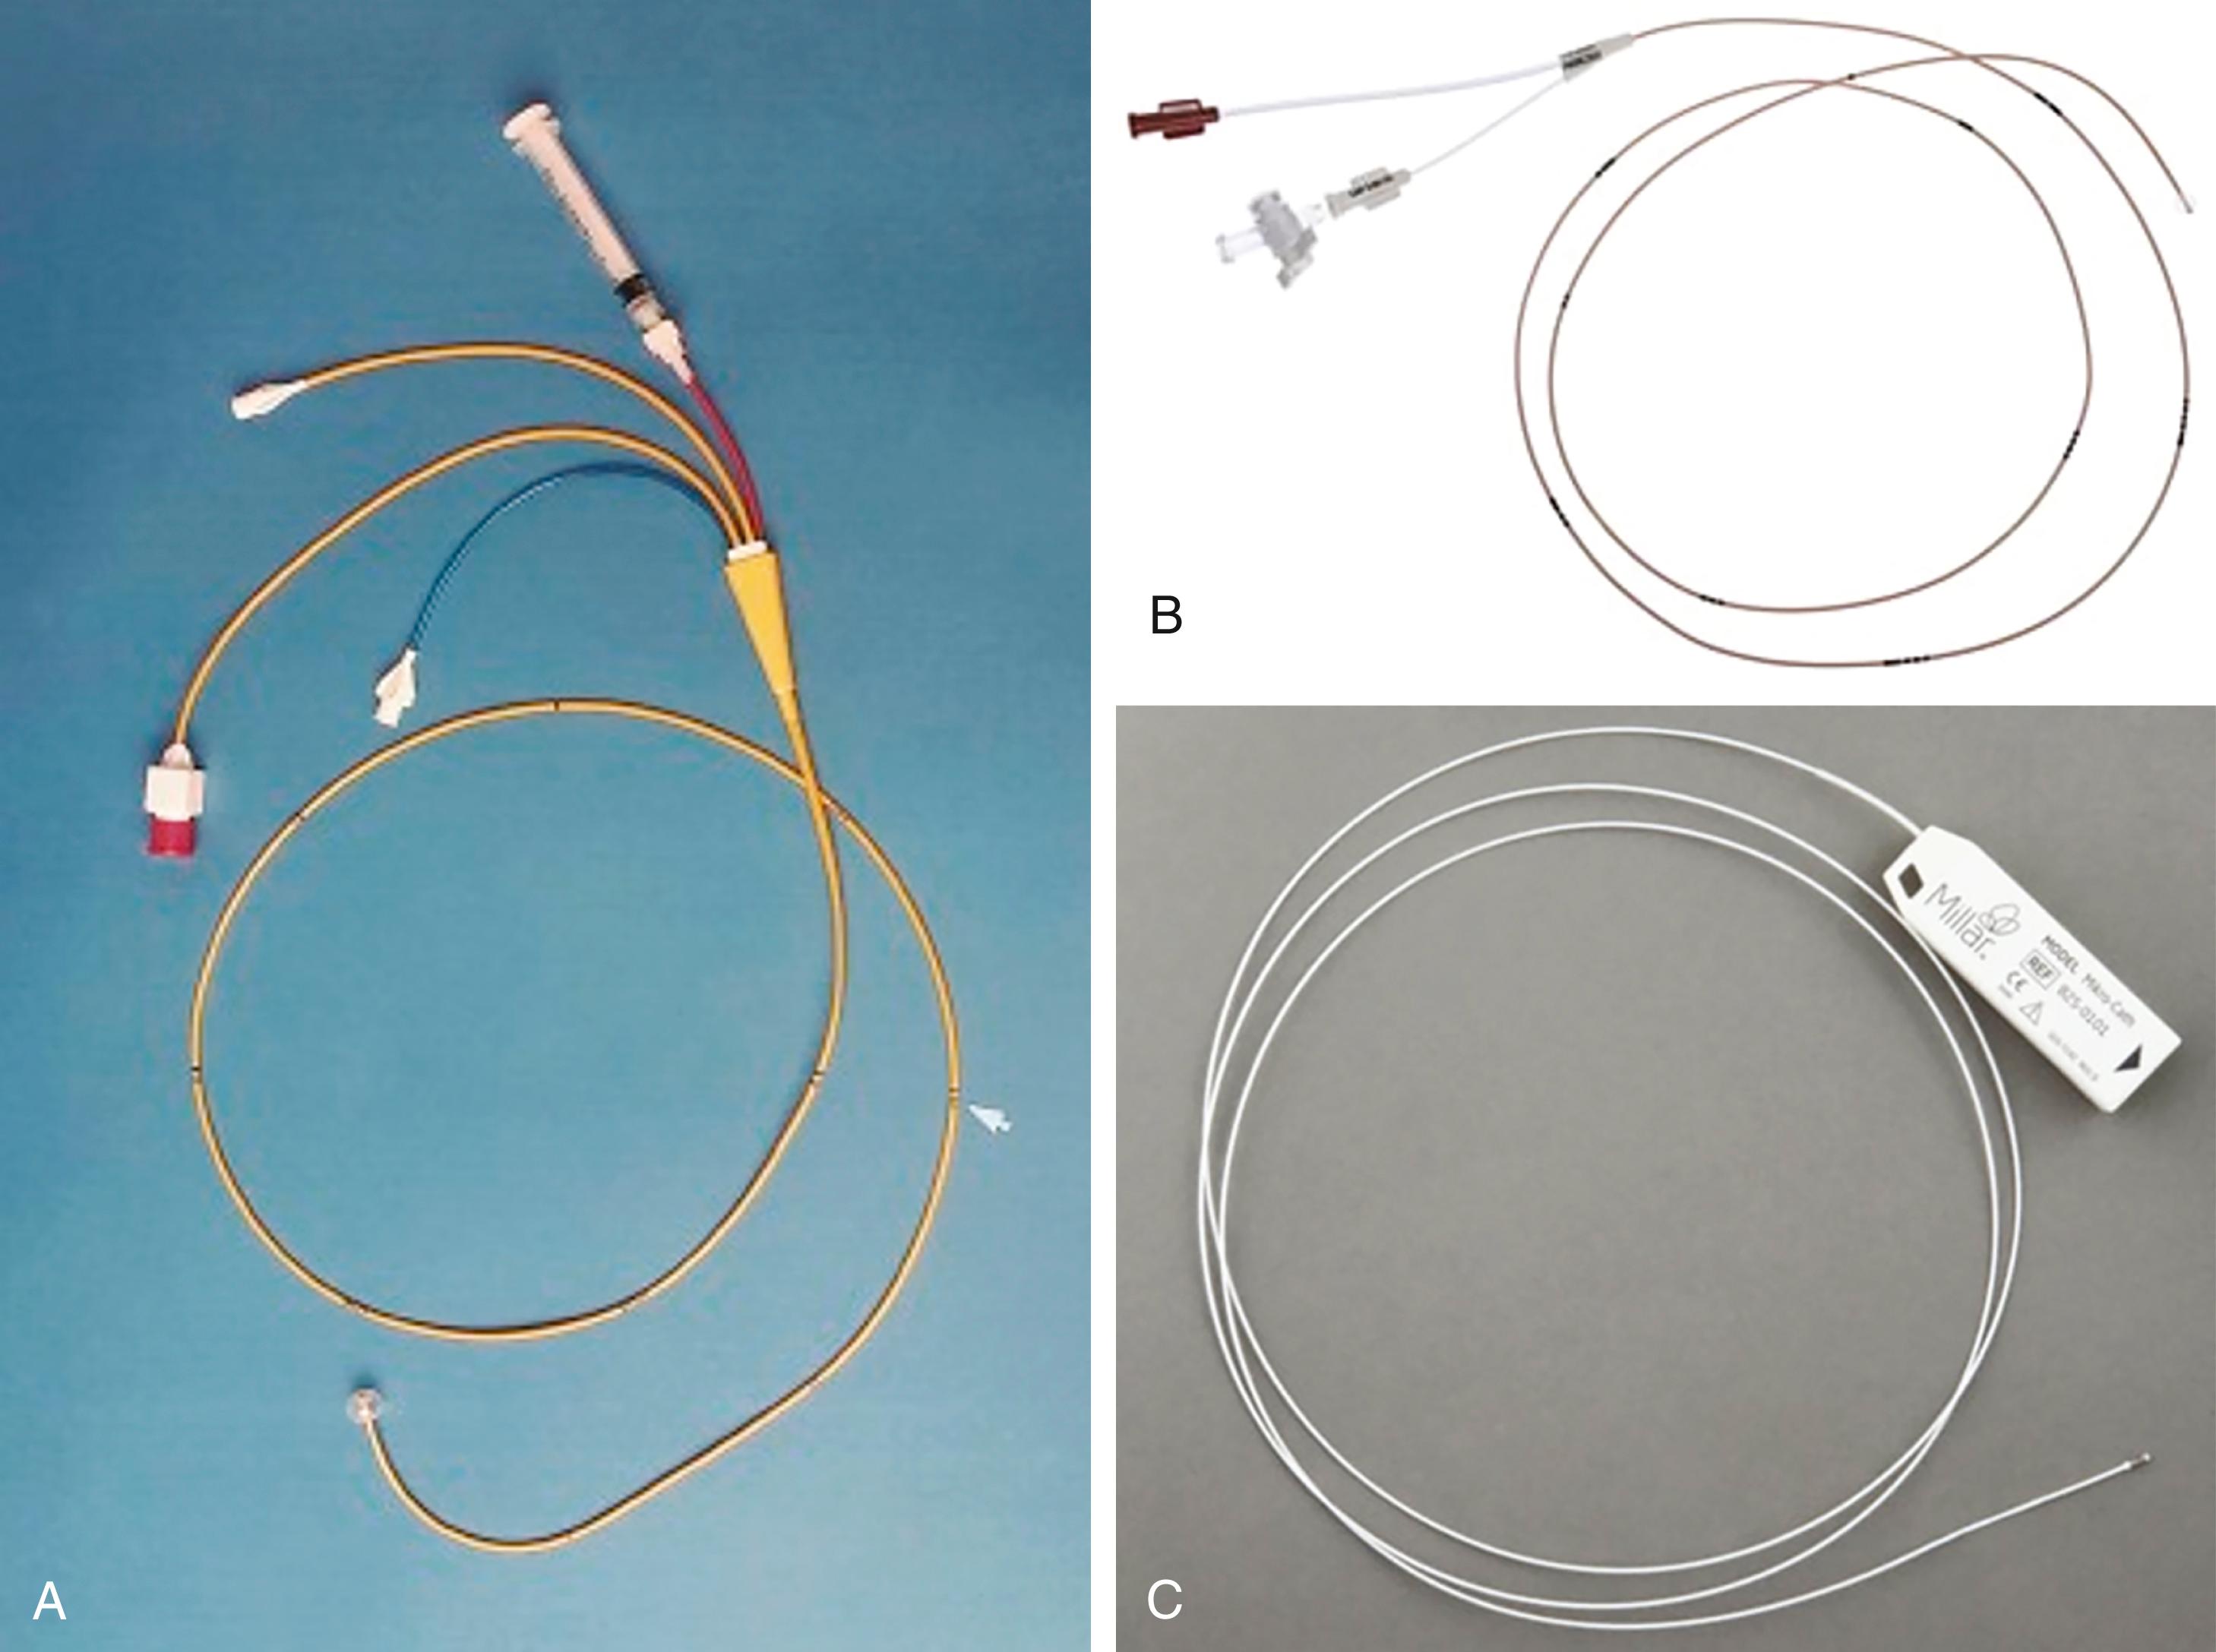
Right-heart catheterization is one of the central elements in the hemodynamic evaluation in the catheterization laboratory. The choice of venous access and catheter depends on the clinical presentation and patient-specific characteristics. The most commonly used right heart catheters are pulmonary balloon-tipped flotation (e.g., Swan-Ganz) catheters with multiple lumens for pressure recording and a thermistor sensor for thermodilution-based cardiac output measurement ( Fig. 22.10 ). Single-lumen balloon wedge catheters have similar rigidity, larger caliber, less catheter whip artifact, and thus higher fidelity for pressure measurement but lack the capacity to determine cardiac output by thermodilution.
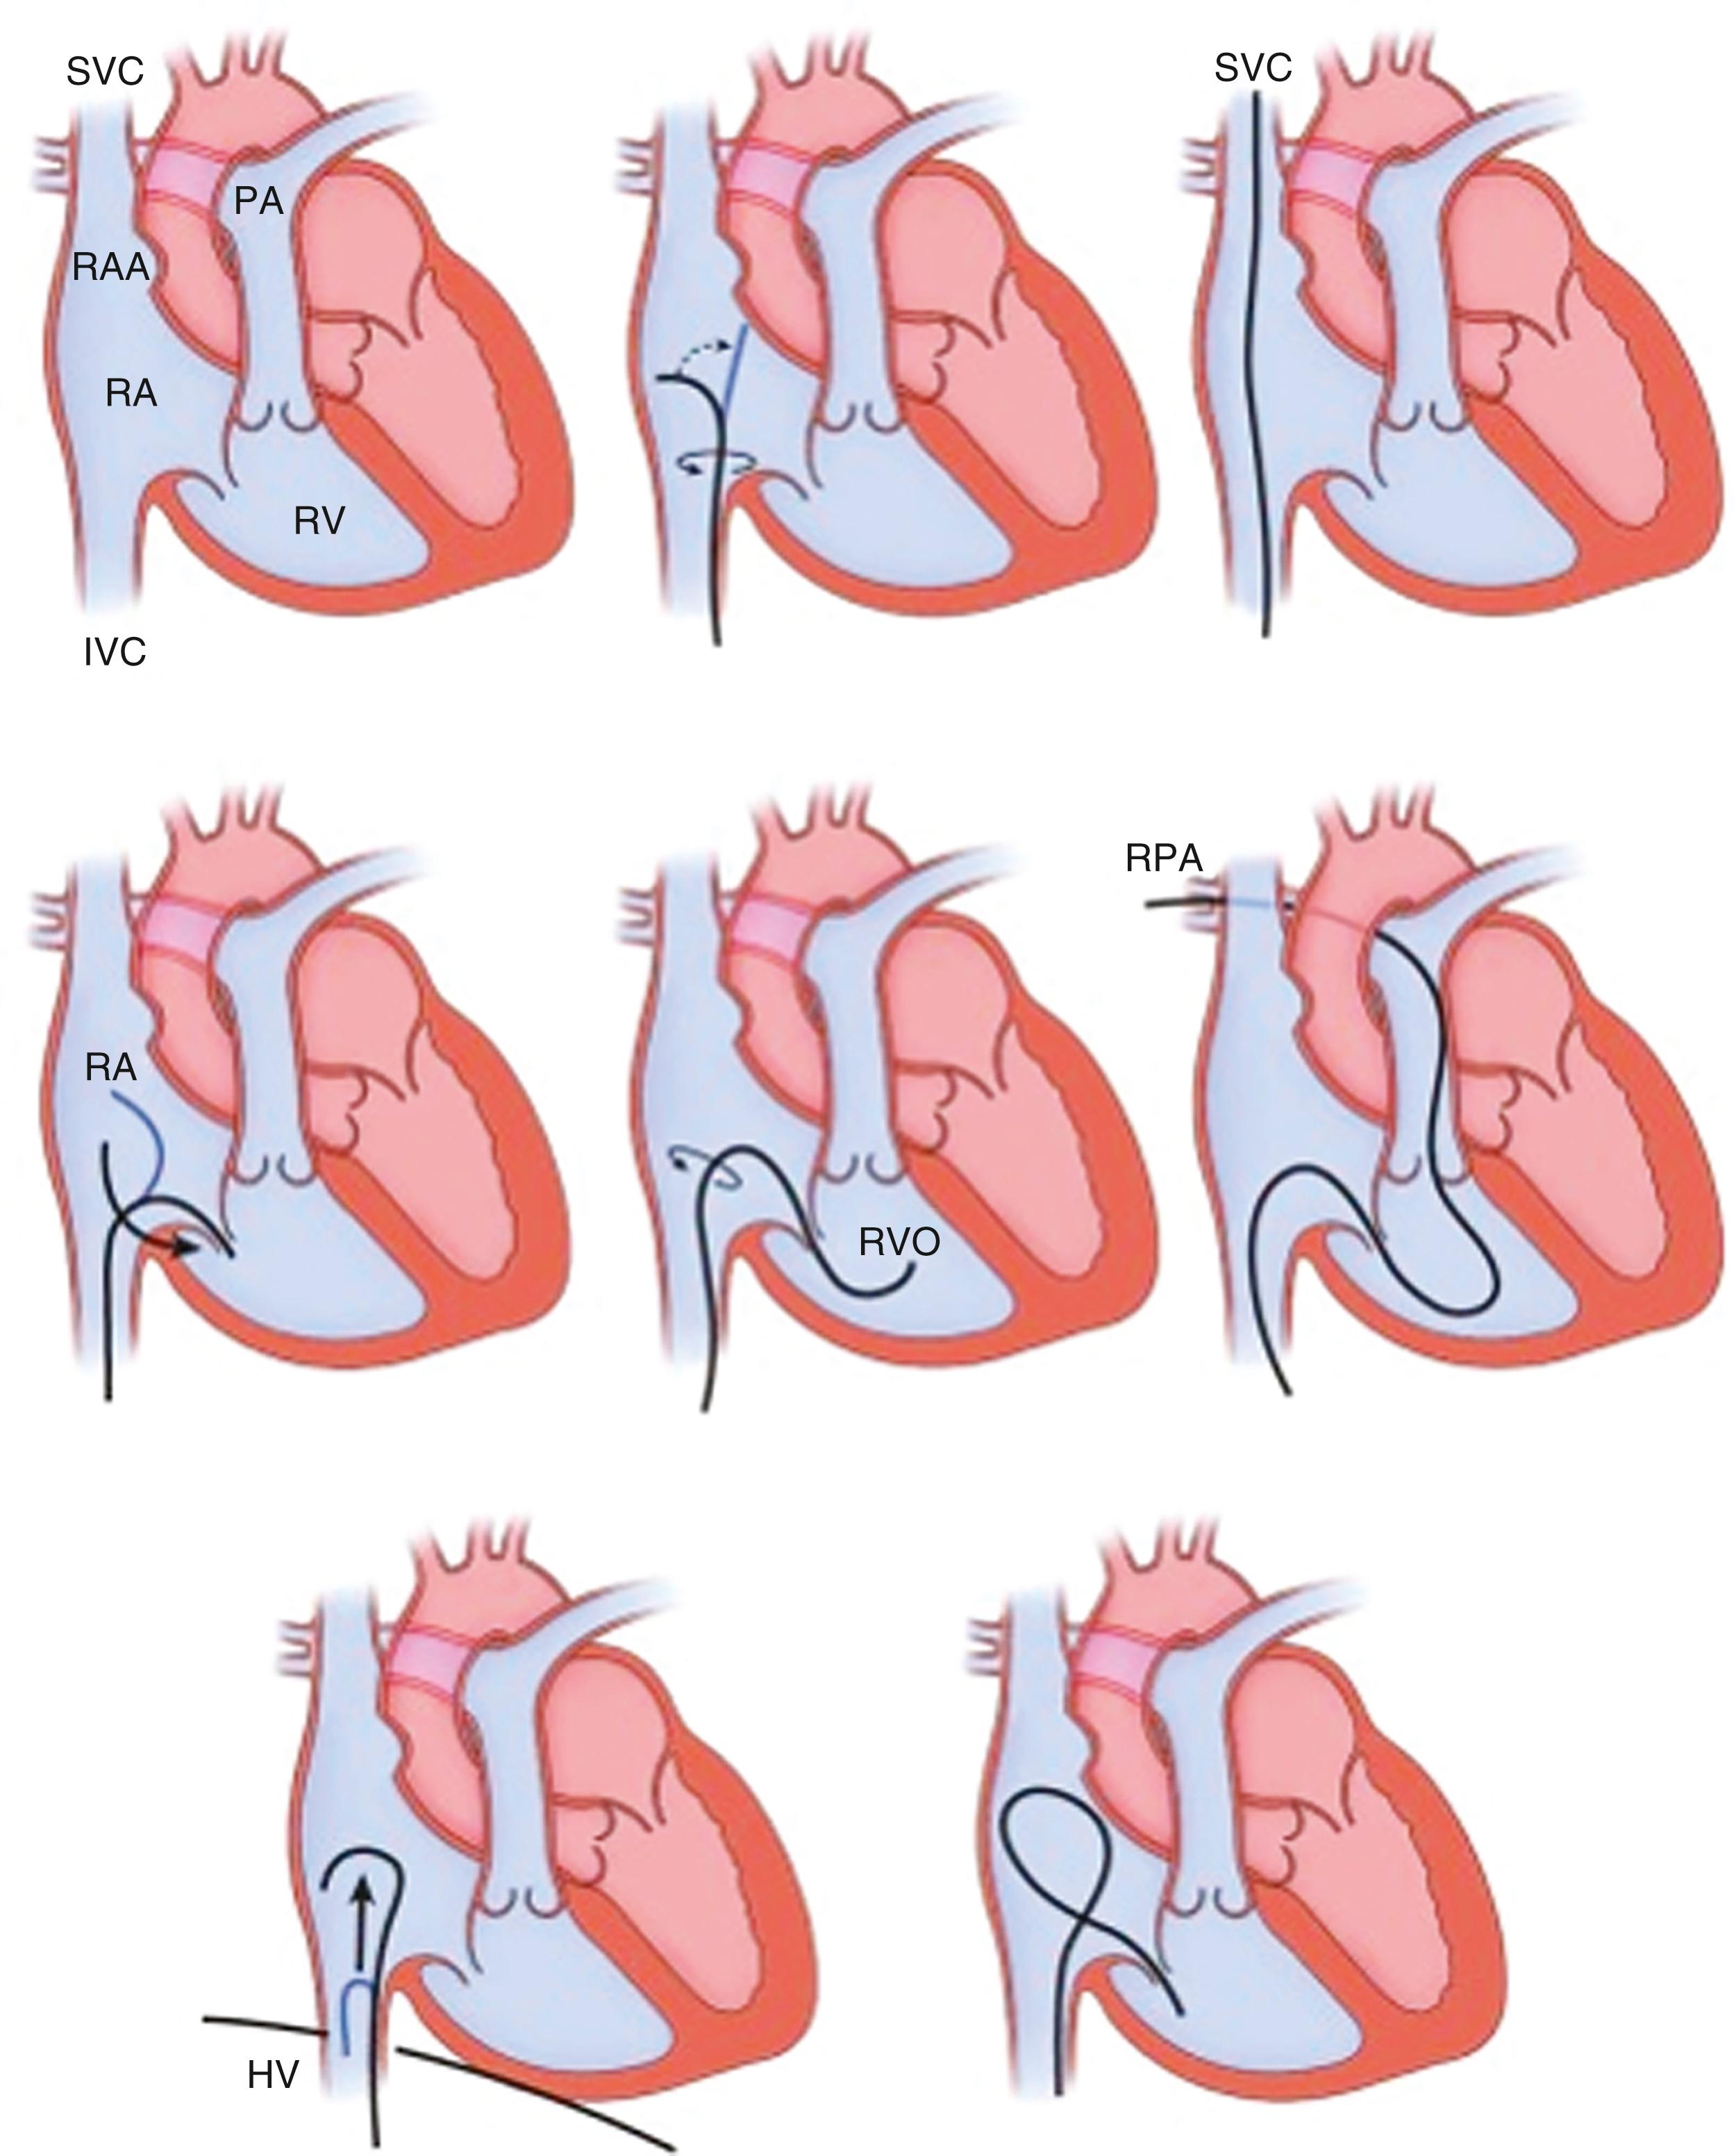
A standard pulmonary balloon-tipped catheter is relatively easy to advance into the right atrium, the right ventricle, and on to the pulmonary artery and PCW position ( Fig. 22.11 ). Although catheter location can be noted from pressure tracings alone, fluoroscopy is advisable, especially if any structural and functional difficulties (e.g., severe right atrial enlargement, severe TR, severe right ventricular [RV] dilation) are encountered or pacing/defibrillator leads are present. Even more so under the latter circumstances, fluoroscopy should be considered for a left IJ approach. Some maneuvering of the catheter may require guidewire assistance.
Before addressing the normal and abnormal pressure waveforms used in the hemodynamic diagnosis of cardiac disease, a basic understanding of factors and artifacts affecting the accurate recording of pressure waveforms is required. A correct interpretation of the pressure waveforms requires confidence in the data. A pressure wave is the cyclic force generated by cardiac muscle contraction, and its amplitude and duration are influenced by various mechanical and physiologic parameters. The pressure waveform is influenced by the force of the contracting chamber. The waveform is also a function of chamber compliance, both intrinsic and extrinsic (i.e., the surrounding structures, including the contiguous chambers of the heart, pericardium, lungs, and vasculature). Physiologic variables of heart rate, respiratory cycle, and vascular resistance all influence the pressure waveform.
Catheter-based pressure recording is accomplished by converting the force of the pressure wave from the catheter tip into an electrical signal by a transducer. A fluid-filled system (catheter plus tubing and connectors) transmits the pressure wave to the transducer in which the distortion of a diaphragm is converted into an electrical analog or digital signal to be visualized on the hemodynamic display monitor/recorder.
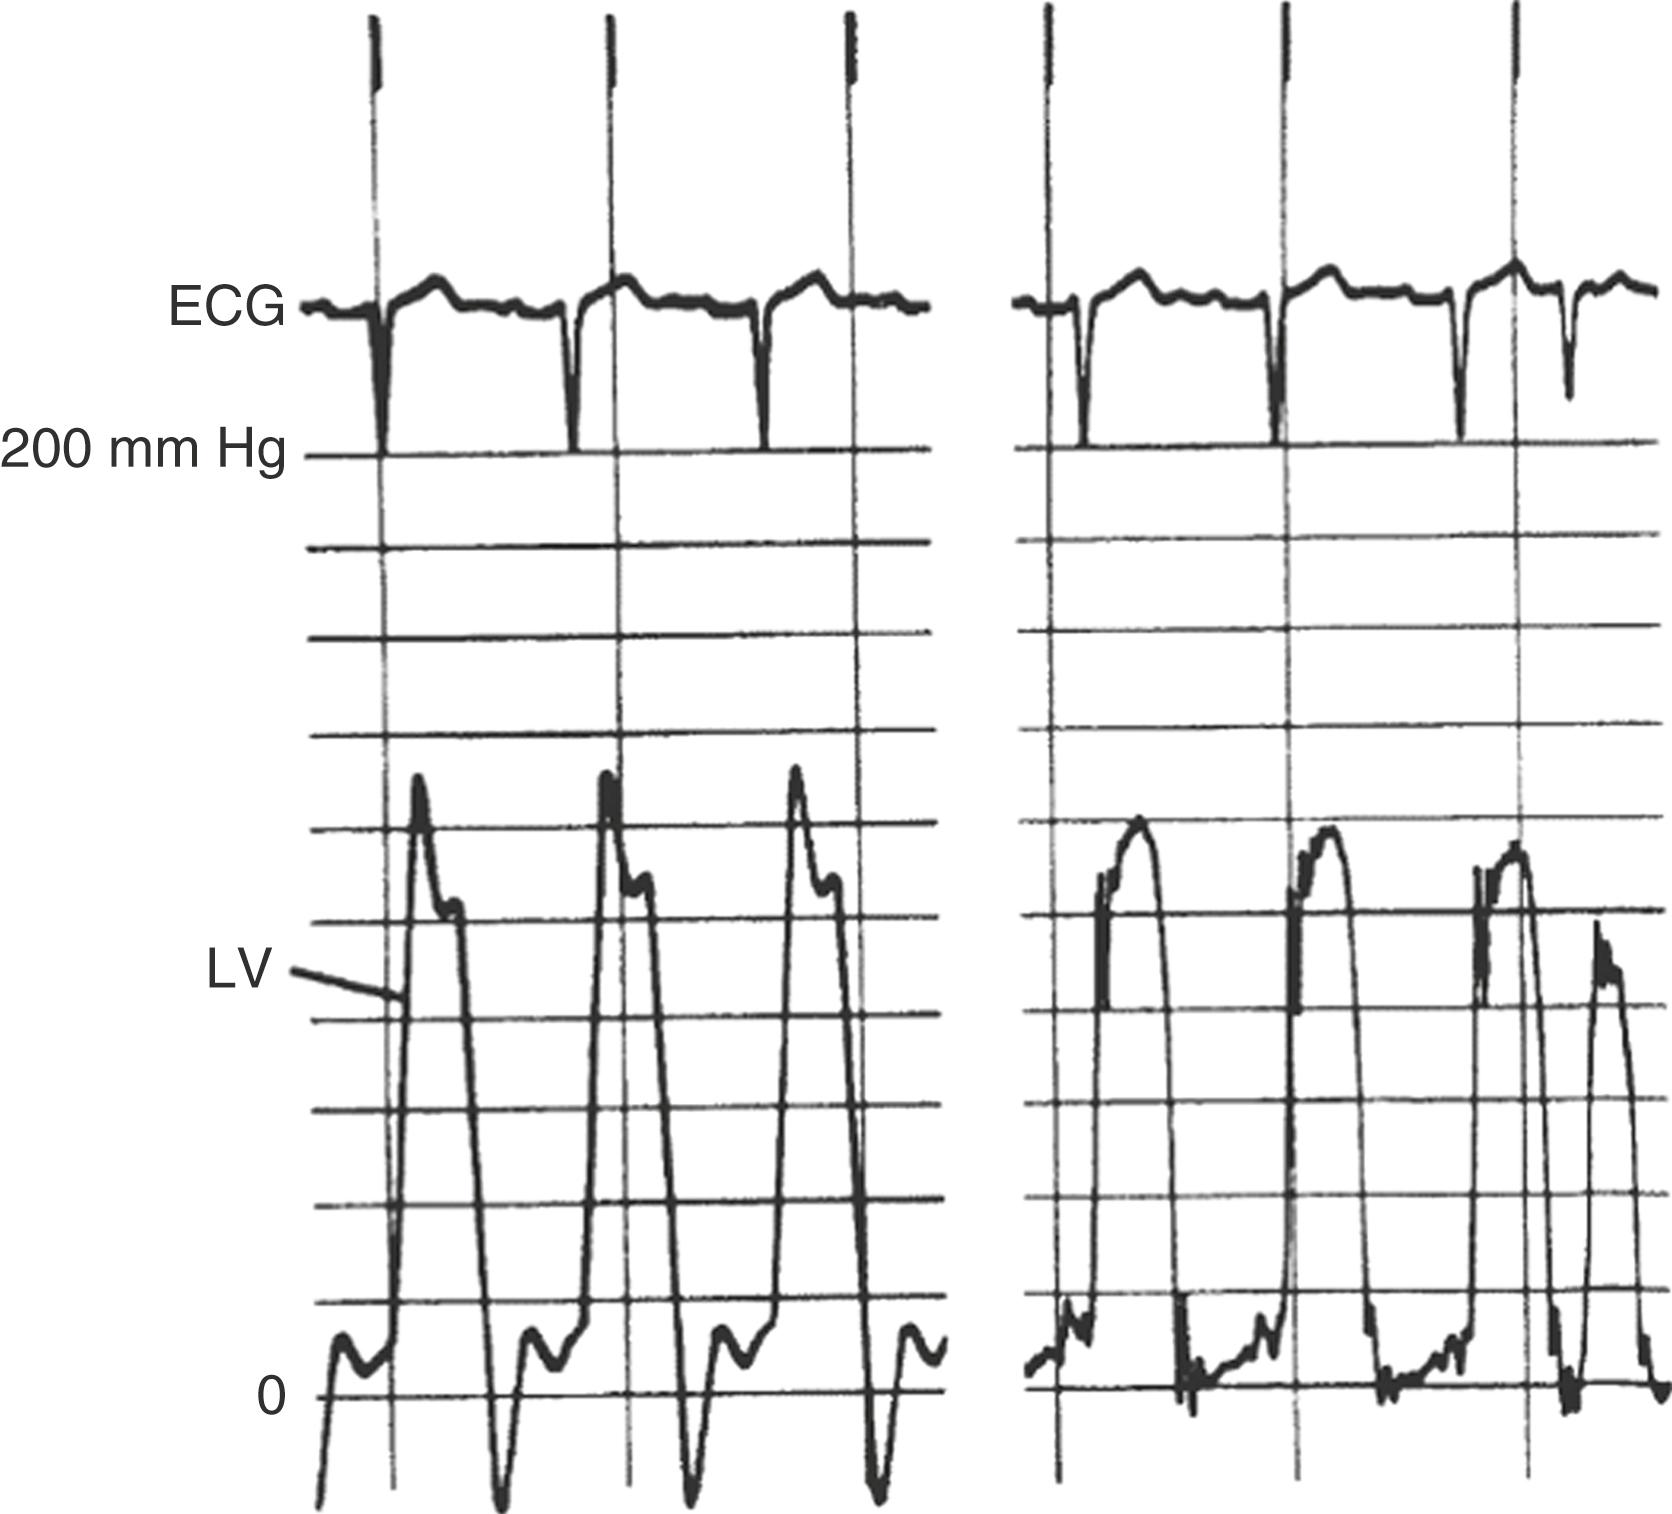
Various factors influence the pressure signal, which can impact signal accuracy. In such cases, the output amplitude would not be a true representation of the physiologic input amplitude. The most common technical artifacts of fluid filled systems are underdamping (also known as excessive resonant artifact or ringing) ( Fig. 22.12 ), over-dampening (e.g., blunted waveforms), and improper calibrations or setting (i.e., zeroing) the transducer to atmospheric pressure. An output-to-input ratio less than 1 represents damping (dissipation of energy), as may be caused by friction. This cause of error can be reduced by using a short, wide-bore, noncompliant tubing system that is directly connected to the transducer. Damped signals are frequently associated with air bubbles, blood, or contrast in the tubing. Aspiration and catheter flushing with saline will produce more accurate measurements. The higher the density of the liquid (e.g., contrast media) within the catheter, the greater is the damping effect. Furthermore, any luminal compromise (“kink”) of the catheter-tubing system is also a source of damping and needs to be considered with any unexpected or unexplained pressure drop (e.g., during extensive catheter torquing or manipulation). Another explanation for a damped signal may be catheter tip obstruction by small vessel orifices or by engagement against vessel walls or thrombus within a catheter. Other sources of error are related to catheter motion artifact or impacts on the catheter (internal) or tubing (external). An impact artifact (a brief, very high-frequency signal) can be noted when the catheter is struck by the walls or valves of the cardiac chambers.
Critical for all measurements is correct positioning (heart level) and calibration of the pressure transducer against atmospheric pressure, a function known as zeroing . This is performed by placing the fluid-filled tubing to the transducer open to air at the level of the atria, which corresponds to the mid-axillary line. Because fluid-filled transducer signals may fluctuate over time, the signal may “drift” from its initial zero calibration. To address signal drift, all transducers should be zeroed immediately before any simultaneous recordings. Several key points to accurate pressure are summarized in eTable 22.4 .
|
Micromanometer pressure catheters and sensor guidewires allow for superior pressure recording because they have a miniaturized high-fidelity solid-state pressure transducer mounted at the tip, which eliminates the interposing fluid column and its damping effect as well as the 30- to 40-millisecond delay in wave transmission (see later). The pressure waveform is less distorted and the whip (motion) artifact is greatly reduced. High-fidelity catheters can assess the rate of rise in ventricular pressure (dP/dt), wall stress, rate of decay in ventricular pressure (−dP/dt), and time constant of relaxation (τ), and when coupled to impedance catheters can provide ventricular pressure-volume relationships. Catheters with two transducers separated by a short distance allow for accurate determination of gradients within chambers (e.g., intraventricular gradient in HCM) and across structures (e.g., stenotic AV). Some high-fidelity micromanometer systems allow for over-the-wire insertion and angiography.
Become a Clinical Tree membership for Full access and enjoy Unlimited articles
If you are a member. Log in here