Physical Address
304 North Cardinal St.
Dorchester Center, MA 02124
This chapter presents the scientific rationale, supporting data, and specific strategies for the implementation of Sportsmetrics, a neuromuscular knee ligament injury prevention training program. Since Sportsmetrics was first introduced to the medical community by the senior author (F.R.N.) and associates in 1996, at least 50 other so-called anterior cruciate ligament (ACL) injury prevention programs have followed that are focused on female athletes. Many investigations have been conducted to determine the effectiveness of these programs in reducing ACL injury rates, improving knee kinematic and kinetic factors, * and enhancing athletic performance indicators. †
* References .
† References .
There exist differences in opinion among investigators regarding the frequency, intensity, duration, and components that should comprise an ACL intervention training program. One issue is whether a true reduction in the injury rate can be accomplished with warmup programs that are relatively short in session duration (10-20 minutes) but long in total training duration (for instance, one season). This is in contrast to preseason programs that last 6 to 8 weeks but require 60 to 120 minutes of training per session. A second issue is whether ACL intervention training should be modified according to the athlete's age and sport. A third issue is whether athletes may be identified as having a high risk of sustaining a noncontact ACL injury and thus whether they should undergo a different training program than those who are at a lower risk for this injury. There does not exist to date an accurate prediction model for ACL injury according to all of the potential risk factors discussed in Chapter 13 .
We recently reviewed all published ACL neuromuscular retraining programs to determine those that significantly reduce the incidence of noncontact ACL injuries in female adolescent athletes ( Table 14-1 ). Only eight studies were found that assessed noncontact ACL injury rates in these athletes according to athlete exposures (AEs). Three programs—Sportsmetrics, Prevent Injury and Enhance Performance, and Knee Injury Prevention —were found to be effective in reducing noncontact ACL injuries. Unfortunately, several programs failed to have an effect on reducing the ACL injury rate. Issues related to poor compliance with training and too few ACL injuries to avoid a type II statistical error were commonly cited as the reasons for the outcomes of these investigations. In general, ACL intervention programs published to date have had methodologic problems that preclude definitive answers regarding which programs are effective and which are ineffective. These include lack of randomization and control, limited statistical power because of the small number of exposures and ACL injuries, failure to determine ACL injury incidence according to AEs, poor compliance with training, poor documentation of contact versus noncontact ACL injuries, and changes in study protocols over the course of the investigations.
| Program (year) | TRAINED ATHLETES | CONTROL ATHLETES | |||||||||
|---|---|---|---|---|---|---|---|---|---|---|---|
| Athletes (n) | NC ACL (n) | AE (n) | NC ACL Injury Incidence Rate † | Athletes (n) | NC ACL (n) | AE (n) | NC ACL Injury Incidence Rate † | P Value | Relative Risk Reduction (95% CI) | Number Needed to Treat * (95% CI) | |
| Sportsmetrics (1999) | 366 | 0 | 17,222 | 0 | 463 | 5 | 23,138 | 0.22 | <.05 | 100 (NA) | 93 (50-722) |
| Sportsmetrics (1999, 2012) | 700 | 1 | 36,724 | 0.03 | 1120 | 13 | 61,244 | 0.21 | .03 | 88 (6-98) | 98 (59-302) |
| PEP (2005) | 1885 | 6 | 67,860 | 0.09 | 3818 | 67 | 137,448 | 0.49 | <.0001 | 82 (58-92) | 70 (52-105) |
| KIPP (2011) ‡ | 485 | 2 | 20,345 | 0.10 | 370 | 6 | 12,467 | 0.48 | .04 | 75 (-25-95) | 83 (38-503) |
* Positive value to benefit, negative value to harm.
† Calculated per 1000 athlete exposures.
‡ Data provided by personal communication with senior author.
The Sportsmetrics program is proven effective in inducing changes in neuromuscular indices in female athletes because studies have shown improved overall lower limb alignment on a drop-jump test, increased hamstring strength, increased knee flexion angles on landing, and reduced deleterious abduction and adduction moments and ground reaction forces. Sportsmetrics significantly reduces the risk of noncontact ACL injuries in female athletes participating in basketball and soccer. In addition, this program enhances athletic performance indicators in female soccer, basketball, volleyball, and tennis players.
A pilot laboratory study was conducted at our institution using 11 high school female volleyball players to determine the effect of Sportsmetrics training on landing mechanics and lower extremity strength. The control group consisted of nine male subjects matched for height, weight, and age. Training was performed three times per week for 6 weeks. Before and after the training program, the athletes completed isokinetic muscle testing at 360 degrees/sec and force analysis testing to measure motions and ground reaction forces during volleyball jumping and landing maneuvers.
After 6 weeks of training, peak landing forces from a volleyball block jump decreased 22% ( P = .006), or an average of 456 N (103 lb) ( Fig. 14-1 ). Knee adduction and abduction moments decreased approximately 50% ( Fig. 14-2 ). Decreased abduction or abduction moments may lessen the risk of liftoff of the medial or lateral femoral condyle, improve tibiofemoral contact stabilizing forces, and reduce the risk of knee ligament injury. In addition, the female athletes demonstrated lower landing forces than male athletes and lesser adduction and abduction moments compared with pretraining values. Hamstring-to-quadriceps muscle peak torque ratios increased 26% on the nondominant side and 13% on the dominant side, correcting side-to-side imbalances.
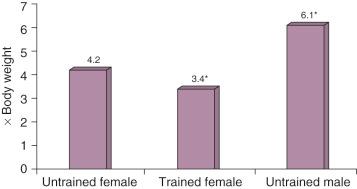
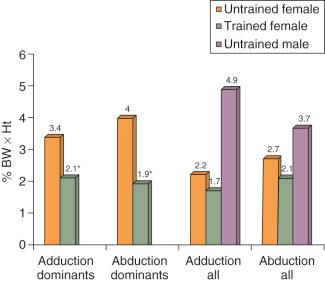
A second study was conducted in 62 high school female athletes to determine whether Sportsmetrics training altered lower limb alignment on a drop-jump task and improved isokinetic lower limb muscle strength. Before training, 80% of the female athletes had a valgus overall lower limb alignment on landing from a drop-jump. After training, 34% of the females demonstrated this alignment ( P < .0001). Significant increases were noted after training in knee flexion peak torque in both the dominant and nondominant limbs ( P < .0001).
Sportsmetrics training has been shown to significantly reduce the incidence of noncontact ACL injuries in female adolescent athletes. Our research institution followed 700 females who underwent Sportsmetrics training, as well as 1120 female controls and 434 male control athletes. All athletes were followed throughout their sports seasons for injury documentation. The total numbers of AEs were 36,724 for the trained group, 61,244 for the control female group, and 21,390 for the control male group. Noncontact ACL injuries were sustained in 1 trained female athlete, 13 control female athletes, and 1 control male athlete. The knee injury incidence per 1000 AEs was 0.03 in trained female athletes, 0.49 in control female athletes, and 0.09 in male athletes ( P = .03).
We recently reviewed the effectiveness of Sportsmetrics training in 1000 female athletes 13 to 18 years of age who participated in a variety of sports activities. There were statistically significant improvements and large effect sizes (ESs) in overall lower leg alignment in the coronal plane on the drop-jump test ( P < .0001; ES = 0.97). Before training, 79% had a valgus alignment appearance on landing. The program markedly improved the alignment in 75% of these athletes. There were significant improvements in the single-leg triple-crossover hop in the mean distance hopped (33 cm; P < .0001; ES = 0.47). In addition, 13% had abnormal limb symmetry on this test before training, whereas only 2% were rated as having abnormal symmetry after completing the program. There were significant improvements in the agility t test ( P < .0001; ES = 0.64) and the multistage fitness test (MSFT) ( P < .0001; ES = 0.57). Isokinetic hamstring strength significantly improved ( P < .0001; ES = 0.57 dominant, ES = 0.61 nondominant), as did quadriceps strength ( P < .01; ES = 0.27 dominant, ES = 0.35 nondominant). Significant improvements, but low ESs, were found in the vertical jump and sit-up tests.
We also compared the difference in noncontact ACL injury rates between a subset of 700 trained athletes with that of 700 untrained athletes matched for age, sport, and body mass index. The subgroup of 700 trained athletes had a significant reduction in the noncontact ACL injury incidence rate (according to AEs) compared with the control group. The trained group had 36,724 AEs and 1 ACL injury, whereas the control group had 61,244 AEs and 13 ACL injuries (incidence rates, 0.03 and 0.21 per 1000 AEs, respectively; P = .03).
The risk factors that have been hypothesized to increase the potential for an ACL injury are discussed in Chapter 13 . The final position of the knee joint on landing, pivoting, and cutting is influenced by the center of gravity of the upper body and the trunk over the lower extremity. Equally important are the factors of trunk-hip adduction or abduction, foot-ankle pronation-supination, and foot separation distance. These effects additively produce either a varus or valgus moment about the knee joint that must be balanced by the lower limb musculature. If the athlete is off balance or contacts another player, a loss of trunk and lower limb control and position may occur and the knee joint may go into a hyperextended or valgus position. Although there are many potential mechanisms for ACL injury, it has been postulated that excessive valgus moments about the knee joint, with subsequent high anterior tibial shear forces, may be one of the most common to occur in females. Excessive valgus loading may result in decreased tibiofemoral contact, or condylar liftoff, and a reduction in the normal joint contact geometry that contributes to knee joint stability. This position, coupled with a highly activated quadriceps muscle that produces maximum anterior shear forces with the knee joint at low flexion angles (0-30 degrees) and a relatively inactive hamstring musculature, could potentially lead to ACL rupture. The function of the hamstrings is dependent on the angle of knee flexion and degrees of external tibial rotation. The mechanical advantage of these muscles increases as the knee is flexed because at 0 degrees of extension, the flexion force is only 49% of that generated at 90 degrees of flexion. Withrow et al. speculated that it may be possible to limit ACL strain by accentuating hip flexion during the knee flexion phase of jump landings because this increases the tension in the active hamstring muscles.
The time within which an ACL rupture occurs has been estimated to range from 17 to 50 milliseconds after initial ground contact. It is evident that there is not enough time for an athlete, upon sensing a knee injury about to occur, to alter the body's or lower extremity's position to prevent this injury. To have a significant impact on reducing the incidence rate of noncontact ACL tears, the goals of a training program are to teach athletes to control the upper body, trunk, and lower body position; lower the center of gravity by increasing hip and knee flexion during activities; and develop muscular strength and techniques to land with decreased ground reaction forces. Athletes should be taught to pre-position the body and lower extremity before initial ground contact to obtain the position of greatest knee joint stability and stiffness. This includes avoidance of sudden deceleration and cutting and pivoting with an extended knee that induces a large quadriceps contraction. The program should consist of a dynamic warmup, plyometric jump training, strengthening exercises, agility and aerobic conditioning, and risk awareness training.
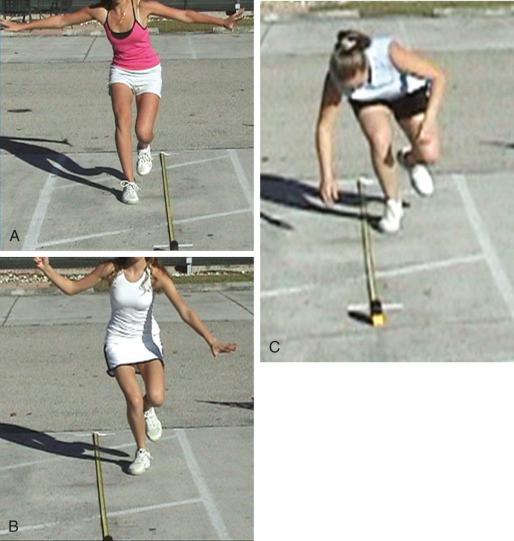
We developed a sports injury test (SIT) to obtain a profile of each athlete before and after Sportsmetrics training. Before testing begins, a history is collected regarding prior injuries to the knees and ankles. The SIT is completed just before training begins and then again within 1 week after the program is completed. The SIT measures (1) knee and ankle position on landing and takeoff from a drop-jump during a video test, (2) lower limb symmetry and a general assessment of lower limb control on single-leg hop tasks ( Fig. 14-3 ), (3) hamstring flexibility, and (4) vertical jump height (countermovement and two-step approach). Athletes participating in sport-specific Sportsmetrics programs, discussed later in this chapter, also undergo additional agility, speed, and aerobic tests as required for their sport. These may include a t test, 37-meter sprint, 18-meter sprint, MSFT, sit-up test, and 1-mile run. Tennis players perform a series of tests on the court, including a suicide sprint, service box and baseline speed and agility tests, and a medicine ball toss described elsewhere.
There are four essential components of Sportsmetrics: dynamic warmup, plyometric jump training, strengthening, and flexibility. It is recommended that training be conducted either during the off-season or just before the start of the athlete's sport season. The training is conducted three times per week on alternating days for 6 weeks. As described later in this chapter, sport-specific speed and agility components may be added to the training program if desired by an athlete or team. A maintenance training program (Sportsmetrics Warm-up for Injury Prevention and Performance [WIPP]) may be performed upon completion of the formal Sportsmetrics program to continue to instill the skills and techniques learned during the athlete's sports season. Training may be accomplished either in classes led by an instructor who has completed certification training from our foundation or by following an instructional step-by-step DVD series. Athletes who do not train with a certified instructor are encouraged to perform training either in front of a mirror or with a partner so that mistakes in technique, form, and body alignment may be detected and corrected. A list of certified instructors and sites is available at www.sportsmetrics.org .
The dynamic warmup prepares the body using function-based activities that incorporate sport-specific motions. The goals are to raise core body temperature, increase heart rate, increase blood flow to the muscles, and improve flexibility, balance, and coordination. Upon completion of this warmup, the athlete will be physically prepared for training. All of these exercises should be performed across the width of a court or field or for approximately 20 to 30 seconds.
Toe walk. The athlete walks up on the toes with the legs straight. The heel of the foot should not touch the ground, and the hips should remain neutral throughout.
Heel walk. The athlete walks on the heels with the legs straight. The toes should not touch the ground; the knees should not lock; and the hips should remain neutral.
Straight-leg march . The athlete walks with both legs straight, alternating lifting up each leg as high as possible without compromising form. The knees are kept straight and posture is erect, and the body should not lean backward. The arms are swung in opposition.
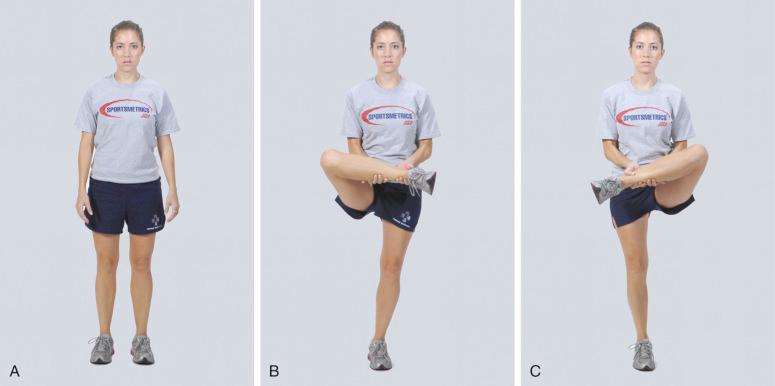
Leg cradle ( Fig. 14-4 ). The athlete walks forward, keeping the entire body straight and neutrally aligned. One leg is lifted in front of the body, bent at the knee. The knee is rotated outward and the foot inward. The foot is held with both hands while standing on one leg, and this position is held for 3 seconds. The foot is placed back down, and the exercise is repeated with the opposite leg.
Dog and bush (hip rotator) walk ( Fig. 14-5 ). The athlete is instructed to pretend that there is an obstacle directly in front of her or him. The athlete faces forward and keeps the shoulders and hips square. One leg is extended at the hip, and the knee is kept softly bent. The leg is externally rotated out at the hip, and the knee is bent to approximately 90 degrees. The leg is rotated and brought up and over the obstacle and then placed back on the ground. The exercise is repeated with the opposite leg.
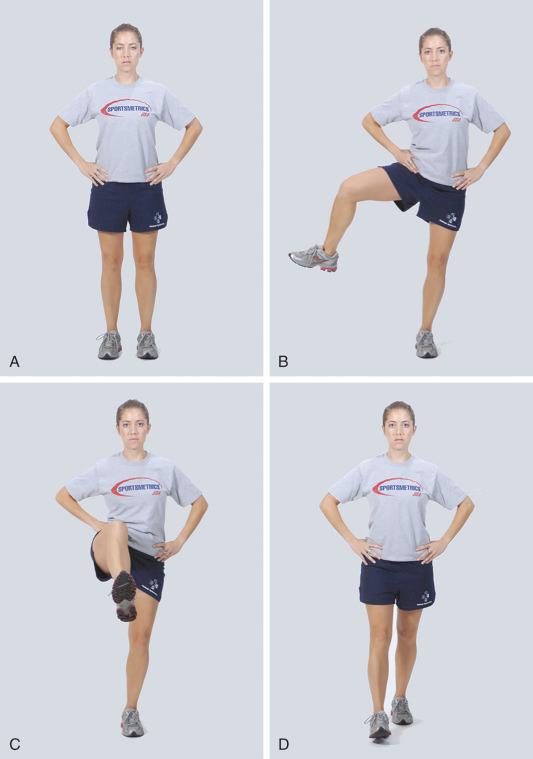
High-knee skip. The athlete begins to skip. One knee is driven up in the air as high as possible while the other leg is used to hop off the ground. As the athlete lands, the exercise is immediately repeated on the opposite side. The opposite arm of the high knee is swung up in the air to help gain height.
High knees. The athlete begins to jog forward. With each step, the knees are driven up as high as possible using short, choppy steps. The athlete remains facing forward, keeping the shoulders and hips square throughout the exercise.
Glute kicks. The athlete begins to jog forward. With each step, the athlete kicks the feet back as if trying to reach the glutes with the heel, using short, choppy steps. The athlete remains facing forward, keeping the shoulder and hips square throughout the exercise.
Stride out. The athlete begins jogging forward with an exaggerated running form. The knees are driven as high as possible and the feet are kicked back, as if trying to make a large complete circle with the legs. The athlete should stay up on the balls of the feet throughout the exercise.
All-out sprint. The athlete sprints forward as fast as possible while maintaining proper technique and running form.
Plyometrics help develop the muscle control and strength considered critical to reducing the risk of knee ligament injuries. These exercises are well known to increase muscular power, vertical jump height, acceleration speed, and running speed. However, if done improperly, plyometrics would not be expected to have a beneficial effect in reducing the risk of a noncontact ACL injury. Therefore the philosophy of the plyometric and jump-training component in the Sportsmetrics program is to place a major emphasis on correct jumping and techniques throughout the 6 weeks of training. Specific drills and instruction are used to teach the athlete to pre-position the entire body safely when accelerating or decelerating on landing. The selection and progression of the exercises entail neuromuscular retraining and proceed from simple two-legged jumping drills (to instill correct form) to multidirectional single-foot hops and plyometrics with an emphasis on quick turnover (to add movements that mimic sport-specific motions). The jump training is divided into three 2-week phases. Each 2-week phase has a different training focus, and the exercises change correspondingly ( Table 14-2 ).
| Phase | Jumps | Duration | Emphasis, Goals | |
|---|---|---|---|---|
| 1: Technique Development | Week 1 | Week 2 | Proper form and technique for each jump | |
| Wall jump | 20 seconds | 25 seconds | Correct posture, body alignment throughout each jump | |
| Tuck jump | 20 seconds | 25 seconds | Jump straight up with no excessive side-to-side or forward-backward movement | |
| Squat jump | 10 seconds | 15 seconds | Soft landings that include toe-to-midfoot rocking and bent knees | |
| Barrier jump (side to side) | 20 seconds | 25 seconds | Deep knee flexion | |
| Barrier jump (forward and back) | 20 seconds | 25 seconds | Instant recoil preparation for the next jump, no double-bouncing | |
| 180-degree jump | 20 seconds | 25 seconds | ||
| Broad jump (stick 5 seconds) | 5 reps | 10 reps | ||
| Bounding in place | 20 seconds | 25 seconds | ||
| 2: Fundamentals | Week 3 | Week 4 | Proper technique to build a base of strength, power, agility | |
| Wall jump | 25 seconds | 30 seconds | Focus on well-performed, quality jumps | |
| Tuck jump | 25 seconds | 30 seconds | Same jumps from phase 1 done for longer duration | |
| Jump, jump, jump, vertical jump | 5 total | 8 total | New, more difficult jumps introduced to build on skills mastered from phase 1 | |
| Squat jump | 15 seconds | 20 seconds | ||
| Barrier hop side to side | 25 seconds | 30 seconds | ||
| Barrier hop forward and back | 25 seconds | 30 seconds | ||
| Scissors jump | 25 seconds | 30 seconds | ||
| Single-leg hop (stick) | 5 reps | 5 reps | ||
| Bounding for distance | 1 run | 2 runs | ||
| 3: Performance | Week 5 | Week 6 | Enhance basic skill and muscle control learned in first two phases | |
| Wall jump | 20 seconds | 20 seconds | Increase quantity, speed of jumps with well-performed, quality jumping technique | |
| Jump up, down, 180 degrees, vertical | 5 total | 10 total | ||
| Squat jump | 25 seconds | 25 seconds | ||
| Mattress jump side-side | 30 seconds | 30 seconds | ||
| Mattress jump forward-back | 30 seconds | 30 seconds | ||
| Hop, hop, hop, stick | 5 reps | 5 reps | ||
| Jump into bounding | 3 runs | 4 runs | ||
The aim of phase 1, termed the technique development phase, is to teach the athlete proper form and technique for eight different jumps. Four basic techniques are stressed: correct posture and body alignment throughout the jump (spine erect, shoulders back, chest over knees); jumping straight up with no excessive side-to-side or forward-backward movement; soft landings, including toe-to-midfoot rocking and bent knees; and instant recoil preparation for the next jump. The athletes are taught these techniques through verbal queues from instructors, such as “On your toes,” “Straight as an arrow,” “Light as a feather,” “Shock absorber,” and “Recoil like a spring.” Constant feedback is offered by instructors, and mirrors are used in the training sessions to provide direct visual feedback if possible. Throughout each session, exercises are increased by duration or repetition. If the athlete becomes fatigued and cannot perform the jumps with the proper technique, he or she is encouraged to stop and rest. Approximately 30 seconds of recovery time is allowed between each exercise.
In phase 2, called the fundamentals phase, emphasis continues to be on proper technique and quality jumping form. Five jumps from phase 1 are continued, but these are performed for longer periods of time. In addition, four new jumps of increased difficulty are incorporated.
In phase 3, the performance phase, the quantity and speed of the jumps are increased to develop a truly plyometric exercise routine. The athlete is encouraged to complete as many jumps as possible with proper form and to concentrate on the height achieved in each jump.
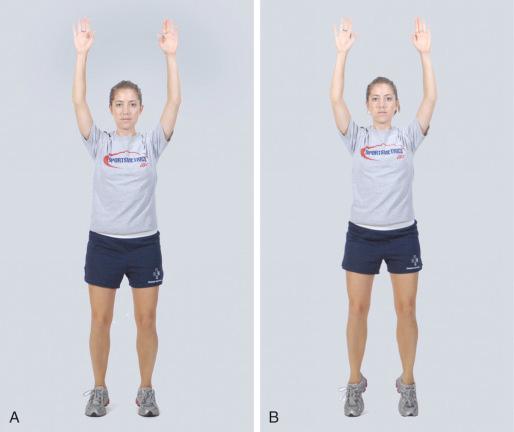
Wall jump (weeks 1-6). Also known as ankle bounces, these jumps are performed with the knees slightly bent and both arms raised over the head ( Fig. 14-6, A ). From this position, the athlete bounces up and down off his or her toes ( Fig. 14-6, B ). The knees should be soft and the hips, knees, and ankles in neutral alignment. This jump is performed first to prepare the athlete mentally and physically for plyometric training. This also provides the trainer with an opportunity to observe and begin positive feedback and instruction.
Mistakes to correct include slouched posture, too much knee flexion, and eyes watching the feet with the head down. The athlete should be told to keep the eyes and head focused upward, bend the knees slightly, and maintain neutral alignment.
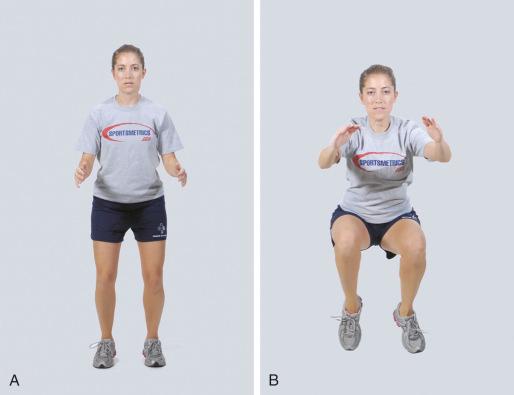
Tuck jump (weeks 1-6). The athlete begins in an upright neutral stance with the feet shoulder width apart ( Fig. 14-7, A ). The athlete jumps up, bending the knees together to bring the thighs up toward the chest as high as possible ( Fig. 14-7, B ).
Mistakes to correct include lowering the chest to the knees rather than lifting the knees to the chest, bringing the knees together during takeoff or landing, double-bouncing between jumps, and producing a loud landing with a lack of muscle control. The athlete should be told to lift the knees up to the chest, control and keep the landing quiet, land on the balls of the feet, keep the knees bent when landing to go immediately into the next jump, keep the knees and ankles at shoulder and hip width at all times, keep the back straight and shoulders back, and keep the head and eyes up with each jump.
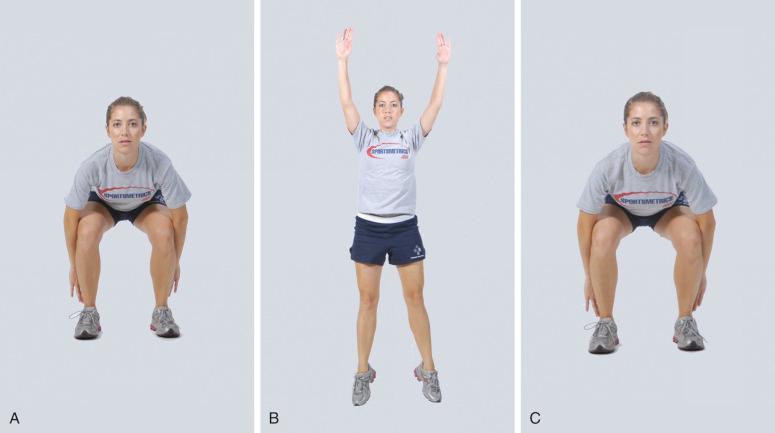
Squat jump (weeks 1-6). The athlete begins in a fully crouched position as deep as comfortable ( Fig. 14-8, A ). The knees and feet are directed forward and are in alignment with the hips. The upper body is upright with the chest open. The hands touch or reach toward the ground on the outside of the heels. The athlete jumps up, reaching as high as possible (see Fig. 14-8, B ), and then returns to the crouched position with hands reaching back toward the heels (see Fig. 14-8, C ).
Mistakes to correct include landing with body and/or knees forward and/or off-balance, bringing the knees together during takeoff or landing, and producing a loud landing with a lack of muscle control. The athlete should be told to keep the hands reaching back toward the heels (not forward), keep the knees tracking under the hips on takeoff and landing, maintain the knees and ankles at shoulder and hip width at all times, keep the back straight and the shoulders back, and keep the head and eyes up with each jump.
Barrier jump side to side (weeks 1 and 2). A cone or barrier approximately 6 to 8 inches in height is used. The athlete stands in a modified squat position ( Fig. 14-9, A ). The athlete then jumps from one side of the barrier to the other side with the feet kept together ( Fig. 14-9, B ) and lands in the same amount of knee flexion as the starting position ( Fig. 14-9, C ).
Mistakes to correct include landing or taking off with stiff, straight, or wobbly knees; jumping side to side quickly without bringing the entire body over the barrier; double-bouncing on landing and takeoff; and not landing with the feet together. The athlete should be told to bend the knees up to clear the barrier, land quietly on the balls of the feet and rock back to the heels, control the landing to be able to immediately take off again, keep the back straight with the shoulders back, keep head and eyes up with each jump, keep the knees tracking under the hips and toes pointed forward on takeoff and landing, and keep the feet parallel to each other.
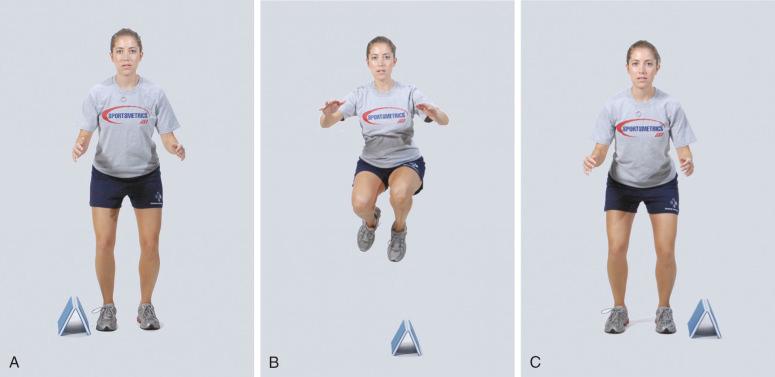
Barrier jump forward-backward (weeks 1 and 2). A cone or barrier approximately 6 to 8 inches in height is used. The athlete stands facing the barrier in a modified squat position ( Fig. 14-10, A ). The athlete jumps forward and backward with the feet kept together ( Fig. 14-10, B ) and lands in the same amount of knee flexion as the starting position ( Fig. 14-10, C ).
Mistakes to correct include landing or taking off with stiff, straight, or wobbly knees; jumping forward and backward quickly without bringing the entire body over the barrier; double-bouncing on landing and takeoff; and separating the feet to clear the barrier. The athlete should be told to lift the knees up to the chest to clear the barrier, land quietly on the balls of the feet and rock back to the heels, control the landing to be able to immediately take off again, keep the back straight with the shoulders back, keep the head and eyes up with each jump, and keep the knees tracking under the hips and the toes pointed forward on takeoff and landing.
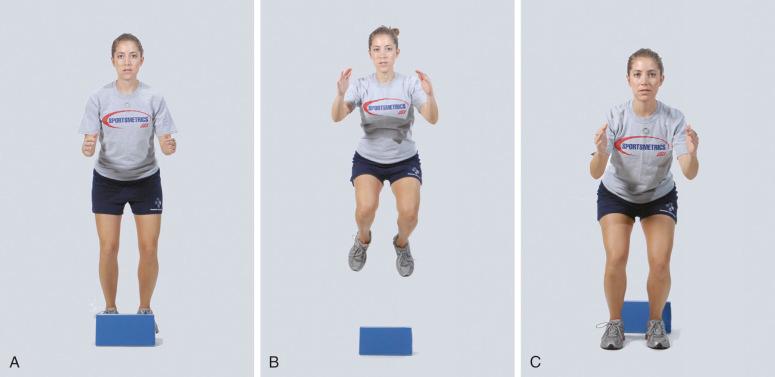
180-degree jump (weeks 1 and 2). The athlete begins from an upright neutral stance with the feet shoulder width apart ( Fig. 14-11, A ). The athlete jumps straight up into the air with both feet and makes a 180-degree turn in midair ( Fig. 14-11, B ) before landing ( Fig. 14-11, C ). The landing is held for 2 seconds, and then the direction is reversed and the jump repeated.
Mistakes to correct include overrotating or underrotating; not turning the body 180 degrees; not rotating the body as a unit; landing loud, straight, and stiff-legged, with staggered feet or one foot landing before the other; always jumping in the same direction (in a circle); rotating back and forth with minimal height during the jump; and separating the feet beyond the desired “feet, shoulder, and/or hip width” distance.
The athlete should be told to jump straight upward and rotate the body as a unit from the head to the toes; land with soft, slightly flexed knees; always jump in opposing directions (one jump over the right shoulder, the next over the left); keep the knees tracking under the hips on takeoff and landing; maintain the knees and ankles at shoulder and/or hip width at all times; keep the back straight with the shoulders back; and keep the head and eyes up with each jump.
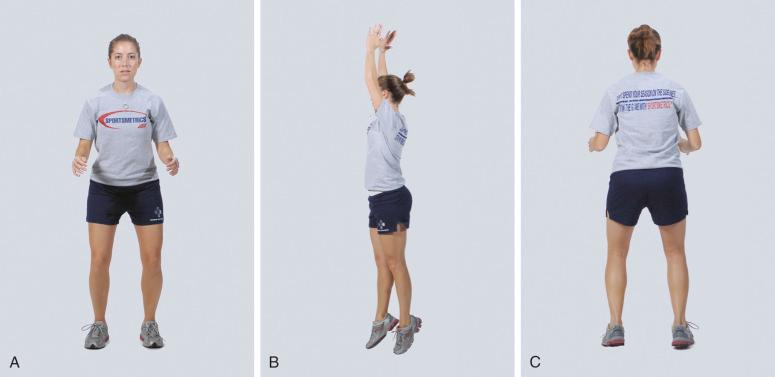
Broad jump (weeks 1 and 2). The athlete starts from an upright neutral stance ( Fig. 14-12, A ) and jumps forward as far as possible (see Fig. 14-12, B ), taking off with both feet. The athlete lands on both feet, remains in a deep crouch position (see Fig. 14-12, C ) for 5 seconds, and then repeats the jump.
Mistakes to correct include not holding or sticking the landing, pointing the knees inward during landing and takeoff, and landing in a straight-legged or upright position. The athlete should be told to track the knees over the heels and under the hips on takeoff and landing, land with a soft toe-ball-heel rock with the knees flexed, and hold the landing for 5 seconds.
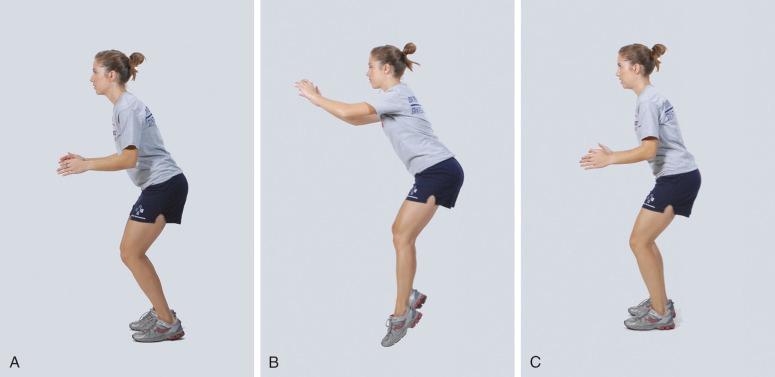
Bounding in place (weeks 1 and 2). The athlete begins this jump on a single leg, with the opposite leg bent behind. While the athlete stays in one place, the leg positions are alternated by driving the back leg forward and upward. The rhythm and height are progressively increased throughout the exercise ( Fig. 14-13 ).
Mistakes to correct are simply alternating the knees or jogging in place and landing loudly or with wobbly knees. The athlete should be told to use the arms as a countermovement to progress to increasing height and power, drive the knees upward, and land with soft knees and a toe-ball-heel rock landing pattern.
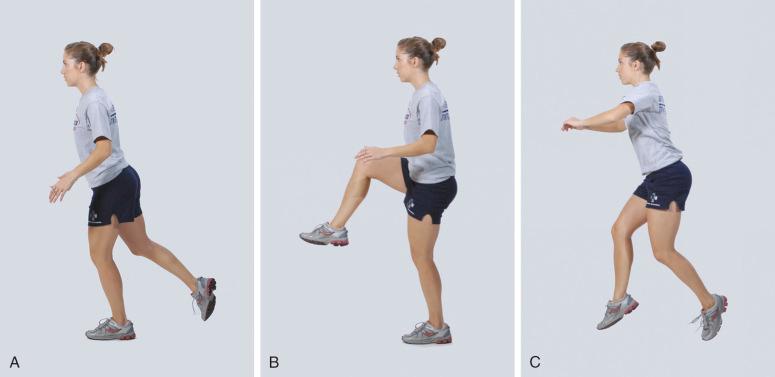
Jump, jump, jump, vertical jump (weeks 3 and 4). The athlete performs three broad jumps with each takeoff and landing in a deep crouch position. Then, the athlete finishes with a maximum vertical jump and returns to the deep crouch position and holds the position for 5 seconds.
Mistakes to correct include pointing the knees inward during landing and takeoff and carrying the body forward rather than upward on the vertical jump. The athlete should be told to keep the knees over the heels and under the hips on takeoff and landing, land with the toe-ball-heel rock with the knees flexed, and go straight up on the vertical jump.
Barrier hop side to side (weeks 3 and 4). Using the same cone or barrier from phase 1, the athlete performs a single-leg hop rather than a double-leg jump side to side over the barrier ( Fig. 14-14 ).
Mistakes to correct are landing or taking off with stiff, straight, or wobbly knees; hopping side to side quickly without bringing the entire body over the barrier; and double-bouncing on landing. The athlete should be told to bend the knee to clear the barrier; land quietly on the ball of the foot and rock back to the heel; control the landing to be able to immediately take off again; keep the back straight, shoulders back, and head and eyes up with each hop; keep the knee tracking under the hips; and keep the toes pointed forward on takeoff and landing.
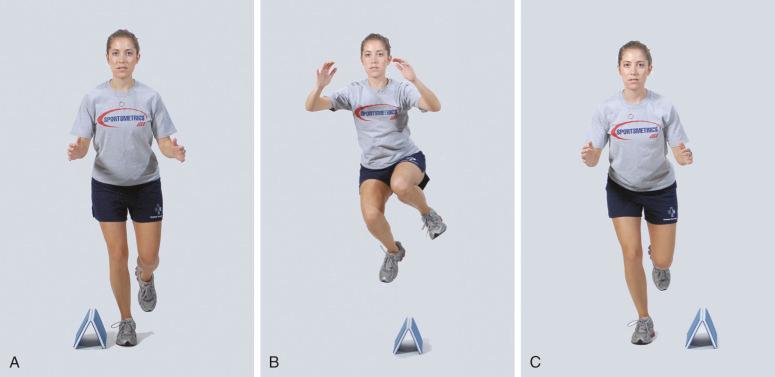
Barrier hop forward and backward (weeks 3 and 4). Using the same cone or barrier from phase 1, the athlete performs a single-leg hop rather than a double-leg jump forward and backward over the barrier ( Fig. 14-15 ).
Mistakes to correct are landing or taking off with stiff, straight, or wobbly knees; hopping forward and backward quickly without bringing the entire body over the barrier; and double-bouncing on landing. The athlete should be told to bend the knee to clear the barrier; land quietly on the ball of the foot and rock back to the heel; control the landing to be able to immediately take off again; keep the back straight, shoulders back, and head and eyes up with each hop; keep the knee tracking under the hips; and keep the toes pointed forward on takeoff and landing.
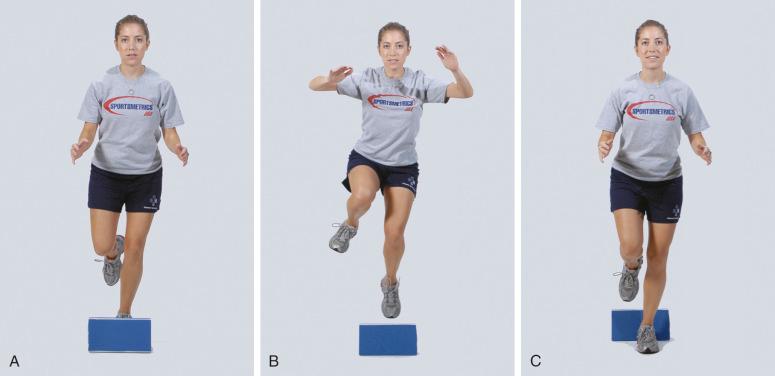
Scissors jump (weeks 3 and 4). The athlete begins in a long lunge position with the front knee bent directly over the ankle ( Fig. 14-16, A ). The athlete pushes off the front leg, jumps straight up in the air (see Fig. 14-16, B ), lands with the opposite leg bent in front (see Fig. 14-16, C ), and then alternates legs.
Mistakes to correct are landing with wobbly knees or knees extended past the front ankle, jumping up to alternate legs with minimal height, not switching legs directly under the body, simply switching legs without power, landing loudly, landing with a straight or stiff leg, landing with staggered feet, or landing with one foot before the other. The athlete should be told to push off with power from the front leg, obtain maximum height on the leg switch, land in control with the legs bent and the front knee directly over the ankle, keep the back straight, keep the shoulders back, keep the head and eyes up with each jump, and keep the toes pointed forward with each takeoff and landing.
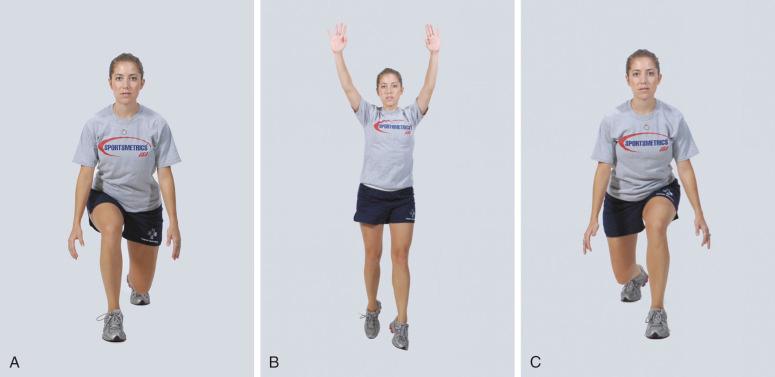
Single-leg hop (weeks 3 and 4). This hop is performed just like the broad jump, except the athlete starts and lands on the same leg. The athlete lands in a deep crouched position, which is held for 5 seconds, and then repeats the hop on the opposite leg ( Fig. 14-17 ).
Mistakes to correct include landing with a wobbly knee, landing upright with the knee straight, and landing in deep knee flexion but standing up immediately. The athlete should be told to keep the knees over the heels and under the hips on takeoff and landing, land with the toe-ball-heel rock and the knees and ankles flexed, and hold the landing for 5 seconds (more important than distance).
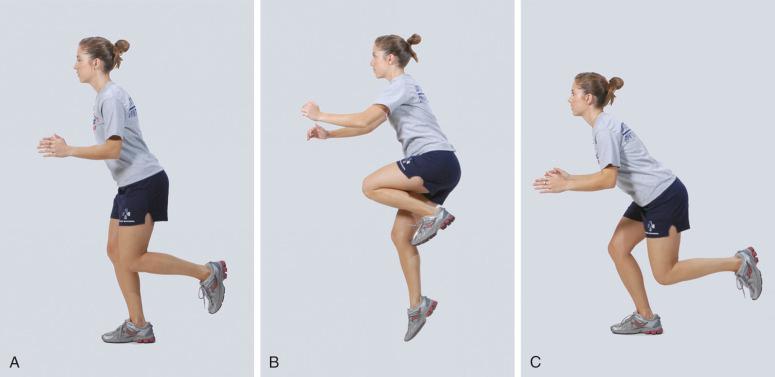
Bounding for distance (weeks 3 and 4). The athlete begins bounding in place and progresses forward, increasing the distance with each step while keeping the knees high.
Mistakes to correct include performing alternating knee lifts or a high knee jog, landing loudly or with wobbly knees, and keeping the knee low instead of lifting it up. The athlete should be told to use the arms as a countermovement to progress and increase height and power, and also to drive the knee upward and forward.
Jump up, jump down, 180 degrees, vertical (weeks 5 and 6). This is a double-foot jump onto a 6- to 8-inch box or stacked mat. The athlete lands in a deep crouched position and immediately performs a double-foot jump-down (a depth jump) off the box or mat. The athlete lands again in a deep crouched position and immediately performs a 180-degree jump. Upon landing, the athlete jumps right into a maximum vertical jump, landing once again in the deep crouched position, which is held for 5 seconds.
Mistakes to correct are landing each jump in an upright straight- or stiff-legged stance or landing with one foot. The athlete should be told to land every jump in a deep crouch with the knees and ankles flexed and to have the feet land at the same time.
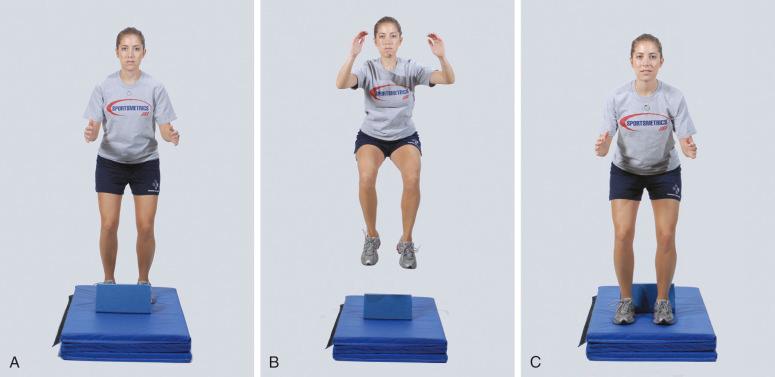
Mattress jump side to side (weeks 5 and 6). The cone or barrier is placed on a cushioned surface approximately 2 to 3 inches deep. The athlete performs a double-foot jump from side to side ( Fig. 14-18 ).
Mistakes to correct are landing with wobbly knees or knees pointed inward, double-bouncing on landing, landing with the feet staggered, or landing with one foot in front of the other. The athlete should be told to land and take off with both feet together, control the landing to be able to immediately take off back over the barrier, and keep the feet parallel to each other.
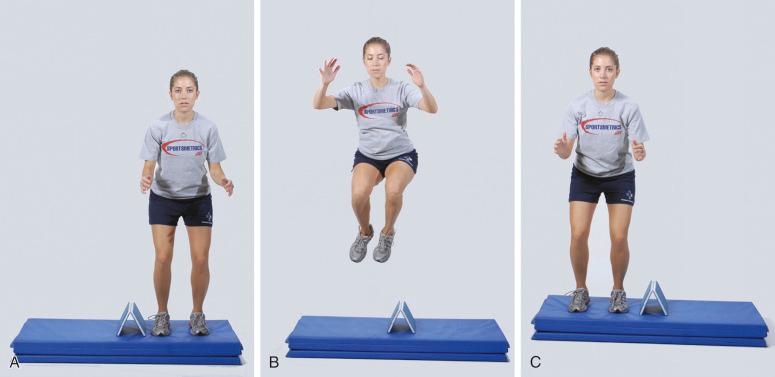
Mattress jump forward and backward (weeks 5 and 6). The cone or barrier is placed on a cushioned surface approximately 2 to 3 inches deep. The athlete performs a double-foot jump forward and backward ( Fig. 14-19 ).
Mistakes to correct include landing with wobbly knees or knees pointed inward, double-bouncing on landing, landing with the feet staggered, or landing with one foot in front of the other. The athlete should be told to land and take off with both feet together, control the landing to be able to immediately take off back over the barrier, and to keep the feet parallel to each other.
Hop, hop, hop, stick (weeks 5 and 6). The athlete performs three single-leg hops for distance, holding and sticking the final landing for 5 seconds.
Mistakes to correct include landing with wobbly knees or knees pointed inward, landing upright with poor knee and ankle flexion, and landing in keep knee flexion but immediately standing up. The athlete should be told to keep the knees over the heels and under the hips on takeoff and landing, land with a toe-ball-heel rock and keep the knees flexed, and hold the landing for 5 seconds (more important than distance).
Jump into bounding (weeks 5 and 6). The athlete jumps forward off both feet, landing on one leg with the other bent behind, and immediately begins bounding for distance.
Mistakes to correct are performing alternating knee lifts or a simple high-knee jog, landing loudly or with wobbly knees, and keeping the knees low instead of lifting them high. The athlete should be told to land with control off the jump and immediately begin bounding, use the arms as a countermovement to progress and increase height and power, and to drive the knees upward and forward as if going for an approach vertical jump.
Become a Clinical Tree membership for Full access and enjoy Unlimited articles
If you are a member. Log in here