Physical Address
304 North Cardinal St.
Dorchester Center, MA 02124
A 65-year-old man presented to our office 2 years after a right total knee arthroplasty (TKA). He has had increasing right knee pain and swelling during the past 2 months, particularly in the past week. His primary procedure was complicated by a superficial wound infection, which was treated with oral antibiotics. He has hypertension and is a type 2 diabetic who uses oral hypoglycemic drugs for control.
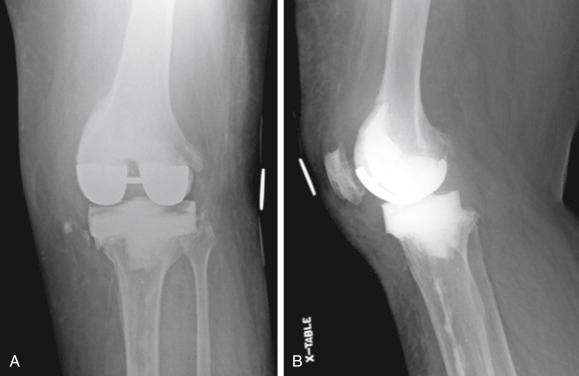
Examination confirmed a limp and a temperature of 37.5° C. His knee was warm and had a large effusion, but there was no deformity. The midline wound had healed. A complete blood cell count found a white blood cell (WBC) count of 14,000 cells/μL with a C-reactive protein (CRP) level of 120 mg/L and erythrocyte sedimentation rate (ESR) of 80 mm/hr. Anteroposterior and lateral radiographs of the knee showed progressive osteolysis around both components compared with views obtained 3 months postoperatively. Analysis of the aspirated fluid revealed a WBC count of 30,000 cells/μL with 80% polymorphonucleocytes. The Gram stain result was negative. Culture grew methicillin-sensitive Staphylococcus epidermidis . After a discussion with the patient about treatment options, we performed a two-stage revision to address the chronic, deep infection.
Articulating, antibiotic-impregnated spacers are useful devices in the treatment of infected total knee arthroplasties (TKAs). By reducing the articular surface friction and providing improved knee stability, the prosthesis with antibiotic-loaded acrylic cement (PROSTALAC) facilitates early mobility and discharge from the hospital. It promotes a higher level of activity for the patient, preserves motion through the knee, and improves quadriceps strength before definitive reimplantation. Local delivery of antibiotics can be tailored to the infecting organism by adding customized doses of antibiotics to the bone cement before the spacer is manufactured in the operating room.
Use of heat-stable antibiotic powder is based on the known or suspected organisms, and it is applied at a minimum dose of 4 g of antibiotic per 40 g of cement. For most organisms, we use vancomycin (1.5 g per 40 g of cement) with tobramycin (3.6 g per 40 g of cement).
Bone stock is preserved whenever possible, but all infected and devitalized tissue must be débrided. Bone loss is preferred to leaving infected tissue in situ.
The size of the PROSTALAC system is customized to create a stable, well-aligned knee that aids rehabilitation and subsequent reconstruction. Asymmetric defects are augmented with extra antibiotic-loaded cement.
Patients should be encouraged to move and to work on quadriceps strengthening. We encourage range-of-motion exercises and allow weight bearing as tolerated depending on the quality and quantity of remaining host bone.
Increasing the amount of antibiotic in the cement increases the curing time.
Combining two antibiotics in the cement increases the overall elution rate.
After the implants have been sized, manufacturing the spacer on the back table while débridement and irrigation are being completed increases surgical efficiency.
The PROSTALAC components should not be removed from the molds until they are completely set. They will not release properly and may be damaged if removed too early.
The molds are lubricated with sterile mineral oil to prevent the cement sticking to them.
Antibiotic-eluting spacers are a well-established means of delivering local antibiotic therapy. They most commonly are used during two-stage revision of an infected total knee arthroplasty (TKA) but also can be used to treat septic arthritis with joint degeneration when reconstructive arthroplasty will eventually be required. Static spacers deliver local antibiotic therapy but do not allow knee motion and limit the patient’s function. Articulating (mobile) spacers are designed to allow mobility and weight bearing while maintaining soft tissue tension and joint stability.
The prosthesis with antibiotic-loaded acrylic cement (PROSTALAC) was the first articulating spacer described in the English literature. The prototype, which was first used in 1987, consisted of a handcrafted copy of a conventional prosthesis made of highly antibiotic-loaded cement. In 1991, the device was improved by the use of flexible polyethylene molds, which created smooth articular surfaces on the femoral and tibial components. Although it allowed a greater range of relatively pain-free motion and improved mobility, this design had several problems. The cement-on-cement articulation was not a low-friction design and interfered with the rhythm of a normal gait. It was difficult to maintain a consistent thickness of the cement, making restoration of the joint line problematic. This spacer did not have a means of substituting for the posterior cruciate ligament (PCL) and was prone to instability.
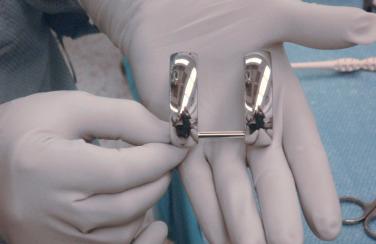
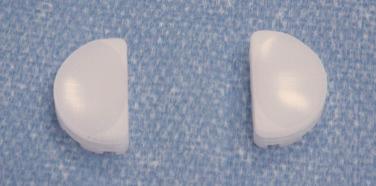
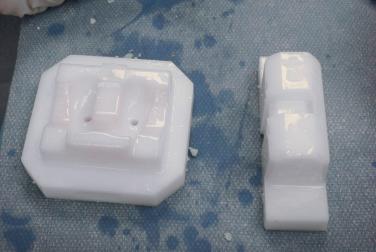
The current PROSTALAC spacer was introduced in 1994 and had modifications to improve performance and stability. Its femoral and tibial components are made with antibiotic-loaded Palacos acrylic cement (Zimmer, Warsaw, Ind.). Each component is cast in a size-specific mold. The tibial mold allows adjustment of the thickness of the spacer to assist in restoration of bone loss. It has a post and cam mechanism formed from cement between two inlay polyethylene plateaus. The femoral component incorporates small metal runners linked by a posterior crossbar, creating a metal-on-polyethylene bearing surface with a posterior-stabilized system ( Fig. 33A.1 ).
The primary indication for the use of the PROSTALAC system is for treatment of an infected TKA as the first-stage device in a two-stage reimplantation. It can be used in the treatment of infected unicompartmental and revision TKAs. The PROSTALAC device may also be used to treat severe intraarticular infections when secondary reconstruction with joint replacement is appropriate.
Use of the PROSTALAC system is contraindicated when there is severe bone or soft tissue loss that prevents future reconstruction. Because the PROSTALAC design substitutes for the PCL, it requires intact collateral ligaments for optimal joint stability. Other means of management should be considered for patients who have severe life-threatening infections in multiple sites, those with severe immunocompromise, those with severe vascular deficiency, and in those with lifestyle issues that preclude major reconstructive surgery.
Placement of the PROSTALAC system requires the following equipment:
General or regional anesthesia as appropriate
Standard supine positioning and an available tourniquet
Instruments to facilitate implant removal, including specialized knee extraction osteotomes, a Gigli saw, and an angled punch or femoral and tibial component extractors
Soft tissue débridement and pulse lavage systems
Palacos acrylic bone cement with gentamicin (three 40-g batches: one for the femoral component, one for the tibial component, and one to secure the spacer and fill minor defects)
Antibiotic powder: vancomycin (1.5g per 40 g of cement) with tobramycin (3.6 g per 40 g of cement)
Sterile mineral oil
Metal femoral condylar runners and polyethylene tibial skids ( Figs. 33A.2 and 33A.3 )
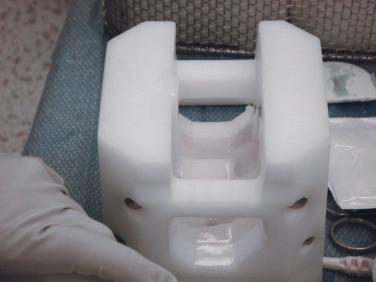
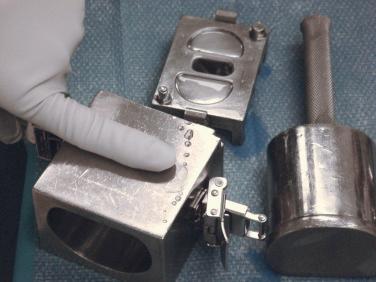
Femoral and tibial molds ( Figs. 33A.4 to 33A.6 )
Patients should be assessed for deformity and range of motion (ROM). An effusion or boggy swelling suggests synovitis. Careful attention should be paid to previous incisions and scars, especially recently healed lesions or actively draining sinuses. Vascular and neurologic assessments should be completed.
Anteroposterior, lateral, and skyline plain radiographs should be obtained, and old radiographs are useful for comparison. They are assessed for lysis, implant migration, and likely bone defects. The extent of cement within the femoral and tibial canals should be accounted for in the preoperative plan for removal.
When presented with multiple previous surgical scars, the surgeon should try to use the most lateral incision. Transverse scars should be crossed with a perpendicular incision. Incisions should be planned to débride areas where an open wound or sinus exists. If there are concerns about soft tissue viability or about obtaining closure, particularly over the proximal tibia, the opinion of a plastic surgeon should be sought preoperatively. It is always best to achieve stable soft tissues at the first stage rather than wait until the second stage. Having healthy soft tissues at the time of reimplantation reduces the risk of recurrent infection.
A medial parapatellar approach is most commonly used, although lateral approaches have been described. Débriding the synovium from the suprapatellar pouch and then reestablishing the medial and lateral gutters can facilitate exposure and removal of potentially infected tissue. Eversion of the patella is neither required nor recommended. Remnants of the lateral patellofemoral ligament or scar in that area should be released, and the patella should be subluxated laterally instead of everted. After the liner is removed, a medial release is performed, and the tibia is externally rotated to assist in the subluxation of the patella. This protects the extensor mechanism, and extensile maneuvers are rarely required unless the medullary canal of the tibia needs exposure to remove hardware or cement. In that case, a tibial tubercle osteotomy (TTO) or other extensile maneuver (e.g., rectus snip, quadriceps turndown) is performed in keeping with the indications for these techniques.
The modular polyethylene insert can be removed using an osteotome or implant-specific instruments. In the setting of all-polyethylene or cementless trabecular metal prostheses, the implant can be carefully cut with a saw across the fixation lugs or post, which can then be removed separately. The lugs can be removed using a pencil-tipped, high-speed bur.
The femoral component is debonded at the cement–implant or bone–implant interface using thin, flexible osteotomes. A Gigli saw may be used under the anterior flange. Small osteotomes must be used around the derotation lugs because they can pull condylar bone away when the component is removed. The posterior condylar portion of the implant and the implant around the intercondylar notch need to be debonded with angled osteotomes. Ideally, the component should be lifted free with a punch or a femoral extractor without excessive tapping or undue force.
The tibial component is debonded initially with an oscillating saw using a variety of wide and narrow blades and subsequently debonded with osteotomes. Care should be taken to free the component anteriorly and posteriorly to avoid a plateau fracture. A series of wide osteotomes can be used to lift the component with gentle pressure. The stacked osteotome technique can be used to gently and slowly lift the tibial component, allowing it to be removed with a punch. The stacked osteotome technique allows the surgeon to avoid excessive leverage against soft tibial bone, which can make bone defects worse.
The patellar component can be removed with a saw at the cement–implant or bone–implant interface. The remaining cement and lugs can be removed with a high-speed bur.
The remaining bone can then be débrided, preserving bone where possible. The posterior soft tissue compartment can be easily débrided with protection of the neurovascular structures.
Bone loss should be assessed. The prior implants can give an indication of appropriate component size. Because a temporary spacer is being used, the exact location of the joint line is not as critical as it is for definitive reimplantation. There are three sizes of femoral and tibial components, and the most appropriate size is chosen for both sides. Trial implants that closely match the definitive PROSTALAC components are inserted, and the appropriate tibial liner thickness is determined. Bone loss can be accommodated by adding more cement on one side or the other to correct varus or valgus deformities when the definitive PROSTALAC components are cemented.
The thickness of the tibial component is established from the trial tibial insert. The tibial mold also allows alteration of the thickness of the tibial component in 2-mm increments based on the size of the trial tibial liner. For example, a 12-mm trial liner requires a 12-mm tibial PROSTALAC implant ( Fig. 33A.7 ; see Fig. 33A.6 ).
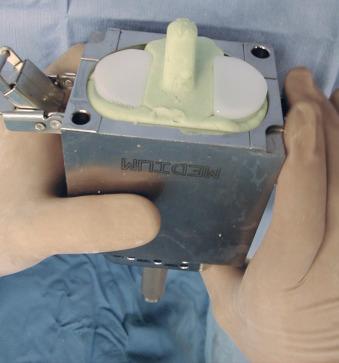
Antibiotic-loaded cement is then packed into the appropriate molds that have been lubricated with sterile mineral oil ( Fig. 33A.8 ; see Figs. 33A.4 and 33A.5 ). Curing time is substantially lengthened by the addition of antibiotic.
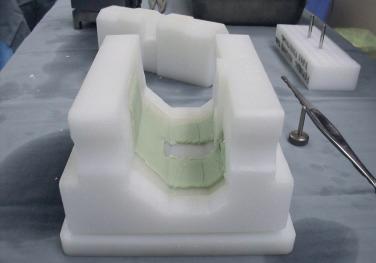
While the molded PROSTALAC components are setting, débridement is completed, and the knee is thoroughly lavaged with no less than 9 L of normal saline. If the medullary canals of the tibia and femur are opened, they must be thoroughly débrided and irrigated. During the lavage phase, a small amount of antibiotic-loaded cement is inserted into the post defect in the tibia so that it is molded within the defect. It is then removed without disturbing its shape and is allowed to set on the back table for later insertion into the post defect after the cement has hardened. It is called the tibial plug .
Become a Clinical Tree membership for Full access and enjoy Unlimited articles
If you are a member. Log in here