Physical Address
304 North Cardinal St.
Dorchester Center, MA 02124
Since 2001 the Agency for Healthcare Research and Quality (AHRQ) and the American College of Emergency Physicians (ACEP) have recommended the use of ultrasound guidance for the placement of central venous catheters. The superiority of ultrasound guidance over traditional landmark-based approaches is well established in the emergency medicine literature and is a skill that all acute care practitioners should master. Ultrasound is utilized to improve the success of central line placement in the internal jugular (IJ), subclavian, and femoral veins, as well as placement of peripheral intravenous (IV) catheters. Understanding probe orientation and image display is critical for accurate interpretation and identification of the vascular structures of interest when performing vessel cannulation. Ultrasound guidance for vascular cannulation is most effectively utilized in real time, allowing visualization of the anatomic structures during actual needle placement, rather than static scanning, which visualizes structures before performing a landmark-based approach. Real-time scanning allows for faster cannulation with fewer needle attempts over static ultrasound imaging. Ultrasound-guided vascular access requires significant dexterity and multitasking for simultaneous probe direction and needle manipulation.
The first step in ultrasound-guided venous cannulation is prescanning, which includes visualization of the target vein and surrounding anatomy and locating the optimal position for cannulation. This should occur before the practitioner dresses in sterile attire and applies the sterile transducer cover. Linear, high-frequency transducers (5–13 MHz) are preferred for all venous access, as they provide better resolution of superficial structures.
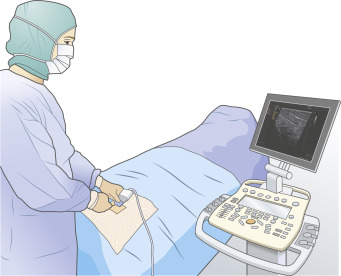
Correct positioning is key to the success of ultrasound-guided central line placement. The ultrasound machine should be placed directly in line with the operator’s line of vision so that the physician minimizes movement when alternating their focus from the needle to the screen. Conventional probe positioning places the indicator to the patient’s right or cephalad. For cannulation of the IJ vein and the supraclavicular approach to the subclavian vein, the operator will be located at the head of the bed facing the patient’s feet ( Fig. 30.1 ). In this position, the indicator should be directed toward the patient’s feet or left side. Movement of the probe will then correspond to movement on the screen rather than presenting a mirror image, which can be confusing when attempting to align the needle and the vessel. The target vessel should always be centered on the screen, and the depth should be decreased to the most superficial setting in which the target vessel and surrounding structures can still be visualized.

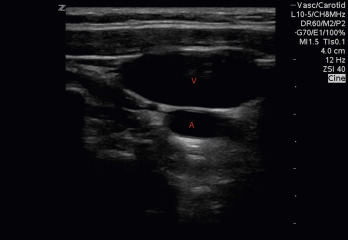
Differentiating arteries from veins is crucial for proper placement of central lines and is easily accomplished with an understanding of anatomy and bedside ultrasound interrogation of vessel shape, pulsatility, compressibility, and respiratory variation. Veins are generally thin walled and ovoid, whereas arteries generally have a thick muscular wall and are round. The application of gentle pressure will compress a patent vein, but will not affect the shape of an artery. Visualization of full compressibility of a vein also rules out the presence of thrombus at that location. Arteries will exhibit pulsatility, which is generally absent in veins, but care should be taken when using this criteria, as veins adjacent to arteries can appear pulsatile. Utilizing Doppler color flow can distinguish vessels from other round, anechoic structures, but the color itself should not necessarily guide the sonographer, as the flow is determined by the direction of flow in relation to the position of the probe. Measurement of Doppler flow will show a continuous, laminar flow pattern in a vein and a higher-velocity, pulsatile pattern in an artery ( Fig. 30.2 ). Misidentification of the vessel with ultrasound is one of the most common causes of arterial puncture; the combination of these factors aids in correct identification of central veins and increases the chances of successful placement.
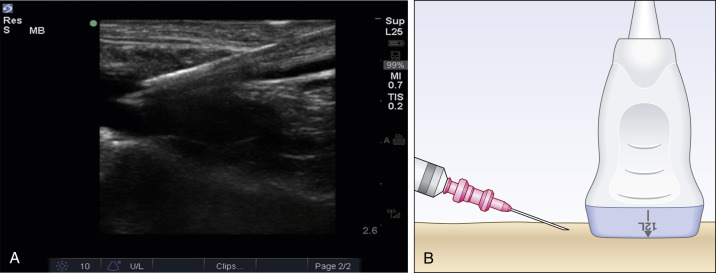
Once the ultrasonographer and machine are correctly positioned and the target vessel is identified, the provider must decide which ultrasonographic view they will utilize to access the vessel. Vascular structures can be imaged in short (transverse), long (longitudinal), or oblique orientations. The transverse approach is an out-of-plane technique in which only one point of the needle is visualized and appears as a hyperechoic dot on the screen ( Fig. 30.3A ). In this view, vessels are visualized in cross-section and appear as anechoic circles. This approach has two main advantages. First, it is the least technically difficult method to visualize the vessel and the needle. Second, the short axis provides the advantage of continuous visualization of both artery and vein, which is crucial for avoiding arterial puncture. Using this technique, the needle will be inserted just proximal to the center of the probe and visualized as it passes under the probe’s beam ( Fig. 30.3B ). The longitudinal approach is an in-plane technique in which the entire length of the needle is visualized as it approaches and enters the vessel, which appears as a anechoic tube. The needle is inserted at the proximal aspect of the probe, and its entire length is visualized as it advances from the left to the right of the screen ( Fig. 30.4 ). Significant dexterity is required to maintain alignment of the ultrasound beam and the needle, both of which measure about 1 mm. As the longitudinal approach is more technically challenging for novice ultrasonographers, two methods have been described to overcome these downsides. The first is the “tilt to follow” method, which is utilized with the transverse visualization. Using this technique, the ultrasonographer continuously fans the probe superiorly and inferiorly as the needle is advanced so that the tip of the needle is continuously visualized as it is advanced. This technique converts the procedure from ultrasound assisted to truly ultrasound guided. The second technique is the oblique approach, which allows a combination of short and long axes, and combines their respective advantages. The probe is rotated 45 degrees to a position between the short and long axes of the vessels. The vein and artery are both visualized but appear ovoid rather than round or cylindrical ( Fig. 30.5 ). The needle is inserted at the lateral aspect of the probe and advanced using an in-plane technique. The needle tip is continuously visualized at the same time that both vessels are visualized, decreasing the chance that the operator will mistake the artery for the vein. A third technique uses an all in-plane approach. The operator obtains a longitudinal (or oblique) view of the vessel while bracing their hand to minimize movement. The proximal end of the transducer is then rocked off the skin, lifting the proximal aspect of the probe off the skin. The needle is then inserted at the seam of the transducer under the footprint of the probe. When the transducer is rocked back to make full contact with the skin, the needle tip will be in view and can be advanced without moving the probe.


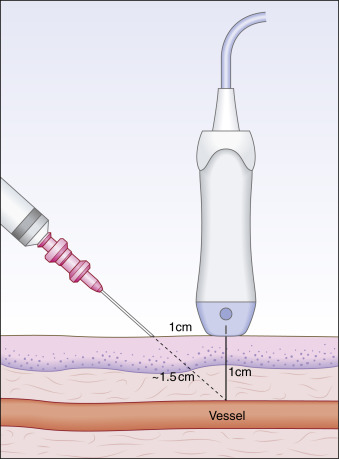
Before needle insertion the operator should note the depth of the vessel using the depth markers on the right of the screen. Care should be taken to place the probe gently on the patient’s skin, as applying too much pressure can obscure the vessel and make depth measurements inaccurate. If a transverse or short-access approach is taken to access the vessel, a “right triangle” method can be used to insert the needle. The needle should be inserted at a 45-degree angle at a distance proximal to the probe that is equal to the depth of the vessel. For example, if the vessel is 1 cm deep, the needle should be inserted at a 45-degree angle 1 cm from the probe. It can then be estimated that the vessel will be accessed at about 1.5 cm of needle length (the triangle’s hypotenuse) ( Fig. 30.6 ). Before the needle is inserted the operator should note how much of the needle will be inserted. This technique is useful in avoiding overshooting the vessel, as the tip of the needle is not always visualized in the transverse view.

Become a Clinical Tree membership for Full access and enjoy Unlimited articles
If you are a member. Log in here